After seeing a series of incredible images of the process of making pencils by photographer Christopher Payne, we decided to hunt down some video footage of the process of turning wood, graphite, and clay into writing instruments at New Jersey’s General Pencil Co.
We’ve said it before, and we’ll say it again: If you live where there is serious winter, you really need to consider winter tires on your daily driver. Yes, even if you have all-wheel drive. Yes, even if it clearly says “ALL seasons” right there on the receipt from the tire store. It just makes good sense.
To remind us of what we really should know by know, TireRack.com ran through a series of tests to see just how important winter tires are in icy conditions. The answer: very.
Even with traction control and anti-lock brakes, the car without winter tires is all over the place. In a low-speed stopping test, the car without winter boots on slid a full car length further before coming to a stop.
Advertisement
“Ah ha!” you say, because you talk like a 1930s movie villain. “That is a mere Toyota Avalon, with front-wheel-drive. I have ALL-wheel drive, thus negating the need for winter tires!”
Tire Rack has an answer for you, too:
As you can see, all-wheel drive can help when you want to get going, but it’s nowhere near as effective when you need to turn, and especially not when you need to stop.
Advertisement
Of course, Tire Rack is, indeed, trying to sell more tires. But you can’t really argue with the tape.
And when winter is over, get those all-season puppies put on, because winter tires don’t do well on dry pavement.
Jason Momoa stars as Arthur Curry, aka Aquaman: half human, half Atlantean.
We’re just one month away from the release of director James Wan’s Aquaman, the first full-length feature film centered around Jason Momoa’s Justice League superhero. Now the final trailer has dropped, with all the magical tridents, warrior princesses, and epic CGI battles you’d expect from a superhero movie about averting a mythological war between two very different worlds.
Aquaman first entered the DC Comics universe in a 1941 anthology and later turned into a solo comic book series. He was a founding member of the Justice League during the “Silver Age” of the 1950s and 1960s. But he was never among the most compelling superheroes in the DC stable, often serving as the butt of jokes because of his supposedly inferior super powers. Hey, telepathically communicating with fish is cool, right?
So there was some initial skepticism about introducing the character into DC’s rebooted cinematic universe. Casting Momoa, who was so riveting as Khal Drogo in Game of Thrones‘ first season, was an inspired choice, and the initial artwork showing an Aquaman reimagined for the 21st century looked promising. For the reboot, DCEU wisely played down the talking-to-fish thing (it’s more a form of telepathic compulsion) and focued instead on Aquaman’s superhuman strength, ability to breathe underwater, super fast swimming, and so forth.
The first two Aquaman trailers didn’t inspire confidence, particularly among Ars staffers.
It’s just that DC hasn’t had quite the same success as Marvel Studios in building a unified superhero world. Momoa’s Aquaman first appeared in Batman v Superman (2016) and followed that up with Justice League (2017), both of which were critically panned and didn’t perform as well as expected at the box office. And the first two Aquaman trailers didn’t inspire confidence, particularly among Ars staffers. (Ars’ culture editor Sam Machkovech offered a variety of colorful vulgarities upon seeing this latest trailer. Count him among the skeptics.)
But let’s not forget the smashing success of Wonder Woman (2017)—everything a superhero origin story should be. So maybe it’s premature to outright dismiss Aquaman (another origin story) simply based on the trailers, which have been visually striking but a little incoherent in terms of telling us what the movie is supposed to be about.
The final trailer doesn’t add much more to what we already know. We see the same lush underwater scenes that were so challenging to shoot, and we see elaborate CGI battle scenes. We catch a glimpse of Arthur before he becomes Aquaman with his parents as a baby and toddler. We watch him swim with dolphins and find a mentor in Willem Dafoe’s Nuidis Vulko.
We know Arthur’s destiny is to take his rightful place as king of Atlantis, pitting him against his half brother and current ruler of Atlantis, Orm (he’s played by Wan regular Patrick Wilson of the director’s Insidious and Conjuring franchises). In an interview withEntertainment Weekly at CinemaCon in April, Wan described their relationship as “almost a very classic Shakespearean story about brother from another world vs. brother from another world.”
Apparently Orm wants to use a magic trident to bring Atlantis back to the surface and declare war on the human race. And Aquaman will try to stop him and find a way to unite the two worlds, possibly by acquiring another magical trident? It’s not entirely clear. But we can definitely look forward to some villainous preening from Orm, a bit of romance with Atlantean warrior Princess Mera (Amber Heard), and what looks like an underwater battle with giant crabs, sharks, and manta rays—plus one extra-large sea monster.
Maybe that will be enough to win over the skeptics. Or maybe the final product will be just as bad as they fear. We’ll have to wait until the film comes out to see if Wan can pull it off. Aquaman will hit theaters on December 21.
Late last week, California Rep. Eric Swalwell decided to double-down on previous anti-gun comments. In the process, he sparked a debate that led to one of the worst possible comments an elected official could make.
And it would be a short war my friend. The government has nukes. Too many of them. But they’re legit. I’m sure if we talked we could find common ground to protect our families and communities.
That’s right, he implied that the United States government would use nukes to deal with Second Amendment activists who resist gun confiscation.
With that in mind, I wanted to pen a bit of an open letter to Rep. Swalwell.
Dear Rep. Swalwell.
On Friday, I fired up Twitter to see what was going on and I saw something baffling. That was the above tweet where you respond to someone warning of a civil war in the even your assault weapon confiscation scheme ever came to fruition. You actually brought up nuclear weapons.
Seriously?
You then began to mischaracterize the entire thing, first calling it “sarcasm” while still ignoring the reality that you brought up the argument of nuking Americans who disagree with you. Then you tweet this:
America’s gun debate in one thread.
1) I propose a buy-back of assault weapons
2) Gun owner says he’ll go to war with USA if that happens
3) I sarcastically point out USA isn’t losing to his assault weapon (it’s not the 18th Century)
First, you propose a “buy-back” sure enough…but notice how you said you wanted the police to go after anyone who didn’t want to sell their AR-15s for a fraction of their purchase price?
You’re not proposing a method to potentially reduce the number of AR-15s on the streets, you were talking about confiscating the single most effective rifle for self-defense and going after anyone who didn’t want to go along with the program.
You were then warned that if you do that, it’ll spark a civil war. To be clear, this point was made long before. This Twitter user can’t be the first one to have ever mentioned the possibility to you. American gun owners will not become subjects. We don’t trust the government enough, regardless of who is in power, to just accept them as the only one with these weapons.
It’s also interesting that you claim you “sarcastically point out the USA isn’t losing to his assault weapons” and claiming that is leading to you being called a tyrant.
No.
You’re being called a tyrant because you are seeking to ignore the Second Amendment, deprive people of their property without due process, and seek to create the perfect environment for tyranny to take hold in this great nation. You’re called a tyrant because you then respond to warnings of what that might lead to with comments about nuclear weapons.
However, I’m going to clue you in on a little something, Mr. Swalwell.
In the 1960’s, my father went on an all-expenses-paid trip to the far east. His destination was a tiny country few people had even heard of a decade before. It was called “Vietnam.” There, the mighty American military came face to face with an enemy that was little more than guys with assault rifles and how did that work out?
We didn’t nuke them.
Then fast forward to 2001. A group of terrorists hijacked some planes and flew them into buildings. We knew who was responsible and roughly where he was. We told the Taliban to give him over, and they refused. We rolled right over them.
Now, little more than guys with assault rifles, they’ve been a major headache for the military since then.
The same thing played out in Iraq. Saddam’s army fell in no time, but we were stymied by the guerrilla warfare that followed.
Should, God forbid, a civil war come to our American shores, it won’t be pretty. However, I can also tell you that the combined might of the United States will have a damn hard time neutralizing that rebellion.
And that’s if the military is even interested in fighting. Don’t be surprised, Mr. Swalwell, to find out that most of the guys on the sharp end actually disagree with you over this crap. And they’re the ones who will have to kick in doors and be the ones who get shot.
The same is true of law enforcement. Don’t mistake police chiefs pontificating on gun control to mean that the regular beat cop is your ally in this. They often know damn good and well they can’t be everywhere, but an armed citizen can at least protect themselves.
In other words, the people who you want to stand against these Americans aren’t likely to side with you on any particular level.
But then again, maybe you did know that. Maybe that is why you brought up nukes in the first place.
Look, Rep. Swalwell, I get you’re from California and people there seem to love them some gun control. California isn’t the rest of the United States, and I’m thankful for that. However, you should also realize that many of us have seen what is transpiring in other countries and are bound and determined not to allow that to happen here. We’ve watched the UK ban guns, then start going after free speech at a time when crime is becoming more and more of an epidemic, for example. We watch Europe do the same thing as “refugees” act however they want and the governments of Europe seem unwilling to do anything about it, but the idea of average Europeans having the means to defend themselves is unconscionable.
We’ve seen that and we’re not interested in it ourselves.
If that means you want to nuke us, then so be it. However, look at the writings of our Founding Fathers when it comes to guns. They explicitly wanted us to be able to overthrow the government if it fails to act in our interests.
By making your crack about nukes, you didn’t take down the pro-gun argument. You may have created a “pro-civilian ownership of nukes” argument, though, so good job for that.
Maybe the next time you decide to be so flippant over a gun owner’s concerns about his constitutionally protected rights, you’ll stop being such an elitist schmuck and recognize there are real concerns at work on this side of the aisle, and your attitude isn’t making anyone more willing to sit down with you and talk about finding “common ground to protect our families and our communities.”
Especially since the only common ground you want us to find better boils down to “your way or the highway.”
So no. We’re not giving up our weapons.
And yes, if you insist on coming after us, it will spark a civil war.
You need to come to terms with this reality if you’re going to keep pushing this ban of yours. Man up and admit that you want us dead and I might at least be able to respect your guts. But stop pretending that you want anything else.
Krutie is technical business analyst and a front-end consultant with expertise in Vue.js and Nuxt.js, alongside back-end proficiency in Laravel. She has an … More about Krutie
Build An Interactive Infographic With Vue.js
Have you ever had a requirement in which you had to design and build an interactive web experience but the grid system fell short? Furthermore, the design elements turned into unusual shapes that just wouldn’t fit into the regular web layouts? In this article, we’re going to build an interactive infographic using Vue.js, SVG and GreenSock by using dynamic data and unusual layout.
This article presents a modern approach to building an interactive infographic. You sure can have plain infographic with all the information available upfront — without any user interaction. But, thinking of building an interactive experience — changes the technology landscape we choose. Therefore, let’s understand first, why Vue.js? And you’ll see why GSAP (GreenSock Animation Platform) and SVG (Scalable Vector Graphics) become obvious choices.
Vue.js provides practical ways to build component-based, dynamic user interfaces where you can manipulate and manage DOM elements in powerful ways. In this instance, it’s going to be SVG. You can easily update and manage different SVG elements — dynamically — using only a small subset of features available in Vue.js — some of the staple features that fit the bill here, are, data binding, list rendering, dynamic class binding to name a few. This also allows you to group relevant SVG elements together, and componentize them.
Vue.js plays nice with external libraries without losing its glory, that is GSAP here. There are many other benefits of using Vue.js, one of which is that, Vue.js allows you to isolate related templates, scripts, and styles for each component. This way, Vue.js promotes modular application structure.
Vue.js also comes packaged with powerful lifecycle hooks that let you tap into the different stages of application to modify application behavior. Setting up and maintaining Vue.js applications doesn’t require a big commitment, meaning you can take phased-approach to scale your project as you go.
The infographic is very light-weight in a visual sense, as the main aim of this article is to learn how to think in terms of data, visual elements, and of course, Vue.js — the framework that makes all the interactivity possible. In addition, we’ll use GreenSock, a library for animating SVG elements. Before we dive in, take a look at the demo.
We’ll start with:
The overview of the data for infographic;
SVG image preparation;
An overview of Vue components in context of the SVG artwork;
Code samples and diagrams of key interactivity.
The infographic that we’re going to build is about Tour De France, the annual bicycle racing event held in France.
Tour De France — Interactive bicycle listing game stages (rear-wheel) and participating teams (front-wheel). (Large preview)
Overview Of Tour De France Data
In infographic design, data drives the design of your infographic. Therefore, while planning your infographic design, it’s always a good idea to have all data, information, and statistics available for the given subject matter.
During Tour De France of 2017, I learned everything about this biggest cycling event that I could in 21 days of the game in July, and I familiarized myself with the subject.
Basic entities of the race that I decided to go for in my design are,
Stages,
Teams,
Routes,
Winners,
Length and classifications of each routes.
This next part of the process depends on your thinking style, so you can be creative here.
I created two sets of data, one for stages and other for teams. These two datasets have multiple rows of data (but within limit) — which matched with two wheels of the bicycle with multiple spokes in each. And that defined the key element of the design, The Bicycle Art that you saw at the beginning — where each spoke will be interactive & responsible to drive what information is revealed on screen.
I mentioned within limits above, because what we’re aiming for in this instance is not a full-blown data-visualization in context of big data but rather an infographic with high-level data.
Therefore, spend quality time with data and look for similarities, differences, hierarchy or trends that can help you convey a visual story. And don’t forget about the amazing combination of SVG and Vue.js while you’re at it, as it will help you bring about the right balance between information (data), interactivity (Vue.js) and design elements (SVG Artwork) of infographic.
Here’s the snippet of a stage data object:
{
"ID": 1,
"NAME": "STAGE 01",
"DISTANCE": "14",
"ROUTE": "KMDÜSSELDORF / DÜSSELDORF",
"WINNER": "THOMAS G.","UCI_CODE": "SKY","TYPE": "Individual Time Trial","DATE": "Saturday July 1st","KEY_MOMENT": " Geraint Thomas takes his first win at 32"}
This infographic is operated by a very simple logic.
UCI_CODE (Union Cycliste Internationale) is the connecting key between the stage and the team object. When a stage is clicked, first we’ll activate that stage, but also use UCI_CODE key to activate corresponding winning team.
SVG Preparation
Having a couple of datasets and a rough concept of bicycle art ready, here’s the static SVG CodePen of the infographic I came up with.
We have created only one spoke for each wheel, that is because we’ll dynamically create rest of the spokes using a number of records found in the dataset, and animate them using GreenSock Library.
The workflow to create this SVG code is also very simple. Create your Infographic artwork in Adobe Illustrator and save as SVG. Make sure to name each group and layer while working in Illustrator, because you will need those ids to separate parts of SVG code that will eventually populate <template> area of Vue components. Remember that layer names given in Illustrator become element ids in SVG markup.
You can also use SVGOMG and further optimize SVG code exported from Adobe Illustrator.
Important Note: If you use SVGOMG to optimize SVG markup, your code certainly will look neat, but note that it will convert all <rect> elements into <path> with d attribute. This results into losing x and y values of the rectangle, in case you wish to adjust few pixels manually later-on.
Second thing, make sure to uncheck Clean Id option (right-hand side options in SVGOMG interface), this will help maintain all groups and ids intact that were created in Illustrator.
Vue Component Overview
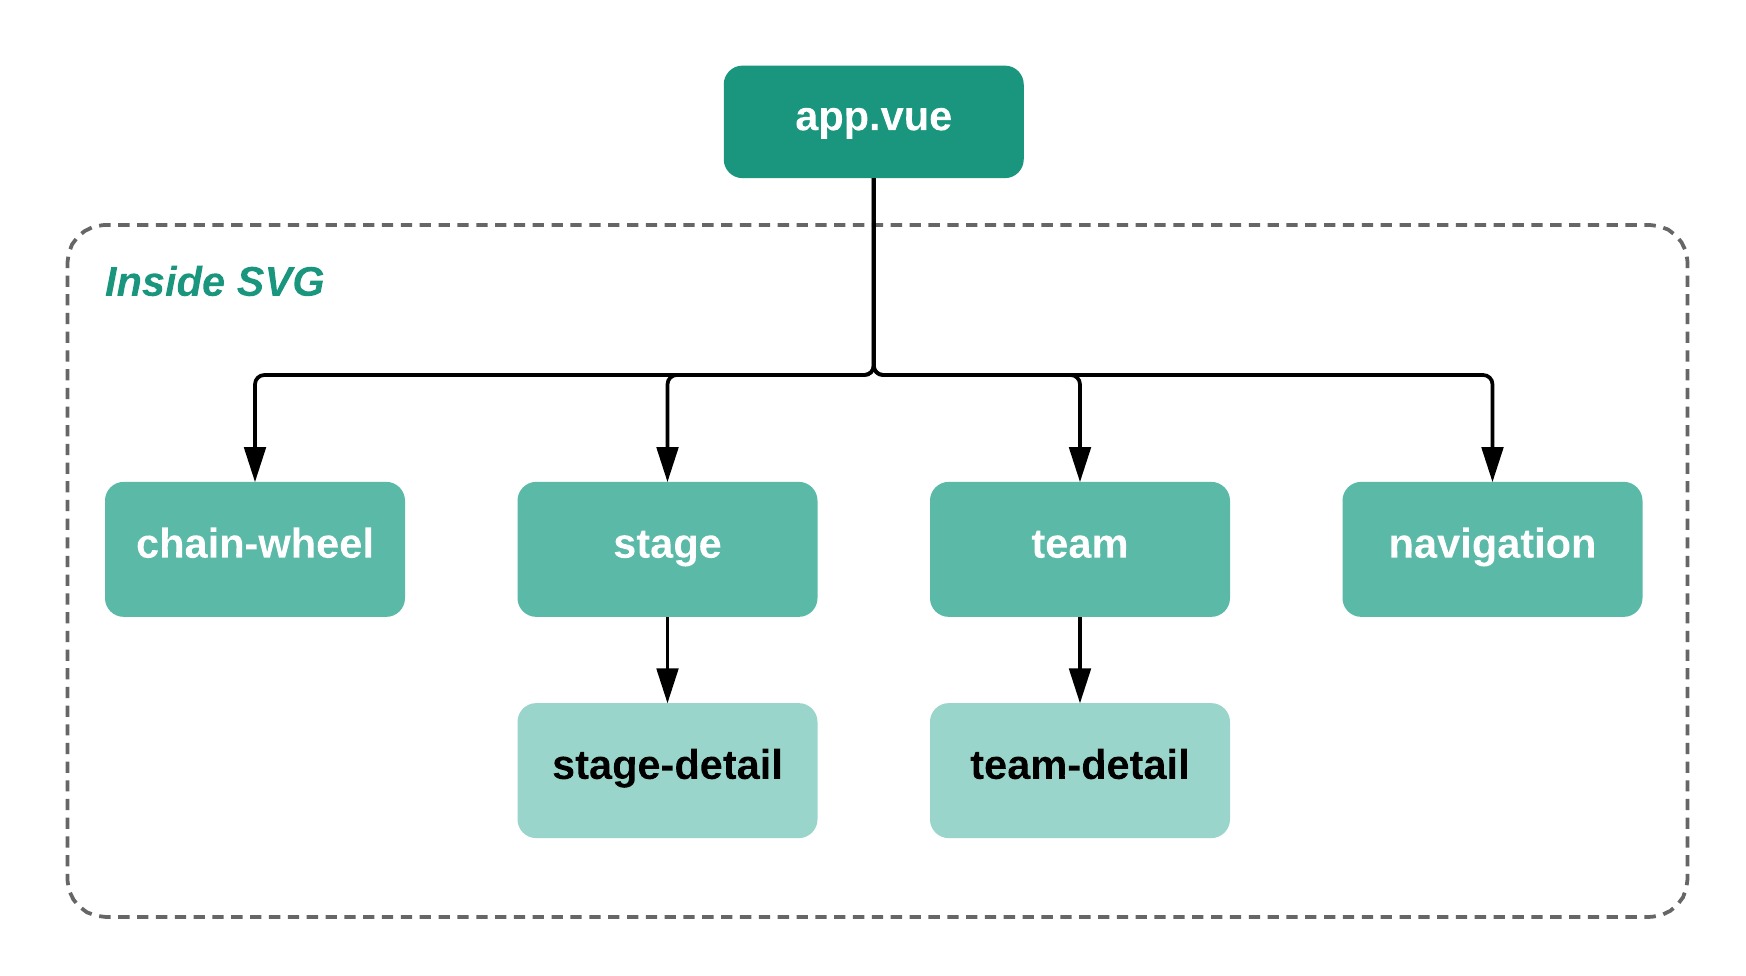
Even if interactivity and data-flow in your infographic project is quite simple in nature, you should always take a moment to draw up a tree diagram of components.
This will especially help in case you’re not using any shared-data mechanism, where child components are dependent on the values sent from the parent component (i.e. via props) or vice-versa (i.e. this.$emit events). This is your chance to brainstorm these prop values, emit events and local data — and document them before starting to write the code.
Diagram above is the snapshot of Vue components that is partially derived from interactivity requirements and partially based on SVG markup. You should be able to see how SVG markup will be split up based on this tree structure. It’s pretty self-explanatory from hierarchy view-point.
Chain-wheel will imitate rotation of spokes.
Stage component is the rear wheel that will list all 21 stages.
Stage-detail component will display related information on a curved path (left-hand side).
Team component is the front wheel that will list all participating teams on spokes.
Team-detail component will display related information on a curved path (right-hand side).
Navigation will include back and next button to access stages.
The diagram below represents the same Vue components seen above, but in the context of the infographic design.
Less is more — should be the approach you should try to take while working on similar projects. Think through the animation and transition requirements you have, if you can get away with using TweenLite instead of TweenMax — do so. If you have the option to choose elementary shapes and simpler paths over complex ones — by all means try to opt-in for light-weight elements that are easy to animate — without any performance penalty.
Next section will take you through an exciting part with GreenSock animation and Vue.js.
GreenSock Animation
Let’s take a closer look at:
Text animation on a curved path;
Spoke animation on a wheel.
Animating Text On A Curved Path
Remember the curve path seen around the bicycle wheel, that curved path is slightly bigger than the radius of the bicycle wheel. Therefore, when we animate text on this path, it will look as if it follows the shape of the wheel.
As you increase the startOffset percentage, text will travel further through the circle perimeter.
In our final project, this animation is triggered every time any spoke is clicked. Now, let’s move on to a more exciting part of the animation.
Animating Stages/Spokes Inside The Wheel
It’s visible from the demo that stage and team components are similar in nature with couple of small differences. So, let’s focus on just one wheel of the bicycle.
The CodePen example below zooms in on just the three key ideas:
You may have noticed in the static SVG CodePen above that the spokes are nothing but SVG rectangles and text grouped together. I have grouped them together since I wanted to pick both text and rectangle for the purpose of animation.
Rotation To rotate spokes, we’ll simply map through all elements with className stage, and set dynamic rotation value that is calculated for each spoke.
Transform Origin Notice transformOrigin value in the code above, which is as important as index value, because “0% 100%” enables each spoke to rotate from the center of the wheel.
stageAngle This is calculated using total number of stages divided by 360-degree. This will help us lay every spokes evenly in 360-degree circle.
ADDING INTERACTIVITY
Next step would be to add click-event on each stage to make it interactive and reactive to data changes — hence, it will breathe more life into an SVG image!
Let’s say, if stage/spoke is clicked, it executes goAnimate(), which is responsible to activate and rotate the stage being clicked using the stageId parameter.
We’ll use DirectionalRotationPlugin…which is a key ingredient for this interactivity. And yes, it is included in TweenMax.
There are three different ways of using this plugin. It animates rotation property in 1) clockwise, 2) counter-clockwise and 3) in the shortest distance calculated to the destination.
As you’d have guessed by now, we’re using the third option to rotate the shortest distance between the current stage and new stage.
Review the CodePen above and you’ll see how Stage 01 is constantly moving around the circle, leaving its original spot for new active stage at 0-degree angle.
First, we need to find the angle of a stage being clicked, and interchange its rotation with Stage 01. So, how do we find the rotation value of the stage being clicked? Check out the diagram below.
Distance calculation from Stage 01 to the ‘clicked’ stage. (Large preview)
For example, if Stage 05 is clicked (as you can see above), the journey from Stage 01 to Stage 05 — requires 4 x angle-value.
And therefore, we can get the correct angle using, (Active stage Id - 1) * 17 degree, followed by ‘_short’ string postfix to trigger directional rotation plugin.
The final goAnimate() function will look something like below:
_.map(spokes, (item, index) => {
if(activeId == index+1) {
// active stage
TweenMax.to(item, 2,
{ rotation: 0+'_short',
transformOrigin: "0 100%"
})
} else if (index == 0) {
// first stage
TweenMax.to(item, 2,{ rotation: (activeId*angle)-angle+'_short',transformOrigin: "0 100%"})} else {TweenMax.to(item, 2,{ rotation: index*angle+'_short',transformOrigin: "0 100%"})}}) // end of map
Once we have the rear wheel ready, the front wheel (for team) should follow the same logic with a couple of tweaks.
Instead of stage, we’ll fetch team data and update registration point of transformOrigin attribute to enable spokes generation from opposite registration point than the stage wheel.
// set team spokes
map(teamSpokes, (index, key) => {
TweenMax.to(index, 2,
{ rotation: angle*key,
transformOrigin: "100% 100%"}, 1)})
Final Project
Like me, if you have written all animation and data related functions in Vue components itself. It’s time to clean them up using Vuex and Mixins.
Using Vuex state management to power both wheels with data. (Large preview)
VUEX
Vuex eases up the management of shared data among components, and more importantly, it streamlines your code, keeping methods and data() clean and tidy, leaving components only to render the data, not to handle it.
Lifecycle hooks are a very suitable place to perform any HTTP requests. We fetch initial data in created hook, when the Vue application has initialized, but hasn’t yet mounted into the DOM.
Empty state variables, stages and teams are updated using mutations at this stage. We then, use watcher (only once) to keep track of these two variables, and soon as they’re updated, we call in animation script (from mixin.js).
Every time user interacts with stage or team component, it will communicate with Vuex store, executes setActiveData, and updates current stage and current team values. That is how we set active data.
And when the active data is set after state update, goAnimate will kick in to animate (directional rotate) spokes using updated values.
Now that the data is handled by Vuex, we’ll separate out GreenSock animations. This will prevent our Vue components being cluttered with long animation scripts. All GreenSock functions are grouped together in mixin.js file.
Since you have access to Vuex Store within Mixins, all GSAP functions use state variables to animate SVG elements. You can see fully functional store.js and mixin.js in the CodeSandbox example over here.
Conclusion
Creating interactive and engaging infographics requires you to be analytical with the data, creative with visuals and efficient with the technology you use, which in this case is Vue.js. You can further use these concepts in your project. As a closing note, I’ll leave you with this circular interactive color wheel below that uses an idea similar to the one we’ve discussed in this article.
With no doubt, Vue.js has many great features; we’re able to create interactive infographics with just a few things, such as watchers, computed properties, mixins, directive (see color-wheel example) and a few other methods. Vue.js is the glue that holds both SVG and GreenSock animation together efficiently, giving you ample of opportunity to be creative with any number of subject matter and custom interactivity at the same time.
Making a boat anchor is easy: Just buy a heavy cast-iron vise, neglect it for 27 years and boom, you’ve got a rusty piece metal that can serve no other function.
Unless, that is, you’re the Swiss tinkerer behind the My Mechanics Youtube channel. He acquired an old, rusted and hopelessly frozen Gressel vise for $20 and was determined to bring it back to its original glory and function. To do so required a lot of creative problem-solving, including building some clever little jigs and contraptions to get the darn thing apart:
I sat through the entire video and didn’t get bored once. However, if you’re sneaking peaks at the office and the boss is about, here are some time codes for jump-cutting:
“I wanted them to feel buying a Marvel book was like visiting an old friend.” The House of Ideas’ executives remember Stan Lee’s legacy. Stan captured the imaginations of people all over the world while championing equality, diversity and social change.
Best price on .22 Long Rifle we have seen all year!!!
Federal Black Label 22 Long Ammo 1600pc Rebate Deal
USA –-(Ammoland.com)-Brownell’s is having a special on Federal Black Label .22 Long Rifle Ammo that gets you down to $0.024 each after a coupon code for FREE shipping, and a MFG’s rebate.
To get this deal you have to order at Brownells and apply the coupon code “VB5” for free shipping and pay $59.99 at check out then apply for the rebate online, link below. No one can touch this price for Federal 22 Long Rifle ammunition that is $44.00 dollars of the normal retail. If you follow ammo price trends you know that 22 Long Rifle averages around $0.07 a round. This will sell out.
PS: This rebate and code work on other Federal ammo products as well.
Federal Blaser Black Label Rebate Info Click Image for more info.
Federal Black Label 22 Long Ammo 1600pc Cart Check 11/16/2018:
Federal Black Label 22 Long Ammo 1600pc Cart Check
Daily Gun Deals are the short-term money saving deals AmmoLand News’ Editors search out each day on the world wide web. Be forewarned that many of these deals will sell quickly or expire by the time you read them, but hey we tried. When we find sweet deals on gun products, we need we will be passing along those tips to AmmoLand News readers so you can save cash too. We have your back. Click the product name link for more info and to buy online.
Ammoland Editors are scouring the web to find you the deal that will save you money. So good are these deals that they do not last long so pay attention to the publish date and do not delay, take advantage of this deal as soon as we publish it for our readers.
Consider checking our Gun Deals Coupon page and our past featured Daily GunDeals page for additional savings from your favorite industry partners. Thank you very much for your support and I hope we save you some money by highlighting these sweet daily deals. Enjoy!
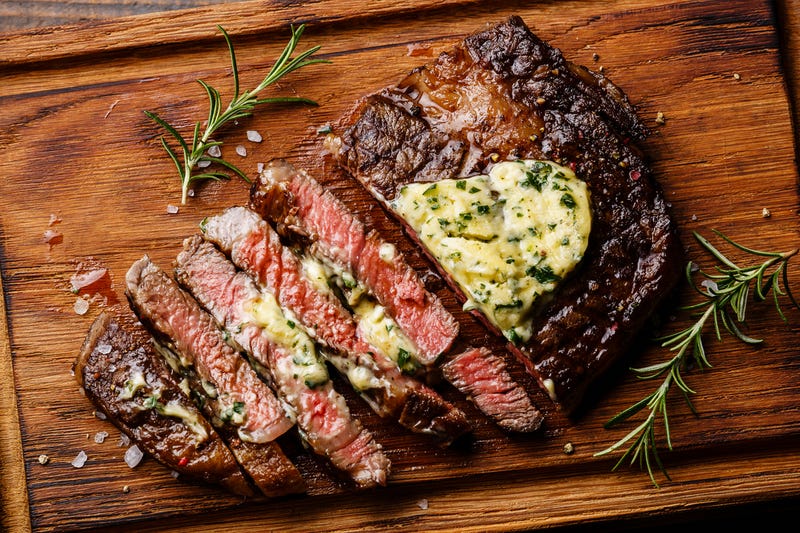
In an effort to bring better quality meat from small family farms to my community, I opened a butcher shop in Chicago called The Butcher & Larder. For eight years I’ve been helping people with everything from Thanksgiving dinner to how to cook a steak.
When they’re gazing wistfully at the steaks in the case, customers often say, “I’d really love to cook one of those for myself, but I just don’t know how. I’ve tried cooking steak at home, but I just ruin them…” In the past, I’d try and dig into their cooking psyche and figure out from where the block stemmed, but these days, I build up their confidence, and then arm them with a simple formula.
Advertisement
Before we get to the formula, though, I’d like to bust a few myths about cooking steak (or most meat, for that matter).
First: Rid yourself of the notion that high heat is what makes a great steak, or that you need a “rippin’ hot pan” to “seal in the juices.” The pan matters, but the heat less so. Searing a steak is great for flavor. Look up the Maillard reaction to see what I mean in detail, but for brevity’s sake, when it comes to meat, brown = flavor.
How you do your browning is key, because while brown is good, gray is bad. Gray is the sad, unintentionally over cooked portion of the interior of the steak. When you sear in, say, “a rippin’ hot pan, bro!” you get great browning on the outside, but just under that sear is a layer of gray that takes away from the steak’s flavor and juiciness. The other myth I’m most asked about—whether steaks should be room temperature before cooking—might seem to make sense, but science says otherwise. It’s not a bad habit, but not totally necessary, either.
Photo: Lisovskaya (iStock)
My method for cooking the average steak (average steak means your basic ½-to-1-inch thick ribeye or New York strip, not a 3-inch Fiorentina or 47-ounce tomahawk-mancave-beast-mode behemoth) is a 16 minute commitment: 1 minute to season, 10 minutes to cook, five minutes to rest.
Advertisement
I call it the 3-3-2-2 method as that’s an easy thing to remember if you’re at a butcher counter with nothing to write on, and it results in a perfectly browned, medium-rare steak. Seasoning doesn’t matter. I’m a salt and pepper guy, but if you like Guy Fieri’s Santa Maria steak rub, go for it.
Here’s how it works:
Put your heaviest skillet over medium heat (yes, medium—335 degrees or thereabouts Fahrenheit). Cast iron is great, but any heavy pan will do. After a few minutes on the fire, add a couple tablespoons of oil (olive, grapeseed, sunflower, etc) and lay your steak in the pan. Resist the temptation to slide, poke, wiggle, or move the steak. Just leave it there for an agonizing three minutes. Flip and repeat for three more minutes. It will seem like forever, but remember what Tom Petty said, “The waiting is the hardest part.” Flip again, but this time for two minutes and again for another two minutes. Remove your steak from the pan and rest for five minutes.
Advertisement
This works because three minutes over medium heat is just enough to get some nice brown on the meat while warming the steak through to the center, but you turn it in time to avoid any of the nasty gray we are trying to avoid. The two-minute cycle continues to brown the surface gently while getting your steak cooked to temperature. If you like your steak a little more done, add a minute or so to the cook time. If you like it closer to well done, add another minute. I wouldn’t suggest any longer, though. The important thing here is that the times have to be even so the steak isn’t more done on one side than the other. Keep the heat modest so everything stays nicely seared and juicy—see? Simple.
Rob Levitt’s 3-3-2-2 Steak Method
Preheat heavy pan over medium heat for a few minutes, add oil


