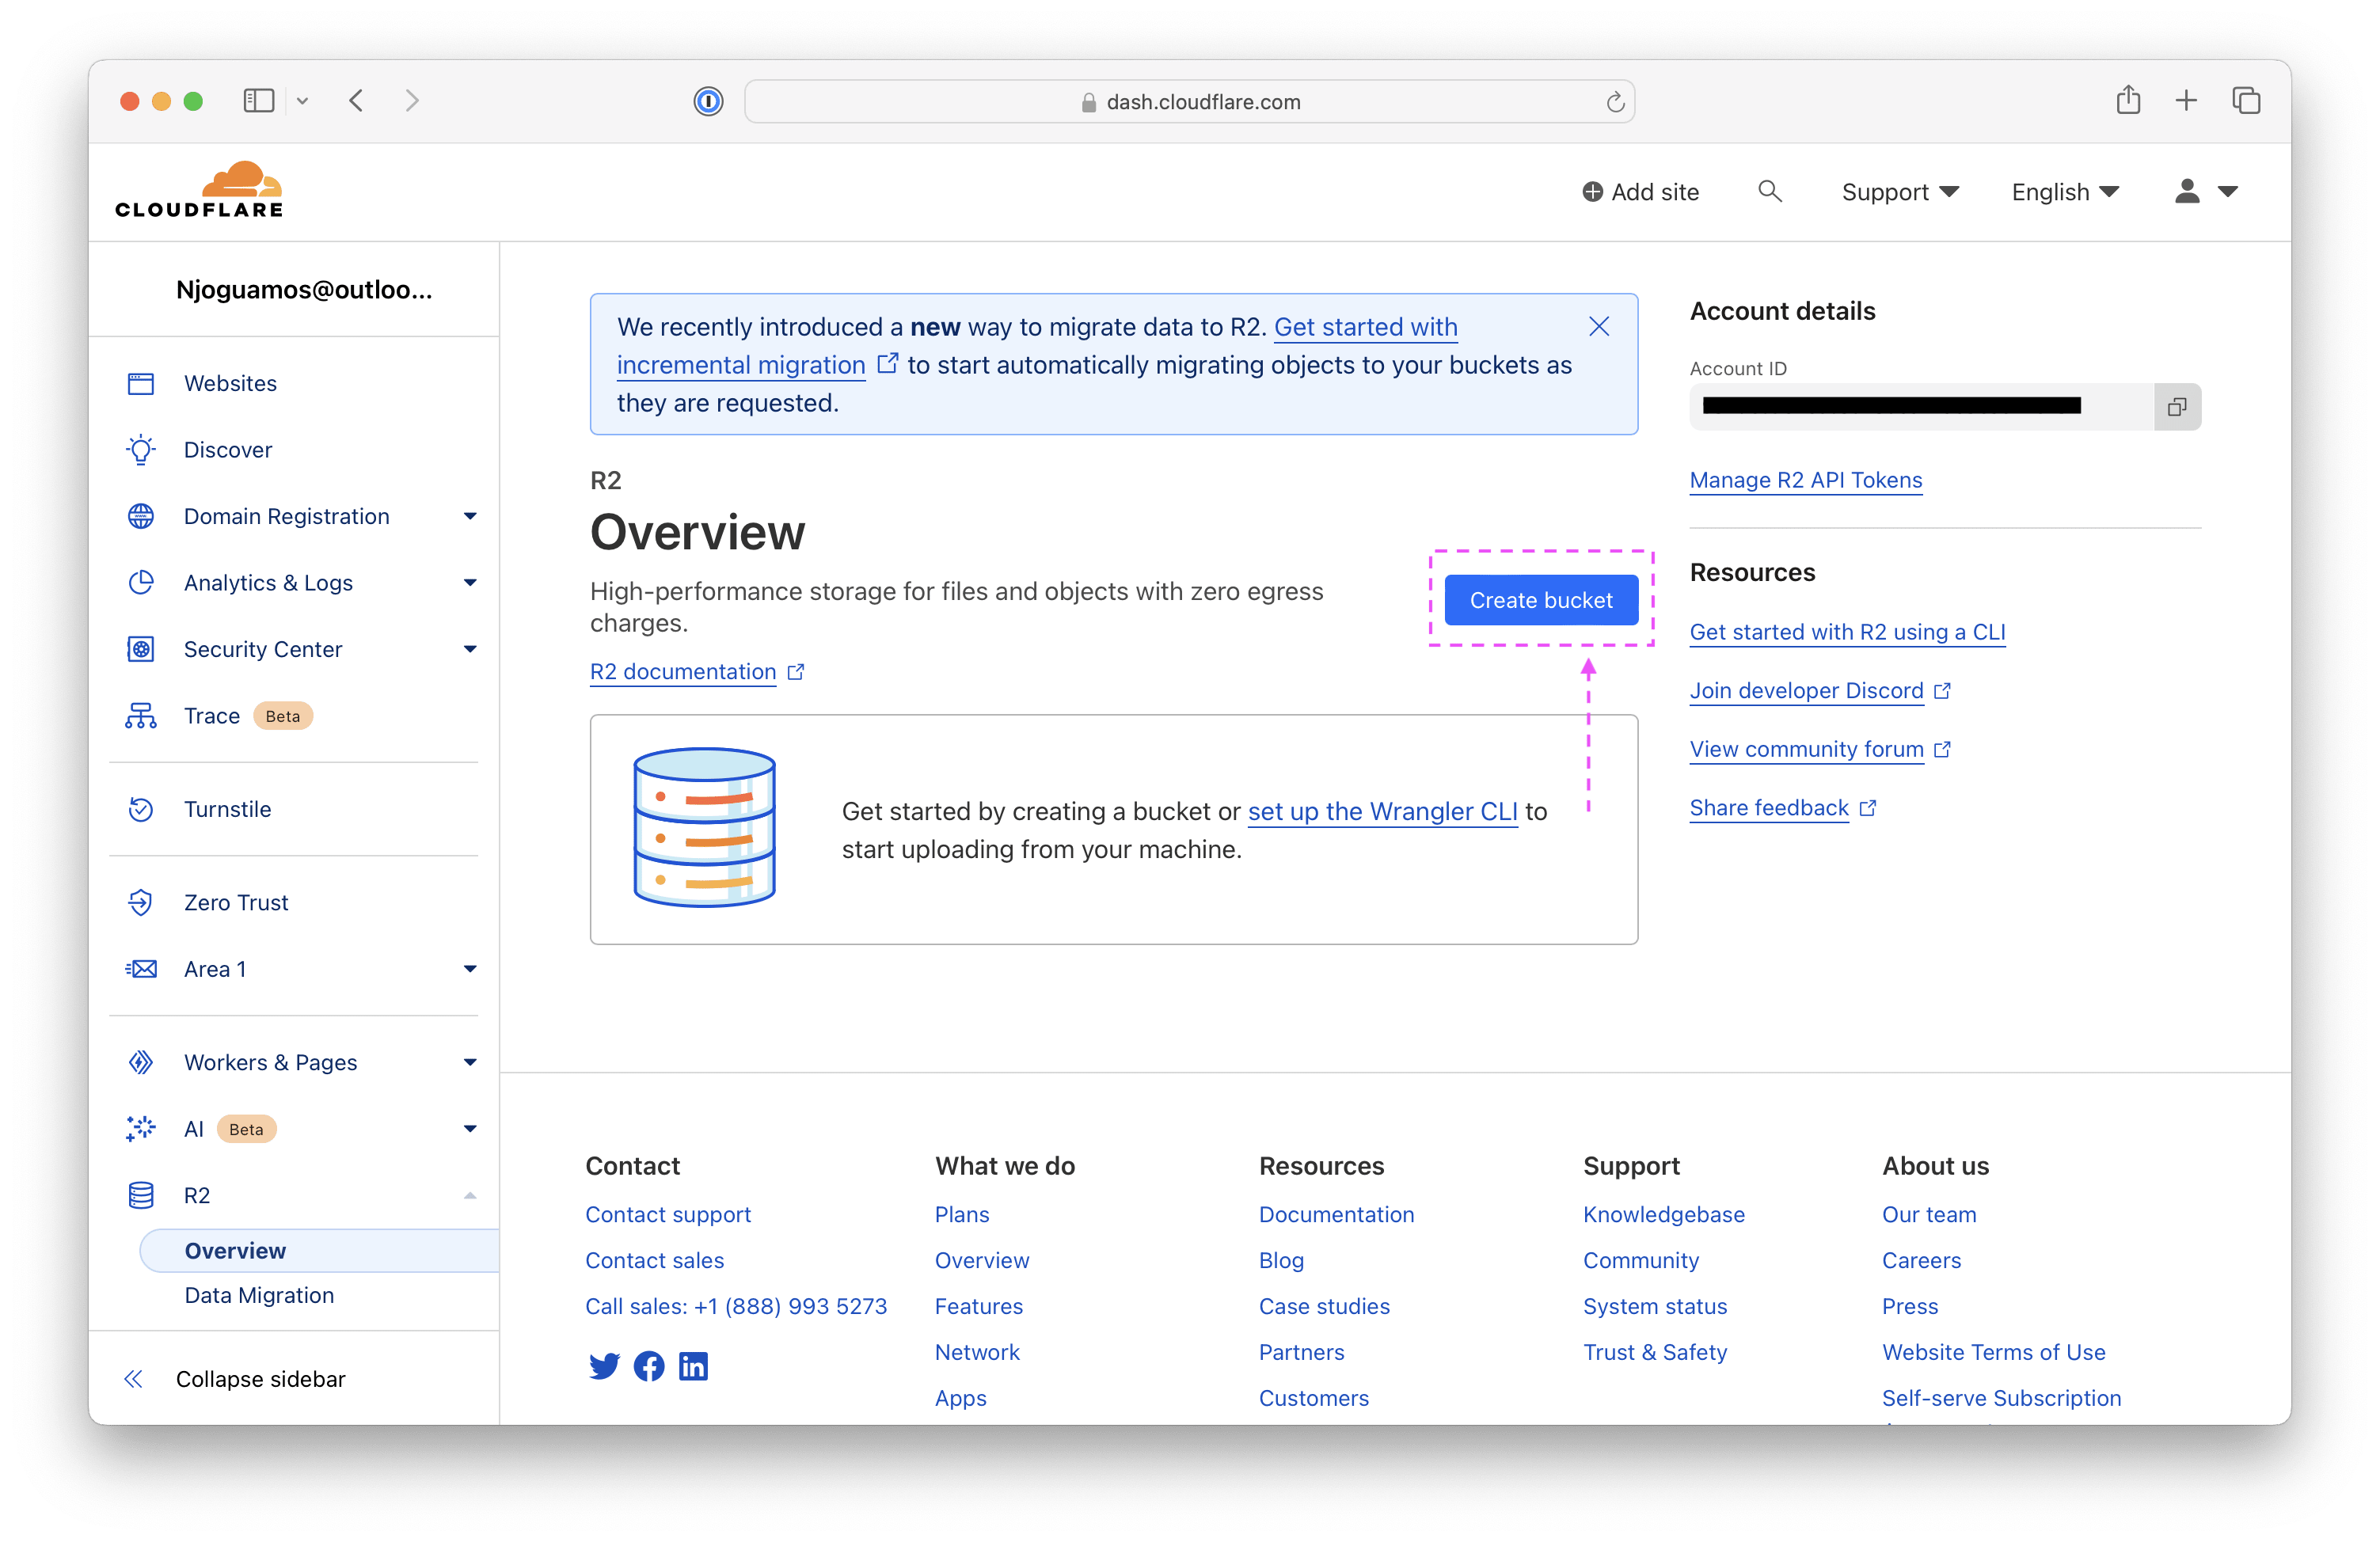
https://static1.makeuseofimages.com/wordpress/wp-content/uploads/wm/2024/06/ringtone-app-on-an-app-store-shown-on-an-iphone-laying-on-a-desk-1.jpg
Tired of hearing the monotonous Marimba ringtone every time you get a phone call? Fortunately, there are several apps and websites where you can find a variety of new ringtones for your iPhone without needing to purchase them.
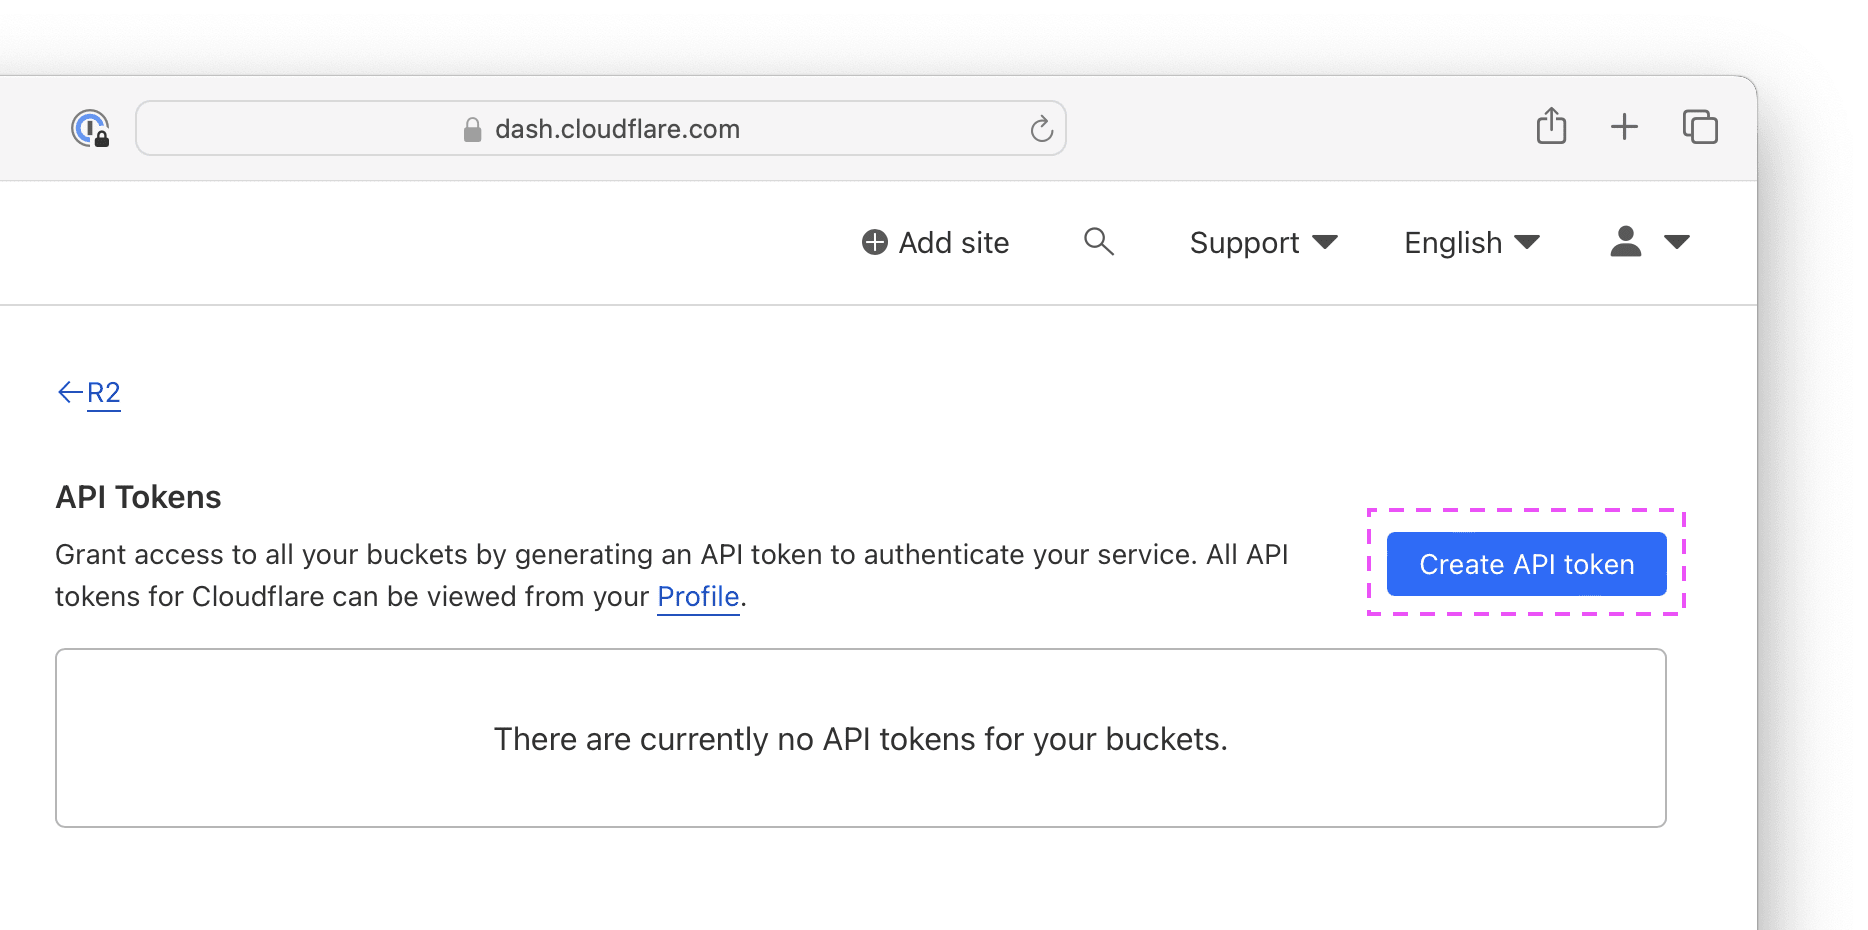
1 Ringtones for iPhone: Music
If you’re looking for an app that only features free ringtones, the Ringtones for iPhone: Music app, developed by Jerome Melis, is your best bet! While the app being completely free to use is certainly impressive, it features more than eight hundred popular ringtones and has an incredibly easy-to-use interface.
Upon launching the app, you’ll see ringtones classified as Most Popular. When you dig deeper, you’ll find ringtones divided into various categories like Funny Ringtones, Summer Selection, Christmas, Old phone ringtones, and much more. Unfortunately, to access these ringtones, you need to watch an ad or rate the app on the App Store, but it’s certainly better than paying money!
Once you find a ringtone you like, the app allows you to install it using GarageBand or iTunes (for which you’ll need a computer). If you find a ringtone that you like that you’d like to save to view later, simply tap the Heart icon next to it to save it to your favorites.
Download:Ringtones for iPhone: Music (Free)
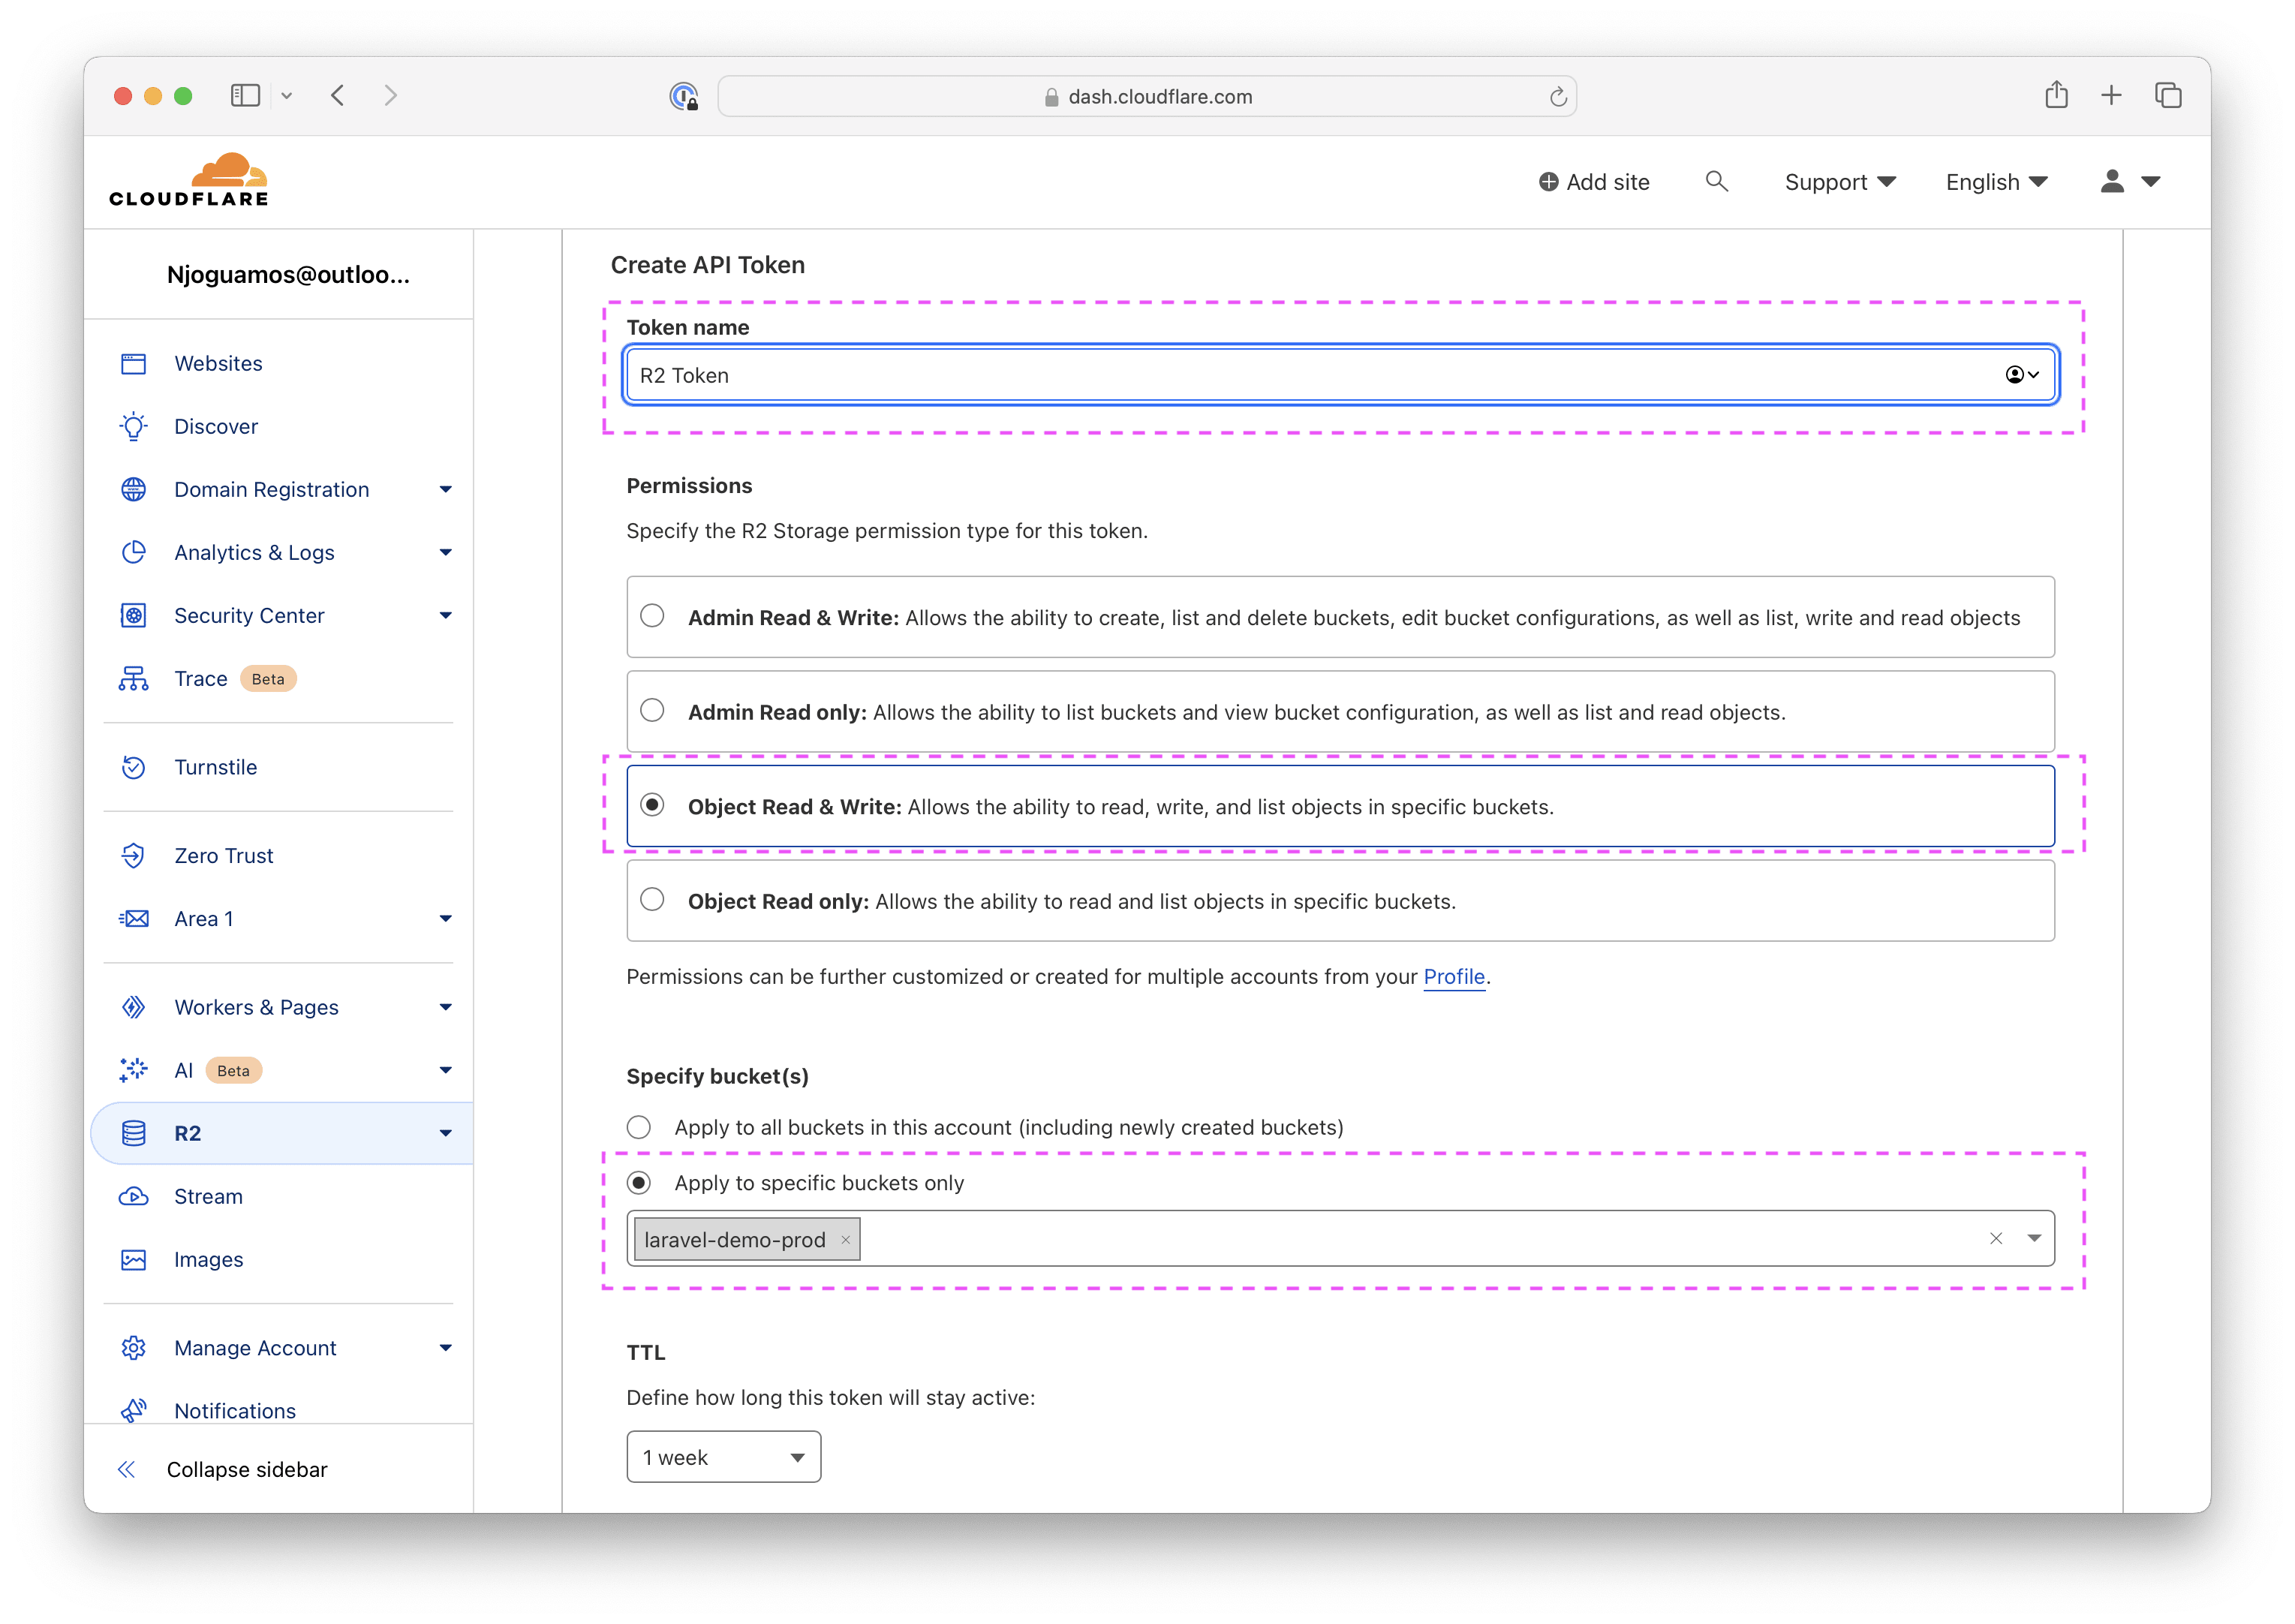
2 Tuunes
With over ten thousand licensed ringtones to choose from, the Tuunes app, developed by WhitePoint GmbH, is a worthwhile option. The app sorts available ringtones into various categories, like Latest Chart Remixes, Around The World, and TikTok Classics.
You can also view ringtones and alarms sorted into genres by tapping the Genre button below the search bar. You’ll now see different genres, like Alternative, Blues, Children’s Music, Comedy, and more. Similarly, if you’d like to view free ringtones, tap the Free button below the search bar.
Tuunes allows you to create ringtones without needing iTunes or your computer. Once you download a ringtone, all you need to do now is follow the on-screen instructions to set it as your iPhone’s ringtone using GarageBand. If you’d like to recognize who’s calling simply by hearing the ringtone, the app also lets you assign unique ringtones to each of your contacts.
While Tuunes has a decent collection of ringtones that you may download for free, you’ll unfortunately need to collect coins to purchase the more popular ones. When you download the app initially, you’re granted 75 coins. You can win 15 coins daily by watching an ad and win 30 coins by playing a quiz. If you’d like more, you’ll unfortunately need to pay.
Download:Tuunes (Free, subscription available)
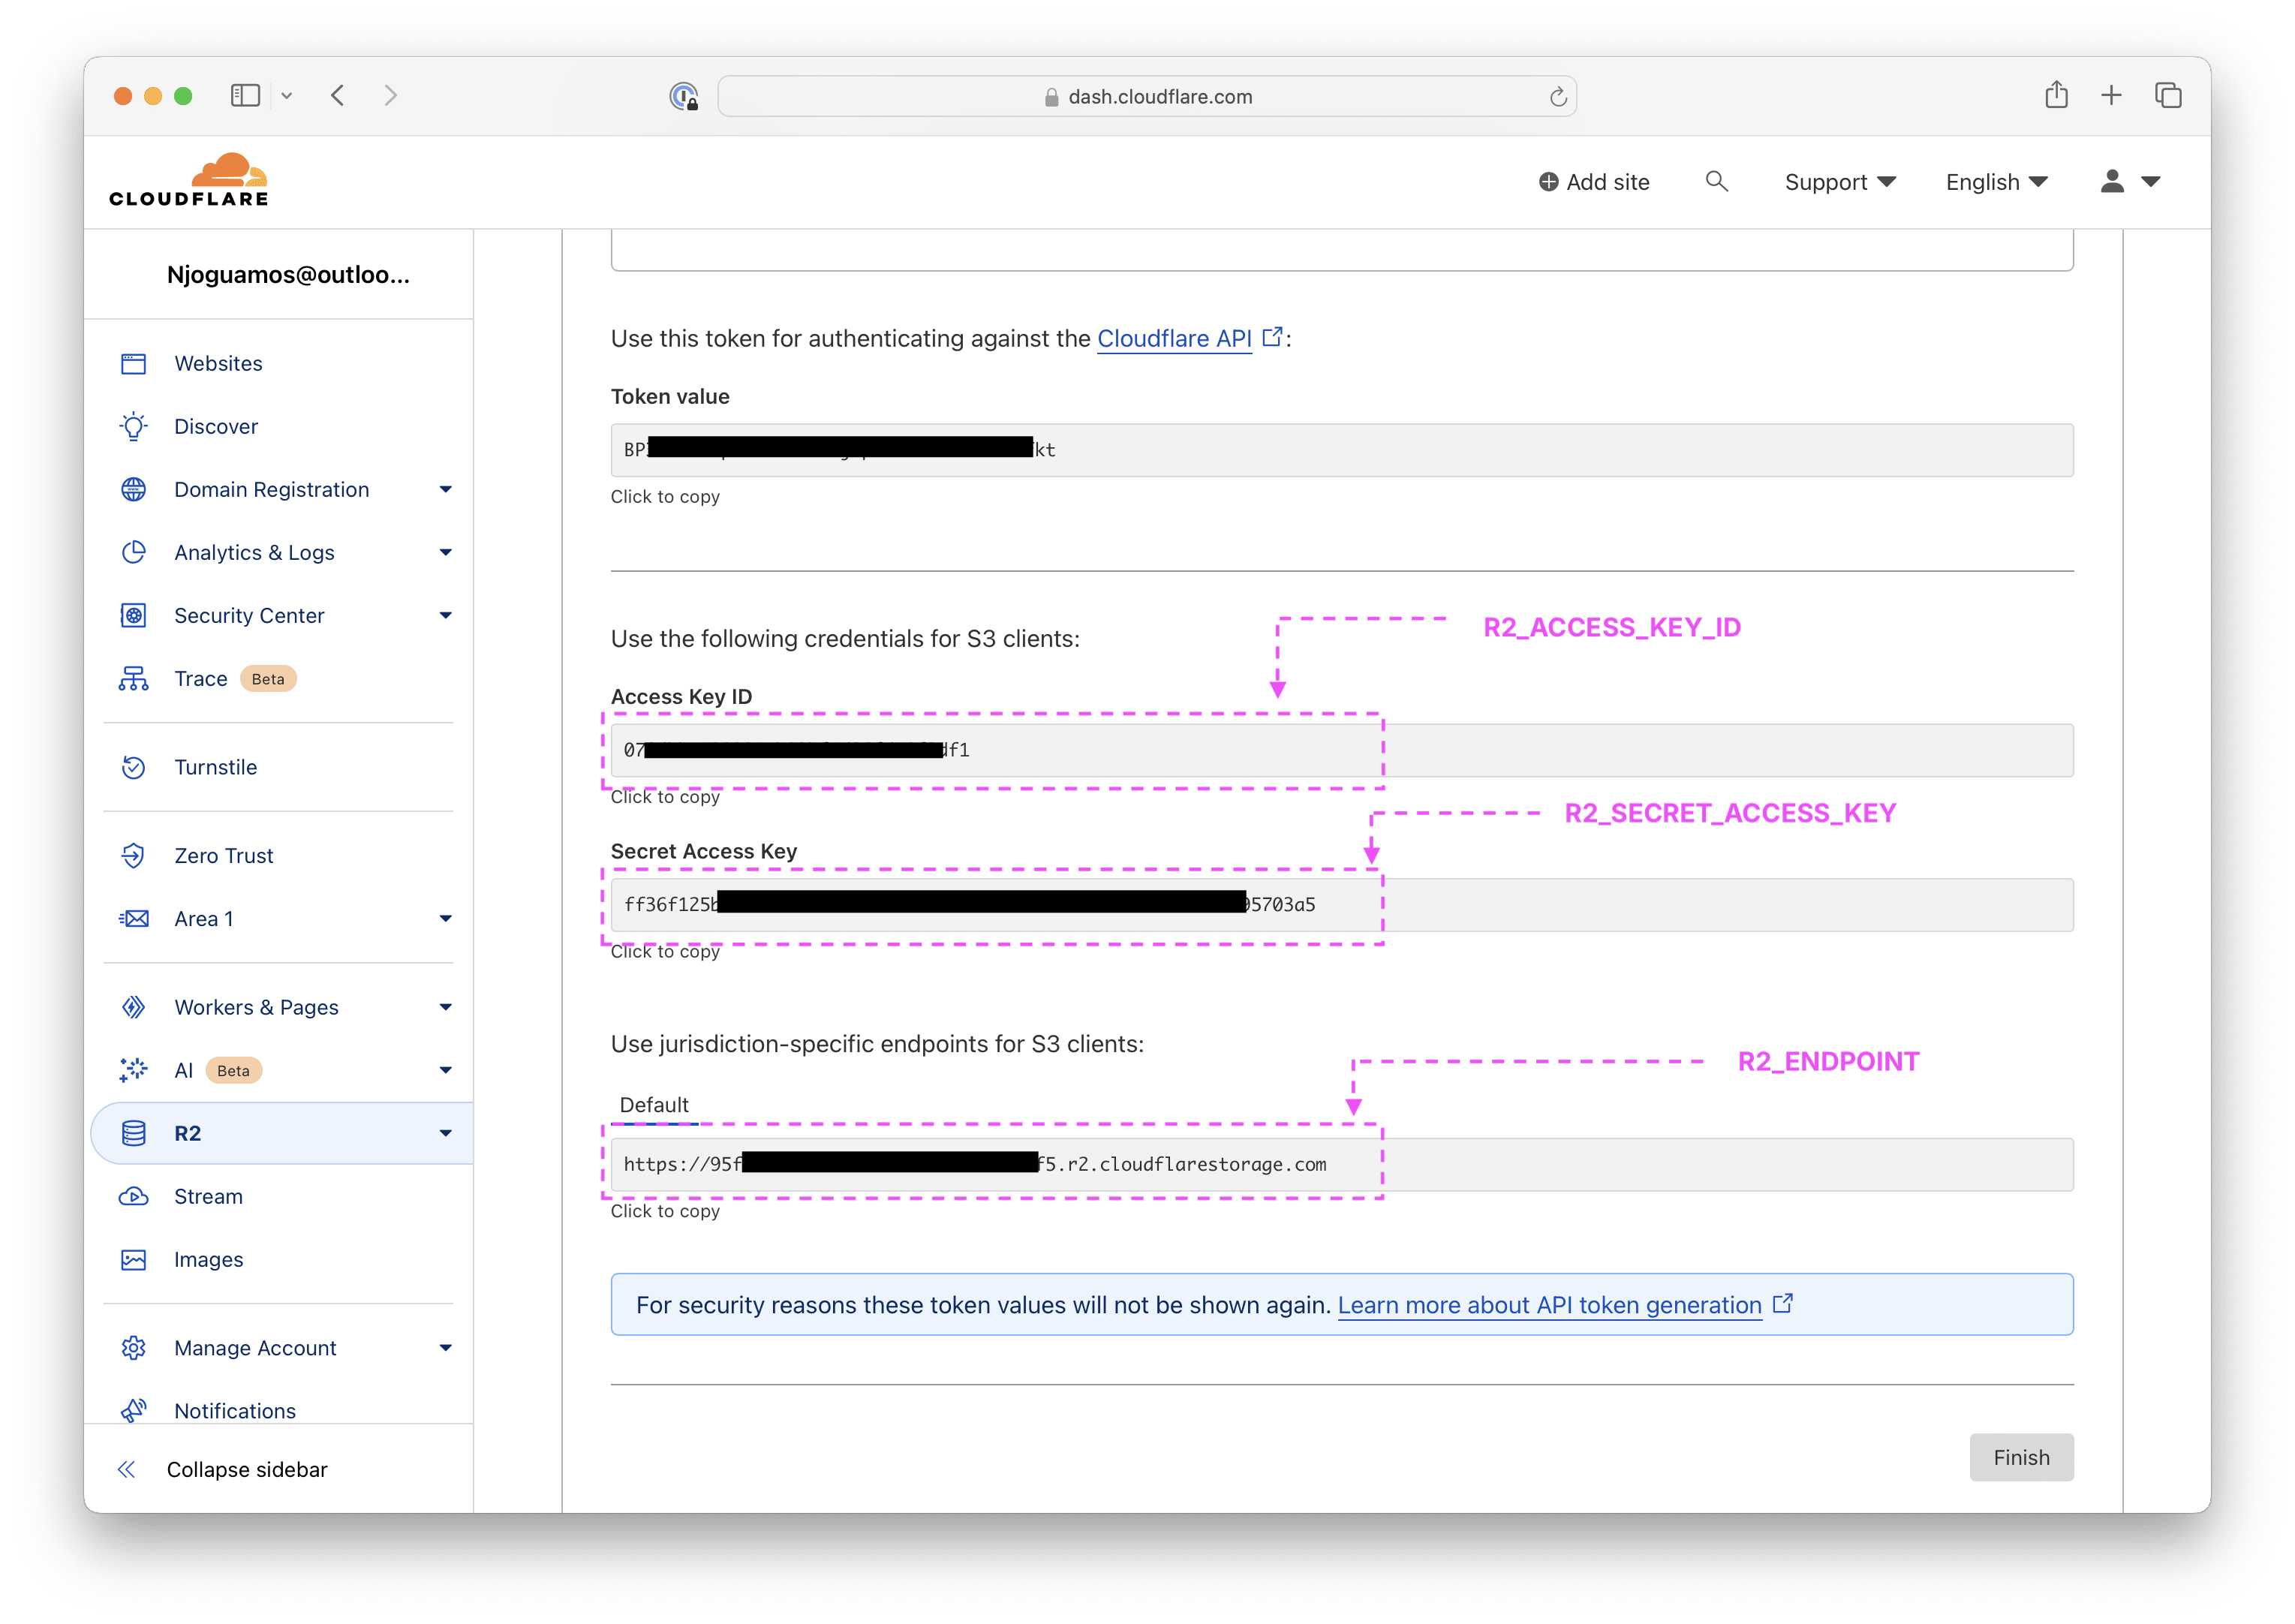
3 Ringtones
While Tuunes has an easy-to-use interface, the amount of free ringtones available is unfortunately limited. The Ringtones app is a great alternative if you’re looking for a wider selection of ringtones for free. Ringtones are categorized into various sections, like Christmas, ASMR, Alerts, Animals, Asian, and more.
The Ringtones app also shows the most popular ringtones in a separate section called Hottest Ringtones. The app also allows you to make and set a custom ringtone on your iPhone for free. You can do so by tapping the Editor tab at the bottom of the screen.
If you want to set an audio recording as your ringtone, simply tap Recorder. Otherwise, you can use the Ringtone Maker to import an audio file from iCloud, your device’s gallery, or the app’s list of ringtones. Once you import audio, you can tweak its pitch and tempo, use the app’s built-in equalizer to edit the audio, trim it, and more.
Once you’re satisfied, you can simply export it to GarageBand and set it as your ringtone. Like Ringtone Maker, you can also assign separate ringtones to individual contacts.
Download:Ringtones (Free, subscription available)
4 Zedge.net
You’ve probably heard of Zedge if you’ve searched the web for good ringtones. From Bollywood to Hip-Hop ringtones, finding a ringtone that you vibe with using the Zedge app is no difficult task.
While the app has a wide collection of free ringtones available for download, you may need to watch an ad to unlock some of them. Similarly, you may need to purchase Zedge Credits to download exclusive ringtones.
You can use the app to set any sound you like as your notification tone or a ringtone. Once you find a tone you like, you just need to tap the Download icon and choose Set on Device. You can then use GarageBand to set the tone as your ringtone.
If you don’t want to use the app, you can use Zedge’s web app in any browser. Similar to the app, you can download any tone you like by simply hitting the Download button. However, you’ll need to transfer the ringtone to your iPhone if you’re accessing the site on a computer.
Download:Zedge (Free, subscription available)
5 Melofania.club
MeloFania is another website with a great selection of trending songs you can use as ringtones for your iPhone. However, what makes the website stand out is that it lets you extract audio from YouTube besides uploading a song of your choice.
Unlike the sites and apps listed above, the ringtones on MeloFania aren’t sorted by categories. So, you’ll have to rely on the search bar and dig around to find a ringtone you like. If you want to download a ringtone from a certain artist, there’s also an option to browse artists by alphabet.
If you decide to create your own ringtone by uploading a tune or extracting one from a YouTube video, the platform allows you to clip the desired part, adjust the volume, and add fade-in or fade-out effects. Once you’re satisfied, you can download the ringtone as an M4R file.
6 Audiko.com
While Zedge and Melofania both have a great collection of ringtones, I noticed that neither website is updated as frequently as I’d like. As a result, I couldn’t find trending songs to set as my ringtone. If you’re someone who likes to have viral songs as your ringtone, Audiko will undeniably be your best friend. Like most other sites, Audiko categorizes its tunes into sections like Country, Pop, K Pop, Jazz, and more.
If you want a song by a particular artist, type the artist’s name in the search bar. To find trending songs, click the three horizontal lines and select Collections from the dropdown menu. Here, you’ll not only find trending songs but also various alterations of them to set as your ringtone. For instance, you may find the TikTok version of the original song, the sped-up version, etc.
While Audiko has an app on the Google Play Store, iPhone users need to rely on the website in Safari or any other popular iOS browser they prefer. Once you find your desired ringtone, you can download it to your computer as a M4R file and export it to your iPhone.
Whether you’re looking for a fun tune to set as a ringtone to make sure you never miss a call or are looking for more subtle ringtone options than what Apple offers, I’m sure you’ll be able to find your next ringtone easily using the apps and sites above!
MakeUseOf
 (@AMAZlNGNATURE)


 History comes alive with the Ohio Civil War and Artillery show!Recoil