A server maintained by Cogent Communications, one of the 13 root servers crucial to the Internet’s domain name system, fell out of sync with its peers for over four days due to an unexplained glitch. This issue, which could have caused worldwide stability and security problems, was resolved on Wednesday. The root servers store cryptographic keys necessary for authenticating intermediate servers under the DNSSEC mechanism. Inconsistencies in these keys across the 13 servers could lead to an increased risk of attacks such as DNS cache poisoning. Engineers postponed planned updates to the .gov and .int domain name servers’ DNSSEC to use ECDSA cryptographic keys until the situation stabilized. Cogent stated that it became aware of the issue on Tuesday and resolved it within 25 hours. ArsTechnica, which has a great writeup about the incident, adds: Initially, some people speculated that the depeering of Tata Communications, the c-root site outage, and the update errors to the c-root itself were all connected somehow. Given the vagueness of the statement, the relation of those events still isn’t entirely clear.
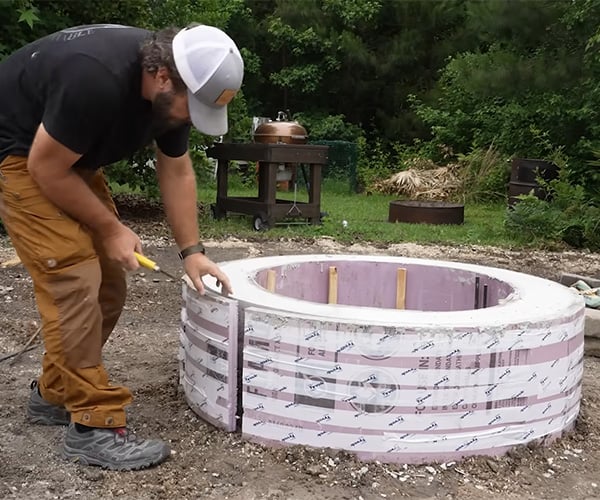
Backyard fire pits are great but can blow smoke in your face. After building a smokeless fire pit a few years back, HAXMAN wanted to make a new version for his patio out of concrete. He bent sheets of XPS insulating foam to create two forms, then filled them with concrete. After building the structure, he drilled holes into a metal fire pit ring for ventilation.
https://orasites-prodapp.cec.ocp.oraclecloud.com/content/published/api/v1.1/assets/CONTFB2A013CF4E04D7CA51DEF059A3B29C1/Medium?cb=_cache_8547&format=jpg&channelToken=32954b2a813146c9b9a4fa99364eba8eThis blog post illustrates how to use AutoML on MySQL Heatwave to train an optimized machine learning model to forecast crimePlanet MySQL
Step 2: Take a screenshot of the statistics tab using the screencapture software of your choice. Save everything including the non-visible parts of the page:
Step 3: Paste the screenshot into your ChatGPT (e.g., 4o) prompt and add the following text to the prompt:
Analyze this stock - give me a unique perspective on whether it's overvalued or undervalued assuming a 15% discount rate
Step 4: Wait for the stock analysis and use follow-up prompt — e.g., to find the implicit growth rate of the stock based on the current market cap:
Please figure out the growth assumptions implicit in the market cap assuming a growth period of 10 years and different growth rates until you find the growth rate assumed by the market
In my case, ChatGPT figured out that given my 15% discount rate and a terminal 3% growth after 10 years, the market currently assumes a 42.77% implicit growth rate of free cash flows. Judge for yourself if you find this reasonable!
If you want a more fine-grained qualitative analysis, check out my valuation here:
I’ve seen lots of craftspersons who can join wood to wood. But I haven’t seen many who can join wood to stone, with this kind of precision:
That’s the Wabi-Sabi bed, by furniture designer Ethan Stebbins. The wood is White Ash, and the stone is granite, which Stebbins harvested from coastal Maine, where he’s based.
Stebbins’ Dovetail Bench employs the same granite, and Douglas Fir:
"My work mainly relies on paying close attention to the organic matter’s properties. One must appreciate the individual characteristics of a certain wood kind or a certain type of stone before shaping them and joining the two together."
"There is a rather special moment when you carve, a quiet, flashing moment when the natural character of the stone reveals itself. This moment is everything."
In the evolving landscape of Software as a Service (SaaS), scalability and efficient resource management are paramount. This is where the concept of multi-tenancy steps in, serving multiple tenants with a single application. In this article, I’ll explain the basics of multi-tenancy in Laravel, demonstrating how this architecture can be a game-changer for developing scalable applications. This article is the first part of a series focused on multi-tenancy, starting with the basics and moving to more detailed implementations in future articles.
What is Multi-Tenancy?
Multi-tenancy is a software architecture where a single application serves multiple users or customer groups, known as tenants. Each tenant’s data is isolated and remains invisible to other tenants. Essentially, multi-tenancy allows for sharing the same application and infrastructure while providing each tenant with a separate and secure environment. I call it a game-changer because it transforms how resources are utilized and managed, leading to more scalable and efficient systems.
In simpler terms, it’s all about the same software that multiple customers use, where each can see their own data, and it’s hosted in one place.
I highly recommend watching this insightful talk from 2017 on building multi-tenant applications, you can watch it here.
Pros & Cons of Multi-Tenancy
Pros
Cost Efficiency: Managing one infrastructure for multiple customers is more cost-effective than maintaining separate systems for each.
Maintenance: Updates, patches, and general maintenance are simplified because they only need to be applied once across the shared software.
Scalability: Scaling a single system to accommodate more tenants is typically easier and faster than scaling multiple separate systems.
Cons
Complexity: Ensuring that each tenant’s data remains isolated and secure can add complexity to the system’s design and operation.
Performance Issues: Shared infrastructure means that high demand from one tenant can potentially impact the performance for others, a challenge known as the “noisy neighbor” problem.
Customization Limitations: When tenants share the same application, it can be challenging to customize the software to meet specific tenant needs without affecting others.
Types of Multi-Tenancy
Single Database Multi-Tenancy
Definition: All tenants share a single database. Data from different tenants is differentiated by including a tenant_id on each relevant table.
Pros:
Simplicity: Easier to manage because there is only one database.
Cost-Effective: Less expensive as it requires fewer resources and less maintenance compared to multiple databases.
Cons:
Scalability Issues: As the number of tenants and the volume of data grow, performance can degrade due to the shared nature of the database.
Security Concerns: Data from different tenants is stored together, which might increase the risk of accidental data leakage between tenants.
Use Case: Best for small to medium-sized applications where the number of tenants and the volume of data are manageable, and the security requirements are not exceptionally stringent.
Multi Database Multi-Tenancy
Definition: Each tenant has its own database, ensuring complete isolation of data.
Pros:
Scalability: Each tenant’s database can be scaled independently, suitable for handling larger applications.
Security: Enhanced security because data is not shared between tenants at the database level.
Cons:
Complexity: More complex to implement and manage, especially with an increasing number of tenants.
Higher Costs: Maintaining multiple databases can be more expensive in terms of resources and operational overhead.
Use Case: Recommended for larger applications where tenants require robust data isolation, have high data volumes, or need to comply with strict regulatory standards.
Hybrid Multi-Tenancy
Definition: A mix of single and multiple database approaches where some tenants share a database while others have individual databases. This model is tailored based on tenant size, regulatory needs, or performance requirements.
Pros:
Flexibility: Offers a balance between resource efficiency and tenant isolation by adjusting the database strategy according to tenant needs.
Cost-Effectiveness: More cost-effective than a full multi-database setup but offers better scalability and security than a single database setup.
Cons:
Management Complexity: More complex to configure and maintain due to the variability in database setups.
Partial Scalability Issues: While it mitigates some scalability issues, performance challenges can still arise in the shared database component.
Use Case: Ideal for applications with a diverse tenant base where different tenants have varying needs regarding scalability, security, and cost. For instance, startups or small enterprises in the same multi-tenant application might share a database, while large corporations have dedicated databases.
Challenges and Common Concerns of Multi-Tenancy
While having a multi-tenancy application offers numerous benefits, there are still challenges to consider, as mentioned below:
Data Isolation: Isolating data from tenants is a common challenge and can be cumbersome if not done correctly. Improper isolation may lead to tenants seeing other tenants’ data.
Security: Security is always a concern on the internet, and it becomes even more critical in a multi-tenant environment. If a security breach occurs, it could potentially affect all tenants, which is not ideal.
Noisy Neighbor Problem: This problem arises when one tenant experiences high traffic, which can affect the performance for others because the infrastructure is shared among them.
Customization Limitations: As mentioned earlier, it’s harder to customize the software for individual tenants because the same software is shared across multiple tenants.
These challenges highlight the need for careful planning and robust system design to ensure the successful implementation of a multi-tenancy architecture.
Real-Life Examples
I think it’s always good to see real-life examples, as they help you understand the concept better and assist in deciding whether you need it or not:
Salesforce
Shopify
Office 365
Google Workspace
AWS
Zoom
Why Laravel?
Laravel is well-suited for multi-tenancy because it offers robust built-in features like authentication, database migrations, and a powerful queue system, all of which simplify the management of multi-tenant environments. Additionally, Laravel’s extensive package ecosystem, including tools specifically designed for multi-tenancy, makes it easier to implement and maintain isolated tenant data and functionality within a single application framework. This, combined with strong community support, makes Laravel a practical and efficient choice for developing scalable multi-tenant applications.
Conclusion
Thank you for reading this article, which has covered the basics of multi-tenancy. In the next article, I will delve into a step-by-step implementation of multi-tenancy using a multi-database approach with the tenancyforlaravel package. Feel free to leave a comment with your thoughts or questions!
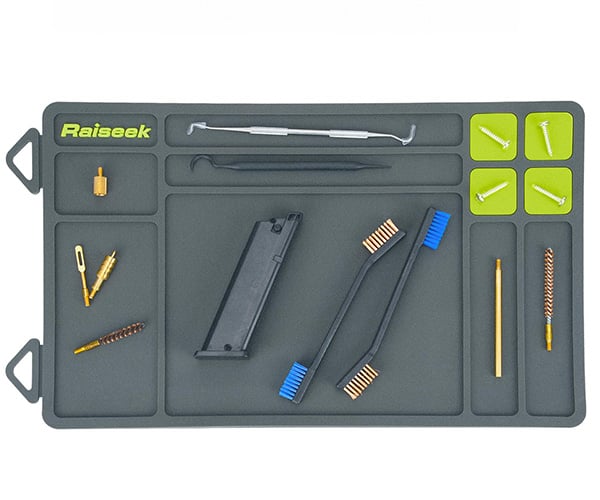
This rubberized mat is ideal for maintaining firearms, knives, pocket tools, and mechanical gadgets. Its divided trays keep parts and tools organized, while magnetic panels in its top right corner keep metal parts from rolling away. Its soft polymer surface resists damage from oils and has a non-slip backing, while built-in hooks make it easy to hang and store.