https://larafast.com/og-image/Larafast%20Fast%20Projects/Laravel%20based,%20ready%20to%20use%20projects%20made%20with%20LarafastLaravel News Links
Five AR Rifle Builder Mistakes You Should Avoid ~ VIDEO
https://www.ammoland.com/wp-content/uploads/2024/05/zbmlogihpsy-500×281.jpg
Building an AR-15 from scratch or enhancing an existing one can be a gratifying experience for any firearm enthusiast.
However, it’s a process that demands precision and awareness of common pitfalls. Steve and Caleb from Brownells delve deep into the crucial aspects of AR-15 assembly that can make or break your build. Avoid these mistakes on your next rifle build.
Key AR Rifle Builder Mistakes & How to Avoid Them
Mounting Accessories that Impact the Gas Block
One of the most common mistakes in AR-15 assembly is the incorrect mounting of accessories, such as bipods, that affect the gas block. This error can shift the barrel’s alignment subtly but significantly, compromising the rifle’s accuracy. To avoid this, it is crucial to select the attachment point carefully and use shorter screws if necessary to ensure that these do not exert undue pressure on the gas block.
Gas Block Alignment
Proper alignment of the gas block with the barrel’s gas port is essential for the reliable operation of your AR-15. Misalignment can result in cycling issues due to insufficient gas flow, leading to operational failures. When installing the gas block, ensure it is perfectly aligned with the gas port for optimal performance. This precise fit is crucial for maintaining the rifle’s reliability and longevity.
Over-Torquing the Castle Nut
While it might seem minor, applying too much torque to the castle nut can cause serious damage to the threads of the receiver extension or buffer tube. The recommended torque setting is 40 foot-pounds. Exceeding this can deform the buffer tube and other connected components, potentially leading to irreversible damage.
Excessive Material Removal in Upper Receiver Lapping
Lapping the upper receiver can be beneficial for ensuring a flush fit between the barrel and the receiver. However, removing too much material can result in the barrel sitting too far inside the upper receiver. This misplacement can affect feed ramp alignment and gas block positioning, which could lead to functional issues. Controlled lapping is necessary to achieve the right fit without compromising the structural alignment of the receiver.
Improper Buffer Tube Installation
The correct installation of the buffer retainer and spring is vital for the proper functioning of your AR-15. An incorrectly installed buffer tube can prevent the upper receiver from closing correctly, which could lead to operational failures. Ensuring that these components are installed at the proper depth is essential for their optimal performance.
Live Inventory Price Checker

|
Cmmg Ar-15 Parts Kit Hd Pivot & Takedown Pins |
Brownells.com |
$ 18.99 |
|
|
|
PSA AR15 Parts Replacement Kit |
Palmetto State Armory |
$ 12.99 |
|
|
PSA AR15 Parts Replacement Kit |
Palmetto State Armory |
$ 12.99 |
|
|
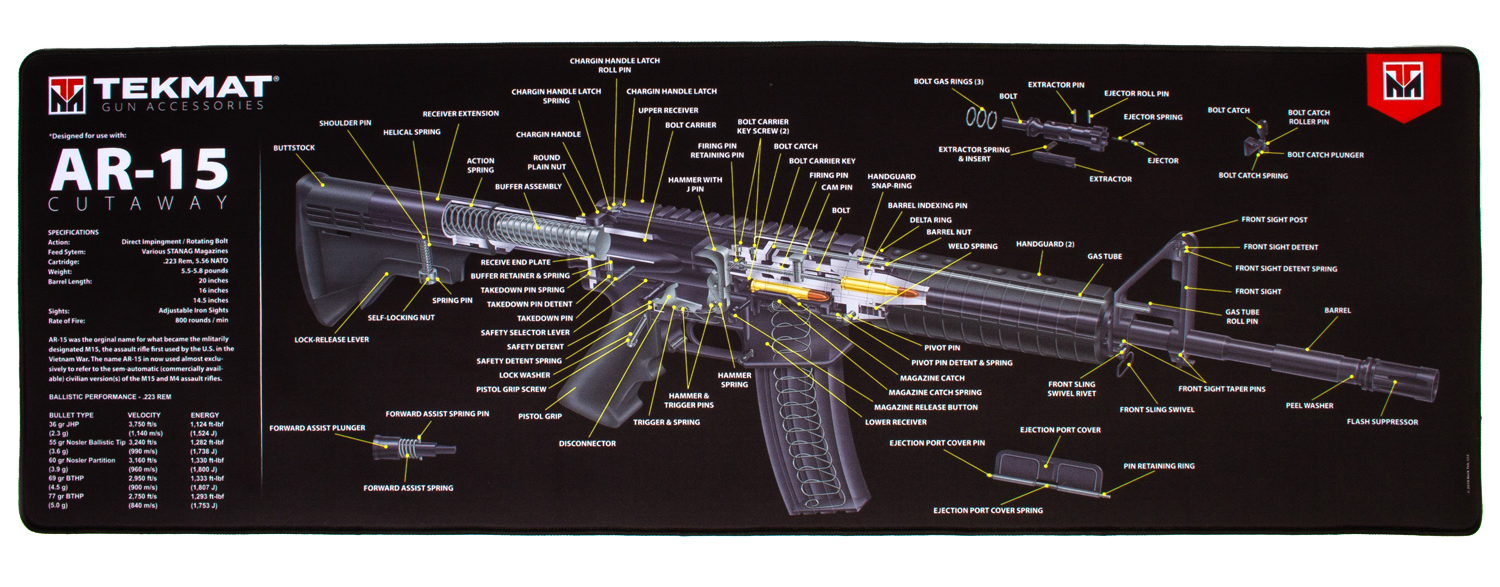
TekMat TEKR44AR15CA AR15 3D Cutaway Ultra 44 Cleaning Mat AR15 Parts Diagram 15 x 44 |
Ammunition Depot |
$ 21.99 |
|
Lock & Load
Building an AR-15 requires attention to detail and an understanding of the intricacies involved in its assembly. By avoiding these common mistakes, you can ensure the creation of a reliable and accurate firearm. Remember, every mistake is a learning opportunity. Share your experiences and tips within the AR-building community to help others avoid common pitfalls and enhance their building skills.
We encourage our readers to engage with the content, share their personal insights, and discuss their building experiences in the comments below. Whether you are a novice or a seasoned builder, there is always more to learn in the evolving world of firearm assembly.
AmmoLand Shooting Sports News
How a Factory Makes Ship Propellers
https://theawesomer.com/photos/2024/05/boat_propeller_factory_t.jpg

Ships of all sizes need propellers to move through the water. Process X takes us on a tour of Japan’s Mikawa Propeller Co., Ltd., a factory that makes precision marine propellers by casting bronze in sand. After the melting and casting process, workers remove excess sand, painstakingly grind away excess metal, and polish propellers to a smooth finish.
The Awesomer
Learn to Ride a Motorcycle for Free: Here’s How
https://s3.us-east-1.amazonaws.com/images.gearjunkie.com/uploads/2024/05/DSC07468.jpg

For 50 years, the Motorcycle Safety Foundation (MSF) has taught over 10 million riders safe riding skills on and off road. Just in time for summer, it offers an incredible opportunity to learn to ride, free of charge!
Learning to ride a motorcycle is a daunting task. Not only do you need access to a bike appropriate for total beginners, but you also need patient and proper instruction. This usually comes in the form of a buddy, family member, or significant other.
But believe me, it can strain even the strongest personal bonds! There is also the issue of safety gear, a significant financial ask for something that might ultimately not be for you.
The Motorcycle Safety Foundation
The MSF has been educating both new and experienced riders since 1973. Its process is rooted in field-based experimental research, which includes a 3.5-year study involving sensors and video cameras installed on privately owned motorcycles in four states.
Data such as steering inputs, lean angle, acceleration, braking, and all bike motions and surrounding traffic helped formulate the MSF curriculum. The MSF developed each course using a sequential “interactive and intergroup” process and vetted them through testing before they were public.
The national nonprofit organization is also involved with state motorcycle licensing. Over 30 states use MSF skills tests as part of the endorsement procedure, and over 40 states use the MSF’s Motorcycle Operator Manual as an official study resource for applicants. The MSF also partners with the military.
The MSF has over 2,000 training sites across the U.S. and operates an MSF Government Relations Office. This office promotes motorcyclists’ best interests before Congress, federal regulatory agencies, and state legislatures and agencies. It is also involved in many national forums regarding motorcyclist safety.
The graphic below outlines the MSF “360 Rider Training” program. It has 24 total RiderCourses.

Free Motorcycle Safety Foundation Ride Day
Learn to Ride: MOTO Intro
The MSF offers a free, 30-minute first-time ride experience. This includes the bike and safety gear (you will need your own over-the-ankle footwear, long pants, long sleeves, or a jacket). MSF RiderCoaches will guide you through basic motorcycle operation in the safety of a closed-course environment.
At the end of the introductory learn-to-ride experience, you will be able to start, stop, shift into first gear, and ride around the MSF course with control and confidence. You will learn all this on the simple oval course below.

SKILLS Check

If you already have a motorcycle license and own a bike, you can still gain skills and knowledge for free at an MSF Ride Day. RiderCoaches will provide and oversee advanced exercises, offering tips along the way.
In addition to your bike, you will also need a helmet, gloves, eye protection, over-the-ankle footwear, long sleeves, and long pants. The MSF staff will expect your bike to be in good working order and will inspect it before the exercises begin.
An example of a SKILLS Check course is below.

MSF Ride Day Schedule
The MSF Ride Day program started in March, with 28 events scheduled through September, making it an ideal summer outing. Courses are available in Alaska, Arizona, Colorado, Maryland, Nevada, New Mexico, New York, Texas, and Virginia. No RSVP is needed! Just show up and get a free introduction to what could be a lifetime outdoor pursuit!
I got my motorcycle license through the MSF 30 years ago. This led me to a professional career in motorsports, which continued on to my position as the Powersports editor at GearJunkie. You never know where a first ride experience may go! I cannot recommend the MSF enough; you never know where your first motorcycle experience may lead.
Check the schedule at the MSF website.

The post Learn to Ride a Motorcycle for Free: Here’s How appeared first on GearJunkie.
GearJunkie
The best apps to turn any iPad into a powerful audio editor
https://photos5.appleinsider.com/gallery/59642-121802-000-lede-Logic-Pro-d2-xl.jpg
Logic Pro on an iPad
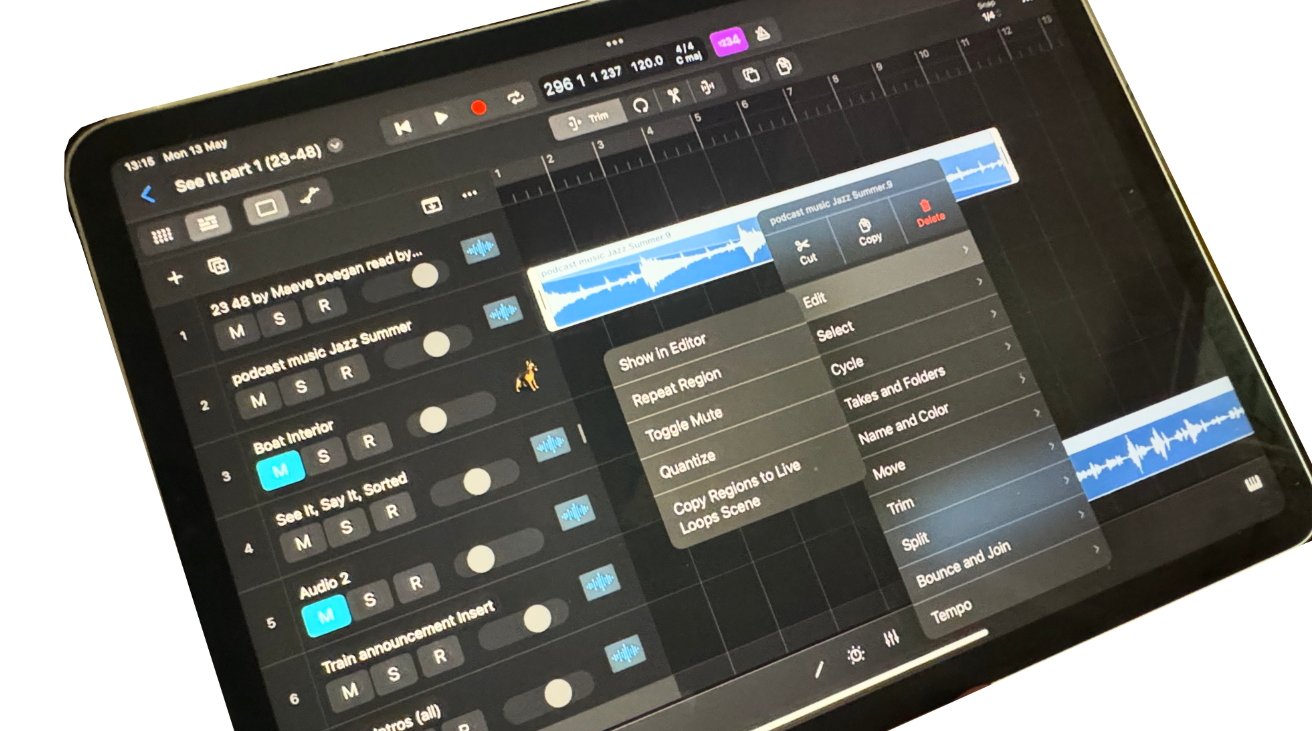
Today’s iPads are capable enough to be used as full Digital Audio Workstations, but there’s also a range of audio editing apps for every need — and budget. Here are your best choices.
One thing that iPads are unexpectedly poor at is recording podcasts — they can’t readily be used to record a host and remote guest separately. There are workarounds but none that match the audio quality of being able to record directly.
Which is curious, because once a recording has been done, the iPad is nothing short of spectacularly capable at editing. There is simply a slew of audio editing apps available in the App Store — AppleInsider stopped counting at 60 of them.
Although at least one,Audacity, is really only on the iPad as a scaled-up iPhone app for people who like the Mac versions.
Alternatively, though, some of the apps claiming to edit audio are really meant for other media purposes and happen to include audio editing. A couple of those are worth looking at if you only rarely need to edit audio and you do already know these apps well.
That’s really how you decide between the apps. There is no limit now on what you can do with an iPad and the right app, but you always have to start with what your needs are — and what your budget is.
Apps that include audio editing
Even when audio isn’t their primary focus, there are very many apps that have to include at least some features for editing spoken word or music. The best examples of this are iPad video editors, of which there are now many.
DaVinci Resolve is a video editor, but it can also be used for just audio
Apple’s own iMovie is one, and it’s free for all iPad users. Equally, Apple’s other video editing app, Final Cut Pro for iPad 2 includes very many audio features for $49/year (or $4.99/month).
In this same line there is also DaVinci Resolve, which is free but includes optional in-app purchases. If it’s solely audio editing you want it for, you’ll never need its paid extras.
How, while all of these include at least basic and often quite powerful audio editing features, they are never the right choice unless you need their other functions. If you already edit video, for instance, then being able to quickly use tools to also do some audio editing in an app you’re familiar with is tremendous.
If you don’t already know, say, iMovie, then simply getting to its audio editing features will be a chore.
When you don’t know apps like that, and when you need to do more than one or two quick audio pieces, then you need an audio editor. In AppleInsider‘s experience, there are three audio apps that are worth considering.
Best easy and free iPad audio editor — GarageBand
Apple’s GarageBand is designed first for recording voice and musical instruments, and then for adding music loops. But once you’ve done all or any of that, you have to be able to edit the audio.
Consequently, GarageBand comes with a multi-track audio editor. That means you can, say, have two podcast guests recorded separately and then line them up together.
GarageBand. Note the one-size-fits-all "Fade Out" control
GarageBand also lets you split tracks, so you can cut out sections if you need. There are also features such as fading in or out, although overall, GarageBand tends to prefer ease of use over fine control.
So when you need more, or GarageBand’s settings don’t happen to suit what you want to do, it’s time to buy or subscribe to an audio app.
Best one-off purchase iPad audio editor — Ferrite
Ferrite is an example of where a list of features doesn’t convey all of what’s good about it. For instance, it has multi-track editing, but so does GarageBand.
Yet in Ferrite’s case, manipulating those multiple tracks just feels easier. And there are specific features such as the ability to tell it to automatically dip one track as another is playing.
Multiple audio tracks being edited in Ferrite for iPad
Ferrite is also an example of an app whose free version is excellent enough that you upgrade at least in part just to reward the developer. Nonetheless, if you do upgrade to the Pro version for $30, you do get extra features.
Such as the ability to play back at twice normal speed as you edit. Or the ability to tell Ferrite to strip out accidental silences, for instance when you’ve misaligned two vocal tracks and inadvertently left gaps.
The Ferrite Recording Studio requires iPadOS 16.4 or later.
Best subscription iPad audio editor — Logic Pro
As shown off by Apple at its "Let Loose" event as a highlight of the iPad’s capabilities, Logic Pro is surely the single most powerful and comprehensive audio editor available for the iPad. On the Mac, it has competition from Pro Tools and to a lesser extent Adobe Audition, but neither are available on the iPad.
It’s a true Digital Audio Workstation (DAW) and as such is right for musicians, producers, and audio engineers. Logic Pro is really extreme overkill if you’re doing much less than making albums.
Yet even if all you want is to record a podcast with two hosts, having a full-on DAW at your fingertips is superb. It does come with the cost of a fairly steep learning curve, though, simply because it does so much.
It’s also arguably expensive, or at least it is not a casual purchase. Following a month-long free trial, Logic Pro for iPad costs $49/year, or $4.99/month.
Logic Pro for iPad 2 requires iPadOS 17.4. Apple has not yet specified any minimum hardware requirements for the forthcoming new version, but Logic Pro for iPad 1 needed an iPad with an A12 Bionic chip or later.
It also takes up quite a significant amount of storage space. The app itself is 1GB — compared to Ferrite’s 25MB — but then there are optional extras that can swell that to 15GB.
Editing an audio track in Logic Pro for iPad
The AppleInsider podcast used to be edited on Ferrite, but it’s now done on Logic Pro — albeit for the Mac. The Mac edition is a one-off $199 fee and it does not come as part of the iPad version’s subscription.
That’s the same as with the other app that Apple highlighted at its iPad event, Final Cut Pro. But unlike Apple’s video editor, Logic Pro has the tremendous benefit that projects can be moved between iPad, Mac, and back again, as you need.
Choosing the right audio editor for you
The one you want is Logic Pro for iPad — if you’re going to use it enough to warrant the subscription cost. And if you’re going to be using it for either complex enough projects, or just so many of them that it’s worth the time it takes to learn Logic Pro.
Then at the other end of the scale there is GarageBand, which you’ve already got. The fact that it’s designed for musicians means it has a lot of recording and loop features that you might not need, though, and its controls tend to be more basic.
So the sweet spot across all of the audio editor apps that AppleInsider has used, is the Ferrite Recording Studio. This, too, takes some time to learn but not as much as Logic Pro.
There may be situations where it becomes an issue that there isn’t a Mac version of Ferrite. But overall, it just means that the developer is truly focused on making it the best it can be for iPad users.
Whichever app you use, though, it’s got to be said that editing audio on an iPad is a pleasure. It’s much more of a pleasure to edit it than it is to record on, but pinching in and out of a track’s timeline, it feels like you’re touching your music and vocals.
AppleInsider News
Star Wars: Vintage Noir Edition
https://theawesomer.com/photos/2024/05/star_wars_1940s_black_and_white_t.jpg

George Lucas got his inspiration for Star Wars from a variety of sources, among them, vintage serials like Flash Gordon. Abandoned Films used generative AI to imagine what a Star Wars movie might have looked like had it been created 40 years earlier. The ship design and voiceover are spot-on, but the creepy AI-generated characters are nightmare fuel.
The Awesomer
Watch as a tornado flattens every tree in a Michigan man’s front yard in like thirty seconds flat
https://media.notthebee.com/articles/663e188c1534d663e188c1534e.jpg
Pretty rare to get this kind of demonstration of nature’s raw power, but when you see it — man.
Not the Bee
Configuring and Utilizing Multiple Databases in Laravel
https://kongulov.dev/assets/images/posts/configuring-and-utilizing-multiple-databases-in-laravel.png
Configuring and Utilizing Multiple Databases in Laravel
In Laravel, managing multiple databases is a common requirement for complex applications where data is distributed across different databases. Whether you need to interact with multiple databases for sharding, legacy systems, or simply for better organization, Laravel provides a convenient way to handle multiple database connections out of the box. n this guide, we’ll explore how to configure and utilize multiple database connections in Laravel, along with practical examples to demonstrate various scenarios.
Before diving into the usage, let’s set up multiple database connections in Laravel. Laravel’s database configuration is stored in the config/database.php file. Inside this file, you’ll find an array of database connections. To add a new connection, simply define a new array with the connection details.
'connections' => [
    'mysql' => [
        'driver' => 'mysql',
        'host' => env('DB_HOST', '127.0.0.1'),
        'port' => env('DB_PORT', '3306'),
        'database' => env('DB_DATABASE', 'forge'),
        'username' => env('DB_USERNAME', 'forge'),
        'password' => env('DB_PASSWORD', ''),
        'charset' => 'utf8mb4',
        'collation' => 'utf8mb4_unicode_ci',
        'prefix' => '',
        'strict' => true,
        'engine' => null,
    ],

    'second_db' => [
        'driver' => 'mysql',
        'host' => env('SECOND_DB_HOST', '127.0.0.1'),
        'port' => env('SECOND_DB_PORT', '3306'),
        'database' => env('SECOND_DB_DATABASE', 'forge'),
        'username' => env('SECOND_DB_USERNAME', 'forge'),
        'password' => env('SECOND_DB_PASSWORD', ''),
        'charset' => 'utf8mb4',
        'collation' => 'utf8mb4_unicode_ci',
        'prefix' => '',
        'strict' => true,
        'engine' => null,
    ],
],
We’ve added a new database connection named second_db here. Ensure you’ve updated the environment variables in your .env file accordingly.
Once you’ve set up the database connections, you can utilize them throughout your application. Laravel’s Eloquent ORM provides a convenient way to interact with databases.
1. Model Setup
When defining Eloquent models that use a different database connection, specify the $connection property.
<?php

namespace App\Models;

use Illuminate\Database\Eloquent\Model;

class SecondModel extends Model
{
    protected $connection = 'second_db';
}
2. Querying Data
When querying data from a specific database connection, you can use the on method on the Eloquent query builder.
$users = App\Models\SecondModel::on('second_db')->get();
3. Raw SQL Queries
You can execute raw SQL queries on a specific connection using the DB::connection() method.
$users = DB::connection('second_db')->select('select * from table_name');
Conclusion
Managing multiple databases in Laravel provides flexibility and scalability to your applications. By following the steps outlined in this guide, you can seamlessly configure and utilize multiple database connections in your Laravel projects. Whether it’s for distributed data storage, legacy integrations, or other requirements, Laravel’s robust database management capabilities make handling multiple databases a breeze.
Laravel News Links
The Fifth Element: 1950s AI Edition
https://theawesomer.com/photos/2024/05/the_fifth_element_1950s_ai_t.jpgAbandoned Films is back with another trippy, AI-generated movie trailer. This time, they took the 1997 sci-fi classic The Fifth Element and applied a 1950’s big-screen aesthetic to Leeloo, Corbin Dallas, Vito Cornelius, Ruby Rhod, Zorg, and their retro-futuristic world. Will our heroes find the stones and save us before the Ultimate Evil swallows the […]The Awesomer
You’re Practically Guaranteed to Get Alzheimer’s If You Have This Genetic Variant
https://i.kinja-img.com/image/upload/c_fill,h_675,pg_1,q_80,w_1200/3452ed649ba942470995d6560b3ddd10.jpg
A team of scientists seems to have discovered a previously hidden genetic cause of Alzheimer’s. In a new study Monday, the researchers found strong evidence that people carrying two copies of a genetic variation already tied to Alzheimer’s risk are practically destined to develop the neurodegenerative disorder as they get older. As much as 2% of the general population may have the same mutation, suggesting that the genetic risk of Alzheimer’s is larger than currently assumed.
Cop-Proof Your Phones Right Now
Alzheimer’s currently affects around 7 million Americans. It’s a complex condition that can have many different risk factors behind it, including age, cardiovascular disease, and genetics. There are known rare mutations that almost always cause someone to develop Alzheimer’s at a much younger age than usual, while other mutations appear to raise the risk of the classic form of Alzheimer’s, which typically starts occurring after age 65. One of these latter mutations affects the apolipoprotein E gene, or APOE, and is known as APOE4.
About a quarter of the population carries at least one copy of APOE4, and the variant is commonly studied as an important aspect of Alzheimer’s risk by scientists. Often, these studies don’t distinguish between people having one or both copies of the gene, but some research has suggested that these dual carriers, also known as APOE4 homozygotes, have a much higher risk of Alzheimer’s than others.
A large team of researchers from Spain and the U.S. sought to settle the question. To do so, they analyzed brain donor data from the National Alzheimer’s Coordinating Center (NACC) as well as data from five other large-scale studies that tracked people’s biomarkers related to Alzheimer’s, including their APOE4 status. All told, the analysis included over 13,000 people.
In the NACC data, the researchers found that nearly everyone with two APOE4 genes showed medium to high levels of brain changes associated with Alzheimer’s at the time of their death. For comparison, the same was only true for 50% of those with APOE3, the most common APOE variant, and which isn’t thought to affect Alzheimer’s risk. In the biomarker data, the team similarly found that almost everyone with two APOE4 copies had abnormal levels of amyloid beta in their spinal fluid (a potential early sign of the disease) by age 65, while 75% had positive amyloid scans. By age 80, almost 90% of these carriers had all of the biomarkers associated with amyloid and tau (another protein key to Alzheimer’s) that the researchers were able to track.
Not everyone with these changes will show clinical symptoms of Alzheimer’s before they die. But the findings, published Monday in the journal Nature Medicine, provide a clear illustration of almost-complete penetrance, the authors say—the odds of a genetic mutation causing a specific trait. In this case, those with two APOE4 genes appear near certain to develop at least the early signs of Alzheimer’s by the time they reach their mid-60s. Given that level of certainty, it’s more accurate to classify this mutation as representing a distinct, “genetic form” of Alzheimer’s, the researchers argue. They also note that 2% of the population is thought to have two APOE4 copies, which would make this form of Alzheimer’s one of the most common diseases tied to a single gene.
The findings, assuming they’re validated by other researchers, could lead to important changes in how we study Alzheimer’s. For starters, it should lead to a broader definition of genetic Alzheimer’s, with the APOE4 form recognized as usually causing Alzheimer’s at an older age than other genetic causes of it. Given the much higher danger associated with two APOE4 copies, the researchers say, future studies should also not bunch them together with single copy carriers. And simply knowing about this heightened risk should hopefully help scientists better understand how Alzheimer’s can happen, which might one day lead to more effective treatments for it.
“In conclusion, our study provides compelling evidence to propose that APOE4 homozygotes [i.e. two APOE4 alleles, or copies] represent a distinct, genetically determined form of [Alzheimer’s disease], which has important implications for public health, genetic counseling of carriers and future research directions,” they wrote.
Gizmodo