The rifle portion of Sandstone focuses on breath control, accuracy and crosswind with scope and iron sights.
The Civilian Marksmanship Program (CMP) is excited to announce the launch of Combine 2 in its Sightline series of Esports games – Sandstorm!
In November, the CMP began its venture into Esports through Sightline, Combine 1, which had over 100,000 unique users and aimed to present versatile marksmanship training through gameplay that can later be translated to a live range. Combine 2 expands upon that notion by engaging users in breath control, crosswind and shot visualization – featuring fresh gameplay mechanics within a desert environment.
“Sightline Sandstorm adds several features which increase the marksmanship challenges,” said Will Dantzler, CMP’s Chief Information & Technology Officer. “With a new environment including incentives, the game keeps bringing you back to do better!”
Similar to Combine 1, users in Combine 2 will play from a perspective set behind the firearm to simulate range scenarios for action pistol, rifle and shotgun. Users will enter a 3D arena where he or she will be given a series of nine tasks to complete. The player uses a keyboard and mouse to control the speed of play and the movement of the firearm itself.
New elements in Sightline Sandstorm include exclusive rewards, like earning your own custom firearm skin for a more personal feel, as well as score history/past shot display to verify which shots earned the most points based on proximity to the bullseye.
In pistol, precision and speed are tested within tasks such as Target Frenzy, Tempo Precision and Drone Wave. Shotgun challenges each user’s reflexes through Trap Shoot, Maze Race and Zone Defend – firing at clay pigeons while navigating through a winding labyrinth or defending against a horde of targets. Rifle tasks focus on breath control, simulated through sway motion during gameplay, along with accuracy and crosswind compensation with scope and iron sights.
Pistol tests speed and precision through a series of challenging tasks.
Global leaderboards will be collected within each task. Finish within the Top 100 of users and earn a special Title! Users may go back and play as many times as they’d like, so keep playing, share with your friends and earn those rewards while absorbing marksmanship fundamentals along the way!
Those interested in playing may access Sightline Sandstorm by following this step-by-step setup guide through the Steam and Aimlabs gaming platforms. Unfortunately, MacOS is currently unsupported by Aimlabs, meaning Sightline is only accessible to PC/Windows users until a later date. Note that download times may vary due to user internet connectivity and available hard disk space.
CMP’s Esports Mission:
The CMP is dedicated to finding ways of expanding its footprint and base participation, especially with youth, outside of its static ranges in Ohio, Alabama and at travel competition sites across the country. Making a move to the virtual world, the CMP is launching a series of “Combines” for users to enter gameplay. Each Combine will present a new series of tasks using a variety of firearms and training techniques through engaging settings, with the hope of migrating marksmanship gameplay to real-world applications.
About the Civilian Marksmanship Program
The Civilian Marksmanship Program is a federally chartered 501 (c) (3) non-profit corporation. It is dedicated to firearm safety and marksmanship training and to the promotion of marksmanship competition for citizens of the United States. For more information about the CMP and its programs, log onto www.TheCMP.org.
Restricted 18+ in CA in compliance with CA State Assembly Bill 2571 prohibiting the marketing of firearms to minors in the State of CA.
If you are planning a job in data engineering, then you should be well prepared for it. We have identified 30 data engineer interview questions that can help in your endeavor. During the interview, you can be asked questions from different related areas. So, we tried to cover these in this tutorial. 30+ Data Engineer […]
December is a great time to learn something new, perhaps some little enhancement to your Laravel skills or a new tool from the ecosystem. And Laracasts is one of the best platforms to help with that.
With hundreds of hours of top-tier learning content by Mr. Laracasts himself, Jeffrey Way, along with a star-studded assortment of other Laravel community favorites, and more being added constantly.
Come learn new tricks and tools or go deeper on the ones you already know and love—Laracasts is for developers at every level.
That’s why I wanted to kick December off with Laradir’s first PRIZE DRAW ????
Any profiles that get approved during December will be up for winning a Laracasts Forever subscription.
You can buy the Laracasts Forever subscription at any time for a one-off $399 giving you unfettered access to this growing library of incredible content. Or you could win a license and get it all for free!
Here are the rules:
Your profile must be approved between 1st December 2023 00:00:00 UTC and 31st December 2023 23:59:59 UTC
You may enter only one time into the prize draw
If your profile was approved before 1st December 2023, you may still enter: simply update your profile to add it to the approval queue. If it’s approved, you will be entered into the draw
The draw will take place on January 2nd 2024. The winner will be notified by email at the address associated with their Laradir profile
No employees or contractors (or family members of employees/contractors) working on Laradir can enter
Dealing with hefty CSV files is pretty standard in the business world, especially when you’ve got loads of data to analyze, report on, or move around. If you’re using Laravel and need to process large CSV files, you’ve come to the right place. We will guide you through the smoothest way to handle this task without causing a traffic jam in your application’s performance.
Memory and Performance
First off, let’s talk about the elephant in the room: memory and performance. Chugging through a massive CSV can be a memory hog and could slow down your app. Sure, you might think about just cranking up the memory limit or extending the timeout period. But let’s be honest, that’s like putting a band-aid on a leaky pipe – not the best solution.
Enter Simple Excel by Spatie
Instead of the band-aid approach, we’re going to use a nifty package called Simple Excel by Spatie. If you’re nodding because you expected Spatie to have a solution, you’re not alone.
composer require spatie/simple-excel
Assuming you’ve got your CSV file ready to go, we’ll use SimpleExcelReader to load it up. The cool thing is, by default, it returns you a LazyCollection – think of it as a more considerate way to handle your data without exhausting your server’s memory. This means you can process the file bit by bit, keeping your app light on its feet.
$rows is an instance of Illuminate\Support\LazyCollection
Laravel Jobs to the Rescue
Now, before we dive into code, let’s set up a Laravel Job to manage our CSV processing.
php artisan make:job ImportCsv
Now here is what our ImportCsv job looks like:
<?php
namespace App\Jobs;
use Illuminate\Bus\Queueable;
use Illuminate\Contracts\Queue\ShouldQueue;
use Illuminate\Foundation\Bus\Dispatchable;
use Illuminate\Queue\InteractsWithQueue;
use Illuminate\Queue\SerializesModels;
use Spatie\SimpleExcel\SimpleExcelReader;
class ImportCsv implements ShouldQueue
{
use Dispatchable, InteractsWithQueue, Queueable, SerializesModels;
/**
* Create a new job instance.
*/
public function __construct()
{
//
}
/**
* Execute the job.
*/
public function handle(): void
{
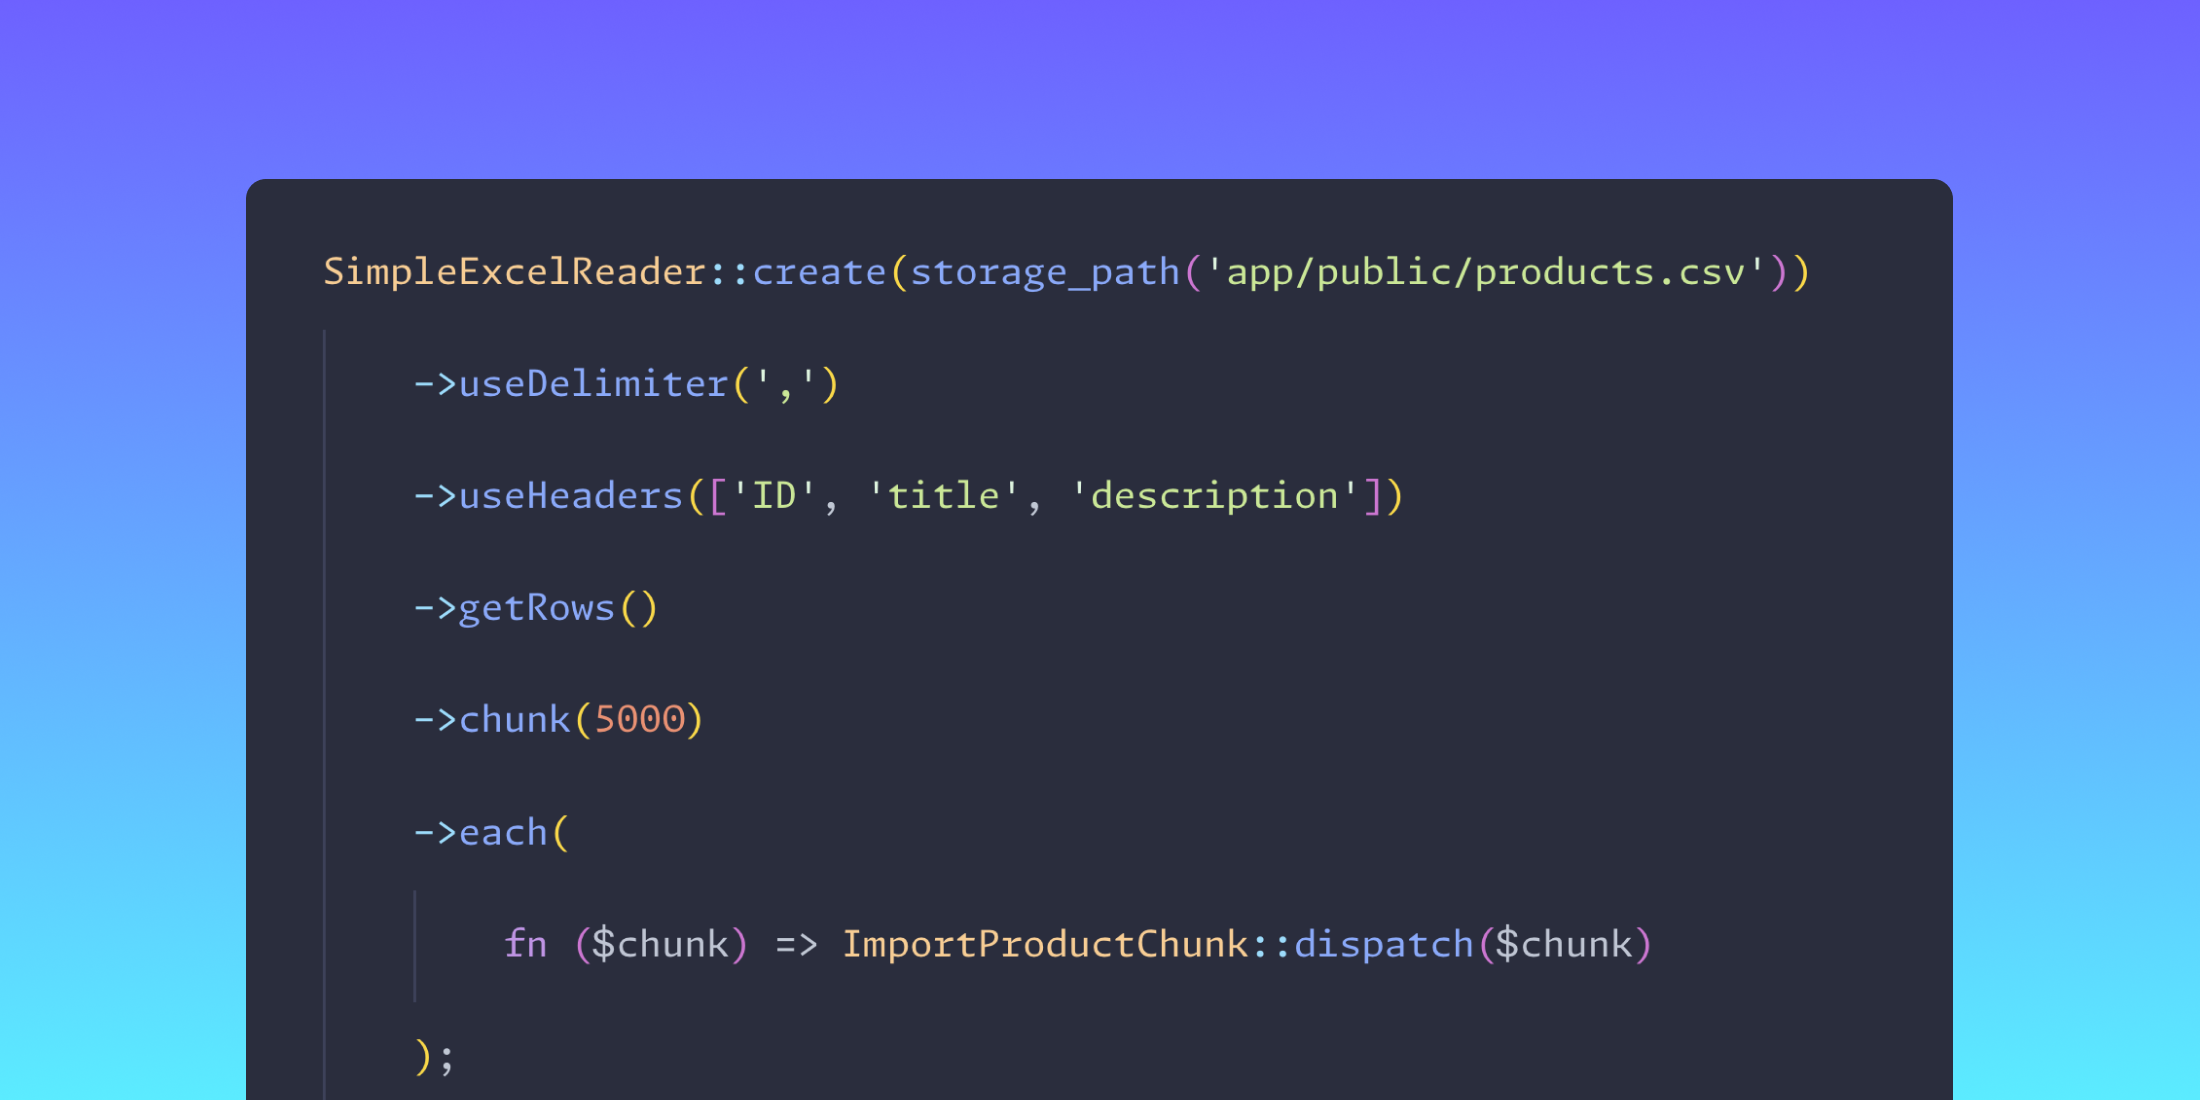
SimpleExcelReader::create(storage_path('app/public/products.csv'))
->useDelimiter(',')
->useHeaders(['ID', 'title', 'description'])
->getRows()
->chunk(5000)
->each(
// Here we have a chunk of 5000 products
);
}
}
Here’s the game plan:
Chunking the CSV: We’re going to break that file into manageable pieces, giving us a LazyCollection to play with.
Job Dispatching: For each chunk, we’ll send out a job. This way, we’re processing in batches, which is way easier on your server.
Database Insertion: Each chunk will then be inserted into the database, nice and easy.
Chunking the CSV
With our LazyCollection ready, we’ll slice the CSV into chunks. Think of it like turning a gigantic sandwich into bite-sized pieces – much easier to handle.
php artisan make:job ImportProductChunk
For every piece of the CSV, we’ll create and fire off a job. These jobs are like diligent workers, each taking a chunk and carefully inserting the data into your database.
<?php

namespace App\Jobs;

use App\Models\Product;
use Illuminate\Bus\Queueable;
use Illuminate\Contracts\Queue\ShouldBeUnique;
use Illuminate\Contracts\Queue\ShouldQueue;
use Illuminate\Database\Eloquent\Model;
use Illuminate\Foundation\Bus\Dispatchable;
use Illuminate\Queue\InteractsWithQueue;
use Illuminate\Queue\SerializesModels;
use Illuminate\Support\Str;

class ImportProductChunk implements ShouldBeUnique, ShouldQueue
{
    use Dispatchable, InteractsWithQueue, Queueable, SerializesModels;

    public $uniqueFor = 3600;

    /**
     * Create a new job instance.
     */
    public function __construct(
public $chunk
) {
        //
    }

    /**
     * Execute the job.
     */
    public function handle(): void
    {
        $this->chunk->each(function (array $row) {
            Model::withoutTimestamps(fn () => Product::updateOrCreate([
                'product_id' => $row['ID'],
'title' => $row['title'],
'description' => $row['description'],
           ]));
        });
    }

    public function uniqueId(): string
    {
        return Str::uuid()->toString();
    }
}
Ensuring Uniqueness
One crucial thing to remember is to use $uniqueFor and uniqueId in your jobs. It’s like giving each worker a unique ID badge, so you don’t accidentally have two people doing the same job – a big no-no for efficiency.
Dispatching Jobs
Back in our ImportCsv job, we’ll dispatch a job for each chunk within the each method. It’s like saying, "You get a chunk, and you get a chunk – everybody gets a chunk!"
<?php

namespace App\Jobs;

use Illuminate\Bus\Queueable;
use Illuminate\Contracts\Queue\ShouldQueue;
use Illuminate\Foundation\Bus\Dispatchable;
use Illuminate\Queue\InteractsWithQueue;
use Illuminate\Queue\SerializesModels;
use Spatie\SimpleExcel\SimpleExcelReader;

class ImportCsv implements ShouldQueue
{
    use Dispatchable, InteractsWithQueue, Queueable, SerializesModels;

    /**
     * Create a new job instance.
     */
    public function __construct()
    {
        //
    }

    /**
     * Execute the job.
     */
    public function handle(): void
    {
        SimpleExcelReader::create(storage_path('app/public/products.csv'))
            ->useDelimiter(',')
            ->useHeaders(['ID', 'title', 'description'])
            ->getRows()
            ->chunk(5000)
            ->each(
fn ($chunk) => ImportProductChunk::dispatch($chunk)
);
    }
}
And there you have it! Your chunks are off to be processed independently, without any memory drama. If you’re in a rush, just add more workers, and like a well-oiled machine, your data will be processed even quicker.
Processing large CSV files in Laravel doesn’t have to be a headache. With the right tools and approach, you can keep your application running smoothly while dealing with all that data.
The answer is to configure your tests to use a different database than you use for local development. But how do you accomplish that?
First, think about how we tell Laravel which database to use at all? We use environment variables like DB_HOST and DB_DATABASE. So what we really want is for DB_DATABASE to have a different value inside our tests than in a normal application request.
Laravel will look for an .env.testing file, and use those values during a test run, but I prefer to use the phpunit.xml for all testing-related configuration.
By default, Laravel sets some values in our phpunit.xml for testing configuration. For example, it sets APP_ENV to testing and it drops BCRYPT_ROUNDS to 4 to make our tests a little faster.
We can use this same file to change our DB_DATABASE value. If my development database is called app, then I’d have DB_DATABASE set to app_test in the phpunit.xml.
Related to this, we’ll also forcibly set any env values used by third party services (AWS, Stripe, etc) to purposely-invalid values. This prevents our tests from ever accidentally hitting a third-party service.
Freelancers that use Upwork have an advantage if they apply to job soon after they are posted.
Upwork offers an RSS feed that can be parsed for job information sent in the jobs broadcast.
Feedparser is a python module that can be used to extract some of the key data from the XML data in that RSS field.
Some of the data in the feed is more deeply embedded and so must be extracted and cleaned before use.
By combining the extracted data into a Pandas DataFrame there is the ability to filter data and save to a more useful format.
At the end of this article, I’ll provide an interactive Google Colab link for the interactive version of this article. But let’s start with the video:
The Coding Challenge
Upwork is seen to be a good platform for potential freelance jobs.
But there can be some challenges in getting to the jobs quickly enough. Early applications are frequently the ones accepted.
The job search interface is also not very well suited to the filtering and listing of jobs you are looking for.
And… Freelancers need to actively search the jobs page!
This tutorial and video look at a way to accelerate that search and filter the jobs on preferred criteria.
Learning Objectives
By the end of this tutorial, you will have:
Defined the project requirements
Explored aspects of Data Scraping
Explored RSS feeds and XML
Followed a potentially useful and repeatable workflow
Built a useful tool
Developed some useful Python skills
Approach
As freelancers, it can be helpful to approach every task as a formal project. It is good practise and you never know when project might become something more valuable.
A client may want something similar or it may become a product you can sell. So, it is a good discipline and will save time in the long run to approach such projects professionally.
A Useful Workflow
This pattern of development has proven helpful for me:
Set the project requirements
Follow a sound process for data scraping
Investigate the data source
Acquire the data
Extract the data you want
Clean the data
Filter the data
Output the data
Use the data and confirm the information is valid
Document the project
Deliver to the client
And we’ll follow this process now.
Requirements Setting
Just like we do for our clients, we should have specific requirements.
I use the MoSCow approach to setting my requirements.
This identifies the parts that the project we:
Must Do
Should Do
Could Do
Won’t Do
And sets out clearly what will be delivered and equally as important, what will not be delivered.
Our requirements:
MUST:
Provide data from Upwork relevant to the Freelancer
Present the information in a readable format
SHOULD:
Allow filtering and manipulation of the data as needed by the user
Allow for rapid refresh
COULD:
Run from the command line with arguments
Could be automated
WONT:
Have a graphical interface
We are limited on time. So we will focus on the data-scraping aspect of the task. And we will only complete the Must and Should requirements.
Getting the Data
Investigation
We can see here on the Upwork ‘search page’, entering a search term will give you a large number of potential tasks. But we only want some of these and preferably the latest. And we want them filtered to our needs. So we need to defer from what is presented here.
This symbol identifies the Really Simple Syndication (RSS) feed that we shall be using that feed for our data.
If we click the link and select RSS, a new page opens with the job feed structured in the Extensible Markup Language (XML).
We can also see that the feed format is XML.
This is similar to HTML and is a markup language that is readable by the computer and by people (people who can look past the tags and format).
Apparently this dense text is ‘person’ readable!
Some of it seems ok but most is hard to read.
Let’s make this more readable.
Time is money for the Freelancer. So let’s copy this data and use a web tool, an XML formatter to explore the RSS XML data.
Here we can see that the XML forms a tree. With 10 indiviual elements, one for each job in this field.
If we look in to the first few items, we can see the information about each job.
Observations
It looks like the feed has 10 elements and each element has the Title, Link to the Job and a Description. The description appears to be an HTML script that contains some of the information that we need.
So let’s scrape that data next!
Acquisition
There are Python packages that we can use to scrape data from such XML feeds.
And it looks like we will be able to extract data from the ‘description’ field too. It appears to be a long string object and we have Python mehtods for strings.
Note: For simple data-scraping tasks, I like to use a Jupyter notebook. The notebook is useful because it holds the data in memory so it can be explored while we change the code.
This means we don’t need to capture the feed many times.
There is no reason you can’t use VSCode or Pycharm or any other editor.
Again as a freelancer, time is money, so use the tools you are familiar with.
Now we need to extract the individual elements of information from the ‘description‘ string.
Let’s take a closer look at one of the ‘description‘ strings.
description: We are looking for a skilled developer who can create a mobile application and web application for a fitness app. The main feature of the app will be the integration of AI technology to detect the user's body, diet, and workout plan. The successful candidate will be responsible for designing and developing the app, ensuring it is user-friendly and has a modern, sleek design. The app should be able to track user progress and provide personalized recommendations based on the user's inputs and body data. Key skills required for this project include: <br /><br />
- Mobile app development <br />
- Web app development <br />
- AI integration <br />
- UX/UI design <br />
- Data analysis and interpretation<br /><br /><b>Hourly Range</b>: $8.00-$10.00
<br /><b>Posted On</b>: December 02, 2023 17:57 UTC<br /><b>Category</b>: Mobile App Development<br /><b>Skills</b>:iOS, Android, Smartphone, Python, Mobile App Development
<br /><b>Skills</b>: iOS, Android, Smartphone, Python, Mobile App Development <br /><b>Country</b>: United States
<br /><a href="https://www.upwork.com/jobs/Fitness-App-Development-with-Functionality_%7E01494dc445d89c9f7f?source=rss">click to apply</a>
Here we see 14 lines of text with HTML markup and tag and characters such as ‘br‘ and &# 039 ;
Then we see a selection of headings inside HTML bold tags.
So the general theme for the description block is:
description – HTML code of variable lengths and with some HTML character codes and tags
Hourly Range – b_tags and some text
Posted On – b_tags and some text
Category – b_tags and some text
Skills – b_tags and 1 or more skills with commas and spaces in between
Skills – a repeated line of skills
Country – b_tags and some text
Link – a repeat of the link
Knowing this data structure, we can now use Python to extract the information we need.
Let’s write some code!
First we need to import some packages.
feedparser for the RSS feed.
pandas for our data storage and filtering
ssl to bypass some ssl elements of the feed broadcast.
import feedparser
import pandas as pd
import ssl
Now we need a function to create and return an empty and prepared Dataframe in Pandas.
We need a function that steps through the feed and extracts our information.
Firstly, we set up a list of blank data so that if there are gaps in the information, we still have data to place in the DataFrame. Failure to do this would raise an error.
Then we ‘Parse the Feed’
Title and Job link we can get directly from the feed entry.
But for the ‘description‘, we need to use the ‘string.split‘ method and split the string into a list of elements using the ‘bold‘ tag as the separator.
This gives us:
description[0] is the first item in the list and is the main description field we just need to stip this of HTML tags Here we use the ‘clean_string‘ function.
‘Posted On’ and ‘Category’ also get cleaned with ‘clean_string‘.
Notice that we slice off only that part we need to send to be ‘cleaned’ eg clean_string(b_tag[15:])
‘Hourly Range’ / Budget’ get special treatment in the ‘clean_price’ function where we return a float for the money value and a string for ‘Budget’ or ‘Hourly Rate’
‘Skills’ needs to be stripped into a list (for searching) and also cleaned.
‘Country’ also needs some special treatment
Once cleaned the data is assigned to a dictionary and added to a DataFrame and added to the master DataFrame.
def get_data(entry):  # entry is a job item from the RSS feed

    # Some data ends up Null so set those values just in case
    item_posted = ''
    item_cat = ''
    item_price_type = ''
    item_price = 0.0
    item_skills = []
    item_country = ''

    # Set from parsing the feed
    item_title = entry.title
    item_link = entry.link
    description  = entry.description
    description = description.split('<b>')
    item_desc = clean_string(description[0])
    for b_tag in description[1:]:
        if "Hourly Range" in b_tag or "Budget" in b_tag:
            item_price_type, item_price = clean_price(b_tag)
        elif "Posted On" in b_tag:
            item_posted = clean_string(b_tag[15:])
        elif "Category" in b_tag:
            item_cat = clean_string(b_tag[14:])
        elif "Skills" in b_tag and not item_skills :
            item_skills = clean_skills(b_tag[11:])
        elif "Country" in b_tag:
            item_country = clean_country(b_tag[10:])


    # build the DataFrame and return it

    new_job = {
    'Title': item_title,
    'Link': item_link,
    'Description': item_desc,
    'Posted': item_posted,
    'Category': item_cat,
    'Skills': item_skills,
    'Price Type': item_price_type,
    'Price': item_price,
    'Country': item_country}

    new_job_df = pd.DataFrame([new_job])

    return new_job_df
The ‘clean_string‘ function uses the ‘replace‘ method and takes each substring that isn’t required and either removes it or replaces it with the correct value.
Note: This is not the most pythonic approach, but it has been written for clarity for beginners in mind. How would you make it more Pythonic?
The ‘clean_price‘ function splits the identifier (‘Hourly Range’ or ‘Budget’) into a new string.
It then extracts the number (also a string) and returns it as a float along wth the identifier.
def clean_price(item_Bud_HR):

    price_split = item_Bud_HR.split(':')
    item_price_type = clean_string(price_split[0])
    item_price = price_split[1] # Get and clean the value
    item_price = item_price.replace('$','')
    item_price = item_price.replace('<br />','')
    item_price = item_price.strip()
    if '-' in item_price:
        item_price = item_price.split('-') # If the price is an 'Hourly Range' we split, returning the number on the right of  '-'
        item_price = item_price[1]
    item_price = float(item_price)

    return item_price_type, item_price
The ‘clean_country‘ function splits the string on '\n'. It then takes the first element, cleans off the white space and returns the Country name.
The ‘clean_skills‘ function is a little more complex.
We create a new empty list, ‘item_skills_list‘.
We then clean the string by removing HTML tags.
We split the string on the ',' character and step through the list that is created, cleaning each string and then appending it to the list before it is returned.
def clean_skills(item_skills):

    item_skills_list =[]
    item_skills = item_skills.replace('<br />','')
    item_skills = item_skills.split(',')
    for skill in item_skills:
        item_skills_list.append(skill.strip())

    return item_skills_list
Once a new job DataFrame is created for each job, it is ‘concatenated’ to the master DataFrame for later filtering.
The DataFrame jobs_df now holds all of the RSS feed jobs and their associated data. We can now filter it as required.
The ones I have presented here (commented out) offer examples for your own filters.
Strips out any duplicates based on the ‘Posted’ time.
Looks for budgets and hourly figures above 20.0 dollars
Looks for selected countries (United States and India)
What would you want to filter for?
def filter_output(jobs_df):


    # FILTER THE DATA USING Pandas

# 1. Strip out non unique values - Posted on is the pseudo-primary key
    # Uncomment if needed
    #jobs_df = jobs_df.drop_duplicates(subset=['Posted'], ignore_index=True)

 #2. Only save for Price or budget greater than $10
    # Uncomment if needed
    #jobs_df = jobs_df[jobs_df['Price'] > 20]

# 3. Only save for Specific Country
    # selecting rows based on condition
    # Uncomment below if needed
    #options = ['United States', 'India']
    #jobs_df = jobs_df[jobs_df['Country'].isin(options)]

    return jobs_df
Here we have the main() function that takes the Upwork RSS URL and feeds it to the function in turn.
# MAIN
def main():

# Why SSL
# Python is adding http verification in in the std library
# This bypasses the check for th moment
    if hasattr(ssl, '_create_unverified_context'):
        ssl._create_default_https_context = ssl._create_unverified_context


    url="https://www.upwork.com/ab/feed/jobs/rss?q=Python&sort=recency&paging=0%3B10&api_params=1&securityToken=6b9f07dc2632b4ac772d5daa37626af471b7d2526826c56a0c16aad6580245646f4e13804c72bd1ed3755f3bd552f5ba1d3f67a021987f714a1ff340ba7659dc&userUid=1215586676591329280&orgUid=1215586676603912193"

    #Get the Feed Data
    data = feedparser.parse(url)

    # Make the master dataframe
    jobs_df = make_dataframe()

    #Get the data for each item and add it to the DataFrame
    for entry in data.entries:
        new_job_df = get_data(entry)
        # join the new dataframe to the list
        jobs_df = join_dataframes(new_job_df, jobs_df)
Now we have the jobs from the RSS feed in a DataFrame, we can filter using the pandas methods.
filter_output(jobs_df)
Title
Link
Description
Posted
Category
Skills
Price Type
Price
Country
0
AWS Python Consultant – Upwork
https://www.upwork.com/jobs/AWS-Python-Consult…
Fluent English speaking Python developer with …
December 02, 2023 20:13 UTC
DevOps Engineering
[Ubuntu, Amazon Web Services, Python, AWS Lamb…
Hourly Range
10.0
United Kingdom
1
1min Time Frame Forex Scalper – Upwork
https://www.upwork.com/jobs/1min-Time-Frame-Fo…
If you scalp the forex market on the m1 time f…
December 02, 2023 20:13 UTC
Deep Learning
[Forex Trading]
Hourly Range
40.0
United Kingdom
2
AI – driven crypto charting project – Upwork
https://www.upwork.com/jobs/driven-crypto-char…
Scope of work\nThedevelopment of a crypto char…
December 02, 2023 20:03 UTC
Machine Learning
[Artificial Intelligence, Machine Learning, Bl…
Hourly Range
40.0
Nigeria
3
Gelato Smart Contract Integration Upgrade – Up…
https://www.upwork.com/jobs/Gelato-Smart-Contr…
I’m looking for a Solidity developer with Foun…
December 02, 2023 20:01 UTC
Emerging Tech
[Solidity, Blockchain, TypeScript, Ethereum]
Hourly Range
40.0
United States
4
Publish Open-source AI Agent to Web UI (Flutte…
https://www.upwork.com/jobs/Publish-Open-sourc…
The goal of this project is to create a web UI…
December 02, 2023 20:01 UTC
Full Stack Development
[AI Agent Development, AI App Development, Flu…
Budget
100.0
Canada
5
Price check automation – Upwork
https://www.upwork.com/jobs/Price-check-automa…
Would like one of the experts to build me a bo…
December 02, 2023 19:57 UTC
Scripting & Automation
[Automation, Data Scraping, Data Mining, Data …
Hourly Range
100.0
Saudi Arabia
6
Need for Good Hackers to Assist in Scamming Si…
https://www.upwork.com/jobs/Need-for-Good-Hack…
We are looking for good hackers who can assist…
December 02, 2023 19:38 UTC
Information Security
[Data Entry, Python]
Hourly Range
45.0
United States
7
Microservices Architecture Help – Upwork
https://www.upwork.com/jobs/Microservices-Arch…
### **The Data Synchronization Dilemma**\n—\…
December 02, 2023 19:35 UTC
Back-End Development
[Python, Microservice, Software Architecture &…
Hourly Range
40.0
India
8
Build two AVL trees for project – Upwork
https://www.upwork.com/jobs/Build-two-AVL-tree…
I need an avl tree to hold a string node (key)…
December 02, 2023 19:28 UTC
Full Stack Development
[C++]
Budget
250.0
United States
9
ROMP texture on 3D SMPL mesh using Pytorch (No…
https://www.upwork.com/jobs/ROMP-texture-SMPL-…
(WARNING to SCAMMER)\nStarting from an existin…
December 02, 2023 19:23 UTC
AR/VR Design
[Python, PyTorch, Augmented Reality, Linux, Ub…
Budget
300.0
Germany
Once we have filtered the data to meet our needs, we use the pandas method to save the DataFrame to an Excel file.
It also prints out the top 3 entries to demonstrate the data has been captured.
    print(jobs_df.head(3))
    # Export to excel
    jobs_df.to_excel('jobs.xlsx', index=False)
                                          Title  \
0                AWS Python Consultant - Upwork
1        1min Time Frame Forex Scalper - Upwork
2  AI - driven crypto charting project - Upwork

                                                Link  \
0  https://www.upwork.com/jobs/AWS-Python-Consult...
1  https://www.upwork.com/jobs/1min-Time-Frame-Fo...
2  https://www.upwork.com/jobs/driven-crypto-char...

                                         Description  \
0  Fluent English speaking Python developer with ...
1  If you scalp the forex market on the m1 time f...
2  Scope of work\nThedevelopment of a crypto char...

                        Posted            Category  \
0  December 02, 2023 20:13 UTC  DevOps Engineering
1  December 02, 2023 20:13 UTC       Deep Learning
2  December 02, 2023 20:03 UTC    Machine Learning

                                              Skills    Price Type  Price  \
0  [Ubuntu, Amazon Web Services, Python, AWS Lamb...  Hourly Range   10.0
1                                    [Forex Trading]  Hourly Range   40.0
2  [Artificial Intelligence, Machine Learning, Bl...  Hourly Range   40.0

          Country
0  United Kingdom
1  United Kingdom
2         Nigeria
That completes our exploration of the code.
I hope you have found some insight and value here.
Let us review.
Learning Objectives
This tutorial and video looked at how to read the RSS feed from Upwork, to accelerate your search and allow you to filter the jobs on your preferred criteria.
We have covered:
Defining your project requirements
Data Scraping
RSS feeds and XML (briefly)
A potentially useful workflow
The building of a useful tool
Some useful Python skills
Next Steps
This code is very flexible and so here are some options you might want to consider if you are extending its utility:
You may want to run this code on a timer to give you frequent updates.
You may also want to load the previous jobs scraped into the jobs_df DataFrame so that you can append new jobs.
You may also want to have a ‘list of urls’ for different searches that you step through in order to cover lots of searches
If you searches are very specific you might want to have the script email you when a job is posted.
What will you do?
Resources:
https://jsonformatter.org/xml-formatter
https://ascii.cl/htmlcodes.htm
You can also check out this guide on Google Colab using this link.
The archived hour-long chat is a must-watch for any long-time Doom fan.
While Doom can sometimes feel like an overnight smash success, the seminal first-person shooter was far from the first game created by id co-founders John Carmack and John Romero. Now, in a rare joint interview that was livestreamed during last weekend’s 30th-anniversary celebration, the pair waxed philosophical about how Doom struck a perfect balance between technology and simplicity that they hadn’t been able to capture previously and have struggled to recapture since.
Carmack said that Doom-precursor Wolfenstein 3D, for instance, "was done under these extreme, extraordinary design constraints" because of the technology available at the time. "There just wasn’t that much we could do."
Wolfenstein 3D‘s grid-based mapping led to a lot of boring rectangular rooms connected by long corridors.
One of the biggest constraints in Wolfenstein 3D was a grid-based mapping system that forced walls to be at 90-degree angles, leading to a lot of large, rectangular rooms connected by long corridors. "Making the levels for the original Wolfenstein had to be the most boring level design job ever because it was so simple," Romero said. "Even [2D platformer Commander Keen] was more rewarding to make levels for."
By the time work started on Doom, Carmack said it was obvious that "the next step in graphics was going to be to get away from block levels." The simple addition of angled walls let Doom hit "this really sweet spot," Carmack said, allowing designers to "create an unlimited number of things" while still making sure that "everybody could draw in this 2D view… Lots of people could make levels in that."
Doom‘s support for angled walls and variable heights added a huge amount of design variation while still keeping things relatively simple to edit.
Romero expanded on the idea, saying that working on top of the Doom engine was, at the time, "the easiest way to make something that looks great. If you want to get anything that looks better than this, you’re talking 10 times the work."
Was Quake too complex?
Then came Quake, with a full 3D design that Carmack admitted was "more ambitious" and "did not reach all of its goals." When it came to modding and designing new levels, Carmack lamented how, with Quake, "a lot of potentially great game designers just hit their limit as far as compositional aesthetic in terms of what something is going to look like."
"When you have the ability to do a full six degree-of-freedom modeling, you not only have to be a game designer, you have to be an architect, a modeler working through your composition," Carmack continued. "[Doom] helped you along by keeping you from wasting time doing some crazy things that you would have had to be a master of a different craft to pull off… Going to full 3D made this something that not everybody does on a lark, but something you set out time, almost set a career arc to make mods for newer games."
Enlarge/Quake‘s full 3D maps required much more design skill to build good-looking levels.
Romero reminisced during the chat about "the Everest of Quake" and "the insane amount of technology we took on" during its development. "Even adding QuakeC on top of [a] client/server [architecture] on top of full 3D, it was so much tech. It was a whole new engine, it wasn’t Doom at all. It was all brand new."
Looking back, Carmack allowed that "there’s a couple different steps we could have taken [with Quake], and we probably did not pick the optimal direction, but we kept wanting to make this, just throw everything at it and say, ‘If you can think of something that’s going to be better, we should just strive our hardest to do that.’ When Doom came together, it was just a perfect storm of ‘everything went right.’.. [it was] as close to a perfect game as anything we made."


 The Ruger American Gen II rifle debuts, in Standard an Ranch configurations. Improvements include stock updates, three-position safety and new finish.
 TLDR
TLDR


 Note: For simple data-scraping tasks, I like to use a Jupyter notebook. The notebook is useful because it holds the data in memory so it can be explored while we change the code.