The leaves of fall are one of the most gorgeous gifts from nature. Every year, we ask you to share your best photo of the season. And as usual, you didn’t disappoint.
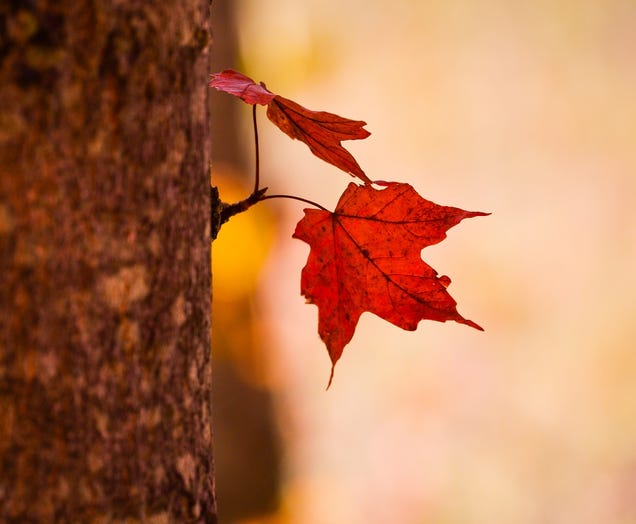
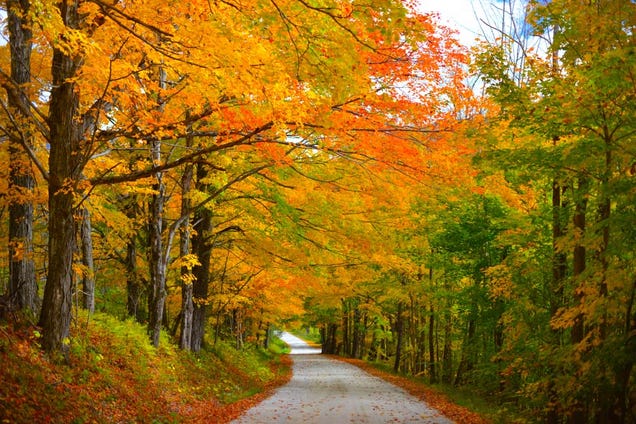
Winner: Norway Maple

This is a photo of a Norway Maple tree trying to make it’s colors seen through the forest. Often confused with the Sugar Maple… It is very invasive in North America and can choke out native vegetation.
Luc Lavign
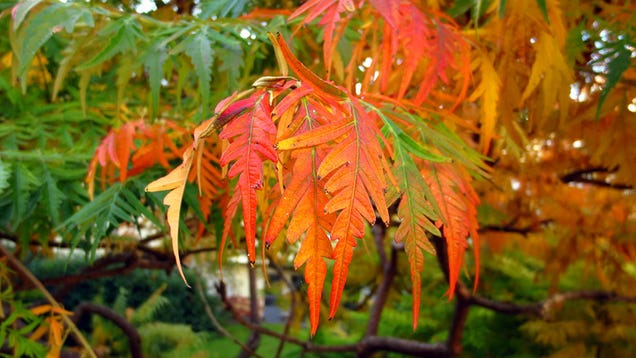
Orange Tower

I took this last weekend with a Samsung NX30 using an 85mm lens while walking along Summit Avenue in Saint Paul, MN with my mom. The light was perfect and many of the trees were at peak color – couldn’t have asked for a better chance to take some photos.
Andrew Putschoegl
Denied

I took this pic after I asked my crush to go on a walk with me but she denied. I went by my damn self and took the picture while walking through the woods. The picture was taken with a GALAXY S4 using the SnapChat Camera app.
Billy Gonzalez
The Road
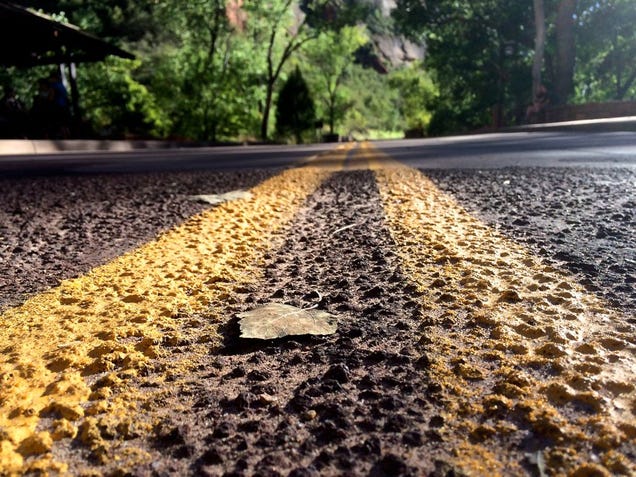
Just took this in Zion National Park, Utah.
– David Tobin
Hide, Dad!
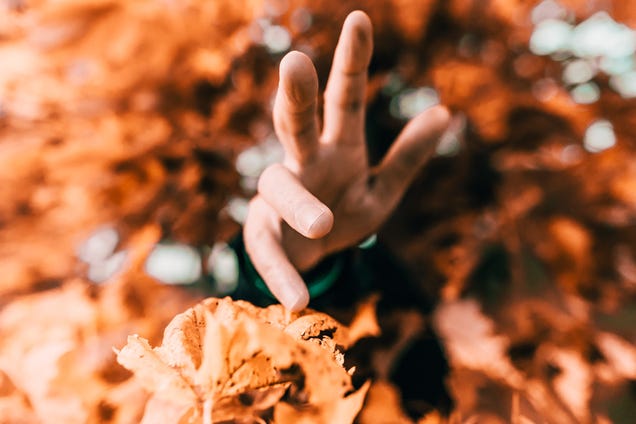
A reach Julian shoot that i took with my Canon 6D, 24mm L 1.4 mark II lens. Shoot at F 2.5 in Sweden this year before the last days of fall, which sadly already almost is over. I was out shooting with my dad and told him to hide in behind the leaves, and reach towards me.
– Julian Castaneda
Cape Breton Pony

25 year old Shetland Pony with Coxheath mountain in the background . Taken a week ago in Cape Breton, Nova Scotia, Canada. Photo taken with HTC one m7
Michael MacQueen
Blue House, Orange Tree

I took this last week on Rt 100 in southern Vermont. Drove up from Connecticut in the rain in search of some color. Never left the car. Stuck my Fujifilm x100s out the window and got this one. f/6.4 1/850 ISO 800
Tom DeRosa
It’s Hard

It is damn hard to get a good picture of falling leaves. I was disappointed that I never got a good one in focus – but liked this one. Shot with Nikon D40x/50MM lens.
Tom O’Brien
Elora

I shot this nearly a month ago, actually, but the leaves were already beginning to peak up in Elora, Ontario by that time. That little pumpkin-head over on the left is my son.
I would normally have shot this on a Panasonic GX7, but we left the house in a hurry that day, and I forgot to bring it, so I had to resort to my Nexus 5 in panorama mode. I have to say I’m quite pleased with the results — I gave it a slight sharpness bump and a bit of corner vignetting in Snapseed, but otherwise this is as-shot with the phone. Doesn’t hurt that early-evening light in Elora at this time of year is completely magical.
Gabriel Hanna
Bright Red Creep
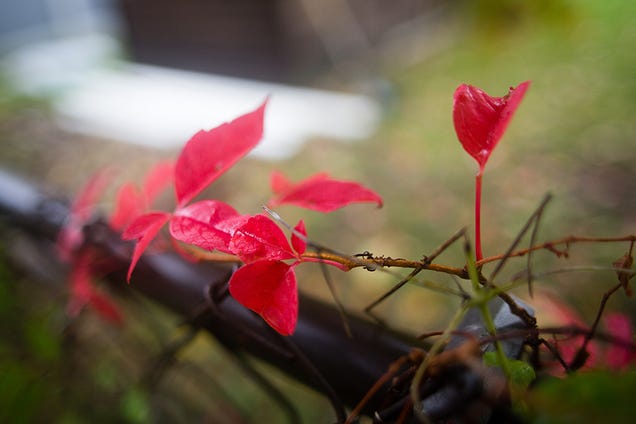
Headed into the backyard after a rainstorm to take a few autumn leaf shots. These bright red leaves creeping over my neighbor’s fence certainly grabbed my attention. Canon EOS 5D MkIII, Sigma 24mm f/1.8 @ f/2.0, 1/125, ISO 125
Tim Heyer
At An Old Military Base

I took this at an old military base (now a small town) a couple of weeks ago in Central Massachusetts. I used my Nikon D7100 with a Tokina 11-16mm lens. I was just shooting upward and kept rotating until I found an interesting perspective. Hope you like it!
Cassaundra Morin
Go Explore
The story behind it is the beauty and colorfulness of fall. Red, orange and green are the colors that rule the image. Red is the symbol of warmth, joy, and passion. Orange is similar to red, but it has more power. Green symbols life, nature and harmony. The combination of these colors create an incredible experience with these stunning details. The best thing about this image is that it is not an artificial effect, you can also find it in the nature. The goal of this image is to make you go out into the nature and find similar beautiful places. So please go and explore your environment! You cannot find more peaceful and amazing place in the world than mother-nature itself especially in the fall…
Kristof Karpati
Dew
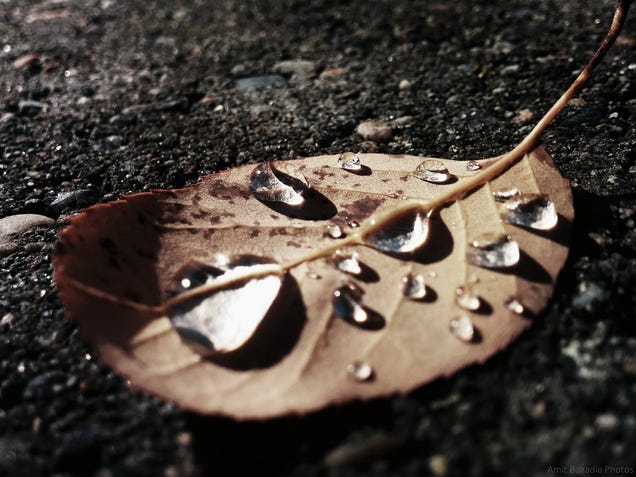
I came to work and saw this leaf sitting on the wall next to the entrance with a few drops of rain/dew. Not having my handy DSLR with me, I whipped out my Nexus 5 and tried to take a close-up picture. On the 2nd try I captured this shot. I then tried a a few filters and the "bleach" filter made the wall stand look bold in the background against the leaf. So I saved it.
Amit Bagadia
Ann Arbor

I took this shot depicting some fallen leaves on a patch of grass on my way back from shooting the foliage in the Nichols Arboretum in Ann Arbor a couple days ago. It was taken with a Sony Alpha NEX-7 and a Sigma 19mm f/2.8 Prime lens, shot in RAW and developed in Adobe Lightroom. Hope you like it!
Jason Contangelo
Mount Seoraksan

This photo was taken on my first trip to Korea in October 2014 at Mount Seoraksan in Sokcho. It was also my first time experiencing leaves changing colors (I am from Hawaii and our leaf colors don’t change during fall).
It was quickly shot on my iPhone 6 with no additional filters applied nor was a tripod used. I saw the branch above me, grabbed it so I could frame the branch properly with the sun behind it, then shot the photo. I am not a photographer, so excuse the poor quality or composition.
Chris Ota
Van Buren National Historic Site

I am not a professional, and I am just getting started into serious photography. I used a Canon EOS Rebel T3i with the Canon EOS IFS 18-55mm Lens with a UV filter. I took in on Sunday 10/19/2014 at the Van Buren National Historic Site in Kinderhook, NY. I touched it slightly with iPhoto. Again, not a professional, but I wanted to submit something. I have a billion shots from that day, but I think this was one of the best. Fall colors with a green backdrop and trees behind it. It just looks fantastic. I have included as an attachment a small file and the original.
Chris Sehne
After the Eclipse

I took this photo using my Canon Rebel SL1 with a 55-250mm lens. I took this photo the morning of October 8th, 2014. After watching the lunar eclipse, I went for a walk on a bike path behind my house to get some leaf pictures.I took about 200 pictures on this walk, but this has to be my favorite. This photo has not been edited.
Caleb Haley
Carried Away

Taken with my Nikon D610 and Nikon 24-70 f2.8. Shot was taken at f/11 and 1/80 sec handheld in my front yard. I had set out to do some macro work, but got carried away just taking snaps of the trees. I was right at the base of the tree for this shot and tried to get the limb at an angle where it’d provide an appealing contrast to the orange/yellow leaves with the blue sky.
Danny Holland
After Rain Showers

I took this photo with my Nikon D3100 with an 18-270 lens on October 22nd, 2014 during a yellow-orange tinted sunset after rain showers. Leaf came from one of the prettiest trees in the city. Taken in Sioux Falls, South Dakota.
Mary Brunick
Technicolor
Multiple exposure on a tripod and combined in Photoshop to extract best color. It’s a Lover’s Leap State Park looking over Lake Lillinonah towards Bridgewater, CT. I went up one day after work to see what I could get with the new camera. Came out pretty well. Fujifilm X-T1, 18-55mm lens.
Carl Keyser
Enchanted Trail

This shot was taken while trail running the 19 mile Enchantment trail in Washington state. Every fall the larches change into this brilliant fiery yellow. The camera was a Panasonic LX7, and the shot was pretty much taken as we were running down towards the lakes.
Zachary Thomson
Spur of the Moment

Taken with an iPhone 6 Plus on the spur of the moment as I left my garage in the morning. Minor editing using Camera+ to bring up the contrast and vibrancy.
Nick Diaz
Santa Fe

Photo taken in Santa Fe Ski Area, Santa Fe, New Mexico
Gerri Reese
Toronto

On holiday visiting family in Toronto, Canada, was out taking family photos by some amazing trees, thought be nice to capture some close ups of the leaves. It had just rained as well leaving some droplets on the leaf for a nice effect.
Tor Harrington
Lincoln Park Zoo
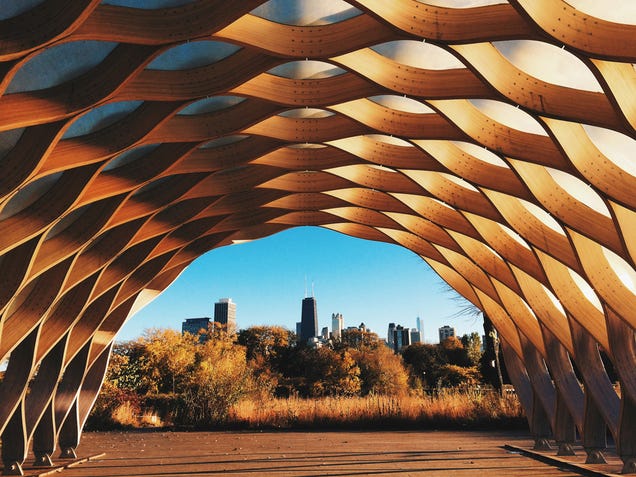
According to the farmer’s almanac, this is the peak week to see fall colors in Chicago, my home city. I knew Lincoln Park would be a great place to take it all in, so I ventured out there and shot this photo today during that golden hour before sunset. The Windy City’s skyline, with the John Hancock in the center, is framed by a wonderful sculpture by Studio Gang Architects on the Nature Boardwalk of Lincoln Park Zoo.
Jenny Lam
My Picture

This is my picture, taken by me.
Todd Harper
Weeping Willows
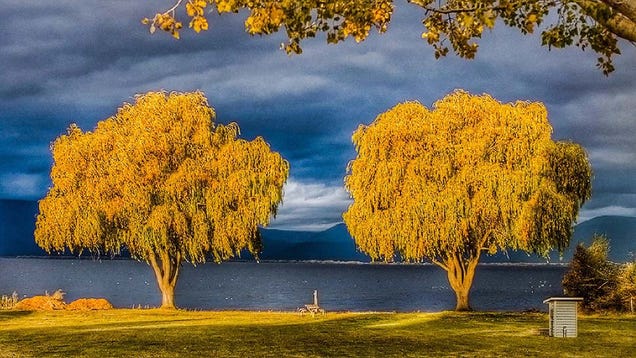
I live on the Upper Klamath Lake, Chiloquin OR. On a dark overcast morning the sun rose out of the southeast and shone brightly on my weeping willows so I quickly grabbed my cannon and snapped the shot. The white spots on the lake are ducks.
James MacPherson
Dinosaur Foot

A nice walk in the nature with some friends in the Netherlands. GH4 with 35-105 canon fd f3.5 ISO640 1/100 sec
Davide Bellotta
Roaring Fork Falls

This is a photo I took of my wife on the trail to Roaring Fork Falls in western NC. My idea of heaven. Unfortunately, this was after the rains and winds that denuded the trees of many of their leaves.
Marcelo Yanes
Blue Mountain

I’m a hot tub repair person in Collingwood Ontario Canada, at the foot of Blue Mountain. Beautiful country, any season. Fall is particularly brilliant tho and I’m constantly looking for the perfect picture.
This one was taken near part of the Bruce Trail, just south of Blue. For me, the colours are breathtaking but what puts it over the top is the form of the branches. To me it’s very evocative of a Mandelbrot set, which of course in some sense it is. I’ve taken a lot of pictures and this is one of my favorites.
Sean Sallows
Lone Soldier

Walking through the woods behind my home.
Jared VanLeuven
Fishing

When fall began, I had this photo in my mind. I tied a pretty leaf to a string and a shot weight, and attached the string to a long stick. I handed the makeshift fishing rod to my 4 year old son, and had him attempt to hold the leaf over my daughter so I could take the picture. There were many instances of crawling away (by both of them!), but after my husband stepped in to help keep my daughter looking upwards, I finally got this shot. Taken with a Nikon D600, 24-70mm, f/2.8, ISO 400, 1/320.
Angel Caracciolo
Rocky Mountain National Park
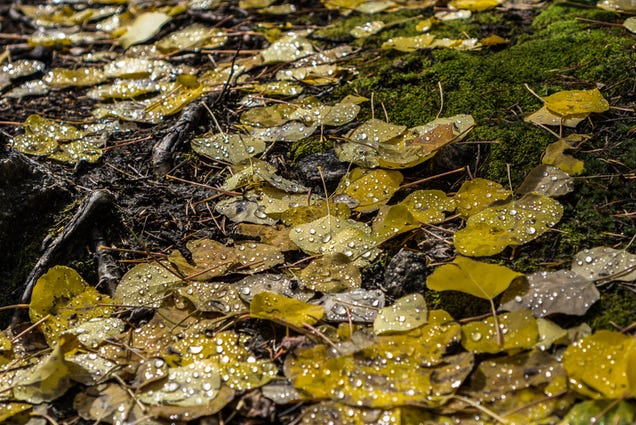
This photo was taken in September in Rocky Mountain National Park. We are midwesterners who head to the hills at every chance we have, and were on one last mountain adventure before our first child is due in November. The weather was great on our trip except for one rainstorm, providing awesome shots of the aspen leaves on the ground, in addition to in the air. Shot with a Sony A6000 with a 35mm F1.8 prime, shot at F/4.
Jordan Chapell
Driveway
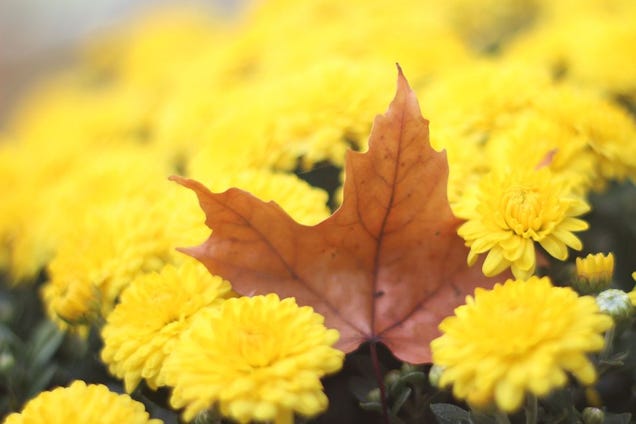
I had gone out to the brick wall at the front of our driveway to try and take some macro photos of a really nice little purple flower sitting on top of the bricks. On my way back inside I noticed this maple leaf sitting on the flowers in the pot on our front porch. I thought this would be a neat photo opportunity. The leaf is exactly as I found it, and I liked the contrasting colours quite a bit.
I shot this with a T3i with a 50mm f1.8 wide open. ISO 100 and a shutter speed of 1/250th. No flash. The shooting I did that day has made me interested in macro photography, so I want to pick up some extension tubes. There is a minimal amount of editing in PaintShop Pro X6, just and auto colour, and maybe some light sharpening.
Stephen Nelson
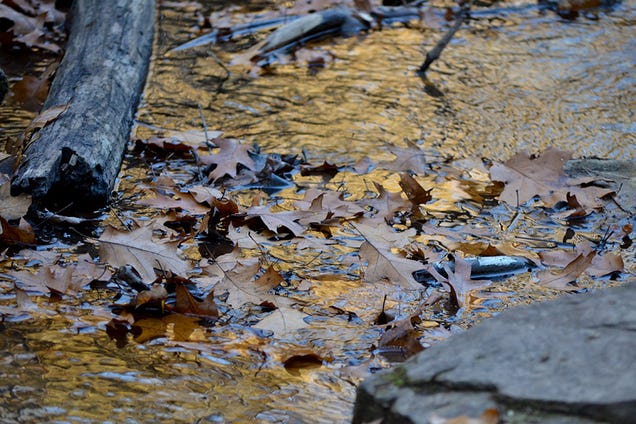
Leaves In a Puddle
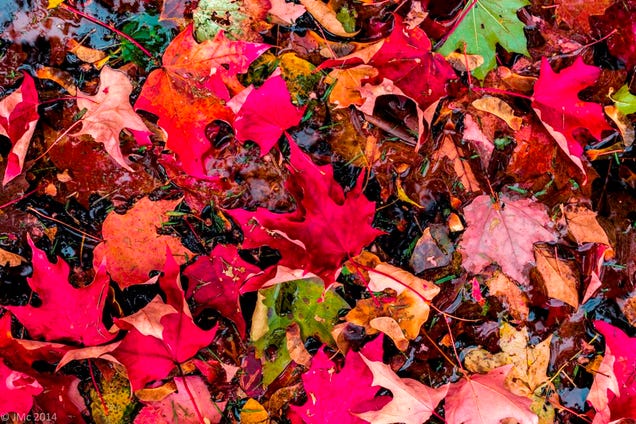
Picture was taken while walking through my neighborhood during an overcast day. It had rained previously so I was looking for downed leaves to take pictures of. I came across this cluster of leaves in a puddle in a park. It was shot using a Canon 6D camera with a 500MM f/1.4 USM lens. I took the picture using Aperture mode at f16 at 1/30 sec. with Auto white balance. Landscape picture style, evaluative metering and ISO 400 was used. It was shot in RAW format(is there really any other way to shoot?) and processed in Lightroom 5.6. This was one of a series taken that day celebrating the fall.
John McNamara
On the Hillside

Shot in Aspen Colorado 3 weeks ago, a few days after the first snow of the season. Saw this hillside on a drive and had to stop! Used Canon 5D Mark III with 70-200 F2.8
Abe Kislevitz
From The Bell Tower

Canon Rebel T2i, settings automatic, shot on October 17th, 2014 from the bell tower at the National Shrine of the Divine Mercy, Stockbridge, MA.
Mark Fanders
Bend

I’ve been doing a bit of traveling this autumn season for the sole purpose of capturing the leaves. I got a lot of cool shots, but this one (which was taken just a few weeks ago) seemed extra cool to me. I’ve never seen a leaf do this! I found it balancing one day on the edge of our deck all by itself and was able to capture it before a breeze came and took it away. I hope you guys find it as cool as I do! This was shot with my Canon Rebel SL1 fitted with the 40mm pancake lens (the shorty forty). A little bit of post work was done just to get the colors right—otherwise, that’s it!
Armont van Dyck
Frosted

This was shot Sunday morning at around 8, with a Canon EOS Rebel XSI with the kit 18-55mm lens. This shot was taken at 55m, with ISO 200, with a shutter speed of 1/125, and f/5.6
Tyler Triemstra
Melbourne

I live in Melbourne, Australia, where seasons are the opposite of what happens in the northern hemisphere and due to the highly variable weather conditions in Melbourne it is not easy to find definite transitions between the seasons. However, each year the autumn pays a visit to Melbourne too. I captured these photos during my early morning walk in a beautiful rainy day in May 2014.
Reza Marzooghi
Droplet Leaf

I called it Droplet Leaf (not very imaginative I know) I chose to photograph it because the dew had beaded beautifully on it and looked quite refreshing. I used a Sony Alpha 6000 with a Sony 35mm prime lens at f1.8, 1/640 of a sec exposure, ISO 100. Camera was hand held over the subject.
Daryl Jewell
New River
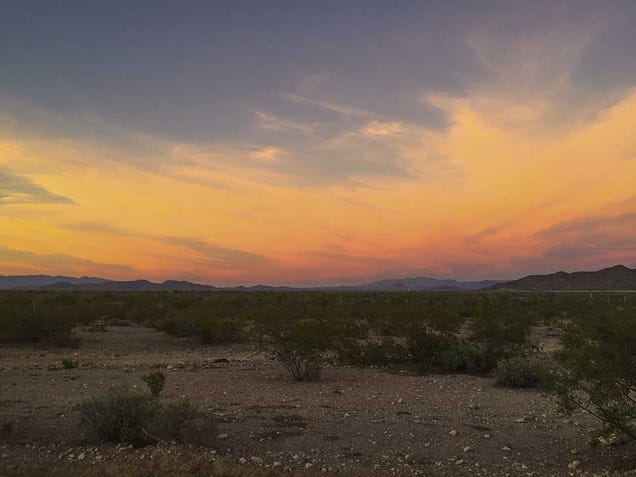
In Arizona, we don’t get much in the way of fall colors, or leaves, for that matter. But we do get our share of amazing color. This probably doesn’t qualify for the challenge, but I thought I’d submit it anyway. Taken with my iPhone 6 while riding in the New River, WA, in the far northwest Phoenix area, just south of Lake Pleasant.
Dave Reuss
Unharmed

The leaf was harmed in the making of this picture 🙂 [Ed note: well, sort of.]
Hans van der Kruijf
Door County
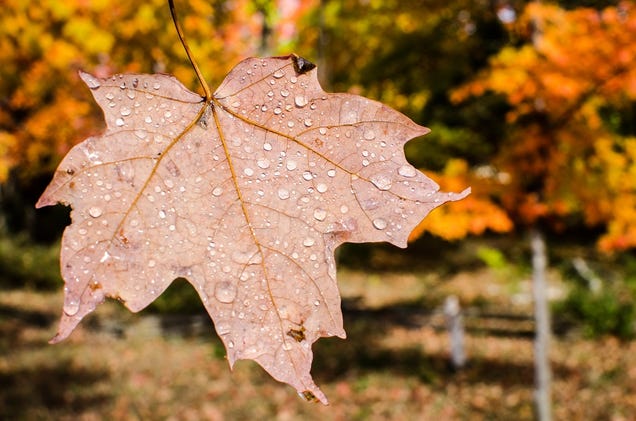
This photo was taken in Door county, WI which has become my fall destination for the past 4-5 years. This is my 3rd submission to Fall Photo contest to Gizmodo in 4 years.
It had rained in the morning and I found this leaf had water droplets that were visible in the afternoon sun. Thought of taking it with a fall color background and the resulting image. Taken using Nikon D7000 and a 35mm f/1.8 lens.
Deepak Sundar
Veteran’s Park

This classic reflective image was taken at Veteran’s Park in Mentor, Ohio during a beautiful fall hike. Veteran’s Park is part of Lake Metropark’s. My favorite images to shoot are reflective. I used a Cannon T3i, 18-55mm Canon lens, Iso 800, F 6.3, shutter speed 1/2000, focal length 40.
Angie Simone
On the Patio
Looking out a back window in Vermont earlier this month I saw this leaf lying in between the slats on the patio. It just landed there. Amazing how leaves can fall in perfect little places. This is an iPhone 5 photo.
Kasy Prendergast
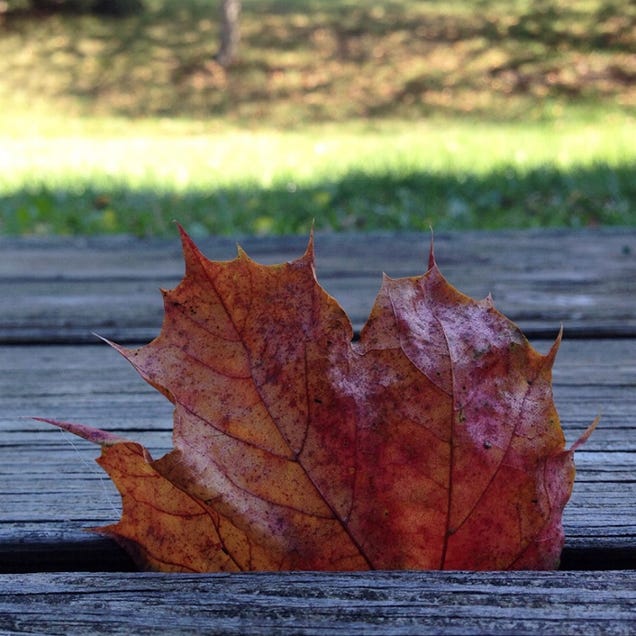
One Of The Four Most Interesting Seasons Of The Year
Fall being one of the most interesting seasons of the year, I visited Door county during its peak and got hold of beautiful scenery around.
Clicked few interesting snaps and found these two beautiful maple couple leaves as I state, holding onto the branch tightly is the one which is close to my heart.
Sumeet Sindagi
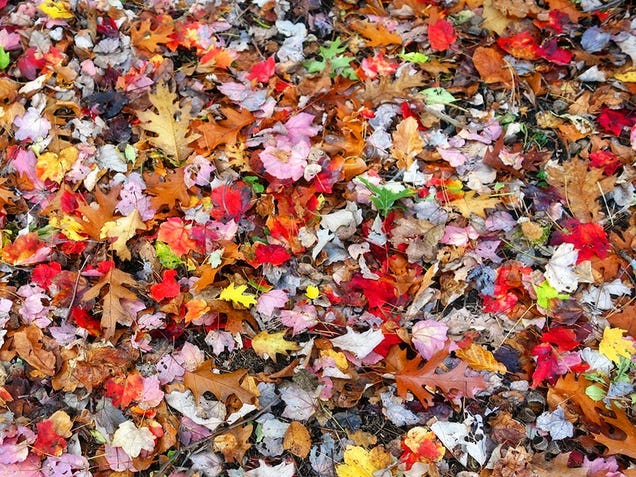
Rainbow

Shot with Nikon D3200 and its kit lens. Leaves gathered on an Autumn walk with my wife in Kansas City. She was determined to collect leaves from every color of the rainbow. She was the inspiration behind this photo.
Dustin Sharp
Shih Tzu

Taken with Samsung GalaxyS3. Buried in these leaves, you’ll find my Shih Tzu hiding. Can you find her? Follow her adventures on Instagram #lifewithtayter . Hope you like it!
Jocelyn Schell
Oyster Bay
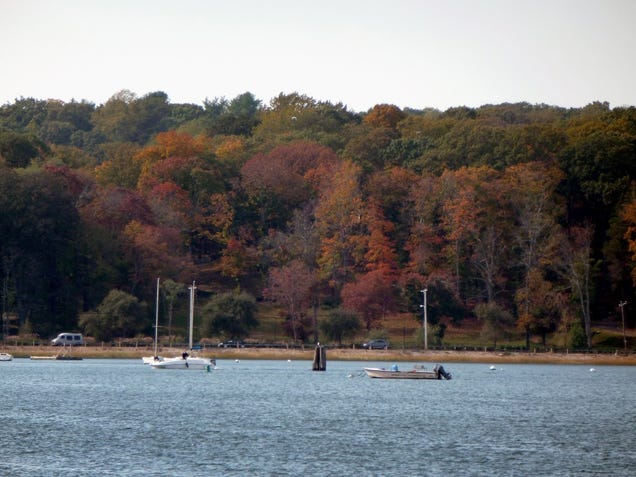
This year’s Fall contest came a little early for my area of NY, with many of the leaves not at their peak of color yet. This image was captured across Oyster Bay Harbor, of the trees above Shore Road. This road, which was closed for months after Hurricane Sandy, is open now.
Jonas Demuro
The Grace of the Fallen
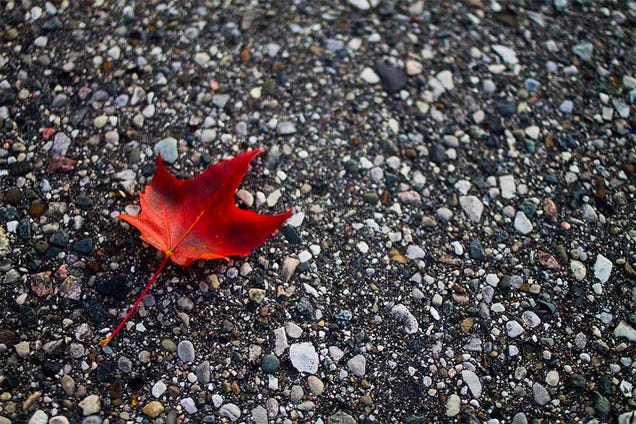
This picture was taken at Stony Creek MetroPark in Michigan, on 5 Oct, 2014. This one leaf with its deep orange-red color caught my eye and the grey background helped to bring out the colors in a more deep manner. I started to think about it as the grace with which a part of nature falls/fades away. I would like to title this picture as ‘The Grace of the Fallen’.
Pavana Kumar
Droplets

I took this photo on Sunday 19th October on Verulamium Park behind the cathedral in St Albans, UK. It has been the usual wind and rain overnight the previous night.
I was running around with my 21 month old son Daniel. Just stopping for a second, I looked down and saw the leaf. The sky was overcast above me but a bit brighter in front of me which lit up the droplets on the leaf. It looked fantastic. I only had my iPhone 5S with me, so I used that to take the photo.
David Burrows
The Fallen
Massachusetts, Fall 2014. Sony RX100 M2; ISO 200; f/2.8; 1/100 s.
Costas Kitsos
East Dorset

No tripod no nothing- just an impromptu shot taken while waiting for a couple other people to get ready, just wandering around the yard with my dog. Taken Columbus Day weekend (10/12) up at my house in Dorset, VT. Taken late morning looking east towards East Dorset. Just a perfect fall morning- about 70 degrees and was about to head out for a long drive/hike in search of the perfect foliage shot— hard to beat this view from the top of my driveway though! Day before was horrible, cold/rainy and windy. Drove for about 5 hours day before/day of and after 500+ photos this one was near perfect for its nice contrast of sky/colors with some scattered clouds. Granted I did some minor saturation work but frankly even the raw jpeg has fabulous colors (happy to provide that instead).
Charles Macintosh
Canada Represents

I decided to represent a Canadian submission with a photo of a maple leaf for this week’s photo challenge. This image was taken during a hike at the Kortright Centre for Conservation in Woodbridge, Ontario. This particular leaf caught my eyes as it popped up against others with its interesting pattern of colours.
Kelly Seto
The Berkshires

While walking along a rail trail in the Berkshires, I noticed a section in the canopy that displayed a full spectrum of colors. It was absolutely stunning so I pointed my Nexus 5 straight up at it. I had a DSLR with a16-35mm with me, but the phone camera pulled the canopy closer and captured the image the way I envisioned it. Sometimes it’s not about the image quality, but how you frame your subject.
Caitlin Tam
Vermont
This was taken in Vermont over Columbus Day weekend during a family foliage excursion. Struggled with choosing the optimal submission out of the cache taken, particularly with targeting shallower depth of field on isolated foliage ‘sprays’ versus more traditional landscapes. Settled on the image below as embodying the trifecta of chromatic harmony, clarity, and fall essence. ‘Essence’ in the creeping, brilliant encroachment of transition on the heady youth of summer, with the promise of uncertain winter lurking around the bend. Looking forward to seeing the other submissions and thanks!
Michelle Nichols
Stephen’s Falls
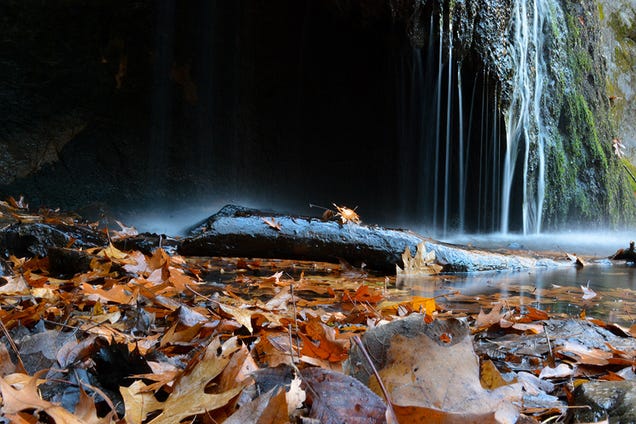
This photo was taken at Stephen’s Falls in the Governor Dodge State Park (Dodgeville, WI) in the evening of October 25th. Even though I went hunting for fall color leaves, most of the leaves have fallen already in the Madison ,WI area where I live. But this water fall with all of the fall leaves on the ground gave me an opportunity for a photo that I liked.
Chamath Guneratne
Smoke On The Water And Fire On The Trees

Taken not too far away from my office building in Michigan on a cold morning last week. When the pond water is still warm, there is often an interesting steam-like effect that emerges.
Brandon Satanek
The High 70s

My name is Kirk Davis. I hope you all understand how hard it is too get a good fall shot in Atlanta, GA when we’re in the high 70’s but I got one. I was testing out my new lens at the time.
Kirk Davis
Boo

Late afternoon here in Gloucester, Ma, the light this time of year is low and intense… everything seems to glow.
Shot this leaf and as i was processing it, became aware of the unique shadow… and with halloween approaching, i decided to have some fun with it. So, boo!
Charlie Carroll
Trio

We noticed these leaves while taking some photos of our daughter. Leaves haven’t begun changing much around here yet, but I think this shot came out OK.
Kyle Spaans
Ohio State University

I took this photo on campus at The Ohio State University. I thought the cloudless sky gave a great stark contrast between the blue and colors of fall. Used a Sony NEX5T, with a 35mm f1.8 prime lens, edited in Lightroom.
Devin Cheek
Presque Isle

My wife, son, and I were walking a nature trail in Presque Isle, WI this September and I decided to look straight up. Shot with a Canon S110 in HDR mode.
Jeff Thelen
Governor Dodge State Park
I took this photo while out enjoying a crisp fall day with my husband at Governor Dodge State Park.
Shiranthi Wickramasinghe
On Ice

For this challenge, I found a few leaves and froze them in a thin layer of ice. Then, I put the ice over a makeshift light table to backlight the ice and leaf. The idea came from an article on Digital Camera World.
Christopher Sears
On the Bark

Shot with my Galaxy S5, then tweaked in Snapseed. More and more, my phone has been my go-to for photos… I came across this at a local park here in Kansas. I have no idea if someone placed this leaf on the tree trunk, or if it was blown by the wind and somehow became stuck, but I thought it would make for a great photo! Enjoy!
Kurt Gaulke
Pumpkins
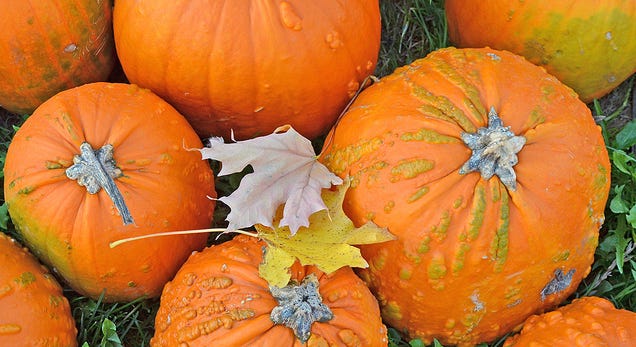
No description given.
Jacques Surveyer
Public Garden

This was taken at the Public Garden in Boston right before sunset. Canon t3i, 18-200 ƒ/3.5-5.6 @18/3.5 1/60"
Katie Fennel
Green Holdouts

There was a lawn evenly covered in fallen leaves, edge to edge. I stood up on a bench and got the camera as high as possible to get as much of the leafy area as possible in the frame.
Nathan Fennel
Japanese Maple

I have an interest in macro photography and was aiming to both develop my skill and capture the detail and colour of autumn from a different perspective which is necessary where I live in Norway (Bergen although originally from the UK) as autumn tends to be extremely wet, dark and dreary. I picked a single leaf from a lace-leaf Japanese maple and froze this in a thin layer of water. This was shot against a black background to generate a monotone setting interspersed with frozen air bubbles. The leaf was lit with a 100W light source positioned to the side.
Mathew Edenbrow
Largo Springs

The Fall color in Michigan has been phenomenal this season, but when I went out to shoot it this past weekend at Largo Springs (near Tawas) it seemed like it was about a week too late. Much of the color had faded, and on top of that it was a chilly, rainy day too. So rather than concentrate on the trees, I looked down and saw several leaves that had raindrops which made for a great macro view of the season. This was shot with the Olympus OMD EM-1 body and Olympus 60mm macro lens. Because it was quite dark in the forest I had to crank up to ISO to 3200 which gave me settings of 1/60 at F10 in the natural light.
John Clark
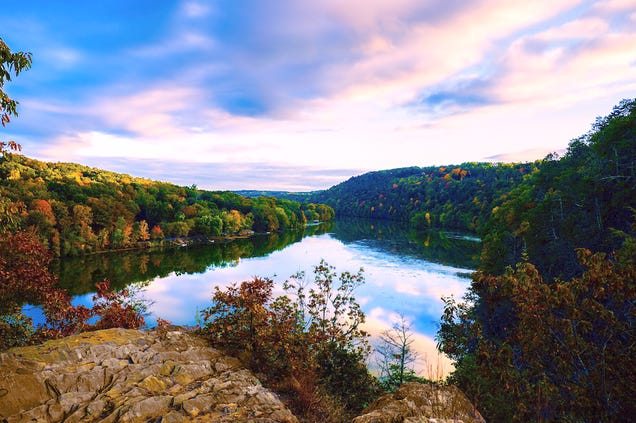
Cooling Pond

The area where this was taken was originally a cooling pond for a lead smelter at the turn of the 20th Century. It is now a peaceful and beautiful residential area that is a popular area for walkers and joggers. You are seeing the colorful trees across the lake reflected on the surface of the water. There were countless photo opportunities, but this is one of my favorites.
John Locus
Kensington Park

I happend to find an amazing spot at Kensington Park, along the road leading to island lake. Michigan is an amazing place to be in the fall, the colors displayed in the fall make putting up with the winters worth it. This photo was taken in the 2nd weekend of October during the golden hour.
Josh Young
So many wonderful photos! For those of you in search of a new wallpaper, the high resolution shots are over on flickr.
via Gizmodo
76 Stunning Photos Of Fall Leaves