The next Laravel Worldwide Meetup is tomorrow

The next Laravel Worldwide Meetup is tomorrow

https://ift.tt/3j9AHZG

The next Laravel Worldwide Meetup is coming tomorrow, at 18:00 UTC, and you’ll be able to watch it live on the YouTube Channel.

The post The next Laravel Worldwide Meetup is tomorrow appeared first on Laravel News.


Join the Laravel Newsletter to get Laravel articles like this directly in your inbox.

programming

via Laravel News https://ift.tt/14pzU0d

September 28, 2020 at 10:25AM

Making a Flywheel Trebuchet

Making a Flywheel Trebuchet

https://ift.tt/3mT83yp

Making a Flywheel Trebuchet

Link

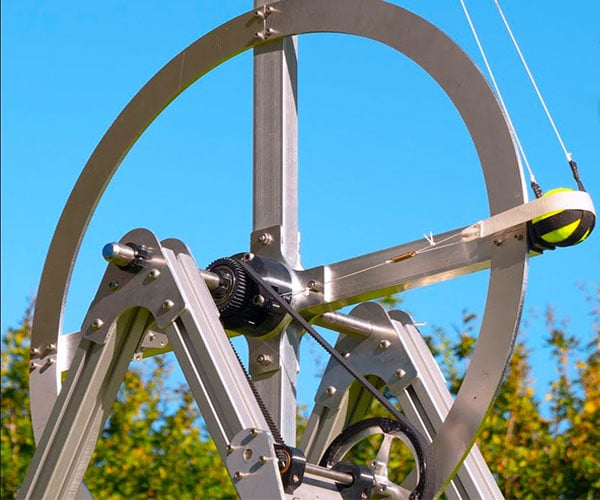
Engineer Tom Stanton is fascinated by the way in which flywheels can store up energy as they’re spun up to speed. In this clip, he combines a flywheel mechanism with a sturdy aluminum trebuchet, creating a durable machine that can toss a tennis ball at fast as 180 mph.

fun

via The Awesomer https://theawesomer.com

September 28, 2020 at 11:00AM

Laravel 8 Jetstream Livewire CRUD with Tailwind CSS Tutorial

Laravel 8 Jetstream Livewire CRUD with Tailwind CSS Tutorial

https://ift.tt/3n53H7x


Now, let’s see article of laravel 8 livewire crud example. This tutorial will give you simple example of laravel 8 livewire crud with jetstream & tailwind css. i would like to show you laravel 8 livewire crud with modal. We will look at example of laravel 8 jetstream livewire crud application example.

In this example i will show you step by step laravel 8 livewire crud app with modal tailwind css.

Laravel 8 jetstream designed by Tailwind CSS and they provide auth using livewire and Inertia. i will show you how to create module with livewire on default jetstream auth in laravel 8.

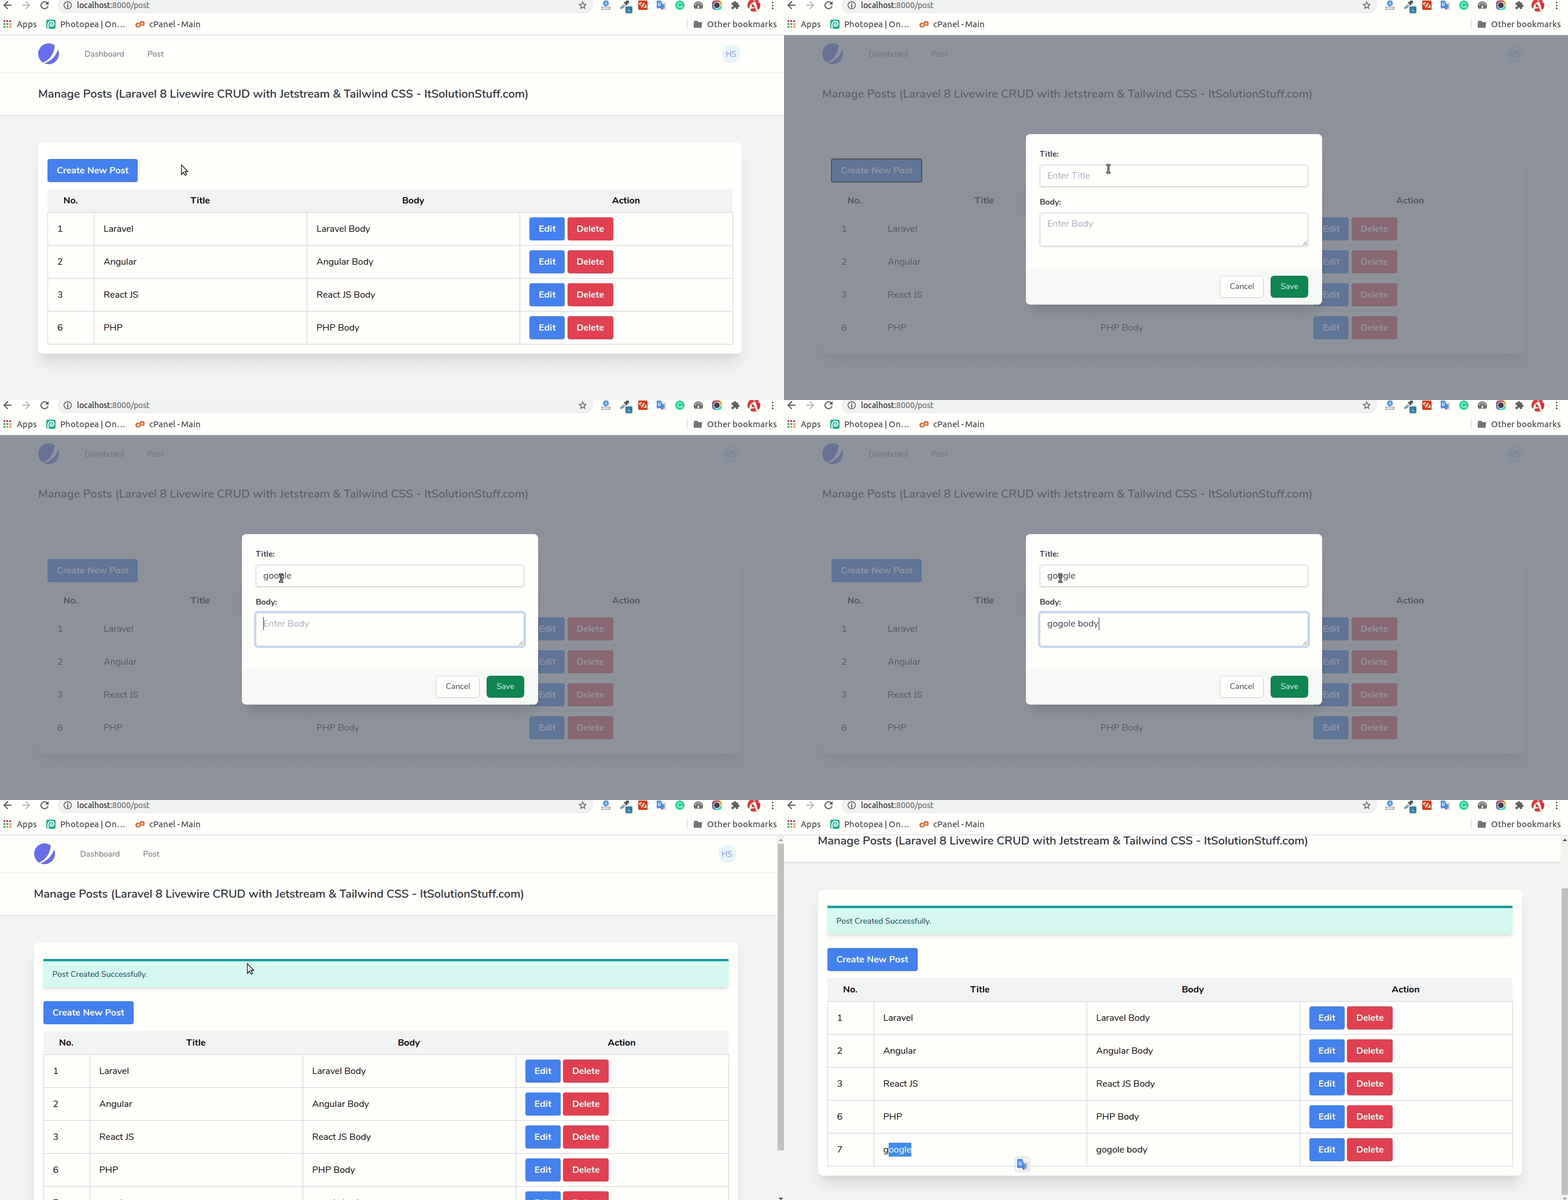
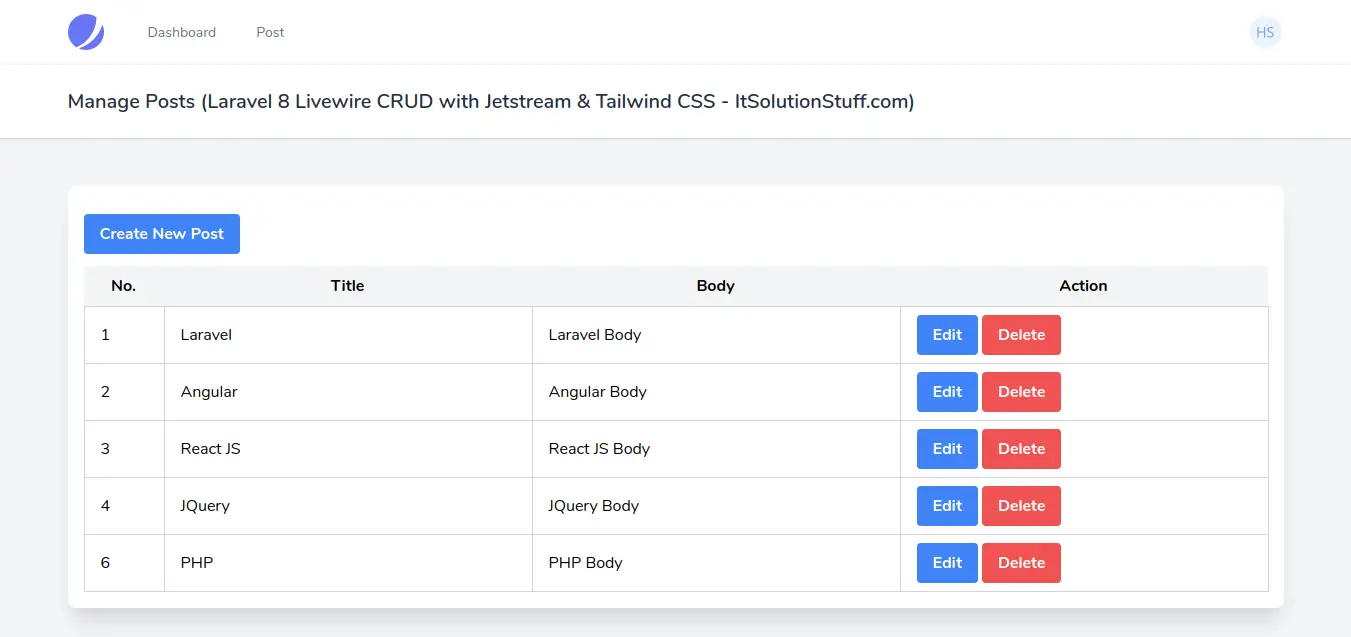
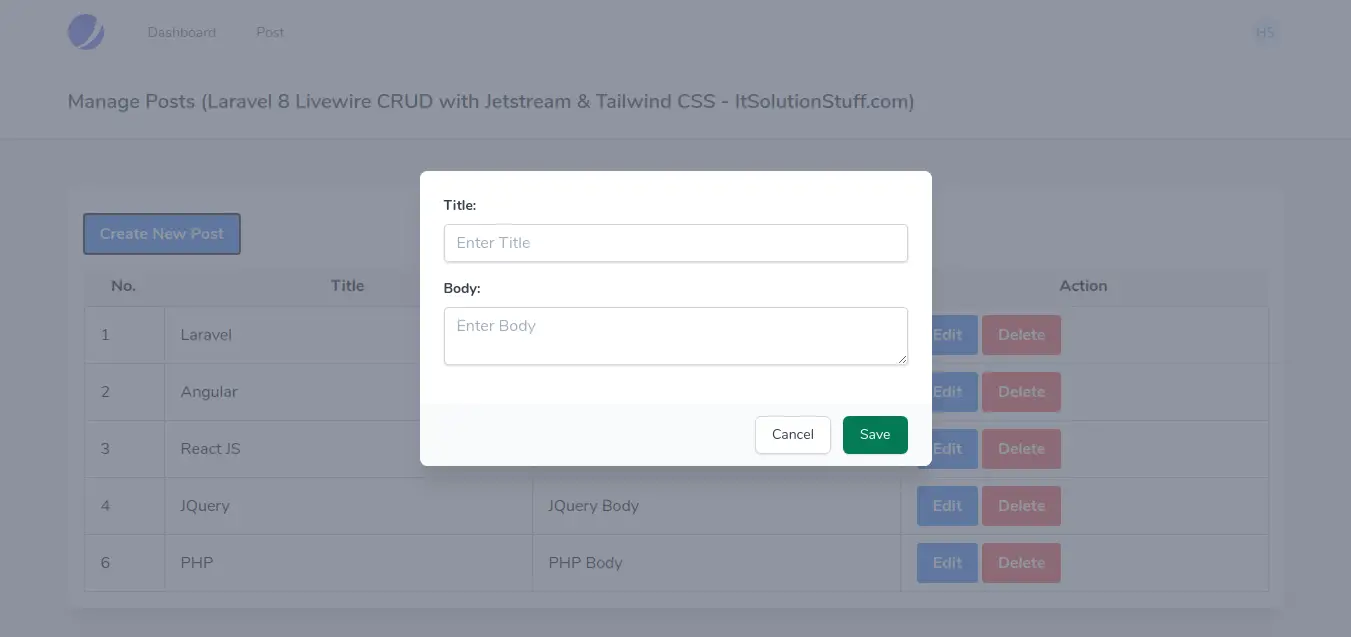
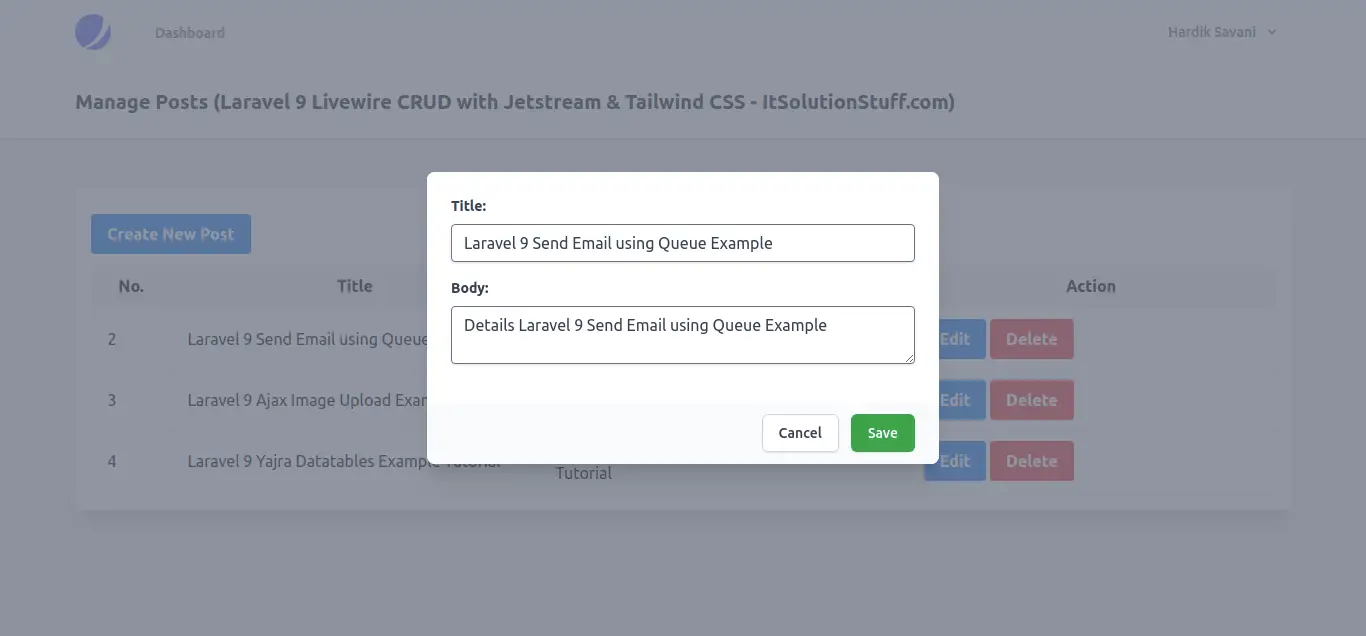
Here, bellow i written step by step, so you can easily start simple post master with your existing step up of laravel 8 jetstream auth with tailwind css. you just need to follow few bellow step and you will get layout as like bellow:

Preview:
List View:
Create View:
Update View:
Step 1: Install Laravel 8

here, we need to install laravel 8 application using composer command.

composer create-project --prefer-dist laravel/laravel blog

Step 2: Create Auth with Jetstream Livewire

Now, in this step, we need to use composer command to install jetstream, so let’s run bellow command and install bellow library.

composer require laravel/jetstream

now, we need to create authentication using bellow command. you can create basic login, register and email verification. if you want to create team management then you have to pass addition parameter. you can see bellow commands:

php artisan jetstream:install livewire

Now, let’s node js package:

npm install

let’s run package:

npm run dev

now, we need to run migration command to create database table:

php artisan migrate

Step 3: Create Migration and Model

Here, we need create database migration for files table and also we will create model for files table.

php artisan make:migration create_posts_table

Migration:

<?php

use Illuminate\Database\Migrations\Migration;

use Illuminate\Database\Schema\Blueprint;

use Illuminate\Support\Facades\Schema;

class CreatePostsTable extends Migration

{

/**

* Run the migrations.

*

* @return void

*/

public function up()

{

Schema::create('posts', function (Blueprint $table) {

$table->id();

$table->string('title');

$table->text('body');

$table->timestamps();

});

}

/**

* Reverse the migrations.

*

* @return void

*/

public function down()

{

Schema::dropIfExists('posts');

}

}

php artisan migrate

now we will create Post model by using following command:

php artisan make:model Post

App/Models/Post.php

<?php

namespace App\Models;

use Illuminate\Database\Eloquent\Factories\HasFactory;

use Illuminate\Database\Eloquent\Model;

class Post extends Model

{

use HasFactory;

/**

* The attributes that are mass assignable.

*

* @var array

*/

protected $fillable = [

'title', 'body'

];

}

Step 3: Create Post Component

Now here we will create livewire component using their command. so run bellow command to create post crud application component.

php artisan make:livewire posts

Now they created fies on both path:

app/Http/Livewire/Posts.php

resources/views/livewire/posts.blade.php

Step 4: Update Component File

Here, we will write render(), create(), openModal(), closeModal(), resetInputFields(), store(), edit() and delete() method for our crud app.

So, let, update following file.

app/Http/Livewire/Post.php

<?php

namespace App\Http\Livewire;

use Livewire\Component;

use App\Models\Post;

class Posts extends Component

{

public $posts, $title, $body, $post_id;

public $isOpen = 0;

/**

* The attributes that are mass assignable.

*

* @var array

*/

public function render()

{

$this->posts = Post::all();

return view('livewire.posts');

}

/**

* The attributes that are mass assignable.

*

* @var array

*/

public function create()

{

$this->resetInputFields();

$this->openModal();

}

/**

* The attributes that are mass assignable.

*

* @var array

*/

public function openModal()

{

$this->isOpen = true;

}

/**

* The attributes that are mass assignable.

*

* @var array

*/

public function closeModal()

{

$this->isOpen = false;

}

/**

* The attributes that are mass assignable.

*

* @var array

*/

private function resetInputFields(){

$this->title = '';

$this->body = '';

$this->post_id = '';

}

/**

* The attributes that are mass assignable.

*

* @var array

*/

public function store()

{

$this->validate([

'title' => 'required',

'body' => 'required',

]);

Post::updateOrCreate(['id' => $this->post_id], [

'title' => $this->title,

'body' => $this->body

]);

session()->flash('message',

$this->post_id ? 'Post Updated Successfully.' : 'Post Created Successfully.');

$this->closeModal();

$this->resetInputFields();

}

/**

* The attributes that are mass assignable.

*

* @var array

*/

public function edit($id)

{

$post = Post::findOrFail($id);

$this->post_id = $id;

$this->title = $post->title;

$this->body = $post->body;

$this->openModal();

}

/**

* The attributes that are mass assignable.

*

* @var array

*/

public function delete($id)

{

Post::find($id)->delete();

session()->flash('message', 'Post Deleted Successfully.');

}

}

Step 5: Update Blade Files

Here, we will update following list of files for our listing page, create page.

So, let’s update all the files as bellow:

resources/views/livewire/posts.blade.php

<x-slot name="header">

<h2 class="font-semibold text-xl text-gray-800 leading-tight">

Manage Posts (Laravel 8 Livewire CRUD with Jetstream & Tailwind CSS - ItSolutionStuff.com)

</h2>

</x-slot>

<div class="py-12">

<div class="max-w-7xl mx-auto sm:px-6 lg:px-8">

<div class="bg-white overflow-hidden shadow-xl sm:rounded-lg px-4 py-4">

@if (session()->has('message'))

<div class="bg-teal-100 border-t-4 border-teal-500 rounded-b text-teal-900 px-4 py-3 shadow-md my-3" role="alert">

<div class="flex">

<div>

<p class="text-sm"></p>

</div>

</div>

</div>

@endif

<button wire:click="create()" class="bg-blue-500 hover:bg-blue-700 text-white font-bold py-2 px-4 rounded my-3">Create New Post</button>

@if($isOpen)

@include('livewire.create')

@endif

<table class="table-fixed w-full">

<thead>

<tr class="bg-gray-100">

<th class="px-4 py-2 w-20">No.</th>

<th class="px-4 py-2">Title</th>

<th class="px-4 py-2">Body</th>

<th class="px-4 py-2">Action</th>

</tr>

</thead>

<tbody>

@foreach($posts as $post)

<tr>

<td class="border px-4 py-2"></td>

<td class="border px-4 py-2"></td>

<td class="border px-4 py-2"></td>

<td class="border px-4 py-2">

<button wire:click="edit()" class="bg-blue-500 hover:bg-blue-700 text-white font-bold py-2 px-4 rounded">Edit</button>

<button wire:click="delete()" class="bg-red-500 hover:bg-red-700 text-white font-bold py-2 px-4 rounded">Delete</button>

</td>

</tr>

@endforeach

</tbody>

</table>

</div>

</div>

</div>

resources/views/livewire/create.blade.php

<div class="fixed z-10 inset-0 overflow-y-auto ease-out duration-400">

<div class="flex items-end justify-center min-h-screen pt-4 px-4 pb-20 text-center sm:block sm:p-0">

<div class="fixed inset-0 transition-opacity">

<div class="absolute inset-0 bg-gray-500 opacity-75"></div>

</div>

<!-- This element is to trick the browser into centering the modal contents. -->

<span class="hidden sm:inline-block sm:align-middle sm:h-screen"></span>​

<div class="inline-block align-bottom bg-white rounded-lg text-left overflow-hidden shadow-xl transform transition-all sm:my-8 sm:align-middle sm:max-w-lg sm:w-full" role="dialog" aria-modal="true" aria-labelledby="modal-headline">

<form>

<div class="bg-white px-4 pt-5 pb-4 sm:p-6 sm:pb-4">

<div class="">

<div class="mb-4">

<label for="exampleFormControlInput1" class="block text-gray-700 text-sm font-bold mb-2">Title:</label>

<input type="text" class="shadow appearance-none border rounded w-full py-2 px-3 text-gray-700 leading-tight focus:outline-none focus:shadow-outline" id="exampleFormControlInput1" placeholder="Enter Title" wire:model="title">

@error('title') <span class="text-red-500"></span>@enderror

</div>

<div class="mb-4">

<label for="exampleFormControlInput2" class="block text-gray-700 text-sm font-bold mb-2">Body:</label>

<textarea class="shadow appearance-none border rounded w-full py-2 px-3 text-gray-700 leading-tight focus:outline-none focus:shadow-outline" id="exampleFormControlInput2" wire:model="body" placeholder="Enter Body"></textarea>

@error('body') <span class="text-red-500"></span>@enderror

</div>

</div>

</div>

<div class="bg-gray-50 px-4 py-3 sm:px-6 sm:flex sm:flex-row-reverse">

<span class="flex w-full rounded-md shadow-sm sm:ml-3 sm:w-auto">

<button wire:click.prevent="store()" type="button" class="inline-flex justify-center w-full rounded-md border border-transparent px-4 py-2 bg-green-600 text-base leading-6 font-medium text-white shadow-sm hover:bg-green-500 focus:outline-none focus:border-green-700 focus:shadow-outline-green transition ease-in-out duration-150 sm:text-sm sm:leading-5">

Save

</button>

</span>

<span class="mt-3 flex w-full rounded-md shadow-sm sm:mt-0 sm:w-auto">

<button wire:click="closeModal()" type="button" class="inline-flex justify-center w-full rounded-md border border-gray-300 px-4 py-2 bg-white text-base leading-6 font-medium text-gray-700 shadow-sm hover:text-gray-500 focus:outline-none focus:border-blue-300 focus:shadow-outline-blue transition ease-in-out duration-150 sm:text-sm sm:leading-5">

Cancel

</button>

</span>

</form>

</div>

</div>

</div>

</div>

Step 6: Add Route

In third step, we will create routes for multiple file upload. so create two route with GET and POST route example.

routes/web.php

<?php

use Illuminate\Support\Facades\Route;

use App\Http\Livewire\Posts;

/*

|--------------------------------------------------------------------------

| Web Routes

|--------------------------------------------------------------------------

|

| Here is where you can register web routes for your application. These

| routes are loaded by the RouteServiceProvider within a group which

| contains the "web" middleware group. Now create something great!

|

*/

Route::get('post', Posts::class);

Now you can run your application by bellow command:

php artisan serve

now you can run app and login as user, then you can open bellow url:

//localhost:8000/post

now it’s works…

I hope it can help you…

programming

via Laravel News Links https://ift.tt/2dvygAJ

September 27, 2020 at 07:12PM

An alternative to the Death Penalty I would not mind.

An alternative to the Death Penalty I would not mind.

https://ift.tt/2EDCur6

Reader It’s Just Boris made this comment:

On the other hand, I also don’t believe a government should routinely be in the business of deliberately and purposefully putting its own citizens to death.

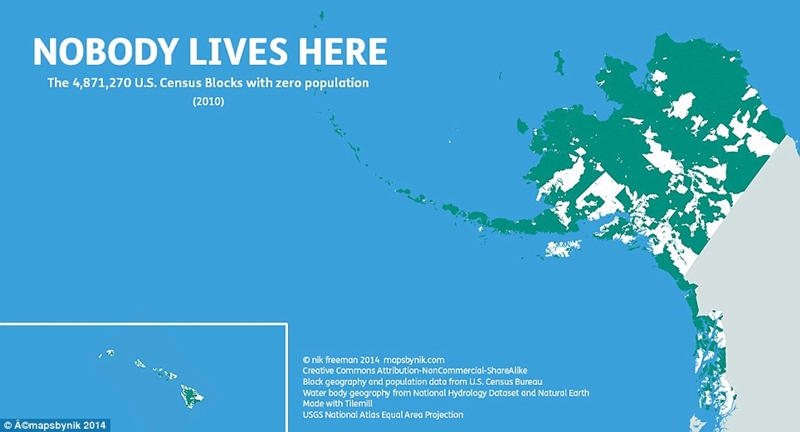
And what if there was a way that we could deal with human predators deserving the death penalty that did not involve the government killing or the families affected? I believe I have the answer: Alaska.

I believe that the green areas are probably millions upon millions of acres of pure and pristine nature, untouched by civilization. My idea is to grab all those on death row and during the Spring in Alaska, drop them in the middle of the north green area with clothes on their back, a box of waterproof matches and a knife.  The idea is to let the human predator make his living among nature’s predators and Mother Nature itself. The convict will have a nice huge tattoo across his forehead as a warning label for others that he is a bad guy and the admonition that if my the miracle of God, they manage to reach hamlet, village, town or city, the Federal government will pay a bounty of $100,000 for his dead ass.

We don’t have to kill them, but sure as hell we don’t have to give them a roof, 3 hot ones plus dental and medical.

Just an idea.


guns

via https://gunfreezone.net

September 25, 2020 at 10:47AM

Selling a startup can come with an emotional cost

Selling a startup can come with an emotional cost

https://ift.tt/3hX8iES

Every founder dreams of building a substantial company. For those who make it through the myriad challenges, it typically results in an exit. If it’s through an acquisition, that can mean cashing in your equity, paying back investors and rewarding long-time employees, but it also usually results in a loss of power and a substantially reduced role.

Some founders hang around for a while before leaving after an agreed-upon time period, while others depart right away because there is simply no role left for them. However it plays out, being acquired can be an emotional shock: The company you spent years building is no longer under your control,

We spoke to a couple of startup founders who went through this experience to learn what the acquisition process was like, and how it feels to give up something after pouring your heart and soul into building it.

Knowing when it’s time to sell

There has to be some impetus to think about selling: Perhaps you’ve reached a point where growth stalls, or where you need to raise a substantial amount of cash to take you to the next level.

For Tracy Young, co-founder and former CEO at PlanGrid, the forcing event was reaching a point where she needed to raise funds to continue.

After growing a company that helped digitize building plans into a $100 million business, Young ended up selling it to Autodesk for $875 million in 2018. It was a substantial exit, but Young said it was more of a practical matter because the path to further growth was going to be an arduous one.

“When we got the offer from Autodesk, literally we would have had to execute flawlessly and the world had to stay good for the next three years for us to have the same outcome,” she said at a panel on exiting at TechCrunch Disrupt last week.

“As CEO, [my] job is to choose the best path forward for all stakeholders of the company — for our investors, for our team members, for our customers — and that was the path we chose.”

For Rami Essaid, who founded bot mitigation platform Distil Networks in 2011, slowing growth encouraged him to consider an exit. The company had reached around $25 million run rate, but a lack of momentum meant that shifting to a broader product portfolio would have been too heavy a lift.

technology

via TechCrunch https://techcrunch.com

September 23, 2020 at 01:28PM

Todoist’s new Boards feature is a better-looking Trello

Todoist’s new Boards feature is a better-looking Trello

https://ift.tt/3iRVGA9

Todoist is consistently one of our favorite to-do apps. The company is pretty good about releasing useful updates, and today it’s adding a Boards feature that should make it even easier to organize and visualize your tasks and projects.

The Boards format makes Todoist look a whole lot like Trello, another one of our favorite project management apps. The feature lets you view tasks as cards, and you can drag the cards horizontally into customizable categories. If you’re not totally sold on the format, you can switch projects back and forth between cards and traditional lists as you work.

Todoist Boards
Todoist

Todoist’s Boards are rolling out now. If you don’t see the option immediately, it should appear in a day or two. Todoist hopes the new format will help you better visualize projects and collaborate with team members. The feature could be especially useful for teams working remotely.

geeky,Tech,Database

via Engadget http://www.engadget.com

September 23, 2020 at 12:57PM

Here’s Everything New You Can Do With an IFTTT Pro Subscription

Here’s Everything New You Can Do With an IFTTT Pro Subscription

https://ift.tt/32X9Fzg


Established Field Guide favorite IFTTT (If This Then That) has a new pro subscription, giving you more options and more features than before for $10 a month (though you can actually set your own price for the first year). It’s something for power users to consider adding to their digital subscriptions.

For the completely uninitiated, IFTTT basically connects services together—Spotify and Slack, Gmail and Dropbox, Instagram and Pocket—so you can have triggers in one service lead to actions in another service. A simple IFTTT applet could be getting an email every time there’s a public tweet tagged with a specific location.

Here’s everything you can do with the new Pro subscription.

In addition to executing applets faster, the new IFTTT Pro plan lets you put together multiple actions and multiple triggers in the same applet, create routines with multiple steps, and introduce queries and conditional logic. That means applets can be much more complex, if you need them to be. Those on a free IFTTT plan will be limited to three applets in the future.

Once you’ve signed up to access the Pro features, you can start building your applet by clicking Create from the main screen on the web. You begin with two basic If This and Then That blocks, and you can use the Add buttons to pick your services: When you click into a service, a choice of different triggers or actions appears.

G/O Media may get a commission

Select Feedly as your trigger, for instance, and the available triggers include a new article saved for later, a new highlight, or a new article in a board. If you choose a service that you haven’t previously connected to IFTTT, then you’re going to need to provide your login credentials and allow access as well.

What’s new with a Pro subscription are the Plus buttons underneath the If This trigger and the Then That action. Click on these buttons and you can add queries to refine your applet and multiple actions at the end of it. With a little bit of experimentation you should be able to work out what you can do with these extra fields.

Queries are intended to enable you to add more context and information to an applet, which then affects whether or not it gets triggered, and again you’ve got a host of different options and services to pick from—example queries would be the current weather forecast or the current price of electricity.

For example, it can be useful to apply a filter so an IFTTT only runs at a specific time of day or on a specific day of the week. Or, you might want to have an applet that’s triggered by a Google Calendar event, but only with a certain keyword in the title. These are the sorts of granular controls you can apply as you build up your applet.

Some technical and coding know-how is required to get the most out of the query and filter features, but it’s not difficult to pick up: IFTTT has put together a helpful guide that will take you through the time of day filter, and several others, here. Once you’ve got a grasp of the basic syntax and structure, you can adapt it for your own needs.

As you close out the applet creation process, you might be asked to add some specifics about how the action is carried out, depending on what you’re building. A lot of the triggers that IFTTT supports will come with so-called ‘ingredients,’ or types of data that are mined from the connected service.

Say you’re using an applet to add all of your finely honed tweets to a Google Sheet. As you build the applet, you can choose which of the tweet’s ingredients are included: the time and date it was created, the username it was tweeted from, a URL leading back to the tweet, the text of the actual tweet itself, and the tweet embed code. All of these elements can be included or excluded and ordered as required.

All of these settings can be configured at any time through your IFTTT dashboard, and all of your applets can be turned on or off whenever you like. You can also manage your account through the IFTTT apps for Android and iOS, though you can’t dig into the construction of your applets in quite as much detail as you can through a web browser—when you’re creating applets, it’s best to do it in a desktop web browser.

The easiest way to understand how IFTTT and IFTTT Pro works is just to dive in and work through some examples. IFTTT provides a few examples itself, so you can see how the queries and filter code in particular can be used. You can, for example, send an alert when you hit your daily distance goal in the Fitbit app—but disable the alert on certain days, and change the wording when the weather isn’t good.

You can also use IFTTT to turn on a SmartThings lightbulb based on the amount of available natural light—data obtained through a query run through a Tempest Weather System. When your custom brightness threshold is met, the lights turn on. (IFTTT works with a bunch of other smart home platforms as well.)

Another official example from IFTTT sets an applet to run once a day, using Date & Time as the trigger and Weather Underground as a weather forecast source. If the outlook is good, you’ll get a reminder to go for a run added to your Google Calendar, which is the main action in the applet.

Even if you don’t go deep into the query and filter coding aspects of IFTTT Pro, being able to run as many applets as you want with multiple actions might make the subscription worth your while. It really depends whether you need more from the apps and services that you use every day—and whether IFTTT has deep enough hooks into them to give you more functionality and features than you get by default.

geeky,Tech

via Gizmodo https://gizmodo.com

September 23, 2020 at 08:42AM

Datatables

Datatables

https://ift.tt/2FUHS9B


Let’s build a datatables component that allows a person to search, filter, sort and manipulate the query string. This component will demonstrate the power of Livewire, as building a datatables component the traditional way would require a significant amount of JavaScript.

View the source code for this episode on GitHub.

Published on Sep 16th, 2020.

programming

via Laracasts https://ift.tt/1eZ1zac

September 22, 2020 at 12:00AM

POTD: A-10 Thunderbolt II with GAU-8 Avenger 30mm Rotary Cannon

POTD: A-10 Thunderbolt II with GAU-8 Avenger 30mm Rotary Cannon

https://ift.tt/3iV11qn

POTD: A-10 Thunderbolt II with GAU-8 Avenger 30mm Rotary Cannon

Posted in Defense, Photo Of The Day with No Comments
Tags: , ,

Photo Of The Day

– Flying above is a U.S. Air Force

A-10 Thunderbolt II

assigned to the 51st Fighter Wing during a RED FLAG-Alaska over the Yukon Training Area in Alaska in 2019. As you may know, the A-10 Aircraft is what happens when you build a gun that you want to fly around with. In this case, the gun is the

GAU-8 Avenger 30mm rotary cannon

, and they also managed to find some space to add some bombs and missiles depending on the mission.

British Army Staff Sgt. Robert Leonard, British Army Headquarters 1st Artillery Brigade Joint Terminal Attack Controller, views a feed from an A-10 Thunderbolt II

The GAU.8 is one of the most powerful aircraft cannons ever flown.

Republic of Korea Air Force Joint Terminal Attack Controllers (JTACs) observe as an A-10 Thunderbolt II provides close air support (CAS) during RED FLAG-Alaska 19-2 in the Yukon Training Area.

All pictures by U.S. Air Force, photo by Senior Airman Isaac Johnson.


guns

via The Firearm Blog https://ift.tt/2JX8W99

September 21, 2020 at 08:00PM

Creating an Interface for Your API in Laravel

Creating an Interface for Your API in Laravel

https://ift.tt/3hLX7ic

I gave a sample format of how to create an interface for API responses in Laravel.

programming

via Laravel News Links https://ift.tt/2dvygAJ

September 21, 2020 at 08:03PM