How to Export LastPass Passwords and Move to Another Password Manager

How to Export LastPass Passwords and Move to Another Password Manager

https://ift.tt/3qQfnfS

For some time, LastPass was the go-to free password manager, as it offered all the features most people need at no cost. However, as of March 16, 2021, LastPass’s free users are limited to using the service on either desktop or mobile devices—using both requires you to upgrade to the paid plan.

This is a frustrating limitation. If you don’t want to use LastPass anymore, we’ll show you how to export your data from LastPass and switch to something else.

How to Export Your LastPass Data

To start the move to a new password manager, you’ll first need to export your data from LastPass. This is easy and you can do it anytime; it will still work even after LastPass’s free plan changes.

Before you export your passwords, it’s a good idea to clean up your password manager. Chances are that you have a lot of old data in your account, so why not tidy it up so you only move over what you actually use?

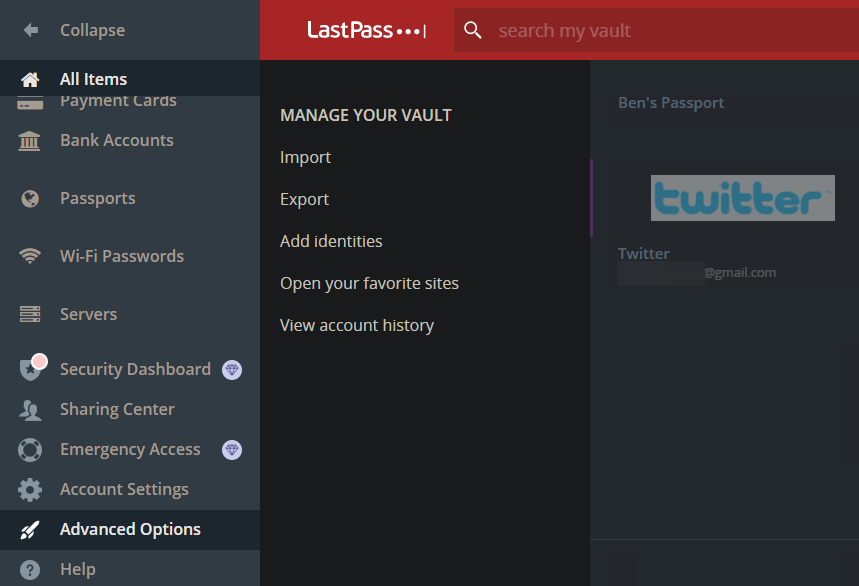
Once you’re done, go to LastPass.com and sign in to access your vault. At the bottom-left, click Advanced Options to open a new menu. From the list that appears, choose Export.


This will open a new browser tab where you’ll need to confirm your LastPass master password. After you do, depending on your browser, you’ll either get a prompt to download a CSV file, or will see a screen full of text that makes up this file. If you get a prompt, you can save the file as normal.

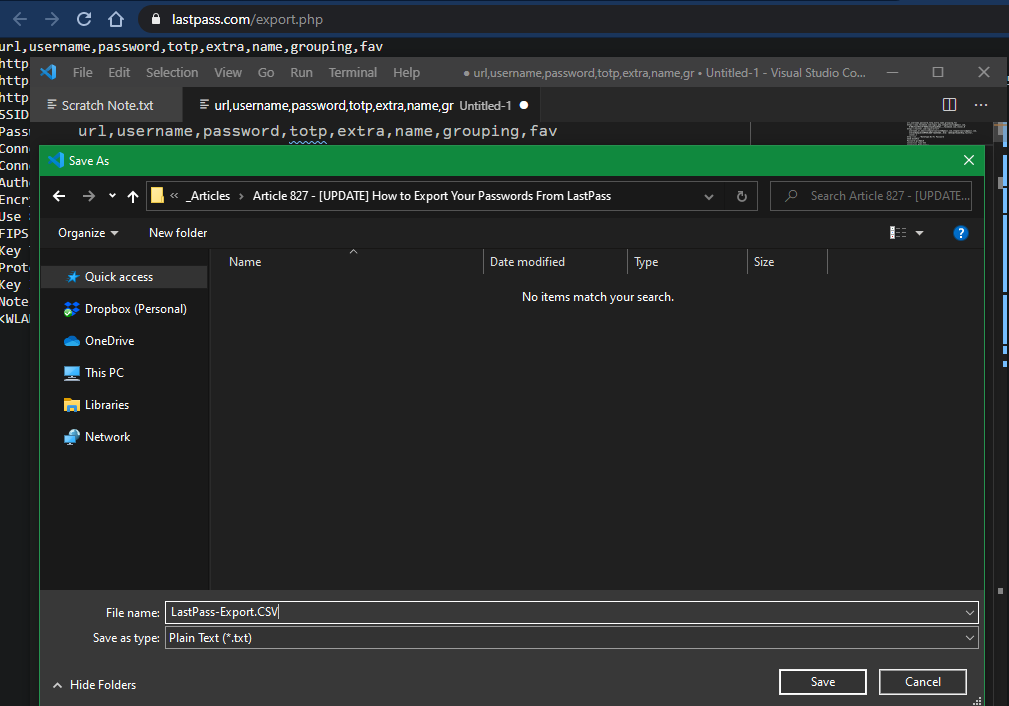
For the screen of text, press Ctrl + A (Cmd + A on a Mac) to copy all the text, then Ctrl + C (Cmd + C) to copy it. Open Notepad, TextEdit, or another text editor, then use Ctrl + V (Cmd + V) to paste the text into a new file.

Finally, save the file with the extension .CSV so it’s in the format that other password managers expect when importing.


Important: Keep this file somewhere safe during the transfer! It contains all of your passwords and other information in plain text, which is not secure. You should avoid syncing the file with cloud storage, and make sure to permanently delete it once you’re done with it.

Export Your LastPass Form Data

If you also want to move your saved LastPass form data to a new password manager, you’ll need to export this separately. This requires you to use the LastPass browser extension; it doesn’t work in the web app.

To do this, click the LastPass extension and go to Account Options > Advanced > Export and choose Form Fills. You may be prompted to enter your master password again. After that, your browser will download another CSV file with your form fill data.


How to Import LastPass Data Into a New Password Manager

Now you’re ready to import your passwords into a new password manager service. If you’re leaving LastPass because you don’t want to pay for the premium plan, we recommend Bitwarden. Its free plan has everything most people need, including multi-device sync.

If that doesn’t work for you, have a look at some of the other best password managers instead. We’ll illustrate with Bitwarden here, but the steps are similar on most services. Check their documentation if you’re not sure.

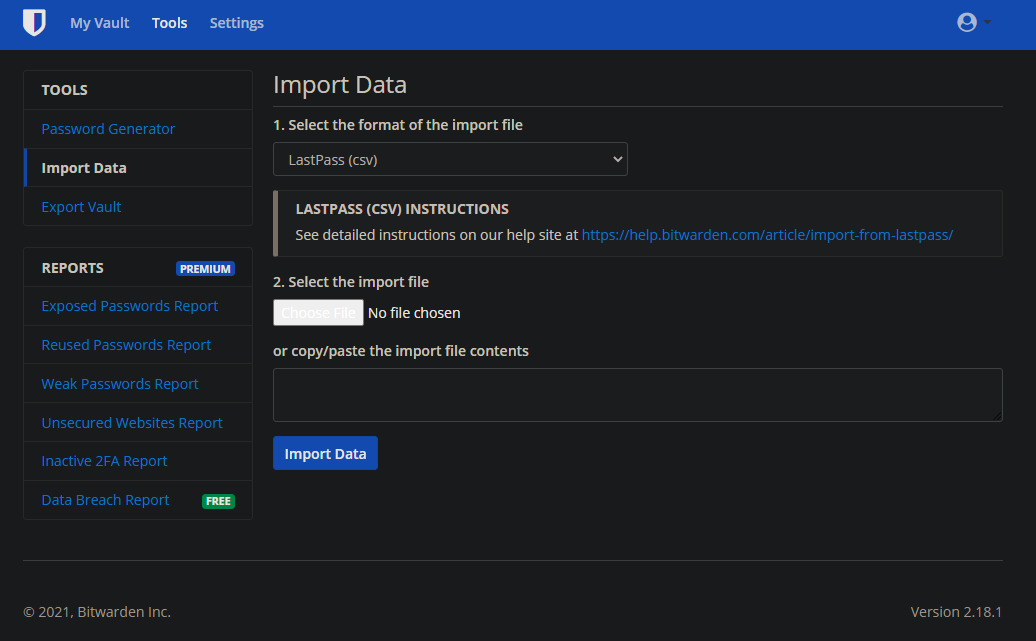
Create an account with your new password manager, if you don’t have one already. Then open your Bitwarden vault and log into your account. Select Tools from the bar at the top, followed by Import Data on the left side.

Set the dropdown under Select the format of the import file to LastPass (csv). Then hit the Choose File button and select the file from where you saved it on your PC. You can instead paste the file’s contents in the box below, if you prefer.


Once you click Import Data, Bitwarden will add all your data to your new vault. Repeat these steps to add your form fill data, if needed.

Now you’re ready to start using your new password manager. For your security, remember to delete the CSV file when you’re done with the transfer!

Say Goodbye to LastPass

That’s all it takes to leave LastPass for a new password manager. Bitwarden makes it easy to enjoy passwords synced across all your devices for free, but there are plenty of other great choices too.

This is also a great time to make sure you’re taking advantage of all your password manager’s handy features.

non critical

via MakeUseOf.com https://ift.tt/1AUAxdL

February 22, 2021 at 01:28PM

Laravel Installation, Migrations, Models and Relationships – Real Ecommerce with Laravel 8 – Ep 1

Laravel Installation, Migrations, Models and Relationships – Real Ecommerce with Laravel 8 – Ep 1

https://youtu.be/rlOramH-irk

Building a large Laravel project can be a daunting task! In this new series I’ll be building an ecommerce store with Laravel 8 from start to finish. You will see my thought process when tackling different features throughout the build, all the way up until launch.

programming

via Laravel News Links https://ift.tt/2dvygAJ

February 18, 2021 at 10:39PM

Laravel Livewire: an introduction

Laravel Livewire: an introduction

https://ift.tt/3bhZ84C


Laravel Livewire: an introduction

Feb 07, 2021

Laravel Livewire is a great framework for creating interactive web apps without writing any JavaScript. In this tutorial we’re going to make a few components using Laravel Livewire so we can see the power of this framework.

Setting up

Important: Livewire requires you to use Laravel.

You can install Livewire using Composer:

composer require livewire/livewire

Next, you have to include Livewire’s assets on your page:

<livewire:styles /> <!-- Styles -->
<livewire:scripts /> <!-- Scripts -->

And that was it! Now you can use Livewire.

The counter

A typical example of Livewire is the counter. Although it may not be really useful to use Livewire in this situation, it does however really show the power of Livewire.

First, we are gonna make a new Livewire component:

php artisan livewire:make counter

Now Livewire has made two files: a Counter.php class and a counter.blade.php view.

Next we’ll go to the Counter.php class and add this code:

<?php

namespace App\Http\Livewire;

use Livewire\Component;

class Counter extends Component
{
    public int $count = 0;

    public function render()
    {
        return view('counter');
    }

    public function increment()
    {
        $this->count++;
    }

    public function decrement()
    {
        $this->count--;
    }
}

And now we’ll add this in our counter.blade.php view:

<div>
    <h1></h1>
    
    <button wire:click="increment">+</button>
    <button wire:click="decrement">-</button>
</div>

Finally, we have to include the component in our blade view:

<livewire:counter />

And that’s it! This is all we have to do to create a working counter in Laravel Livewire.

Note: If you want to create a counter in a real-project, you probably don’t want to do it using Livewire, because there are far simpler alternatives using only JS.

How does this work?

Now that we have had a look at the awesomeness of Livewire, let’s explain how this counter example works.

  1. Livewire renders the component at the first-page load, so it’s SEO-friendly
  2. When a user does something (such as clicking a button), Livewire’s JS makes a request to the server
  3. The server handles the request and then Livewire rerenders the component.

Forms with Livewire

A better use-case for Livewire are forms. So let’s create a form where a user can create a new post.

We’ll start by creating a new component.

php artisan livewire:make create-post

And for the sake of simplicity, a post has a title and a body. So we have to add those fields to our class.

<?php

namespace App\Http\Livewire;

use App\Models\Post;
use Livewire\Component;

class CreatePost extends Component
{
    public string $title = '';

    public string $body = '';

    public function render()
    {
        return view('create-post');
    }

    public function createPost()
    {
        $post = Post::create([
            'title' => $this->title,
            'body' => $this->body
        ]);

        return redirect()->route('posts.show', $post);
    }
}

And in our form we’ll use the wire:model attribute to connect the input or textarea to our Livewire property.

<div>
    <h1>New Post</h1>

    <!-- Title -->
    <label for="title">Title</label>
    <input type="text" name="title" id="title" wire:model="title" />

    <!-- Body -->
    <label for="body">Body</label>
    <textarea name="body" id="body" wire:model="body"></textarea>
</div>

Now our form works! You can click on the submit button and it’ll create a new post!

Livewire’s validation

It’s time for some validation. We can do that really simple using Livewire. First we’ll add a $rules property to our component.

protected $rules = [
    'title' => ['required', 'string', 'max:255'],
    'body' => ['required', 'string']
];

And next, we’ll tell Livewire to validate before creating the post.

public function createPost()
{
    $this->validate();

    $post = Post::create([
        'title' => $this->title,
        'body' => $this->body
    ]);

    return redirect()->route('posts.show', $post);
}

Finally we have to display the validation error messages in the component view.

<div>
    <h1>New Post</h1>

    <!-- Title -->
    <label for="title">Title</label>
    <input type="text" name="title" id="title" wire:model="title" />
    @error('title')<span></span>@enderror

    <!-- Body -->
    <label for="body">Body</label>
    <textarea name="body" id="body" wire:model="body"></textarea>
    @error('body')<span></span>@enderror

    <!-- Submit button -->
    <button wire:click="createPost">Create Post</button>
</div>

Real-time validation

Now that we have added validation, it is really easy to add real-time validation with Livewire. This is the only method you have to add:

public function updated($property)
{
    $this->validateOnly($property);
}

How does this work? When a field (property) is updated, Livewire automatically calls the updated method, from where the validateOnly method is called which validates one field instead of all.

So in theory you could also just say validate, but then the whole form turns full of error messages before the user has typed anything. And that’s not very user-friendly.

Turbolinks and SPA’s

With Livewire you can easily create SPA’s. All you have to do is add those two lines:

<script src="https://cdnjs.cloudflare.com/ajax/libs/turbolinks/5.2.0/turbolinks.js"></script>
<script src="https://cdn.jsdelivr.net/gh/livewire/turbolinks@v0.1.x/dist/livewire-turbolinks.js" data-turbolinks-eval="false" data-turbo-eval="false"></script>

And now your application will use Turbolinks and the Livewire Turbolinks adapter.

Testing Livewire

Livewire is easy to test using PHPUnit. You can learn more at the Livewire docs.

Conclusion

To conclude, Livewire is a great option for writing interactive apps when you don’t want to write JavaScript or when you want it to be SEO-friendly. It is a framework full of features and I’ve just covered the basics.

These are some great features of Livewire:

And much more.

I hope you liked this tutorial. If you did so, please leave a comment.

programming

via Laravel News Links https://ift.tt/2dvygAJ

February 18, 2021 at 10:39PM

Now you can Rickroll people in 4k thanks to this hero who remastered Rick Astley’s classic “Never Gonna Give You Up” music video.

Now you can Rickroll people in 4k thanks to this hero who remastered Rick Astley’s classic “Never Gonna Give You Up” music video.

https://ift.tt/3s6GJ1c

Not all heroes wear capes. Some simply harness the power of neural networks to upscale ’80s music videos to 4k and 60fps.

fun

via Not the Bee https://notthebee.com

February 18, 2021 at 09:11AM

Bitwarden Is Now the Best Free Alternative to LastPass

Bitwarden Is Now the Best Free Alternative to LastPass

https://ift.tt/3dsQW42


Whether you’re looking to make a change in your password management just because, or you’re a LastPass user annoyed with the service’s recent changes to its free tier, switching to the much-loved (and free) Bitwarden service is a good choice. Bitwarden is now the best free password manager for most people—since it works across all of your devices to add convenience and security to your logins—and setting it up is quick and easy.

To get started, head to Bitwarden’s site and create an account. It’s free to do, and all you need to worry about is giving yourself a solid master password. Make it a good one, and one that you don’t use anywhere else, because it’ll be one of the gatekeepers for all of your other passwords that you’ll store on the service. Once you’ve created your account and logged in, make sure you verify your email address using the option in the upper-right corner.

If you’re coming from another service—like LastPass, for example—you’ll want to find a tool you can use to export your passwords. On LastPass, this is tucked away under the Advanced Options link at the bottom; exporting your passwords basically transforms them into a simple .CSV list.

G/O Media may get a commission

You then copy the list (which I’m not screen-shotting, for obvious reasons) directly into Bitwarden via the Tools menu > Import Data.

Your passwords will all appear in your main screen, and should also synchronize to your various Bitwarden apps the next time you go to use them. To edit any of your passwords, simply click on the hyperlink for a given site or service. You can also use the gear icon that appears when you hover over each listing to copy your user name or password directly to your clipboard.

Those are the basics of Bitwarden, but you’re not quite done yet. Click on the profile image in the upper-right corner and select My Account. From there, click on Two-step login in the left-most sidebar.

Here is where you’ll set up two-factor authentication for your account—this isn’t required in order for you to use Bitwarden, but it’s highly recommended to keep your account secure from unauthorized logins. You can choose to have 2FA codes emailed to you to verify any login attempts, but I recommend you use an authenticator app instead. They’re similarly easy to set up, and act like a password manager for all your two-factor authentication tokens.

You might also want to visit the Options link on the lefthand sidebar, which will let you adjust your Vault timeout—as in, how long it’ll stay open from the last time you accessed it. Go past that time, and you’ll have to enter your password once again. Turn this down if you’re on a shared computer, and consider turning it up a bit if you’re feeling especially secure in your setup.

After that, grab all the Bitwarden apps and extensions you’ll need for your devices and browsers. Installing them is easy, and they grant you access to everything you’ve stored in your Bitwarden vault. In the case of your browser, for example, you’ll simply need to right-click on a password prompt to pull up your Bitwarden autofill:

And that’s it. Bitwarden’s free version doesn’t offer a ton of features—no checking your saved passwords for leaks, for example—but it does give you an quick and easy way to synchronize passwords across all your devices. What’s not to like?

geeky,Tech

via Gizmodo https://gizmodo.com

February 18, 2021 at 10:21AM

10 Best Advanced Python Cheat Sheets

10 Best Advanced Python Cheat Sheets

https://ift.tt/37rlhMC

Hey Finxters! I have another set of cheat sheets for you! This time, I am going to focus on the more advanced aspects of Python and what you can do with it! As you know Python is a flexible language used in web development, games, and desktop applications. I am not going to waste too much of your time so let’s hop right to it and dive into these more advanced Python cheat sheets!

Cheat Sheet 0: Finxter Full Cheat Sheet Course

Python Ultimate Cheat Sheet

Cheat Sheet 1: DataQuest

This cheat sheet is from DataQuest and it shows all of the intermediate Python

Regular expressions, date/time module, and counter. This is one you will want to have pinned to the wall or in your developers binder to keep handy as you work.

Pros: Great for budding Python developers, keep it handy as you work.

Cons: None that I can see.

Cheat Sheet 2: DataCamp

It is important to know how to import data during your career no matter what stage you are at. As an intermediate Pythoner, you should keep this cheat sheet handy when working an entry level job of data entry and developing you own projects.

Pros: Great for learning importing data sets in Python.

Cons: None that I can see.

Cheat Sheet 3: DataCamp

You have to import data and you have to be able to plot it as a visual representation for businesses to understand and use to their benefit. This cheat sheet will help you to learn matplotlib and write some amazing graphical visualizations with Python.

Pros: Great to have for matplotlib development.

Cons: None that I can see.

Cheat Sheet 4: GitHub

This cheat sheet is for Machine learning and one you will want to keep in your developers binder as you work. Machine learning and Python go together like peanut butter and jelly, and Scikit is going to be your best friend. If your developers journey takes you to machine learning then make sure to keep this cheat handy for yourself.

Pros: Scikit is easily learnable with this cheat sheet

Cons: None that I can see.

Cheat Sheet 5: DataCamp

SQL is a database system used in programming for all kinds of data sets and is extremely scalable. Keep this cheat sheet handy to you! BI and other business applications rely on you being able to use SQL!

Pros: Rated ‘E’ for everyone. Easy to read and implement

Cons: None that I can see.

Cheat Sheet 6: Pytorch

This cheat sheet is more a tutorial that will teach you pytorch for deep learning projects. Here you will get hands on practice on pytorch.

Pros: You will get a deep understanding pytorch and how it used

Cons: It is an online tutorial.

Cheat Sheet 7: DataCamp

Yet another from Datacamp!! This one is called SpaCy and allows you to understand the natural text from documents. This is one I have in my development folder and is used for Natural language programming.

Pros: Rated ‘E’ for everyone.

Cons: None that I can see.

Cheat Sheet 8: Ask Python

This cheat sheet is also more a tutorial for you to learn image processing in Python. The best way to learn is to get your hands dirty! Ask Python is good for doing that so you can learn what you need to and boost your skills.

Pros: Rated ‘E’ for everyone.

Cons: None that I can see.

Cheat Sheet 9: TutorialsPoint

This cheat sheet is also a tutorial on learning database access with Python. This is an incredibly important skill when you freelance your skills or end up working for a company at a data entry position.

Pros: Rated ‘E’ for everyone. This tutorial is one I have used myself! It includes code snippets to learn from.

Cons: It is a tutorial, not a cheat sheet to print.

Cheat Sheet 10: FullStack Python

This is also a tutorial for you to learn from. This particular cheat sheet discusses Deployment of web applications in Python!! It has explanations that go into depth with tools, resources and learning checklist which is started off with an introductory on deployment what it is and why it is necessary.

Pros: Rated ‘E’ for everyone. This is important to know if you are a Pythoner in Web development.

Cons: Needs to be bookmarked on your browser.

These are the cheat sheets and tutorials I think you will find helpful as a Pythonista developing in your particular field. As you can see this time, I wanted to really give you a wide berth of cheat sheets that intermediate Pythonista use with their career choices. I hope at least one of these  cheat sheets or tutorials is useful to you on your journey! Thank you once again for joining me and I can’t wait to see you again! 😉😉

The post 10 Best Advanced Python Cheat Sheets first appeared on Finxter.

Python

via Finxter https://ift.tt/2HRc2LV

February 18, 2021 at 10:42AM

‘Never Gonna Give You Up’ in 4K Is an Eye-Melting Way to Rickroll Someone

‘Never Gonna Give You Up’ in 4K Is an Eye-Melting Way to Rickroll Someone

https://ift.tt/37qGDtC


As powerful workstations slowly but surely work to remaster all the world’s old film and video footage to higher resolutions and frame rates using machine learning techniques, you’d assume that one piece of footage would have been a top priority. But apparently Rick Astley’s “Never Gonna Give You Up” music video has only just been given the 4K, 60 FPS upgrade, and your eyes may never forgive you.

Watching the original music video again, which boasts a respectable 871,696,897 views on YouTube at the time of writing, it looks like “Never Gonna Give You Up” was shot on professional-grade video tape, presumably Sony’s Betacam format, giving it that recognizable ‘80s video look.

The remastered version, which was created using Topaz Video Enhance AI to boost the resolution to 4K and the Flowframes video interpolation tool to boost the frame rate to 60 frames per second, looks like it was filmed on a modern smartphone just yesterday. We now have the ability to Rickroll someone so that they’re not only inconvenienced, but also feel like they’re actually on set with Astley while this video was being shot. Astley may never desert you, but your eyes will want to.

geeky,Tech

via Gizmodo https://gizmodo.com

February 18, 2021 at 12:21PM

Laravel Api Controller

Laravel Api Controller

https://ift.tt/3s8XNUx


Laravel Api Controller

For Laravel 5
Build Status
Coverage Status
Packagist
Packagist
Packagist
Github Issues

Basic CRUD API Methods that can be extended for your models by default has a list, show, update, add and delete endpoint to interact with your model.

Installation

Install via composer

composer require phpsa/laravel-api-controller

Publish Configuration File (optional – if you need to change any of the default configurations)

php artisan vendor:publish --provider="Phpsa\LaravelApiController\ServiceProvider" --tag="config"

Usage

CLI Commands

  • artisan make:api {ControllerName} to generate the controller
  • artisan make:api:policy to generate a policy file
  • artisan make:api:resource to geneate the response resource

This will create a Api/ModelNameController for you and you will have the basic routes in place as follows:

  • GET api/v1/{model_name} – list all/paged/filtered (class::index)
  • GET api/v1/{model_name}/$id – Show a specified id (class::show)
  • POST api/v1/{model_name} – Insert a new record (class::store)
  • PUT api/v1/{model_name}/$id – Update an existing record (class::update)
  • DELETE api/v1/{model_name}/$id – Delete an existing record (class::destroy)

You can override the methods by simply putting in your own methods to override – method names in braces above

Events

  • POST (class::store) – triggers a new Phpsa\LaravelApiController\Events\Created Event which has the new record available as $record
  • PUT (class::update) – triggers a new Phpsa\LaravelApiController\Events\Updated Event which has the updated record available as $record
  • DELETE (class::destry) – triggers a new Phpsa\LaravelApiController\Events\Deleted Event which has the deleted record available as $record

Policies

Policies: https://laravel.com/docs/6.x/authorization#generating-policies

Generate with php artisan make:policy PostPolicy --model=Post

  • Get list – calls the viewAny policy
  • Get single – calls the view policy
  • Post New – calls the create policy
  • Put Update – calls the update policy
  • Delete item – calls the delete policy

Query/Data modifiers in policies for the api endpoints

  • qualifyCollectionQueryWithUser($user, $repository) -> return void – add any queries to the repository (ie ->where(‘x’,’))
  • qualifyItemQueryWithUser($user, $repository)-> return void – add any queries to the repository (ie ->where(‘x’,’))
  • qualifyStoreDataWithUser($data) – return the updated data array
  • qualifyUpdateDataWithUser($data) – return the updated data array

Resources / Collections (Transforming)

Resources: https://laravel.com/docs/6.x/eloquent-resources

Generate with
php artisan make:apiresource UserResource and php artisan make:resource UserCollection

Change the Resource to extend from:

use Phpsa\LaravelApiController\Http\Resources\ApiResource for your resource
use Phpsa\LaravelApiController\Http\Resources\ApiCollection for your resource collection

in your controller override the following params:

	protected $resourceSingle = UserResource::class;
	protected $resourceCollection = UserCollection::class;

Snake vs Camel

  • middleware to convert all camel to snake: Phpsa\LaravelApiController\Http\Middleware\SnakeCaseInputs
  • set request header X-Accept-Case-Type to either snake or camel to alter your data response

Filtering

For the get command you can filter by using the following url patterns

Seperator Description Example Result
= Equals ?filter[field]=hello select … where field = ‘hello’
!= Not Equals ?filter[field!]=hello select … where field != ‘hello’
<> Not Equals (alt) ?filter[field<>]=hello select … where field != ‘hello’
> Greater Than ?filter[field>]=5 select … where field > 5
>= Greater Or Equal to ?filter[field>=]=5 select … where field >= 5
< Less Than ?filter[field<]=5 select … where field <> 5
<= Less Or Equal to ?filter[field<=]=5 select … where field <= 5
~ Contains (LIKE with wildcard on both sides) ?filter[field~]=hello select … where field like ‘%hello%’
^ Starts with (LIKE with wildcard on end) ?filter[field^]=hello select … where field like ‘hello%’
$ Ends with (LIKE with wildcard on start) ?filter[field$]=hello select … where field like ‘hello%’
!~ Not Contains (LIKE with wildcard on both sides) ?filter[field!~]=hello select … where field not like ‘%hello%’
!^ Not Starts with (LIKE with wildcard on end) ?filter[field!^]=hello select … where field not like ‘hello%’
!$ Not Ends with (LIKE with wildcard on start) ?filter[field!$]=hello select … where field not like ‘hello%’

In / Not In

You can pass to the filters an array of values
ie: filter[user_id]=1||2||||4||7 or filter[user_id!]=55||33

Null / Not Null (introduced 1.23.0)

If you need to filter on whether a field is null or not null, you can use the filter param as of version 1.23.0 EG: filter[age]=NULL or filter[age!]=NULL. Note that NULL must be uppercase.

Older versions
Add a scope to your model: eg

public function scopeAgeNull(Builder $builder, $isNull = true){
  $isNull ? $builder->whereNull('age') : $builder->whereNotNull('age');
}

Add to your allowedScopes and can then be called in url as ?ageNull=1 for where null and ?ageNull=0 for where age not null

Scopes

In addition to filtering, you can use Laravel’s Eloquent Query Scopes to do more complex searches or filters.
Simply add an $allowedScopes to your ApiResource, and that scope will be exposed as a query parameter.

Assuming you have a scopeFullname defined on your Eloquent Model, you can expose this scope to your API as follows:

protected static $allowedScopes = [
  'fullname'
];

Given the above $allowedScopes array, your API consumers will now be able to request ?fullname=John. The query parameter value will be passed to your scope function in your Eloquent Model.

Filtering on related models

You can easily filter using any related model that is configured for include. Simply specify ?filter[model.field]=123 in your query string. The same filter options above apply to related fields.

Fields, Relationships, Sorting & Pagination

Fields

By default all fields are returned, you can limit that to specific fields in the following ways:

  • Api Controller parameter $defaultFields default as protected $defaultFields = ['*']; – switch to include an array of fields
  • fields param in url querystring: ie fields=id,name,age = will only return those, this will also override the above.
  • in your response resource you can set the static::allowedFields to lock down which fields are returnable
  • addfields and removefields params in url querystring will work with these.
  • Use laravel eloquent model $appends property to automatically include custom attribute accessors.

Relationships

  • Using the relationships defined in your models, you can pass a comma delimited list eg include=join1,join2 which will return those joins (one or many).

Simply add a protected static $mapResources to your Resource to define which resources to assign your related data. E.e., for a one to many relationship, you should specify a collection, and a one-to-one relationship specify the related resource directly. This will allow the API to properly format the related record.

    protected static $mapResources = [
        'notes' => NotesCollection::class,
        'owner' => OwnerResource::class
    ];
  • You can automatically update and create related records for most types of relationships. Just include the related resource name in your POST or PUT request.

For BelongsToMany or MorphToMany relationships, you can choose the sync strategy. By default, this will take an additive strategy. That is to say, related records sent will be ADDED to any existing related records. On a request-by-request basis, you can opt for a sync strategy which will remove the pivot for any related records not listed in the request. Note the actual related record will not be removed, just the pivot entry.

To opt for the sync behavaiour, set ?sync[field]=true in your request.

Sorting

  • Sorts can be passed as comma list aswell, ie sort=age asc or sort=age asc,name desc,eyes – generates sql of sort age asc and sort age asc, name desc, eyes asc respectively
  • Default sort can also be added on the controller using by overrideing the protected $defaultSort = null; parameter

Pagination

  • pagination can be enabled/disbled on the controller by overriding the protected $defaultLimit = 25; on the controller
  • pagination can also be passed via the url using limit=xx&page=y
  • pagination can also be limited to a max per page by overriding the protected $maximumLimit = false; parameter

Validation

  • When Posting a new record, validation can be done by adding a rulesForCreate method to your controller returning an array eg
[
    'email' => 'required|email',
    'games' => 'required|numeric',
]

see https://laravel.com/docs/5.8/validation#conditionally-adding-rules

  • for updating a record, add a method rulesForUpdate per above.

Defaults

The following parameters are set in the Base Api controller and can be overwritten by your Controller on a case by case basis:

  • DEPRECATED protected $resourceKeySingular = 'data';

  • DEPRECATED protected $resourceKeyPlural = 'data';

  • protected $resourceSingle = JsonResource::class; Collection to use for your single resource

  • protected $resourceCollection = ResourceCollection::class; Collection to use for your resource collection

  • protected $defaultFields = ['*']; Default Fields to respond with

  • protected $defaultSort = null; Set the default sorting for queries.

  • protected $defaultLimit = 25; Number of items displayed at once if not specified. (0 = maximumLimit)

  • protected $maximumLimit = 0; Maximum limit that can be set via $_GET[‘limit’]. – this ties in with the defaultLimit aswell, and if wanting to disable pagination , both should be 0. ) will allow all records to be returned in a single call.

  • protected $unguard = false; Do we need to unguard the model before create/update?

Scopes

SoftDeleted Records

add the Phpsa\LaravelApiController\Model\Scopes\WithSoftDeletes trait to your model,
add to your resource file:

class MyModelResource extends ApiResource
{

 protected static $allowedScopes = [
        'withTrashed',
        'onlyTrashed'
    ];

you can now append withTrashed=1 or onlyTrashed=1 to your query.

Responses

you can override responses for each point by overriding the following protected methods:

  • handleIndexResponse
  • handleStoreResponse
  • handleShowResponse
  • handleUpdateResponse
  • handleDestroyResponse

Security

If you discover any security related issues, please email
instead of using the issue tracker.

Credits

Sponsors

programming

via Laravel News Links https://ift.tt/2dvygAJ

February 17, 2021 at 10:39PM