“Today I have some UHMW tape. It’s a very slippery plastic and so if you need things to slide across each other like you know when you’re pulling out your antique wooden drawers and they just kind of rub and stick. This tape solves that problem.”
Philadelphia, PA – -(AmmoLand.com)- Many people try to claim that the Founding Fathers couldn’t have conceived of repeating rifles when they drafted the Second Amendment to the Bill of Rights. However, the story of Joseph Belton and his correspondence with the Continental Congress proves otherwise.
If you’d prefer to watch and learn, the video I made below details the entire event. If you’d prefer to read about it, the story unfolds below.
Belton, an inventor and gunsmith from Philadelphia, claimed to have devised a new form of flintlock musket that was capable of firing as many as sixteen consecutive shots in as little as twenty seconds. After the gun had fired its consecutive loads, it could then be reloaded individually like all other traditional firearms of that era. He first wrote to Congress about his new invention on April 11, 1777, letting them know he was available to demonstrate his invention to them at any time.
Intrigued by Belton’s claim, Congress ordered 100 examples of his “new improved gun.” They authorized him to oversee the construction of new guns, or alteration of existing guns, so that they were capable of discharging eight rounds with one loading and that he “receive a reasonable compensation for his trouble, and be allowed all just and necessary expences [sic].”
On May 7, Belton replied to Congress with his terms regarding what he felt to be “reasonable compensation.” In order to determine his fee, Belton wanted to arm 100 soldiers with his invention and demonstrate the capabilities of such armed men to a panel of four military officers – two of Congress’ choosing and two of Belton’s choosing. The officers would then determine how many men they felt Belton’s 100 men were equivalent to when carrying a standard firearm. (For example, 100 specially-armed men were equivalent to 200 regularly-armed men, or more.)
For his ability to double the manpower, Belton felt that he was entitled to £1,000 for every 100 men he armed from a given state. Belton justified his price by claiming that a state could not raise, equip, and clothe 100 men for £1,000, making his 100 men armed as though they were 200 men a bargain. (For reference, £1,000 in 1777 is the equivalent of £150,000 today. If all 13 states outfitted 100 men, Belton would receive £13,000 – or £1,900,000 today.)
Belton felt his rate of compensation was “vastly reasonable.” Congress disagreed.
Belton argued that arming 3,000 men or more with his invention created enumerable advantages beyond description on the battlefield, making his compensation “vastly reasonable.” As such, his terms were nonnegotiable. If Congress refused or attempted to haggle in any way, he would withdraw his offer completely. (For those doing the math, 3,000 men armed with Belton’s repeater would mean that he’d collect more than £4,500,000 in today’s currency.)
Belton must have realized immediately that his demands were more than outlandish because the next day, on May 8, he wrote a letter to John Hancock lowering his fee to £500 for doubling, £1,500 for tripling, £2,000 for quadrupling, and so forth.
On May 15, Congress read Belton’s letter to the body. They quickly dismissed it because of his “extraordinary allowance.” (No one saw that coming, right?) Congress considered the matter dropped and didn’t reply to Belton, likely assuming he would take their lack of reply as a refusal.
They assumed wrong.
Having heard nothing from Congress for more than a month, Belton wrote them again on Saturday, June 14. This time, he claimed he could accurately hit targets with his rifle out to 100 yards, and possibly even out to 200 yards. He offered to demonstrate this feat to Congress on the following Monday at 10:00am in the State House Yard.
The same day that Belton wrote this letter, Congress was involved with something that would prove to be far more important. On June 14, 1777, the Continental Congress approved the design for a national flag.
With Congress engaged in more pressing matters, Belton’s letter went unanswered for almost a month when he decided to write again.
His letter from July 10 was not nearly as polite as his previous ones. This time, he tried to rile members of the body by claiming that Great Britain regularly pays £500 for lesser services. If, he mused, the “little Island” could afford such payments, surely this “extensive continent” could do the same.
Rittenhouse, Arnold, and Gates all signed a letter endorsing Belton.
He also enclosed a letter signed by General Horatio Gates, Major General Benedict Arnold (before he became a turncoat), well-known scientist David Rittenhouse, and others, all claiming that his invention would be of “great Service, in the Defense of lives, Redoubts, Ships &c, & even in the Field,” and that they felt Belton was entitled to “a hansome [sic] reward from the Publick [sic].”
Having received the letter immediately, Congress resolved that same day to refer Belton’s petition to the Board of War, made up of five delegates. Among these five delegates were future 2nd President of the United States, John Adams; and Benjamin Harrison V, father and great-grandfather of the 9th and 23rd Presidents of the United States, respectively.
Nine days later on July 19, Congress got word from the Board of War. Much to Belton’s dismay, they dismissed his petition altogether. At this point, he must have finally gotten the hint that Congress wasn’t going to authorize such exorbitant payment for his services. The historic record turns up no more correspondence between Belton and Congress.
Despite the fact that Joseph Belton failed to convince the Continental Congress to outfit colonial soldiers with his repeating rifle, it’s still a very important story. Belton invented his gun in 1777. The Bill of Rights wasn’t ratified until 1791. That means our Founding Fathers not only knew about repeating rifles 14 years before the creation of the Second Amendment, but that they thought highly enough of the idea to pursue further development and implementation of such technology. The fact that it proved to be cost-prohibitive is moot, as it certainly could have been done if Congress and Belton had agreed upon the definition of “reasonable compensation.”
So, the next time someone tells you the Second Amendment was never designed to protect the right to own a repeating rifle, or that it was only meant to apply to flintlock firearms, sit them down and tell them the story of Joseph Belton and his repeating flintlock musket.
About Logan Metesh
LoganMetesh is a historian with a focus on firearms history and development. He runs High Caliber History LLC and has more than a decade of experience working for the Smithsonian Institution, the National Park Service, and the NRA Museums. His ability to present history and research in an engaging manner has made him a sought after consultant, writer, and museum professional. The ease with which he can recall obscure historical facts and figures makes him very good at Jeopardy!, but exceptionally bad at geometry.
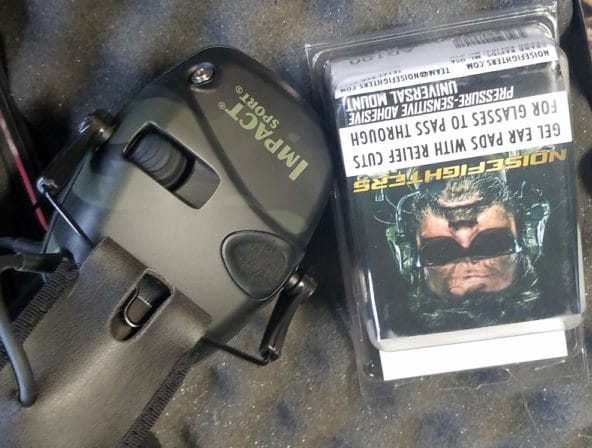
U.S.A. –-(Ammoland.com)– The Howard Leight Impact Sport electronic ear protection is certainly among the most commonly used ear-pro you’ll find at the shooting ranges of America today. I’ve used various versions of the Leights for more than a decade, and am more than familiar with its features and shortfalls (review here). Being popular and common in use is great, but that doesn’t mean there isn’t room for growth. Behold, two simple ways you can DIY improve your Howard Leight Impact Sport headsets. One is nearly free, and the other is a lot cheaper than a hearing aid.
Shown: everything you need. New gel cups and foam from an old rifle case.
Before we can dive in to improvements, lets identify the shortcomings that lead the Impact Sports to a middle-of-the-pack 22 dB Noise Reduction Rating (NRR).
The earcups. The stock earcups are a little bit of what feels like vinyl, filled with the least dense foam imaginable. Each cup weight 9 grams, and does little to stop sound. The OEM cups also deteriorate quickly, causing them to stiffen up. Once that happens, it’s very easy to “break the seal” around your ear, and let in a full-volume blast of noise. Honeywell (Howard Leight parent company) recommends replacing the cups every 6 months, at around $15-$20 a year for upkeep.
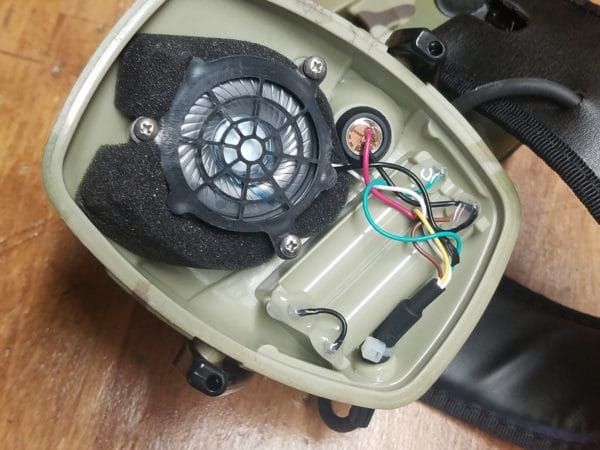
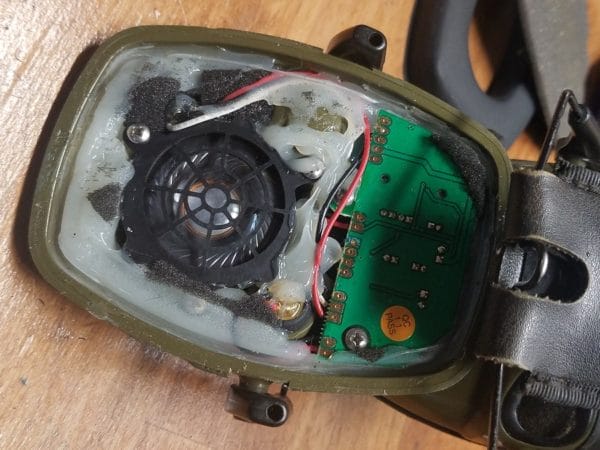
Dead space. If you pop open the ear cups (as I do below), you’ll see a lot of empty space. Open space like that does nothing to stop noise from blowing right through. We need to fill that up to improve the sound absorption!
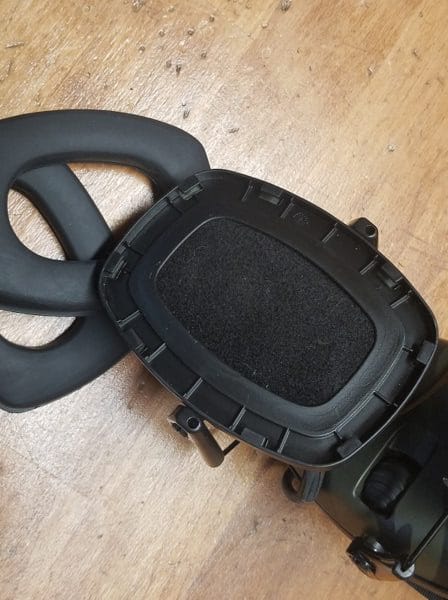
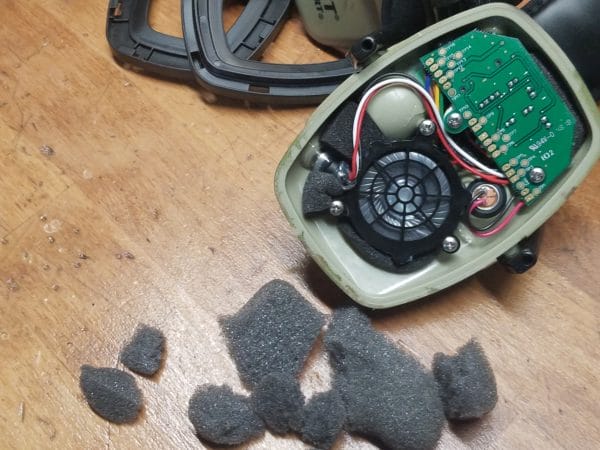
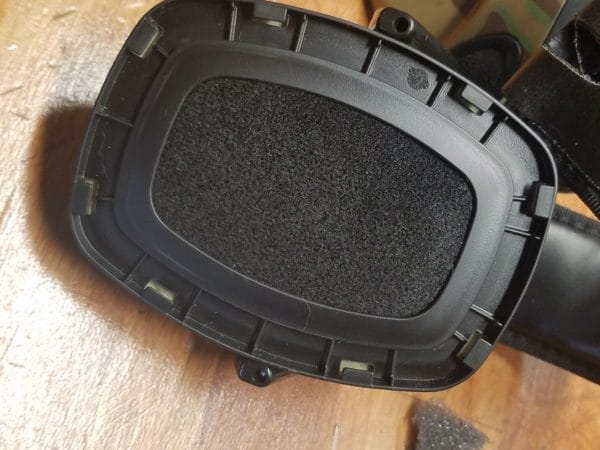
So let’s disassemble our ear pro. First, grab the original foam ear cups and give them a pull. They’re held in with a few retaining tabs, and pop out easily.
First, grab the original foam ear cups and give them a pull.
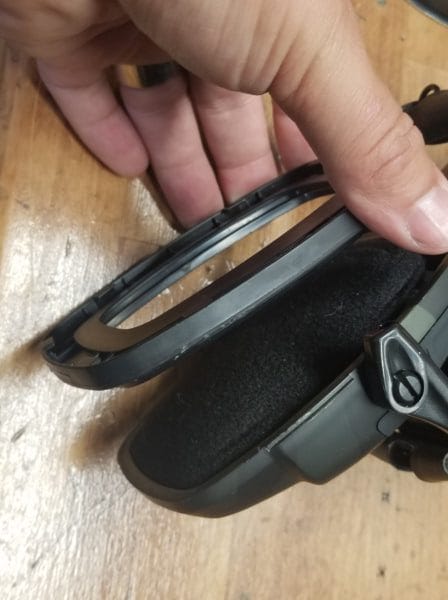
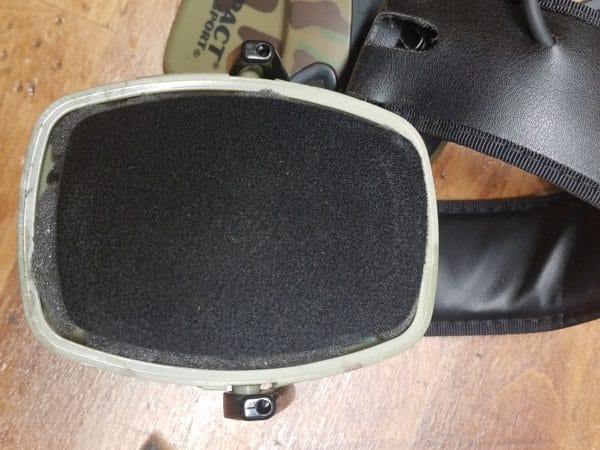
Next, use a flathead screwdriver to pop off the plastic rim that held in the ear cups. Once off, set those (and the small foam sheet underneath) to the side.
Next, use a flathead screwdriver to pop off the plastic rim that held in the ear cups.
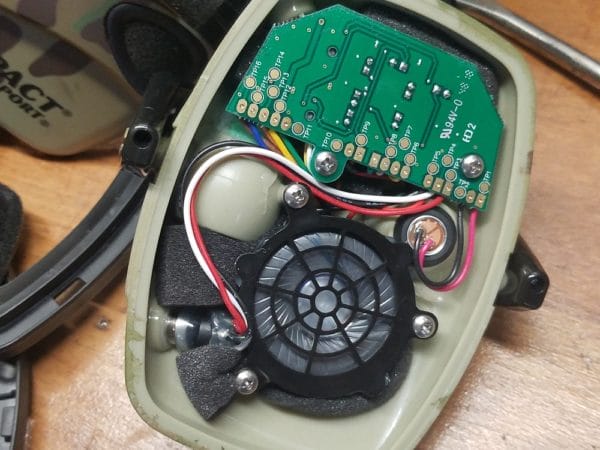
Now you can see into the belly of the beast. The left side (as worn), which has the volume adjustment knob, has a bit more material inside, as it contains the circuit board and internal section of the volume knob. Don’t let looks deceive you though, there’s a lot more space than it seems at first glance.
Left sideRight side
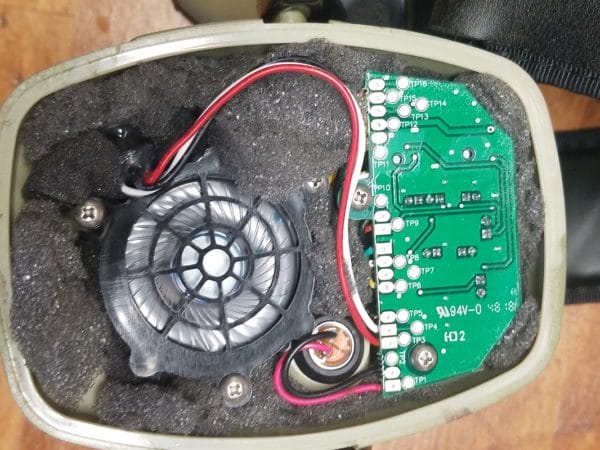
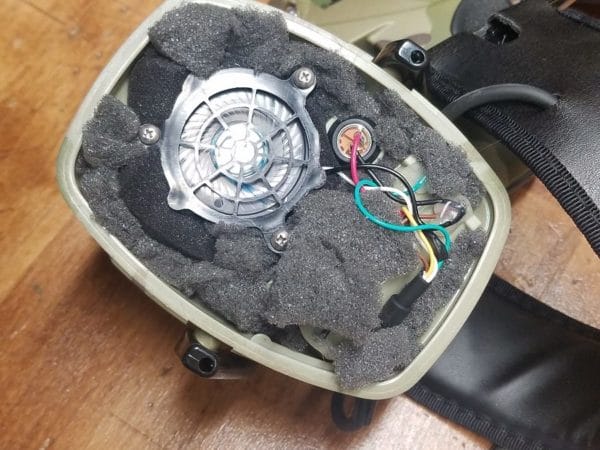
So now we’re at the spot where we can make a big difference, for very little money. We need to fill up all that empty space! On this headset I used foam from an old, unused gun case. I used my screwdriver to (carefully!) squeeze as much extra foam into the case as I could.
On this headset I used foam from an old, unused gun case.Left sideRight side
It’s OK if some of the foam is a little loose, or if it sticks out slightly above the lip of the case. When we reassemble, the foam sheet that goes under the ear cup retaining ring will hold everything in. I’ll take a moment to mention foam isn’t the only thing you can use to fill the empty space in the case. I’ve also used silicon caulking and liquid electrical tape in conjunction with foam for good effect. I put up a video showing this process years ago. The silicone worked well, though it’s not much better (if at all) than foam, and much more permanent.
I’ve also used silicon caulking and liquid electrical tape in conjunction with foam for good effect.
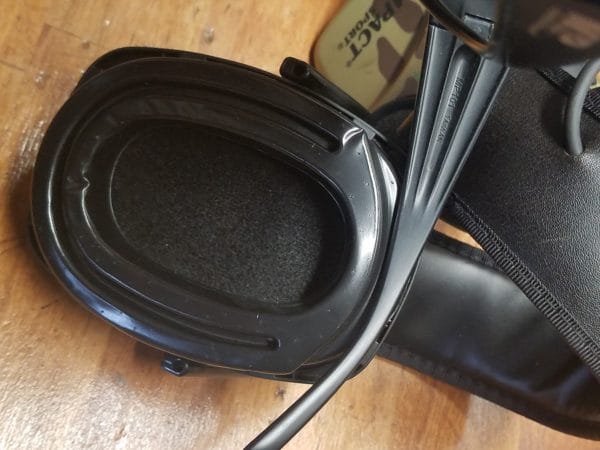
Let’s reassemble! Lay your foam sheet back on.
Howard Leight Impact Sport DIY ImprovementSnap the ear cup retaining ring back on.
Now let’s pause. We’re not putting the stock ear cups back on, instead we’re using Sightlines gel cups from Noisefighters. The Sightlines improves the effectiveness of ear pro such as the Howard Leights in a few ways.
They’re more comfortable. This is especially true with eye protection on, as the Sightlines have channels cut out for the ear bridge of your glasses. No more temple-pressure induced headaches while shooting!
They seal better. Being gel rather than vinyl/foam, the Sightlines cups contour to your head and maintain the ear seal. If you’ve had the ear seal unexpectedly give out while someone is firing off a rifle with a massive muzzle break next to you, you’ll immediately see the benefit here.
They reduce ambient noise passing into your ear. Simply put, there’s more material that sound has to pass through to get to your ear canal. I have an old set of Gen 1 Sightlines, they weight in at 33 grams, versus 9 grams for the OEM’s. That’s a 366% increase in material!
They’re cheaper than maintaining the OEM cups as recommended. Honeywell wants you to spend $15-$20 a year. The Sightlines last much longer, and run $40. My Gen 1 Sightlines are over a year and a half old, and still look just like the brand new Gen 2’s despite regular use.
They seal better. Being gel rather than vinyl/foam, the Sightlines cups contour to your head and maintain the ear seal.
OK, let’s get back to reassembly. While the Gen 1 Noisefighters Sightlines gel cups simply snapped back into the retaining tabs, the Gen 2 Sightlines have a pressure sensitive, non-permanent adhesive. Peel the backing sheet off, then carefully align and press in the gel cups. Once they’re in, give them a firm press to make sure the adhesive is all the way in.
That’s it! Your DIY improvements are done.
That’s it! Your DIY improvements are done. Even comparing performance at low levels of sound (same Megadeth song, same volume, same distance) the improved Howard Leight Impact Sport headset shows a noticeable sound reduction with the electronics off against the unimproved set. That improvement is greatlyexacerbated at louder volumes, such as at the shooting range. Given that the difference is easily apparent to the naked ear means that we’ve improved our headsets by at least 1 decibel. Since decibels are logarithmic, not linear, the jump from 22 dB NRR to 23 (or greater) dB NRR is a significant reduction in sound pressure slamming into your eardrum.
As someone who’s dealt with significant hearing loss since my early twenties, take it from me: good ear protection is always worth the money. Get the best set you can, whether by buying it or improving a good set into a great one. There are more ways to improve ear pro than the ones I’ve listed, if you have a cool technique post it in the comments below so all shooters have the chance to benefit!
About Rex Nanorum
Rex Nanorum is an Alaskan Expatriate living in Oregon with his wife and kids. Growing up on commercial fishing vessels, he found his next adventure with the 2nd Bn, 75th Ranger Regt. After 5 tours to Afghanistan and Iraq, he adventured about the west coast becoming a commercial fisheries and salvage SCUBA diver, rated helicopter pilot instructor (CFII) and personal trainer, before becoming a gear reviewer and writer.”
About ten months after we learned that Jon Favreau would be heading up a Star Wars series called “The Mandalorian” on Disney’s soon-to-launch streaming service Disney+, we have the first full trailer. It premiered this evening during the Disney+ panel at the D23 conference.
Everyone involved had stayed relatively hush-hush about the series until now, with only a couple of details mentioned with its announcement. We knew it takes place about five years after Return of the Jedi — so a few decades before Force Awakens. Favreau had also said that it follows “the travails of a lone gunfighter in the outer reaches of the galaxy” — which we later learned would be played by Pedro Pascal (perhaps best known as Oberyn Martell from Game of Thrones.)
According to the New York Times, Disney is dropping “roughly $100 million” to produce the first 10 episodes.
The Mandalorian is set to debut alongside Disney+ on November 12th, 2019.
In this episode of TFBTV, James Reeves reviews the Hush Puppy Project S&W M&P 2.0. What is the Hush Puppy Project? From their website:
“The Hush Puppy Project® provides innovative solutions to reduce or remove noise signatures from gunshots. Guns produce three distinct sounds: the cartridge’s firing, the bullet’s sonic crack and the gun’s operational cycle. Addressing the loudest of the three— the gunshot— requires a silencer (or sound suppressor) to reduce and impede the flow of high-pressure gases produced by the combustion of the cartridge’s powder charge. Hush Puppy® Project silencers reduce the sound of a gunshot through a marriage of technology from both monocore-style and wipe-style silencer designs. The second sound source is the sonic boom, or “crack,” of a bullet exceeding the speed of sound, which is eliminated with subsonic ammunition. Our silencers are optimized for Hush Puppy® subsonic ammunition, made by our sister company, Super Vel Ammunition. Finally, the metallic noise of a pistol’s operational cycle is removed by transforming the pistol into a locked breech firearm, thus preventing the pistol from self-loading. A Hush Puppy® Slide Lock Device (patent pending) prevents a semi-automatic pistol’s slide from reciprocating on the frame while the pistol is in locked breech mode.”
««« PATREON GIVEAWAYS »»»
PLEASE check out our Patreon page if you enjoy our program, and consider helping us at TFBTV out! We give away hundreds of dollars of gear a month on our Patreon page!
https://ift.tt/20aijRh
NOTE: These giveaways are not affiliated with, associated with, or in any way endorsed by YouTube and TFBTV is solely responsible for the giveaways mentioned in this video and this description.
««« FOLLOW US ON SOCIAL MEDIA »»» https://ift.tt/2Ny4xaJ https://ift.tt/2wqXNET https://ift.tt/2THAj8m
««« G-U-N-S IN THIS VIDEO »»»
S&W Hush Puppy Project M&P 2.0
««« SPONSORS »»»
Please Support Them! They help make our videos possible.
– Ventura Munitions
– Federal Premium – Building the industry’s widest variety of ammunition and offering leading products for every facet of the shooting sports. https://ift.tt/P4n5jx
-Blue Alpha Gear: https://ift.tt/2hKMfnu
««« TFB CHAT ROOM »»»
Want to join the TFBTV chat room? Use our Discord Invite: https://ift.tt/2t6R69l
Using a VPN (Virtual Private Network) is a great way to maintain your privacy online. However, there are several different ways to set up a VPN. In this article we’ll show you how to set up a VPN in several different ways, some easy, some more complex.
1. How to Set Up a VPN Using Third-Party Software
The quickest and easiest solution if you’re wondering how to create a VPN is to use the software that comes with your VPN subscription.
When you purchase a personal VPN service from a company like ExpressVPN or CyberGhost, you’ll get a link to download its software. Usually you visit your VPN provider’s website and it will have links to download the software for all of your devices, including your desktop.
You download and install the VPN software as you would any other piece of software. Once installation is complete you enter your VPN username and password and you can start using the VPN.
The software differs between companies but most will have options to select a server from locations around the world, to connect to and disconnect from a server, to toggle automatic connections on or off, and other features including a kill switch.
2. How to Set Up a VPN at Home Using a Router With VPN Support
If you have lots of people in your home using your network, it can be a hassle to install VPN software on every single one of their devices. Instead, you can set up a VPN at home by installing software directly onto your router.
There are several reasons to set up a VPN on your router, and the main advantage of this method is that any traffic that passes over your network will be encrypted by your VPN, no matter what device you use. This will even protect Internet of Things (IoT) devices. Your VPN is always on and you won’t need to configure it.
The easiest way to get VPN software on your router is by purchasing one of the best VPN routers which have software support for VPNs. TRENDnet routers, for example, allow you to configure VPN connections within their software.
To use your home VPN, log into your router by entering its IP address into your web browser. Find the option saying VPN or similar and add in your VPN username and password. You should be able to enable the VPN across your whole network from here.
3. How to Set Up a VPN by Installing VPN Software on Your Wi-Fi Router
What if you already have a router you’re happy with and you don’t want to buy a new one to set up your VPN? In that case, you can still install VPN software onto compatible routers. However, it will require a little more work.
Both of these options are open source and can add all sorts of new capabilities to your router. This includes monitoring bandwidth usage, increased wireless coverage, and better security. But let’s take a look at how to use the software to add a VPN to your router.
Upgrade Your Router’s Firmware
First, check if your particular router model is supported by DD-WRT or supported by Tomato. If it is, you can go ahead and download the right firmware for your router from the relevant website. Now make sure your computer is connected to your router via Ethernet cable rather than Wi-Fi, so you can still connect to the router once you change the settings.
Open up the web interface to your router. If you know your router’s IP address already, just type it in. If you don’t know it, use the ipconfig command to view your IP address. Log in to your router using your username and password.
You should find a menu option saying Administration or something similar, depending on your particular router. Choose this option and look for an option that says Upgrade Firmware or Upload Firmware. Use this option to upload the new firmware you just downloaded.
Once the firmware upgrade is complete, you’ll need to restart your router. To be certain the old settings are cleared, turn off your router and wait for 30 seconds before turning it on again.
When the router restarts, go back to the web interface by typing the IP address into your browser again. You should set a username and password, and your new software is ready to use.
Set Up a VPN on an Upgraded Router
You’ll need to know your VPN provider’s settings to use the VPN on your upgraded firmware. You can usually find these settings on your VPN provider’s website. For example, here is ExpressVPN’s instructions for setting up Linksys routers.
In your router firmware, go to VPN Tunneling in Tomato or Services > VPN on DD-WRT. Turn on OpenVPN Client and add the information you got from your VPN provider. Now, save your changes and your VPN should be up and running for your whole network.
4. How to Set Up Your Own Custom VPN Server
Finally, if you’re really dedicated and you want more control over your VPN, you could create your own VPN server. You can create a VPN on Windows if you have an old PC you’re not using any more, or you could use a Raspberry Pi. You can install software called OpenVPN to create your own VPN server.
The downside to this method is that the device will need to be on all the time for your VPN to function. The upside is that you don’t have to pay a subscription to a VPN provider and you know that you are in complete control of your data.
To create a VPN server you’ll need to download the OpenVPN software and install it on your chosen device. There’s an installer available for Windows users, but if you’re using a Raspberry Pi and having difficulties with installation, you can try an installer script like PiVPN.
Then, you can configure your VPN by following the instructions on the OpenVPN website.
Alternatively, another option is to use a software bundle for VPN hosting such as Algo VPN hosted on a Virtual Machine on a cloud provider like DigitalOcean.
How to Set Up a VPN at Home
These methods will let you set up your own VPN at home. The easiest way is to pay for a VPN subscription and use the software from your VPN provider to access the VPN. If you want more control, you could try installing a VPN on your router or even hosting your own VPN server.
Prescription omega-3 fatty acid medications are a safe and effective option for reducing high triglycerides, which increase the risk of heart attack and stroke, according to a new study.
Every 38 seconds, a person dies from cardiovascular disease. To put that in perspective, that’s 2,303 people every day.
“High triglycerides are becoming increasingly common because they often occur in people with insulin resistance and elevated blood sugar. Omega-3 fatty acids are effective and safe for reducing high triglycerides, but clinicians often use other medications,” says Ann Skulas-Ray, an assistant professor in the University of Arizona College of Agriculture and Life Sciences, and first author of the paper in Circulation.
When most people think of cardiovascular disease, blood pressure and cholesterol immediately come to mind, but triglycerides are another important part of the picture.
What are triglycerides?
Triglycerides are a type of fat, or lipid, found in the blood. In fact, triglycerides are the most common type of fat in our bodies. One source of triglycerides is our food, but our liver also produces them. If our bodies produce or we consume too many triglycerides, they are stockpiled within our fat cells.
Research has demonstrated that higher levels of triglycerides, above 200 ml/dL, can lead to damaging deposits in the arteries, which increases the risk of heart attack and stroke. Very high triglyceride levels, above 500 ml/dL, can lead to additional issues, such as pancreatitis, or acute inflammation of the pancreas.
By compiling and analyzing the results of 17 randomized, controlled clinical trials on high triglycerides levels, researchers found that prescription omega-3 fatty acid medication reduced triglyceride levels by 20-30% among those receiving prescription treatment.
“We concluded that treatment with 4 grams daily of any of the available prescription choices is effective and can be used safely in conjunction with statin medicines that lower cholesterol,” Skulas-Ray says.
Fish oil supplements
Prescription omega-3 fatty acid medications come in two formulations, EPA (eicosapentaenoic acid) with and without DHA (docosahexaenoic acid). As there have been no clinical comparisons between the two different formulations, the scientific advisory panel does not make a specific recommendation of one over the other.
As part of the national panel, Skulas-Ray and postdoctoral research associate Chesney Richter specifically sought to assess the efficacy of prescription omega-3 fatty acids. The advisory stresses that people with high triglyceride levels should not try to treat the condition themselves with over-the-counter fish oil supplements.
“Dietary supplements containing omega-3 fatty acids are not regulated by the FDA. They should not be used in place of prescription medication for the long-term management of high triglycerides,” Skulas-Ray says.
As many as 18.8 million adults in the US take fish oil supplements in hopes of decreasing their risk of developing heart disease. While there is a lack of scientific consensus regarding the use of fish oil supplements to prevent heart disease, recently completed clinical trials have been more promising, and a large body of research supports fish oil in maintaining general health.
Eating oily fish, such as salmon, mackerel, herring, and albacore tuna, at least two times per week is a good source of beneficial omega fatty acids. However, most Americans consume very little dietary omega-3 fatty acids and, for those people who never eat oily fish, supplements could be very beneficial, Skulas-Ray says.
“Supplements can be a practical and inexpensive option for people interested in maintaining their health. Omega-3 fatty acids are important to many aspects of human physiology.”
Skulas-Ray’s lab is now beginning to study how certain omega-3 metabolites in the blood might be used to predict how older adults will recover from the physical stress of surgery.
“This builds on our ongoing research focus on omega-3 fatty acids and inflammation,” Skulas-Ray says. “We get excited about opportunities to better understand the potential of omega-3 fatty acids to improve human health.”
Best Gaming DealsThe best deals on games, consoles, and gaming accessories from around the web, updated daily.
One of the best reasons to get the Nintendo Switch is its huge and ever-growing library of indie titles.
This week’s Nintendo’s Indie World Showcase confirmed it’ll get even bigger. And while you’ll need to wait for some of the more interesting ones like Risk of Rain 2 and Ori And The Blind Forest, there are a ton great titles already available, and a whole bunch of them can be picked up for under $25.
Below is a list of The Inventory team’s favorites. But of course, feel free to chime in your recommendations in the comment section.
Note: We’re including Amazon and eShop links, as available, but remember that when you buy through Amazon, you’ll always get credit for the full price of your game in your Gold Coins balance, even if it’s on sale. The eShop will only credit you for the price you actually paid.
To be frank, I wrote pitched this entire post just because I wanted to write about this game.
I love this Stardew Valley.
It’s a simple and relaxing way to spend time between Overwatch Role Queue waits and reading the news. It’s basically all of the JRPG side games that I loved without the over-the-top, world-ending stakes. -Tercius
If you like Earthbound, or hilarious dialogue, or incredible music, or having your heart broken…you’ll like this game. It’s also good for multiple playthroughs, because you can essentially play it as a benevolent pacifist, a genocidal warmonger, or anything in between, and your choices have dramatic consequences on the game. – Shep
I don’t normally shed tears when a video game ends. I hardly ever pause in the middle of a playthrough to appreciate a clever game mechanic. I do stop to listen to game music, but it’s rare I spend minutes trying to get gameplay and soundtrack to sync in order to recreate a perfect moment. All of these things happened during the four hours I spent completing Gris. – Mike Fahey, Kotaku
The second outing from the folks who brought us FTL, Into the Breach is a shockingly deep turn-by-turn strategy game considering each game takes place on an 8×8 grid, and only lasts for a few rounds. By telegraphing what the enemies will do on their next turn, you’re in complete control of the outcome of the game, for better or worse – Shep
Luimines timeless, in the same way Tetris or Sudoku can be enjoyed by anyone at any point in time. I loved this game back when first experienced it on my PSP and it’s still one of my favorite puzzle games. With a solid soundtrack and addictive gameplay, it’s still a must-own a decade later. -Tercius
Equal parts stressful and fun, Overcooked! 2 is a window into the soul of (and what it’d be like to work with) your friends. It’s a game that’s best played inebriated with three of your closest friends (plus one or two, just in case someone rage quits IRL.) -Tercius
Enter the Gungeon is one of those games I’m admittedly terrible at, but I still play just because it’s so much fun. With so many ridiculous guns to try out and the ability to play with a friend, it’s one that deserves to be on your Switch.-Tercius
This game was somehow made by two people, but you could have convinced me it was a first party Nintendo game. It’s a hard game, and it’s a long game, but the gorgeous visuals, incredible score, and tight controls mean it never feels like a chore to play. Hollow Knight and Breath of the Wild are 1a and 1b on my ranking of the best Switch games you can buy, and the former is only $15.
Rocket League is one of the best online multiplayer team games for casual players and friends. It also happens to be one of the most popular among competitive players.
The concept of soccer with cars is simple to grasp, yet mastering Rocket League’s mechanics, physics, and ever-changing meta requires discipline and creativity. Matches take less than 10 minutes making it easy to fit in a quick bout or to stack several into a marathon session. -Corey
Cuphead is impossibly frustrating and fun to play. The artwork, cutscenes, lovable characters, and story line instill an insatiable desire to play and fail countless times at multiple points throughout the game. -Corey
Shovel Knight is everything that adult me wants in a platformer reminiscent to what adolescent me used to play. It specifically reminds me of some of my favorite times playing Mega Man titles.
It’s easily picked up, fun to play, packed with secret areas, and is challenging to a degree right before impossibly frustrating. -Corey
Dead Cells is a little bit Hollow Knight, a little bit Into the Gungeon, and while it doesn’t quite hit the highs of either of those games, it’s a challenging, unique roguelike that rewards lots of different types of play. – Shep
We’ve talked ongoing about how ridiculous and aggressive many universities are becoming on trademark matters. Now colleges and universities do many, many annoying things, but their tendency towards trademark bullying certainly ranks up there near the top of the list. Not as high, of course, as Ohio State’s neverending insistence that everyone call it "THE Ohio State University." The school likes to point out that the "the" (sigh) is actually part of the school’s legal name, when the reality is that the school is simply being haughty and pedantic.
Application No. 88571984, filed with the U.S. Patent and Trademark Office on Thursday, was discovered and publicized Tuesday by Josh Gerben, a prominent trademark lawyer in Washington. The application seeks a trademark on the single word "THE" for use on T-shirts and baseball caps and hats.
For years, the university’s demand that it be called "THE Ohio State University" has rankled sports fans and journalists, who’ve called it "pompous and stupid," "ridiculous" and "arrogant."
Partisans, including the university, point out that "the" is part of its name under state law. And Chris Davey, a spokesman for the university, told The Columbus Dispatch on Tuesday that it’s important to "vigorously protect the university’s brand and trademarks."
This, simply, is absurd. Trademark law is written in such a way to be wide open for abuse, but even this is a bridge further than the law will allow. Trademarks require original identifiers that indicate the source of a good or service and the bar for approval by the Trademark Office goes up the shorter and less original the identifier is. The idea that someone might apply for a trademark on the single most commonly used determiner in the English language is the sort of thing reserved for jokes in our comments section. But THE Ohio State University went ahead and did it anyway.
Other schools took notice, of course, and some of them are having fun at OSU’s expense.
Michigan getting a trademark on the word "of" makes every bit as sense as OSU’s application. Fortunately, despite all of the madness we see from the USPTO on a frequent basis, nobody seems to think this application is going to be approved.
Gerben predicted on Tuesday that Ohio State was "likely to receive an initial refusal of the application."
For a trademark to be registered for a brand of clothing, the trademark "must be used in a trademarked fashion," he said on Twitter. "In other words, it has to be used on tagging or labeling for the products. In this case, just putting the word ‘the’ on the front of a hat or on the front of a shirt is not sufficient trademark use," he said.
That careful analysis is almost certainly correct, but I much prefer to simply point out that this is all very, very crazy and be done with it.