6 Reasons Why The AR-15 Is Actually Ideal For Self-Defense

The AR-15 may well be the most vilified rifle in existence at the moment, possibly even more so than the Soviet-designed AK-47. This is especially true following several incidents where bad people did bad things with the rifle in question.

As per usual following such incidents, politicians begin clamoring for the rifle to be banned. They use all kinds of rhetoric to paint the firearm as some kind of evil murder-death-kill machine that serves no other purpose except to end lives. This usually comes from the same people who claim that the most recent gunman, armed with a Glock, didn’t have a semiautomatic weapon.

Yeah.

Anyway, many of these folks–including at least one former vice president of the United States–have said that all you need for self-defense in your home is a shotgun.

Unfortunately, this just isn’t the case. The AR-15 is a great weapon for self-defense, and there are a number of reasons why. What follows is one man’s thinking on why the AR-15 is great for home defense and, in a few cases, why it’s far superior to the shotgun.

1. It’s Lightweight

The AR-15 is lightweight. Typically, a stripped down rifle weighs around six pounds or so unloaded. Ammo adds weight, of course, but it’s still not overly heavy.

With that weight comes some serious advantages. For one, it allows you to hold it up as you check out the entirety of your home to find the source of the sound of breaking glass that woke you up. Keeping a weapon at low ready requires a lot more muscle than many people think, and a lightweight rifle helps keep the muscular strain minimal.

That becomes even more important if, God forbid, you have to fire. Muscle fatigue can make your hands unsteady, which could cause you to miss your target.

Further, because of its weight, it’s light enough for almost any member of the family. In my household, my son and wife can both easily handle my AR-15. The only one who can’t is my almost 7-year-old daughter. And even then the problem isn’t the weight, but the size.

That lightweight design makes it a great choice for home defense because it doesn’t matter who needs to grab it, it’s sized about right.

2. It’s Compact

When you have to work around corners inside the average American home, the last thing you want is a long length on your weapon. A longer gun becomes unwieldy, and the AR-15 is a compact design, particularly when taken with the 16″ barrel. This allows you to move through your home without knocking stuff down and creating more problems for yourself.

Further, it’s length is often adjustable. Most AR-15s come with a collapsible stock. While these are restricted in several states, they’re legal most places and they allow you to set the length even shorter if needed. This means it’s not just compact, but adjustable as well.

3. It Has Low Recoil

The .223/5.56 round isn’t known for a hard kick. The recoil is one of the lightest out there for any weapon that’s considered sufficient for dealing with two-legged predators. This does two things.

For one, it means that you can spend more time at the range. There’s nothing worse than having plenty of ammo to shoot, but your shoulder just can’t cut it anymore. More training time means better accuracy.

Additionally, that low-recoil means it’s suited well to be used by almost any member of the family. From the kid built like an NFL linebacker I have in my house to the petite girl running around other homes, if they can hold the weapon properly, chances are they can fire it.

More than that, though, the AR-15 platform’s light recoil also allows someone to make follow-up shots quickly.

When American Rifleman spoke with former special ops sergeant major Kyle E. Lamb, he had similar things to say.

The AR is very easy to shoot. Head out to the range and test my theory. Ask anyone who wants to join in on the fun to try shooting a scored event, under pressure, with a pistol at home-defense ranges. After you see their performance, try the same with an AR, I will bet money you see much better control of the system. Men and women alike just shoot better with a carbine than with a pistol. As long as the carbine is light enough for the shooter to handle properly, the learning curve will be straight-up.

4. Versatility

The AR-15 is ideal for almost any situation, a fact Lamb also points out in his American Rifleman discussion.

The AR is unbelievably versatile, from contact shooting distances out to 300 yds., the carbine will outperform the pistol. Most of us don’t think of 300-yd. shooting as a likely home-defense scenario, and, in many areas, it wouldn’t be. But if given an option of defensive tools, and considering our country’s independent heritage and past experiences, why wouldn’t you want extended-range capabilities?

Personally, I’m inclined to agree with him. While I don’t see me having to make a 300-yard shot–after all, from my yard you can’t actually see 300 yards in pretty much any direction–that doesn’t mean no one else will. And since it’ll also work from one end of my bedroom to another…well, it’s kind of a no-brainer.

Further, if you decide to do a little varmint hunting, the AR-15 is ideal for that.

However, contrary to what many in Washington seem to think, this isn’t a particularly powerful gun. If you’re wanting to shoot something other than coyotes and similar sized critters, you need something with a little more umph. The AR-15 isn’t the cannon it’s made out to be by the press. But it will do the job in protecting your home.

5. Accuracy

The AR-15 is incredibly accurate as a platform. This is greatly important when considering self-defense in the home because rounds don’t just stop when they miss their target. They keep going, and walls aren’t enough to stop them. If you miss your target, where else can be hit?

And that’s true of any firearm, mind you. Even the shotgun runs the risk of a miss penetrating a wall and hurting someone you care about. Plus, the round is great for minimizing the threat of overpenetration. As Sheriff Jim Wilson notes:

However, for in-house use, a 55-grain soft-point load is probably the best choice in order to minimize bullet penetration. If it can be avoided, we don’t want our bullet to punch through walls, into other rooms where family members might be located. And we certainly don’t want the bullet exiting the house, or apartment, and endangering neighbors.

But the AR-platform is accurate right off the shelf, and it can be made even more accurate with practice. Really, though, most people never shoot up to the ability of their rifle, so a stock configuration is plenty for home defense. And you should be glad of it.

Remember, this is a gun that’s capable of 300-yard shots with accuracy. While you should spend some time familiarizing yourself with how you need to adjust aim for different range increments, the fact is you’ll be able to hit what you’re aiming at.

6. Ammo Capacity

But what if you do miss? Contrary to what the loudmouth on that gun forum might say, people miss in real gunfights. Days at the range are easy, low-stress days. The targets (usually) stand still, and you have all the time in the world to make your shot. Once things go sideways, however, things change. Not only are the targets moving, but they’re shooting back at you. Your blood pressure is up and your heart is pounding through your chest like it’s a demolition crew sent to clear out your rib cage for some new condos.

You’re probably going to miss a shot or two.

That means you’re going to need more ammo than one shot per bad guy. That’s something people tend to forget.

When you wake up in the middle of the night, there’s no time to grab extra ammo and stuff it in the pockets of your bathrobe or pajamas. What you have in your weapon is pretty much what you’ve got.

One of the most popular shotguns out there is the Mossberg 500. I like them. I have one. And you know what they list as the ammo capacity of a Mossberg 500? A whopping six shots. If there are three guys in your house, that’s only two shots per bad guy. Do you really want to bank on not missing that much?

Even in magazine restricted states, you get more shots with an AR-15 than you do with a shotgun.

“But the shotgun puts out a cloud of pellets. You won’t need more shots,” someone might argue. And, to a point, they’re right. A shotgun does put out a cloud of shot. A small cloud.

You see, what most people don’t understand is that a shotgun isn’t a man-portable Death Blossom waiting for you to use it. It’s basically artillery grapeshot in a smaller package. It sends out a lot of shot, but you need to hit with at least most of it to stop the threat. That means you can both hit and miss, and that means the bad guy can keep fighting.

And that’s if you don’t outright miss. Contrary to what you may have heard, it is possible to miss with a shotgun. Ask bird hunters about that sometime.

With the AR, however, you’re going to have 10 rounds at least. In free states, you get 30. And believe me, no one ever survived a gunfight and then griped about having all that extra ammo on their person. More ammo is always better.


And just like that, there are a few reasons why the AR-15 is ideal for home defense. However, this isn’t comprehensive by any means.

Nor should any of this be taken to mean that you can’t defend your home with a handgun or shotgun. You can. Plenty of people do, and like everything else in life, there are tradeoffs. However, when people claim the AR-15 isn’t useful for protecting one’s home and family, they don’t know what they’re talking about, and these are the reasons why they’re wrong. Plain and simple.

However, it’s important to remember that having a gun is just part of the equation. It’s an important part, mind you, but still just a part. You also need training and practice, and a lot of it. Don’t feel bad, I say the same thing to veterans returning from war. I write about this stuff and I’m not even close to done with training or practice. It’s an ongoing process.

Get training, get practice, and get armed. That’s the only way to keep your family safe. No matter what the local police chief says, they can’t always protect you. Only you can do that, and the AR-15 is ideal for doing so.

via Bearing Arms
6 Reasons Why The AR-15 Is Actually Ideal For Self-Defense

The Current State Of Email Marketing Programming: What Can And Can’t Be Used

Many people want to create the best email campaigns possible, and this goal can be realized by following best practices for email design and coding and by implementing advanced techniques correctly. This comprehensive guide, for novices and pros alike, delves deep into the nitty gritty of email marketing.

Here’s what you’ll learn:

  • best practices for email design, from creating a theme to designing the footer;
  • how to add images and incorporate rich media (GIFs, cinemagraphs, video) in your emails;
  • how to design responsive emails for a better user experience;
  • email client support for responsive mobile emails;
  • finally, advanced techniques in email design.

Introduction

Emails have transformed from being an ordinary text-based personal communication tool into a future-proof marketing channel. We have moved into a world of visually attractive HTML emails that have the feel of microsites in the inbox.

Getting acquainted with the best practices of email coding is, therefore, imperative if you want to avoid a broken user experience and instead improve user engagement. Moreover, as the digital world becomes more mobile, creating responsive emails is the need of the hour.

In this article, we shall delve deeper into best practices to follow for all email clients, as well as advanced techniques you can include for email clients that support interactive elements.

Let’s start with the basic structure of an email.

Basic Email Structure

As Leonardo da Vinci said, ”Simplicity is the ultimate sophistication.” Accordingly, keep the design of your email simple.

Check out the email design below by Charity: Water. Simple yet engaging.

A simple yet engaging email design by Charity: Water.
View large version

Developers have been coding emails using <table> layouts for a long time now. So, it is recommended that you place your email elements in a grid-based layout, rather than arbitrarily placed. Moreover, any element that might overlap needs to be added to a different layer.

The email shown above by Charity: Water looks like this when exported to a tabular layout:

Email design by Charity: Water divided into a grid.
View large version

Email design is made up of different subelements. Let’s explore them now.

1. Email Theme

The logo is not the only element that reflects your brand’s personality. The overall theme of your email, including the fonts, color scheme and imagery, should be in sync with branding guidelines.

2. Width And Height Of Email Template

Because your subscribers use diverse email clients and devices, your email should be appropriately visible in the preview pane of all email clients. Keep in mind that the email will be displayed according to the display pane of the email service provider or client. Only certain email clients, such as Thunderbird, Apple Mail and native mobile email clients, will display email at full width.

For other email clients, the display boxes have variable sizes. Many service providers, such as MailChimp, go over the basics of HTML email, by recommending, for example, 600 to 800 pixels as a width, so that the full email gets displayed. Remember, that most subscribers never use the horizontal scroll bar in an email.

The height of your email template should usually be long enough to accommodate your copy within two scroll lengths. You can certainly have a longer email template if you have to convey a huge amount of information. However, if your email template gets too long, it might become boring for subscribers, who will be less likely to scroll to the end to check out all of the offers and promotions included.

The height of the preview pane of most email clients (which contains content commonly referred to as “above the fold”) is generally between 300 and 500 pixels. Make the best use of this space, so that the content included above the fold entices the subscriber to scroll down.

Every email developer knows that if an email’s file size exceeds 102 KB, Gmail’s app will clip the email, and they will not be able to track metrics.

Check out the screenshot below to see what an email looks like in Gmail when it is clipped:

Email message, the weight of which exceeds 102 KB, as seen in Gmail, with ‘View entire message’ at the end.
View large version

To avoid Gmail’s clip, make sure your email does not have unnecessary code and is not over-formatted. Go for a minimalist email design, without any shortened URLs. Note that images will not be embedded in the email and, so, will not increase the file’s size. That being said, removing unnecessary images will help to reduce the email size.

For marketers who use predesigned templates, the height and width will already be taken care of. If you want to use your own design, consider the ideal width and height of an email template.

3. Body Of Email

Emails usually begin with a hero image at the top, followed by the main copy, a call to action and then the footer.

Because most people read on screens positioned about 2 to 3 feet away, your h1 title should be around 16 pixels; if your title is short, it could even go up to 20 pixels. A good idea would be to render the h1 title as text, along with an attractive hero image.

Your descriptive text should not be smaller than 12 pixels. It should be easily readable across all email clients and devices. Moreover, the alignment of paragraphs and paragraph size also play an important role.

4. Call To Action

The primary objective of email marketing is to persuade customers to take action. To do that, your call to action (CTA) should have engaging, actionable verbs. Use convincing and actionable text, like “Start the free trial,” rather than drab phrases like “Click here.”

An interesting study by ContentVerve, “10 Call-to-Action Case Studies With Takeaways and Examples From Real Button Tests”,” shows that use of the first-person perspective in CTAs increase clicks by 90%, regardless of the product. For example, “Get my free copy” converts better than “Get your free copy.”

Create a sense of urgency in CTAs and get higher click-through rates by adding the word “now.”

This email from 'Alice and Olivia' has a CTA in bright pink, contrasting with the white background.
View large version

Campaign Monitor, in one of its guides, “10 Tips to Optimize Your Calls to Action,” emphasizes that a CTA button should always contrast strongly with the background color, so that it doesn’t blend in and that it grabs the subscriber’s attention. Based on your target audience, your industry and the message to be conveyed, including CTAs at regular intervals can increase email conversions and the desired subscriber action. Its height should be at least 30 pixels, and it should be easily tappable with a thumb on mobile devices.

Check out the email below from Asana. It places a CTA strategically above the first fold and also follows the CTA best practices discussed above.

Email by Asana strategically places CTA above the first fold.
Email by Asana strategically places CTA above the first fold. (View large version)

5. Images And Interactive Elements

If you are putting images or rich media in your email, add relevant alternative (alt) text, so that the purpose of the email is preserved even when the visuals are blocked by the email client. This is also greatly helpful with accessibility, because screen readers will be able to read the alternative text and convey your message.

Most email marketers tend to send emails consisting of a single image, which is first of many common HTML mistakes compiled by MailChimp. It recommends a text-to-image ratio of 80 to 20, to make sure that emails do not get trapped in spam filters. According to a recent study by MailChimp, 200 words per image yield a good click-through rate.

Using linked images in your email ensures an optimum file size. Load images from an external server using <img> tags.

The main advantage of this technique is that you can change images even after sending the email. It makes the email light and reduces the time taken to send the email. The disadvantage is that subscribers will have to download the images from the external server, which will incur download costs for those on metered connections, and the images might also get blocked by some email services.

Rich media elements, such as GIFs, cinemagraphs and video, are becoming popular in email these days.

You can add a GIF or cinemagraph in an email simply by uploading the file to the server that stores your images. Then, copy the URL and use the following HTML:

<pre class="lang:default decode:true" title="Code for adding GIFs or Cinemagraphs in Email"><img src="/wp-content/uploads/thefiletobeinserted.gif">
</pre>

Test the email to make sure that the GIF works properly.

Embedding video is a very adaptable technique of web development, but unfortunately, it’s not supported in email. Therefore, opt for HTML5 video.

To add a video in email, use the code below:

<pre class="lang:default decode:true" title="Code for including video in email"><video width="400" height="200" controls poster="http://www.art.com/images/blog_images/Imagefiles/2017/html5_video/valentinesday.jpg"><br/><source src="http://www.videofile.com/htmlfiles/movie-14thfeb.mp4" type="video/mp4"><br/><!-- fallback 1 --><br/><a href="http://www.xyz.com" ><br/><img height="200" src=" http://www.art.com/pictures/important/Imagefiles/2017/html5_video/valentinesday.jpg " width="400" /><br/></a><br/></video><br/><br/><br/>
</pre>

HTML5 primarily supports the MP4, OGG and WebM video formats.

Pro tip: Apple supports the MP4 video format in its email clients and browsers.

Some points to remember:

  • Make sure that the server configuration you use can output the right MIME type, so that the email client identifies the correct video format when retrieving the video.

  • If you are using an Apache web server, add this entry to the .htaccess file: Add Type video/mp4.mp4 m4v.

6. Number Of Email Folds

Your email should have just two folds, as mentioned earlier. The first fold should capture your brand and include the h1 title with a relevant CTA. If your email template exceeds two scrolls, then the third scroll should cross-sell your products. The idea is to change up the content and keep subscribers hooked by providing interesting information.

7. Footer

The footer is the most overlooked part of any email. However, it probably has information that subscribers are looking for, such as the company address, social sharing buttons and contact details. In order for your email to be CAN-SPAM compliant, the footer should have some additional elements.

An “Unsubscribe” link should allow subscribers to opt out of your mailing list easily and will reduce spam complaints.

Your contact details should link back to your company website and should include your postal and email address.

Additionally, you can have ancillary links, such as “Forward to a friend” and “View in Browser.”

As stated in “The Best Practices of Footer Design” by Bee, the fine print of your email should have the following sections:

  • Explanation of why the recipient got this email
    Your subscribers have probably subscribed to numerous mailing lists. Subtly remind recipients of the reason they received the email, to maintain your reputation as an emailer and to minimize spam complaints.
  • Copyright
    Include the copyright mark, along with the current year and your business name.
  • Privacy policy
    Link to your privacy policy, because subscribers should know where that information is stored. This is critical for e-commerce retailers.
  • Terms of use
    If you are sending out a promotional email highlighting discount offers, share the terms of use that govern the deals.
Designing The Footer

Cramming information into the footer sounds tempting, but you should determine the most important information for your business and restrict the footer to the minimum. Stuffing it with too much information could lead readers to dismiss it entirely because they will not be able to figure out which links to click.

Check out the footer below by Cotton on Body. Although it is well organized, it could be overwhelming for the subscriber who is scanning the email.

The Cotton on Body email footer, which is too lengthy.
View large version

Have a look at the footer below by Alice and Olivia. It is simple, and it maintains a visual hierarchy according to the actions they want subscribers to take.

Alice and Olivia's email footer is concise and designed with all good practices in mind.
View large version

The footer by HSN below is clean and makes good use of padding and white space. It is not overwhelming, yet it conveys important information that readers might be looking for.

HSN's footer is clean; padding and white space are used appropriately.
View large version

Mobile Responsive Emails

Most subscribers will check email on their phone. Owing to this trend, your emails ought to be responsive. Responsive design includes several elements, such as media queries, fluid grids and fluid images, so that users can view the email as intended, regardless of screen size or device. The basics of responsive email design include the table element, easily stackable sections and full-width CTAs.

If your subscriber list consists of many mobile users, then avoid overlapping layouts. Hide non-primary sections, such as navigation and email advertisements, to cater to mobile subscribers. Mobile-specific email elements such as a navigation menu and image sliders can also be used.

Responsive email design is supported in these email clients:

  • iOS Mail app
  • Windows Phone 7.5
  • Android 4.x Email (OEM) app
  • BlackBerry Z10
  • BlackBerry OS7
  • iPhone Gmail app

The following email clients do not support responsive email:

  • Android Yahoo Mail app
  • iPhone Yahoo Mail app
  • BlackBerry OS 5
  • Windows Phone 7
  • iPhone Mailbox app
  • Windows Phone 8
  • Android Gmail app
  • Windows Mobile 6.1

Responsive design enables you to do the following:

  • change hierarchy,
  • modify navigation,
  • enlarge fonts,
  • change layout,
  • scale images,
  • add padding,
  • change or hide content.

Designing Responsive Email

To make their emails responsive, developers use a media query that is commonly referred to as @media. It is a special set of CSS styles, included in the header, that work as conditional statements or dynamic rules.

The point of media queries is to identify the screen size of the device being used and to execute various rules according to that screen size. The challenge is that media queries do not work in all email clients and might need detailed planning and testing compared to other design techniques.

Have a look at the media query below:

<pre class="lang:default decode:true" title="Structure of Media Query">@media only screen and (min-width:479px) and (max-width:701px) {
.em_main_table {
     width: 100% !important;
}

.em_hide {
     display: none !important;
}
}
</pre>

When this email is accessed on a device whose screen is between 479 and 701 pixels wide, the email’s width will be 100%, according to the width: 100% !important; attribute. The !important function forces this attribute in email clients such as Gmail, where it might be ignored.

The styles in the CSS rule block should specify the container or element type that the styles will dictate. Assign these rules in the HTML if you want them to work.

Here is the CSS:

<pre class="lang:default decode:true" title="Code for CSS"> td[class="body-header"]{ font-size: 18px !important; }

And here is the HTML:

<pre class="lang:default decode:true" title="Code for HTML"><td align="left" class="body-header">
</pre>

It is important that the element (td) and the class (body-header) added in the CSS and HTML match each other.

Advanced Techniques

With the advent of advanced email clients, such as Apple Mail, which is based on Webkit, email developers can even play around with keyframe animation, interactive elements such as carousels, and live feeds.

Conditional coding for different email clients (such as for Outlook and for Samsung and Apple devices) has also become possible.

Conditional coding for Outlook and for Samsung and Apple devices
View large version

Wrapping Up

If you follow these simple tips, you will surely be able to create awesome email marketing campaigns that convert, whether you are a novice or pro at email programming. In the end, aim to create a good user experience and make subscribers look forward to your emails. Happy emailing!

Smashing Editorial
(da, ra, yk, al, il)

via Smashing Magazine
The Current State Of Email Marketing Programming: What Can And Can’t Be Used

Database Audit Log Monitoring for Security and Compliance

We recently conducted a webinar on Audit Log analysis for MySQL & MariaDB Databases. This blog will further provide a deep dive into the security & compliance surrounding databases.

Database auditing is the tracking of database resources utilization and authority, specifically, the monitoring and recording of user database actions. Auditing can be based on a variety of factors, including individual actions, such as the type of SQL statement executed, or on a combination of factors such as user name, application, time, etc.  Performing regular database log analysis bolsters your internal security measures by answering questions like who changed your critical data, when it was changed, and more. Database auditing also helps you comply with increasingly demanding compliance requirements.

The purpose of this blog is to outline the importance of audit log analysis using MariaDB and Enterprise MySQL as examples.

Auditing Requirements

The requirement to track access to database servers and the data itself is not that new, but in recent years, there has been a marked need for more sophisticated tools. When auditing is enabled, each database operation on the audited database records a trail of information such as what database objects were impacted, who performed the operation and when. The comprehensive audit trail of executed database actions can be maintained over time to allow DBAs, security staff, as well as any authorized personnel, to perform in-depth analysis of access and modification patterns against data in the DBMS.  

Keep in mind that auditing tracks what a particular user has done once access has been allowed. Hence, auditing occurs post-activity; it does not do anything to prohibit access. Of course, some database auditing solutions have grown to include capabilities that will identify nefarious access and shut it down before destructive actions can occur.

Audit trails produced by intrusion detection help promote data integrity by enabling the detection of security breaches.  In this capacity, an audited system can serve as a deterrent against users tampering with data because it helps to identify infiltrators. Your company’s business practices and security policies may dictate being able to trace every data modification back to the initiating user. Moreover, government regulations may require your organization to analyze data access and produce regular reports, either on an ongoing basis, or on a case-by-case basis, when there is a need to identify the root cause of data integrity problems.  Auditing is beneficial for all of these purposes.

Moreover, should unauthorized, malicious, or simply ill-advised operations take place, proper auditing will lead to the timely discovery of the root cause and resolution.

The General Data Protection Regulation

On April 27, 2016, the General Data Protection Regulation (GDPR) was adopted by the European Parliament and the council of the European Union that will be taking effect starting on May 25, 2018.  It’s a regulation in EU law governing data protection and privacy for all individuals within the European Union. It introduces numerous security and compliance regulations to all organizations worldwide that handle, process, collect or store personal information of EU citizens. This means that organizations that work with personal data will have to elevate security measures and auditing mechanisms when handling Personal Identifiable Information (PII) of EU citizens.

Furthermore, organizations will have to ensure that only people which should have access to the personal information of EU citizens are granted  access, and in case of unauthorized access, organizations must have mechanisms to detect and be alerted on any such incident in order to resolve any possible issues in an expeditious manner.  Following a data breach, organizations must disclose full information on these events to their local data protection authority (DPA) and all customers concerned with the data breach in no more than 72 hours so they can respond accordingly.

Failing to comply with GDPR standard could result in heavy fines for up to 4% of the offending organization’s global revenue, or up to €20 million (whichever is greater). With this in mind, it is crucial for all affected organizations to make sure that they implement adequate log monitoring on their databases, as defined by the standard.

How Databases Implement Auditing

There is no set standard that defines how a database should implement auditing, so vendors and Database Administrators (DBAs) differ in their approach.  Some employ special tables while others utilize log files. The two DBMSes that we’ll be looking at here today, MariaDB and MySQL, employ log-based auditing.

The MariaDB Audit Plugin

Prior to MariaDB 5.5.20, in order to record user access, you would have had to employ third-party database solutions. To help businesses comply with internal auditing regulations and those of various regulatory bodies, MariaDB developed the MariaDB Audit Plugin.  The MariaDB Audit Plugin can be used also with MySQL, but includes some unique features that are available only for MariaDB.

In MariaDB, the Audit Plugin logs detailed information for any type of access from users to your database server and tables, including:

    • Timestamp
    • Server-Host
    • User
    • Client-Host
    • Connection-ID
    • Query-ID
    • Operation
    • Database
    • Table
    • Error-Code

Installation

Getting the Maria Audit Plugin installed, configured and the auditing activated is fairly simple.  In fact, you only need a few minutes to enable auditing for your database. A restart of the Server is not needed, so you do not need to plan any downtime for the installation of the plugin.  The only requirement is that you are running MariaDB or MySQL Server with version 5.5 or newer (MySQL 5.5.14, MariaDB 5.5.20).

If you installed MariaDB from its official packages, you probably already have the plugin on your system, even though it’s neither installed nor enabled by default. Look for a file called “server_audit.so” (in Linux) or “server_audit.dll” (in Windows) inside your plugins directory.  The file path of the plugin library is stored in the plugin_dir system variable. To see the value of this variable and determine the file path of the plugin library, execute the following SQL statement:

SHOW GLOBAL VARIABLES LIKE 'plugin_dir';
+---------------+--------------------------+
| Variable_name | Value |
+---------------+--------------------------+
| plugin_dir | /usr/lib64/mysql/plugin/ |
+---------------+--------------------------+

If you don’t find the plugin file inside your plugins directory, download it from the MariaDB site and place it in the plugins directory manually. (In Linux, ensure that the MariaDB server can read the file by giving it 755 permissions and root user ownership.)

Next, install the plugin using the command:
INSTALL PLUGIN server_audit
SONAME 'server_audit.so';

To confirm the plugin is installed and enabled, run the query show plugins;. You should see it appear in the results list:

+-----------------------------+----------+--------------------+-----------------+---------+
| Name | Status | Type | Library | License |
+-----------------------------+----------+--------------------+-----------------+---------+
| SERVER_AUDIT | ACTIVE | AUDIT | server_audit.so | GPL |
+-----------------------------+----------+--------------------+-----------------+---------+

The MariaDB Audit Plugin comes with many variables to let you fine-tune your auditing to help you better concentrate on just those events and statements that are important to you. You can see the currently set variables with the command show global variables like "server_audit%";:

MariaDB [(none)]> SHOW GLOBAL VARIABLES LIKE "server_audit%";
+-------------------------------+-----------------------+
| Variable_name | Value |
+-------------------------------+-----------------------+
| server_audit_events | |
| server_audit_excl_users | |
| server_audit_file_path | server_audit.log |
| server_audit_file_rotate_now | OFF |
| server_audit_file_rotate_size | 1000000 |
| server_audit_file_rotations | 9 |
| server_audit_incl_users | |
| server_audit_logging | ON |
| server_audit_mode | 0 |
| server_audit_output_type | file |
| server_audit_syslog_facility | LOG_USER |
| server_audit_syslog_ident | mysql-server_auditing |
| server_audit_syslog_info | |
| server_audit_syslog_priority | LOG_INFO |
+-------------------------------+-----------------------+

These variables should be specified in the MariaDB server configuration file (e.g /etc/my.cnf.d/server.cnf) in the [server] section in order to be persistent between server restarts. For example, to have the variable server_audit_logging set to ON, add the line server_audit_logging=ON to the file:

[server]

server_audit_logging=OFF

Here is a quick rundown of some of the most important variables:

  • server_audit_logging – Enables audit logging; if it’s not set to ON, audit events will not be recorded and the audit plugin will not do anything.
  • server_audit_events – Specifies the events you wish to have in the log. By default the value is empty, which means that ALL events are recorded. The options are:

    • CONNECTION (users connecting and disconnecting)
    • QUERY (queries and their result)
    • TABLE (which tables are affected by the queries)
  • server_audit_excl_users, server_audit_incl_users – These variables specify which users’ activity should be excluded from or included in the audit. server_audit_incl_users has the higher priority. By default, all users’ activity is recorded.
  • server_audit_output_type – By default auditing output is sent to a file. The other option is “syslog”, meaning all entries go to the syslog facility.
  • server_audit_syslog_facility, server_audit_syslog_priority – Specifies the syslog facility and the priority of the events that should go to syslog.

Understanding the Log File Entries

Once you have the audit plugin configured and running, you can examine the log file, (e.g. /var/lib/mysql/server_audit.log). There you will find all the events that have been enabled by the server_audit_logging variable. For example, CONNECTION entries will show you the user and from where connects and disconnects occur:

20140901 15:33:43,localhost.localdomain,root,localhost,5,0,CONNECT,,,0
20140901 15:45:42,localhost.localdomain,root,localhost,5,0,DISCONNECT,,,0

Here are some example TABLE and QUERY entries:

20140901 15:19:44,localhost.localdomain,root,localhost,4,133,WRITE,video_king,stores,
20140901 15:19:44,localhost.localdomain,root,localhost,4,133,QUERY, video_king,'DELETE FROM stores LIMIT 10',0

The first entry shows that there were WRITE operations on the database video_king and the table stores. The query that made the WRITE changes follows: DELETE FROM stores LIMIT 10. The order of these statements will be always the same – first the TABLE event and then the QUERY event that caused it.

A READ operation looks like this:

20140901 15:20:02,localhost.localdomain,root,localhost,4,134,READ,video_king,stores,
20140901 15:20:05,localhost.localdomain,root,localhost,4,134,QUERY,stores,'SELECT * FROM stores LIMIT 100',0

MySQL Enterprise Audit

MySQL Enterprise Edition includes MySQL Enterprise Audit, implemented using a server plugin named audit_log. MySQL Enterprise Audit uses the open MySQL Audit API to enable standard, policy-based monitoring, logging, and blocking of connection and query activity executed on specific MySQL servers. Designed to meet the Oracle audit specification, MySQL Enterprise Audit provides an out of box auditing and compliance solution for applications that are governed by both internal and external regulatory guidelines.

Installation

The plugin is included with MySQL Enterprise Audit, so you simply need to add the following to your my.cnf file to register and enable the audit plugin:

[mysqld]

plugin-load=audit_log.so (keep in mind the audit_log suffix is platform dependent, so .dll on Windows, etc.)

Alternatively, you can load the plugin at runtime:

mysql> INSTALL PLUGIN audit_log SONAME 'audit_log.so';

Auditing for a specific MySQL server can be dynamically enabled and disabled via the audit_log_policy global variable. It uses the following named values to enable or disable audit stream logging and to filter the audit events that are logged to the audit stream:

  • “ALL” – enable audit stream and log all events
  • “LOGINS” – enable audit stream and log only login events
  • “QUERIES” – enable audit stream and log only query events
  • “NONE” – disable audit stream

Another global variable, audit_log_rotate_on_size, allows you to automate the rotation and archival of audit stream log files based on size. Archived log files are renamed and appended with a datetime stamp
when a new file is opened for logging.

The MySQL audit stream is written as XML, using UFT-8 (without compression or encryption) so that it can be easily formatted for viewing using a standard XML parser. This enables you to leverage third-party tools to view the contents. You may override the default file format by setting the audit_log_format system variable at server startup.  Formats include:

  • Old-style XML format (audit_log_format=OLD): The original audit logging format used by default in older MySQL series.
  • New-style XML format (audit_log_format=NEW): An XML format that has better compatibility with Oracle Audit Vault than old-style XML format. MySQL 5.7 uses new-style XML format by default.
  • JSON format (audit_log_format=JSON)

By default, the file is named “audit.log” and resides in the server data directory. To change the name of the file, you can set the audit_log_file system variable at server startup.

MySQL Enterprise Audit was designed to be transparent at the application layer by allowing you to control the mix of log output buffering and asynchronous or synchronous disk writes to
minimize the associated overhead that comes when the audit stream is enabled. The net result is that, depending on the chosen audit stream log stream options, most application users will see little to no difference in response times when the audit stream is enabled.

Monyog MySQL Monitor

While reading the audit log file is great for a quick casual look, it’s not the most practical way to monitor database logs. Chances are you’ll be better off using the syslog option or, better still, taking advantage of tools that report on the audit log and/or syslogs.  There, you can process entries to focus on certain type of events of interest.

One such tool is Monyog MySQL Monitor.  Version 8.5.0 introduces audit log analysis for MySQL Enterprise and MariaDB.  This feature parses the audit log maintained by the server and displays the content in clean tabular format.

Monyog accesses the audit log file, the same way it does for other MySQL log files, including the Slow Query, General Query and Error log.

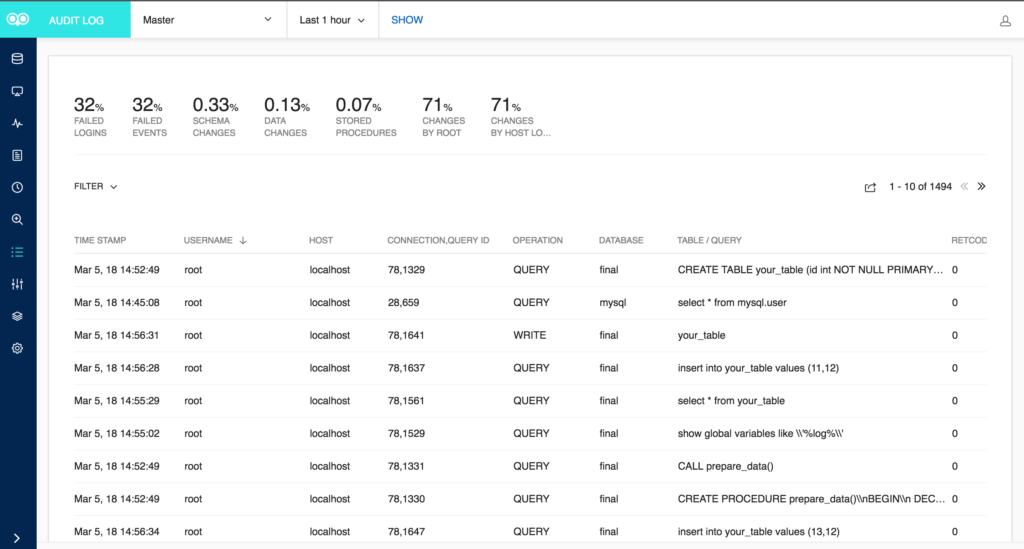
Figure 1: Audit Log Options

You can select the server and the time-frame for which you want the audit log to be seen from.  Then, clicking on “SHOW AUDIT LOG” fetches the contents of the log. The limit on the number of rows which can be fetched in one time-frame is 10000.

Figure 2: Audit Log Screen

The section on the top gives you quick summary of the audit log in percentage like Failed Logins, Failed Events, Schema changes, Data Changes and Stored Procedure. All these legends are clickable and shows the corresponding audit log entries on clicking. Furthermore, you can use the filter option to fetch audit log based on Username, Host, Operation, Database and Table/Query. There is also an option to export the fetched audit log content in CSV format.

Conclusion

In this blog, we outlined the importance of audit log analysis using MariaDB and Enterprise MySQL as examples.  

In recent years, there has been a marked need for more sophisticated tools due to increased internal and external security and auditing policies.  

A properly audited system can serve as a deterrent against users tampering with data because it helps to identify infiltrators.  Once an unauthorized, malicious, or simply ill-advised operation has taken place, proper auditing will lead to the timely discovery of the root cause and resolution.

Both MariaDB and MySQL implement auditing via native plugins.  These are fully configurable and may record database activities in a variety of formats.  The resulting log files may be read directly or analyzed by a tool such as the Monyog MySQL Monitor.  It provides a summary of Failed Logins, Failed Events, Schema changes, Data Changes and Stored Procedure, as well as fields such as Username, Host, Operation, Database and Table/Query, all within an easy-to-read tabular format.

Download a 14-day free trial of Monyog MySQL monitor. Here’s the complete video for all those who couldn’t attend the webinar.

The post Database Audit Log Monitoring for Security and Compliance appeared first on Monyog Blog.

via Planet MySQL
Database Audit Log Monitoring for Security and Compliance

The X-Force Awakens in This Great New Deadpool 2 Trailer

May the X-Force be with you.
Image: 20th Century Fox

You almost don’t realize there have already been two trailers for Deadpool 2. That’s because one was in a Bob Ross joke and the other one was about Cable. Well, now, here’s the film’s third trailer and it’s got a whole lot of action and fun for us.

Check it out.

There is so much awesome here, not the least of which is that epic X-Force drop.

The highly anticipated sequel, which has reportedly been getting very favorable test screenings, opens May 18. It’s directed by David Leitch and stars Ryan Reynolds, Josh Brolin, Zazie Beetz, and Julian Dennison as that kid.

[YouTube]

via Gizmodo
The X-Force Awakens in This Great New Deadpool 2 Trailer

The case against auto increment in MySQL

Introduction

In my travels to visit many customers over the last few years, I often see my customers creating many or all of their MySQL InnoDB tables using auto-increment primary keys. Many Object Relational Mappers do this by default on behalf of the user. Once the tables are all created with auto increment primary keys, then the database designer/developer goes about assigning alternate keys that they will actually use to access the data. Most of the time the auto-increment key is simply there to ensure that there is a unique key on the table and it’s often not used as an access path. This is a common design pattern, but is it the best way to create tables using MySQL? I am witting this blog to present the case that it’s a pretty bad idea most of the time.

Why it’s a bad Idea

There are four reasons why, which I will explain in some depth later in the post but for now, they are:

  • Auto increment keys used indiscriminately are a waste of the primary key access which is always the fastest way to get to a row in a table.
  • Auto increment locks can and do impact concurrency and scalability of your database.
  • In an HA replication environment using standard Async Replication, auto increment risks orphan rows during a master failure event.
  • If you are lucky enough to need to scale writes beyond a single server and end up having to shard auto increment no longer produces unique keys.

What are the alternatives

What can I use instead you might ask? Well, there are a few  good answers to that as well.

  • Use UUID instead. It’s larger, uglier and even more meaningless looking than an auto increment key, but it avoids most, if not all, of the issues above.
  • My favorite, is to use a natural key. This is not always possible, but I often see tables with an auto increment primary key and then one or more unique secondary indexes. In this case, you simply replace the auto- increment key with your choice of already existing unique keys.
  • Use a custom roll your own custom key generator. This is probably worthy of a lengthy blog all on its own.

The problem cases in a bit more depth

The waste of a primary key

MySQL InnoDB stores tables store the table data as part of the primary key’s B-Tree. Storing data this way makes access by primary key fast it also helps to keep the table well organized during inserts and deletes minimizing the impact of fragmentation over time.

What this means is when access is made by a secondary index, first the secondary index B-Tree must be traversed and then the primary key index must be traversed. In addition, when the primary index is not used for access just to ensure uniqueness, there is the additional cost for maintaining a secondary index which could be the primary key index.

As a result, it will take 2x additional work to access rows via secondary key, extra writes to maintain an additional B-Tree and InnoDB buffer pool space consumed by an additional B-Tree.

auto increment PK means secondary unique index

Unique secondary index with primary key in InnnoDB

Auto-increment locks

When an insert is performed on a table with an auto increment key table level lock is placed on the table for inserts only until the transaction in which the insert is performed commits.

When auto-commit is on, this lock lasts for a very short time. If the application is using manual commits, the lock will be maintained for a longer period.

In some cases, I have seen this lock result in deadlocks when two or more transactions insert into multiple tables in differing order. Always a bad idea, but the very low granularity of auto-increment locks causes this to be especially problematic.

Replication orphans

Standard MySQL replication is asynchronous by default this allows the master and slave to become disconnected without impacting the master’s operations. It also can result in updates to the master which are not replicated to the slave when the master fails. In a situation like this failing over to the slave will result in new rows going into auto increment tables using the same increment values used by the previous master.

If the tables are using a method to generate primary keys other than auto-increment, when the original master becomes available the missing operations from the original master Binlog can be played against the new master with minimal risk. If auto-increment is used the Binlog entries will not be able to be used without modification. Note if Statement mode replication was used this issue is avoided, but there are bunch of other reasons why you really shouldn’t be using statement mode replication anymore.

Lost uniqueness when sharding

If you get to the enviable point where you need to shard your database because you have just too much traffic going to your database for it to scale any further without sharding it, you will quickly find that the unique keys you get from auto-increment aren’t unique anymore. This causes problems when you want to merge shard data for analytics or if you need to recombine sharded data for any other reason, the no longer unique auto-increment primary keys get in the way.

Primary Key Alternatives

Once it becomes apparent that auto-increment, as implemented in InnoDB, is not necessarily the great idea it once appeared to be, the question becomes what are the alternatives? I’ll offer four options here.

Natural Key

By far and away the best choice is to use a natural key. By that, I mean one that has meaning outside of the database itself. Examples of Natural keys are National Identity numbers, State or Province identity number, timestamp, postal address, phone number, email address etc. These are generally already unique and have the advantage that they are already likely to have been used as secondary indexes anyway when you were creating your table with auto-increment primary keys. If you just simply use the existing Natural key as your primary key, you improve access to the table by that key and eliminate the cost of maintaining an extra index while avoiding the consequences of all of the problems I have already described.

Modified Natural Key

In the case of a modified natural key, you have a natural key which you are fairly sure is mostly unique, but maybe not always. Maybe occasionally you will run into cases where it’s not really going to be unique. The most common case is when you want to use a timestamp. Even if you make your timestamp down to the nanosecond there is always a small chance you will have two different processes attempting to insert into the same table with the same timestamp. By making your primary key a compound key with a small byte sized counter on the end, you can add duplicates by incrementing the small counter if an insert fails. If it fails again rinse and repeat. This only works when most of the time the natural key is fully unique.

UUID

The use of a UUID (Universally Unique Identifier) has become popular in recent years as an alternative to auto- increment keys. See:  https://en.wikipedia.org/wiki/Universally_unique_identifier UUIDs have the advantage of being unique much like auto-increment keys but they do not require table locks and they are unique within the constraints of their construction which often includes the generators MAC address, a timestamp and a unique value much like the kinds of value generated by the modified natural key approach above. To save space and minimize the impact on index block consumption UUIDs should be stored as binary(16) values instead of the Char(36) form they are usually seen. If insertion order is significant the bytes of a Type 1 UUID should be re-ordered as described here: https://www.percona.com/blog/2014/12/19/store-uuid-optimized-way/

Custom Key generator

Finally you can go to a custom key generator. Custom key generators like UUIDs can produce universally unique keys with specific characteristics.  I am not going to go into a lot of detail here but here are some examples of such generators:


A slideshare presentation that does a good job of describing a number of distributed options can be found here: https://www.slideshare.net/davegardnerisme/unique-id-generation-in-distributed-systems
Another custom approach to generating distributed keys makes light use of a persistent store by breaking up the keys into large ranges and assigning each range to a specific generator (say for example by customer id or hash of customer id) and then pulling smaller ranges of a few hundred to a few thousand keys into memory for allocation at a time. This allows distribution across multiple generators and limits database updates to relatively infrequent key batch allocation requests.

via Planet MySQL
The case against auto increment in MySQL

The Case Against The Case Against Auto Increment in MySQL

In the Pythian blog today, John Schulz writes The Case Against Auto Increment In MySQL, but his blog contains some misunderstandings about MySQL, and makes some bad conclusions.
The Concerns are Based on Bad Assumptions
In his blog, Schulz describes several concerns about using auto-increment primary keys.
Primary Key Access
"…when access is made by a secondary index, first the secondary
via Planet MySQL
The Case Against The Case Against Auto Increment in MySQL

MySQL Cheat Sheet

So first I have posted in sometime as felt I should be. I have been very busy still working with MySQL and all related forks and failed to put out blogs as I felt I should. So I will work on that.

Now That being said I recalled the other day a website I used to love because it was a common VI cheat sheet list. The syntax you know , you know you need it, but type it 3 times until it right. When it does get entered right you look at it dumbfounded , I thought I wrote that already.

So I figured why not a simple list of common MySQL commands that we all either type 50 times a month or should know like the back of our hand but forget when the client is looking over our shoulder.
For starters..
We set up a new MySQL 5.7.6+ server and log in..
Need to change password before we can do anything. But it is Alter user not Set pass.
We want to know how to read the password still as it is in clear text.

ALTER USER

ALTER USER 'root'@'localhost' IDENTIFIED BY 'MyNewPass';

Set Password is

SET PASSWORD FOR 'bob''@'localhost' = PASSWORD('cleartext password');

Purge Binary Logs

PURGE BINARY LOGS TO 'mysql-bin.010';
PURGE BINARY LOGS BEFORE '2008-04-02 00:00:00
PURGE BINARY LOGS BEFORE NOW() - interval 3 DAY;

MySQL Dump

# COMPACT WILL REMOVE DROP STATEMENTS
mysqldump --events --master-data=2 --routines --triggers --compact --all-databases > db.sql
mysqldump --events --master-data=2 --routines --triggers --all-databases > NAME.sql
mysqldump --opt --routines --triggers dbname > dbname.sql
mysqldump --opt --routines --triggers --no-create-info joomla jforms > dataonly.sql

Turn off Foreign Keys for a moment

SET GLOBAL foreign_key_checks=0;

Skip Grants

/usr/bin/mysqld_safe --defaults-file=/etc/mysql/my.cnf --skip-grant-tables
vi /etc/mysql/my.cnf
[mysqld]
skip-grant-tables

BinLog reviews
–base64-output=DECODE-ROWS & –verbose

mysqlbinlog --defaults-file=/home/anothermysqldba/.my.cnf --base64-output=DECODE-ROWS --verbose binlog.005862 > 005862.sql

MYSQL SECURE CLIENT

mysql_config_editor print --all
mysql_config_editor set --user=mysql --password --login-path=localhost --host=localhost
mysql --login-path=localhost -e 'SELECT NOW()';

Swap

sudo swapoff -a
To set the new value to 10: echo 10 | sudo tee /proc/sys/vm/swappiness
sudo swapon -a

IF INFORMATION SCHEMA IS SLOW

set global innodb_stats_on_metadata=0;

AWS Variables

CALL mysql.rds_show_configuration;
> call mysql.rds_set_configuration('binlog retention hours', 24);
> call mysql.rds_set_configuration('slow_launch_time', 2);

Find what table a column name is in

SELECT TABLE_SCHEMA , TABLE_NAME , COLUMN_NAME FROM information_schema.COLUMNS WHERE COLUMN_NAME = 'fieldname' ;

Client says it is in TableA but they have 50 databases.. What schema has TableA

SELECT TABLE_SCHEMA , TABLE_NAME FROM information_schema.TABLES WHERE TABLE_NAME = 'TableA' ;

Adjust Slave workers

Select @@slave_parallel_workers;
Stop Slave; Set GLOBAL  slave_parallel_workers=5; Start Slave;

MySQL Multi

5.6>
To start both : mysqld_multi start 1,2
To check on status of both: mysqld_multi report 1,2
To check on status or other options you can use just one

5.7<
[mysqld1] BECOMES [mysqld@mysqld1]
systemctl start mysqld@mysqld1
systemctl start mysqld@mysqld2
systemctl start mysqld@mysqld3
systemctl start mysqld@mysqld4

MySQL Upgrade System tables only

mysql_upgrade --defaults-file=/home/anothermysqldba/.my.cnf --upgrade-system-tables

SKIP REPLICATION ERROR

STOP SLAVE; SET GLOBAL sql_slave_skip_counter =1; START SLAVE; SELECT SLEEP(1); SHOW SLAVE STATUS\G

via Planet MySQL
MySQL Cheat Sheet

MySQL 8.0.4rc

MySQL 8.0.4rc was just released as "Pre-General Availability Draft: 2018-03-19".

I decided to take a quick peek and note my impressions here.  Some of this is old news for many as this release has been talked about for awhile but I added my thoughts anyway.. 
First thing I noticed was a simple issue of using the updated mysql client. My older version was still in my path that resulted in 

ERROR 2059 (HY000): Authentication plugin 'caching_sha2_password' cannot be loaded

So simple fix and make sure you are using the valid updated mysql client. Of course other options existed like changing the authentication plugin back to  mysql_native_password but why bother, use the secure method.  This is a very good enhancement for security so do not be shocked if you have some connection issues while you get your connections using this more secure method. 

Welcome to the MySQL monitor.  Commands end with ; or \g.
Your MySQL connection id is 36
Server version: 8.0.4-rc-log

Copyright (c) 2000, 2018, Oracle and/or its affiliates. All rights reserved.

So the first very cool enhancement… 

mysql> show create table user\G

*************************** 1. row ***************************

       Table: user
Create Table: CREATE TABLE `user` (
  `Host` char(60) COLLATE utf8_bin NOT NULL DEFAULT '',
  `User` char(32) COLLATE utf8_bin NOT NULL DEFAULT '',
  `Select_priv` enum('N','Y') CHARACTER SET utf8 NOT NULL DEFAULT 'N',
  `Insert_priv` enum('N','Y') CHARACTER SET utf8 NOT NULL DEFAULT 'N',
  `Update_priv` enum('N','Y') CHARACTER SET utf8 NOT NULL DEFAULT 'N',
  `Delete_priv` enum('N','Y') CHARACTER SET utf8 NOT NULL DEFAULT 'N',
  `Create_priv` enum('N','Y') CHARACTER SET utf8 NOT NULL DEFAULT 'N',
  `Drop_priv` enum('N','Y') CHARACTER SET utf8 NOT NULL DEFAULT 'N',
  `Reload_priv` enum('N','Y') CHARACTER SET utf8 NOT NULL DEFAULT 'N',
  `Shutdown_priv` enum('N','Y') CHARACTER SET utf8 NOT NULL DEFAULT 'N',
  `Process_priv` enum('N','Y') CHARACTER SET utf8 NOT NULL DEFAULT 'N',
  `File_priv` enum('N','Y') CHARACTER SET utf8 NOT NULL DEFAULT 'N',
  `Grant_priv` enum('N','Y') CHARACTER SET utf8 NOT NULL DEFAULT 'N',
  `References_priv` enum('N','Y') CHARACTER SET utf8 NOT NULL DEFAULT 'N',
  `Index_priv` enum('N','Y') CHARACTER SET utf8 NOT NULL DEFAULT 'N',
  `Alter_priv` enum('N','Y') CHARACTER SET utf8 NOT NULL DEFAULT 'N',
  `Show_db_priv` enum('N','Y') CHARACTER SET utf8 NOT NULL DEFAULT 'N',
  `Super_priv` enum('N','Y') CHARACTER SET utf8 NOT NULL DEFAULT 'N',
  `Create_tmp_table_priv` enum('N','Y') CHARACTER SET utf8 NOT NULL DEFAULT 'N',
  `Lock_tables_priv` enum('N','Y') CHARACTER SET utf8 NOT NULL DEFAULT 'N',
  `Execute_priv` enum('N','Y') CHARACTER SET utf8 NOT NULL DEFAULT 'N',
  `Repl_slave_priv` enum('N','Y') CHARACTER SET utf8 NOT NULL DEFAULT 'N',
  `Repl_client_priv` enum('N','Y') CHARACTER SET utf8 NOT NULL DEFAULT 'N',
  `Create_view_priv` enum('N','Y') CHARACTER SET utf8 NOT NULL DEFAULT 'N',
  `Show_view_priv` enum('N','Y') CHARACTER SET utf8 NOT NULL DEFAULT 'N',
  `Create_routine_priv` enum('N','Y') CHARACTER SET utf8 NOT NULL DEFAULT 'N',
  `Alter_routine_priv` enum('N','Y') CHARACTER SET utf8 NOT NULL DEFAULT 'N',
  `Create_user_priv` enum('N','Y') CHARACTER SET utf8 NOT NULL DEFAULT 'N',
  `Event_priv` enum('N','Y') CHARACTER SET utf8 NOT NULL DEFAULT 'N',
  `Trigger_priv` enum('N','Y') CHARACTER SET utf8 NOT NULL DEFAULT 'N',
  `Create_tablespace_priv` enum('N','Y') CHARACTER SET utf8 NOT NULL DEFAULT 'N',
  `ssl_type` enum('','ANY','X509','SPECIFIED') CHARACTER SET utf8 NOT NULL DEFAULT '',
  `ssl_cipher` blob NOT NULL,
  `x509_issuer` blob NOT NULL,
  `x509_subject` blob NOT NULL,
  `max_questions` int(11) unsigned NOT NULL DEFAULT '0',
  `max_updates` int(11) unsigned NOT NULL DEFAULT '0',
  `max_connections` int(11) unsigned NOT NULL DEFAULT '0',
  `max_user_connections` int(11) unsigned NOT NULL DEFAULT '0',
  `plugin` char(64) COLLATE utf8_bin NOT NULL DEFAULT 'caching_sha2_password',
  `authentication_string` text COLLATE utf8_bin,
  `password_expired` enum('N','Y') CHARACTER SET utf8 NOT NULL DEFAULT 'N',
  `password_last_changed` timestamp NULL DEFAULT NULL,
  `password_lifetime` smallint(5) unsigned DEFAULT NULL,
  `account_locked` enum('N','Y') CHARACTER SET utf8 NOT NULL DEFAULT 'N',
  `Create_role_priv` enum('N','Y') CHARACTER SET utf8 NOT NULL DEFAULT 'N',
  `Drop_role_priv` enum('N','Y') CHARACTER SET utf8 NOT NULL DEFAULT 'N',
  `Password_reuse_history` smallint(5) unsigned DEFAULT NULL,
  `Password_reuse_time` smallint(5) unsigned DEFAULT NULL,
  PRIMARY KEY (`Host`,`User`)
) /*!50100 TABLESPACE `mysql` */ ENGINE=InnoDB DEFAULT CHARSET=utf8 COLLATE=utf8_bin STATS_PERSISTENT=0 COMMENT='Users and global privileges'
1 row in set (0.00 sec)

Yep user table is InnoDB and has own TableSpace. 
With the addition of the new Data Dictionary you will now notice Information_schema changes. 
So as a simple example the Columns table historically has not been a view but that has now changed , along with many others as you can see via the url provided. 

mysql> show create table COLUMNS \G

*************************** 1. row ***************************

                View: COLUMNS
         Create View: CREATE ALGORITHM=UNDEFINED DEFINER=`mysql.infoschema`@`localhost` 

This appears to be done to help performance with the information_schema but removing the temporary table creations per queries into the information_schema. 
Chapter 14 of the documentation goes into depth on this, the provided url below will help you find more information and future blog posts might touch more on this. 
The previously mentioned Data Dictionary then also leads into the ability to have atomic Data Definition Language (DDL) statements or  atomic DDL. 
This is likely to trip up a few transactions if you do not review your queries before setting up replication to a new MySQL 8.0 instance. I say that because of how the handling of table maintenance could be impacted. If you write clean queries with "If Exists" it won’t be a big problem. Overall it is a more transaction based feature that protects your data and rollback options. 
Resource management looks very interesting and I will have to take more time to focus on this as it is a new feature with MySQL 8.0. Overall you can assign groups and no longer have to set priority of query but let your grouping define how a query should behave and resources allotted to it. 

mysql> select @@version;

+------------+

| @@version  |
+------------+
| 5.7.16-log |
+------------+
1 row in set (0.00 sec)
mysql> desc INFORMATION_SCHEMA.RESOURCE_GROUPS;
ERROR 1109 (42S02): Unknown table 'RESOURCE_GROUPS' in information_schema
mysql> select @@version;
+--------------+
| @@version    |
+--------------+
| 8.0.4-rc-log |
+--------------+
1 row in set (0.00 sec)
mysql> desc INFORMATION_SCHEMA.RESOURCE_GROUPS;
+------------------------+-----------------------+------+-----+---------+-------+
| Field                  | Type                  | Null | Key | Default | Extra |
+------------------------+-----------------------+------+-----+---------+-------+
| RESOURCE_GROUP_NAME    | varchar(64)           | NO   |     | NULL    |       |
| RESOURCE_GROUP_TYPE    | enum('SYSTEM','USER') | NO   |     | NULL    |       |
| RESOURCE_GROUP_ENABLED | tinyint(1)            | NO   |     | NULL    |       |
| VCPU_IDS               | blob                  | YES  |     | NULL    |       |
| THREAD_PRIORITY        | int(11)               | NO   |     | NULL    |       |
+------------------------+-----------------------+------+-----+---------+-------+
5 rows in set (0.00 sec)

More insight into your InnoDB buffer pool cache in regards to the indexes that are in it is now available. 

mysql> desc INFORMATION_SCHEMA.INNODB_CACHED_INDEXES ;

+----------------+---------------------+------+-----+---------+-------+

| Field          | Type                | Null | Key | Default | Extra |
+----------------+---------------------+------+-----+---------+-------+
| SPACE_ID       | int(11) unsigned    | NO   |     |         |       |
| INDEX_ID       | bigint(21) unsigned | NO   |     |         |       |
| N_CACHED_PAGES | bigint(21) unsigned | NO   |     |         |       |
+----------------+---------------------+------+-----+---------+-------+
3 rows in set (0.01 sec)

If you are unsure what to set the InnoDB Buffer pool , log_sizes or flush method MySQL will set these for you now based on the available memory. 
innodb_dedicated_server

[mysqld]

innodb-dedicated-server=1

mysql> select @@innodb_dedicated_server;
+---------------------------+
| @@innodb_dedicated_server |
+---------------------------+
|                         1 |
+---------------------------+

This simple test set my innodb_buffer_pool_size to 6GB  for example when the default is 128MB. 
Numerous JSON additions have been made as well as regular expression changes. Both of which look promising. 
The only replication enhancement per this release itself is that is now supports binary logging of partial updates to JSON documents using a compact binary format. 
However overall many features are available ( you can read all about them here) ,  one of which (I wish my client had tomorrow ) is replication filers per channel. 
My test instance already had binary logs enabled, but they are on by default now along with TABLE based versus file based master & slave info, ( big fan of having that transaction based by default )
Overall keep in mind this is just a first glance at this release and very high level thoughts on it, many other changes exist. Looking over other blog posts about this release as well as the manual and release notes will also help. Certainly download and review as it looks to be very promising for administration, security and replication points of view. 

via Planet MySQL
MySQL 8.0.4rc

Migrating to MySQL 8.0 without breaking old application

Recently I blogged about the new default authentication plugin in MySQL 8.0 and I got some comments complaining that this new authentication plugin is breaking half of applications.

So first of all, if you are using an old connector or a connector (like the one for Go) not yet supporting caching_sha2_passwordas authentication plugin, you are still able to use the oldone. If you have created a new user for your application not supporting the new authentication method, you just have to run the following command (please use the right user account):

ALTER USER 'username'@'hostname' IDENTIFIED WITH 'mysql_native_password' BY 'password';

Let’s got back to the blog post now.

Situation

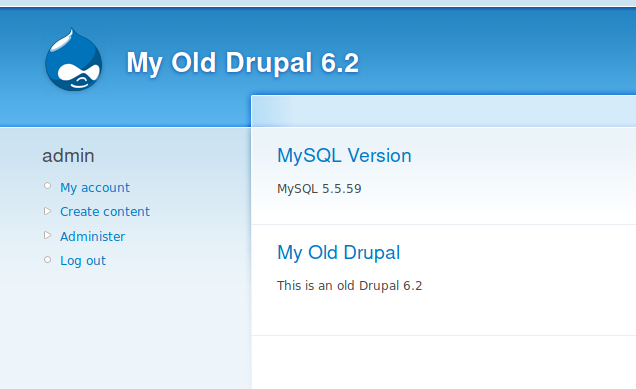
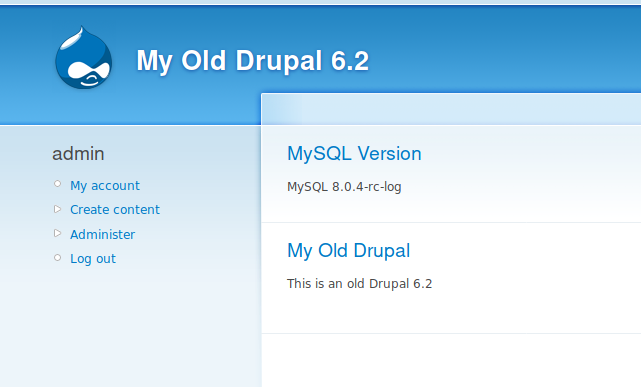
The exercise of this blog consists in the migration of the MySQL server 5.5.59 used by Druapl 6.2  to MySQL 8.0 without migrating to the latest Drupal version.

This is what we have now:

So far so good 😉

MySQL Upgrade

In the MySQL Manual, we propose 2 different strategies:

The logical method consists of making a logical dump and I restore it, I won’t cover it here. The in-place method is as far as I know the most common one. However, there is something very important that people tend to forget: “Upgrade that skips versions is not supported. For example, upgrading directly from MySQL 5.6 to 8.0 is not supported.

So know that this is clarified again, let’s continue with our plan.

As we are using 5.5.59, the latest 5.5 version, we don’t need to upgrade the binaries to the latest 5.5, if we would use a older version of 5.5, I would have recommended to upgrade first to the latest version of the same major version too. Our first step is then to put our site in maintenance and then upgrade to the latest 5.6.

MySQL 5.6

# yum update --enablerepo=mysql56-community --disablerepo=mysql57-community mysql-community-server
...
Updated:
  mysql-community-server.x86_64 0:5.6.39-2.el7                                                                                                         
Dependency Updated:
  mysql-community-client.x86_64 0:5.6.39-2.el7      
  mysql-community-common.x86_64 0:5.6.39-2.el7      
  mysql-community-libs.x86_64 0:5.6.39-2.el7     
Complete!

Perfect, let’s run the mandatory mysql_upgrade command:

Looking for 'mysql' as: mysql
Looking for 'mysqlcheck' as: mysqlcheck
Running 'mysqlcheck with default connection arguments
mysql.columns_priv                                 OK
mysql.db                                           OK
mysql.event                                        OK
...
mysql.time_zone_transition_type                    OK
mysql.user                                         OK
Running 'mysql_fix_privilege_tables'...
Running 'mysqlcheck with default connection arguments
drupal.access                                      OK
drupal.actions                                     OK
drupal.actions_aid                                 OK
...
drupal.watchdog                                    OK
OK

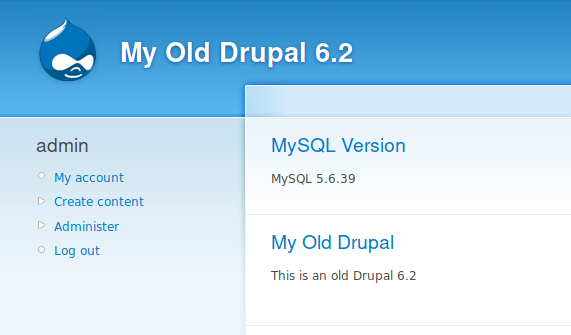
We are good, let’s put back the site online and check the home page again:

MySQL 5.7

OK, let’s move on and upgrade to the latest 5.7:

# yum upgrade  mysql-community-server
Dependency Installed:
  mysql-community-libs-compat.x86_64 0:5.7.21-1.el7                                                                                                    
Updated:
  mysql-community-server.x86_64 0:5.7.21-1.el7                                                                                                         
Dependency Updated:
  mysql-community-client.x86_64 0:5.7.21-1.el7      
  mysql-community-common.x86_64 0:5.7.21-1.el7      
  mysql-community-libs.x86_64 0:5.7.21-1.el7     
Complete!
# mysql_upgrade 
Checking if update is needed.
Checking server version.
Running queries to upgrade MySQL server.
Checking system database.
mysql.columns_priv                                 OK
mysql.db                                           OK
mysql.engine_cost                                  OK
...
mysql.time_zone_transition_type                    OK
mysql.user                                         OK
Upgrading the sys schema.
Checking databases.
drupal.access                                      OK
drupal.actions                                     OK
...
sys.sys_config                                     OK
Upgrade process completed successfully.
Checking if update is needed.

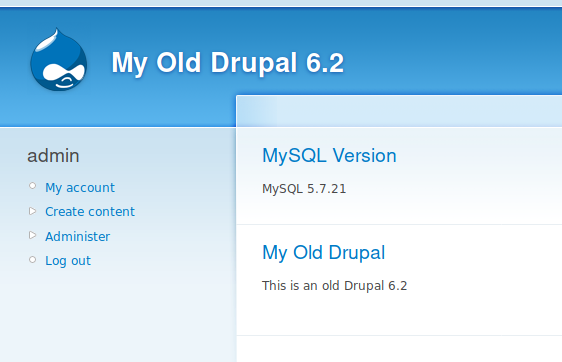
Once again, nothing wrong here, let’s check the website:

MySQL 8.0

It’s time now to upgrade to MySQL 8.0 !

Let’s perform like we did for the previous version:

# yum update --enablerepo=mysql80-community --disablerepo=mysql57-community mysql-community-server
Updated:
  mysql-community-server.x86_64 0:8.0.4-0.1.rc.el7                                                                                                     
Dependency Updated:
  mysql-community-client.x86_64 0:8.0.4-0.1.rc.el7  
  mysql-community-common.x86_64 0:8.0.4-0.1.rc.el7  
  mysql-community-libs.x86_64 0:8.0.4-0.1.rc.el7 
Complete!
[root@mysql1 drupal-6.2]# mysql_upgrade 
Checking if update is needed.
Checking server version.
Running queries to upgrade MySQL server.
Upgrading system table data.
Checking system database.
mysql.columns_priv                                 OK
mysql.component                                    OK
mysql.db                                           OK
mysql.default_roles                                OK
...
mysql.time_zone_transition_type                    OK
mysql.user                                         OK
Found outdated sys schema version 1.5.1.
Upgrading the sys schema.
Checking databases.
drupal.access                                      OK
drupal.actions                                     OK
...
drupal.watchdog                                    OK
sys.sys_config                                     OK
Upgrade process completed successfully.
Checking if update is needed.

Again, no problem here ! Let’s see the website:


OH! We have a problem it seems… Did my user’s authentication method changed and my old PHP connector doesn’t support it ?

Let’s verify:

mysql> select Host, User, plugin from mysql.user where User like 'drup%';
+------+---------+-----------------------+
| Host | User    | plugin                |
+------+---------+-----------------------+
| %    | drupal  | mysql_native_password |
+------+---------+-----------------------+
1 rows in set (0.00 sec)

So that’s not the problem. As I said before, users authentication method is not changed. So this new default doesn’t break old applications…. but my site is still not working…

What’s wrong then ?

In fact, this old Drupal, uses a table name that is now part of the reserved keywords. It’s always advised to verify what are the new keywords reserved for MySQL itself. New features can also mean new keywords sometimes.

I searched in the code and I replaced all the calls to system table by `system` and now the result:

Conclusion

If you are using an old application, no the new authentication plugin doesn’t break your application, until you don’t create a new user for it and not specify an authentication method compatible with your connector. But of course other things, like reserved keywords in this case, can be problematic. This is why an major release upgrade always need to be tested in advance. Not only for schema and syntax compatibility but also for performance as the query execution plan might not be the one you expect event if in most cases the MySQL Optimizer becomes smarter and smarter with the releases and has the support of new features like the histograms.

And don’t forget that the new MySQL Shell includes a new utility checking your current environment to identify possible issues like the one covered in this article.

via Planet MySQL
Migrating to MySQL 8.0 without breaking old application

MySQL Yum repo setups for commercial and community use cases

MySQL Package Management Options In this blog we will explore some interesting ways to install MySQL Community and Enterprise Edition binaries using your associated Linux package manager.  In this case we’ll look mostly at the Yum package manager on Oracle Linux.  The benefit of these package managers is that you can install software packages easily,… Read More »
via Planet MySQL
MySQL Yum repo setups for commercial and community use cases