How To Upload File in Laravel 5.7 Using MySQL

This tutorial help to upload files using Laravel 5.7.We will create html form view that upload file into server and save path information into MySQL table. We will use MySQL and php 7 to create file upload functionality. File Upload Using Laravel 5.7 and Mysql Lets create new laravel application using laravel CLI. The Artisan […]

The post How To Upload File in Laravel 5.7 Using MySQL appeared first on Phpflow.com.

via Planet MySQL
How To Upload File in Laravel 5.7 Using MySQL

Contentful raises $33.5M for its headless CMS platform

Contentful, a Berlin- and San Francisco-based startup that provides content management infrastructure for companies like Spotify, Nike, Lyft and others, today announced that it has raised a $33.5 million Series D funding round led by Sapphire Ventures, with participation from OMERS Ventures and Salesforce Ventures, as well as existing investors General Catalyst, Benchmark, Balderton Capital and Hercules. In total, the company has now raised $78.3 million.

It’s been less than a year since the company raised its Series C round and, as Contentful co-founder and CEO Sascha Konietzke told me, the company didn’t really need to raise right now. “We had just raised our last round about a year ago. We still had plenty of cash in our bank account and we didn’t need to raise as of now,” said Konietzke. “But we saw a lot of economic uncertainty, so we thought it might be a good moment in time to recharge. And at the same time, we already had some interesting conversations ongoing with Sapphire [formerly SAP Ventures] and Salesforce. So we saw the opportunity to add more funding and also start getting into a tight relationship with both of these players.”

The original plan for Contentful was to focus almost explicitly on mobile. As it turns out, though, the company’s customers also wanted to use the service to handle its web-based applications and these days, Contentful happily supports both. “What we’re seeing is that everything is becoming an application,” he told me. “We started with native mobile application, but even the websites nowadays are often an application.”

In its early days, Contentful focused only on developers. Now, however, that’s changing, and having these connections to large enterprise players like SAP and Salesforce surely isn’t going to hurt the company as it looks to bring on larger enterprise accounts.

Currently, the company’s focus is very much on Europe and North America, which account for about 80 percent of its customers. For now, Contentful plans to continue to focus on these regions, though it obviously supports customers anywhere in the world.

Contentful only exists as a hosted platform. As of now, the company doesn’t have any plans for offering a self-hosted version, though Konietzke noted that he does occasionally get requests for this.

What the company is planning to do in the near future, though, is to enable more integrations with existing enterprise tools. “Customers are asking for deeper integrations into their enterprise stack,” Konietzke said. “And that’s what we’re beginning to focus on and where we’re building a lot of capabilities around that.” In addition, support for GraphQL and an expanded rich text editing experience is coming up. The company also recently launched a new editing experience.


via TechCrunch
Contentful raises $33.5M for its headless CMS platform

Game of Thrones’ Final Season Video Teases a Song of Ice and Fire


Fire and ice collide.
Image: HBO (YouTube)

Winter may have already arrived around the globe, but next year we’ll also be getting a winter the likes of which we’ve never seen. We’re a few months away from the final season of Game of Thrones, where good will take its last stand against the forces of the undead, and we’ve gotten a gorgeously symbolic teaser for the final battle to come.

Today, showrunners David Benioff and Dan Weiss appeared alongside Maisie Williams (Arya Stark) and John Bradley (Samwell Tarly) at São Paulo Expo in Brazil, an offshoot of San Diego Comic-Con. There, they premiered a new beautiful teaser for the final season. Following that brief three-second glimpse of footage earlier this year, this animation shows the Houses of Westeros freezing and burning on the table at Dragonstone, clashing together in ice and fire. It’s perfectly poetic.

In the final season of Game of Thrones, Jon Snow and Daenerys Targaryen have joined forces to defeat the White Walkers once and for all. But the coming night isn’t the only threat. Cersei Lannister, still ruling as Queen of the Seven Kingdoms, isn’t giving up her Iron Throne that easily. Ice and fire, indeed.

Game of Thrones returns on HBO, one last time, in April 2019.


For more, make sure you’re following us on our new Instagram @io9dotcom.


via Gizmodo
Game of Thrones’ Final Season Video Teases a Song of Ice and Fire

Small Arms Survey Publish Free Guide to the Identification of Small Arms

cover of An Introductory Guide to the Identification of Small Arms, Light Weapons, and Associated Ammunition

Front cover of the new An Introductory Guide to the Identification of Small Arms, Light Weapons, and Associated Ammunition from Small Arms Survey (Small Arms Survey)

The Geneva-based Small Arms Survey have published a free 352 page guide to help with the identification of small arms, light weapons and their ammunition. The new introductory identification guide was written by a raft of subject matter experts and edited by Nic Jenzen-Jones and Matt Schroeder.

The guide includes sections explaining how the international arms trade works before four chapters layout the identifying characteristics and features of small arms, small arms ammunition, light weapons and other improvised weapons.

The Small Arms Survey explain the aims of the new book on its download page:

Arms and ammunition are evidence. Many weapons carry marks that, combined with their physical characteristics, reveal important information about them, including their manufacturer, age, and origin. This information, in turn, provides vital clues about the sources and flows of weapons in the area in which they were found.

The goal of this Handbook is to provide the reader with a basic understanding of how to identify and analyse small arms and light weapons, and to track their proliferation. The process of identifying arms is complex, and no single guide can provide all of the information required to identify every weapon or round of ammunition that may be encountered at crime scenes or in conflict zones. Instead, this guide explains the process by which weapons and ammunition are identified and arms flows are tracked. Reference material on specific small arms, light weapons, and ammunition is included throughout the guide. This material will help readers to take the steps necessary to identify the make and model of the most commonly encountered weapons and ammunition.

The guide’s introduction explains that “Reference material on specific small arms, light weapons, and ammunition is included throughout the guide. This material will help readers to take the steps necessary to identify the make and model of the most commonly encountered weapons and ammunition.”

Here’s a look at some pages from the guide:

The guide does not assume prior knowledge and explains how various different weapons work (Small Arms Survey)

How to identify a musket (Small Arms Survey)

A flow chart explaining how to use the guide to identify firearms (Small Arms Survey)

A breakdown of a Bulgarian 40mm grenade (Small Arms Survey)

Detachable magazines 101 (Small Arms Survey)

The new identification handbook follows on from another Small Arms Survey publication helmed by Jenzen-Jones, a report on Improvised Weapons was published earlier this month.

Source

via The Firearm Blog
Small Arms Survey Publish Free Guide to the Identification of Small Arms

How startups spend their money: New data shows how burn rates differ by industry and region

(Photo via Bigstock)

After a startup raises venture capital, where does all that money go? What types of services do they purchase? Do burn rates differ depending on where a company is based?

Brex, a San Francisco-based payments startup that raised $125 million in October, aimed to answer some of these questions with its new 2018 State of Startup Spend Report.

Brex helps startup founders get corporate credit cards and counts PayPal founders as investors. It analyzed financial data from YC companies using Brex — Brex was a YC startup and has raised funding from YC — to learn more about how early-stage startups are spending cash. Here are the key takeaways:

  • San Francisco-based startups have the highest burn rate at a whopping $369,000 per month. Bay Area (companies not in Silicon Valley or SF) ranked next, followed by Austin, New York, Silicon Valley, Boston, Los Angeles, Seattle, and San Francisco.
  • Startups that burn through the most money do business with internet services; transportation; and data analytics. Those that spend the least are in consumer electronics; design; operating systems; and clothing.
  • Startups rely on other startups for their tech stack needs. For example: 62 percent of companies use Gusto for payroll; 61 percent use Copper for CRM; 78 percent use Intercom for customer support. For cloud services, 54 percent use AWS, compared to 20 percent on Google. However, for productivity, 61 percent use Google Suite compared to 40 percent for Microsoft. “What we’ve learned is that startups are creating their own ecosystem,” the report notes. “They are investing in other startups that mirror their own goals of creating user-friendly, affordable, and innovative solutions for the market.”

See the full report here.

via GeekWire
How startups spend their money: New data shows how burn rates differ by industry and region

Laravel Stripe Payment Gateway Integration Tutorial With Example

Laravel Stripe Payment Example Tutorial

Laravel Stripe Payment Gateway Integration Tutorial With Example is today’s leading topic. We will use the Cashier package to integrate Stripe Payment Gateway in Laravel. The demand for Saas based platform is increasing day by day and nowadays building a subscription-based system is universal. So to make it easy on the backend like Laravel, we do need some packages that can help us build scalable, securable, and reliable web applications. Laravel Cashier makes it very simple to integrate Payment Gateway like Stripe. So let us see how we can integrate stripe in Laravel on Subscription based system.

Laravel Stripe Payment Gateway Integration

Let us first install and configure Laravel 5.7

Step 1: Install and configure Laravel 5.7

Type the following command.

laravel new stripesub

Go to the project folder and open the project in an editor. I am using VSCode.

cd stripesub && code .

Install the js dependencies using the following command.

npm install

Install the Cashier package for Stripe dependencies.

composer require laravel/cashier

Also, create an authentication scaffold.

php artisan make:auth

Step 2: Create an essential database migrations

Before using Cashier, we’ll also need to prepare the database. We need to add several columns to your users’ table and create new subscriptions and plans table to hold all of our customer’s subscriptions.

So, first go to the create_users_table.php and add the following schema.

$table->string('stripe_id')->nullable()->collation('utf8mb4_bin');
$table->string('card_brand')->nullable();
$table->string('card_last_four', 4)->nullable();
$table->timestamp('trial_ends_at')->nullable();

Your schema now looks like this.

public function up()
{
     Schema::create('users', function (Blueprint $table) {
         $table->increments('id');
         $table->string('name');
         $table->string('email')->unique();
         $table->timestamp('email_verified_at')->nullable();
         $table->string('password');
         $table->string('stripe_id')->nullable()->collation('utf8mb4_bin');
         $table->string('card_brand')->nullable();
         $table->string('card_last_four', 4)->nullable();
         $table->timestamp('trial_ends_at')->nullable();
         $table->rememberToken();
         $table->timestamps();
     });
}

Now, create two more migrations files.

php artisan make:migration create_subscriptions_table
php artisan make:migration create_plans_table

Now, write the schema on both of the files.

First, add the following schema inside the create_subscriptions_table.php file.

public function up()
    {
        Schema::create('subscriptions', function (Blueprint $table) {
            $table->increments('id');
            $table->unsignedInteger('user_id');
            $table->string('name');
            $table->string('stripe_id')->collation('utf8mb4_bin');
            $table->string('stripe_plan');
            $table->integer('quantity');
            $table->timestamp('trial_ends_at')->nullable();
            $table->timestamp('ends_at')->nullable();
            $table->timestamps();
        });
    }

Write the following schema inside the create_plans_table.php file.

public function up()
    {
        Schema::create('plans', function (Blueprint $table) {
            $table->increments('id');
            $table->string('name');
            $table->string('slug')->unique();
            $table->string('stripe_plan');
            $table->float('cost');
            $table->text('description')->nullable();
            $table->timestamps();
        });
    }

Save the file and go to the terminal and migrate tables.

php artisan migrate

Now, add two plans manually on the plans table like this.


Laravel Stripe Payment Gateway Integration Tutorial With Example

Step 3: Get and Set Stripe API Keys

First, you need to create an account on Stripe. You can do it on here. Then after login to your account, you will find a Test dashboard.

Now, click on the Developers link on the left sidebar. In the submenu, you can find the API keys item. Click on that item, and you will be redirected to this page.


Stripe API keys

Here, you can find the Publishable Key or Stripe Key and Secret Key.

You need to add these keys inside the .env file in our project.

// .env

STRIPE_KEY=your key here
STRIPE_SECRET=your secret here

Finally, you should configure your Stripe key in your services.php configuration file. You can retrieve your Stripe API keys from the Stripe control panel.

// services.php

'stripe' => [
    'model'  => App\User::class,
    'key' => env('STRIPE_KEY'),
    'secret' => env('STRIPE_SECRET'),
],

Also, you need to add the Billable Trait inside the User.php model.

// User.php

use Laravel\Cashier\Billable;

class User extends Authenticatable
{
    use Billable;
}

Step 4: Create Plans on Stripe Dashboard

You can create a plan through Laravel but that will take some time, and our motto is to accept the payment through stripe. So we will create the plans manually on Stripe Dashboard.

First, go to the Billing >> Products link and right now, there are no products available. So we need to create two products. Here products mean plans. So we will create two plans.

  1. Basic
  2. Professional

Create and assign the values same as we have assigned the values on the Plans table in our Laravel application. After creating two plans, your products look like this.


Laravel Subscription Based System Using Stripe Payment

Step 5: Display Plans on Frontend

First, define the routes for our application inside the routes >> web.php file.

// web.php

Route::group(['middleware' => 'auth'], function() {
    Route::get('/home', 'HomeController@index')->name('home');
    Route::get('/plans', 'PlanController@index')->name('plans.index');
});

We have taken the auth middleware to protect the routes related to payment and home.

Now, create the Plan.php model and PlanController.php file.

php artisan make:model Plan
php artisan make:controller PlanController

Define the index method inside the PlanController.

// PlanController.php

use App\Plan;

public function index()
{
        $plans = Plan::all();
        return view('plans.index', compact('plans'));
}

Now, inside the resources >> views folder, create one folder called plans and inside that folder, create one file called index.blade.php file. Write the following code.

@extends('layouts.app')

@section('content')
<div class="container">
    <div class="row justify-content-center">
        <div class="col-md-12">
            <div class="card">
                <div class="card-header">Plans</div>
                <div class="card-body">
                    <ul class="list-group">
                        @foreach($plans as $plan)
                        <li class="list-group-item clearfix">
                            <div class="pull-left">
                                <h5></h5>
                                <h5>$ monthly</h5>
                                <h5></h5>
                                <a href="" class="btn btn-outline-dark pull-right">Choose</a>
                            </div>
                        </li>
                        @endforeach
                    </ul>
                </div>
            </div>
        </div>
    </div>
</div>
@endsection

Now, register one user on Laravel application and go to this URL: https://ift.tt/2SsY5nd

You will find the plans like this.


Laravel Saas Tutorial

Step 6: Show the plan

So, when the user chooses the plan, we need to redirect the user to a particular plan page.

Define one more route inside the routes >> web.php file.

// web.php

Route::group(['middleware' => 'auth'], function() {
    Route::get('/home', 'HomeController@index')->name('home');
    Route::get('/plans', 'PlanController@index')->name('plans.index');
    Route::get('/plan/{plan}', 'PlanController@show')->name('plans.show');
});

Now, by default, RouteModelBinding works with the ID of the model. But we will not pass the ID to show the particular plan instead we will pass the slug. So we need to define it inside the Plan.php model.

<?php

// Plan.php

namespace App;

use Illuminate\Database\Eloquent\Model;

class Plan extends Model
{
    protected $fillable = [
        'name',
        'slug',
        'stripe_plan',
        'cost',
        'description'
    ];

    public function getRouteKeyName()
    {
        return 'slug';
    }
}

Here, we have defined the function called getRouteKeyName. So based on this function, now we can fetch the record based on the slug and not based on the ID. That is why we have taken the slug field as a unique field in the database.

Now, define the show() function inside the PlanController.php file.

// PlanController.php

public function show(Plan $plan, Request $request)
{
     return view('plans.show', compact('plan'));
}

Next step is to create a view file called show.blade.php inside the resources >> views >> plans folder. Add the following code inside the show.blade.php file.

@extends('layouts.app')

@section('content')
<div class="container">
    <div class="row justify-content-center">
        <div class="col-md-12">
            <div class="card">
                <div class="card-header"></div>
                <div class="card-body">
                </div>
            </div>
        </div>
    </div>
</div>
@endsection

Now, we will display the Payment Form on this page.

Step 7: Display the Payment Form

For this example, I am using Card Element. You can find it on official Stripe Documentation. It is securely collect sensitive card details using Elements, our pre-built UI components.


Stripe Payment Form Example

Now, we need to include the External JS files in our project. For that, we need to modify the resources >> views >> layouts >> app.blade.php file.

<!DOCTYPE html>
<html lang="">
<head>
    <meta charset="utf-8">
    <meta name="viewport" content="width=device-width, initial-scale=1">

    <!-- CSRF Token -->
    <meta name="csrf-token" content="">

    <title></title>

    <!-- Fonts -->
    <link rel="dns-prefetch" href="//fonts.gstatic.com">
    <link href="https://fonts.googleapis.com/css?family=Nunito" rel="stylesheet" type="text/css">

    <!-- Styles -->
    <link href="" rel="stylesheet">
</head>
<body>
    <div id="app">
        <nav class="navbar navbar-expand-md navbar-light navbar-laravel">
            <div class="container">
                <a class="navbar-brand" href="">
                    
                </a>
                <button class="navbar-toggler" type="button" data-toggle="collapse" data-target="#navbarSupportedContent" aria-controls="navbarSupportedContent" aria-expanded="false" aria-label="">
                    <span class="navbar-toggler-icon"></span>
                </button>

                <div class="collapse navbar-collapse" id="navbarSupportedContent">
                    <!-- Left Side Of Navbar -->
                    <ul class="navbar-nav mr-auto">

                    </ul>

                    <!-- Right Side Of Navbar -->
                    <ul class="navbar-nav ml-auto">
                        <!-- Authentication Links -->
                        @guest
                            <li class="nav-item">
                                <a class="nav-link" href=""></a>
                            </li>
                            <li class="nav-item">
                                @if (Route::has('register'))
                                    <a class="nav-link" href=""></a>
                                @endif
                            </li>
                        @else
                          <li class="nav-item">      
                            <a class="nav-link" href=""></a>
                          </li>
                            <li class="nav-item dropdown">
                                <a id="navbarDropdown" class="nav-link dropdown-toggle" href="#" role="button" data-toggle="dropdown" aria-haspopup="true" aria-expanded="false" v-pre>
                                     <span class="caret"></span>
                                </a>

                                <div class="dropdown-menu dropdown-menu-right" aria-labelledby="navbarDropdown">
                                    <a class="dropdown-item" href=""
                                       onclick="event.preventDefault();
                                                     document.getElementById('logout-form').submit();">
                                        
                                    </a>

                                    <form id="logout-form" action="" method="POST" style="display: none;">
                                        @csrf
                                    </form>
                                </div>
                            </li>
                        @endguest
                    </ul>
                </div>
            </div>
        </nav>

        <main class="py-4">
            @yield('content')
        </main>
    </div>
    <!-- Scripts -->
    <script src=""></script>
    @yield('scripts')
</body>
</html>

Here, we have defined one navigation link called plans and also add one section for scripts. So, now we can add the Javascript per pagewise using @yield directive.

Next step is to write the Card Element inside the show.blade.php file.

@extends('layouts.app')

@section('content')
<div class="container">
    <div class="row justify-content-center">
        <div class="col-md-12">
            <div class="">
                <p>You will be charged $ for  Plan</p>
            </div>
            <div class="card">
                <form action="#" method="post" id="payment-form">
                    @csrf                    
                    <div class="form-group">
                        <div class="card-header">
                            <label for="card-element">
                                Enter your credit card information
                            </label>
                        </div>
                        <div class="card-body">
                            <div id="card-element">
                            <!-- A Stripe Element will be inserted here. -->
                            </div>
                            <!-- Used to display form errors. -->
                            <div id="card-errors" role="alert"></div>
                            <input type="hidden" name="plan" value="" />
                        </div>
                    </div>
                    <div class="card-footer">
                        <button class="btn btn-dark" type="submit">Pay</button>
                    </div>
                </form>
            </div>
        </div>
    </div>
</div>
@endsection
@section('scripts')
<script src="https://js.stripe.com/v3/"></script>
<script>
    // Create a Stripe client.
var stripe = Stripe('');

// Create an instance of Elements.
var elements = stripe.elements();

// Custom styling can be passed to options when creating an Element.
// (Note that this demo uses a wider set of styles than the guide below.)
var style = {
  base: {
    color: '#32325d',
    lineHeight: '18px',
    fontFamily: '"Helvetica Neue", Helvetica, sans-serif',
    fontSmoothing: 'antialiased',
    fontSize: '16px',
    '::placeholder': {
      color: '#aab7c4'
    }
  },
  invalid: {
    color: '#fa755a',
    iconColor: '#fa755a'
  }
};

// Create an instance of the card Element.
var card = elements.create('card', {style: style});

// Add an instance of the card Element into the `card-element` <div>.
card.mount('#card-element');

// Handle real-time validation errors from the card Element.
card.addEventListener('change', function(event) {
  var displayError = document.getElementById('card-errors');
  if (event.error) {
    displayError.textContent = event.error.message;
  } else {
    displayError.textContent = '';
  }
});

// Handle form submission.
var form = document.getElementById('payment-form');
form.addEventListener('submit', function(event) {
  event.preventDefault();

  stripe.createToken(card).then(function(result) {
    if (result.error) {
      // Inform the user if there was an error.
      var errorElement = document.getElementById('card-errors');
      errorElement.textContent = result.error.message;
    } else {
      // Send the token to your server.
      stripeTokenHandler(result.token);
    }
  });
});

// Submit the form with the token ID.
function stripeTokenHandler(token) {
  // Insert the token ID into the form so it gets submitted to the server
  var form = document.getElementById('payment-form');
  var hiddenInput = document.createElement('input');
  hiddenInput.setAttribute('type', 'hidden');
  hiddenInput.setAttribute('name', 'stripeToken');
  hiddenInput.setAttribute('value', token.id);
  form.appendChild(hiddenInput);

  // Submit the form
  form.submit();
}
</script>
@endsection

Here, we have used the Card element and Javascript to display the form.

Now, add the link to this page inside the index.blade.php file.

// index.blade.php

<a href="" class="btn btn-outline-dark pull-right">Choose</a>

So, it will be redirected to the page like this.


Stripe Payment Gateway Integration in Laravel

So, here we need to enter the following details. You can enter the details like below inputs.

  1. Card Number: 4242 4242 4242 4242
  2. Expiration Date: 10/21 or whatever you like from the future of today’s date
  3. CVC: whatever you like
  4. Zipcode: whatever you like

These are dummy details, but these details generally used in sandbox account to check the application.

Right now nothing will happen because we need to define the form action to store the data inside the database tables. So let us define the post route.

Step 8: Save the subscriptions and accept payment

Define the final route inside the web.php file.

// web.php

Route::group(['middleware' => 'auth'], function() {
    Route::get('/home', 'HomeController@index')->name('home');
    Route::get('/plans', 'PlanController@index')->name('plans.index');
    Route::get('/plan/{plan}', 'PlanController@show')->name('plans.show');
    Route::post('/subscription', 'SubscriptionController@create')->name('subscription.create');
});

We have defined the POST route for subscriptions. Now, create SubscriptionController using the following command.

php artisan make:controller SubscriptionController

Now, add a POST route inside the show.blade.php file when we post the data to the server.

// show.blade.php

<form action="" method="post" id="payment-form">

Inside that controller, we need to define one function called create().

<?php

// SubscriptionController.php

namespace App\Http\Controllers;

use Illuminate\Http\Request;
use App\Plan;

class SubscriptionController extends Controller
{
    public function create(Request $request, Plan $plan)
    {
        $plan = Plan::findOrFail($request->get('plan'));
        
        $request->user()
            ->newSubscription('main', $plan->stripe_plan)
            ->create($request->stripeToken);
        
        return redirect()->route('home')->with('success', 'Your plan subscribed successfully');
    }
}

Here, we are creating the subscription for registered User and charge him.

First, we have to fetch the plan according to the id. Then we need to pass that plan to the newSubscription() function and create a subscription.

So, here we have used the Billable trait’s subscribedToPlan() method and pass the first parameter plan and the second parameter main.

We are creating a new Subscription, if the payment made successfully then, it would redirect to the HomePage with a  success message.

Write the following code inside the home.blade.php file.

@extends('layouts.app')

@section('content')
<div class="container">
    <div class="row justify-content-center">
        <div class="col-md-8">
            @if(session()->get('success'))
                <div class="alert alert-success">
                    
                </div>
            @endif
            <div class="card">
                <div class="card-header">Dashboard</div>

                <div class="card-body">
                    @if (session('status'))
                        <div class="alert alert-success" role="alert">
                            
                        </div>
                    @endif

                    Welcome to the Dashboard
                </div>
            </div>
        </div>
    </div>
</div>
@endsection

So, if your all of the configurations are right, then you should go to any of the plans and try to subscribe to the plan. If you are redirecting to the homepage, then you are almost done.

You can see that one database entry inside the subscriptions table is there.


Laravel Saas Example

Your user’s table also has been updated as you can see some field’s details is updated.

You can check the Stripe Dashboard as well. As we have subscribed the 50$ Professional Plan.


Stripe Payment Example

Step 9: Security Tweaks

Now, we need to keep in mind one thing that if the user is already subscribed to one plan, then we need the user to prevent to choose that plan. So, we need to add one condition on the choose button.

So, add the condition inside the index.blade.php file.

@if(!auth()->user()->subscribedToPlan($plan->stripe_plan, 'main'))
    <a href="" class="btn btn-outline-dark pull-right">Choose</a>
@endif

Also, we need to add the condition inside the PlanController.php file’s show() function.

// PlanController.php

public function show(Plan $plan, Request $request)
{
        if($request->user()->subscribedToPlan($plan->stripe_plan, 'main')) {
            return redirect()->route('home')->with('success', 'You have already subscribed the plan');
        }
        return view('plans.show', compact('plan'));
 }

Also, we need to do the same thing inside the SubscriptionController’s create() method.

// SubscriptionController.php

public function create(Request $request, Plan $plan)
{
        if($request->user()->subscribedToPlan($plan->stripe_plan, 'main')) {
            return redirect()->route('home')->with('success', 'You have already subscribed the plan');
        }
        $plan = Plan::findOrFail($request->get('plan'));
        
        $request->user()
            ->newSubscription('main', $plan->stripe_plan)
            ->create($request->stripeToken);
        
        return redirect()->route('home')->with('success', 'Your plan subscribed successfully');
}

Save the file, and now you are good to go. I am putting this Laravel Stripe Payment Gateway Integration Tutorial’s whole code on Github.

Finally, Laravel Stripe Payment Gateway Integration Tutorial article is over. There are still so many things that we can do with the project. But for basic understanding, this is enough. Thanks.

Github Code

The post Laravel Stripe Payment Gateway Integration Tutorial With Example appeared first on AppDividend.

via Planet MySQL
Laravel Stripe Payment Gateway Integration Tutorial With Example

Laravel Cashier Braintree Payment Gateway Tutorial With Example

Laravel 5.6 Firebase Example Tutorial

In this tutorial, we will see Laravel Cashier Braintree Payment Gateway Tutorial With Example We will build a Subscription based Platform in which the user can choose a plan, and according to that, he will be charged. We use Braintree for this demo, and we will discuss the stripe in the next tutorial. So, we will build a simple payment gateway in which a user can charge according to their selected plan. It is a straightforward system to work with, and for that, we need to create a developer account at Braintree. So, if you have not created yet, then please go to this link.

Laravel Cashier Braintree Payment Gateway

Integrate payment gateway in any web application used to be a very tough task. But nowadays, there are lots of SDKs available to work with that is why it is effortless to integrate any payment gateway to any web application. Now, you can find the Official Laravel Documentation to integrate Braintree here.

Braintree Caveats

For many operations, the Stripe and Braintree implementations of the Cashier function is the same. Both services provide the subscription billing with the credit cards, but Braintree also supports the payments via PayPal. We will not use Paypal for this example. However, Braintree also lacks some features that are supported by the Stripe. You should keep the following things in mind when deciding to use Stripe or Braintree:

  • Braintree supports PayPal while Stripe does not.
  • Braintree does not support the increment and decrement methods on subscriptions. This is a Braintree limitation, not a Cashier limitation.
  • Braintree does not support percentage based discounts. This is a Braintree limitation, not a Cashier limitation.

Let us start this small project by installing the Laravel Framework. I am using Laravel 5.7 for this example.

Step 1: Install and configure Laravel

Install Laravel using the following command.

laravel new subscription

Now, go inside the project folder and configure the database inside the .env file.

DB_CONNECTION=mysql
DB_HOST=127.0.0.1
DB_PORT=3306
DB_DATABASE=subscription
DB_USERNAME=root
DB_PASSWORD=root

Also, install the npm dependencies using the following command.

npm install

Compile the CSS and JS files.

npm run dev

Also, create the standard authentication using the following command.

php artisan make:auth

Step 2: Install and configure Braintree package

Next step is to install the Laravel Cashier package. So let us install that.

composer require "laravel/cashier-braintree":"~2.0"

Next step is to register the Laravel\Cashier\CashierServiceProvider  service provider in your config/app.php configuration file.

...
Laravel\Cashier\CashierServiceProvider::class,
...

Now, we need to create and modify the database migrations.

First, edit the create_users_table.php file and add the following fields inside the schema.

Schema::table('users', function ($table) {
    $table->string('braintree_id')->nullable();
    $table->string('paypal_email')->nullable();
    $table->string('card_brand')->nullable();
    $table->string('card_last_four')->nullable();
    $table->timestamp('trial_ends_at')->nullable();
});

So, our final create_users_table.php file looks like below.

<?php

use Illuminate\Support\Facades\Schema;
use Illuminate\Database\Schema\Blueprint;
use Illuminate\Database\Migrations\Migration;

class CreateUsersTable extends Migration
{
    /**
     * Run the migrations.
     *
     * @return void
     */
    public function up()
    {
        Schema::create('users', function (Blueprint $table) {
            $table->increments('id');
            $table->string('name');
            $table->string('email')->unique();
            $table->timestamp('email_verified_at')->nullable();
            $table->string('password');
            $table->string('braintree_id')->nullable();
            $table->string('paypal_email')->nullable();
            $table->string('card_brand')->nullable();
            $table->string('card_last_four')->nullable();
            $table->timestamp('trial_ends_at')->nullable();
            $table->rememberToken();
            $table->timestamps();
        });
    }

    /**
     * Reverse the migrations.
     *
     * @return void
     */
    public function down()
    {
        Schema::dropIfExists('users');
    }
}

Also, we need to create two more migrations file. To create the files, hit the following commands.

php artisan make:migration create_plans_table
php artisan make:migration create_subscriptions_table

Now, write the following schemas inside it.

<?php

// create_subscriptions_table.php

use Illuminate\Support\Facades\Schema;
use Illuminate\Database\Schema\Blueprint;
use Illuminate\Database\Migrations\Migration;

class CreateSubsriptionsTable extends Migration
{
    /**
     * Run the migrations.
     *
     * @return void
     */
    public function up()
    {
        Schema::create('subsriptions', function (Blueprint $table) {
          $table->increments('id');
          $table->integer('user_id');
          $table->string('name');
          $table->string('braintree_id');
          $table->string('braintree_plan');
          $table->integer('quantity');
          $table->timestamp('trial_ends_at')->nullable();
          $table->timestamp('ends_at')->nullable();
          $table->timestamps();
        });
    }

    /**
     * Reverse the migrations.
     *
     * @return void
     */
    public function down()
    {
        Schema::dropIfExists('subsriptions');
    }
}

And the following is plans table schema.

<?php

// create_plans_table.php

use Illuminate\Support\Facades\Schema;
use Illuminate\Database\Schema\Blueprint;
use Illuminate\Database\Migrations\Migration;

class CreatePlansTable extends Migration
{
    /**
     * Run the migrations.
     *
     * @return void
     */
    public function up()
    {
        Schema::create('plans', function (Blueprint $table) {
            $table->increments('id');
            $table->string('name');
            $table->string('slug')->unique();
            $table->string('braintree_plan');
            $table->float('cost');
            $table->text('description')->nullable();
            $table->timestamps();
        });
    }

    /**
     * Reverse the migrations.
     *
     * @return void
     */
    public function down()
    {
        Schema::dropIfExists('plans');
    }
}

Now go to the terminal and create the tables using the following command.

php artisan migrate

It will create the tables.

Laravel Cashier Braintree Payment Gateway

Now, add the Billable Trait inside the User.php model.

// User.php

use Laravel\Cashier\Billable;

class User extends Authenticatable
{
    use Billable;
}

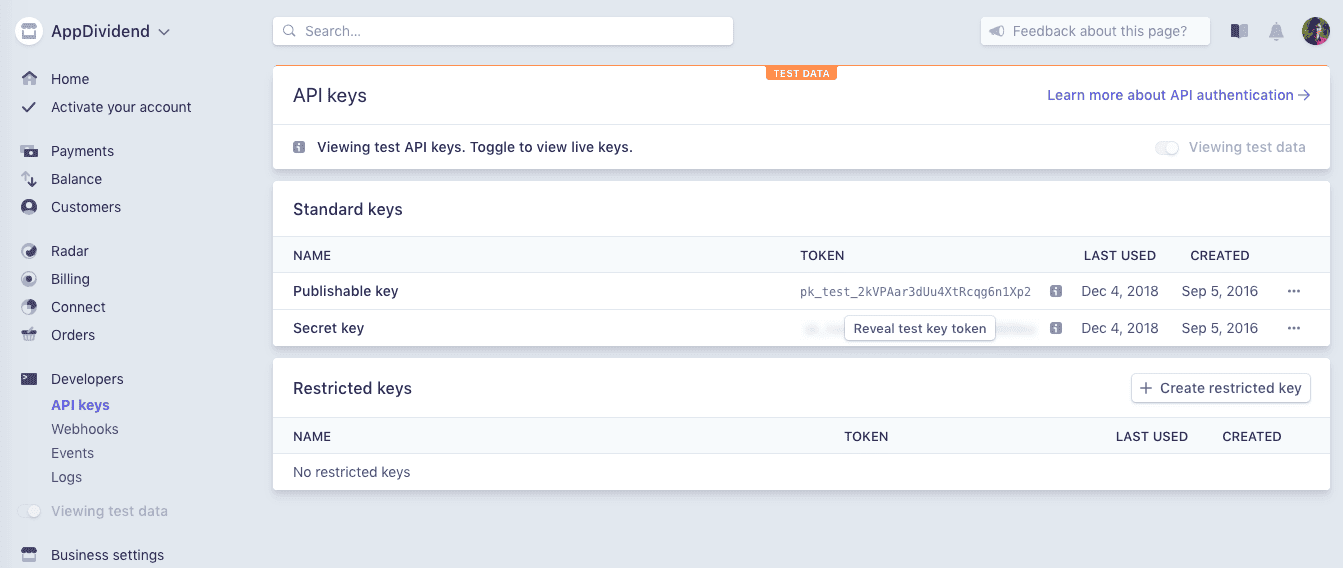
Step 3: Grab and add API keys for Braintree

Now, if you have not created a developer account at Braintree, then please create one.

After that, you will be redirected to the Dashboard and then go to the Account >> My User and click the View Authorizations link under the API Keys, Tokenization Keys, Encryption Keys section.

API Keys, Tokenization Keys, Encryption Keys

After clicking the View Authorizations link, you will be redirected to your Sandbox API Keys page.

Laravel Braintree Payment Gateway Example Tutorial

Now, you need to click the View links inside the table, and now you can see your following keys and data.

  1. Your Public Key
  2. Your Private Key
  3. Your Environment
  4. Your Merchant Id

You need to add these keys inside your .env file.

BRAINTREE_ENV=sandbox
BRAINTREE_MERCHANT_ID=your merchant id
BRAINTREE_PUBLIC_KEY=your public key
BRAINTREE_PRIVATE_KEY=your private key

Next step is that you should configure the following options inside your services.php file.

// services.php

'braintree' => [
    'model'  => App\User::class,
    'environment' => env('BRAINTREE_ENV'),
    'merchant_id' => env('BRAINTREE_MERCHANT_ID'),
    'public_key' => env('BRAINTREE_PUBLIC_KEY'),
    'private_key' => env('BRAINTREE_PRIVATE_KEY'),
],

Then you should add the following Braintree SDK calls to your AppServiceProvider’s boot method.

// AppServiceProvider.php

use Braintree_Configuration;

public function boot()
{
      Braintree_Configuration::environment(env('BRAINTREE_ENV'));
      Braintree_Configuration::merchantId(env('BRAINTREE_MERCHANT_ID'));
      Braintree_Configuration::publicKey(env('BRAINTREE_PUBLIC_KEY'));
      Braintree_Configuration::privateKey(env('BRAINTREE_PRIVATE_KEY'));
}

You can also set the currency. Dollar($) is by default.

You can change the default currency by calling the Cashier::useCurrency method from within the boot method of one of your service providers. In our case we have used the AppServiceProvider. The useCurrency method accepts two string parameters: the currency and the currency’s symbol.

// AppServiceProvider.php

use Laravel\Cashier\Cashier;

Cashier::useCurrency('eur', '€');

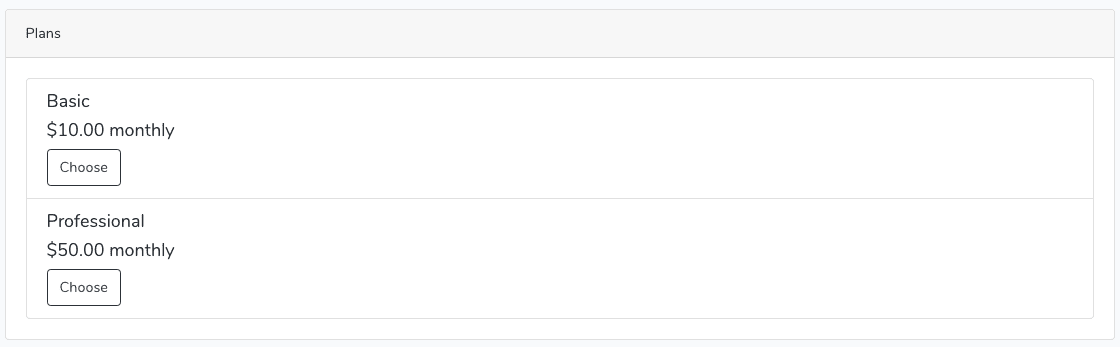
Step 4: Create plans on Braintree dashboard

Now, for this example, we will create only two plans. You can create as per your requirement. You can find the plans inside your dashboard on the left sidebar.

I have created two plans.

  1. Basic
  2. Professional

Laravel Subscription Based System

Also, you need to add the plans manually inside the plans table inside MySQL.

Laravel Braintree Example

Make sure both plans have the same names as on MySQL and Braintree dashboard.

Step 5: Display plans on Frontend

First, define the routes for our application inside the routes >> web.php file.

// web.php

Route::group(['middleware' => 'auth'], function() {
    Route::get('/home', 'HomeController@index')->name('home');
    Route::get('/plans', 'PlanController@index')->name('plans.index');
});

We have taken the auth middleware to protect the routes related to payment and home.

Now, create the Plan.php model and PlanController.php file.

php artisan make:model Plan
php artisan make:controller PlanController

Define the index method inside the PlanController.

// PlanController.php

use App\Plan;

public function index()
{
        $plans = Plan::all();
        return view('plans.index', compact('plans'));
}

Now, inside the resources >> views folder, create one folder called plans and inside that folder, create one file called index.blade.php file. Write the following code.

@extends('layouts.app')

@section('content')
<div class="container">
    <div class="row justify-content-center">
        <div class="col-md-12">
            <div class="card">
                <div class="card-header">Plans</div>
                <div class="card-body">
                    <ul class="list-group">
                        @foreach($plans as $plan)
                        <li class="list-group-item clearfix">
                            <div class="pull-left">
                                <h5></h5>
                                <h5>$ monthly</h5>
                                <h5></h5>
                                
                                <a href="" class="btn btn-outline-dark pull-right">Choose</a>
                                
                            </div>
                        </li>
                        @endforeach
                    </ul>
                </div>
            </div>
        </div>
    </div>
</div>
@endsection

Save the file and navigate to the URL: http://subscription.test/plans. If you have not registered yet, then please register one user in our application.

You will see something like this.

Laravel Payment Example

So, we have successfully displayed the plans from the database. Now, the next step is when a user chooses the plan, you will redirect to a page from where a user can be charged for that plan.

Step 6: Show the plan

So, when the user chooses the plan, we need to redirect the user to a particular plan page.

Define one more route inside the routes >> web.php file.

// web.php

Route::group(['middleware' => 'auth'], function() {
    Route::get('/home', 'HomeController@index')->name('home');
    Route::get('/plans', 'PlanController@index')->name('plans.index');
    Route::get('/plan/{plan}', 'PlanController@show')->name('plans.show');
});

Now, by default, RouteModelBinding works with the ID of the model. But we will not pass the ID to show the particular plan instead we will pass the slug. So we need to define it inside the Plan.php model. Also, define the fillable fields as well.

<?php

// Plan.php

namespace App;

use Illuminate\Database\Eloquent\Model;

class Plan extends Model
{
	protected $fillable = [
		'name',
		'slug',
		'braintree_plan',
		'cost',
		'description'
	];

	public function getRouteKeyName()
	{
		return 'slug';
	}
}

Here, we have defined the function called getRouteKeyName. So based on this function, now we can fetch the record based on the slug and not based on the ID. That is why we have taken the slug field as a unique field in the database.

Now, define the show() function inside the PlanController.php file.

// PlanController.php

public function show(Plan $plan, Request $request)
{
     return view('plans.show', compact('plan'));
}

Next step is to create a view file called show.blade.php inside the resources >> views >> plans folder. Add the following code inside the show.blade.php file.

@extends('layouts.app')

@section('content')
<div class="container">
    <div class="row justify-content-center">
        <div class="col-md-12">
            <div class="card">
                <div class="card-header"></div>
                <div class="card-body">
                </div>
            </div>
        </div>
    </div>
</div>
@endsection

So, here, we will display the payment form.

Step 7: Display the Payment Form

For displaying the Payment Form, we will use the Drop-in UI. You can find the complete documentation here. We are using Version 2 of the Drop-in UI. There is version 3 but let us stick with version 2 for this example. Now, we are implementing the Client Side configuration. Configure the container and from where the Drop-in UI will add the payment method nonce. Make sure to replace CLIENT_AUTHORIZATION with your generated client token.

Now, we need to include the External JS files in our project. For that, we need to modify the resources >> views >> layouts >> app.blade.php file.

<!DOCTYPE html>
<html lang="">
<head>
    <meta charset="utf-8">
    <meta name="viewport" content="width=device-width, initial-scale=1">

    <!-- CSRF Token -->
    <meta name="csrf-token" content="">

    <title></title>

    <!-- Fonts -->
    <link rel="dns-prefetch" href="//fonts.gstatic.com">
    <link href="https://fonts.googleapis.com/css?family=Nunito" rel="stylesheet" type="text/css">

    <!-- Styles -->
    <link href="" rel="stylesheet">
</head>
<body>
    <div id="app">
        <nav class="navbar navbar-expand-md navbar-light navbar-laravel">
            <div class="container">
                <a class="navbar-brand" href="">
                    
                </a>
                <button class="navbar-toggler" type="button" data-toggle="collapse" data-target="#navbarSupportedContent" aria-controls="navbarSupportedContent" aria-expanded="false" aria-label="">
                    <span class="navbar-toggler-icon"></span>
                </button>

                <div class="collapse navbar-collapse" id="navbarSupportedContent">
                    <!-- Left Side Of Navbar -->
                    <ul class="navbar-nav mr-auto">

                    </ul>

                    <!-- Right Side Of Navbar -->
                    <ul class="navbar-nav ml-auto">
                        <!-- Authentication Links -->
                        @guest
                            <li class="nav-item">
                                <a class="nav-link" href=""></a>
                            </li>
                            <li class="nav-item">
                                @if (Route::has('register'))
                                    <a class="nav-link" href=""></a>
                                @endif
                            </li>
                        @else
                          <li class="nav-item">      
                            <a class="nav-link" href=""></a>
                          </li>
                            <li class="nav-item dropdown">
                                <a id="navbarDropdown" class="nav-link dropdown-toggle" href="#" role="button" data-toggle="dropdown" aria-haspopup="true" aria-expanded="false" v-pre>
                                     <span class="caret"></span>
                                </a>

                                <div class="dropdown-menu dropdown-menu-right" aria-labelledby="navbarDropdown">
                                    <a class="dropdown-item" href=""
                                       onclick="event.preventDefault();
                                                     document.getElementById('logout-form').submit();">
                                        
                                    </a>

                                    <form id="logout-form" action="" method="POST" style="display: none;">
                                        @csrf
                                    </form>
                                </div>
                            </li>
                        @endguest
                    </ul>
                </div>
            </div>
        </nav>

        <main class="py-4">
            @yield('content')
        </main>
    </div>
    <!-- Scripts -->
    <script src=""></script>
    @yield('scripts');
</body>
</html>

Here, we have defined one navigation link called plans and also add one section for scripts. So, now we can add the Javascript per pagewise using @yield directive.

Also, we need to fetch the Client Token for authorization. So we will fetch that token from Backend using AJAX request.

So, define one route inside the web.php file.

// web.php

Route::group(['middleware' => 'auth'], function() {
    Route::get('/home', 'HomeController@index')->name('home');
    Route::get('/plans', 'PlanController@index')->name('plans.index');
    Route::get('/plan/{plan}', 'PlanController@show')->name('plans.show');
    Route::get('/braintree/token', 'BraintreeTokenController@index')->name('token');
});

Create a new Controller called BraintreeTokenController using the following command.

php artisan make:controller BraintreeTokenController

Write the following code inside the BraintreeTokenController.php file.

<?php

// BraintreeTokenController.php

namespace App\Http\Controllers;

use Illuminate\Http\Request;
use Braintree_ClientToken;

class BraintreeTokenController extends Controller
{
    public function index()
    {
        return response()->json([
            'data' => [
                'token' => Braintree_ClientToken::generate()
            ]
        ]);
    }
}

The index() function returns the ClientToken to the Clientside JS file, and now we can authorize our Laravel application with the Braintree developer account.

So, write the final code inside the show.blade.php file.

@extends('layouts.app')

@section('content')
<div class="container">
    <div class="row justify-content-center">
        <div class="col-md-12">
            <div class="card">
                <div class="card-header"></div>
                <div class="card-body">
                <form method="post" action="">
                    @csrf
                    <div id="dropin-container"></div>
                    <hr />
                    <input type="hidden" name="plan" value="" />
                    <button type="submit" class="btn btn-outline-dark d-none" id="payment-button">Pay</button>
                </form>
                </div>
            </div>
        </div>
    </div>
</div>
@endsection

@section('scripts')
<script src="https://js.braintreegateway.com/js/braintree-2.32.1.min.js"></script>
<script>
    jQuery.ajax({
        url: "",
    })
    .done(function(res) {
        braintree.setup(res.data.token, 'dropin', {
            container: 'dropin-container',
            onReady: function() {
                jQuery('#payment-button').removeClass('d-none')
            }
        });
    });
</script>
@endsection

So, when the document is loaded, we will send an Ajax request to the Laravel server and get the Client Auth token. From that token, included js will generate the Payment Form. We defined the form like this.

<form method="post" action="">
        @csrf
        <div id="dropin-container"></div>
        <hr />
        <input type="hidden" name="plan" value="" />
        <button type="submit" class="btn btn-outline-dark d-none" id="payment-button">Pay</button>
</form>

Also, write the Javascript like this.

@section('scripts')
<script src="https://js.braintreegateway.com/js/braintree-2.32.1.min.js"></script>
<script>
    jQuery.ajax({
        url: "",
    })
    .done(function(res) {
        braintree.setup(res.data.token, 'dropin', {
            container: 'dropin-container',
            onReady: function() {
                jQuery('#payment-button').removeClass('d-none')
            }
        });
    });
</script>
@endsection

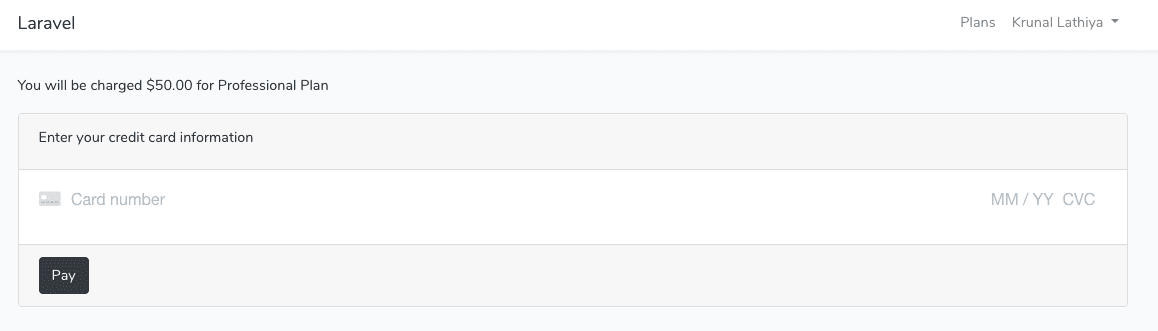
So, when the request succeeds, it will return the token, and we use that token to create a Payment Form. The form looks like this.

Laravel 5.7 Payment Tutorial With Example

So, here we need to enter the two details. You can enter the details like below inputs.

  1. Card Number: 4242 4242 4242 4242
  2. Expiration Date: 10/21 or whatever you like

These are dummy details, but these details generally used in sandbox account to check the application.

Right now nothing will happen because we need to define the form action to store the data inside the database tables. So let us define the post route.

Step 8: Save the plan details

Define the final route inside the web.php file.

<?php

// web.php

Route::get('/', function () {
    return view('welcome');
});

Auth::routes();

Route::group(['middleware' => 'auth'], function() {
    Route::get('/home', 'HomeController@index')->name('home');
    Route::get('/plans', 'PlanController@index')->name('plans.index');
    Route::get('/plan/{plan}', 'PlanController@show')->name('plans.show');
    Route::get('/braintree/token', 'BraintreeTokenController@index')->name('token');
    Route::post('/subscription', 'SubscriptionController@create')->name('subscription.create');
});

We have defined the post route for the subscription details. Now, create SubscriptionController using the following command.

php artisan make:controller SubscriptionController

Inside that controller, we need to define one function called create().

<?php

// SubscriptionController.php

namespace App\Http\Controllers;

use Illuminate\Http\Request;
use App\Plan;

class SubscriptionController extends Controller
{
    public function create(Request $request, Plan $plan)
    {
        $plan = Plan::findOrFail($request->get('plan'));
        
        $request->user()
            ->newSubscription('main', $plan->braintree_plan)
            ->create($request->payment_method_nonce);
        
        return redirect()->route('home')->with('success', 'Your plan subscribed successfully');
    }
}

First, we have to fetch the plan according to the id. Then we need to pass that plan to the subscribedToPlan() function.

So, here we have used the Billable trait’s subscribedToPlan() method and pass the first parameter plan and the second parameter main.

We are creating a new Subscription, and if the payment made successfully then, it would redirect to the HomePage with a  success message.

Write the following code inside the home.blade.php file.

@extends('layouts.app')

@section('content')
<div class="container">
    <div class="row justify-content-center">
        <div class="col-md-8">
            @if(session()->get('success'))
                <div class="alert alert-success">
                    
                </div>
            @endif
            <div class="card">
                <div class="card-header">Dashboard</div>

                <div class="card-body">
                    @if (session('status'))
                        <div class="alert alert-success" role="alert">
                            
                        </div>
                    @endif

                    You are logged in!
                </div>
            </div>
        </div>
    </div>
</div>
@endsection

So, if your all of the configurations are right, then you should go to any of the plans and try to subscribe to the plan. If you are redirecting to the homepage, then you are almost done.

Laravel Saas Example

You can see that one database entry inside the subscriptions table is there.

Laravel Saas Tutorial

That means, we have successfully subscribed the Professional plan. Also, there is updation on the user’s table. We have already added some more fields.

You can see inside your Dashboard that Sales and Transaction volume is there. So, our Laravel Cashier Braintree Payment Gateway Tutorial With Example is almost complete.

Step 9: Security Tweaks

Now, we need to keep in mind one thing that if the user is already subscribed to one plan, then we need the user to prevent to choose that plan. So, we need to add one condition on the choose button.

So, add the condition inside the index.blade.php file.

@if(!auth()->user()->subscribedToPlan($plan->braintree_plan, 'main'))
     <a href="" class="btn btn-outline-dark pull-right">Choose</a>
@endif

Also, we need to add the condition inside the PlanController.php file’s show() function.

// PlanController.php

public function show(Plan $plan, Request $request)
{
    if($request->user()->subscribedToPlan($plan->braintree_plan, 'main')) {
            return redirect()->route('home')->with('success', 'You have already subscribed the plan');
    }
    return view('plans.show', compact('plan'));
}

Also, we need to do the same thing inside the SubscriptionController’s create() method.

// SubscriptionController.php

public function create(Request $request, Plan $plan)
{
        if($request->user()->subscribedToPlan($plan->braintree_plan, 'main')) {
            return redirect()->route('home');
        }

        $plan = Plan::findOrFail($request->get('plan'));
        
        $request->user()
            ->newSubscription('main', $plan->braintree_plan)
            ->create($request->payment_method_nonce);
        
        return redirect()->route('home')->with('success', 'Your plan subscribed successfully');
}

Save the file, and now you are good to go. I am putting this Laravel Cashier Braintree Payment Gateway Tutorial’s whole code on Github.

Finally, Laravel Cashier Braintree Payment Gateway Tutorial With Example article is over. There are still so many things that we can do with the project. But for basic understanding, this is enough. Thanks.

Github Code


The post Laravel Cashier Braintree Payment Gateway Tutorial With Example appeared first on AppDividend.

via Planet MySQL
Laravel Cashier Braintree Payment Gateway Tutorial With Example

Carol Danvers Is a Noble Warrior Hero in the New Captain Marvel Trailer 


Carol eats Skrulls for breakfast
GIF: Disney
Trailer FrenzyA special place to find the newest trailers for movies and TV shows you’re craving.  

The first trailer for Captain Marvel was big but we hadn’t seen anything yet. Now the second trailer is here, and the worlds of Carol Danvers have exploded onto the scene in ways that are sure to make your own head explode.

Earth, Space, Skrulls, Nick Fury—they are all here and then some in the new trailer for Captain Marvel. Check it out.

That trailer is incredible and, if you believe the rumors, there may be more to come from Marvel later this week. Yes, we mean that. And yet, Anna Boden and Ryan Fleck’s cosmic origin story looks so good, it almost makes us forget we’re getting two Carol-starring movies next year.

Captain Marvel, which stars Brie Larson, Samuel L. Jackson, Ben Mendelsohn, Djimon Hounsou, Lee Pace, Lashana Lynch, Gemma Chan, Rune Temte, Algenis Perez Soto, Mckenna Grace, Annette Bening, Clark Gregg, and Jude Law, opens March 8.


For more, make sure you’re following us on our new Instagram @io9dotcom. 


via Gizmodo
Carol Danvers Is a Noble Warrior Hero in the New Captain Marvel Trailer