Laravel 5.8 CRUD Tutorial With Example For Beginners is today’s topic. You can upgrade your Laravel’s 5.8 version by going to this link. Laravel 5.8 continues the improvements made in Laravel 5.7 by introducing the following features.
- has-one-through Eloquent relationships.
- Improved email validation.
- convention-based automatic registration of authorization policies.
- DynamoDB cache and session drivers.
- Improved scheduler timezone configuration.
- Support for assigning multiple authentication guards to broadcast channels.
- PSR-16 cache driver compliance, improvements to the artisan serve command.
- PHPUnit 8.0 support.
- Carbon 2.0 support.
- Pheanstalk 4.0 support, and a variety of other bug fixes and usability improvements.
You can find the detailed guide on Laravel 5.8 releases.
Server Requirements
The following are the server requirements.
- PHP >= 7.1.3
- OpenSSL PHP Extension
- PDO PHP Extension
- Mbstring PHP Extension
- Tokenizer PHP Extension
- XML PHP Extension
- Ctype PHP Extension
- JSON PHP Extension
- BCMath PHP Extension
Laravel 5.8 CRUD Tutorial
You can install Laravel 5.8 via global installer or using the Composer Create-Project command.
composer create-project --prefer-dist laravel/laravel laravel58crud
Now, go inside the project and open the project in your favorite editor.
cd laravel58crud
code .
Step 1: Configure the MySQL Database
Now, first, in MySQL, you need to create the database, and then we need to connect that database to the Laravel application. You can also use phpmyadmin to create the database.
I have created a MySQL database called laravel58crud and now write the MySQL credentials inside the .env file.
DB_CONNECTION=mysql
DB_HOST=127.0.0.1
DB_PORT=3306
DB_DATABASE=laravel58crud
DB_USERNAME=root
DB_PASSWORD=root
So now you will be able to connect the MySQL database.
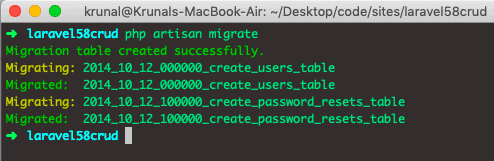
Laravel always ships with migration files, so you can able to generate the tables in the database using the following command.
php artisan migrate
We will create a CRUD operation on Books. So the user can create, read, update, and delete the books from the database. So, let’s create a model and migration files.
Step 2: Create a model and migration files.
Type the following command to create a model and migration files.
php artisan make:model Book -m
It will create a Book.php file and [timestamp]create_books_table.php migration file.
Now, open the migration file inside the database >> migrations >> [timestamp]create_books_table file and add the following schema inside it.
public function up()
{
     Schema::create('books', function (Blueprint $table) {
        $table->bigIncrements('id');
        $table->string('book_name');
        $table->string('isbn_no');
        $table->integer('book_price');
        $table->timestamps();
     });
}
Now, create a table in the database using the following command.
php artisan migrate
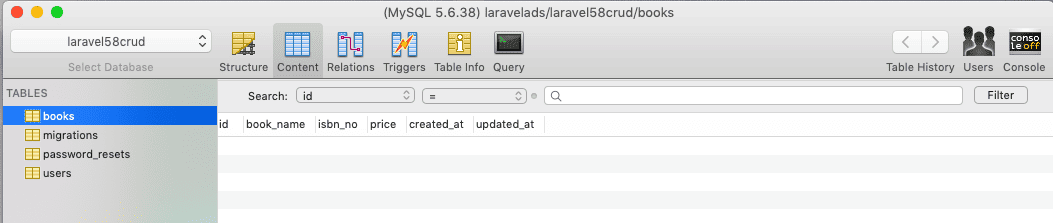
So, in the database, the table is created successfully.
Now, add the fillable property inside Book.php file.
// Book.php

<?php

namespace App;

use Illuminate\Database\Eloquent\Model;

class Book extends Model
{
    protected $fillable = ['book_name', 'isbn_no', 'book_price'];
}
Step 3: Create routes and controller
First, create the BookController using the following command.
php artisan make:controller BookController --resource
Now, inside routes >> web.php file, add the following line of code.
<?php

// BookController.php

Route::get('/', function () {
    return view('welcome');
});

Route::resource('books', 'BookController');
Actually, by adding the following line, we have registered the multiple routes for our application. We can check it using the following command.
php artisan route:list

Okay, now open the BookController.php file, and you can see that all the functions declarations are there.
<?php

// BookController.php

namespace App\Http\Controllers;

use Illuminate\Http\Request;

class BookController extends Controller
{
    /**
     * Display a listing of the resource.
     *
     * @return \Illuminate\Http\Response
     */
    public function index()
    {
        //
    }

    /**
     * Show the form for creating a new resource.
     *
     * @return \Illuminate\Http\Response
     */
    public function create()
    {
        //
    }

    /**
     * Store a newly created resource in storage.
     *
     * @param  \Illuminate\Http\Request  $request
     * @return \Illuminate\Http\Response
     */
    public function store(Request $request)
    {
        //
    }

    /**
     * Display the specified resource.
     *
     * @param  int  $id
     * @return \Illuminate\Http\Response
     */
    public function show($id)
    {
        //
    }

    /**
     * Show the form for editing the specified resource.
     *
     * @param  int  $id
     * @return \Illuminate\Http\Response
     */
    public function edit($id)
    {
        //
    }

    /**
     * Update the specified resource in storage.
     *
     * @param  \Illuminate\Http\Request  $request
     * @param  int  $id
     * @return \Illuminate\Http\Response
     */
    public function update(Request $request, $id)
    {
        //
    }

    /**
     * Remove the specified resource from storage.
     *
     * @param  int  $id
     * @return \Illuminate\Http\Response
     */
    public function destroy($id)
    {
        //
    }
}
Step 4: Create the views
Inside resources >> views folder, create one folder called shares.
Inside that folder, create the following three files.
- create.blade.php
- edit.blade.php
- index.blade.php
But inside views folder, we also need to create a layout file. So create one file inside the views folder called layout.blade.php. Add the following code inside the layout.blade.php file.
<!-- layout.blade.php -->

<!DOCTYPE html>
<html lang="en">
<head>
  <meta charset="UTF-8">
  <meta name="viewport" content="width=device-width, initial-scale=1.0">
  <meta http-equiv="X-UA-Compatible" content="ie=edge">
  <title>Laravel 5.8 CRUD Example Tutorial</title>
  <link href="" rel="stylesheet" type="text/css" />
</head>
<body>
  <div class="container">
    @yield('content')
  </div>
  <script src="" type="text/js"></script>
</body>
</html>
So basically, this file is our main template file, and all the other view files will extend this file. Here, we have already included the Bootstrap 4 by adding the app.css.
Next step would be to code the create.blade.php file. So write the following code inside it.
<!-- create.blade.php -->

@extends('layout')

@section('content')
<style>
  .uper {
    margin-top: 40px;
  }
</style>
<div class="card uper">
  <div class="card-header">
    Add Book
  </div>
  <div class="card-body">
    @if ($errors->any())
      <div class="alert alert-danger">
        <ul>
            @foreach ($errors->all() as $error)
              <li></li>
            @endforeach
        </ul>
      </div><br />
    @endif
      <form method="post" action="">
          <div class="form-group">
              @csrf
              <label for="name">Book Name:</label>
              <input type="text" class="form-control" name="book_name"/>
          </div>
          <div class="form-group">
              <label for="price">Book ISBN Number :</label>
              <input type="text" class="form-control" name="isbn_no"/>
          </div>
          <div class="form-group">
              <label for="quantity">Book Price :</label>
              <input type="text" class="form-control" name="book_price"/>
          </div>
          <button type="submit" class="btn btn-primary">Create Book</button>
      </form>
  </div>
</div>
@endsection
Okay, now we need to open the BookController.php file, and on the create function, we need to return a view, and that is the create.blade.php file.
// BookController.php

public function create()
{
   return view('create');
}
Save the file and start the Laravel development server using the following command.
php artisan serve
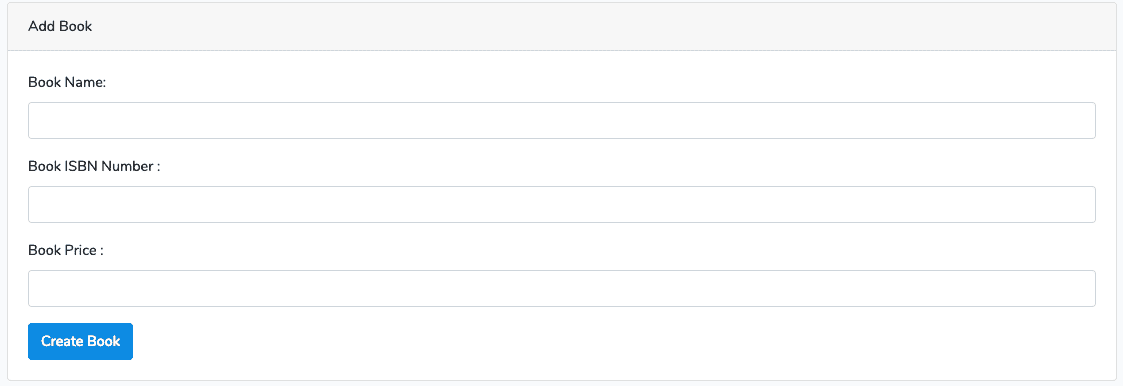
Go to the http://localhost:8000/books/create.
You can see something like this.
Step 5: Add Validation rules and save data
Now, the first step inside the BookController.php is that import the namespace of Book model inside the BookController.php file.
// BookController.php

<?php

namespace App\Http\Controllers;

use Illuminate\Http\Request;
use App\Book;
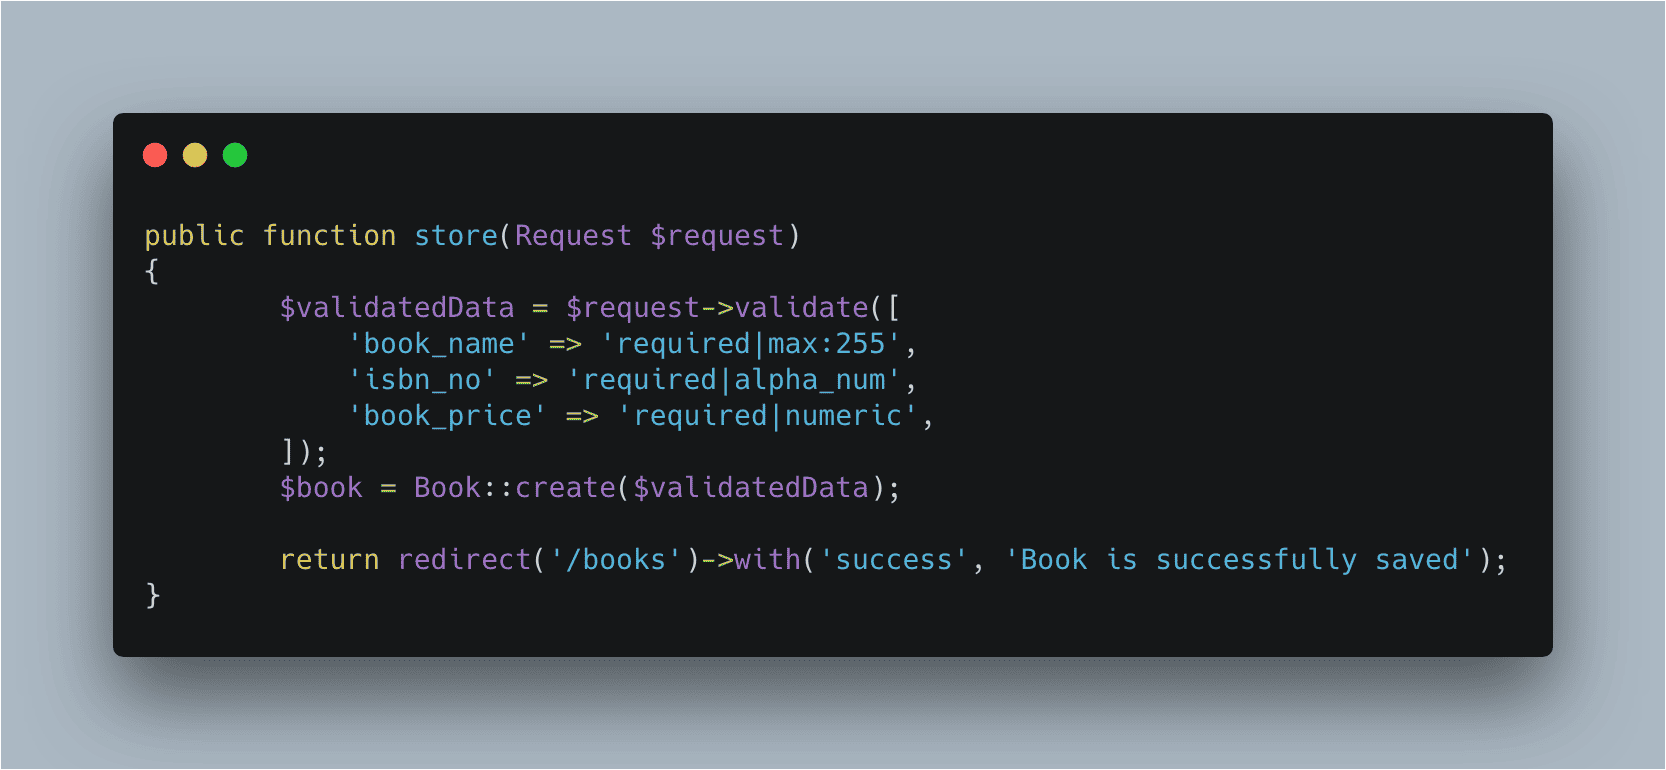
Now, write the following code inside the BookController.php file’s store() function.
// BookController.php

public function store(Request $request)
{
    $validatedData = $request->validate([
         'book_name' => 'required|max:255',
         'isbn_no' => 'required|alpha_num',
         'book_price' => 'required|numeric',
     ]);
     $book = Book::create($validatedData);

     return redirect('/books')->with('success', 'Book is successfully saved');
}
Here, what we have done is first check for all three fields of the form.
If any of the rules are failed by the incoming data, then it will directly go to the form with the error messages.
We need to loop through that error messages inside the create.blade.php file which we have already done it.
If you leave all the form fields empty, then you will find an error message like this image.

Now, if you fill the form fields correctly, then it will create a new row in the database. I have created a new book.

Step 6: Display the data.
Now, we need to write the BookController’s index function to return the index view with the data fetched from the database. Write the following code inside the index() function.
// BookController.php

public function index()
{
     $books = Book::all();

     return view('index', compact('books'));
}
Okay, now create the file called index.blade.php inside the views folder and add the following code.
<!-- index.blade.php -->

@extends('layout')

@section('content')
<style>
  .uper {
    margin-top: 40px;
  }
</style>
<div class="uper">
  @if(session()->get('success'))
    <div class="alert alert-success">

    </div><br />
  @endif
  <table class="table table-striped">
    <thead>
        <tr>
          <td>ID</td>
          <td>Book Name</td>
          <td>ISBN Number</td>
          <td>Book Price</td>
          <td colspan="2">Action</td>
        </tr>
    </thead>
    <tbody>
        @foreach($books as $book)
        <tr>
            <td></td>
            <td></td>
            <td></td>
            <td></td>
            <td><a href="" class="btn btn-primary">Edit</a></td>
            <td>
                <form action="" method="post">
                  @csrf
                  @method('DELETE')
                  <button class="btn btn-danger" type="submit">Delete</button>
                </form>
            </td>
        </tr>
        @endforeach
    </tbody>
  </table>
<div>
@endsection
Here, we have looped through the books array and display the data in the tabular format.
Also, we have added two buttons for edit and delete operation.
Step 7: Create Edit and Update Operation
First, we need to add the following code inside the BookController.php file’s edit function.
// BookController.php

public function edit($id)
{
    $book = Book::findOrFail($id);

    return view('edit', compact('book'));
}
Now, create a new file inside the views folder called edit.blade.php and add the following code.
<!-- edit.blade.php -->

@extends('layout')

@section('content')
<style>
  .uper {
    margin-top: 40px;
  }
</style>
<div class="card uper">
  <div class="card-header">
    Edit Book
  </div>
  <div class="card-body">
    @if ($errors->any())
      <div class="alert alert-danger">
        <ul>
            @foreach ($errors->all() as $error)
              <li></li>
            @endforeach
        </ul>
      </div><br />
    @endif
      <form method="post" action="">
          <div class="form-group">
              @csrf
              @method('PATCH')
              <label for="name">Book Name:</label>
              <input type="text" class="form-control" name="book_name" value=""/>
          </div>
          <div class="form-group">
              <label for="price">Book ISBN Number :</label>
              <input type="text" class="form-control" name="isbn_no" value=""/>
          </div>
          <div class="form-group">
              <label for="quantity">Book Price :</label>
              <input type="text" class="form-control" name="book_price" value=""/>
          </div>
          <button type="submit" class="btn btn-primary">Update Book</button>
      </form>
  </div>
</div>
@endsection
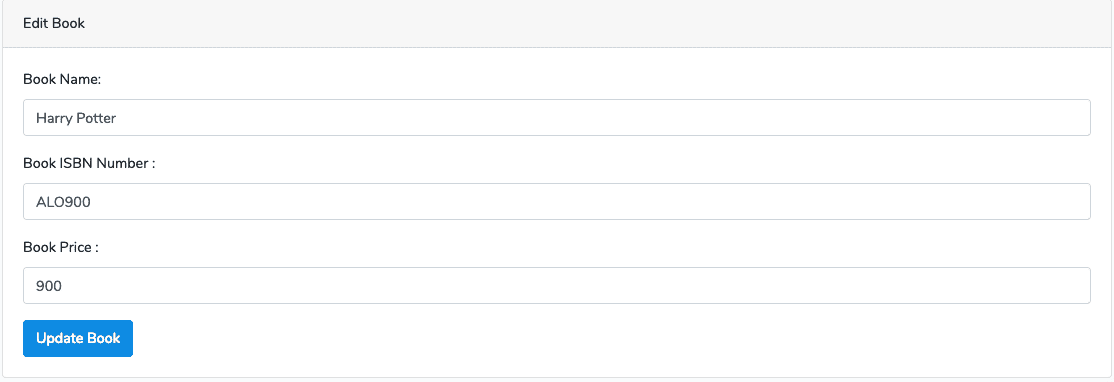
In this file, you can show the values of the particular row using its unique id inside the form fields.
So, when you hit this URL: http://localhost:8000/books/1/edit, you will see something like below image.
Now, add the following code inside the BookController’s update() function.
// BookController.php

public function update(Request $request, $id)
    {
        $validatedData = $request->validate([
            'book_name' => 'required|max:255',
            'isbn_no' => 'required|alpha_num',
            'book_price' => 'required|numeric',
        ]);
        Book::whereId($id)->update($validatedData);

        return redirect('/books')->with('success', 'Book is successfully updated');
    }
So now, you can edit and update the data into the database successfully.
Step 8: Create Delete Functionality
Write the following code inside the BookController’s destroy function.
// BookController.php

public function destroy($id)
    {
        $book = Book::findOrFail($id);
        $book->delete();

        return redirect('/books')->with('success', 'Book is successfully deleted');
    }
Now, go to this URL: http://localhost:8000/books and try to delete the book.
You can see that you have successfully deleted the book.
So, our complete BookController.php code looks like below.
<?php

// BookController.php

namespace App\Http\Controllers;

use Illuminate\Http\Request;
use App\Book;

class BookController extends Controller
{
    /**
     * Display a listing of the resource.
     *
     * @return \Illuminate\Http\Response
     */
    public function index()
    {
        $books = Book::all();

        return view('index', compact('books'));
    }

    /**
     * Show the form for creating a new resource.
     *
     * @return \Illuminate\Http\Response
     */
    public function create()
    {
        return view('create');
    }

    /**
     * Store a newly created resource in storage.
     *
     * @param  \Illuminate\Http\Request  $request
     * @return \Illuminate\Http\Response
     */
    public function store(Request $request)
    {
        $validatedData = $request->validate([
            'book_name' => 'required|max:255',
            'isbn_no' => 'required|alpha_num',
            'book_price' => 'required|numeric',
        ]);
        $book = Book::create($validatedData);

        return redirect('/books')->with('success', 'Book is successfully saved');
    }

    /**
     * Display the specified resource.
     *
     * @param  int  $id
     * @return \Illuminate\Http\Response
     */
    public function show($id)
    {
        //
    }

    /**
     * Show the form for editing the specified resource.
     *
     * @param  int  $id
     * @return \Illuminate\Http\Response
     */
    public function edit($id)
    {
        $book = Book::findOrFail($id);

        return view('edit', compact('book'));
    }

    /**
     * Update the specified resource in storage.
     *
     * @param  \Illuminate\Http\Request  $request
     * @param  int  $id
     * @return \Illuminate\Http\Response
     */
    public function update(Request $request, $id)
    {
        $validatedData = $request->validate([
            'book_name' => 'required|max:255',
            'isbn_no' => 'required|alpha_num',
            'book_price' => 'required|numeric',
        ]);
        Book::whereId($id)->update($validatedData);

        return redirect('/books')->with('success', 'Book is successfully updated');
    }

    /**
     * Remove the specified resource from storage.
     *
     * @param  int  $id
     * @return \Illuminate\Http\Response
     */
    public function destroy($id)
    {
        $book = Book::findOrFail($id);
        $book->delete();

        return redirect('/books')->with('success', 'Book is successfully deleted');
    }
}
So, we have completed a Laravel 5.8 CRUD operations tutorial with the example from scratch.
I have put this code on Github so you can check it out as well.
The post Laravel 5.8 CRUD Tutorial With Example For Beginners appeared first on AppDividend.
via Planet MySQL
Laravel 5.8 CRUD Tutorial With Example For Beginners