ceo to dilbert: is this everything i need to know?
dilbert: yes.
ceo: how can you be sure there isn’t something out there we don’t know about?
dlbert: are you asking me to prove a negative?
ceo: it’s more of an accusation than a question.
Buying ammunition online can save you money and get you far more in terms of choice. Prices are usually lower (watch out for those shipping charges, though) and you aren’t at the mercy of the local gun store’s distributor.
No, your LGS doesn’t buy straight from Federal or Winchester. They go through a third, fourth or even a fifth party depending on the distributor they deal with. That’s why some stores seem to have different ammo for sale all the time.
Before we begin, however, we need to point out that California has made the online purchase of ammunition more difficult for the people who live there. (The Nanny State Strikes Again: Electric Boogaloo) Since purchase of ammunition now requires a background check, it makes buying ammo online more complicated.
The quick version is that you can still buy your ammunition online, but it has to be shipped to either a designated FFL or a California Ammo Vendor with a Certificate of Eligibility in jurisdictions that do not forbid having ammunition shipped to an FFL or CAV/COE for purchase.
Obviously, it’s not that you can’t, but it’s more complicated than it was or needs to be thanks to California’s apparent need to continually make it hard for anyone to enjoy anything, anywhere, ever, at all.
With that said, if you want to secure a regular supply of a particular box and brand, or buy in bulk, getting your ammunition online is one of the best ways to do it.
However, take into consideration what kind of ammunition you’re shopping for. There are certain brands/boxes/types of ammunition that any retailer will have (hardball for range use) and others that you have to find the right source for. Every ammunition site is a little different and tends to caters to a specific market. For instance, some have a lot of different rifle ammo choices, some are a bit more weighted to handguns, and so on.
With that said, who are the go-tos?
Credit: Midwayusa.com
MidwayUSA is one of the largest online retailers of all things gun-related, including a decent selection of…ammunition. Here you can find a pretty decent cross-section of every kind of gun food you might want, from bulk FMJ to JHP for concealed carry, JSP for handgun hunting and anything and everything in between.
Selection isn’t unlimited, but they have far more than almost any other online ammunition retailer. If there’s a one-stop-shop for all things ammunition, guns and so on, Midway USA is as close as it gets.
MidwayUSA is also one of the few somewhat reliable sources for occult esoteric like 7.62mm Tokarev, .45 GAP, 7mm Shooting Times Westerner or .35 Whelen, which many ammunition websites don’t stock at all and you can basically forget about finding in local stores.
Credit: ableammo.com
Able’s Ammo comes close to Midway in terms of breadth and depth of selection. Prices are competitive, and you can find almost any style of bullet you might want. They have a good mix of bulk ammunition and practical ammunition as well.
Credit: luckygunner.com
If all you’re looking for is pistol ammo – and maybe some 5.56/.223 on the side – then LuckyGunner.com is also a very decent supplier. They have a generous selection for people who own typical handguns in typical chamberings such as 9mm, .40 S&W and so on, with a few “oddballs” (.25 and .32 ACP, .50 AE, .357 Sig) as well. FMJ and JHP abounds, so most handgunners will be able to find almost anything they need.
As a bonus, LuckyGunner also produces some fantastic video content as well as maintains a testing database for concealed carry ammunition. Their test is similar to the FBI protocol, so you can see if they’ve tested your carry rounds or the ones you’re thinking of switching to.
Credit: ammunitiondepot.com
Ammunition Depot bridges the gap, so to speak, between Midway and LuckyGunner. The former has darn near everything, the latter only deals in the most popular handgun, a very limited number of rifle calibers (5.56/.223, 7.62x39mm and .308/7.62mm NATO) and does offer some 12-gauge shotgun shells.
Ammunition Depot expands their rifle offerings to include more common rifle calibers and a bit more in terms of shotgun offerings.
However, pickings are a little slimmer for rifle ammunition basically outside of the AR/AK/tactical rifle/assault rifle/modern sporting rifle/whatever you want to call a semi-auto family. In other words, you’ll be happier than a pig in slop if you want .300 Blackout. If you have a .30-06, they have some, but be prepared to feel almost as let down than Cleveland Browns fans.
Credit: sportsmansguide.com
Sportsman’s Guide is not a bad choice for ammunition either. Granted, there are certain things they don’t have much or any of (shop for your JHP elsewhere) but what they DO usually have is great for certain people.
Specifically, they have a good selection of hunting ammunition and some fantastic deals on bulk ammunition as well. If you’re stocking up on, say, Nosler Partitions or laying in a few thousand rounds of 9mm hardball or 5.56/.223, they’re a great source.
Credit: ammo.com
Ammo.com is one of the few sites that comes close to rivaling Midway in terms of sheer breadth of selection. Rifle, pistol and shotgun ammo abounds and with multiple bullet styles and in dozens of calibers. However, their forte is volume, so this isn’t where you go to get a box or two of hardball for the range, hollow points for concealed carry or JSP for hunting. This is where you go to buy A LOT of it.
If you feel like there is a better source than the above, say so in the comments! We, along with everyone else, are always interested in finding a new, better, more cost-effective and reliable source of freedom seeds.
The 2020 presidential campaigns have just begun, but on the issue of gun control, we’re already hearing a common refrain from numerous candidates: The Second Amendment does not protect anyone’s right to own, as they put it, “weapons of war” (a term the candidates use to refer to such things as semi-automatic rifles and standard-capacity magazines).
That’s wrong. The Second Amendment unambiguously protects our right to own “weapons of war.” That is, weapons suitable not just for sport, but for combat.
Many people find this obvious. It’s hard to imagine what else the Second Amendment could possibly be intended to do. James Madison wrote the Second Amendment in the aftermath of a bloody war for independence from a tyrannical empire. The first shots of that war were fired to resist disarmament. Can anyone truly believe that Madison wrote the Second Amendment with, say, hunting or target shooting in mind? It’s a preposterous notion.
But, let’s suppose that we’re not sure what “arms” the Second Amendment refers to. How might we figure out what the authors of our Constitution and Bill of Rights were thinking when they used the term “arms?” Were they thinking about “weapons of war,” or something else?
The Federalist Papers offer a window into the minds of the founders of our country and the architects of our Constitution specifically during the time between its writing and subsequent ratification (and the addition of the Bill of Rights).
In the papers, the term “arms” appears 27 times. “Arms” unambiguously refers to weapons (rather than something like “appendages”) 25 times. In every instance that the term “arms” refers to “weapons,” “arms” is used in the context of combat and warfare, not recreation.* Here are just a few examples:
“(W)ho, by their joint counsels, arms, and efforts, fighting side by side throughout a long and bloody war, have nobly established general liberty and independence.” –Federalist 2 (John Jay)
“(T)hat combination and union of wills of arms and of resources, which would be necessary to put and keep them in a formidable state of defense against foreign enemies.” –Federalist 5 (John Jay)
“To these would be opposed a militia amounting to near half a million of citizens with arms in their hands…fighting for their common liberties…It may well be doubted, whether a militia thus circumstanced could ever be conquered by such a proportion of regular troops. Those who are best acquainted with the last successful resistance of this country against the British arms, will be most inclined to deny the possibility of it.” –Federalist No. 46 (James Madison)
Moreover, in the papers’ extensive discussions of the civilian militia, there is never any suggestion that the arms of the militia ought to be different from or inferior to those of the state military. If anything, the papers call for parity in arms between the militia and the state military.
In Federalist 29, Hamilton wrote:
“If circumstances should at any time oblige the government to form an army of any magnitude that army can never be formidable to the liberties of the people while there is a large body of citizens, little, if at all, inferior to them in discipline and the use of arms, who stand ready to defend their own rights and those of their fellow-citizens.”
This statement simply wouldn’t make sense if Hamilton envisioned the militia being armed with categorically inferior weapons compared to those carried by the state military. What good is a militia that’s well-trained, but poorly armed?
And note that the terms “sport,” “game,” and “hunt” do not appear anywhere in the Federalist Papers. That the Second Amendment protects the right to own weapons suitable for fighting is clear not only from what the papers say, but also from what they don’t say.
Gun control proponents are quick to point out that Madison and his contemporaries didn’t imagine the sort of weapons that exist today. That’s probably true, but it’s irrelevant to the question at hand.
We don’t say that the First Amendment doesn’t apply to typed or online publications simply because the Framers did not imagine typewriters or the internet. We don’t say that the Fourth Amendment does not apply to search and surveillance capabilities that the Framers did not imagine, such as GPS tracking. Technological development doesn’t change the fundamental nature of the rights that the Bill of Rights seeks to secure.
The Second Amendment clearly and unambiguously protects the right to own weapons suitable for combat. The Bill of Rights concerns itself with defense against tyrants–foreign and domestic–not with clay pigeons or whitetail deer.
The only way to escape this conclusion is to adopt a method of constitutional interpretation that willfully ignores the clear language and plain meaning of the Constitution and thus imperils every right that it seeks to secure.
Note, I have not argued here that it’s a good thing that the Second Amendment secures the right to own “weapons of war.” I have merely shown that the Second Amendment obviously does secure that right. Intellectually honest opponents and proponents of gun control alike must recognize that reality.
Yes, this is an inconvenient truth for gun control proponents, because it means that measures they think are “common sense” (like an “assault weapons ban”) are blatantly unconstitutional, and, if the courts are faithful to the document, would require a constitutional amendment in order to be legal.
However, gun-rights supporters can’t complacently retreat to the apparent safety of the Second Amendment, no matter how plain and obvious its meaning. On the contrary, they would do well to remember that the Constitution has been amended 17 times since the adoption of the Bill of Rights.
Our rights may be innate and eternal, but the document that protects them from violation is certainly not. And even if the document remains unchanged, we have ample evidence that, without our tireless vigilance, it will often be ignored.
So it’s not enough to merely have the Constitution and to know what it means. We must also do the continual work of holding our politicians accountable to it.
* The Anti-Federalist papers use “arms” in the same way.
SQL Having Clause Example | SQL Having Tutorial is today’s topic. The SQL HAVING clause is used in the combination with a GROUP BY CLAUSE to restrict the groups of returned rows to only those whose condition is TRUE. The HAVING clause was added to SQL because the WHERE keyword could not be used with aggregate functions.
SQL Having Clause Example
SQL HAVING filters the records that work on summarized GROUP BY results. The HAVING applies to the summarized group records, whereas WHERE applies to the individual records. Only the groups that meet a HAVING criteria will be returned. HAVING requires that the GROUP BY clause is present. WHERE and HAVING can be in a same query.
Syntax
SELECT Expressions, aggregate functions(aggregate_expression)
FROM TABLE
WHERE CONDITION
GROUP BY COLUMN
HAVING CONDITION;
PARAMETERS
Expressions: Expressions that are not encapsulated within the aggregate function and must be included in the GROUP BY Clause near the end of an SQL statement.
Aggregate function: Sum, count, Min, Max are some of the aggregate functions.
Aggregate Expressions: It is the column expression used in an aggregate function.
Table: Name of the table.
Where Condition: Where condition Is used for the records to be selected.
Group By: It is a keyword used for grouping some rows based on the same values.
Having Keyword:This is the further condition applied only to an aggregated results to restrict the groups of the returned rows. Only those groups whose condition evaluates to be TRUE will be included in the result set.
Let’s clear with an example:
Consider the following Table.
CUSTOMERS
CUST_CODE
CUST_NAME
CITY
GRADE
AMOUNT
101
SHUBH
KOLKATA
1
10000
201
SOURAV
KOLKATA
1
10000
301
KISHAN
PATNA
2
20000
401
DILEEP
ALLAHABAD
2
30000
501
SHRUTI
PATNA
3
40000
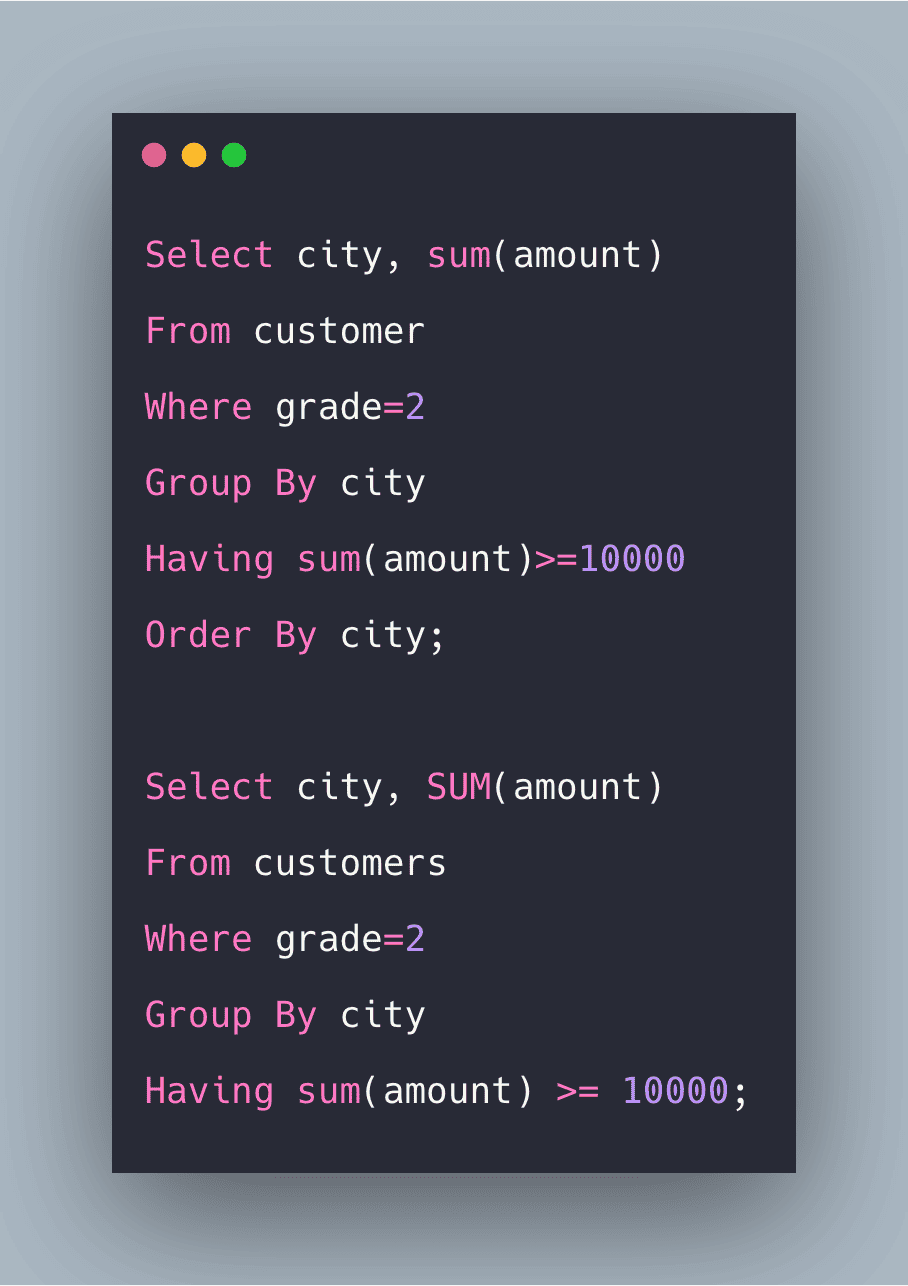
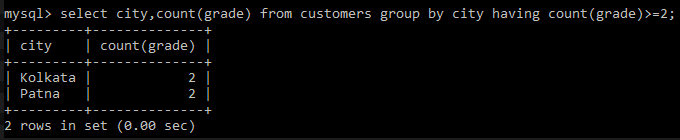
In this, we are going to use the aggregate function count. See the following query.
QUERY
Select city,count(grade)
From customers
Group By city
Having count(grade)>=2;
See the following output.
Explanation
In the above example, we have displayed the total no of employees having similar grades greater than 2, and their city groups data.
SQL Having With Aggregate MIN
In this example, we are going to use the aggregate function MIN.
QUERY
Select city, MIN(amount) as “LESS AMOUT”
From customers
Group By city
Having MIN(amount)>10000;
See the following output.
Explanation
In this example, we have displayed the Min amount a customer has belonging to the respective city.
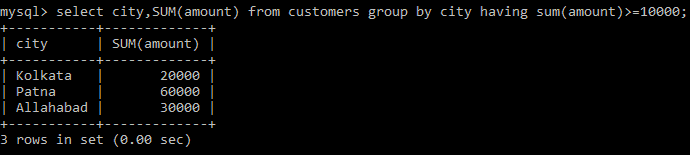
SQL Having With Aggregate SUM
In this example, we are going to use an aggregate function SUM.
QUERY
Select city, SUM(amount)
From customers
Group By city
Having sum(Amount) >= 10000;
See the output.
Explanation
In this example, we have displayed the total sum of the number of customers belonging to the same city.
SQL Having With Aggregate MAX
In this example, we are going to use the aggregate function MAX.
QUERY
Select city, MAX(amount)
From customers
Group By city
Having MAX(amount)<20000;
OUTPUT
Explanation
In this example, we have displayed the max amount from customers grouped by their cities.
SQL Having With Aggregate WHERE
In this example, we are going to use the where keyword.
QUERY
Select city, SUM(amount)
From customers
Where grade=2
Group By city
Having sum(amount) >= 10000;
OUTPUT
In this example, we have displayed the total sum of amount whose grades are 2 and are grouped by their city and also having a total sum greater than equal to 10000.
SQL Having With Aggregate Order By
In this example, we are going to use the ORDER BY keyword.
QUERY
Select city, sum(amount)
From customer
Where grade=2
Group By city
Having sum(amount)>=10000
Order By city;
OUTPUT
Explanation
In this example, we have displayed the total sum of amount whose grades are 2 and are grouped by their city and also having a total sum greater than equal to 10000 followed by order by, which have displayed the city in ascending order as ASC is executed by default.
When WHERE statement, GROUP BY, and HAVING clauses are used together in the SELECT statement, the WHERE clause is processed first and then rows that are returned after a WHERE clause is executed are grouped based on a GROUP BY clause. Finally, any conditions on that group functions in a HAVING clause are applied to the grouped rows before the final output is displayed.
So, we have seen SQL Having with WHERE clause, GROUP BY, ORDER BY and all the aggregate functions.
Finally, SQL Having Clause Example | SQL Having Tutorial is over.
Star Wars Episode IV: A New Hope came out in May, 1977. A few months later, ABC aired this gem, a one-hour behind-the-scenes special which went inside the production, with hosts C-3PO and R2-D2. It’s a wonderful watch for any fan of the franchise, and serves as a great time capsule of pre-CGI visual effects.
One of the things I really love about Laravel is how easy it is to customize it to your own wishes.
Recently I was working on a model that used a standard auto-incrementing integer as its primary key. My task was to convert this model to work with a version 4 UUID.
Making the change
It was actually quite simple, there are just a few protected attributes you have to change on the Eloquent model(s), as can be seen in this code sample:
class Article extends Model { // column name of key protected $primaryKey = 'uuid'; // type of key protected $keyType = 'string'; // whether the key is automatically incremented or not public $incrementing = false; }
What does this do?
This change will make some frequently used Eloquent methods as they did before. For example Article::find() can now be called using the UUID. The same is true for findMany, findOrFail and firstOrNew.
Authentication with an Eloquent user model will now also work as you would expect it. This should not come as a surprise as authenticated uses the same Eloquent methods as we mentioned before. Still, it is very nice we don’t need to make any further changes to get this to work.
What does not automatically work?
Not everything will automatically work as it did before. The best example I’ve come across is model route binding. Depending on whether you use implicit or explicit model binding you will need to make different changes, which are clearly stated in the docs.
Workshops are interactive group activities and exercises cohesively designed to meet a goal. Generally, workshops are in-person with a facilitator guiding participants. They take people out of their normal day-to-day environment and laser focus them on the task at hand.
In this distraction-free zone, what normally takes weeks or months to accomplish takes just a few days. You can harness this efficiency to build and nurture a customer-centric culture by introducing participants to thinking tools that they can apply to everyday decision-making and that can be shared with their teams.
During my time as a customer experience manager, I have designed, facilitated, and made speeches about workshops that do just that. In this article, I have distilled key components from these workshops and documented the process around four types of workshops that you (“you” as the facilitator or organizer of a workshop) can use to drive customer-centricity in your own companies.
For discussion purposes, I have broken the workshops into two categories: “general” and “project-specific”. General refers to workshops that are designed for anyone to participate. They introduce many basic customer-centric concepts with the end-goal of equipping participants to think about the customer differently and more often.
This article will cover two types of general workshops:
Project-specific workshops are best run with a particular, actionable outcome in mind. They are designed to be run in the context of a broader project or effort. Therefore, they are best suited for participants involved in the project (more specifics later).
Project-specific workshops are the most powerful because they contextually apply customer-centric tools to the project at hand, minimizing the mental leap participants have to make between the tools they gain and how to apply them first-hand.
I discuss two types of project-specific workshops:
Workshop Decision Table: When To Use Which Workshop
Workshop
Who
Time
Goal
Outcome
Name of workshop
Who can participate
Time commitment
Increase customer centricity by…
After the workshop, participants will have learned how to…
Customer Bowl
Anyone
3 days
Introducing customer centric principles in a fun, interactive competition
Empathize to understand customer needs
Apply design thinking principles
Innovate based on needs
Sketch/visualize ideas
Use customer feedback to iterate
Customer Canvas
Anyone (but particularly good for product and sales)
½-1 day
Teaching a customer centric mindset rather than a product-first mindset
Empathize to understand customer needs
Have meaningful conversations with customers based on what is important to them (and recommend relevant solutions)
Create and design products and services that provide value for customers
Journey Mapping
Project-Specific
2 days
Taking the customer’s perspective to identify experience improvements
Be empathetic towards customers’ experience and interaction with brand
Use research insights to uncover pain points and opportunities
Design experience improvements to address pain points and opportunities
Google Design Sprints
Project-Specific
5 days
Rapidly designing and testing ideas to address customer needs
Empathize to understand customer needs
Apply design thinking principles
Make decisions based on customer feedback
Sketch/visualize ideas
Customer Bowl
Workshop type: General
Who should participate: Anyone
In summary: This introduction workshop gamifies basic customer-centric concepts by having participants compete in the Customer Bowl, a contest to see who can innovate a solution that best meets customer needs.
Why it drives customer-centricity: It introduces thinking tools and methods that encourage participants to think differently and more often about customers.
Outcome: After the workshop, participants will learn how to empathize to understand customer needs, apply design thinking principles, innovate based on needs, sketch/visualize ideas, and use customer feedback to iterate.
Context: The Customer Bowl splits participants into groups. Each group is assigned a customer for whom they will be designing a solution. Groups will follow a basic design thinking framework, using tools such as personas, journey mapping, sketching, and testing in the hopes of having the customer-sanctioned “best” innovation at the end of the workshop.
Along the way, participants can also receive individual points for showcasing customer-centric behavior, such as stepping into the customer’s shoes, talking about value to the customer rather than features, and encouraging other group members to put on their customer hats.
This is my favorite comment from a participant after facilitating this workshop:
“Wow, customers are real people!”
The CX Bowl can be modified for any industry and context, but because I work at a travel company, the workshop example I outline focuses on travelers as customers with participants acting as travel agents or experience providers.
The Customer Bowl starts with an explanation of the contest and end-goal. To stoke the competitive spirit, break participants into groups, have them name themselves, and showcase the amazing prizes they stand to gain by winning the contest or earning the most individual points (amazing prizes generally means cheap candy).
Introduce each group to their customer, the person they are designing for and who ultimately decides their fate. If you can get actual customers to join the workshop and play along, great! If not, use personas to represent customers. If using personas, explain the concept of them, when you use them and why, and assign a different one to each group.
For fun, let’s use Pinterest’s newly released high-level traveler personas based on data from their 250 million monthly users:
The Group Vacationer
Values spending time with friends, family or fellow travelers.
The Culture Chaser
Values learning about local culture and history.
The Spa Sojourner
Values rest and relaxation
The Adventure Lover
Values being active.
The Eating Explorer
Values a good dining experience.
Get groups to name their personas and add context around the persona’s goals and motivations. Encourage teams to make the personas their own and really step into their shoes.
Tip:
Your goal in this activity is to teach participants how to empathize with a persona, so it is ok if you create proto-personas not 100% based on data and research
Print off persona sheets and let teams fill them in. (Large preview)
Map Journey (1 Hour 30 Minutes)
The groups will put themselves in the mind of a traveler and map the journey of their persona going on a trip: from research to shopping, booking, pre-trip, traveling, on trip, and post-trip.
Journey map: visualization of the process a persona goes through as they try to accomplish a goal.
Tip:
I like to use journey maps in the Customer Bowl workshop as the method to uncover opportunities for innovations, but there are many other approaches you can use as well, particularly if you are able to secure a real customer to participate.
Provide a simple journey mapping template for participants to use with the journey phases running horizontally on top and the customer jobs-to-be done, thoughts, and emotions running vertically on the side.
Note that the first row in each phase is titled “jobs-to-be-done.” This refers to the things that a person is trying to get done or accomplish — problems they are trying to solve or needs that are trying to satisfy. This is a more powerful lens than focusing on “actions” or “steps” typically used in journey maps. Jobs-to-be-done encourages participants to consider not only the functional actions but also social as well as the emotional components to an experience (more on jobs-to-be-done later).
After groups complete their persona’s journey map, they vote on the most important or compelling jobs-to-be-done, thoughts, and emotions, paying attention to areas in the journey where there are pain points, opportunities and/or gaps.
With the journey map in mind, participants put on their traveler agent hats. For the rest of the workshop, they will use the journey map as the foundation for an innovation exercise in which they ideate solutions to address a need they uncovered in the journey.
Create A Problem Statement (30 Minutes)
Based on the top voted jobs, thoughts, and/or emotions, participants pick the area that they think travel agents could add the most value and articulate this by writing a problem statement.
This may sound basic, but this activity is important. It directs participants to define what problem they are trying to solve from their customer’s point of view. There is not one right format for problem statements. The key is to focus the statement on customer need.
I like this template from the Interactive Design Foundation:
User… (descriptive)] needs [need… verb)] because [insight… (compelling)]
Tip:
Encourage participants to find the right level of detail for a problem statement. Too broad and you won’t be able to narrow in on any solutions. Too narrow and you are limiting the potential solutions you could come up with.
For example, a group that mapped the journey of Ellen (the “Adventure Lover”) may have highlighted a pain point related to Ellen’s wardrobe. As a busy on-the-go adventure lover, Ellen might not have the time or money to wash her clothes while she is traveling. Therefore, a group could focus their problem statement on this aspect of Ellen’s journey.
Too broad: Ellen, the adventure lover, needs to be able to travel cheaply…
Too narrow: Ellen, the adventure lover, needs to be able to clean her clothing while traveling…
Just right: Ellen, the adventure lover, needs access to clean clothing while traveling…
Ideate Solutions To Address Problem Statement (Approx. 2 Hours)
Now that participants know what problem they want to solve, walk them through a process to ideate potential solutions to the problem. I like the Google Design Sprint process for ideating (check out the Google Sprint workshop section about sketching), which starts with individual brainstorming and ends with a collective vote.
Step
Description
Time
1
Participants review their persona, journey map, and problem statement, taking notes and reminding themselves of the problem they are trying to solve. and who they’re trying to solve it for.
20 minutes
2
Sketch out rough ideas or solutions.
20 minutes
3
Crazy 8s! Picking the best idea, participants draw 8 iterations to explore the solution from all angles).
8 minutes
4
Solution sketch. Participants create a shareable visualization that represents their idea.
45 minutes
5
Participants vote on the top sketches to create final solution sketch.
5 minutes
Tip:
A lot of people will be intimidated by the sketch and drawing portion of ideation. Let them know if they can draw boxes and circles, they can sketch!
Sketch process outlined in Google Venture’s Sprint book (Large preview)
Show Sketch To Customers For Feedback (1 Hour For Preparation, Half A Day For Interviews)
Now that participants have a solution sketch, they will prepare to share their ideas with customers (travelers) for feedback. As preparation, encourage participants to do a role-playing exercise in which one participant pretends to be the traveler and the other an interviewer. The goal of the interviewer is twofold.
First, the interviewer should learn what is important to the traveler, what their biggest pain points are, and where their opportunities for improvements are along with their travel experience. This will be validated against the assumptions made in the journey mapping exercise.
Second, the interviewer should validate the idea or solution they designed in order to gauge the traveler’s interest in the idea. Does it address a pain point? Is it useful? Would you buy it?
Tip:
Keep looking for customer-centric behavior to reward. A fun way to do this is to design your own Customer Bowl money to give out.
A couple of useful guidelines for interviewers:
Listen more than you talk;
Don’t be afraid of silence;
Keep asking why — dig into emotions and motivations;
Don’t ask leading questions;
Do ask open-ended questions.
With participants feeling confident in their interviewing abilities, get them out of the building! Encourage participants to find out what it is like to talk to customers or potential customers in the real world. They can go to airports, train stations, bus stops (really wherever as most people have traveled before, there aren’t any limitations of who participants can talk to or where to find them). Each group should talk to at least five people. After groups talk to customers, they should debrief and prepare for their pitches.
Wrap-Up (2 Hours Pitch Prep, 5 Minutes Each Per Group To Pitch, 15 Minutes Judge Feedback, 30 Minute Wrap-Up Discussion)
To wrap it all together, give participants a chance to “pitch” their innovations to the group. Give them prompts to answer as part of their presentation, such as:
What were the emotional highs and lows of your persona on their journey?
What needs does your solution address?
How did input from real travelers change your idea?
After each group has pitched, it’s time to pick a winner!
If you were able to secure real customers to participate, these will be your judges. If not, you can recruit a panel of impartial judges (it always helps if these folks are more senior, not only so participants will take the judging seriously but also so more senior executives are exposed to customer-centric principles).
Regardless of who judges, give them a scorecard to fill in after each group has presented, assessing things such as: familiarity of who customer is and what is important to them, extent to which solution maps to customer needs and an indication that customer feedback was incorporated into solution. Once the votes are tallied, announce the winners and celebrate*!
* By “celebrate”, I mean have a discussion on how to apply the principles from the workshop to their roles.
Customer Canvas
Workshop type: General.
Who should participate: Anyone but particularly good for sales and product people.
In summary: Introduction to the value proposition canvas as a tool to build empathy and understand products and services in terms of customer needs.
Why it drives customer centricity: Gives participants framework they can use in conversations with customers and product decisions.
Outcome: After the workshop, participants will learn how to empathize to understand customer needs, have meaningful conversations with customers based on what is important to them (and recommend relevant solutions), and create and design products and services that create value for customers.
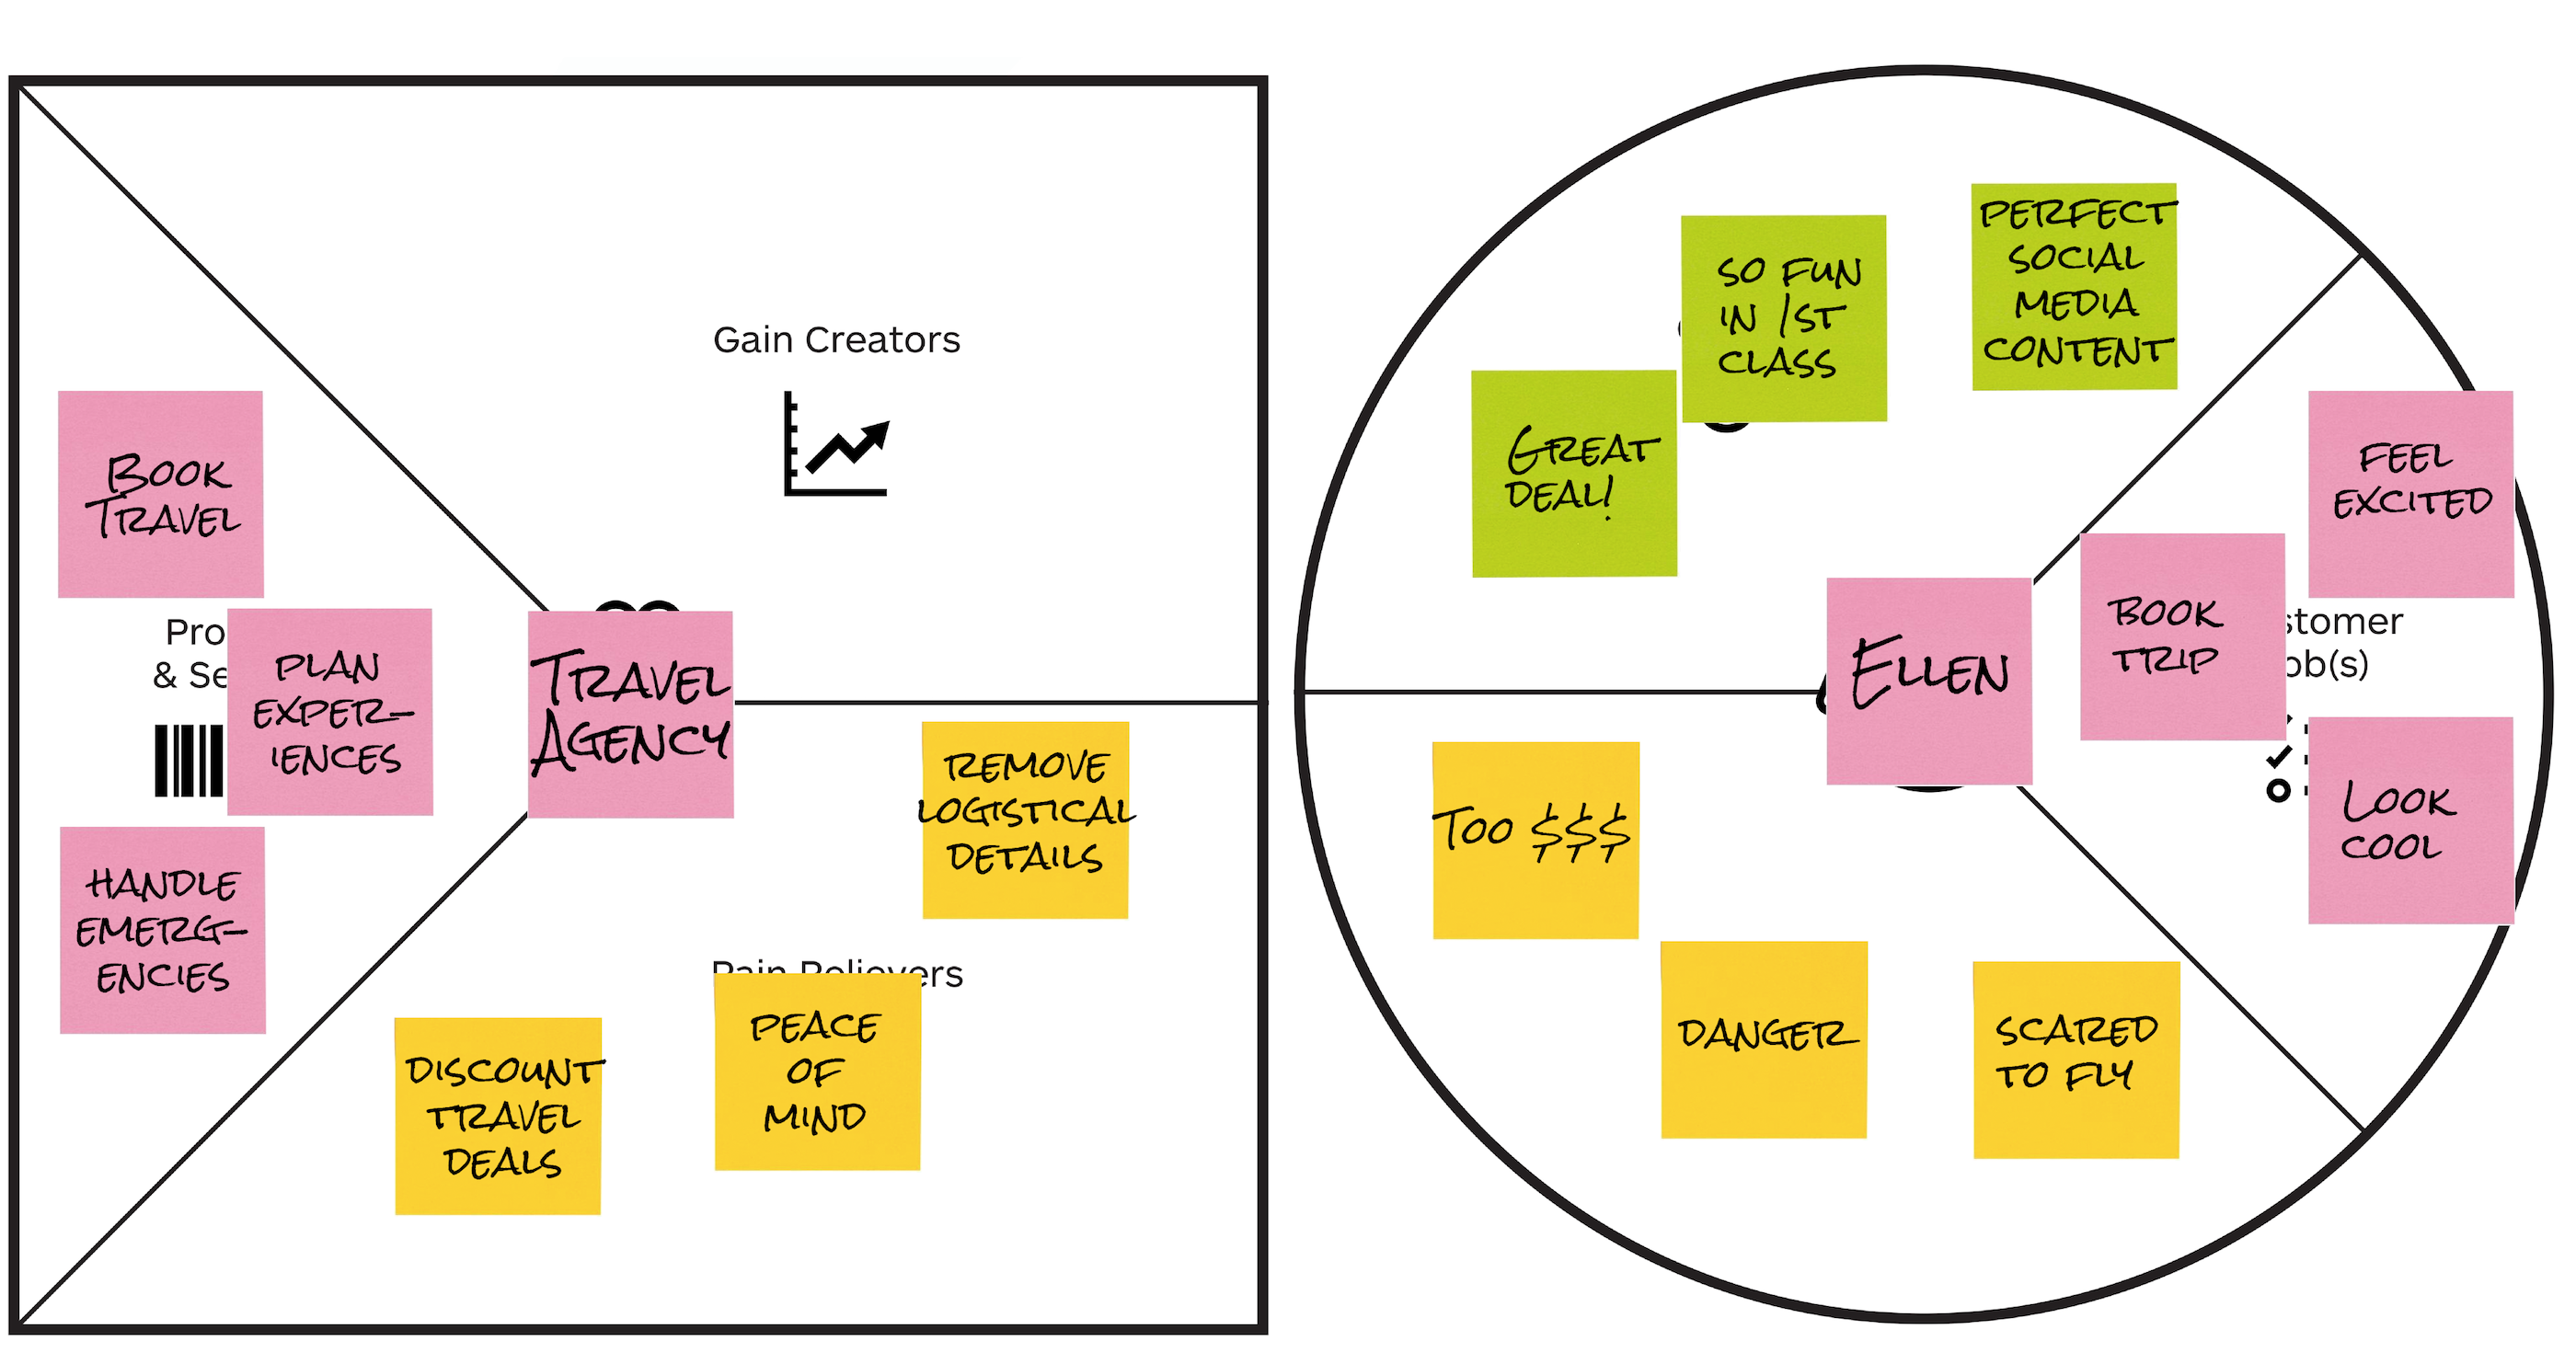
Context: The Customer Canvas workshop introduces the concept of value proposition design based on Stategzyer’s Value Proposition Design book by lan Smith, Alexander Osterwalder, Gregory Bernarda, Trish Papadakos, and Yves Pigneur. It focuses on customer profiles which represent the “who” that a company serves with the “what” of products and services. This exercise is typically used as a way to innovate new offerings or act as a check that new ideas for products and services map to customer needs. However, I find that the workshop also works well as a way to teach customer-centric thinking rather than product-first thinking.
Though suited for anyone looking to become more customer-centric, the Customer Canvas workshop is particularly good for sales and product people.
For salespeople, it teaches how to speak the customers’ language, and better equips them to recommend solutions based on a deeper understanding of what customers are trying to accomplish. For product people, it provides a simple and practical framework for creating and improving products and services that map to customer needs.
Tip:
This is another good workshop to gamify with points for customer centricity (and candy)!
Like with Customer Bowl, start with a discussion of personas and assign one to each group. Have participants familiarize themselves with their personas and modify as needed to make them feel real.
Introduce Stategyzer’s value proposition canvas, and give an overview explanation of the intent of the canvas. As Strategyzer summarizes:
“A simple way to understand your customers’ needs, and design products and services they want.”
Explain that they will be leveraging this framework in order to move from a product-first mindset to a customer-centric mindset.
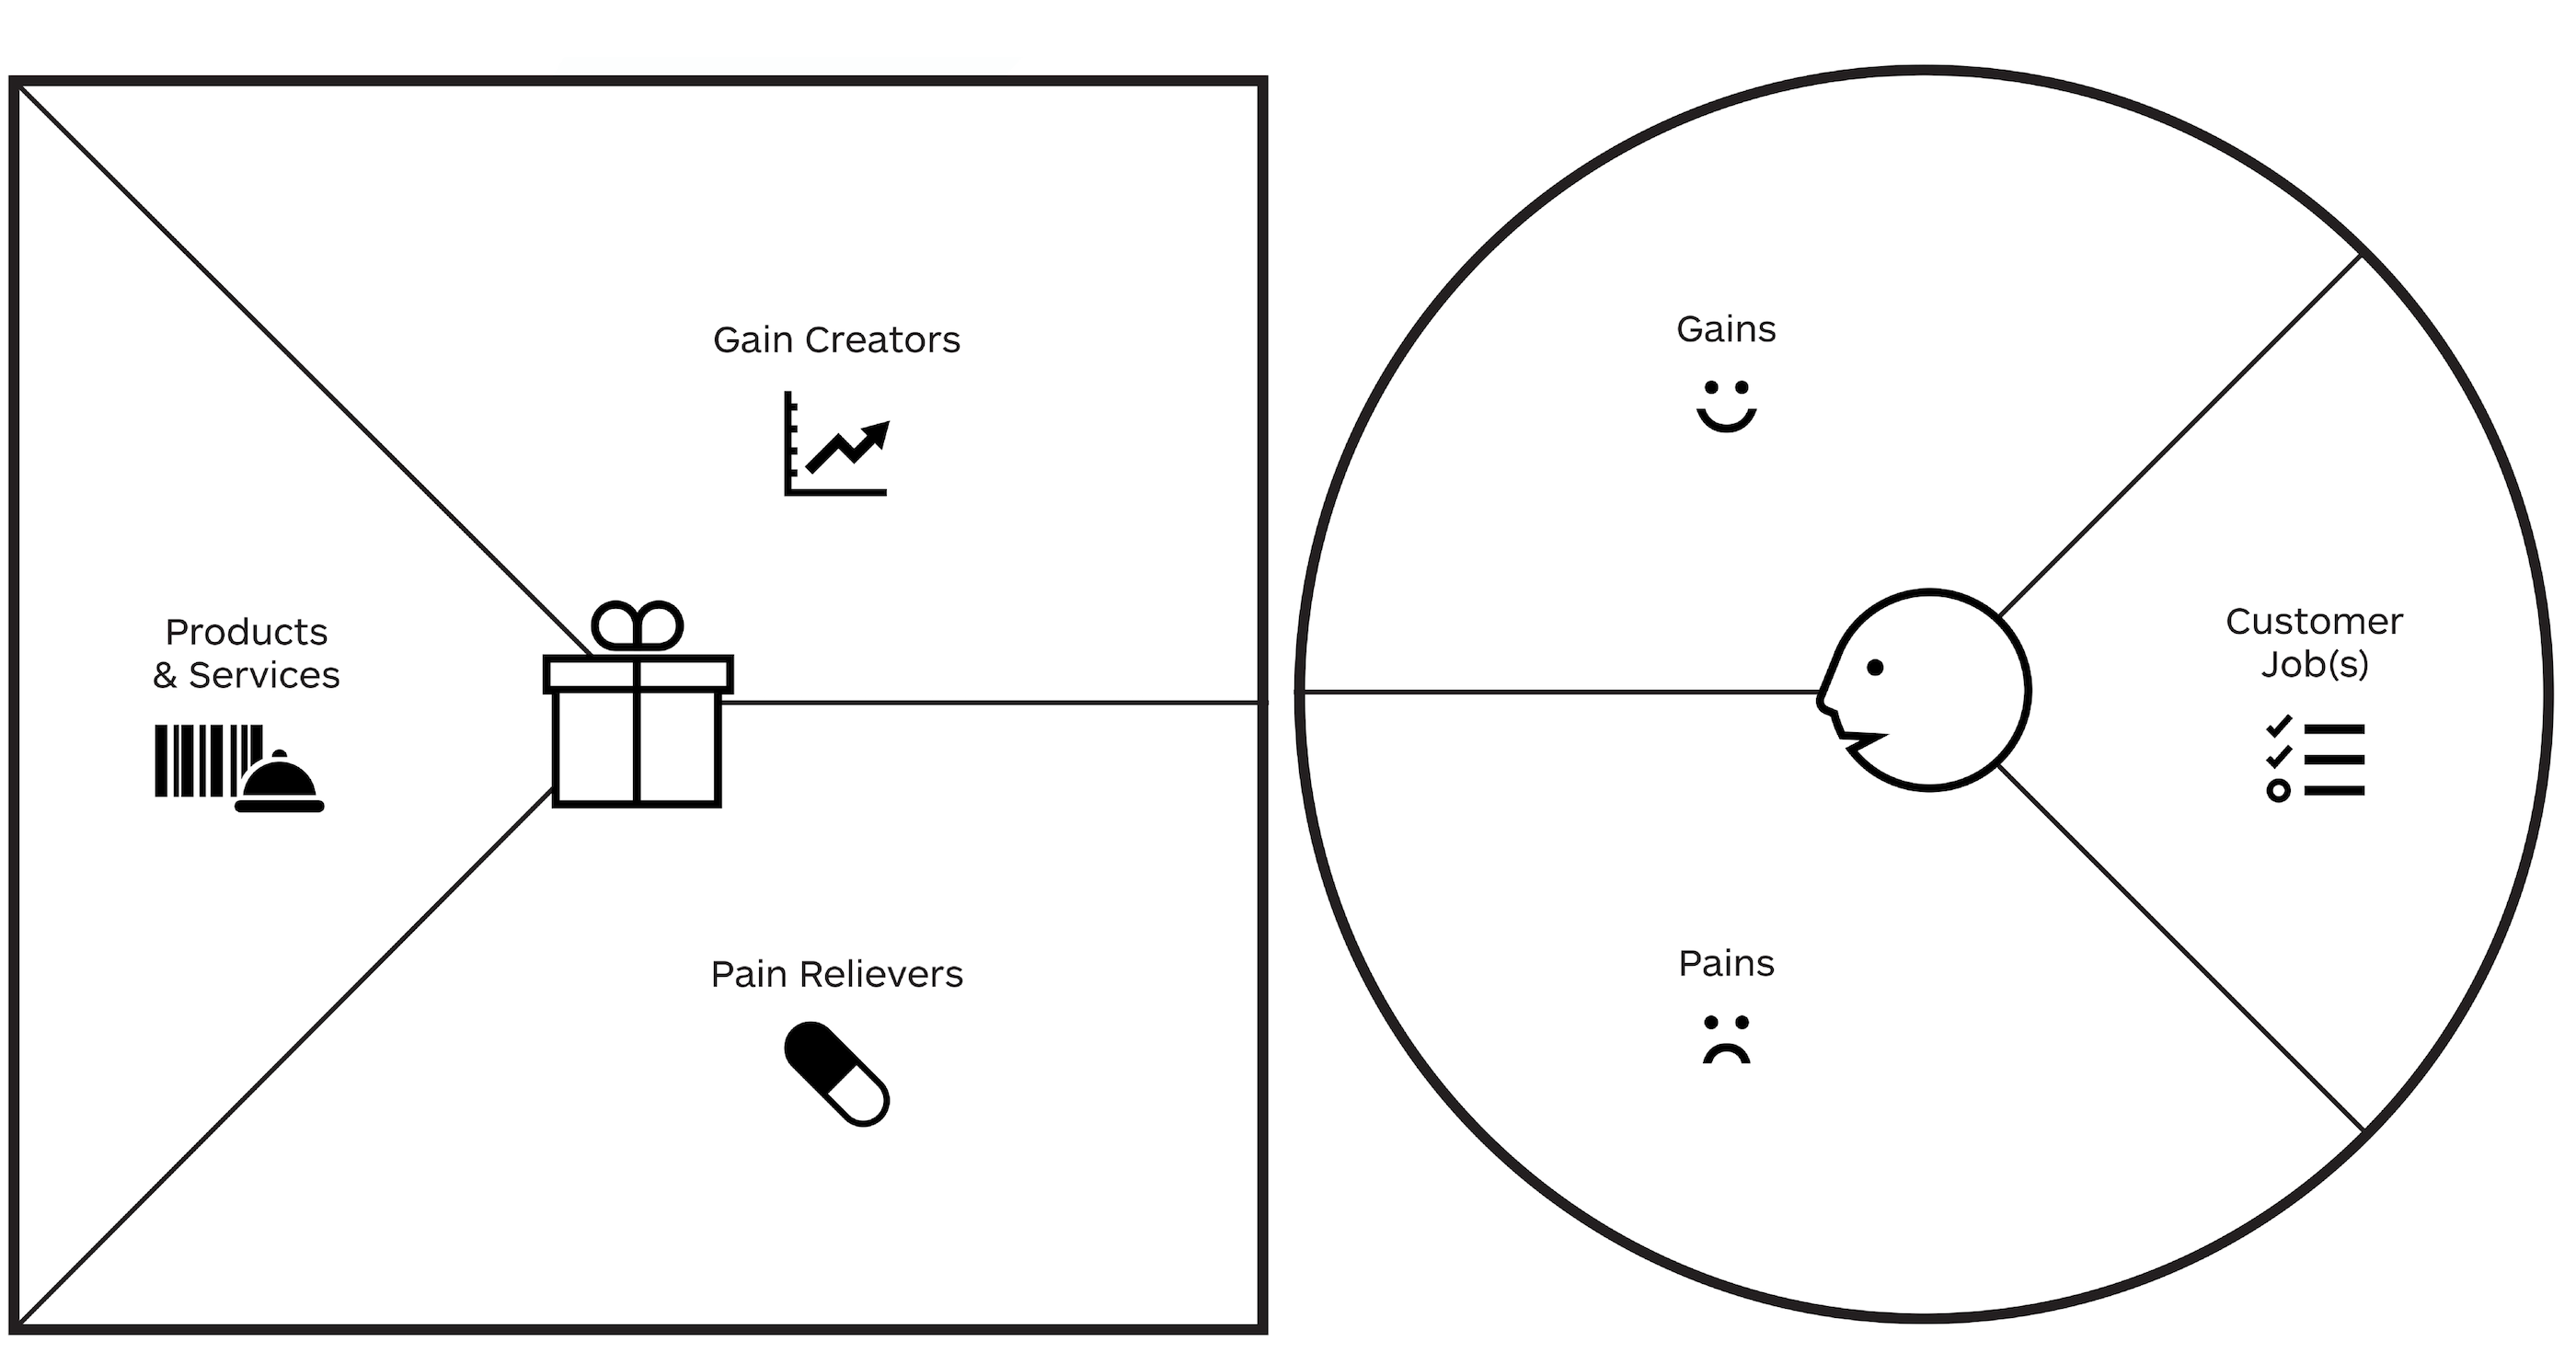
There are two sides to the value proposition canvas. The right side is called the customer profile. It represents the observed or assumed set of characteristics that represent one of the customers.* It is comprised of three components: customer jobs-to-be-done, pains, and gains.
Stategyzer’s Value Proposition canvas (Large preview)
Note: Strategyzer calls the right side of the canvas the “customer (segment) profile” and focuses on customer segments. However, I find that using a persona and choosing a context for the persona is a much stronger training tool to build customer centricity. For example, focus on Ellen, the adventure traveler, who is planning her next trip (persona and context based) rather than focusing on millennial travelers living in Atlanta, GA (customer segment based). Therefore, I refer to the right side of the canvas as just “customer profile”.
Groups will stick their persona onto their customer profile. They will then proceed to fill in the jobs-to-be done, pains, and gains segments of the profile.
Jobs-To-Be-Done (20 Minutes)
As mentioned earlier, the jobs-to-be-done framework is a great way to understand what is truly important to customers from the perspective of what they are trying to accomplish in a given circumstance. This brings customers to life in a way that big data about customers and buyer segments correlations cannot.
Tip:
If you are tight on time and can only focus on one thing, focus on jobs-to-be-done!
Jobs-to-be done can be functional, emotional, or social. They represent the things customers are trying to get done in a given circumstance. Here are a few sample prompt questions:
What is your customer trying to accomplish?
What emotional and/or social needs are they trying to satisfy?
How do they want to feel and what do they need to do to make this happen?
For the persona Ellen in a travel scenario, a few examples of her jobs-to-be done could be: functional — book a trip, social — go to a cool place to get Instagram likes; and emotional — feel a sense of adventure or excitement.
A few examples of customer jobs. A proper profile should be more filled out. (Large preview)
Pains (20 Minutes)
Customer pains are the things that prevent customers from accomplishing their jobs to be done, are risks, or are simply annoying. They also can be functional, emotional, or social. A few sample prompt questions:
What is keeping your customer awake at night? What are their big issues, concerns, and worries?
What makes them feel bad? What are their frustrations, annoyances, or things that give them a headache?
What negative social consequences do they encounter or fear? Are they afraid of a loss of face, power, trust, or status?
Pains for Ellen could be: travel costs too much; as a single female, I don’t want to travel to dangerous places; I don’t have that much money, but I want to be perceived as glamorous and adventurous.
Tip:
Really drive empathy for the pains and gains that travelers experience. It helps to frame statements from a first-person point of view “I’m scared of flying!”
The last section of the customer profile centers around Customer Gains. These represent the functional, social, and emotional benefits a customer might need, expect or desire (or be unexpected positive outcomes).
A few sample prompt questions:
What would be a dream come true for them?
What would make their jobs easier?
What savings in terms of time, money, or effort would be beneficial?
Gains for Ellen could be: I found a really great deal on this flight!; wow, I am going to look so cool for my Instagram followers; getting to fly 1st class is a dream come true.
Tip:
People can have a hard time coming up with gains. Encourage them to think about the opposite of the pains they defined. For example, if a pain is “travel is so expensive”, then a gain could be “I found a really great deal on this flight!” It may seem repetitive, but it will be important later on when participants think of ways to address pains.
Time permitting, have participants rank each segment of the profile in terms of importance to highlight the most important jobs-to-be done, pains, and gains.
The last section of the exercise fills out the left side of the canvas, called the value proposition. The value proposition represents the value that a company offers in terms of its products and services, pain relievers, and gain creators.
When mapping the left side of the canvas (the value proposition) to the right side of the canvas (the customer profile), participants assess how well the products and services enable customer jobs-to-be done, relieve pains, and create gains. This mapping teaches participants how to frame the company’s products and services in terms of customer needs (stop leading the conversation with product features, and instead, talk about the jobs they enable and the value they provide!).
Tip:
As a takeaway, encourage participants to post their customer profiles around their offices to be a constant reminder of who their customer is and what is important to them. They can also print off the full list of jobs-to-be done, pains, and gains prompt questions to help focus future customer conversations.
Products And Services (20 Minutes)
Participants start filling out the left side of the canvas by listing out the products and services that their company offers. These could be physical products (i.e. the iPhone), or more intangible services (i.e. offer training on the iPhone), digital (i.e. online photo storage for your iPhone), and so on. Simply list offerings — this should be the easiest part of the exercise!
Tip:
Products and services may or may not enable your jobs-to-be-done. That’s ok, a good value proposition doesn’t need to address everything, but knowing where the gaps are can help facilitate more effective conversations with customers and lay the groundwork for future innovation and product improvements.
A few examples of products and services (Large preview)
Pain Relievers (20 Minutes)
Next is the pain relievers section. Here, participants outline how products and services reduce or remove pains or things that annoy customers. This section helps participants see products and services in terms of how they are eliminating pains.
A few sample prompt questions:
How does your product or service help your customer sleep better at night? Or address issues or concerns?
Gain Creators describe how products and services create customer gains or positive outcomes for customers to enjoy.
Sample prompts questions:
How do your products and services save time, money, or effort for your customers?
How do they outperform other related products or services customers could be using?
How do they create positive emotional or social reactions?
Tip:
This section of the workshop can be tricky. People really struggle with this area of the canvas feeling redundant, and it is a little tedious after filling out five other sections of the value canvas already. It might be a good idea to take a little break here or do a quick exercise to get people’s energy up.
Assessing Fit (1 Hour 30 Min Including Wrap-Up Discussion)
The last activity in the workshop is assessing how well the value proposition offerings map to the needs uncovered in the participant’s customer profiles.
Are there major jobs to be done that your products and services aren’t enabling?
Are there important pains and gain opportunities that are being left on the table?
Have participants discuss the “fit” and what they learned. Some great questions here:
How will this impact the way you think about customers?
How will this impact the way you talk to customers?
How can you use this framework to ensure you are designing and building the right things?
As an ideal after-workshop-activity, participants should test the assumptions they’ve made with real customers. This really brings customers to life.
Wrap-Up And Alternative Approaches
Tailored For Sales Training
Another way to run the workshop which is especially helpful for salespeople is to do the same exercise, but this time, have one person role play as the customer. And the other can only fill out the customer profile based on asking the “customer” questions about what is important to them, what jobs they are trying to accomplish, what their pains are, and so on. This not only gives salespeople a more customer-centric way to think about their products, but it also trains them to be able to talk (and listen!) to customers.
Tailor For Product Innovation
The canvas is intended to be used to design products and services that customers want. It acts as a gut check to ensure time and money isn’t wasted on designing something that doesn’t enable customer jobs-to-be done, relieve pains, or create gains. If this sort of innovation is your goal, simply have participants fill in the left side, or value proposition canvas, with their new product or service ideas and assess fit to see if the idea is worthwhile.
Journey Mapping
Workshop type: Project-specific.
Who should participate: Participants should be specific to a project and represent different business units supporting the relevant phases of the journey you are mapping.
In summary: Workshop to map specific phases of a customer’s journey, uncover pains/gaps/opportunities, and (end-goal) provide a more seamless end-to-end experience for customers. While the Customer Bowl taught journey mapping as an introduction to customer-centric tools (and innovation), this method is more geared towards experience improvements of existing products and services.
Why it drives customer centricity: encourages participants to step into the customer’s shoes and understand how the customer sees their business.
Outcome: After the workshop, participants will learn how to be empathetic towards the customer’s experience and interaction with the company brand, use research insights to uncover pain points and opportunities, and design experience improvements to address pain points and opportunities.
Context: Journey mapping is a critical activity that scales to any business size and a particular element of a journey. For example, people can map the customers’ end-to-end experience with a business, from the moment they discover it, sign up for a product or services, install and use it, get support, and so on. This high-level view ensures that the customer experience is seamless across each phase in their journey. This end-to-end view is especially important as so much focus can be given how the customer uses a product or service (the “use” phase), that other components of the customer journey are ignored.
People can also focus on one area of the journey in more detail. For example, people can map customers’ support journey from when they first encounter an issue, to seeking help, to waiting for a response, and issue resolution (or not). This secondary-level view is equally useful to ensure every aspect of the customer experience is understood because even seemingly inconsequential experiences can have a big impact on the customer’s perception of a business.
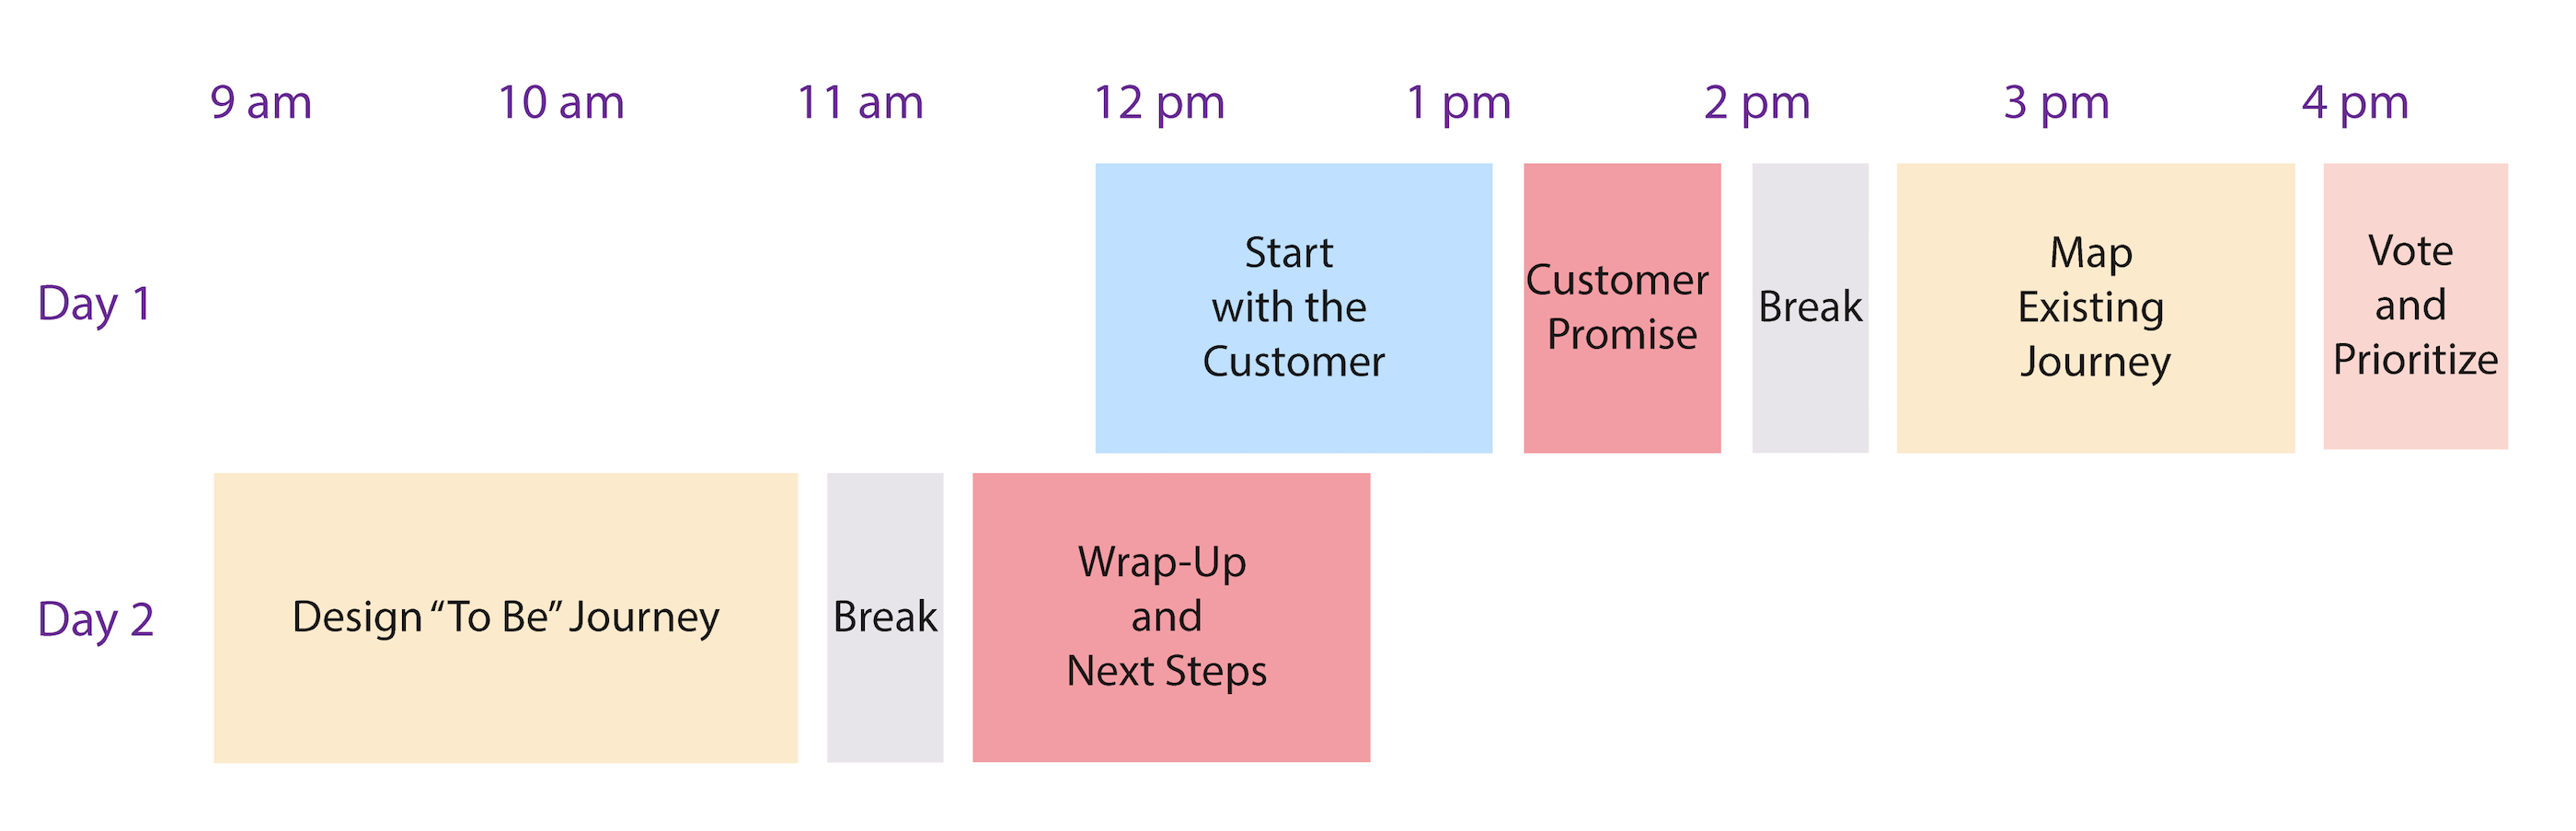
Start With The Customer (1 Hour Readout, 30 Min Discussion)
Start the Journey Mapping workshop with a review of customer research that has been conducted prior to the session. For example, during a workshop focused on the customers’ support experience, do a readout of the qualitative and quantitative research conducted — customers talked to, survey results, and operational data analyzed. Your job here is to bring customer experiences to life. Have participants take notes because these will be useful when mapping the journey later on.
Tips:
If possible, record and play audio clips of customer conversations.
It can get a little sensitive when participants in the workshop are directly responsible for the negative experiences customers are sharing. Be sure to start the session by explaining that the feedback is not a commentary on anyone in the room but is an opportunity to improve.
Create A Customer Promise (30 Minutes)
After a discussion of the customer research, have participants create something called a “customer promise.” This is a statement written from the customer’s point of view that represents the ideal experience that they want, expect, and desire. It then becomes the participants’ promise to try to provide this experience for them.
As a customer, I want/expect/deserve:
To have easy access to useful help (without being made to feel stupid).
To have the impact to my business understood.
A response at the pace that I have to respond to my own customers.
An answer (either a solution or at least honest and frequent communication around my issue).
You will point back to (and update if needed) this promise throughout the workshop to ensure that the decisions being made support the promise.
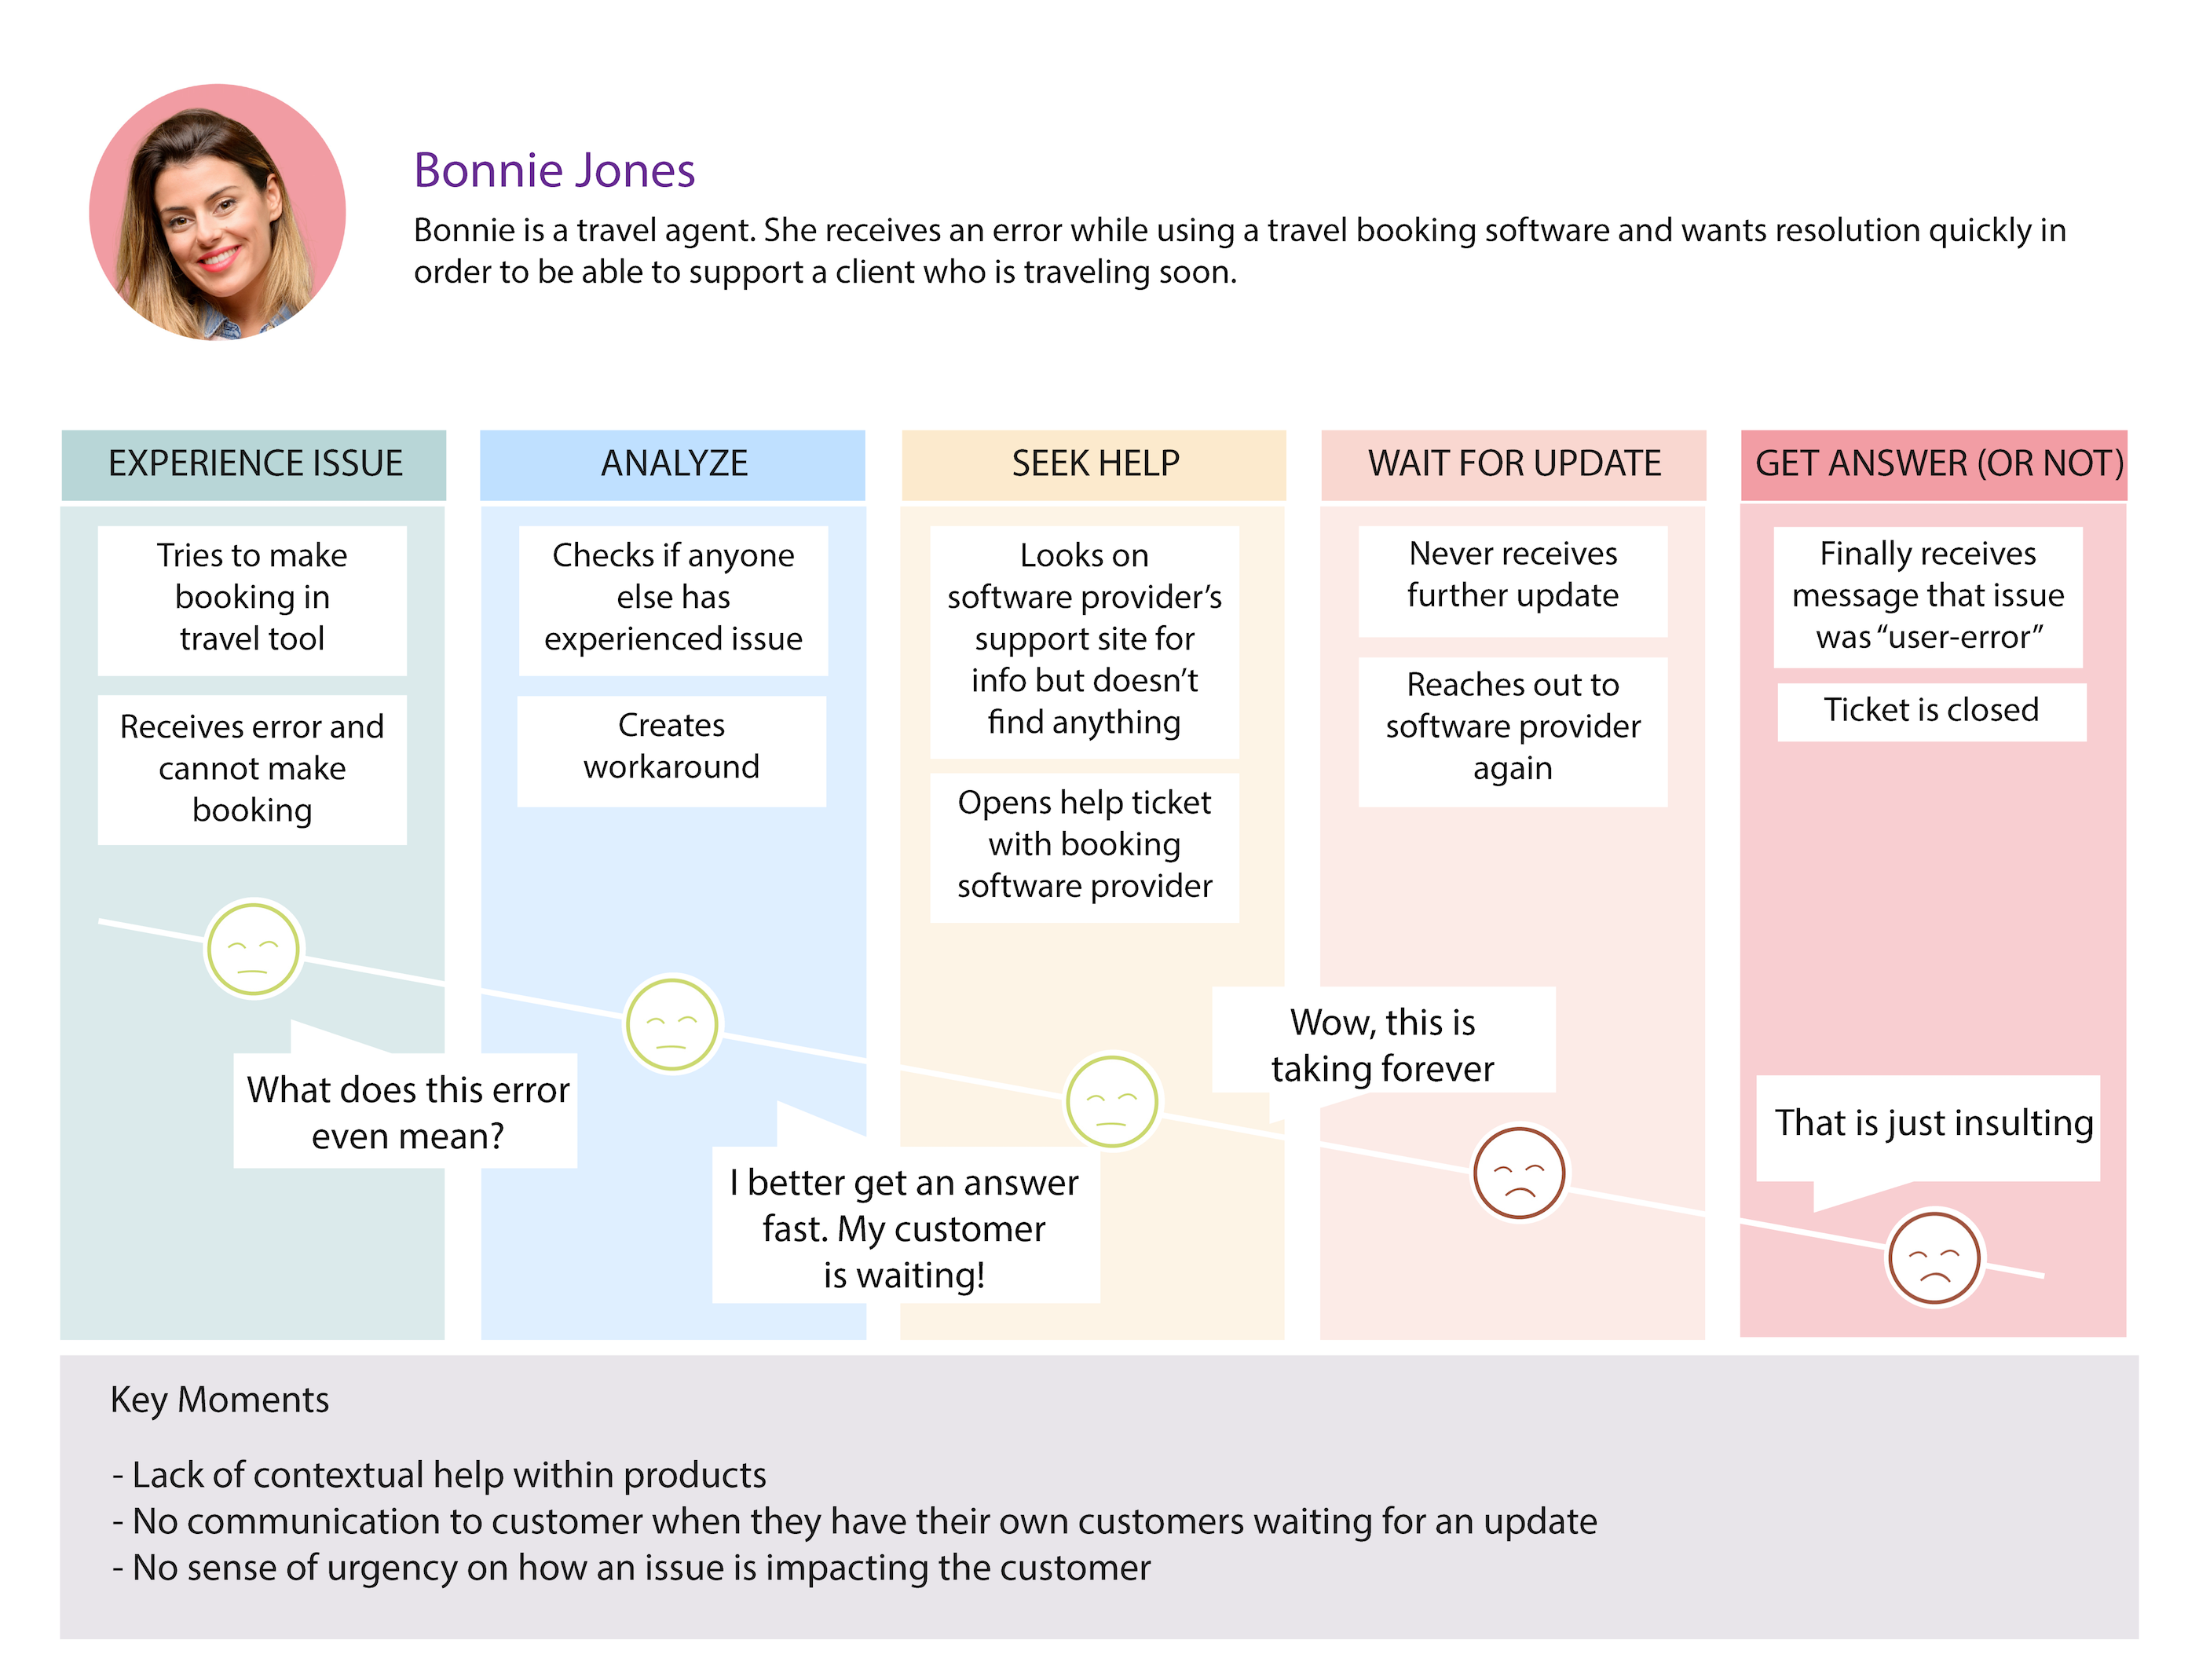
Map The Existing Journey (1 Hour, 30 Minutes)
Journey maps are most effective when they tell a story. Therefore, focus on one customer in one specific scenario and map the corresponding jobs-to-be done, thoughts, and emotions (high and lows of the journey). Use examples from research to select a persona and scenario that best represent a typical customer and situation.
As an example, a scenario could be: Bonnie Jones, a travel agent, receives an error while using travel booking software and wants resolution quickly in order to be able to support a client’s travel schedule:
Generally, selecting a persona and scenario that represent the typical experience of a customer is representative enough of most customers’ experience and thus one journey map is sufficient. However, if a different persona and corresponding set of behaviors change the outcome of the journey in significant ways, or a different scenario would uncover key insights, you may choose to do another journey map.
You can modify what components of the journey you want to map depending on how you want to tell the customer story. For example, you can add additional components, such as touch points, images, and expectations.
Come prepared with the phases of your journey already defined, i.e. for a support journey map: experience an issue, analyze, seek help, wait for an update, and issue resolution (or not). This is easier than starting from scratch — you can always update if needed.
Start by mapping the customer’s jobs-to-be done along with the scenario. What are they trying to accomplish? What functional, emotional, or social tasks do they need to do? Then, capture the corresponding thoughts they have while trying to accomplish the jobs-to-be-done using actual verbatims from research. Last, plot a line to represent the emotional highs and lows the customer feels as their story progresses.
Tip:
Throughout the journey map, add notes from the customer research.
Simplified sample existing support journey map (Large preview)
Vote And Prioritize (10 Minutes)
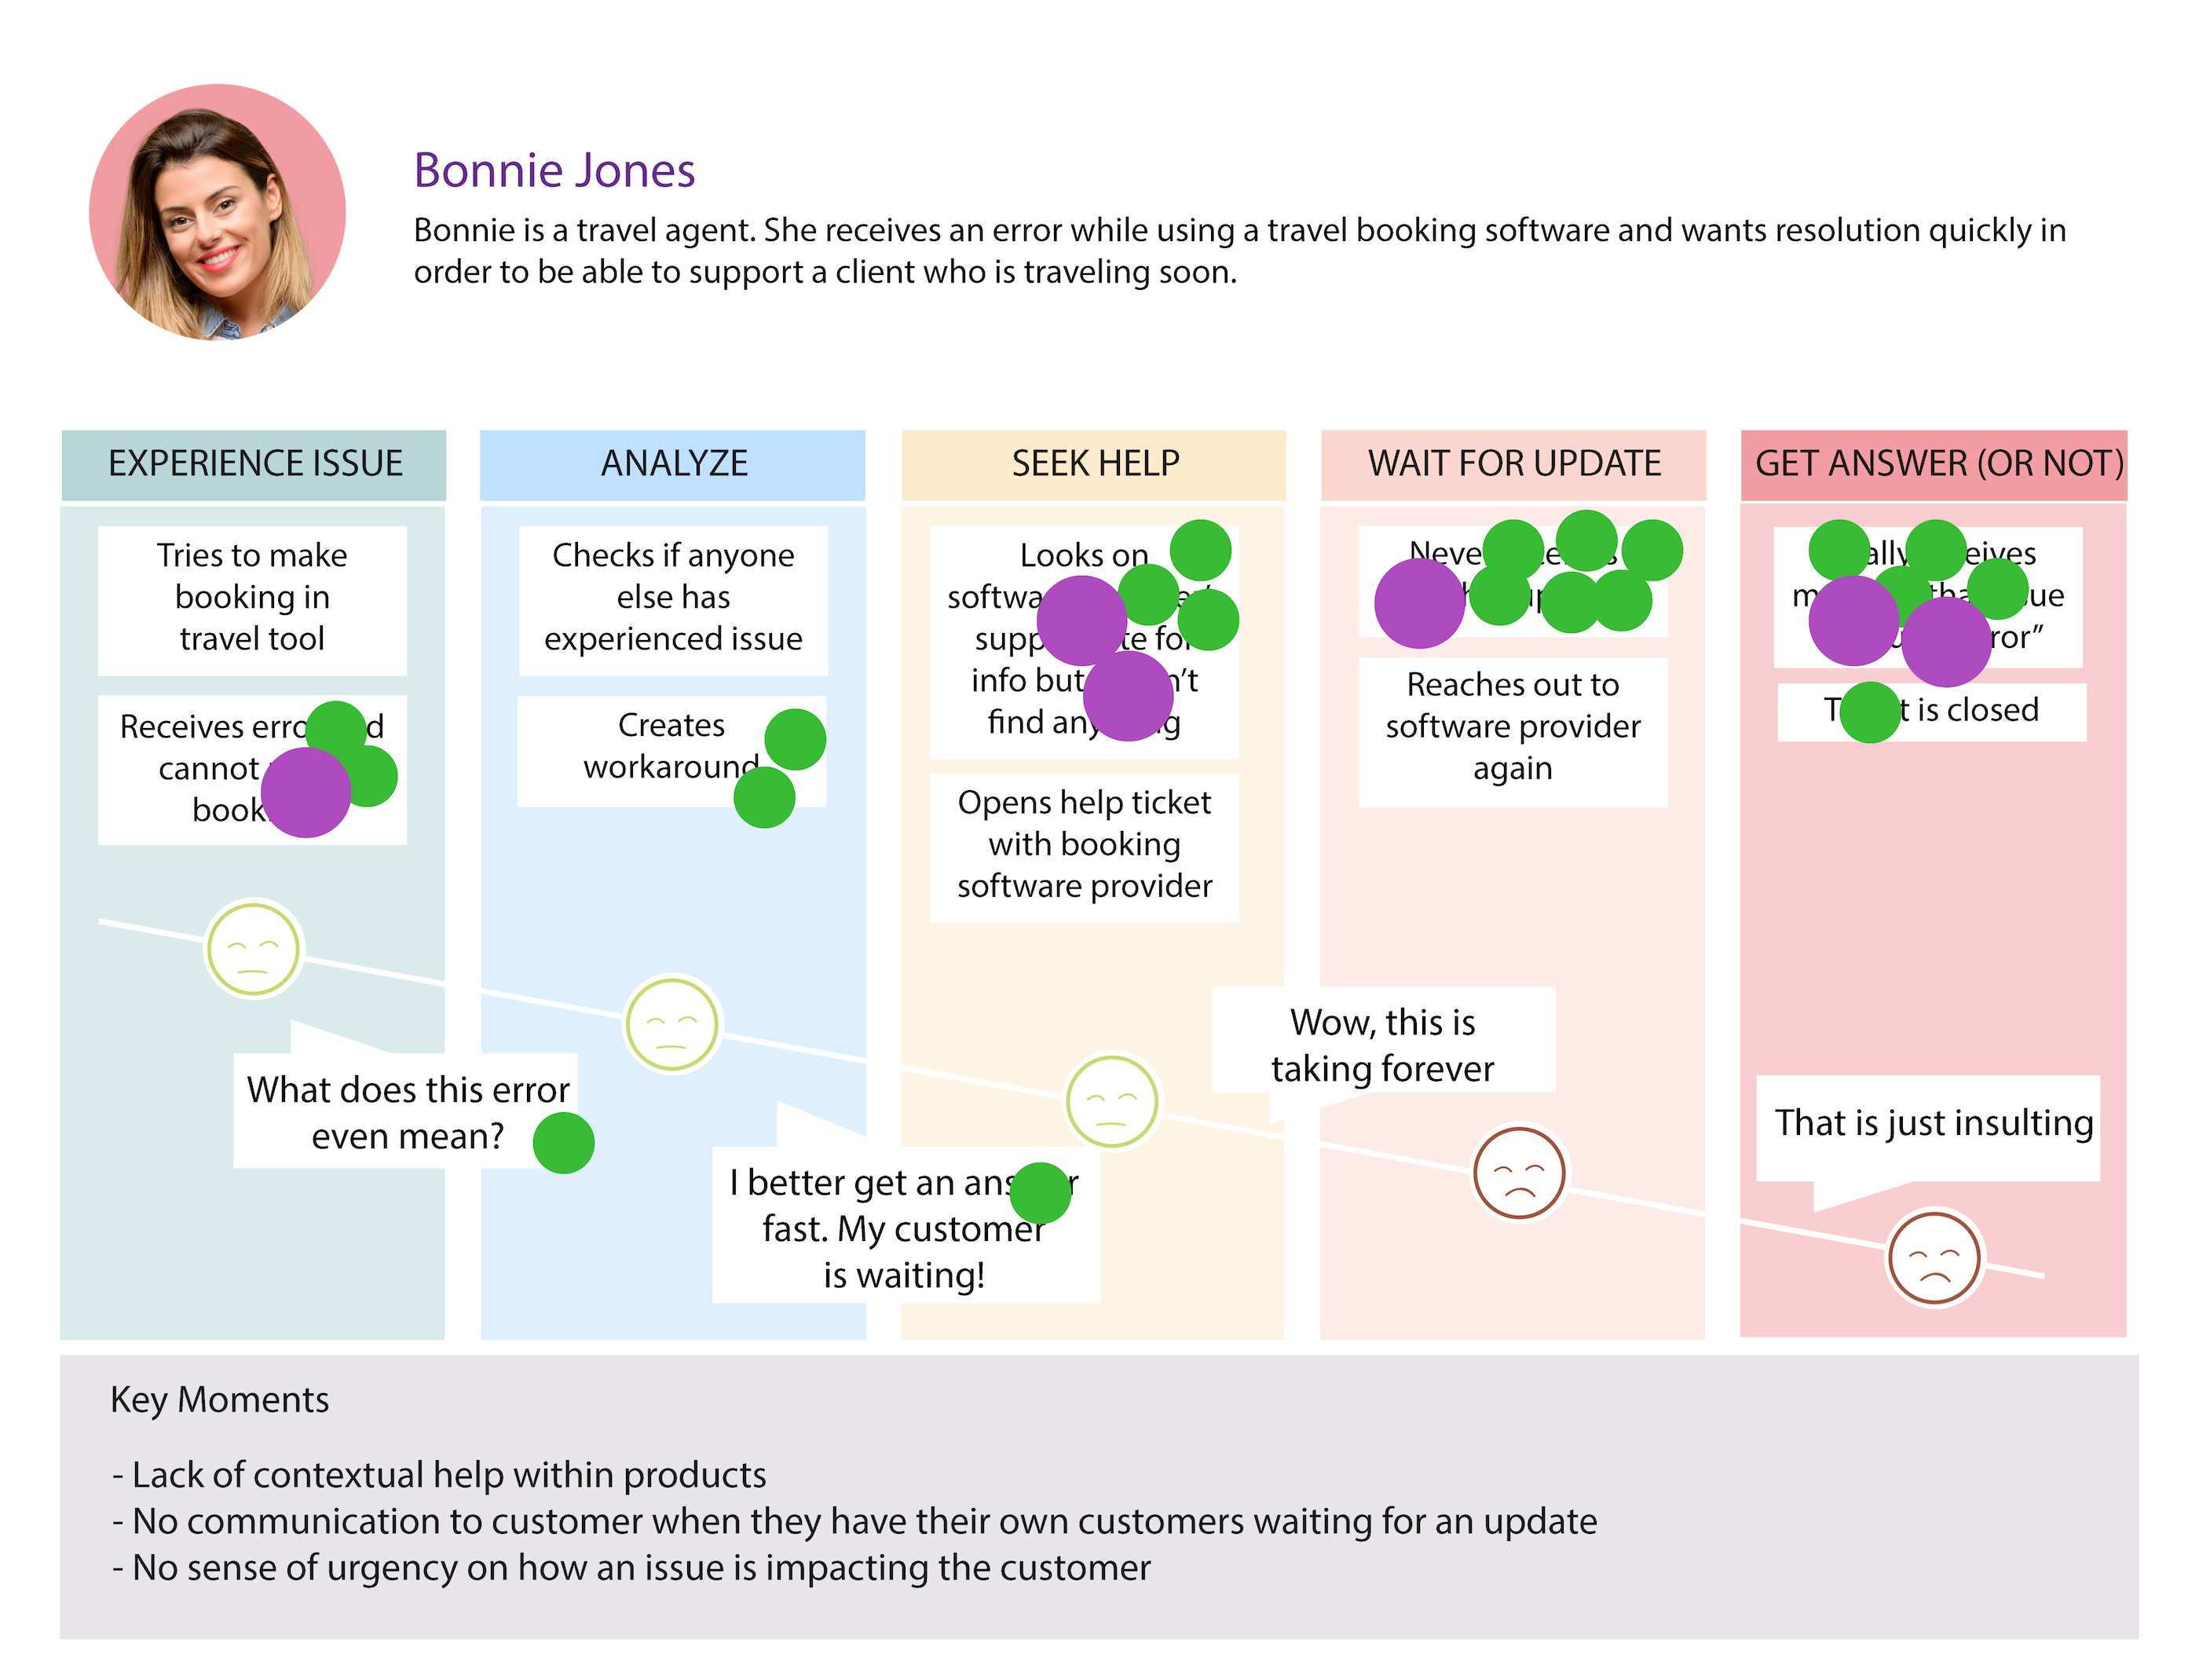
Once the group has filled in the journey map, take a step back and walk through the journey again, telling the customer’s story from their perspective. Hopefully, what emerges is a rich narrative based on real customer insight. Discuss as a group — what surprised people? What did they learn?
Now it’s time to pinpoint the areas of the journey that could be improved. An easy and fast way to do this and build consensus is to give each participants dots or stickers that represent votes. They each have a number of votes they can use to indicate where the pain points/gaps/opportunities are along the journey. Give people infinite votes; this will create a sort of heat map and make sure that smaller, potentially easier-to-address areas are captured as well as the big and obvious issues.
Also, let people vote on the biggest or most important areas. Here, limit dots to around three in order to force people to prioritize. These big areas will serve as a gut check, making sure the group addresses the things that matter in the “to be” journey.
Simplified sample of dot voting with heat map effect and priority items identified (Large preview)
Design The “To Be” Journey (2 Hours)
Now that the group has mapped the existing journey, it is time to design what they want that journey to look like in the future, or what the “to be” journey is. The “to be” aspect of journey mapping is often overlooked but critically important to drive improvements for the customer. It is not enough to identify the pains, gaps, and opportunities associated with the existing journey. Take it one step further, and design the end-to-end journey that customers desire. This also ensures that any improvements flagged are executed in the context of the full journey, supporting a more seamless experience.
Before designing the “to be” journey, revisit the customer promise for inspiration and guidance. Also review the top voted pains, gaps, and opportunities to make sure the future journey addresses these.
The easiest way to create a new journey is to overlay new aspects of the experience on top of the old journey. Retell the narrative, but this time, tell it from the perspective of someone who has just had a really good experience. For example, if the existing journey tells the story of a travel agent who has to wait weeks for an answer to a support ticket (in the meantime, making their own client upset), then the “to be” journey should tell the story of an agent who not only receives an immediate answer to their issue but receives it contextually without ever having to leave their workflow. And even better if they never experienced an issue at all.
After completing the “to be” journey, check it against the top voted pains, gaps, and opportunities of the existing journey. Are they addressed? Would the experience that the group designed enable them to deliver on the customer promise?
Simplified sample “to be” support journey map (Large preview)
Wrap-Up And Next Steps (1 Hour)
If the group has time during the workshop, it is ideal to look at the internal actions and processes (the backstage and offstage) accompanying the customer journey (front stage). This helps the group pinpoint exactly what needs to change internally to be able to support the improved experiences designed in the “to be” journey. At a minimum, the workshop needs to wrap with a strategy of how to execute this journey. Ideally, the workshop will be run as part of a fuller program to drive change. The actions and recommendations uncovered in the workshop can be integrated into the overall program plan.
As a post-workshop activity, convert the existing and “to be” journey maps into nice visualizations, with the jobs-to-be-done, thoughts, and emotions clearly articulated. This is easy to share and consume and will serve as a reminder to participants of what it is like to be a customer and interact with their brand, and what participants can do to deliver improved experiences at every phase of the customer journey.
Tip:
Start every PowerPoint, presentation, readout, with following the workshop with the customer promise. Don’t let people forget what they promised and why. Everything they do should map back to this!
Tip:
For more journey mapping and workshop resources, Oracle’s Designing CX website is useful.
Google Design Sprints
Workshop type: Project-specific
Who should participate: Individuals supporting the ideation and validation of a new value proposition. In general, a technical person, product person, designer, and decision-maker.
In summary: Google Design Sprints enable participants to understand quickly if a new idea resonates with (potential) customers.
Why it drives customer centricity: Encourages decision-making based off of customer understanding and feedback.
Outcome: After the workshop, participants will learn how to apply design thinking principles in action: learn about customer need, define the problem to solve, ideate ideas to address the problem, create a prototype to represent the idea, and test with customers.
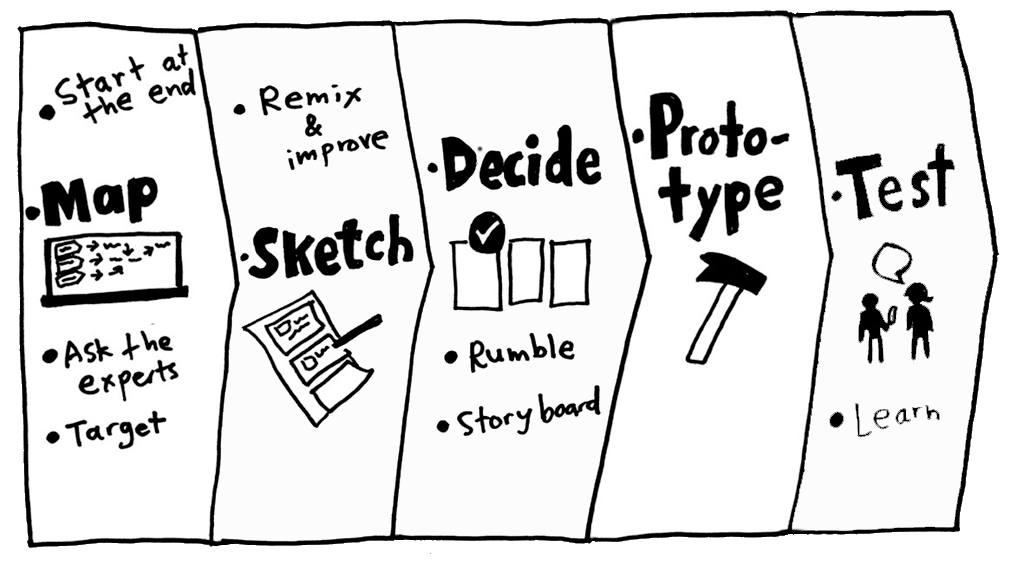
Context: The Google Sprint process was introduced by Google Ventures and documented in the book Sprint: How to Solve Big Problems and Test New Ideas in Just Five Days by Jake Knapp with John Zeratsky and Braden Kowitz. Designed to “solve big problems,” the Sprint can be run in 5 days or less. It is a great, hands-on way to introduce participants to the customer-centric design thinking framework in a way that is fun and results-driven.
There are many resources you can reference if you are interested in learning about Sprints in more detail, such as the Sprint book, newsletter, and an overview article that I wrote a couple of years ago. With these available, I will only summarize salient points below.
Agenda
Google Design “Sprint” agenda for the five days (Image source: Sprint) (Large preview)
Overview Of The Process
Day 1
Participants have to come into the Sprint process with a high-level understanding of the problem they are trying to solve or at least a general idea of what to focus on. Day 1 acts as a way to gather the information necessary to narrow focus enough to target the area of the problem to solve.
Tip:
Make sure to start the workshop with the customer — either a readout of research or interview actual customers in addition to the recommended customer experts.
Day 2
Day 2 starts with a review of existing products and services that each participant “lightning demos” to see if any ideas can be leveraged. I’ve never found this activity to be particularly helpful. While it makes sense from a design perspective not to have to “reinvent the wheel,” most designers already have tool kits and templates to draw from, so it’s not the best use of everyone’s time.
It is also not a useful exercise in uncovering potential ideas or value propositions. Rather, it is better to start with customer needs and ideate solutions that address those needs without relying on preconceived notions of what those solutions should be. So, if you’re looking to shorten a Sprint workshop, you might want to cut the lightning demos.
A more worthwhile exercise on day 2 is the ideate and sketch process. Participants use this process to come up with different ideas of solutions that may address customer needs. The Sprint book suggests a great step-by-step process to accomplish this.
Rather than group brainstorming, the process centers around individual ideating and sketching — resulting in more varied and diverse ideas. The process is also repetitive and iterative, encouraging participants to push past the most basic ideas and think of truly innovative ones.
Tips for ideation and sketching:
Visualize
Sketch out different ideas. Asking people to capture ideas visually gets their creative juices flowing. It also helps frame solutions from the perspective of how a customer might interact with and obtain value from an idea.
Individual Brainstorming
“Group think” does not encourage ideas that are out-of-the box. Instead, create as many individual divergent ideas as possible before converging as a group.
Everything Goes
Ideation needs to be a criticism-free zone to allow creativity to emerge.
The More The Better
As more and more ideas are generated, people start to push past the obvious answers and start thinking of new and innovative ideas.
Crazy 8s, one method in the Sprint process, involves rapid iterations of ideas from different angles encourages people to think outside of the box. (Large preview)
Day 3
Participants review the sketches, vote on the top ideas, and create a storyboard to represent how a customer will interact with the winning idea.
Tip:
Some people are intimidated with the idea of drawing a storyboard. Don’t sweat it! The most important aspect of a storyboard is to communicate and tell a story in a customer-centered way. Do this by thinking about what the customer is trying to accomplish and how a solution might enable them to do so.
Day 4
After storyboarding, create a visual and interactive representation of an idea called a prototype. A prototype allows someone to interact with an idea to give a realistic picture of the value offered. A prototype can be a physical object, a clickable website, app — whatever best represents the idea.
Tip:
Participants often feel like they need to create an entire prototype to test ideas. This is generally not necessary. All that is needed is a representation of the value proposition to validate with potential customers. One easy way to do this is to create a fake landing page with an overview of what the idea is and why it is useful. For solutions further down the validation process, more complex prototypes may be more useful.
Day 5
After creating a prototype to represent the idea, participants conduct customer testing sessions. These sessions allow the group to see how customers will react to the idea before making expensive commitments. This initial round of testing should be aimed at understanding if the idea resonates with customers. Would they use it? Would they buy it?
Tips:
Create a test script ahead of time: this helps keep the flow of conversation going and standardizes feedback results for easier analysis. But be sure to still leave room for organic conversation and flexibility to go off script.
Ask open-ended questions: this encourages customers to talk more and gives more information about their reaction to an idea. Get them talking!
Be comfortable with silence: people have a tendency to want to fill silence to avoid awkwardness, resist the temptation and customers will talk more.
Turn questions back on the customer: when customers are interacting with a prototype for the first time, they’ll naturally have some questions. When they ask something like, “What does this do?” then turn it back on them and ask, “What do you think it does?” Again, get them talking.
Use the feedback heard from customers as a way to decide how to move forward (or don’t) with the idea. Maybe customers loved everything about it and can’t wait to see more. Maybe customers didn’t think it was entirely useful, or maybe customer feedback was somewhere in between. Whatever the outcome, remind participants that they learned something they didn’t know before.
In addition, even if customers hated the idea, think of all the money potentially saved by not further investing in the idea. As icing on the cake, the sprint outlines a formulaic approach that participants can use again and again for more customer-centric decision making.
General Facilitation Tips And Tricks
Rapid-fire facilitation tips and tricks for any workshop!
Before The Workshop
Understand the objective, define the scope (drive stakeholders to narrow focus and create clear definitions).
What is the problem you are trying to solve?
Define your desired end-state. What would make your workshop a success?
Identify and execute pre-work needed to make the workshop a success .
Design high-level workshop to drive towards desired end-state.
Break down into more detail (define timings, breaks, lunch, and so on) for you to follow as a guideline.
Create and share a high-level agenda with participants to let them know what to expect.
Day Of Workshop Prep
Hang up area for next steps/action items and parking lot.
Setup supplies (paper, snacks, etc.).
During The Workshop
Kick-off with a high-level intro (project sponsor, why are we here, what are we trying to accomplish, and so on).
Team intros & icebreakers.
Housekeeping: set expectations that you will be keeping people on track.
Document high-level goal, get team agreement.
Continue into the flow of the workshop.
Best Practices
Set clear expectations with stakeholders and participants.
Stay neutral.
Keep people on track (“Great feedback, I’m going to capture that in our parking lot and move on…”).
Individual brainstorming and sketching.
Dot voting as a quick way to prioritize.
Get people to take notes during presentations to stay engaged, use during later exercises.
Delegate other people to help facilitate or run different sessions.
Visualize as much as possible.
Breaks every 1.5-2 hours.
Define clear next steps and ownership.
Elicit participant feedback after the workshop.
Use participant feedback to design more effective and engaging workshops. (Large preview)
In Conclusion
The list of general and project-specific workshops discussed is neither exhaustive nor static. There is great flexibility to add, modify, or remove workshops and elements depending on what works, doesn’t work, or is missing.
It is my hope that we can create a collective bag of tools to enable us and our colleagues to think about things differently — about the customer more often — and ultimately make decisions that are first filtered through the customer lens. So the next time you want to jolt your organization with a good dose of customer centricity, run a workshop (and tell us about it!).
A Pollen Systems drone working a vineyard. (Pollen Systems Photo)
For farmers managing thousands of acres, tracking the health of all those plants can be a huge undertaking. Enter Pollen Systems, a Bellevue, Wash.-based startup that’s using drones and robotic scouting vehicles to help farmers better understand their fields. The company recently raised $777,572, according to a regulatory filing.
Pollen 5, a robotic scouting vehicle for agriculture, was developed by Pollen Systems and students at the University of Washington. (Pollen Systems Photo)
Pollen founder and CTO Keith McCall said the seed round came from local venture investors at Keiretsu Forum and Alliance of Angels.
Pollen got its start surveying vineyards with flying drones and has since expanded to blueberries, raspberries and hops. The startup has also grown its arsenal of surveying machines. It added a scouting robot that helps with close-up views from the ground as well as small planes that can gather intel on larger crops.
To build the new robotic scouting vehicle, called Pollen 5, the company collaborated with students at the University of Washington’s college of engineering. The purpose-built machine meanders down rows of crops taking pictures and analyzing the plants. The ground images help to give a more detailed view than what can be captured from above.
Pollen’s robotic helpers are meant to reduce labor costs and to improve yields. The startup is part of a growing class of companies betting on a future of technology-fueled precision agriculture.
Cheap drones and increasing access to machine learning tools have helped contribute to the increasing usage of precision agriculture. The global market for agricultural robots and drones is projected to grow from $2.5 billion in 2018 to $23 billion by 2028, according to BIS Research.
That opportunity has given rise to a number of innovative drone and analytics startups such as SenseFly, Sentera and MicaSense. Last month, GeekWire reported about agricultural automation startup Abundant Robotics, the maker of apple harvesting machines gearing up for its U.S. debut in Washington state.
Images like this one of the vineyards operated by Goodnoe Hills are available offline through Pollen’s PrecisionView mobile app. (Pollen Systems Photo)
Earlier this year, McCall brought on Phil Van Etten to be CEO of Pollen. McCall and Van Etten previously founded Azaleos, a hybrid software as a service email management company that was acquired by Avanade for $106 million in 2012. McCall also founded shipping startup Enroute Systems, which was bought by Pitney Bowes in 2016.
Pollen’s drones take normal pictures, as well as two kinds of images that are specific to agricultural surveying. These images, some of which are analyzed with the machine learning platform Amazon SageMaker, help farmers spot problems related to soil, crops, pests and disease.
Pollen recently introduced PrecisionView, an offline mobile app that lets workers see the aerial images while out in the field. The startup plans to expand its services to farms growing apples, pears and plums. Pollen has seven employees in the U.S. and three in Chile.
The company works with clients in Washington state, Oregon and California. Some of its customers include hops grower Roy Farms, berry operation Enfield Farms and the winegrower Goodnoe Hills Ranch.
Matt Damon stars as Carroll Shelby, and Christian Bale plays race car driver Ken Miles in director James Mangold’s (Walk the Line, Logan) true story about how two upstarts took on massive obstacles to go up against Enzo Ferrari’s dominant team at the 24 Hours of Le Mans in 1966.