Dear Farmers, miners, Red staters,

Dear Farmers, miners, Red staters,

https://ift.tt/3eSMmuH

This is a Biden supporter.

This is what they think of you.

Please stop shipping food into Blue cities.

Please stop shipping coal and oil into Blue cities.

Let them starve in the dark.

Thank you


guns

via https://gunfreezone.net

November 11, 2020 at 10:35PM

How to Generate PDF and Send Email in Laravel?

How to Generate PDF and Send Email in Laravel?

https://ift.tt/36HQxpF


Hi Artisan,

In this post, we will learn laravel generate pdf and send email. if you have question about laravel mail attachment pdf then i will give simple example with solution. In this article, we will implement a dompdf send email attachment laravel. we will help you to give example of generate pdf and send mail in laravel.

you can also generate pdf and send email in laravel 6, laravel 7 and laravel 8 application.

In this example, i will simply use dompdf to generate pdf file and send mail with pdf attachment. you just need to follow few step to create simple example of send mail with created pdf file in laravel app.

Let’s see bellow steps:

Step 1: Install Laravel

I am going to explain step by step from scratch so, we need to get fresh Laravel application using bellow command, So open your terminal OR command prompt and run bellow command:

composer create-project --prefer-dist laravel/laravel blog

Step 2: Install dompdf Package

first of all we will install barryvdh/laravel-dompdf composer package by following composer command in your laravel 8 application.

composer require barryvdh/laravel-dompdf

After successfully install package, open config/app.php file and add service provider and alias.

config/app.php

'providers' => [

....

Barryvdh\DomPDF\ServiceProvider::class,

],

'aliases' => [

....

'PDF' => Barryvdh\DomPDF\Facade::class,

]

Step 3: Make Configuration

In first step, you have to add send mail configuration with mail driver, mail host, mail port, mail username, mail password so laravel 8 will use those sender details on email. So you can simply add as like following.

.env

MAIL_DRIVER=smtp

MAIL_HOST=smtp.gmail.com

MAIL_PORT=587

[email protected]

MAIL_PASSWORD=rrnnucvnqlbsl

MAIL_ENCRYPTION=tls

[email protected]

MAIL_FROM_NAME="${APP_NAME}"

Step 4: Add Route

In this is step we need to create routes for items listing. so open your “routes/web.php” file and add following route.

routes/web.php

<?php

use Illuminate\Support\Facades\Route;

use App\Http\Controllers\PDFController;

/*

|--------------------------------------------------------------------------

| Web Routes

|--------------------------------------------------------------------------

|

| Here is where you can register web routes for your application. These

| routes are loaded by the RouteServiceProvider within a group which

| contains the "web" middleware group. Now create something great!

|

*/

Route::get('send-email-pdf', [PDFController::class, 'index']);

Step 5: Add Controller

Here,we require to create new controller PDFController that will manage index method of route. So let’s put bellow code.

app/Http/Controllers/PDFController.php

<?php

namespace App\Http\Controllers;

use PDF;

use Mail;

class PDFController extends Controller

{

/**

* Write code on Method

*

* @return response()

*/

public function index()

{

$data["email"] = "[email protected]";

$data["title"] = "From ItSolutionStuff.com";

$data["body"] = "This is Demo";

$pdf = PDF::loadView('emails.myTestMail', $data);

Mail::send('emails.myTestMail', $data, function($message)use($data, $pdf) {

$message->to($data["email"], $data["email"])

->subject($data["title"])

->attachData($pdf->output(), "text.pdf");

});

dd('Mail sent successfully');

}

}

Step 6: Create View File

In Last step, let’s create myTestMail.blade.php(resources/views/emails/myTestMail.blade.php) for layout of pdf file and put following code:

resources/views/emails/myTestMail.blade.php

<!DOCTYPE html>

<html>

<head>

<title>ItsolutionStuff.com</title>

</head>

<body>

<h1></h1>

<p></p>

<p>Thank you</p>

</body>

</html>

Now you can run and check example.

It will send you email, let’ see.

Run Project:

php artisan serve

Open Link:

localhost:8000/send-email-pdf

Output:

I hope it can help you…

programming

via Laravel News Links https://ift.tt/2dvygAJ

November 10, 2020 at 07:42PM

There’s a Massive Recall of Amazon Ring Doorbells

There’s a Massive Recall of Amazon Ring Doorbells

https://ift.tt/36muHrq


Photo: CC Photo Labs (Shutterstock)

In a year where it seems everything is both literally and figuratively on fire, it’s not surprising that we can now add Amazon’s Ring Video Doorbell to the list. Yes, it turns out that the device you purchased and installed for the purpose of making your home safer is itself a safety hazard. As a result, Amazon has issued a massive recall of its popular doorbell/spy camera. Here’s what to know.

What’s going on with Ring Doorbells?

Amazon is recalling approximately 350,000 Ring Video Doorbells (2nd Generation) sold through Amazon.com, Ring.com, and at third-party electronics and home goods stores in the United States and Canada between June and October 2020. The company made this decision after receiving reports of 85 incidents tied to incorrectly installed doorbells—23 of which involve doorbells igniting and causing minor property damage, in addition to eight reports of minor burns.

According to the Consumer Product Safety Commission (CPSC), the video doorbell’s battery can overheat if the wrong type of screws are used to install the device, posing fire and burn hazards. As a result, the CPSC advises that consumers immediately stop installing the recalled video doorbells.

A spokesperson for Ring provided Fast Company with the following statement:

“The safety of our customers is our top priority. We [have and continue to work cooperatively with the CPSC on this issue, and] have contacted customers who purchased a Ring Video Doorbell (2nd Gen) to ensure they received the updated user manual and follow the device installation instructions. Customers do not need to return their devices.”

G/O Media may get a commission

How to know if your Ring Doorbell has been recalled

Those who use a 2nd Generation Ring Video Doorbell can enter its serial number on the Ring website to find out whether it’s part of the recall. If it turns out that yours is, download revised installation instructions and contact Ring with any questions at (800) 656-1918 from 8 a.m. to 12 a.m. ET, seven days a week, or visit the company’s website and click on “Help,” then on “Installation Services” for more information.

geeky,Tech,Database

via Lifehacker https://lifehacker.com

November 11, 2020 at 04:49PM

Learn PyQt: Laying Out Your GUIs With Qt Designer — Use Qt Designer to effortlessly build your application UI

Learn PyQt: Laying Out Your GUIs With Qt Designer — Use Qt Designer to effortlessly build your application UI

https://ift.tt/36jo1ud

When laying out your Qt GUIs it can be quite a tricky task to place every widget in the right position on your forms. Fortunately, Qt offers a set of layout managers that simplify the process of widget positioning and will allow you to easily create any kind of layout. To lay out the widget in a form, you can create everything in code, or you can create your layout with Qt Designer. In this tutorial, you’ll learn how to use Qt’s layouts with Qt Designer to build complex GUIs for your applications.

Additionally, we’ll create a dialog example using several widgets with a coherent layout to reinforce your knowledge and put everything together into a fully functional dialog just like you would create in a real-world application.

Using Layouts With Qt Designer

Qt Designer is the Qt tool for designing and creating graphical user interfaces (GUI) for desktop applications. With Qt Designer, you can create windows, dialogs, and forms. It allows you to add different kind of widgets to create your GUIs using on-screen forms and a drag-and-drop based interface.

Qt Designer’s main interface looks as follows —

Qt Designer — Main Interface

Qt Designer has a clear and user-friendly interface that allows you to create any kind of GUI by dragging widget onto an empty form. After you place all the widgets on your form, you need to place them in a coherent layout. This will ensure that all your widgets will be displayed and resized properly when the form is previewed or used in an application.

Qt’s layout managers are structured containers which automatically arrange child widgets ensuring that they make good use of the available space. Placing widgets within a layout manager automatically lays them out according to the defined rules. One of Qt Designer’s most useful features is the ability to drag and drop hierarchies of layout managers to arrange widgets into clean and functional interfaces.

In Qt Designer, you can create layout objects by applying a layout to a group of existing widgets. Although it’s possible to drag layouts onto a form and then drag widgets into the layouts, this can be a bit fiddly. The best practice is to instead drag all the widgets and spacers you need onto the form and then select related widgets and spacers and apply the layouts to them. Use the following steps —

  1. Drag and drop the widgets on the form trying to place them near their desired position
  2. Select the widgets that should be managed with a given layout, by holding the Ctrl key and clicking on them
  3. Apply the appropriate layout (horizontal, vertical, grid, or form) using Qt Designer’s toolbar, main menu, or the form’s context menu

Before you go into an example, take a look at the layout related options that Qt Designer offers —

  1. Use layout options on the main toolbar
  2. Use layout options on the main menu
  3. Use layout options on the form’s context menu

The most accessible way for creating layouts is using the layout section of Qt Designer’s main toolbar. This section looks as follows —

Qt Designer — Layout toolbar

From left to right, you’ll find the following buttons —

  • Lay Out Horizontally arranges selected widgets in a horizontal layout next to each other (Key combination, Ctrl+1). This option uses a standard QHBoxLayout object
  • Lay Out Vertically arranges selected widgets in a vertical layout, one below another (key combination, Ctrl+2). This option uses a standard QVBoxLayout object
  • Lay Out Horizontally in Splitter arranges the widgets horizontally using a splitter (Key combination, Ctrl+3)
  • Lay Out Vertically in Splitter arranges the widgets vertically using a splitter (Key combination, Ctrl+4)
  • Lay Out in a Grid arranges widgets in a table-like grid (rows and columns). By default, each widget occupies one cell of the grid, but you can modify this behavior and make the widgets to span several cells (Key combination, Ctrl+5). This option uses a standard QGridLayout object
  • Lay Out in a Form Layout arranges selected widgets in a two-column layout. The left column is usually for labels asking for some information and the right column includes widgets for entering, editing, or showing that information (Key combination, Ctrl+6)
  • Break Layout this key allows you to brake an existing layout. Once widgets are arranged in a layout, you cannot move and resize them individually, because their geometry is controlled by the layout. To modify individual widgets, you’ll need to break the layout and redo it later (Key combination Ctrl+0)
  • Adjust Size adjusts the size of the layout to accommodate contained widgets and to ensure that each has enough space to be visible (Key combination Ctrl+J)

These same layout related options are also available through Qt Designer’s main menu under the Form menu and through the form’s context menu, so you can choose the one you like better.

Now we have the theory out of the way, we can put these layouts into practise. In the next few sections, we’ll be using Qt Designer to lay out the widgets on our forms and build nice and elegant GUIs for your desktop applications. But before we start experimenting with the different layout managers that Qt offers, we’re first going to create a custom widget to visualize the layouts as we go through this tutorial.

The completed .ui file can be downloaded below if you would like to skip this step.

layout-labels.ui

Go ahead and fire up your Qt Designer, then run the following steps —

  1. Select Widget at the templates/forms tab of the New Form dialog. This will create a new empty form to work on.
  2. Save your form as layout-labels.ui.
  3. Look for a Label widget on the Widget Box and drag it onto the form.
  4. Go to the Property Editor and set the text property to 0.
  5. Open the Text Edit dialog and set the text color to white. Set the font size to 20 points and justify the text. Press OK to apply the changes.
  6. Go to the Property Editor and set the autoFillBackground property to True by selecting the check box.
  7. Look up the palette property and open the Edit Palette dialog. Use the Quick option to set the color to red.

If you feel lost, take a look at the following screencast to see the steps in action —

In this example, you create a new window based on the Widget template. Then, you add a Label, set its text property to 0, and set its background color to red.

To complete this example, repeat all the steps to add three more labels with their respective text set to 1, 2, and 3 and their colors set to green, yellow, and blue. You’ll end up with a form like this:

Qt Designer — Form with colored labels

The above screenshot shows the initial form that you’ll use for the next few sections. It’s a clean form with four label objects on it. You can set a background color to each label to be able to see and differentiate them more easily in the following sections.

Horizontal Layouts, QHBoxLayout

You can use a horizontal layout manager (QHBoxLayout) to arrange the widgets in one row. To create this kind of layout in code, you need to instantiate the QHBoxLayout class and then add your widgets to the layout object. In Qt Designer it’s easier to work in the other way around.

With your layout-labels.ui file open, first select all your labels. To do this, you can click each widget in turn while you hold the Ctrl key or you can also click and drag with the mouse pointer inside the form to select the widgets.

Once you have selected the widgets, put them in a horizontal layout by selecting the Lay Out Horizontally button in the Qt Designer’s main toolbar. You can also use the option Lay out->Lay Out Horizontally from the context menu shown below or you can press Ctrl+1. The following screencast will guide you through these steps —

If the layout is wrong, then you can easily undo everything and restart laying things out again. To undo things, you can press Ctrl+z or use the Edit menu from Qt Designer’s main menubar. If that isn’t possible or doesn’t work, then you can just break the layout using the Break Layout button from Qt Designer’s main toolbar. Another way to break a layout is to press Ctrl+0 or choose Break Layout from the form’s context menu.

Vertical Layouts, QVBoxLayout

You can use a vertical layout (QVBoxLayout) to arrange your widgets in one column one above the other. This can be very useful when you’re creating groups of widgets and you need to ensure that they are vertically aligned.

Starting up with your original layout-labels.ui file, the first step will be to select the widgets that you need to include in the vertical layout. After that, you can click on the Lay Out Vertically button over the main toolbar, or you can use the context menu, or you can also press Ctrl+2. The following screencast will guide you through these steps —

If you take a closer look at the screencast, then you can see that the layout object is indicated by a thin red frame surrounding the labels on the form. This red frame isn’t visible at preview or at runtime it’s just a guide you can use when you’re designing the form. Also notices that, the layout object appears in the Object Inspector and its properties (margins and constraints) are shown in the Property Editor.

Grid Layouts, QGridLayout

Sometimes you need to lay out your widgets both horizontally and vertically within the same layout. To do this, you can use a grid layout manager (QGridLayout). Grid layout managers lay out your widgets in a square or rectangular grid, with all widgets aligning vertically and horizontally with their neighbours. This kind of layout can give you much more freedom to arrange your widgets on a form, while maintaining some degree of structure. This arrangement can be more suitable than nested arrangement of horizontal and vertical layouts, particularly when you care about the alignment of adjacent rows or columns.

You can build a grid layout with Qt Designer in the same way as for other layouts. The first step is to select the group of widgets that you want to lay out using a grid layout manager. Then, you can use the toolbar, the context menu, or you can press Ctrl+5 to set up the layout. Watch the following screencast —

In this case, we use a 2 x 2 grid layout to arrange the labels on your form. Notice that, to use this kind of layout, you should first place your widgets in rows and columns on the form, as shown in the screencast above. Qt Designer is quite clever and will try to keep your design as similar as possible to what you initially created by hand. It can even create difficult multi-column arrangements automatically or automatically fill empty cells.

Form Layouts, QFormLayout

While a QGridLayout can be used to layout forms with inputs and labels in two columns, Qt also provides a layout designed specifically for this purpose — (QFormLayout). This type of layout is ideal when you’re creating a structured data-entry or database application. The left column will commonly hold labels that ask for some information. The right column holds the input widgets such as line edits (QLineEdit), spin boxes (QSpinBox), date edits (QDateEdit), combo boxes (QComboBox), and so on.

The advantage of using this layout over QGridLayout is that it is simpler to work with when you only need two columns. The following screencast shows it in action —

In this example, we first add four new labels. These labels will hold information about the data you need to be entered or edited in the second column. In this case, the second column holds your tests colored labels, but usually this column will be used to place input widget like line edits, spin boxes, combo boxes, and so on.

Splitter Layouts

Splitters are container objects that arrange widgets horizontally or vertically in two resizeable panels. With this kind of layout, you can freely adjust the amount of space that each panel occupy on your form, while keeping the total space used constant. In Qt splitter layouts are managed using QSplitter.

Even though splitters are technically a container widget (not a layout), Qt Designer treats them as layouts that can be applied to existing widgets. To place a group of widgets into a splitter, you first select them as usually and then apply the splitter by using the appropriate toolbar button, keyboard shortcut, or context menu option in Qt Designer Take a look at the following screencast —

In this example, we first apply a horizontal splitter to your labels. Notice that, you’ll need to launch the form preview if you want to see the splitter in action. You can launch the form preview by pressing Ctrl+R. Later on, we apply a vertical splitter to the labels. In each case, you can freely resize the widget using your mouse’s pointer.

Building Other Layouts With Qt Designer

There are a few more things you can do with layouts in Qt Designer. For example, suppose you need to add a new widget to an existing layout, or to use nested layouts to arrange your widgets in a complex GUI. In the following few sections, we’ll cover how to accomplish some of these tasks.

Inserting Objects into an Existing Layout

Objects can be inserted into an existing layout by dragging them from their current positions and dropping them at the required position in the layout. A blue cursor is displayed in the layout when an object is dragged over it to indicate where the object will be placed.

Take a look at the following screencast where we put three of our labels in a vertical layout and then realize the we left the blue label out of the game —

It’s also possible to move or change the position of a given widget in a layout. To do this, just drag and drop the widget to its new position in the layout. Remember to follow the blue line to get this right.

Nesting Layouts to Build Complex GUIs

You can also nest layout managers one inside another using Qt Designer. The inner layout then becomes a child of the enclosing layout. By doing this you can iteratively create very complex, yet well-structured user interfaces.

Layouts can be nested as deep as you need. For example, to create a dialog with a horizontal row of buttons at the bottom and a bunch of other widgets aligned vertically on the form, you can use a horizontal layout for the buttons and a vertical layout for the rest of the widgets, then wrap these layouts in a vertical layout.

Coming back to our colored labels example, the following screencast shows the process of arranging a nested layout in Qt Designer —

In this example, we first arrange widgets in pair using a horizontal layout. Then we nest both of these layouts in a third layout, but this time a vertical one. The layouts can be nested as deep as required.

When you select a child layout, its parent layout can be selected by pressing the Shift key while clicking on it. This allows you to quickly select a specific layout in a hierarchy, which otherwise will be difficult to do because of the small frame delimiting each layout manager.

Setting a Top Level or Main Layout

The final step you need to perform when building a form is to combine all the layouts and widget into one main layout or top level layout. This layout is at the top of the hierarchy of all other layouts and widgets. It’s vital that you have a layout because otherwise the widgets on your form won’t resize when you resize the window.

To set the main layout just right click anywhere on your form that doesn’t contain a widget or layout. Then, you can select Lay Out Horizontally, or Lay Out Horizontally, or you can also select Lay Out in a Grid like in the following screencast —

In this example, we use each of the three different layouts as our top level layout in turn. We first use a horizontal layout, then break the layout and use a vertical layout. Finally we set a grid layout. Which top level layout you choose for your top-level layout will depend on your specific requirements for your app.

It’s important that you note that top level layouts are not visible as a separate object in the Object Inspector. Its properties appear below the widget properties of the main form. Also, note that if your form doesn’t have a layout, then its icon appears with a red circle on the Object Inspector. Another way to check if you’ve properly set a main layout is trying to resize the form, if a main layout is in place, then your widgets should resize accordingly.

As you start to build more complex applications, you’ll discover that other container widgets also require you to set a top level layout, for example QGroupBox, QTabWidget, QToolBox, and so on. To do this, you can run the same steps you’ve seen here, but this time you need to right click on the container widget.

Laying Out a Dialog With Qt Designer

For a final and more complete example of how to use layouts with Qt Designer, we’re now going to create a dialog to introduce some information in a database application. Suppose we’re building a Human Resources Management software for our company Poyqote Inc.. We’re now working in a form to introduce some data about our employees. The dialog should present users with a user-friendly GUI for introducing the following data:

  • Employee name
  • Employment date
  • Department
  • Position
  • Annual salary
  • Job description

What is the best way to lay out this form? There are many options, and it’s largely a matter of taste and practise. But here we’re using a QFormLayout to arrange the entry fields into two columns with labels on the left and input boxes on the right. The process of creating the layout is shown in the following screencast — 

The base dialog is created using Qt Designer’s Dialog with Buttons Bottom template. Then, we add some labels and some input widget, including line edits, date edits, text edits, and combo boxes. Next we put all those widgets in a form layout and finally define a top level or main layout for the form.

The finished dialog .ui file can be downloaded here.

Conclusion

Qt Designer is a powerful tool when it comes to creating GUIs using Qt. One of its most straightforward and useful features is the ability to arrange your widgets in different types of layouts. Learning how to effectively create layouts with Qt Designer can sky rocket your productivity, particularly when creating complex GUIs.

This tutorial guided you through the process of creating custom layouts with Qt Designer. You now know how to get the most out of Qt Designer when laying out your GUIs.

Python

via Planet Python https://ift.tt/1dar6IN

November 10, 2020 at 05:48AM

Learn PyQt: Creating Dialogs With Qt Designer — Using the drag and drop editor to build PyQt5 dialogs

Learn PyQt: Creating Dialogs With Qt Designer — Using the drag and drop editor to build PyQt5 dialogs

https://ift.tt/3neuIEr

Most PyQt GUI applications consist of a main window and several dialogs. Dialogs are small-sized windows that allow you to communicate with your users, either by showing messages on the screen or by taking the user’s input. You can use Qt Designer to create dialogs taking advantage of the variety of options that this tool offers.

In this tutorial, we’ll learn how to create and customize dialogs using Qt Designer. We’ll also learn two different ways of using and launching dialogs in our GUI applications. With this knowledge, we’ll be able to add dialogs to our applications quickly and easily.

For a better understanding of the topics we’ll cover in this tutorial, it will help to have some previous knowledge about PyQt applications, widgets, layouts and signals and slots.

Getting Started With PyQt Dialogs

In GUI programming, dialogs are small-sized windows that offer auxiliary functionalities and allow you to communicate with your users. Some common examples of dialogs include the Open Document dialog in a word processor or a text editor, the Settings or Preferences dialogs in most GUI applications, the Search dialog in a file manager or a text editor, and so on.

Dialogs are also often used to show error messages or general information on a given operation. They can also be used to ask the users their confirmation to continue with an operation or to take input from the user for a database.

PyQt offers a rich collection of built-in dialog classes that you can use directly in your applications. Some of them are:

Additionally, PyQt provides the QDialog class for creating entirely custom dialogs when there is no built-in available for the operation that you need to perform.

While we can use the QDialog class to build dialogs in Python code, we can also use Qt Designer to create custom dialogs in the drag and drop editor. Qt Designer is a Qt tool that offers a user-friendly GUI that will allow us to quickly create and set up our dialogs and windows.

Creating Dialogs With Qt Designer

You can use Qt Designer to create and customize the user interface of your custom dialogs. With Qt Designer, you can create a dialog’s GUI using a built-in template or you can create a dialog entirely from scratch. You can add widgets to your dialogs, arrange widgets in layouts, set their appearance, provide initial values for their attributes, set their tab order, create buddies to provide keyboard shortcuts, and connect the widgets’ built-in signals to slots.

When we create a dialog using Qt Designer, the dialog’s GUI is stored in a .ui file, which is an XML file that provides all the information we’ll need to later build the dialog GUI in our applications.

In the next few sections we’ll look at how to create and customize dialog’s GUI using Qt Designer.

Using Qt Designer’s Dialog Templates

When we launch Qt Designer, we are presented with the application’s main window and with a dialog called New Form. This dialog allows us to select a template for the GUI we want to create. These templates include options to create dialogs, main windows, and custom widgets.

In this tutorial, we’re just interested in how to create dialogs with Qt Designer. So, we’ll just cover the 3 templates Qt Designer offers for creating dialogs:

  1. Dialog with Buttons Bottom to create a form (or dialog) with an OK and a Cancel buttons horizontally-arranged on the bottom-right corner of the form

  2. Dialog with Buttons Right to create a form with an OK and a Cancel buttons vertically-arranged on the top-right corner of the form

  3. Dialog without Buttons to create an empty form without buttons

The following screencast shows how we can use Qt Designer to create custom dialogs using the different (default) dialog templates:

To create a dialog using a Qt Designer’s template, we just need to select the desired template from the New Form dialog and then click on the Create button or hit Alt+R on our keyboard.

If when you launch Qt Designer, the New Form dialog doesn’t appear, then you can click on the New button on Qt Designer’s toolbar. You can also click on the File>New… main menu option or press the Ctrl+N key combination on your keyboard.

Adding Widgets and Layouts

Widgets are the building blocks of any PyQt GUI application. You can use widgets to display information, get the user’s input, and provide containers for other widgets that should be grouped. With Qt Designer, you can add widgets to our dialogs and windows by dragging and doping them from Qt Designer’s Widget Box panel to your form. Once you have all the required widgets in place, you can arrange them using Qt’s layouts.

Say your company is creating a database application to manage the employees’ relevant information. You’re asked to add a new PyQt dialog to enter or update general information about employees. The dialog must include options to enter the following info: Employee name, Employment date, Department, Position, Annual salary and
Job description.

The following screencast shows how we can quickly create the GUI for the dialog at hand using Qt Designer:

Here, we first create a dialog using the Dialog with Buttons Bottom template. Then, we add QLabel objects to ask for the needed information. Every field needs a specific input widget. For example, we add a QLineEdit object for the Employee name, a QDateEdit object for the Employment date, two QComboBox objects for the Department and the Position, a QDoubleSpinBox object for the Annual salary, and a QTextEdit object for the Job description field.

Once we have all the widgets in place, we select all of them and arrange them using a QFormLayout object. The final step is to add a main layout to the dialog. To do that, we use a QVBoxLayout object that allows us to arrange the widgets and the dialog’s buttons in a vertical column. That’s all, we’ve created our first dialog using Qt Designer. Let’s save the dialog’s GUI file with the name employee.ui for later use.

If you want to have a preview of how your dialog will look like in production, then you can press the Ctrl+R key combination or click on the Form>Preview… option on Qt Designer’s main menu.

In this section, we’ve used Qt Designer in Edit Widgets mode, which is the default mode. In this mode, we can add widgets to our dialogs, edit widget’s properties, lay out the widgets on the dialog’s GUI, and so on. To activate the Edit Widgets mode, we can choose any of the three following options:

  1. Press the F3 key
  2. Select the Edit>Edit Widgets option from the main menu
  3. Click on the Edit Widgets button on Qt Designer’s toolbar.

Setting Tab Order of Input Widgets

An element that can improve the usability of your dialogs is the tab order of the input widgets. The tab order is the order in which the input widgets get the focus when you hit the Tab or Shift+Tab keys. The default tab order is based on the order in which you place the widgets on the form.

For example, in our employee dialog, we placed the QDoubleSpinBox object for the Annual salary after the QTextEdit object for the Job description. If the user hits the Tab key for moving around the dialog, then they’ll note that when they hit Tab to move from the Position QComboBox to the Annual salary QDoubleSpinBox what happens is that the focus goes to the Job description QTextEdit. This is a kind of annoying behavior. The following screencast shows the problem:

Note that when the focus is on the Position QComboBox and the user hits Tab, the focus jumps directly to the Job description QTextEdit instead of jumping to the Annual Salary QDoubleSpinBox as we would expect.

To fix this problem, we need to change the tab order of the input widgets on our dialog. Firstly, we need to switch to the Edit Tab Order mode in Qt Designer. To do that, we can either select the Edit>Edit Tab Order option on the main menu or click on the Edit Tab Order button on the toolbar.

In Edit Tab Order mode, each input widget in the form is shown with a number that indicates its position in the tab order chain. We can change the tab order by clicking on the number of each widget in the correct order. You can see how to do this in the following screencast:

In this example, we change the tab order of the input widgets by clicking on each number in the correct order. When we select a number, it changes to red to indicate that this is the currently edited position in the tab order. When we click on another number, then that number will be second in the tab order, and so on.

In case of a mistake, we can restart numbering by choosing Restart from the form’s context menu. To partially edit the tab order, we can select a number with the Ctrl key pressed. The tab order will be changed from that widget on. We can also right-click on a given number and then choose Start from Here from the context menu.

Defining Buddies

In Qt, buddies are connections between related widgets. Normally between a QLabel widget and an input widget like a QLineEdit or a QComboBox. These connections allow you to provide a quick keyboard shortcut to move the focus to a given input widget. By setting buddies, you’ll improve the usability of your dialogs because you’ll provide the user with a fast way to move around dialogs and windows.

In our employee dialog, to move the focus to the Annual salary QDoubleSpinBox, we can set a buddy between it and the Annual salary QLabel widget. The buddy will automatically provide a key combination of the form Alt+Letter, in which Letter represents a single letter in the text of the label.

In our Annual salary QLabel, that letter could be A or s or any other letter in the text of the label. The only restriction is that the selected letter doesn’t clash with the letter of any other buddy in the dialog or window at hand.

To select a letter to use in our buddy, we need to place an ampersand (&) before the letter in the text of the label. With this addition, we provide the letter to use in the keyboard shortcut. For example, if we place the ampersand before the letter s in our Annual salary QLabel, then we’ll be able to access the Annual salary QDoubleSpinBox by hitting the Alt+S shortcut on our keyboard.

Once we have selected the letters to use and placed the corresponding ampersands, we need to set the buddies. To do that, we’ll activate the Edit Buddies mode in Qt Designer by either selecting the Edit>Edit Buddies option from the main menu or by clicking the Edit Buddies button on the toolbar.

To define the buddies, we’ll click on a label and drag it over the corresponding input widget. The whole process is illustrated in the following screencast:

To create buddies between labels and input widgets, we can select a label with our mouse and drag it to the input widget that we want to set as its buddy. The label and the input widget will become buddies. From this point on, our users will be able to quickly move the focus to a specific input widget by pressing Alt+Letter, where Letter will be the letter that we used to define the buddy relation. Note that the buddy letters will be underlined to point the right key combination to use.

Using Button Boxes to Lay Out Dialog’s Buttons

There is a standard set of buttons that you can use when it comes to creating dialogs. Even though Qt Designer’s templates provide an OK button and a Cancel button, in practice you’ll see dialogs that use different buttons like Apply, Close, Yes, No, and so on.

In our employee example, we’ve used a Cancel and an OK button, which were placed in that same order from left to right. This is the usual order for buttons on Linux or macOS but not for Windows, where the order should be swapped.

If we want that our GUI applications look as native as possible on different platforms, then we’ll need to deploy different dialogs for different platforms just to show the buttons in the right order for the platform at hand.

Fortunately, PyQt provides an effective solution for this particular problem. Instead of adding a Cancel and an OK button directly, we can use the QDialogButtonBox class and select the buttons according to our needs. This PyQt class will automatically handle the order of the buttons for us according to the standard practice on the underlying platform.

Here’s how our employee dialog looks like on Windows 10, Linux, and macOS:

Button Box on Windows

Button Box on Linux
Button Box on Linux

Button Box on macOS
Button Box on macOS

n Windows, the buttons at the bottom-right corner of the dialog are shown swapped if you compare them with the same dialog running on Linux or macOS. That’s because Qt Designer’s dialog templates use a QDialogButtonBox object by default to lay out the buttons on the dialog. This is quite convenient if you’re creating multi-platform GUI applications with PyQt.

We can select the buttons that we want to show on our dialogs by changing the .standardButtons property of the QDialogButtonBox object on Qt Designer’s Property Editor. Take a look at the following screencast:

The Property Editor allows us to set the .standardButtons property of a QDialogButtonBox object and to select different sets of standard buttons. Note that when we change the buttons in the QDialogButtonBox, they get placed according to the standard practice on the current platform.

Connecting Built-in Signals and Slots

In PyQt, the user’s actions over the widget of a GUI applications are called events. When an event occurs, the widget at hand emits a signal to let you know that the event has occurred. To give life to your applications, you need to connect those signals to specific slots. Slots are methods that are executed as a response to events.

Most widgets implement built-in signals that are emitted when a given event (like a mouse click) occurs on the widget. Widgets also provide built-in slots that allow you to perform certain actions on the widget. For example, a QTextEdit object provides a .clear() slot that you can connect to a button or to a menu option to clear the content of the widget.

You can use Qt Designer to connect these built-in signals and slots. To establish a signal and slot connection between two widgets in a dialog, you first need to switch to Qt Designer’s Edit Signals/Slots mode. To do that, you can press the F4 key, select the Edit>Edit Signals/Slots option in the main menu, or click on the Edit Signals/Slots button on the toolbar.

Once in the Edit Signals/Slots mode, you select the signal-provider widget with your mouse and then drag and drop this widget over the slot-provider widget. This will launch Qt Designer’s Configure Connection dialog.

The Configure Connection dialog has two panels. In the left panel, you can select a signal and in the right panel, you can select a slot. Then, you need to press the OK button to create the connection. This will draw an arrow from the signal-provider widget to the slot-provider widget indicating that the connection is established. Additionally, you’ll see the name of the signal and the slot that you just connect.

For example, suppose we have a dialog with a QTextEdit and a QPushButton. We need to connect the .clicked() signal of the button with the .clear() slot of the text edit, so we can clear the content of the text edit by clicking on the button. Check out the following example:

In this example, we first switch to the Edit Signals/Slots mode. Then, we select the Clear button, drag it, and drop it over the QTextEdit object. This presents us with the Configure Connection dialog. In this dialog, we select the .clicked() signal in the left panel and the .clear() slot in the right panel. When we press OK, the connection gets established. We can also click on the Cancel button to cancel the connection operation.

The connection appears as an arrow connecting the two widgets with two labels indicating the name of the signal and the slot that each widget provides.

To modify a connection, you can double-click on the arrow or one of the labels. This will display the Configure Connection dialog, where you can change the signal or the slot involved in the connection.

To delete a connection, you can select the arrow that represents the connection or one of the labels that identify the signal and the slot, and then press the Del key.

Since dialogs are also widgets, you can connect a signal of a widget (say a button) with a slot of the dialog or form. The process is the same, you just need to drag and drop the widget over the form and then configure the desired signal and slot from the Configure Connection dialog.

Finally, if you use a Qt Designer’s template for creating a dialog with a button box, then you’ll note that the .accepted() signal of the QDialogButtonBox object is connected by default with the .accept() slot of the form. Likewise, the .rejected() signal is connected with the reject() slot. So, your dialog is fully functional from the very beginning.

Using Dialogs in a GUI Application

So far, you’ve learned how to create custom dialogs with Qt Designer but how can you use those dialogs in your GUI applications? PyQt provides at least two ways for doing that. We can:

  1. Generate the Python code for the dialog’s GUI using a command-line tool called pyuic5 on the .ui file
  2. Dynamically load the code for the dialog’s GUI using the uic.loadUi() function

The first option is the most common and widely used because it’s more efficient when it comes to working with complex dialogs. However, it has the drawback that every time you modify the dialog with Qt Designer, you have to generate the code again.

The second option may be suitable when you’re working with quite small and simple dialogs that don’t involve substantial loading time.

Generating the Dialog’s GUI With pyuic5

You can use the command-line tool pyuic5 to convert your .ui files into .py files that contain the Python code to build your dialogs’ GUI. To do that, you need to open a command-line or terminal and run a command like this:

sh

$ pyuic5 -o dialog.py dialog.ui

This command will generate a Python module called dialog.py from the dialog.ui file that we just created using Qt Designer.

Let’s run the command targeting our employee dialog:

sh

$ pyuic5 -o employee_dlg.py employee.ui

This command generates a Python module called employee_dlg.py. This module contains the Python code for the dialog’s GUI. Here’s a small piece of the code:

python

# -*- coding: utf-8 -*-

# Form implementation generated from reading ui file 'employee.ui'
#
# Created by: PyQt5 UI code generator 5.14.2
#
# WARNING! All changes made in this file will be lost!


from PyQt5 import QtCore, QtGui, QtWidgets


class Ui_Dialog(object):
    def setupUi(self, Dialog):
        Dialog.setObjectName("Dialog")
        Dialog.resize(431, 431)
        self.verticalLayout = QtWidgets.QVBoxLayout(Dialog)
        ...

    def retranslateUi(self, Dialog):
        _translate = QtCore.QCoreApplication.translate
        ...

The Ui_Dialog class has all the code we need to generate the dialog’s GUI. The .setupUi() method contains the code that adds the widgets and lay them out on the dialog’s GUI. The retranslateUi() method contains code for internationalization and localization but this topic is beyond the scope of this tutorial. So, we’ll just consider .setupUi() here.

Let’s create a PyQt main window-style application that allows us to use this Python module for launching our employee dialog. Here’s the code:

python

# Filename: employeeapp.py

import sys

from PyQt5.QtWidgets import QApplication, QDialog, QMainWindow, QPushButton

from employee_dlg import Ui_Dialog


class Window(QMainWindow):
    """Main window."""
    def __init__(self, parent=None):
        """Initializer."""
        super().__init__(parent)
        # Use a QPushButton for the central widget
        self.centralWidget = QPushButton("Employee...")
        # Connect the .clicked() signal with the .onEmployeeBtnClicked() slot
        self.centralWidget.clicked.connect(self.onEmployeeBtnClicked)
        self.setCentralWidget(self.centralWidget)

    # Create a slot for launching the employee dialog
    def onEmployeeBtnClicked(self):
        """Launch the employee dialog."""
        dlg = EmployeeDlg(self)
        dlg.exec()


class EmployeeDlg(QDialog):
    """Employee dialog."""
    def __init__(self, parent=None):
        super().__init__(parent)
        # Create an instance of the GUI
        self.ui = Ui_Dialog()
        # Run the .setupUi() method to show the GUI
        self.ui.setupUi(self)


if __name__ == "__main__":
    # Create the application
    app = QApplication(sys.argv)
    # Create and show the application's main window
    win = Window()
    win.show()
    # Run the application's main loop
    sys.exit(app.exec())

We first import the required classes from the PyQt5 package. Then, we import the Ui_Dialog class from our employee_dlg module.

The Window class will be the main window of our application. In this case, we use a QPushButton as a central widget. This means that our application will show a window with a single button on it. Then, we’ll connect the .clicked() signal of the button with the onEmployeeBtnClicked() slot.

Inside onEmployeeBtnClicked(), we create an instance of EmployeeDlg using our main window (self) as its parent and then launch it using its .exec() method.

In the EmployeeDlg class, we implement our dialog inheriting from the QDialog class. Inside the __init__() method, we create an instance of Ui_Dialog, which is the class that holds the code for creating our dialog’s GUI. The final step is to call the .setupUi() method.

You can also use multiple inheritance when creating the EmployeeDlg class. In other words, you can declare the class as class EmployeeDlg(QDialog, Ui_Dialog): and then call the .setupUi() method as self.setupUi() inside the __init__() method.

Finally, we complete the application by running the following steps:

  1. Create an instance of the QApplication class
  2. Create an instance of our Window class
  3. Call the .show() method on our Window object
  4. Run the application’s main loop calling app.exec()

Let’s run the application and click on the Employee... button. Here’s how it works:

The application’s main window has a single widget, the Employee... button. When we click on this button, our employee dialog appears on the screen.

The final ellipsis in the text of the Employee... button is a common convention that you can use to point that this button (or menu option) doesn’t perform an immediate action but launches a dialog for further processing.

Even though we used a QPushButton to launch our dialog, in real-world applications we normally connect a slot like onEmployeeBtnClicked() to a toolbar button, a main menu option, or a context menu option.

Loading the Dialog’s GUI With uic.loadUi()

You also have the option of dynamically loading the dialog’s GUI directly from your .ui file using the uic.loadUi() function. uic.loadUi() takes a .ui file as an argument and returns a QWidget subclass that implements the GUI.

To dynamically load our employee dialog, for example, we need to make some changes to our employeeapp.py file. Firstly, we’ll remove the line from employee_dlg import Ui_Dialog because we don’t need ti anymore. Then, we’ll add the following import:

python

from PyQt5.uic import loadUi

Once we have access to uic.loadUi(), we need to modify the EmployeeDlg class as follows:

python

class EmployeeDlg(QDialog):
    """Employee dialog."""
    def __init__(self, parent=None):
        super().__init__(parent)
        # Load the dialog's GUI
        loadUi("employee.ui", self)

The __init__() method of EmployeeDlg now calls loadUi() taking "employee.ui" as its first argument. Note that this should be the path to the .ui file. The second argument to loadUi() is called baseinstance. It’s an optional argument. If specified, then the GUI is created in it. If we pass self to this argument, then we’re ensuring that the GUI will be created in the instance of EmployeeDlg.

With this last change, we’re done. Our application will work as expected. Note that the rest of the code remains the same. You can now run the application by yourself and see the result.

This way of loading dialogs is rarely used in practice, although it may be useful when you’re working with simple and small dialogs. It has the advantage that you don’t need to generate the Python code for the dialog’s GUI every time you modify the .ui file using Qt Designer, which can be a productivity and maintainability win in some cases.

Conclusion

When it comes to creating PyQt GUI applications you commonly use a main window and several dialogs. Dialogs allow you to communicate with your users (hence the name dialog). You can use dialogs to show messages on the screen or to take the user’s input. Qt provides Qt Designer for creating dialogs in a fast and productive way.

In this tutorial, we covered how to create and customize dialogs using Qt Designer. We also learned about two different ways of using and launching dialogs in our GUI applications, either by generating the dialog’s GUI code or by loading it dynamically.

With this knowledge, you’ll be able to use Qt Designer to create fully-functional dialogs for your GUI applications in a quick and productive way.

Python

via Planet Python https://ift.tt/1dar6IN

November 10, 2020 at 05:48AM

Green Child O’ Mine

Green Child O’ Mine

https://ift.tt/38s7dUA

Green Child O’ Mine

Link

Novelty band The Merkins celebrate the second season of The Mandalorian with a parody of the Guns N’ Roses track Sweet Child O’ Mine, with the lyrics rewritten to be about everyone’s favorite 50-year-old child, Baby Yoda. The lead vocals are spot-on thanks to special guest singer Alvi Robinson of the rock band The L.A. Maybe.

fun

via The Awesomer https://theawesomer.com

November 9, 2020 at 11:00AM

Undeniable Mathematical Evidence the 2020 Election is Being Stolen

Undeniable Mathematical Evidence the 2020 Election is Being Stolen

https://ift.tt/2UebpyA

Reprinted with permission from The Red Elephants. www.theredelephants.com .
AmmoLand Editors Note: This reprint is only part of the complete article documenting the theft of the 2020 Presidential Election. Check the master page for full and continuing updates. It is important that gun owners are made aware of this as the Biden Administration will be an existential threat to your right to keep and bear arms. All Images property of theredelephants.com.

Undeniable Mathematical Evidence the Election is Being Stolen, img The Red Elephants

USA – -(AmmoLand.com)- According to CBS News, President Trump does not plan to concede in the event that the media declares Joe Biden the winner of the election, and elected the 46th president of the United States. The Trump campaign and it’s top advisers called for multiple lawsuits on the grounds that the ongoing vote count would result in tallying illegally cast ballots.

The lawsuits will amount to an aggressive effort to highlight anomalies, statistical impossibilities, or other perceived problems that could affect vote counts before a final presidential winner is declared.

Many reporters at press conferences that took place in Arizona, Pennsylvania, and Michigan on Thursday asked his political appointees and supporters for evidence of the wide-scale problems they alleged occurred.

If it is just the mathematical evidence Americans are looking for, there is endless evidence. Here are just the facts.

Statistical Impossibilities in Wisconsin and Michigan: 

In Wisconsin, voter turnout matched the record high of 2004. The Wisconsin Elections Commission uses the estimated voting-age population as the denominator when calculating statewide voter turnout numbers. According to the Elections Commission, there was a 73 percent turnout in this Wisconsin election.

Turnout was 67 percent in 2016; 70 percent in 2012; 69 percent in 2008; and 73 percent in 2004. Apparently Joe Biden smashed Barack Obama’s 2008 turnout in most places in the country.

In both Michigan and Wisconsin, several vote dumps occurred at approximately 4am on Wednesday morning, which showed that Joe Biden received almost 100 percent of the votes. President Trump was leading by hundreds of thousands of votes in both states as America went to sleep, and turnout in the state of Wisconsin seems to be particularly impossible.

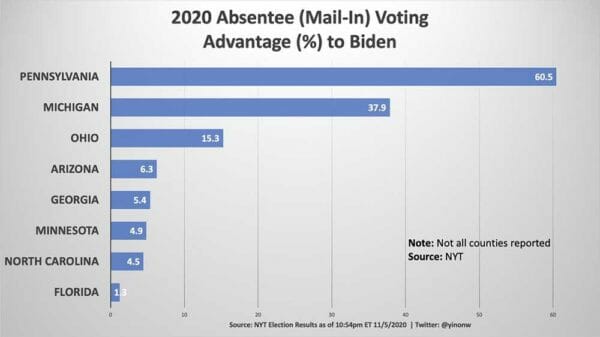
With absentee ballots, former vice-president Joe Biden was also up 60 points in Pennsylvania and almost 40 points in Michigan According to the New York Times.  Comparably, Biden was only up single digits in absentee voting in most other battleground states. Wisconsin has not yet been reported.

New York Times 2020 Absentee Ballot Counts


Elections officials in Michigan and Wisconsin could not explain Democratic presidential nominee Joe Biden’s sudden and dramatic vote tally increase that occurred in both states Wednesday morning.

When asked at a Wednesday press conference how this occurred, Michigan Department of State spokesperson Aneta Kiersnowski told reporters “We cannot speculate as to why the results lean one way or another.”

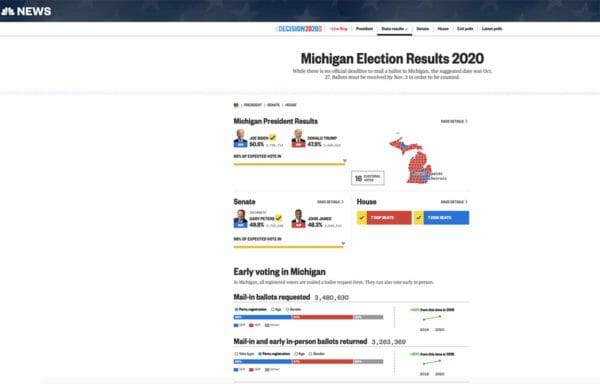
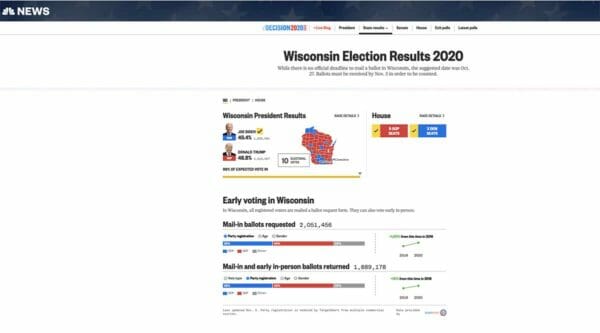
This is particularly concerning considering republicans led in mail-in ballots requested and mail-in and in-person ballots returned leading up to and at the start of election day.

According to NBC News on election day before the polls opened, In Michigan, Republicans led 41% to 39% in Mail-in Ballots requested. Republicans also led 42% to 39% with Mail-in and in-person ballots returned.

In Wisconsin on election day before the polls opened, Republicans led Mail-in Ballots requested 43% to 35%, and Mail-in and early in-person ballots returned 43% to 35%. Almost ALL of the ballots found, while most in the country were sleeping, after they officials stated they would stop counting, were for Joe Biden.

NBC News Michigan 2020 Election Results


NBC News Wisconsin 2020 Election Results

Some statistically savvy observers noticed other mathematical flaws, as random numbers in statistics should follow a pattern in their distribution. If the numbers are falsified, it is easy to detect.

The increase in Democrats relative to Republicans was significantly higher when the Democrat was doing worse overall in early counting. Within each ward, late votes broke heavily to the Democrat in exactly the races where they are likely to affect the result.

Biden’s Vote Tallies Violate Benford’s Law:

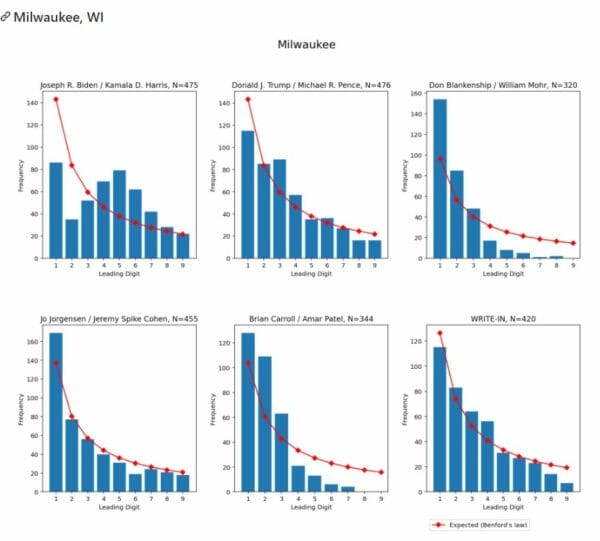
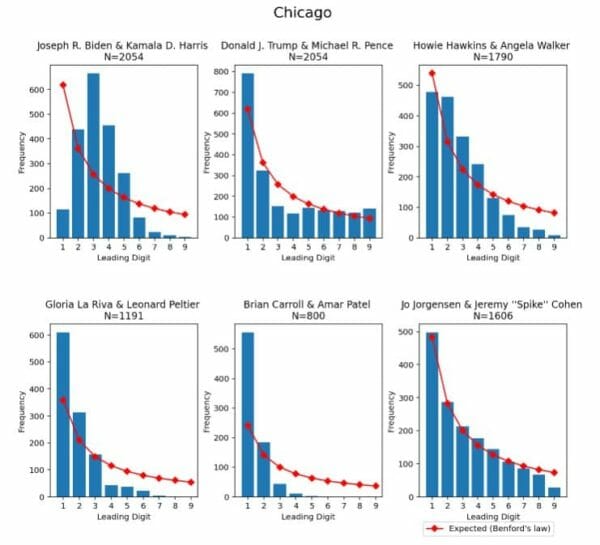
According to some analysts, Biden’s Vote Tallies Violate Benford’s Law. All of the other candidates’ tallies follow Benford’s law across the country, except for Biden’s when he gets in a tight race. Biden pretty clearly fails an accepted test for catching election fraud, used by the State Department and forensic accountants.

Biden’s Vote Tallies Milwaukee, WI


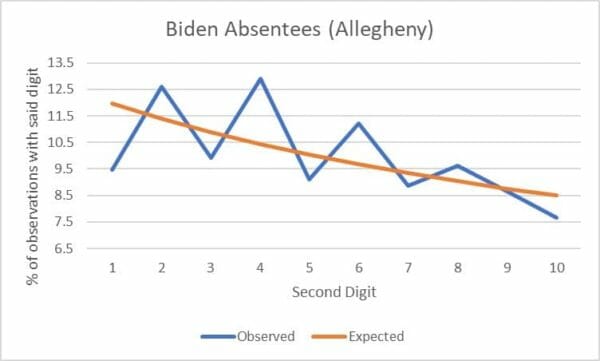
Biden’s Vote Tallies Allegheny, PA

Biden’s Vote Tallies Chicago IL

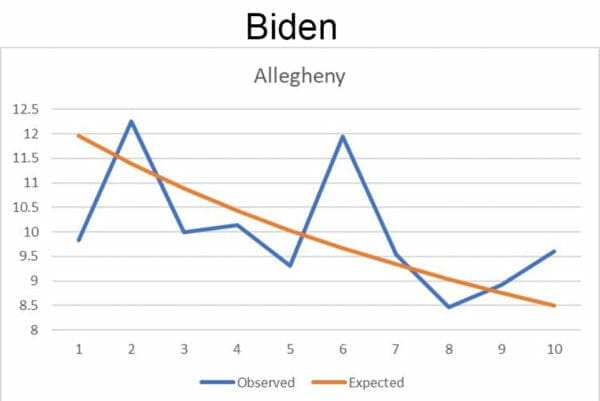
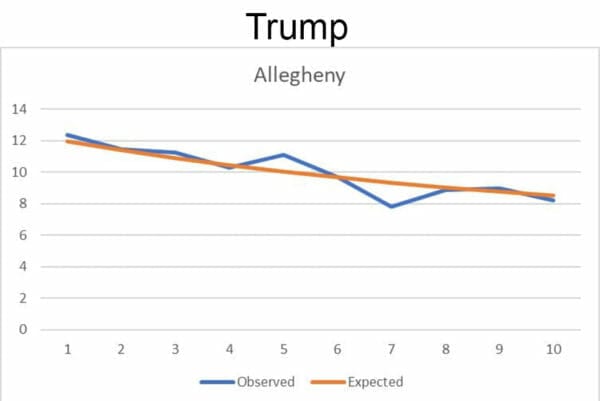
Analysts ran the data with Allegheny using the Mebane 2nd digit test with Trump vs Biden. The difference was significant. It just doesn’t work. Biden’s is fishy, many significant deviations. In Trump’s there were only 2 deviations but neither are significant at the 5% level. The X-asis is the digit in question, the Y-axis is the % of observations with that digit.

Bidens Mebane 2nd digit test Allegheny PA

Trumps Mebane 2nd digit test Allegheny PA

So as an example, if the total votes for Biden is 100 in a precinct, “0” is the second digit. If the total votes were 110, “1” is the second digit, and so on.

For Biden in Allegheny absentee ballots, there are multiple significant deviations. For Trump, none of the deviations are significant at the 5% level.

Biden Absentee Ballots Allegheny PA 2020

Biden’s Vote Tallies Chicago IL

Senate and House Races Compared to Presidential Seem Curious

Others have taken a look at ballot numbers in important states with no down-ballot votes, versus states that are not swing states, and noticed a disturbing trend.

In Michigan, Trump received 2,637,173 votes while the GOP senate candidate received 2,630,042 votes. The difference here is only 7,131 which is not far off from what we see historically. In the same state, Joe Biden received 2,787,544 votes while the Democratic senate candidate received 2,718,451. The difference is 69,093 votes which is much higher than the historical norm.

In Barack Obama’s 2008 victory, he received a total of 2,867,680 votes, while the democratic senate candidate received 3,033,000 votes. Somehow Joe Biden gained over 60,000 ballots with no down-ballot vote.

In Georgia, it’s even worse. President Trump gained 2,432,799 votes, while the GOP Senate candidate tallied 2,433,617 votes. This is a difference of only 818 votes. Joe Biden in contrast gained 2,414,651 votes, while his Democratic Senate candidate tallied 2,318,850 votes.  This is a difference of 95,801 votes.

In many counties and states across the country, including in those called for Biden or where Trump is now trailing, Republicans substantially overperformed what was projected. NBC estimates Republicans may ultimately end up gaining as many as eight seats.

In Cuyahoga, Ohio, Joe Biden only had a net gain of 4,000 votes compared to Hillary Clinton’s 2016 performance, yet at the same time had a net gain of almost 70,000 in Wayne County Michigan. Numbers like this are unprecedented and highly questionable. Some economists have even expressed their confusion regarding what happened in Wayne county and Milwaukee in the dead of night.

Joe Biden apparently ended up with millions more votes than Barack Obama received in his historic 2008 election where he ended up with 365 electoral votes, winning Florida, North Carolina, and even Indiana.  This is even with millions more votes to be counted yet in 2020.

Massive Enthusiasm Gap:

Joe Biden with almost record low enthusiasm, underperformed across many major cities compared to Hillary Clinton in 2016.

In New York City, Chicago, and Miami, he was down 201,408, 260,835, and 6,945 respectively.

However, in the states Biden needed to overtake Trump in 2020, he gained massively.  According to the Associated Press vote total data, in Atlanta, Milwaukee, and Pittsburg, he was up 76,518, 67,630, 28,429, and 29,150 respectively.
According to polling, The difference in enthusiasm for the candidates is significant. Trump leads 52.9 percent to 45 percent among the 51.2 percent of registered Rust Belt voters who say they are “Extremely Enthusiastic” about voting for their preferred candidate. Among likely voters who are extremely enthusiastic, the president enjoys a double-digit advantage—60.5 percent to 44.9 percent.

Massive Enthusiasm Gap Chart

Less than half of the supporters of former vice president Joe Biden, (46.9 percent) said they were voting for Joe Biden because they like the candidate. Approximately 8 in 10 voted for President Trump because they wanted his as President.
Preferred Candidate For or Against Chart


Pennsylvania Chaos:

In Pennsylvania, Trump led by almost 800,000 votes on election night after most Americans headed to bed. Over the course of the last 72 hours, President Trump’s lead shrunk to less than a 95,000 vote lead in the keystone state, and then Joe Biden took the lead.

Over the past couple of days, batches of votes started flowing into the final tally, mostly in favor of Joe Biden. Five Thirty Eight reported recently that “Two more batches of Pennsylvania vote were reported: 23,277 votes in Philadelphia, all for Biden”

The Pennsylvania Democratic Party predicted the remaining 580,000 uncounted mail-in ballots will go resoundingly for Joe Biden, projecting that the former vice president will carry the state by about 175,000 votes.

“Based on the Party distribution of the ballots cast in each county, we believe that 75% of the remaining ballots will go to Joe Biden,” state Sen. Sharif Street wrote in a statement. “We project Biden will win by about 175,000 votes.”

Biden is only leading in Pennsylvania by just a few thousand votes.

According to Politico, it was the ballots found in postal facilities that put Biden over the top in Pennsylvania. Postal workers found more than 1,000 ballots in Philadelphia facilities Thursday and 300 in Pittsburgh. The Philadelphia and Pittsburgh ballots were part of more than 2,000 ballots discovered in dozens of postal facilities across the two states and expedited to election officials, pursuant to a judge’s court order.

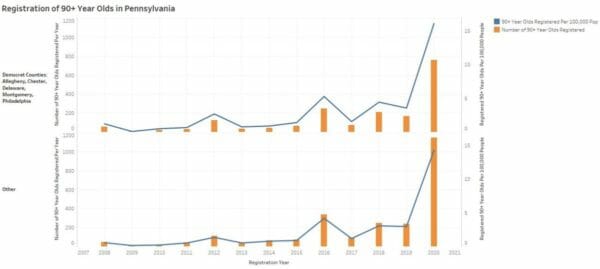
For what it’s worth, there also happens to be a record number of 90-year-olds registered to vote in one year, during a pandemic, than at any point in Pennsylvania history.

New 90 Year Old Voter Registration Pennsylvania 2020

Confirmed Errors: 

On election day, there were several confirmed reporting errors that were fixed upon being revealed by journalists as they watched the numbers roll in.

Arizona

In Arizona according to Politico, An error found in Edison Research data that was identified by a journalist showed that 98% of the vote had been counted in Arizona when in fact only 84% of the vote had been counted.  Officials corrected this mistake when it was pointed out.

Georgia

In Georgia, Voters were unable to cast machine ballots for a couple of hours in Morgan and Spalding counties after the electronic devices crashed, state officials said.

The companies “uploaded something last night, which is not normal, and it caused a glitch,” said Marcia Ridley, elections supervisor at Spalding County Board of Election. That glitch prevented poll workers from using the pollbooks to program smart cards that the voters insert into the voting machines.

“That is something that they don’t ever do. I’ve never seen them update anything the day before the election,” Ridley said. Ridley said she did not know what the upload contained.

Michigan

There was also something suspicious about the vote reporting in Antrim County, Michigan, where Trump beat Hillary Clinton by 30 points in 2016. Initial vote totals there showed Biden ahead of Trump by 29 points, a result that can’t possibly be accurate, as plenty of journalists noted.

When NY Times journalist pointed this out on Twitter, they corrected this and called this an ‘error.’

According to the Detroit Free Press, a USA Today affiliate, officials investigated the wonky election results in Antrim County.

Antrim County Clerk Sheryl Guy said results on electronic tapes and a computer were somehow scrambled after the cards were transported in sealed bags from township precincts to county offices and uploaded onto a computer.

In 2016, Trump won Antrim County with about 62% of the vote, compared with about 33% for Democrat Hillary Clinton. Trump beat Clinton by about 4,000 votes.

Wednesday morning, Antrim results showed Democrat Joe Biden leading Trump by slightly more than 3,000 votes, with 98% of precincts reporting.

More in Michigan

In Oakland County’s 15th county commission district, a fixed computer glitch turned a losing Republican into a winner. A computer error led election officials in Oakland County to hand an upset victory Wednesday to a Democrat, only to switch the win back to an incumbent Republican a day later.  The incumbent, Adam Kochenderfer appeared to lose by a few hundred votes, an outcome that seemed odd to many in his campaign.  After the apparent computer error was found and fixed, Kochenderfer ended up winning by over 1,000 votes.

There were many other confirmed errors, including in Virginia where 100,000 extra votes were tallied for Joe Biden, and more may be revealed as the weeks go on.

There were also many processing delays, specifically in Fulton county Georgia where a pipe suddenly burst in the processing center.

On November 4th, at approximately 6:07 a.m., the staff at State Farm Arena notified Fulton County Registration and Elections of a burst pipe affecting the room where absentee ballots were being tabulated.

As of 7 p.m. on Wednesday Fulton County Elections officials said 30,000 absentee ballots were not processed due to a pipe burst. Officials reassured voters that none of the ballots were damaged and the water was quickly cleaned up.

But the emergency delayed officials from processing ballots between 5:30 a.m. and 9:30 a.m.

Former Politicians of Blue Cities Chime In:

President Trump was leading big until certain Rust Belt states froze their ballot return reports. When reporting resumed, Trump began to lose steadily.
In Mexico, 1988, the PRI was losing handily until ballot returns froze, only to resume in a massive pro-PRI turnaround.
“In an autobiography that began circulating in Mexico this week, de la Madrid sheds more light on that dark night in Mexico’s history. What he reveals is not new, political analysts said. But in 850 pages, de la Madrid’s memoirs give the firmest confirmation to date of one of this country’s biggest open secrets: the presidential elections of 1988 were rigged.

Political analysts and historians have described that election as one of the most egregious examples of the fraud that allowed the Institutional Revolutionary Party to control this country for more than seven decades, and the beginning of the end of its authoritarian rule.”

Rod Blagojevich explained that there is no question that this is what is happening in Philadelphia, Milwaukee, Detroit, and other cities. “In big cities where they control the political apparatus and they control the apparatus that counts the votes, and they control the polling places and the ones who count the votes, it’s widespread and it’s deep,” Blagojevich said on Friday.

I guess even corrupt politicians who went to jail understand the impossibility that Biden outperformed Hillary Clinton in only cities located in Michigan, Pennsylvania, Georgia, and Wisconsin.  All while the GOP lost zero house races, and won 8 of 11 governors races. 

As Nicaraguan dictator Anastasio Somoza once said, “Indeed, you won the elections, but I won the count.”

Ballots Received After Election Day

A federal judge on Wednesday said he may call Postmaster General Louis DeJoy to testify about why the U.S. Postal Service missed an Election-Day deadline to sweep locations in several states for left behind mail-in ballots.

The order, issued by U.S. District Judge Emmet G. Sullivan, was meant to trigger sweeps of facilities in six key battleground states: Pennsylvania, Michigan, Georgia, Texas, Arizona, and Florida. Some of the 12 districts included in the order have legislation against accepting ballots after midnight on election night.

“Now you can tell your clients this in no uncertain terms,” Sullivan said in a Wednesday hearing. “I am not pleased about this 11th-hour development last night. You can tell your clients that someone may have a price to pay for that.”

According to the Washington Post, more than 150,000 ballots were caught in U.S. Postal Service processing facilities and not delivered by Election Day.

In a pair of decisions, the Supreme Court on Wednesday let election officials in two key battleground states, Pennsylvania and North Carolina, accept absentee ballots for several days after Election Day.

In the Pennsylvania case, the court refused a plea from Republicans in the state that it decide before Election Day whether election officials can continue receiving absentee ballots until November 12th.

In the North Carolina case, the court let stand lower court rulings that allowed the state’s board of elections to extend the deadline to nine days after Election Day, up from the three days called for by the state legislature.

On October 26th, the Supreme Court declined to extend the deadline for counting of mail-in votes in Wisconsin, a victory for Republicans who brought the legal challenge. This particular extension order originally came from a federal judge in September, a crucial point that the conservatives on the court all agreed on: federal courts shouldn’t micromanage state-run elections.

The Supreme Court ordered Pennsylvania Democrats to respond by Thursday evening in a case challenging the state’s three-day extension for counting mail-in ballots.

President Trump has moved to intervene in a lawsuit brought by Pennsylvania Republicans, arguing the state’s Democratic Party and Secretary of State violated the law by extending the time for counting mail-in ballots to Nov. 6 at 5 p.m., despite the state legislature setting the deadline as Election Day.

The lawsuit takes issue with a state Supreme Court ruling that postmarked ballots be presumed to have been mailed before Nov. 3, even if not clearly postmarked to that effect.

North Carolina will not finish counting votes in the presidential and state elections until local elections boards process outstanding mail-in and provisional ballots next week, according to state elections officials.

The process, spelled out in state law, means the winner of North Carolina’s 15 electoral votes for president likely won’t be known until next Friday, Nov. 13.

The court, at Trump’s request, recently issued an interim order to election boards to set aside certain mail ballots that lack identifying info for the voter, and to not count those votes until after the court rules further.

Thousands of Deceased Confirmed to Be Registered and Some Even Voting:

An observer noticed something curious about some of the names on the ballots recorded in the state of Michigan.  Upon further review, one particular name out of the list, and confirmed to have cast a ballot, happened to be born in 1902 and passed away in 1984.

A pollster noticed the list and video, and used social security death index data confirming the deceased registered voter.

Here is the website where you can verify for yourself. Note that you have to guess-check the month of birth.

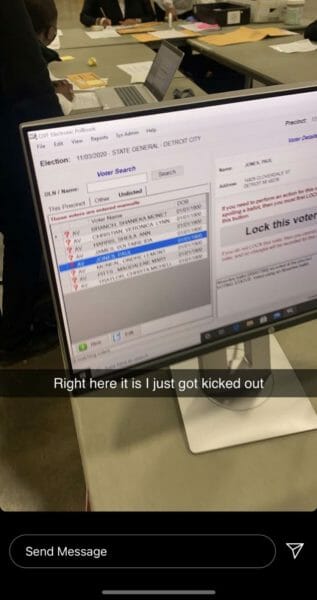
Another poll watcher who was later kicked out for taking photographs, noticed a decent-sized list of Michigan residents who have also been confirmed to have cast their ballots.  All of the names on the list he reviewed show their birthdate in chronological order.  Apparently, there are many voters born in the early 1900’s in the great lakes state.

Michigan voters born in the early 1900

A lawsuit filed by the Public Interest Legal Foundation (PILF) alleges that there are at least 21,000 dead people on Pennsylvania’s voter rolls. The lawsuit claims that Pennsylvania failed to “reasonably maintain” their voter registration records under federal and state law in time for the 2020 presidential election.

“As of October 7, 2020, at least 9,212 registrants have been dead for at least five years, at least 1,990 registrants have been dead for at least ten years, and at least 197 registrants have been dead for at least twenty years,” the lawsuit states.

“Pennsylvania still left the names of more than 21,000 dead individuals on the voter rolls less than a month before one of the most consequential general elections for federal officeholders in many years,” the lawsuit continues.

According to the lawsuit, about 92 percent of the 21,000 dead people on Pennsylvania’s voter rolls died sometime before October 2019. About 216 dead people show voting credits after federally listed dates of death in 2016 and 2018, the lawsuit alleges.

Studies Finds Hundreds of Thousands of Illegal Ballots, and More Votes than Existing Registered Voters:

According to CBS LA, Ellen Swensen with the Election Integrity Project California says they found more than 277,000 questionable ballots were mailed this election year in L.A. County before election day.

That’s 63% of all the questionable ballots mailed statewide.

It includes more than 4,800 duplicate ballots mailed to the same person, and 728 ballots mailed to people who likely have died. In 2016 their investigation found many dead voters still registered. Now four years later, there are more.

If this is happening in LA, it’s certainly happening in major cities nationwide….. this is just the tip of the iceberg, click the link below to read the complete article.

Editors Note:  As we stated at the top of this page the proof of a stolen election continues to pile up. Please follow the link to see the original page for “There is Undeniable Mathematical Evidence the Election is Being Stolen” where the Red Elephant team continues to add more and more glaring examples.  This fight is just beginning.


About The Red Elephants

The Red Elephants is an organization of like-minded conservatives that have come together to spread awareness and truth. Each member of The Red Elephants organization represents the liberties, freedoms, and constitutional rights of the American people.

Our goal is to spread the truth to the citizens of this great nation by reporting news and promoting free-thinking. We will present a new brand of reporting that will be used to give conservatives a voice in the media that’s dominated by the left.

”We Are Spreading Conservative Truth For The Greater Good.” – The Red Elephants (www.theredelephants.com)

The Red Elephants

The post Undeniable Mathematical Evidence the 2020 Election is Being Stolen appeared first on AmmoLand.com.

guns

via AmmoLand.com https://ift.tt/2okaFKE

November 9, 2020 at 03:27PM

Laravel Jetstream: How it Works and Example How to Customize [VIDEO]

Laravel Jetstream: How it Works and Example How to Customize [VIDEO]

https://www.youtube.com/watch?v=d8YgWApHMfA

Laravel Jetstream came as a new Auth solution with Laravel 8, with a lot of tech-stack that may be new to many Laravel users.

programming

via Laravel News Links https://ift.tt/2dvygAJ

November 9, 2020 at 07:48PM

The Python RegEx Cheat Sheet for Budding Programmers | MakeUseOf

The Python RegEx Cheat Sheet for Budding Programmers | MakeUseOf

https://ift.tt/3laVPzF

The use of Python to solve various tech problems and its easy learning curve has made it one of the most popular modern programming languages. Despite being quick to learn, its regular expressions can be tricky, especially for newcomers.

Although Python has a lot of libraries, it’s wise that you know your way around its regular syntaxes. Even if you’re an expert at it, there’s a chance that you still need to occasionally look-up some Python commands to refresh your memory.

For that reason, we’ve prepared this Python regular expressions cheat sheet to help you get a better hold of your syntaxes.

FREE DOWNLOAD: This cheat sheet is available as a downloadable PDF from our distribution partner, TradePub. You will have to complete a short form to access it for the first time only. Download the Python RegEx Cheat Sheet for Budding Programmers.

The Python RegEx Cheat Sheet for Budding Programmers

Get Creative When Using Python

Learning Python’s regular expressions is a big step towards becoming a better Python programmer, but that’s just one of the few things you need to do.

However, playing around with its syntaxes and getting creative with them polishes your coding skill. So beyond learning the syntaxes, use them in real-life projects and you will become a better Python programmer.

Expression Action Examples
print() Display the result of a command x="Hello world"
print(x)

output: Hello world

input() Collect inputs from users print(input("what is your name?"))

output: what is your name?

type() Find the type of a variable x="Regular expressions"
type(x)

output:

len() Find the number of items in a variable len([1, 2, 3])

output: 3

\ Escape a character that changes the intent of a line of code print("I want you to add\"\"")

output: I want you to add""

\n Break a string character to start on the next line print("This is a line \n This is a second line")

output:
This is a line
This is a second line

def function_name(parameter):
commands
Initiate a function with an optional parameter def yourName(x):
print(x+1)
lambda Call an anonymous function add_3_to = lambda y: y+3
print(add_3_to(4))

output: 7

return Return a result from a function def yourName(x):
return x+1
class Create a Python object class myClass:
def myFunc(x):
def __init__ Initialize the attrributes of a class class myClass:
def __init__(self, attributes…)
"__init__.py Save a file containing a module so that it’s read successfully in another Python file Rename a file containing a module as:

"__init__.py

int() Convert a variable to integer int(1.234)

output: 1

str() Convert a variable to string str(1.234)

output: ‘1.234’

float() Convert a variable to float float(23)

output: 23.0

dict(Counter()) Convert a list or a tupple into a dictionary after sorting with a Python built-in Counter from collections import Counter
dict(Counter([1,1,2,1,2,3,3,4]))

output: {1: 3, 2: 2, 3: 2, 4: 1}

round() Round up the output of an operation to the nearest whole number round(23.445)

output: 23

round(operation or number, decimal places) Round up the output of an operation to a specific number of decimal places round(23.4568, 2)

output: 23.46

if: Initiate a conditional statement if 2<3:
print("Two is smaller")
elif: Make a counterstatement when the if statement is False if 2<3:
print("Two is smaller")
elif 2==3:
print("Go on")
else: Make a final counterstatement if other conditions are False if 2<3:
print("Two is smaller")
elif 2==3:
print("Go on")
else:
print("Three is greater")
continue Ignore a condition and execute the rest of the loop a=[1, 4, -10, 6, 8]
for b in a:
if b<=0:
continue
print(b)

output:
1
4
6
8

break Terminate the flow of a loop with a given condition a=[1, 4, -10, 6, 8]
for b in a:
if b>=6:
break
print(b)

output:
1
4
-10

pass Ignore a set of prior instructions for b in a:
pass
try, except Try a block of code, else, raise a defined exception try:
print(a)

except:
print("An error occured!")

output: An error occured!

finally Execute a final code when the try and the except blocks fail try:
print(a)

except:
print(d)
finally:
print("You can’t print an undefined variable")

output: You can’t print an undefined variable

raise Exception() Raise an exception that stops the command when execution isn’t possible a=7+2
if a<10:
raise Exception("Oh! You didn’t get a score of 10")
import x Import a whole module or library import math
from x import y Import a library x from a file, or a class y from scipy.stats import mode
as Customize an expression to your preferred name import pandas as pd
in Check if a value is present in a variable x=[1, 4, 6, 7]
if 5 in x:
print("There is a five")
else:
print("There is no five")

output: There is no five

is Check if two variables refer to a single element x=[1, 4, 6, 7]
x=b
print(x is b)
True
None Declare a null value x=None
< Check if one value is lesser than another 5<10

output: True

> Check if one value is more than another 5>10

output: False

<= Check if a value is lesser or equal to another 2*2<=3

output: False

>= Check if a value is greater or equal to another 2*2>=3

output: True

"== Check if a value is exactly equal to the other 3==4

ouput: False

!= Ascertain that a value is not equal to the other 3!=4

ouput: True

import re Import Python’s built-in regular expressions import re
re.findall("strings", variable)
a|b Check if either of two elements are present in a string import re
someText="Hello regular expression"
a=re.findall("regular|Hello", someText)
print(a)

output: [‘Hello’, ‘regular’]

string$ Check if a variable ends with a set of strings import re
someText="Hello regular expression"
a=re.findall("expression$", someText)

output: [‘expression’]

^string Check if a variable starts with a set of strings import re
someText="Hello regular expression"
a=re.findall("^Hello", someText)
print(a)

output: [‘Hello’]

string.index() Check the index position of a string character a= "Hello World"
a.index(‘H’)

output: 0

string.capitalize() Capitalize the first character in a set of strings a= "Hello World"
a.capitalize()

output: ‘Hello world’

string.swapcase() Print the first letter of each word as a lower case and the others as upper case a= "Hello World"
a.swapcase()

output:
‘hELLO wORLD’

string.lower() Convert all the strings to a lowercase a= "Hello World"
a.lower()

output: ‘hello world’

string.upper() Convert all strings to uppercase a= "Hello World"
a.upper()

output: ‘HELLO WORLD’

string.startswith() Check if a string starts with a particular character a= "Hello World"
a.startswith(‘a’)

output: False

string.endswith() Check if a string ends with a particular character a= "Hello World"
a.endswith(‘d’)

output: True

string.split() Separate each word into a list a= "Hello World"
a.split()

output: [‘Hello’, ‘world’]

strings {}’.format() Display an output as string a=3+4
print("The answer is {}".format(a))

output: The answer is 7

is not None Check if the value of a variable is not empty def checknull(a):
if a is not None:
return "its full!"
else:
return "its empty!"
x%y Find the remainder (modulus) of a division 9%4

output: 1

x//y Find the quotient of a division 9//4

output: 2

"= Assign a value to a variable a={1:5, 3:4}
"+ Add elements together ["a two"] + ["a one"]

output: [‘a two’, ‘a one’]

1+3

output=4

"- Find the difference between a set of numbers 3-4

output=-1

"* Find the product of a set of numbers 3*4

output:12

a+=x Add x to variable a without assigning its value to a new variable a=2
a+=3

output: 5

a-=x Subsract x from variable a without assigning it to a new variable a=3
a-=2

output: 1

a*=x Find the product of variable a and x without assigning the resullt to a new variable a=[1, 3, 4]
a*=2

output: [1, 3, 4, 1, 3, 4]

x**y Raise base x to power y 2**3

output: 8

pow(x, y) Raise x to the power of y pow(2, 3)

output: 8

abs(x) Convert a negative integer to its absolute value abs(-5)

output: 5

x**(1/nth) Find the nth root of a number 8**(1/3)

output: 2

a=b=c=d=x Assign the same value to multiple variables a=b=c=d="Hello world"
x, y = y, x Swap variables x = [1, 2]
y = 3
x, y = y, x
print(x, y)

output:
3 [1, 2]

for Loop through the elements in a variable a=[1, 3, 5]
for b in a:
print(b, "x", "2", "=", b*2)

output:
1 x 2 = 2
3 x 2 = 6
5 x 2 = 10

while Keep looping through a variable, as far as a particular condition remains True a=4
b=2
while b<=a:
print(b, "is lesser than", a)
b+=1

output:
2 is lesser than 4
3 is lesser than 4
4 is lesser than 4

range() Create a range of positive integers between x and y x=range(4)
print(x)
range(0, 4)
for b in x:
print(b)

output:
0
1
2
3

sum() Iterate through the elements in a list print(sum([1, 2, 3]))

output:6

sum(list, start) Return the sum of a list with an added element print(sum([1, 2, 3], 3))

output: 9

[] Make a list of elements x=[‘a’, 3, 5, ‘h’, [1, 3, 3], {‘d’:3}]
() Create a tupple—tupples are immutable x=(1, 2, ‘g’, 5)
{} Create a dictionary a={‘x’:6, ‘y’:8}
x[a:b] Slice through a list x=[1, 3, 5, 6]
x[0:2]

output: [1, 3]

x[key] Get the value of a key in dictionary x a={‘x’:6, ‘y’:8}
print(a[‘x’])

output: 6

x.append() Add a list of values to an empty list x=[1]
x.append([1,2,3])
print(x)

output: [1, [1,2,3]]

x.extend() Add a list of values to continue an existing list without necessarily creating a nested list x=[1,2]
x.extend([3,4,6,2])
print(x)

output:
[1, 2, 3, 4, 6, 2]

del(x[a:b]) Delete an item completely from a list at a specific index x=[1,2,3,5]
del(x[0:2])
print(x)

output: [2,3,5]

del(x[key]) Delete a key and a value completely from a dictionary at a specific index y={1:3, 2:5, 4:6, 8:2}
del(y[1], y[8])
print(y)

output= {2:5, 4:6}

dict.pop() Pop out the value of a key and remove it from a dictionary at a specific index a={1:3, 2:4, 5:6}
a.pop(1)

output: 3

dict.popitem() Pop out the last item from a dictionary and delete it a={1:2, 4:8, 3:5}
a.popitem()

output: (3, 5)
print(a)
output: {1:2, 4:8}

list.pop() Pop out a given index from a list and remove it from a list a=[1, 3, 2, 4, 1, 6, 6, 4]
a.pop(-2)

output: 6
print(a)
output: [1, 3, 2, 4, 1, 6, 4]

clear() Empty the elements of a list or a dictionary x=[1, 3, 5]
x.clear()
print(x)

output: []

remove() Remove an item from a list x=[1, 5, 6, 7]
x.remove(1)

output: [5, 6, 7]

insert() Insert elements into a llist x=[3, 5, 6]
x.insert(1, 4)
print(x)

output: [1, 4, 3, 5, 6]

sort(reverse=condition) Reverse the direction of the elements in a list x=[1, 3, 5, 6]
x.sort(reverse=True)
print(x)

output: [6, 5, 3, 1]

update() Update a dictionary by changing its first element and adding any other item to its end x={1:3, 5:6}
x.update({1:4, 8:7, 4:4})
print(x)

output: {1: 4, 5: 6, 8: 7, 4: 4}

keys() Show all the keys in a dictionary a={1:2, 4:8}
a.keys()

output: dict_keys([1, 4])

values() Show all the values in a dictionary a={1:2, 4:8}
a.values()

output: dict_values([2, 8])

items() Display the keys and the values in a dictionary a={1:2, 4:8}
a.items()

output: dict_items([(1, 2), (4, 8)])

get(key) Get the value of an item in a dictionary by its key a={1:2, 4:8, 3:5}
a.get(1)

output: 2

setdefault(key) Return the original value of an element to a dictionary a.setdefault(2)
f={**a, **b} Merge two dictionaries a={‘x’:6, ‘y’:8}
b={‘c’:5, ‘d’:3}
f={**a, **y}
print(f)

output:{‘x’: 6, ‘y’: 8, ‘c’: 5, ‘d’: 3}

remove() Remove the first matching value of an element from a list without minding its index a=[1, 3, 2, 4, 4, 1, 6, 6, 4]
a.remove(4)
print(a)

output: [1, 3, 2, 4, 1, 6, 6, 4]

memoryview(x) Access the internal buffers of an object a=memoryview(object)
bytes() Convert a memory buffer protocol into bytes bytes(a[0:2])
bytearray() Return an array of bytes bytearray(object)
# Write a single line of comment or prevent a line of code from being executed # Python regex cheat sheet
""" """ Write a multi-line comment """The Python regex cheat sheet is good for beginners
It’s equally a great refresher for experts"""
Command Line
pip install package Install an online library pip install pandas
virtualenv name Use virtaulenv to create a virtual environment virtualenv myproject
mkvirtualenv name Use virtual environment wrapper to create virtual environment mkvirtualenv myproject
python file.py Run the commands in a Python file "python my_file.py
pip freeze List out all the installed packages in a virtual environment pip freeze
pip freeze > somefiles Copy all installed libraries in a single file pip freeze > requirements.txt
where Find the installation path of Python where python
–version Check the version of a package python –version
.exe Run a Python shell python.exe
with open(file, ‘w’) Write to an existing file and overwrite its existing content with open(‘regex.txt’, ‘w’) as wf:
wf.write("Hello World!")
with open(file, ‘r’) Open a file as read-only with open(‘regex.txt’, ‘r’) as rf:
print(rf.read()
with open(file, ‘a’) Write to a file without overwriting its existing content with open(‘regex.txt’, ‘a’) as af:
af.write("\nHello Yes!")
file.close Close a file if it’s not in use af=open(‘regex.txt’)
af.close
exit Exit the Python shell exit()

non critical

via MakeUseOf.com https://ift.tt/1AUAxdL

November 7, 2020 at 03:10PM