SACRAMENTO, CA—California has leveraged one of its recent emergency declarations to declare Christmas caroling a felony.
Christmas caroling is now punishable by 25 years in prison, as it’s detrimental to the public health. In addition to being a potential super-spreader of COVID, Governor Gavin Newsom says he “hates singing” and wishes people would just “cut it out with all the jolliness and joy.”
“Dangerous gangs of outlaws going door to door singing loudly — this must stop,” said Gavin Newsom. “The SCIENCE! says we must wear masks when singing and sing only beneath a standard speaking voice, and these deranged lunatics are going from house to house just shouting COVID all over people’s faces.”
“Furthermore, they are singing insurrectionist lyrics about some ‘King’ who has come to overthrow the earthly governments. I don’t know who this guy is, but this is a clear case of sedition. I’m in charge here!”
Several county sheriffs have already said they will not enforce the law, causing Newsom to question whether they are agents of this coming King.
The Mandalorian’s Explosive Finale Blew Our Minds and Imploded Its World
https://ift.tt/3mDSxFm
An imposing silhouette.Photo: Disney
The credits have rolled on season two of The Mandalorian and we still can’t believe what happened—storylines from both seasons all came to a head in an epic mission to save Baby Yoda/Grogu. We were granted some exciting, intense Star Wars action, plus massive revelations teasing everything to come.
I absolutely want to geek out about what happens at the end of the episode, but let’s start at the beginning. It was no surprise to find out Chapter 16 of The Mandalorian was called “The Rescue,” since we knew that’s where Din Djarin (Pedro Pascal) and his new posse of badasses were headed. What was surprising was how it started. First with Boba Fett’s (Temuera Morrison) Slave 1 hijacking an Imperial Shuttle and kidnapping Dr. Pershing (Omid Abtahi). Next, a stop to meet up with Bo-Katan Kryze (Katee Sackhoff) and Koska Reeves (Mercedes Varnado) so Mando can ask for help by using the fact that he knows where Moff Gideon (Giancarlo Esposito) is. But the tension between Kryze and the clone wearing the same armor as her (Boba Fett, of course) is palpable. Reeves and Fett get into it a bit before calling a quick truce to tackle the bigger problem: rescuing Grogu and retrieving Bo-Katan’s Darksaber.
The plan is solid; crash a hijacked Imperial shuttle onto Moff Gideon’s giant cruiser and have Bo-Katan, Cara, Koska, and Fennic draw the trooper’s attention while Mando slips off to grab Grogu. Luckily, Dr. Pershing has no loyalty whatsoever and offers up every piece of information imaginable, including ship layouts, Grogu’s exact location, and, most importantly, that Dark Troopers aren’t people at all—they’re droids.
G/O Media may get a commission
This crew. Screenshot: Disney+
Once onboard, the Star Wars Avengers absolutely decimate everything on the ship. Seeing those four women kicking unholy amounts of ass somehow brought to mind the weird, fanservice-y moment at the end of Avengers: Endgame where all the women came together. Here, they did the same thing, but it was actually motivated and driven by the story and that made it great. With their combined efforts, they take the ship relatively easily, arriving at the bridge to find Moff Gideon missing.
Meanwhile, Mando has two goals. One, get rid of the Dark Troopers before they get activated and two, find his widdle babby! Step one proved fairly challenging, though, because the Troopers were activated just as Mando arrived. While he was able to shoot the majority of them out of the airlock, one managed to get out, and that one trooper was more than a match for Mando. If it wasn’t for his beskar (which Bo-Katan makes a point of saying is the one thing the Darksaber can’t cut through early in the episode), the repeated punches to the head would’ve killed him. A long struggle occurs and Mando barely wins, only to reach Grogu and find Moff Gideon holding the Darksaber over him.
It sort of felt like an empty threat considering the Child’s importance to him this whole time, but Moff Gideon explains he’s already got Grogu’s blood so Mando can have him…but not the Darksaber. Mando has no interest in Darksaber lore and is fine with that but, of course, Moff Gideon is a bad guy and sneak attacks Mando after his back is turned, resulting in the episode’s 300th or so awesome action scene (props here to director Peyton Reed, returning for his second episode of the season). Finally, this is the battle we’ve been waiting for: Moff Gideon versus the Mandalorian and it didn’t disappoint. Darksaber vs. beskar clashes abound, eventually resulting in the superior warrior, Mando, disarming the Moff and capturing him. Here’s where things got really interesting.
This is a terrifying image.Screenshot: Disney+
Upon entering the bridge with Moff Gideon and the Darksaber, the look on Bo-Katan’s face says it all: She doesn’t like this situation. Apparently, it’s because the Darksaber can’t just be handed off, it must be won in battle. (Tell that to Sabine Wren, who literally just handed it to Bo-Katan on Rebels, but we’ll get back to that.) Mando assumes this is an easy problem to solve and tells her he yields but before the tension can be dispersed, the floated Dark Troopers are back. Moff Gideon knows that a platoon of these troopers would be too much for anyone so he smiles in delight as they fly back onto the ship, march to the bridge and begin pounding on it like a slab of meat in Rocky.
Which is when a lone X-Wing Fighter arrives. Mando’s pals are none too impressed that only one X-Wing has come to help—and you’d be forgiven for assuming it was just the other X-Wing pilots we’d seen this season, Captain Carson Teva or Trapper Wolf—but something seemed different, and Grogu knew it.
We see a lone hooded figure cutting their way through the cruiser, mowing down Dark Troopers left and right…with a green lightsaber. It’s a Jedi. Could it be…? A glimpse of the hilt makes it much more definitive. Meanwhile, back on the bridge, Grogu keeps touching the security screens. He has a connection to this person, whoever it may be. Tensions continue to rise as this mystery Jedi rides the elevator up to the bridge, where he easily dispatches a dozen Dark Troopers in a hallway much like Darth Vader did after the battle of Scarif as he chased the stolen plans to the Death Star.
Black cloak? Green lightsaber? All facilities of the Force on his side? Folks, Luke Skywalker has arrived to help a little baby named Grogu.
And there he is.Screenshot: Disney+
Allow us a quick detour. First, the CGI on Luke looked very bad. Obviously, this takes place mere years after Return of the Jedi so he had to look more like 1983 Mark Hamill than 2020 Mark Hamill, but in the four years since Rogue One’s butchering of Carrie Fisher’s face (and better, but not great, rendition of Peter Cushing) one would think the technology would’ve been better. It was not. Second, while Luke being the Jedi Grogu found through the Force makes the most sense, and is also insanely satisfying for Star Wars fans (I’ll admit, bad CGI aside, the nostalgia made me misty), ultimately, it feels very constrictive to the narrative we’ve been witnessing on The Mandalorian.
It’s true, at this specific time Luke is the most powerful Jedi that we know of and a few years later, he’ll start training a new generation of Jedi, including his sister. But we’ve spent nine movies with Luke’s family—we know what happens to them. Placing Grogu under his tutelage, while logical and thrilling, restricts a bit of what could happen to this plot thread. Basically Grogu and Luke have to separate before Ben Solo (who, at this point, is either a baby or not yet born) betrays Luke, or Grogu dies there. We’re about 99.9% sure it’ll be the former (in the form of some kind of Mando reunion) but the fact that there’s even a slight chance we know how this story could end feels somehow beneath The Mandalorian. The choice makes it a minor side trip from the Skywalker saga rather than its own thing, which is a shame considering how strong this story has been overall. I’d still love to see Luke sit down with Ahsoka and swap some stories though.
Everything we’ve been waiting for. Screenshot: Disney+
All that said, everything after Luke’s arrival is heartbreaking and beautiful. Luke explains he can train Grogu but his attachment to Mando is strong and Grogu needs Mando’s permission to leave. That’s when the biggest character moment of the entire series so far happens as Mando takes off his helmet so Grogu and he can look into each others’ eyes for the first time. It felt very reminiscent of the moment between Darth Vader and Luke at the end of Return of the Jedi. Grogu touches his face and Mando gets extremely emotional, but he knows the child belongs with this powerful Jedi. And so Luke, along with R2-D2 in a brief but fun little appearance, heads off with Grogu as an unhelmeted Mando, and everyone else, stands there and watches.
In a rare post-credit scene, which hopefully you stuck around for, we arrive on Tattooine and Jabba’s old palace in particular. Fennic Shand kills several guards, allowing Boba Fett to arrive casually and kill Bib Fortuna, who was just about to make some small talk. Fett sits in his place, now in charge of the palace, and setting up a new spinoff series called The Book of Boba Fett.
Those two surprises, back to back, ended “The Rescue” on a high note of high notes. The Mandalorian has completed his two-season mission: save the Child, return him to his people. However, odds are you felt a little like I did in this moment, sad to see Mando and Grogu get separated, even if that’s what best for them, and curious about where Mando goes next after being changed by his relationship so drastically. He’s technically now the official owner of the Darksaber and he’s just betrayed his sworn creed for the first (well, second, but you get it) time. We don’t know where he’ll go from here but if Lucasfilm wanted to end The Mandalorian, that episode could have been it. The first story is complete and though it left things even more complicated than it started, the ride was amazing.
I’m not sure if “The Rescue” was the best episode of season two but that’s a testament to just how amazing season two has been. It certainly had everything you’d want in a Star Wars story, plus more, but if you think back to the Krayt Dragon, a Mandalorian siege, the return of Ahsoka, and Boba Fett, it was all so exhilarating. But to see Jedi Master Luke Skywalker there, bad CGI and all, it was hard not to feel that this was the right ending for this part of the story.
The book of Boba Fett begins next year.Screenshot: Disney+
Assorted Musings:
Why didn’t Boba Fett come back? We understand he was a distraction to help the mission go smoothly but they certainly could’ve used an extra blaster or two to help. He obviously went back to pick up Fennic before heading to Tattooine so it seemed odd to just disappear with so much at stake.
How messed up was the Imperial who taunted Cara about blowing up Alderaan? That was cold-blooded.
Remember how Mando warned Moff Gideon he was coming at the end of last week’s episode? Did he make did no preparations for this? He even seemed surprised when they arrived.
I thought it was very cool to get an inside view of TIE Fighters launching from a starship. We’ve seen glimpses of it before but this was our best look yet. Nerdy, yes, but awesome.
The fact that the Darksaber can’t destroy beskar is a fascinating tidbit of information. At first, it seems like an Achilles heel, but then you think about it some more. Since most Mandalorians wear beskar, it suggests the saber should never and could never be used against their own kind. Just an interesting aside, in addition to being a helpful piece of information in this episode.
Maybe Sabine could give Bo-Katan the Darksaber because they’re both “of Mandalore” rather than someone like Din, who is just Mandalorian, and that’s why she needs to win it in battle. That, along with her comments about clones and stuff, really offer an interesting—possibly upsetting—subtext to Bo-Katan.
The moment Moff Gideon tries to kill himself was important. He’s a very proud guy and that might, on the surface, seem out of character—but as Cara mentioned earlier, he is privy to all kinds of information he would not want anyone else to have. Information on clones and Jedis and all kinds of weird stuff. He’s still alive at the end by the way.
It doesn’t come up on the subtitles, but Bib Fortuna definitely says “Maclunky” as Fennic Shand enters the Palace. Oh also, Bib Fortuna was still alive? I didn’t realize. RIP Bib, but all hail crime lord Boba Fett. We’ll be very interested to see what he does with this new stronghold.
For more, make sure you’re following us on our Instagram @io9dotcom.
Data preprocessing is a technique that is used to transform raw data into an understandable format. Raw data often contains numerous errors (lacking attribute values or certain attributes or only containing aggregate data) and lacks consistency (containing discrepancies in the code) and completeness. This is where data preprocessing comes into the picture and provides a proven method of resolving such issues.
Data Preprocessing is that step in Machine Learning in which the data is transformed, or encoded so that the machine can easily read and parse it. In simple terms, the data features can be easily interpreted by the algorithm after undergoing data preprocessing.
Steps involved in Data Preprocessing in Machine Learning
When it comes to Machine Learning, data preprocessing involves the following six steps:
Importing necessary libraries.
Importing the data-set.
Checking and handling the missing values.
Encoding Categorical Data.
Splitting the data-set into Training and Test Set.
Feature Scaling.
Let us dive deep into each step one by one.
Note: The data-set that we will be using throughout this tutorial is as listed below.
❖ Importing Necessary Libraries
Python has a list of amazing libraries and modules which help us in the data preprocessing process. Therefore in order to implement data preprocessing the first and foremost step is to import the necessary/required libraries.
The libraries that we will be using in this tutorial are:
NumPy is a Python library that allows you to perform numerical calculations. Think about linear algebra in school (or university) – NumPy is the Python library for it. It’s about matrices and vectors – and doing operations on top of them. At the heart of NumPy is a basic data type, called NumPy array.
To learn more about the Numpy library please refer to our tutorial here.
The Pandas library is the fundamental high-level building block for performing practical and real-world data analysis in Python. The Pandas library will not only allow us to import the data sets but also create the matrix of features and the dependent variable vector.
You can refer to our playlist here which has numerous tutorials on the Pandas libraries.
The Matplotlib library allows us to plot some awesome charts which is a major requirement in Machine Learning. We have an entire list of tutorials on the Matplotlib library.
Please have a look at this link if you want to dive deep into the Matplotlib library.
So, let us have a look at how we can import these libraries in the code given below:
import numpy as np
import pandas as pd
import matplotlib.pyplot as plt
❖ Importing The Dataset
Once we have successfully imported all the required libraries, we then need to import the required dataset. For this purpose, we will be using the pandas library.
Note:
DataFrames are two-dimensional data objects. You can think of them as tables with rows and columns that contain data.
The matrix of features is used to describe the list of columns containing the independent variables to be processed and includes all lines in the given dataset.
The target variable vector used to define the list of dependent variables in the existing dataset.
iloc is an indexer for the Pandas Dataframe that is used to select rows and columns by their location/position/index.
Now let us have a look at how we can import the dataset using the concepts we learned above.
dataset = pd.read_csv('Data.csv')
x = dataset.iloc[:,:-1].values
y = dataset.iloc[:,-1].values
print(x)
print(y)
While dealing with datasets, we often encounter missing values which might lead to incorrect deductions. Thus it is very important to handle missing values.
There are couple of ways in which we can handle the missing data.
Method 1:Delete The Particular Row Containing Null Value
This method should be used only when the dataset has lots of values which ensures that removing a single row would not affect the outcome. However, it is not suitable when the dataset is not huge or if the number of null/missing values are plenty.
Method 2: Replacing The Missing Value With The Mean, Mode, or Median
This strategy is best suited for features that have numeric data. We can simply calculate either of the mean, median, or mode of the feature and then replace the missing values with the calculated value. In our case, we will be calculating the mean to replace the missing values. Replacing the missing data with one of the above three approximations is also known as leaking the data while training.
➥ To deal with the missing values we need the help of the SimpleImputerclass of the scikit-learn library.
Note
The fit() method takes the training data as arguments, which can be one array in the case of unsupervised learning or two arrays in the case of supervised learning.
transform method returns a self-produced data frame that consists of transformed values after the function specified in its parameter has been applied.
Now that we are well versed with the necessary libraries, modules, and functions needed for handling the missing data in our data set, let us have a look at the code given below to understand how we can deal with the missing data in our example data set.
import numpy as np
import pandas as pd
import matplotlib.pyplot as plt
from sklearn.impute import SimpleImputer

dataset = pd.read_csv('Data.csv')
x = dataset.iloc[:, :-1].values
y = dataset.iloc[:, -1].values
imputer = SimpleImputer(missing_values=np.nan, strategy='mean')
imputer.fit(x[:, 1:3])
x[:, 1:3] = imputer.transform(x[:, 1:3])
print(x)
All input and output variables must be numeric in Machine Learning models since they are based on mathematical equations. Therefore, if the data contains categorical data, it must be encoded to numbers.
➥ Categorical Data represents values in the data set that are non numeric.
The three most common approaches for converting categorical variables to numerical values are:
Ordinal Encoding
One-Hot Encoding
Dummy Variable Encoding
In this article we will be using the the One-Hot encoding to encode and the LabelEncoder class for encoding the categorical data.
One-Hot Encoding
One hot encoding takes a column that has categorical data and then splits the column into multiple columns. Depending on which column has what value, they are replaced by 1s and 0s.
In our example, we will get three new columns, one for each country — India, Germany, and Japan. For rows with the first column value as Germany, the ‘Germany’ column will be split into three columns such that, the first column will have ‘1’ and the other two columns will have ‘0’s. Similarly, for rows that have the first column value as India, the second column will have ‘1’ and the other two columns will have ‘0’s. And for rows that have the first column value as Japan, the third column will have ‘1’ and the other two columns will have ‘0’s.
➥ To implement One-Hot Encoding we need the help of the OneHotEncoder class of the scikit-learn libraries’ preprocessing module and the ColumnTransformer class of the compose module.
Label Encoding
In label encoding, we convert the non-numeric values to a number. For example, in our case, the last column consists of Yes and No values. So we can use label coding to ensure that each No is converted to 0, while each Yes is converted to 1.
Let us apply the above concepts and encode our dataset to deal with the categorical data. Please follow the code given below:
# import the necessary libraries
import numpy as np
import pandas as pd
import matplotlib.pyplot as plt
from sklearn.impute import SimpleImputer
from sklearn.model_selection import train_test_split
from sklearn.preprocessing import LabelEncoder
from sklearn.preprocessing import OneHotEncoder
from sklearn.compose import ColumnTransformer

from sklearn.preprocessing import StandardScaler

# import data set
dataset = pd.read_csv('Data.csv')
x = dataset.iloc[:, :-1].values
y = dataset.iloc[:, -1].values
imputer = SimpleImputer(missing_values=np.nan, strategy='mean')
imputer.fit(x[:, 1:3])
x[:, 1:3] = imputer.transform(x[:, 1:3])
ct = ColumnTransformer(transformers=[('encoder', OneHotEncoder(), [0])], remainder='passthrough')
x = np.array(ct.fit_transform(x))
le = LabelEncoder()
y = le.fit_transform(y)
print("Matrix of features:")
print(x)
print("Dependent Variable Vector: ")
print(y)
❖ Splitting The Data-set into Training Set and Test Set
After we have dealt with the missing data and the categorical data, the next step is to split the data-set into:
Training Set: A subset of the dataset used to train the machine learning model.
Test Set: A subset of the dataset used to test the machine learning model.
You can slice the data-set as shown in the diagram below:
It is very important to split the data-set properly into the training set and the test set. Generally it is a good idea to split the data-set into a 80:20 ratio such that 80 percent data is in training set and 30 percent data is in test set. However, the splitting may vary according to size and shape of the data-set.
Caution: Never train on test data. For example, if we have a model that is used to predict whether an email is spam and it uses the subject, email body, and sender’s address as features and we split the dataset into training set and test set in an 80-20 split ratio then after training, the model is seen to achieve 99% precision on both, i.e. training set as well as the test set. Normally, we would expect lower precision for the test set. So, once we look at the data once again, we discover that many examples in the test set are mere duplicates of examples in the training set because we neglected the duplicate entries for the same spam email. Therefore, we cannot measure accurately, how well our model responds to new data.
Now that we are aware of the two sets that we need, let us have a look at the following code that demonstrates how we can do it:
# import the necessary libraries
import numpy as np
import pandas as pd
import matplotlib.pyplot as plt
from sklearn.impute import SimpleImputer
from sklearn.model_selection import train_test_split
from sklearn.preprocessing import LabelEncoder
from sklearn.preprocessing import OneHotEncoder
from sklearn.compose import ColumnTransformer

from sklearn.preprocessing import StandardScaler

# import data set
dataset = pd.read_csv('Data.csv')
x = dataset.iloc[:, :-1].values
y = dataset.iloc[:, -1].values
imputer = SimpleImputer(missing_values=np.nan, strategy='mean')
imputer.fit(x[:, 1:3])
x[:, 1:3] = imputer.transform(x[:, 1:3])
ct = ColumnTransformer(transformers=[('encoder', OneHotEncoder(), [0])], remainder='passthrough')
x = np.array(ct.fit_transform(x))
le = LabelEncoder()
y = le.fit_transform(y)
x_train, x_test, y_train, y_test = train_test_split(x, y, test_size=0.2, random_state=1)
print("X Training Set")
print(x_train)
print("X Test Set")
print(x_test)
print("Y Training Set")
print(y_train)
print("Y Test Set")
print(y_test)
Output:
X Training Set
[[1.0 0.0 0.0 38.0 50000.0]
 [1.0 0.0 0.0 25.0 58000.0]
 [1.0 0.0 0.0 45.0 80000.0]
 [0.0 0.0 1.0 25.0 60000.0]
 [0.0 0.0 1.0 42.0 32000.0]
 [0.0 0.0 1.0 55.0 70000.0]
 [1.0 0.0 0.0 25.0 90000.0]
 [0.0 1.0 0.0 65.0 80000.0]]
X Test Set
[[0.0 1.0 0.0 35.0 40000.0]
 [0.0 1.0 0.0 25.0 20000.0]]
Y Training Set
[1 1 1 0 0 0 1 0]
Y Test Set
[1 1]
Explaination:
train_test_split() function allows us to split the data-set into four subsets, two for the matrix of features x i.e. x_train and x_test and two for the dependent variable y i.e. y_trainand y_test.
x_train: matrix of features for the training data.
x_test: matrix of features for testing data.
y_train: Dependent variables for training data.
y_test: Independent variable for testing data.
It also contains four parameters, such that:
the first two arguments are for the arrays of data.
test_size is for specifying the size of the test set.
random_state is used to fix the set a seed for a random generator in order to always get the same result.
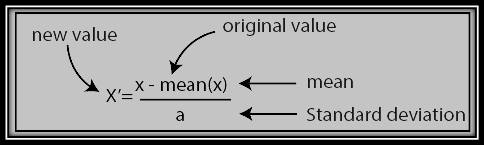
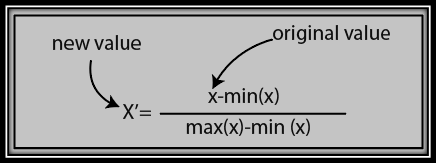
❖ Feature Scaling
Feature scaling marks the final stage of data preprocessing. So, what is feature scaling? It is the technique to standardize or normalize the independent variables or features of the dataset in a specific range. Thus, feature scaling allows us to scale the variables in a specific range so that a particular variable does not dominate another variable.
Feature scaling can be performed in two ways:
➊ Standardization
The formula for standardization is given below:
➋ Normalization
The formula for normalization is given below:
One of the most commonly asked questions among data scientists is: “Should we use Standardization or Normalization for feature scaling?”
Answer: The choice to use normalization or standardization completely depends on the problem and the algorithm being used. There are no strict rules to decide when to normalize or standardize the data.
Normalization is good for data distribution when it does not follow a Gaussian distribution. For example, algorithms that don’t assume any distribution of the data like K-Nearest Neighbors and Neural Networks.
Whereas, Standardization, is helpful in scenarios where the data distribution follows a Gaussian distribution. However, this is not a compulsory rule.
Unlike, normalization, standardization has no bounding range. So, even if the data has outliers, standardization will not affect them.
In our example, we are going to use the standardization technique. Let us have a look at the following code to understand how to implement feature scaling on our dataset.
# import the necessary libraries
import numpy as np
import pandas as pd
import matplotlib.pyplot as plt
from sklearn.impute import SimpleImputer
from sklearn.model_selection import train_test_split
from sklearn.preprocessing import LabelEncoder
from sklearn.preprocessing import OneHotEncoder
from sklearn.compose import ColumnTransformer

from sklearn.preprocessing import StandardScaler

# import data set
dataset = pd.read_csv('Data.csv')
x = dataset.iloc[:, :-1].values
y = dataset.iloc[:, -1].values
imputer = SimpleImputer(missing_values=np.nan, strategy='mean')
imputer.fit(x[:, 1:3])
x[:, 1:3] = imputer.transform(x[:, 1:3])
ct = ColumnTransformer(transformers=[('encoder', OneHotEncoder(), [0])], remainder='passthrough')
x = np.array(ct.fit_transform(x))
le = LabelEncoder()
y = le.fit_transform(y)
x_train, x_test, y_train, y_test = train_test_split(x, y, test_size=0.2, random_state=1)
sc = StandardScaler()
x_train[:, 3:] = sc.fit_transform(x_train[:, 3:])
x_test[:, 3:] = sc.transform(x_test[:, 3:])
print("Feature Scaling X_train: ")
print(x_train)
print("Feature Scaling X_test")
print(x_test)
Initially, we need to import the StandardScaler class of the scikit-learn library using the following line of code:
from sklearn.preprocessing import StandardScaler
Then we create the object of StandardScaler class.
sc = StandardScaler()
After that, we fit and transform the training dataset using the following code:
x_train[:, 3:] = sc.fit_transform(x_train[:, 3:])
Finally, we transform the test dataset using the following code:
x_test[:, 3:] = sc.transform(x_train[:, 3:])
Conclusion
Congratulations! You now have all the tools in your arsenal to perform data preprocessing. Please subscribe and stay tuned for the next section of our Machine Learning tutorial!
Where to Go From Here?
Enough theory, let’s get some practice!
To become successful in coding, you need to get out there and solve real problems for real people. That’s how you can become a six-figure earner easily. And that’s how you polish the skills you really need in practice. After all, what’s the use of learning theory that nobody ever needs?
Practice projects is how you sharpen your saw in coding!
Do you want to become a code master by focusing on practical code projects that actually earn you money and solve problems for people?
Then become a Python freelance developer! It’s the best way of approaching the task of improving your Python skills—even if you are a complete beginner.
This year, we have to find the silver linings wherever we can. One of those glimmering plus-sides is a sudden rise in chicken ownership—at least, I’d call that a silver lining. Chickens are great! (Salmonella outbreaks aside, of course.) And plenty of others seem to think so, too. According to My Pet Chicken, which sells baby chicks and an array of chicken accouterments, its sales rose 525% in April as Americans came to grips with never going anywhere or seeing another human being outside of their household and grocery stores ran out of food.
Well, here we are in December and the pandemic is worse than ever, even as a vaccine dangles on the horizon. Meanwhile, countless families are now deep into the first stages of full-blown chicken ownership, and there are probably a few things they need to keep their flock happy and their sanity intact. I say this as someone who’s had chickens for years—by no means an expert on chickens, but I do know that having chickens becomes a major part of your life. So if you’re now trying to figure out what to get your friend or family member who’s hen-obsessed this holiday season, here are a few Barred Plymouth Rock-solid options.
I’ve said it once, and I’ll say it again: The best thing you can buy a person with chickens is an automatic chicken coop door. These simple contraptions automatically open and close when you want them too, meaning you don’t have to trudge out to the coop at the crack of dawn and be home at sunset every day to close up the chickens and keep them from getting murdered. Which they will if you don’t close the coop door. There are a number of automatic chicken doors out there, but the one I’d go with is ChickenGuard’s “Extreme” door kit, which has all the bells and whistles and won’t break after the first snowstorm. Is it a sexy gift? No, probably not. But it is one that will change a chicken owner’s life—and save the lives of at least a few chickens.
Chances are, if you just got into chickens and don’t live on a working farm, your coop doesn’t have electricity. That means lugging around a flashlight anytime you need to do something in the coop at night, which in my experience isn’t often but happens enough that having a light in the coop is a real bonus. Luckily, we live in the age of cheap LED lights and solar chargers. While I haven’t tested out all the various solar coop lights out there, this Lozayi solar shed and coop light is a good bet. It’s waterproof, frost-proof, has a remote to keep you from fumbling around in the dark for a switch, and it’s cheap enough that if the chickens mess it up, the chicken owner in your life can replace it without too much pain to their bank account.
Here’s something people don’t think about enough before getting chickens: the sheer volume of chicken shit you have to deal with. It’s literally everywhere the chickens are, and it’s almost impossible to avoid when you go anywhere near the chicken run and coop. That means your favorite chicken owner is likely cursing every time they reenter the house after doing whatever with the chickens thanks to the copious amount of chicken crap they’ve tracked in. The Gorilla Grip doormat will make quick work of that under-shoe poo. It’s durable, you can wash it off with the hose, and it comes in a nice array of colors and sizes. It’s a doormat. What more do you want?
If your chicken-owning loved one has a rooster, they also have fertilized eggs. And, because chickens get killed constantly, there’s a good chance they’re going to need more chickens sooner rather than later. But why buy more chickens when you can just make your own? Enter the egg incubator. This handy contraption allows chicken owners to keep eggs at exactly the right temperature for creating baby chicks. There are a lot of incubators out there, but this one from Brinsea is a trusted choice and has room for two dozen eggs, which is important since there will always be a few that fail to hatch.
Are mealworms gross? Yes. Is it weird to have a giant bag of dead bugs in your house? Yes. But chickens love ‘em, and you can easily buy them in bulk. Just make sure to give the person to who you’re gifting the bag of dead bugs a heads up that the gift is mostly for the chickens or they might think 2020 broke your brain.
If you’re looking for a last-minute gift for your chicken-loving loved one, you can’t go wrong with a nice bale of straw. Chicken owners always need more straw as bedding for the coop and for the nesting boxes. Sure, it’s not the sexiest gift in the world. And it’s probably a giant pain in the ass to wrap. But, hey it is practical!
There’s nothing like immersing yourself in a fantasy world, especially with lots of other people alongside you. However, a flawed or expensive outfit can quickly ruin your LARP vibes.
If you don’t have the best crafting skills and prefer to buy gear, there are professionals you can rely on. The following online stores supply all kinds of equipment to LARP events and individual customers. Explore each store’s services and assemble the perfect cost-effective outfit.
What Is LARP?
If you’re a fan of Lord of the Rings, Dungeons and Dragons, or any fantasy RPG video game, then LARPing is a great activity to get into. It stands for Live Action Role Playing and involves group events where everyone dresses up as fantastical characters and acts out a story.
Festivals all over the world, like Germany’s ConQuest, the UK’s Lorien Trust, and Mind’s Eye Society in the US, welcome you as a guest, NPC, or even main character. Some go as far as to provide scripts and fine-tune every detail, from the tavern’s furniture to how spellcasting works.
Above all, there’s a unique freedom to these gatherings. No geek would mind you finding inspiration in popular science fiction books and showing up as Arthur Dent from The Hitchhiker’s Guide to the Galaxy. Steampunk is a particular favorite among LARPing themes too.
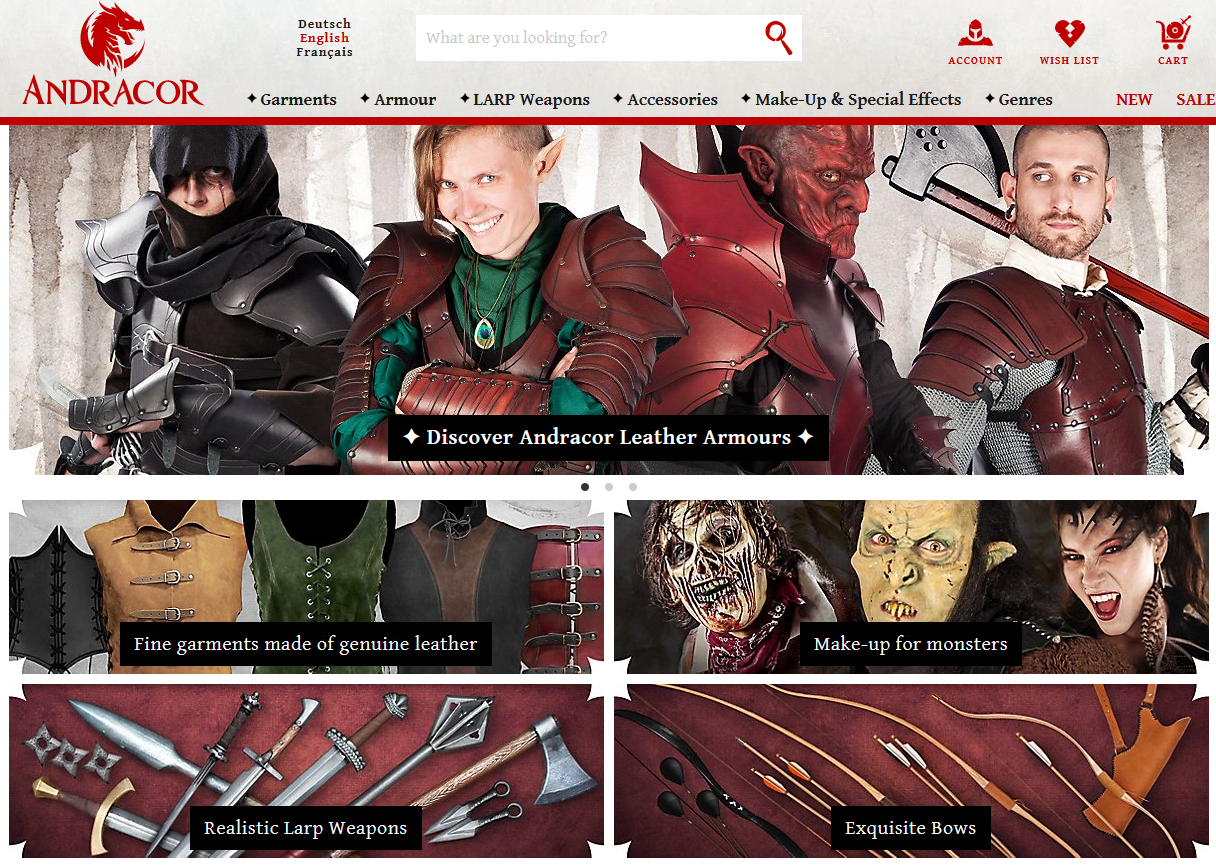
Based in Germany, Andracor is a hallmark name in the LARP community. It offers a huge range of products and shipping to customers worldwide. You’ll find leather armor, broadswords, skull masks, pirate pistols, monster makeup, and so much more.
Prices vary, of course, depending on the item and its quality. A drinking horn holder, for example, is around $12. Jewelry or much simpler products can be cheaper, but expect a full set of plate armor to cost at least a couple hundred dollars.
LARPing is not a cheap hobby. That said, browsing through expert products can inspire you to put your DIY skills to the test and only invest in select items your outfit can’t do without.
This is a UK retailer that also accepts international orders. Chow’s Emporium caters to LARPing demands and also has more unique products, including Oriental styles. The cuts of its tunics, for example, are embellished with extra patterns or fabrics.
Some downsides to the Emporium is that it doesn’t have armor, and its prices reflect the quality of the products. For instance, a jacket and tunic set with faux leather and a mantle will cost you around $326.
As already suggested, you could just get special pieces from here, like unique hats or hip flasks, and combine them with products from other stores or with pieces of your own design. Alternatively, you can always save up and buy the most eye-catching outfit for your next LARP event.
Larp Inn is another major UK-based supplier of LARP equipment. It has been keeping fantasy fans happy for years now, even offering board games like D&D and Warhammer. If what you’re after is definitely armor or a battle ax, the Larp Inn is still a reliable shop to check out.
The quality is good, and although the styles aren’t anything special, it still has some nice Celtic, Samurai, and even steampunk designs. The cost can be just as high as the previous stores on this list, with a breastplate alone reaching over $140. You also have to factor in shipping rates, whether for UK or international destinations.
Once again, smart purchases are the way to go. You can put an outfit together piece by piece without breaking the bank, all while combining different features and giving your look a more personalized touch.
Germany is a great place for LARPing, as it has some of the best suppliers—Your Larp Store is one of them. You can be sure of the quality of the products coming from Your Larp Store, which takes its stock and crafting skills very seriously.
Prices range from around $10 to over $1,000, so choose your investments carefully. A handy part of the platform to check out is the Do It Yourself tab. This contains materials to make your own equipment, like chainrings, leather straps, and silicone spray for weapons.
Alongside additional wares like photo CDs and LARPzeit magazine, Your Larp Store is also a popular source of industry news, especially about ConQuest and similar events.
Canada has its own LARP workshop and store to contribute to the world of LARPing. Its products range from common medieval and fantasy gear to items based on popular video games like The Witcher, Kingdom Come: Deliverance, and Destiny. For around $78 to $188, you can even order a custom sword, ax, or staff.
Simple trinkets, like quills, come to little more than $10. More intricate products, like metal armor, can be over $500. Whether you want pieces of a costume or a whole set, you can control the size of your investment without compromising your outfit’s quality.
Another noteworthy fact is that Calimacil collaborates with fellow creative companies to offer LARPers every possible luxury. Seyrawyn, a fantasy publishing house, stocks the store with books for all ages, while Mythic Workshop adds to its high-end fantasy equipment.
Love of LARP is universal, and the fact that LARP suppliers exist all over the world makes that especially clear. Epic Armoury is located in Denmark and often collaborates with event organizers to create the most immersive environment possible.
That’s why you’ll find a lot of interesting equipment on its website. Roman fire pits, medieval cutlery, potion flasks, skulls, and gold coins are just some special items available. It also has typical fantasy gear, such as armor, clothing, accessories, and so on.
There are some products that are under $10, but anything bigger and more complex than a bracelet will cost more. It also has a DIY section to help LARPers who like to craft their experiences from scratch.
Last but not least, this US company has a vast collection to dive into. Armstreet caters to all medieval tastes, from Viking and Tudor to fairytale styles. It’s not just tunics and dresses you’ll see, but also aprons, headwear, socks, and chemises.
The designs stay loyal to the times, and also cater to LARPers ready to splurge on some extra pieces to make their outfit pop. This includes beautiful jewelry and mirrors, but also archery bracers, cloaks, and belts.
In terms of cost, Armstreet isn’t cheap. A steel and leather mug costs about $44, and that’s typically the lowest price you’ll find here. But when sales go live, you can expect some decent discounts. You just need to time it right and have a specific budget in mind.
Know Your LARP Needs and Suppliers
With a passion for fantasy or medieval themes, you can live the LARP dream. It does take planning and smart spending, however, to avoid going overboard while putting your outfit together.
A great costume really doesn’t have to cost a fortune. At the same time, you can have fun crafting some of its features and refining the overall effect. All you need are the right supplies. Between these top-notch online LARP stores, there’s not much you can’t create.
Readers have asked a number of questions about the AR-15 rifle and/or carbine platform since my article on Tuesday titled "Can a cheap, bargain-basement AR-15 keep up with a high-end model?" A number of them related to the difficulty of obtaining rifles of known quality or provenance, particularly in times of widespread shortages such as this.
First off, let me refer readers to the three-part series on this subject that I wrote earlier this year:
Those articles covered most of the questions. For the rest, here goes with some more answers.
1. An AR-15 has two major parts, an upper receiver and a lower receiver. What’s the difference, and which is most important?
The lower receiver is the part of the AR-15 that’s officially a "firearm", according to Federal law, and is the part that requires a background check when you buy an AR-15 from a dealer. It contains the trigger mechanism that fires the gun, and without it the gun can’t fire: therefore it’s the licensed, registered part. The serial number appears on it (usually engraved or stamped on the magazine well).
A lower receiver is, oddly enough, the least important quality concern when it comes to building an AR-15. As long as you have a stripped (i.e. bare, unequipped) lower that meets military specifications (so-called "mil-spec"), including dimensions, materials and quality, you’re good to go. It’s the parts you put into the lower receiver (pins, springs, and most importantly the trigger group) that make it high- or low-quality. Most AR-15 "home-builders" or modifiers (like myself) source their lower receiver parts kits from decent-quality manufacturers, so there are seldom any issues with them. (That’s exactly what factories do, too, except that they buy their parts by the thousands, whereas we buy them one or two at a time. They come from the same sources.)
For example, my local gun shop currently has a dozen or so parts kits from Anderson Manufacturing – a lower-priced manufacturer – on its rack, and they’re selling like hot cakes. Anderson makes hundreds of thousands of AR-15 rifles, carbines and parts kits every year, so if their parts didn’t work or broke, you’d hear about it in short order from tens of thousands of angry customers. You don’t. Q.E.D. That doesn’t mean that their parts are all necessarily high-quality. Their trigger, for example, is acceptable, but far from stellar. I usually replace them (see below for more details).
The one really important variable in the lower receiver is the trigger group. A stock-standard mil-spec trigger is acceptable, but not much more than that. A "tuned" or "polished" standard trigger is somewhat better. A custom trigger can be head and shoulders above that . . . but the law of diminishing returns applies. You can spend a little more and get a big improvement in trigger quality; but if you spend much more, you won’t necessarily get a much bigger improvement.
In the past, I’ve recommended the single-stage ALG Advanced Combat Trigger ($69), or for those who want maximum accuracy in a designated-marksman-type rifle, the two-stage LaRue Tactical MBT-2S ($80). I recently put two rifles in front of a friend, one fitted with the LaRue trigger, the other with a Geissele trigger costing more than three times as much. I challenged him to tell me which was the more expensive (and therefore presumably "better") trigger. He couldn’t. They were both very good. That being the case, I don’t think it’s worth spending more than the ALG or LaRue units will cost you. I have both. For my general-purpose rifles I stay with the ALG. For two very accurate rifles, that I may use at longer range and therefore want as much trigger control as possible, I use the LaRue.
The upper receiver is, according to Federal law, not a firearm. You can buy it without any license or background check (at least at present). It holds the barrel, bolt carrier group, and everything that goes with them (sights, both optical and mechanical; anything attached to the handguard, like lights, lasers, etc.; brass catchers; etc.). Its components are therefore critical to accuracy, as much as reliability, and you should choose the best you can. I know a large number of people who’ve bought or built the best-quality upper receiver group they could afford, then paired it with a much less expensive mil-spec lower receiver. The performance of the upper receiver isn’t affected by the lower, so the performance of the rifle overall doesn’t suffer – and they save a lot of money. I’ve done that with a Bravo Company 20" upper receiver group, which I’ve paired with a DPMS lower receiver fitted with a high-quality match trigger. That thing’s a tack-driver by anyone’s standards (under 1 MOA with match ammo), and it cost me about two-thirds of what Bravo Company wanted for a full rifle. It’s what I could afford at the time, and I’ve never regretted it.
The basic upper receiver should meet military specifications as to dimensions, quality of metal, etc. Some go further. For example, Bravo Company (one of the top AR-15 manufacturers in the country) is famous (or notorious!) for making its upper receivers to such tight tolerances that it’s really hard work to fit a new barrel to them. One has to take a heat gun, warm up the barrel socket until it expands, fit the barrel into it (usually needing a hammer, lubrication, and a liberal supply of profanity), and then let the socket cool down around it, locking it into place. That’s one of the reasons why Bravo Company rifles, receivers and parts command such high prices. Their reliability and build quality are well-known and respected.
Barrels are, of course, particularly important (for an exhaustive guide to barrels, see here and here). A standard mil-spec barrel, made to meet US military standards, has to shoot its rounds into a 5" group at 100 yards (colloquially referred to as "5 MOA" [minute of angle], although that’s not correct, strictly speaking, in purely mathematical terms). I regard that as hopelessly inadequate. If one of my rifles won’t shoot into 2" at 100 yards from a stable shooting position, I either fix it or replace it! The military barrel also has to last for at least 6,000 rounds before needing replacement. That’s not as much as it sounds: it’s the equivalent of only 200 30-round magazines through the weapon. Just about any commercial barrel will meet those standards, and anything worth the name will be much better than that. Of course, the better barrels will cost more; I’ve paid up to $300 for good-quality examples, and if you go to a custom barrel-maker, you can pay well into four figures for one.
The bolt carrier group (BCG) is also important from the perspective of reliability. A cheap BCG will have a rougher finish (usually phosphate), requiring more lubrication to be reliable. More expensive BCG’s will have a black nitride or nickel boron finish, or even (in the most costly examples) a titanium nitride coating. These slide more easily in the upper receiver, and need less lubrication. (See here and here for more information on BCG coatings.)
A BCG (or representative examples from a production batch) should go through a high-pressure test (HPT) and a magnetic particle inspection (MPI). The gas key should also be properly staked, and the extractor spring good and strong. I willingly pay higher prices for BCG’s from reputable manufacturers, rather than bargain-basement models, because those companies take time and trouble to meet those standards. However, any company selling large numbers of BCG’s will be forced to pay attention to quality, because if they didn’t, they (and we) would rapidly hear about it from dissatisfied customers.
2. In today’s gun market, I can’t find any "name-brand" AR-15’s for sale in local gun shops. Should I buy anything I can get for now, and buy a better one later? Isn’t that throwing my money away?
It depends on your need. If you’re likely to need a rifle or carbine for defensive purposes (e.g. you live in or near an area of urban unrest or rioting, or there are criminal gangs active nearby), then your priorities are very different from someone living on a farm in an isolated area with no likely trouble spots anywhere nearby. If time is of the essence, get the best you can, and plan to upgrade it later – not necessarily selling it, but buying better parts like an improved trigger, etc. If the budget is tight, sure, trade it in against something more to your taste.
It’s also important to test your weapon thoroughly at the range. I know some folks who buy a gun and never shoot it. They simply load it and put it away in case of need. If it’s not the best quality, and may be prone to malfunctions, they’ll only find out about it when they really need it – and that may be too late to do anything to fix it. Rather take your gun to the range and put a couple of hundred rounds through it, to break in and bed down all the moving parts, and make sure there are no malfunctions. If there are, take it back to the vendor and insist that it be fixed or replaced. Your life may depend on it!
If you can’t find an acceptable-quality AR-15, don’t neglect other options. Lever-action rifles have been defending lives (as well as putting meat on the table) for more than one-and-a-half centuries, from the Civil War-era Henry and Spencer rifles to today’s Winchesters, Marlins, Henrys and others. The late, great Jeff Cooper referred to a lever-action rifle or carbine as a modern-day "urban assault rifle", because of their handiness and utility. You can usually get a license for them in even the most restrictive cities, and they do a very good job within their limitations. I have several, and I’ll gladly entrust my life to them if I have to. Other options are pump-action (also known as slide-action) rifles, shotguns, etc. I agree, the AR-15 platform is a very good one for defensive use, and I prefer it: but if I couldn’t afford one, or find a worthwhile example for sale, I wouldn’t be helpless without it.
3. The incoming Biden administration has promised to ban, confiscate or tax AR-15’s. Doesn’t that mean it’s not worth buying one?
I’m not going to tell anyone to break the law. That’s a personal decision each of us has to make. However, I’ll point out three things.
For almost as long as the USA has existed, and particularly during the Civil Rights era, civil disobedience became part of the American political and legal lexicon. Laws were deliberately defied if they were seen as oppressive or discriminatory.
When New York passed its "NY SAFE Act" in 2013, requiring the registration of all so-called "assault weapons" (including AR-15’s), civil disobedience was – and remains – massive. "Based on an estimate from the National Shooting Sports Federation, about 1 million firearms in New York State meet the law’s assault-weapon criteria, but just 44,000 have been registered. That’s a compliance rate of about 4 percent."
When Connecticut passed new gun control legislation in 2013, the same thing happened. "The governor’s new gun law is a dismal, unmitigated failure. According to figures recently released by the state police, approximately 50,000 out of an estimated half-million "assault rifles" in the state of Connecticut were registered under the new gun law. That is a compliance rate of only about 10 percent … The figures are even more acutely low for large capacity magazines. The compliance rate for large capacity magazines appears to be considerably less than 1 percent of the estimated number of affected magazines."
Does anyone expect a national ban or registration requirement to be any more successful? I certainly don’t! Furthermore, the number of gun owners I’ve heard loudly lament the "terrible loss" of all their so-called "assault weapons" and large-capacity magazines in an "unfortunate boating accident" must surely mean that the bottoms of most US dams, lakes, rivers and streams are now several feet deep in firearms!
I’ll also point out the well-known proverb from the days of the Old West: "I’d rather be judged by twelve (i.e. jurors) than carried by six (i.e. pallbearers at my funeral)".
I hope that clarifies the questions I was asked. If you have more, let us know in Comments, and I’ll try to answer them.
LiquidPiston’s ‘Inside-Out’ Rotary X-Engine Wins Army Research Contract
https://ift.tt/2Wl5NUj
Connecticut-based company LiquidPiston is developing a portable generator for the US Army that uses its X-Engine, a fresh and extremely powerful take on the rotary engine that’ll deliver as much power as the Army’s current-gen-set at one-fifth the size. New Atlas reports: We’ve written a few times before about the fascinating LiquidPiston rotary engine. It’s not a Wankel — indeed, it’s closer to an inside-out Wankel — and with only two moving parts, it’s able to deliver extraordinary power density at up to 1.5 horsepower per pound (0.45 kg). According to co-founder and CEO Alec Schkolnik, the X Engine design combines the high compression ratio and direct injection of a diesel engine with the constant volume combustion process of an Otto cycle engine and the over-expansion abilities of an Atkinson cycle engine, while solving the lubrication and sealing issues of the Wankel rotary engine and delivering huge power and efficiency. Check out the design being used in a go-kart and an unmanned aircraft in the video below.
LiquidPiston demonstrated the technology for the US Army by building a Compact Artillery Power System (CAPS) generator unit designed to power the digital fire control system on an M777 Howitzer artillery piece. It replaced a generator that needed a truck to move it around with something 20 percent the size: a 41-lb (18.6-kg), 1.5-cubic foot (28.3-L) box about the size of a gaming PC that can easily be carried by two men. Smartly designed to work in conjunction with a battery in a hybrid system, the 2-kW CAPS generator impressed the Army enough that LiquidPiston has been awarded a Small Business Innovation Research contract to develop it further as a 2-5 kW Small Tactical Generator for a range of military use cases, running on diesel with compression ignition.
Fast Excel is a Laravel package for importing and exporting spreadsheets. It provides an elegant wrapper around Spout—a PHP package to read and write spreadsheet files in a quick and scalable way. It is capable of processing large files, all while keeping the memory usage low.
Here’s an example of exporting models or collections to an Excel file:
use Rap2hpoutre\FastExcel\FastExcel;
use App\User;

// Export a User model
$users = User::all();
(new FastExcel($users))->export('file.xlsx');

// Export a collection Collection
$list = collect([
    [ 'id' => 1, 'name' => 'Jane' ],
    [ 'id' => 2, 'name' => 'John' ],
]);

(new FastExcel($list))->export('file.xlsx');
You can use the download method to force the user’s browser to download a file:
return (new FastExcel(User::all()))->download('file.xlsx');
You can also import and export multiple sheets:
$sheets = new SheetCollection([
    User::all(),
    Project::all()
]);
(new FastExcel($sheets))->export('file.xlsx');
Learn More
You can learn more about this package, get full installation instructions, and view the source code on GitHub at rap2hpoutre/fast-excel.
The USPTO Patent Litigation Dataset: Open Source, Extensive Docket and Patent Number Data
https://ift.tt/3oXWhTr
Guest Post by Prof. Ted Sichelman, University of San Diego School of Law
Many online services provide district court patent litigation dockets, documents, and associated patent numbers. However, none of these services offer comprehensive, hand-coded patent numbers and case types, plus full dockets and key documents (complaints, summary judgments, verdicts), downloadable in bulk at no charge and with no license restrictions.
After more than three years of extensive automated and manual review of patent dockets, the USPTO’s Office of the Chief Economist —in conjunction with researchers from the University of San Diego’s Center for IP Law & Markets (myself) and Northwestern Law School (David L. Schwartz)—have completed that very goal, expanding upon the patent litigation dataset the USPTO had released in 2015.
Dockets: The complete docket for every lawsuit filed in district courts tagged as a patent action in PACER (and many other patent cases tagged under non-patent PACER codes) from the first patent case logged in PACER through the end of 2016 (over 80,000 case dockets).
Attorneys & Parties: Full lists of parties by type (e.g., plaintiff, defendant, intervener, etc.) and their attorneys, with full contact information for the attorneys gathered from public records.
Patent Numbers: Comprehensive, hand-coded patent numbers by a team over 30 law students from all electronically available complaints in PACER in cases filed from 2003 through the end of 2016.
Based on testing against several of the leading commercial services, plus publicly available data from the Stanford NPE Litigation Database, the dataset’s patent number information is substantially more complete and accurate than any of these services (which often use automated methods for determining patents-in-suit).
Case Types: Every case in PACER filed from 2003 through the end of 2016 is identified with one of 15 fine-grained case types, including patent infringement (non-declaratory judgement [DJ]), DJ on non-infringement and invalidity, DJ on non-infringement only, DJ on invalidity only, false marking, inventorship, malpractice, regulatory challenge, and others.
In the next few months, the USPTO will make available:
Documents: Initial complaints, summary judgment orders, and verdicts (bench and jury) that are electronically available for all patent cases in PACER filed from 2003 through the end of 2016.
The data is downloadable only in bulk and is not searchable at the USPTO website. However, it is relatively straightforward to download and search the patent number, case type, and attorney data, in Microsoft Excel or other database and statistical packages.
Importantly, there are no licensing restrictions whatsoever on the use of the data, and the research team and USPTO expect that commercial and non-commercial services will add the information to their search interfaces in the coming year. Additionally, the research team is hoping to update all of the data for patent cases filed through the end of 2020 sometime next year. Further down the road, we hope to code cases for outcomes and add appeals by supplementing Jason Rantanen’s comprehensive Compendium of Federal Circuit Decisions with full dockets and key documents.
In examining litigation trends, many researchers across the academic, public, and private sectors have used proprietary datasets, which generally could not be disclosed to other researchers for study replication and testing. Hopefully, academics and others will now use the USPTO’s fully open dataset for studies on the U.S. patent litigation system to allow for meaningful review of empirical studies.
Documentation on the database is available here and at the USPTO webpage. Anyone interested in using the data is also welcome to contact me (tsichelman@sandiego.edu) with technical and other questions.
legal_stuff
via Patent Law Blog (Patently-O) https://patentlyo.com
 Note: The data-set that we will be using throughout this tutorial is as listed below.