That clip is definitely worse, but it reminded me of this one where the dude falls into the smelting oven. https://t.co/0dutWqP4jH pic.twitter.com/QCMakxLVzg
— 𝐓𝐡𝐞𝐃𝐞𝐚𝐝𝐩𝐨𝐨𝐥 (@JoshD0110) August 28, 2021
Trace element analysis: 0.01% employee remains
Just another WordPress site
That clip is definitely worse, but it reminded me of this one where the dude falls into the smelting oven. https://t.co/0dutWqP4jH pic.twitter.com/QCMakxLVzg
— 𝐓𝐡𝐞𝐃𝐞𝐚𝐝𝐩𝐨𝐨𝐥 (@JoshD0110) August 28, 2021
Trace element analysis: 0.01% employee remains
https://blog.finxter.com/wp-content/uploads/2021/08/image-33.png
When it comes to developing web applications in Python there are lots of frameworks. Some examples are Pyramid, Web2Py, Bottle or CherryPy, among others. However, the two most popular ones are Flask and Django.
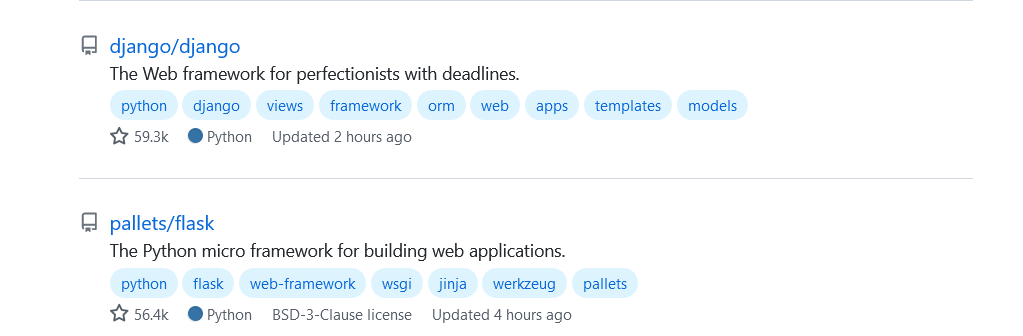
We can confirm this fact by having a look at the most starred Python libraries in GitHub:
As we will see in this post, both of these frameworks follow very different design principles. Thus, we can not conclude that one is superior to the other. To choose the one that is best for you comes down to which type of application you want to build. In this article we will deep in the advantages and disadvantages of both of these frameworks. Therefore, you can make an informed decision on which one better fits your needs.
Flask is a microframework conceived to develop web applications in Python. It started in 2010 as an April Fools Day Joke. The key concept in Flask is the word “micro” that refers to the fact that its core is simple but extensible. Because of that it can be learned fast and has a good learning curve. For instance, the Flask hello world app can be written in just five lines of code.
from flask import Flask

app = Flask(__name__)

@app.route("/")
def hello_world():
    return "<p>Hello, World!</p>"
And to initialize the server you must type the following command in the terminal, which runs the app by default on the URL http://127.0.0.1:5000.
$ FLASK_APP=hello.py flask run
Flask has been designed to start web development quickly and easily. This makes it ideal for building prototype applications. The word that best defines it is “minimalism”, as all that Flask includes are four main components: a template engine (named Jinja2), URL routing, error handling and a debugger. That means that a Flask application is lightweight. In turn, as it does not have to run a lot of code it is also a little bit faster than Django.
But Flask’s minimalism does not mean that you can’t build great web applications with it. Instead Flask is flexible, like a Lego construction set. All the functionalities expected from a web application like an Object-Relational mapping (ORM), security, authentication, data validation, etc. are delegated to third-party libraries that you must choose on. Moreover, there are extensions like Flask-Security that bundle together security libraries that people typically use with Flask.
However, Flask’s flexibility comes with many drawbacks. First, two Flask applications can follow very different patterns, which means that it can be hard for a developer to switch from one to another. Second, as Flask’s extensions are developed by different teams, a Flask app is more prone to security risks and requires more time to keep it updated. Last, because of the use of different libraries the documentation that you can find is very spread over the internet.
Django is a “full stack” web framework that can tackle scalable and high quality web applications. It was publicly released in 2005, but it started earlier as a Python CMS at the Lawrence Journal-World newspaper. In contrast with Flask, Django forces you to do things their own way. Thus, it has a steeper learning curve and can be more intimidating to beginners.
A Django application involves at least the use of three files, and four when a data model is involved. To create a hello world application with Django is as follows.
First, we create a Django project in a folder called config.
$ django-admin startproject config .
We then create an app named pages by typing the following command. This creates a pages folder, located at the same level of the config folder, containing different files.
$ python manage.py startapp pages
In the next step we update the file pages/views.py to make it look as follows:
from django.http import HttpResponse

def helloPageView(request):
    return HttpResponse("Hello, World!")
Then we update the file pages/urls.py with the following code:
from django.urls import path
from .views import helloPageView

urlpatterns = [
    path('', helloPageView, name='home')
]
The last file to update is the config/urls.py file:
from django.contrib import admin
from django.urls import path, include

urlpatterns = [
    path('admin/', admin.site.urls),
    path('', include('pages.urls'))
]
Finally, we can run our Django hello world application with the following command, which starts the server on the URL http://127.0.0.1:8000.
$ python manage.py runserver
As we have seen in this example, the hello world Django application involves much more steps than the same application with Flask.
Django follows the principle of “Don’t Repeat Yourself” and includes all the components that are needed to build a web application. It has out of the box templating, forms, routing, authentication, database administration among other features. It requires less decisions to be made by you. Because of that, an experienced Python developer who wants to dig into web development can do it in a relatively short amount of time. This also means that Django projects follow a pattern making them very similar one to another.
When you use Django you are forced to use its ORM, which assumes that you are going to use a relational database. It officially supports databases like MariaDB, MySQL or SQLite among others. With Django’s ORM you can do almost every operation that an ordinary web app needs. In addition to that, it allows you to write your own SQL queries. The negative side of it is that you can forget about using a NoSQL database like MongoDB with Django.
In terms of security, Django is very reliable as it incorporates features like protection against SQL injection and cross site scripting (XSS) attacks, the possibility to enable HTTPS protection, or JSON web tokens (through external libraries). So it is very suitable for applications that require their users to authenticate or that involve monetary transactions.
Another great aspect of Django is its community. As a popular web framework, Django has a very big community with lots of documentation available online. For instance it has more than 200k tagged questions on Stack Overflow.
But the Django way of doing things, handling everything for you, can also be a drawback as it produces monolithic servers that act as a single unit. This means that it is not possible to develop a microservice architecture with Django.
As a summary these are the main differences between Flask and Django.
| Flask | Django | |
| Type of framework | Microframework with lightweight code | Full stack, provides everything you need |
| Learning | Easy to learn | Steeper learning curve |
| Project size | For smaller and less complicated projects | For larger projects |
| Project layout | Arbitrary | Follows a pattern |
| Templates | Relies on Jinja2 engine | Built-in engine |
| Databases | Lack of ORM but can work with many different databases through libraries | Own ORM for relational databases like MariaBD, MySQL, SQLite, etc. |
| Admin | Can be done with the Flask-Admin extension | Built-in panel for admin tasks |
| Security | Depends on the security of external libraries | Built-in security features |
| API | Supports API | Does not support API |
| Flexibility | Very flexible, allowing developers to add their own libraries | Low, developers must follow Django’s rules |
| Performance | Slightly better | Sufficient for any application |
As you might know, Finxter.com promotes remote work by helping people to start their careers as Python freelance developers. Two well established websites where freelancers can apply to projects posted by companies are Freelancer.com and Upwork.
At the time of writing, we can find at Freelancer.com 82 projects when we search for the keyword Django and 14 projects when we search for Flask.


If we look at Upwork the number of projects are higher for both frameworks. In particular, we find 717 Django projects and 336 Flask projects.


We see that Upwork has a substantially higher number of projects to apply in terms of Python web development. We also see a higher number of Django projects on both websites .
However, the above numbers are snapshots and can vary depending on the time we take them. But if we look at time series like worldwide searches of Flask and Django in the last five years, provided by Google trends, we can confirm that there is a higher interest in Django.

As we have seen in this post Flask and Django are two sides of the same coin. Now that we know all that they offer, this is my recommendation on which cases are best to use one or the other.
Better to use Flask if:
But you better use Django if:
The post Flask vs Django: Comparing the Two Most Popular Python Web Frameworks first appeared on Finxter.Finxter
https://packalyst.com/assets/img/logo.png
A dynamic, responsive Laravel Livewire table component with searching, sorting, checkboxes, and pagination.
Make sure you’ve installed Laravel Livewire.
Installing this package via composer:
composer require kdion4891/laravel-livewire-tables
This package was designed to work well with Laravel frontend scaffolding.
If you’re just doing scaffolding now, you’ll need to add the Livewire @livewireScripts and @livewireStyles blade directives to your resources/views/layouts/app.blade.php file:
<!-- Styles -->
<link href="" rel="stylesheet">
@livewireStyles

...

<!-- Scripts -->
<script src=""></script>
@livewireScripts
This package also uses Font Awesome for icons. If you don’t already have it installed, it’s as simple as:
npm install @fortawesome/fontawesome-free
Then add the following line to resources/sass/app.scss:
@import '~@fortawesome/fontawesome-free/css/all.min.css';
Now all that’s left is to compile the assets:
npm install && npm run dev
Using the make command:
php artisan make:table UserTable --model=User
This creates your new table component in the app/Http/Livewire folder.
After making a component, you may want to edit the query and column methods:
class UserTable extends TableComponent
{
    public function query()
    {
        return User::query();
    }

    public function columns()
    {
        return [
            Column::make('ID')->searchable()->sortable(),
            Column::make('Created At')->searchable()->sortable(),
            Column::make('Updated At')->searchable()->sortable(),
        ];
    }
}
You don’t have to use the render() method in your table component or worry about a component view, because the package handles that automatically.
You use table components in views just like any other Livewire component:
@livewire('user-table')
Now all you have to do is update your table component class!
$table_classSets the CSS class names to use on the <table>. Defaults to table-hover.
Example:
public $table_class = 'table-hover table-striped';
Or, via .env to apply globally:
TABLE_CLASS="table-hover table-striped"
$thead_classSets the CSS class names to use on the <thead>. Defaults to thead-light.
Example:
public $thead_class = 'thead-dark';
Or, via .env to apply globally:
TABLE_THEAD_CLASS="thead-dark"
$header_viewSets a custom view to use for the table header (displayed next to the search).
Example:
public $header_view = 'users.table-header';
Protip: any view you reference in your table component can use Livewire actions, triggers, etc!
<button class="btn btn-primary" wire:click="createUser">Create User</button>
$footer_viewSets a custom view to use for the table footer (displayed next to the pagination).
Example:
public $footer_view = 'users.table-footer';
$checkboxBoolean for if the table should use checkboxes or not. Defaults to true.
Example:
public $checkbox = false;
Or, via .env to apply globally:
TABLE_CHECKBOX=false
$checkbox_sideThe side of the table to place checkboxes on. Accepts left or right. Defaults to right.
Example:
public $checkbox_side = 'left';
Or, via .env to apply globally:
TABLE_CHECKBOX_SIDE="left"
$checkbox_attributeSets the attribute name to use for $checkbox_values. Defaults to id. I recommend keeping this as id.
Example:
public $checkbox_attribute = 'id';
$checkbox_valuesContains an array of checked values. For example, if $checkbox_attribute is set to id, this will contain an array of checked model ids.
Then you can use those ids to do whatever you want in your component. For example, a deleteChecked button inside a custom $header_view.
Example deleteChecked button:
<button class="btn btn-danger" onclick="confirm('Are you sure?') || event.stopImmediatePropagation();" wire:click="deleteChecked">
    Delete Checked
</button>
Example deleteChecked method:
public function deleteChecked()
{
    Car::whereIn('id', $this->checkbox_values)->delete();
}
$sort_attributeSets the default attribute to sort by. Defaults to id. This also works with counts and relationships.
Example:
public $sort_attribute = 'created_at';
Count example (if you added ->withCount('relations') to the query() method):
public $sort_attribute = 'relations_count';
Relationship example (if you added ->with('relation') to the query() method):
public $sort_attribute = 'relation.name';
Notice the use of the dot notation. You use this when declaring column relationship attributes as well.
$sort_directionSets the default direction to sort by. Accepts asc or desc. Defaults to desc.
Example:
public $sort_direction = 'asc';
$per_pageSets the amount of results to display per page. Defaults to 15.
Example:
public $per_page = 25;
Or, via .env to apply globally:
TABLE_PER_PAGE=25
query()This method returns an Eloquent model query to be used by the table.
Example:
public function query()
{
    return Car::with('brand')->withCount('accidents');
}
columns()This method returns an array of Columns to use in the table.
Example:
public function columns()
{
    return [
        Column::make('ID')->searchable()->sortable(),
        Column::make('Brand Name', 'brand.name')->searchable()->sortable(),
        Column::make('Name')->searchable()->sortable(),
        Column::make('Color')->searchable()->sortable()->view('cars.table-color'),
        Column::make('Accidents', 'accidents_count')->sortable(),
        Column::make()->view('cars.table-actions'),
    ];
}
Declaring Columns is similar to declaring Laravel Nova fields. Jump to the column declaration section to learn more.
thClass($attribute)This method is used to compute the <th> CSS class for the table header.
$attributeThe column attribute.
Example:
public function thClass($attribute)
{
    if ($attribute == 'name') return 'font-italic';
    if ($attribute == 'accidents_count') return 'text-right';
    if ($attribute == 'brand.name') return 'font-weight-bold';

    return null;
}
trClass($model)This method is used to compute the <tr> CSS class for the table row.
$modelThe model instance for the table row.
Example:
public function trClass($model)
{
    if ($model->name == 'Silverado') return 'table-secondary';
    if ($model->accidents_count > 8) return 'table-danger';
    if ($model->brand->name == 'Ford') return 'table-primary';

    return null;
}
tdClass($attribute, $value)This method is used to compute the <td> CSS class for the table data.
$attributeThe column attribute.
$valueThe column value.
Example:
public function tdClass($attribute, $value)
{
    if ($attribute == 'name' && $value == 'Silverado') return 'table-secondary';
    if ($attribute == 'accidents_count' && $value < 2) return 'table-success';
    if ($attribute == 'brand.name' && $value == 'Ford') return 'table-primary';

    return null;
}
mount()This method sets the initial table properties. If you have to override it, be sure to call $this->setTableProperties().
Example:
public function mount()
{
    $this->setTableProperties();

    // my custom code
}
render()This method renders the table component view. If you have to override it, be sure to return $this->tableView().
Example:
public function render()
{
    // my custom code

    return $this->tableView();
}
The Column class is used to declare your table columns.
public function columns()
{
    return [
        Column::make('ID')->searchable()->sortable(),
        Column::make('Created At')->searchable()->sortable(),
        Column::make('Updated At')->searchable()->sortable(),
    ];
}
make($heading = null, $attribute = null)$headingThe heading to use for the table column, e.g. Created At. Can be null for view-only columns.
$attributeThe attribute to use for the table column value. If null, it will use a snake cased $heading.
You can also specify _counts and relationship attributes with a dot notation.
For counts, let’s say I added withCount() to my query():
public function query()
{
    return Car::withCount('accidents');
}
Now I can create a column using this count like so:
Column::make('Accidents', 'accidents_count')->sortable(),
For relationships, let’s say I added with() to my query():
public function query()
{
    return Car::with('brand');
}
Now I can create a column using any of the relationship attributes like so:
Column::make('Brand ID', 'brand.id')->searchable()->sortable(),
Column::make('Brand Name', 'brand.name')->searchable()->sortable(),
searchable()Sets the column to be searchable.
sortable()Sets the column to be sortable.
sortUsing($callback)Allows custom logic to be used for sorting. Your supplied callable will receive the following parameters:
$models: The current Eloquent query (\Illuminate\Database\Eloquent\Builder). You should apply your sort logic to this query, and return it.$sort_attribute: The name of the column currently being sorted. If you used a nested relationship for sorting, it will be properly transformed to relationship_table.column_name format so the query will be scoped correctly.$sort_direction: The direction sort direction requested, either asc, or desc.Additionally, your callback will be passed through Laravel’s Container so you may inject any dependencies you need in your callback. Make sure your dependencies are listed before the parameters above.
Example:
Column::make('Paint Color')->searchable()->sortable()->sortUsing(function ($models, $sort_attribute, $sort_direction) {
    return $models->orderByRaw('?->\'$.color_code\' ?', [$sort_attribute, $sort_direction]);
});
This will sort the paint_color column using the JSON value color_code.
SQL Injection warning: Make sure if you are using any of Eloquent’s *Raw methods, you always use the bindings feature.
view($view)Sets a custom view to use for the column.
Example:
Column::make('Paint Color')->searchable()->sortable()->view('cars.table-paint-color'),
Notice how the column is still searchable() and sortable(), because the Car model contains a paint_color attribute!
If you’re making a view-only column (for action buttons, etc), just don’t make it searchable or sortable:
Column::make()->view('cars.table-actions'),
Custom column views are passed $model and $column objects, as well as variables passed from the table component.
For the Paint Color example, we can use the paint_color attribute from the model like so:
<i class="fa fa-circle" style="color: ;"></i>
For the action buttons example, we can use the id attribute from the model like so:
<button class="btn btn-primary" wire:click="showCar()">Show</button>
<button class="btn btn-primary" wire:click="editCar()">Edit</button>
Using a custom view for a relationship column? No problem:
Publishing files is optional.
Publishing the table view files:
php artisan vendor:publish --tag=table-views
Publishing the config file:
php artisan vendor:publish --tag=table-config
Packalyst :: Latest Packages
https://media.notthebee.com/articles/61290e7c7f10f61290e7c7f110.jpg
We are living in a sad time in Covid-world, where we can’t be there for our loved ones in times of need for the sake of their "health" and Australia might just be the most totalitarian of all.
Not the Bee
Unnervingly futuristic, these bulky, high-tech toothbrushes promise to scrub your choppers thoroughly in 20 seconds. WSJ: Dentists like Dr. Lana Rozenberg are overly familiar with two eternal fibs: that their clients floss regularly, and that they brush their teeth for at least two minutes twice a day. "Most people don’t brush their teeth for two minutes," said the Manhattan-based industry veteran. "Thirty seconds is more like it," or under a second for each of their 32 teeth. But what if, in those 30 seconds, a device could reach the front, back and sides of every tooth at once? That’s the proposition of new "whole mouth" toothbrushes, which rely on vibration and a preponderance of bristles packed inside a structure resembling a mouthguard to deliver an up-to-snuff scrubbing in as little as 20 seconds — 10 each for top and bottom sets of teeth. "It helps make things way faster, way easier and feels a little more guaranteed because you actually feel it on each one of your teeth," said Kristopher Paul, a medical-transportation driver in St. Petersburg, Fla., who has bit down on a 360 Sonic Brush Pro ($70) each morning for the past year. Mr. Paul, 36, also likes the tool’s 15-minute whitening mode, which combines a blue LED light and whitening gel to fade bothersome coffee stains.
Read more of this story at Slashdot.
Slashdot
https://media.notthebee.com/articles/6127d9cc4b5d46127d9cc4b5d5.jpg
Oh man this is fantastic:
Not the Bee
https://s3.amazonaws.com/images.gearjunkie.com/uploads/2021/08/Igloo-Pursuit-Tote.jpg
A soft cooler is a lightweight, easy-to-transport solution for preserving fare on road trips, boats, campouts, trailheads, and park picnics. Here are our favorite iceboxes for the outdoors and adventure.
We’ll always have a spot in our gear closet for a hard cooler, but soft coolers have proven an equal utility. These designs weigh less, and are easy for one person to grab and quickly transport from the deck to the truck bed. There’s a broad range of sizes and softness — some of these designs are actually very rigid, stout, and stackable. Others are fully collapsible and pliable, and we celebrate the space-saving option for storage.
For day-long roams, weekend adventures, road trips, or running errands, these soft coolers kept our provisions chilled and fit the bill. For more information about soft coolers, check out our buyer’s guide and FAQ at the end of this article. Otherwise, scroll through to see all of our recommended buys or jump to the category you’re looking for:

The OtterBox Trooper 20 Cooler ($250) bummed us out at first because it lacks a comfortable handle on the lid like its littler discontinued version. But it aptly redeemed itself as hardy, dependable, and easy to operate.
We took this cooler on a two-person, 3,400-mile road trip from Colorado to Washington for ski mountaineering followed by ocean surfing. Then we linked up river surf spots through Idaho, Montana, and Wyoming, camping along the way.
The cooler was hauled in and out of the open truck bed countless times, faced torrential downpours, withstood sunshine, didn’t collapse under other stacked gear, and sat in mud at camp. The cooler didn’t take up too much space in the backseat, either. When posted up, we used the cooler for day trips. But on the road, we packed it full of beverages and snacks.
This cooler’s size, shape, and rigidity are convenient. The wide opening is appreciated for quick, easy access. The leakproof seal prevented melted ice from dripping out, and no rain seeped inside during storms.
The flat backside wall alleviates bounce when we’re using the shoulder strap. We appreciate the water-resistant exterior pocket, which is easy to open and close. We miss the top handle, but the two side grab handles are robust and ergonomic.
We were surprised how well the cooler retained ice despite being out in the elements, due to the premium thermal insulation. The heavy-duty base also increased the chill factor while stabilizing the cooler during transport and beneath items. The staunch base also allowed us to set the cooler on variable ground and was easy to clean.
According to our ice retention test, this cooler is capable of holding ice for up to 78 hours, which is what the brand claims. To put the size in perspective, this cooler could fit 28 12-ounce cans.
Check Price at Amazon Check Price at OtterBox

We took the YETI Hopper M30 Soft Cooler ($300) on a Southwest Colorado road trip to Hardrock 100 to race volunteer and car camp. We also used the cooler for picnics at the park.
The shoulder strap is really comfortable to slide over the shoulder, doesn’t slip around, and holds the cooler close to your side to prevent bounce. The exterior high-density fabric shell feels tough and is resistant to punctures as well as mildew. It’s a bonus that it doesn’t sweat like a few of the other soft coolers.
We were blown away by the power of the HydroShield closure, which uses magnets to create a leak-resistant seal along the top. No water can exit the tote. When the cooler is open, the mouth is wide.
We also give kudos to the closed-cell foam insulation of the tote. For the ice retention test, the cubes melted after 4 days. Inevitably, we had to be strategic with how we packed things, due to the tall, slim shame. This cute cooler could fit 20 12-ounce cans.
We have two critiques. There are two buckles that snap across the magnetic closure, and we wish those were more adjustable and easier to operate. If the cooler is really packed to the brim, we can’t close them. Then, we’d love to see YETI upgrade the cooler with an attachment system that keeps the magnetic closure open when you’re loading the cooler.
As is, the closure slams shut unless you have two hands on — but then you can’t grab your foodstuff. The powerful closure is also an issue for cleaning the cooler and letting the inside dry and air out. The only thing we could find that would keep the cooler open was a 5-pound water jug, and two people were needed to get it inside the cooler.
Check Price at REICheck Price at Amazon

The Arctic Zone Titan Deep Freeze Bucket Tote ($45) is a great budget cooler that keeps our ice cold for long durations. A trio took the cooler fly fishing on Colorado’s Gunnison River, carrying along water and various canned beverages. The temps that day hovered around 80 degrees.
Despite being left in the car for a full day following the river outing, the cooler still had ice and felt cold. That well-founded retention is thanks to the brand’s blend of proprietary insulation, interior radiant barrier, and thick base made of three layers of SuperFoam. We also found the water- and stain-resistant exterior very durable. The inside was easier to wipe clean.
The shape and weight feel easy to move around, and the handles are comfortable. We appreciate all of the pockets to help us keep odds and ends organized. There are two zippered pockets, including one that fits a phone, and two huge broad mesh pockets.
According to our ice retention test, this cooler is capable of holding ice for up to 70 hours. This cooler could fit two dozen 12-ounce cans.
Check Price at AmazonCheck Price at Arctic Zone

One of our favorite products was the Snow Peak Soft Cooler ($160). Even given the large size, it was still very comfortable to transport, due to the malleable, soft walls. With the simple, wide handles Velcroed together, we could sling the cooler over our shoulders when it was fully loaded.
A hard cooler this size would require two hands to move. The flexible walls allow us to flatten and fold the cooler for easy storage, saving us space in a tight apartment.
The exterior is made of synthetic plastic and nylon, so it’s not resilient for a rugged whitewater trip but is suitable for basecamp. There’s ample space to carry multiple meals for several people. The insulated walls have an interior aluminum coat that helps trap cold air, and the ice retention is adequate for single- and two-day adventures.
The cooler did well on a weekend road trip to climb Colorado’s Colorado’s Sangre de Cristo Mountains and camp out but wouldn’t be able to retain ice for long durations. Our ice retention test corroborated that experience, showing the cooler is capable of holding ice for nearly 2.5 days.
Check Price at Snow PeakCheck Price at Camp Saver

The Mountainsmith Takeout ($25) accompanied us on a standup paddleboard session down Colorado’s Slate River, a mellow run sans whitewater. This cute cooler carried and chilled several cans of microbrews and several sparkling waters. We also use it day to day on drives to bring along lunch, snacks, and beverages.
The design is super lightweight and felt comfortable to carry around. It was easy to sling over our shoulders with the removable strap. The material dried surprisingly fast after it wetted while paddling. This design is too small for an all-day adventure, but for a lunchbox or outing, it’s great. And the wide shape allows easy access to the grub inside the cooler.
According to the ice retention test, this cooler can retain ice for 21 hours. To put the size in perspective, this cute cooler could fit six 12-ounce cans.
Check Price at AmazonCheck Price at Camp Saver

If you have limited storage space, consider the REI Co-op Pack-Away Soft Cooler ($50). This origami-inspired design collapses and folds flat when it’s not a cube or a tote. When transformed into a box or bag shape, the cooler is light, nimble, and malleable. No other cooler would’ve fit into the awkward floor space behind our seats.
We loaded the Pack-Away into our jeep for navigating Colorado’s high-altitude Alpine Loop, a 65-mile route that circumnavigates old mining roads through the San Juan Mountains. The cooler held lunch meats, cheese, veggies, dark chocolate, and seltzer waters. The weather got rowdy with bouts of rain and hail between sunshine.
Overall, we found the cooler durable, given it’s made with a tough polyester shell and abrasion-resistant nylon bottom. It also had decent ice retention. The size and insulation is ideal for a single day out. According to the ice retention test, this cooler can retain ice for 57 hours and fit 24 12-ounce cans.

We used the Orca Walker Cooler ($220) for tailgating at trailheads after hikes and park BBQs. Ultimately, this is an excellent cooler for single-day adventures. Our team was most impressed by the 840-denier textile exterior, which is tough and doesn’t get banged up.
The insulation is a metal-coated plastic blend, which did a solid job of preserving the ice and goods. We love the soft interior liner and the waterproof zipper that prevents any leaks from the top.
The two side handles aren’t the most comfortable to grab, and we wish they weren’t adjacent to the shoulder straps’ attachment points. The center magnetic handle is smooth and nice to grab. But when the handgrip is detached into two separate pieces, they’re not comfortable to grasp.
According to our ice retention test, this cooler is capable of holding ice for up to 70 hours. This cooler could fit 20 12-ounce cans.
Check Price at AmazonCheck Price at Bass Pro

The Hydro Flask Day Escape Soft Cooler Tote ($150) is a super-streamlined, lightweight, and durable design. We used this cooler for park BBQs and love how comfortable it was to slip over our shoulders and carry.
The exterior is made of a 600-denier polyester shell that’s waterproof. The zipper is completely watertight with welded seams, so leaking isn’t on the menu. We noticed the zipper is hard to pull one-handed, and we typically need to counter-pull the side handles to open or close it.
We were surprised to see the cooler’s exterior sweat quite a bit during the ice retention test. The ice melted at a faster rate compared to other coolers, lasting for about 60 hours, but well above the brand’s 36-hour stamp. This cooler could fit 24 12-ounce cans.
Check Price at REICheck Price at Backcountry

The Mountainsmith Sixer ($30) was a great cooler for lunch on the go. Our tester, a Colorado-based electrician and mountain biker, packed it with a canned drink, sandwich, fruit, and chocolate. The cooler’s shape and size were easy to fit in a messy work truck.
Inside and out, the cooler is easy to clean. It seems durable, and we like the vintage look. The haul handle is ergonomically sound and comfortable to grab. However, our ice melted fast on hot days, and with minimal room in the cooler, the food can get wet. But, the seamless liner did hold the water and showed no sign of leaks.
According to the ice retention test, this cooler can preserve ice for 25 hours. This cooler could fit one dozen 12-ounce cans.
Check Price at REICheck Price at Amazon

The Igloo Pursuit Tote ($80) preserved our bubbly water, hummus, pepperoni, peppers, and arugula while car camping and crewing Hardrock 100. It was easy to carry around from the van to the hotel porch. We most appreciated the lightweight design and malleable fabric.
We could stuff lots of goods inside or squish down the cooler for storage. The slender shape doesn’t bounce around and feels smooth to carry over the shoulder.
We really like the exterior front zipper pocket. But we wish the side mesh water bottle pockets were hardy like the rest of the cooler — they felt flimsy and easily snagged. Also, we loved that the top entry opened wide and had a two-way zipper, but the wide rim made drying out the cooler a challenge.
Ultimately, due to the ice retention, this tote is a solid option for errands and small trips but be sure to pre-cool the bag before use. According to the ice retention test, this cooler can retain ice for 40 hours. It can fit 30 12-ounce cans.
Check Price at AmazonCheck Price at Igloo Coolers

Our team loudly applauded the REI Co-op Cool Haul Soft Cooler ($100), which was a dependable tool for whitewater rafting Colorado’s Gunnison River, car camping, and crewing the Hardrock 100. We found the size was good for a duo.
The cooler’s exterior is made with stout ripstop nylon that easily wipes down. Inside, the insulated polyester liner is durable and removable. It’s super easy to pull out and clean.
While adventuring, this cooler did a noteworthy job of preserving ice in sunny conditions and exceeded the capabilities of other coolers we tested. The seams are sealed to prevent leaks. A two-way zipper provides easy top access, and the cube shape nicely slides into tight spaces on a boat or in the truck bed.
According to our ice retention test, this cooler is capable of holding ice for up to 60 hours. To put the size in perspective, this cooler could fit one dozen 12-ounce cans.

We wanted the team — and especially our anglers — to love the unique Hobie Soft Cooler Fish Bag ($125), but the design let us down in more ways than one.
On the positive side, the cooler is conveniently shaped to fit inside the bow recess of a boat. We took this cooler out boating, fishing, and standup paddleboarding at Taylor Reservoir in the Elk Mountains of Colorado.
The materials are high-quality with closed-cell foam insulation, a vinyl-coated polyester exterior, and snazzy YKK zippers. We liked the two muscular handles. But without a shoulder strap, it wasn’t ideal to transport the cooler more than short distances.
Unfortunately, the seams leaked water all over the rig before we even got to the water’s edge, and then drained within only a couple of hours of use. We saw the same results during our ice retention test — on a wood floor.
Our other grievance is the zipper only goes around halfway, stopping at an awkward spot that limits access and ability to clean the inside of the cooler. Plus, the zipper isn’t waterproof. So, when you grab one of the two handles to carry the cooler, it leaks all over the place.
Ultimately, the ice retention is not as dependable as other coolers, in part because the cold water all drains out. According to our ice retention test, this cooler is able to hold ice for nearly 45 hours.
Check Price at REICheck Price at Amazon

We took the aesthetic Fishpond Blizzard Soft Cooler ($100) out fly fishing with two anglers. The compact cooler was full of brews, sparkling water, and lunch food. We really liked the touch of the side rope handles — they’re smooth, tough, and easy to grab and hold.
We also appreciate the two broad pockets on each side. One has a zip closure for security, and the other latches via Velcro.
The lid has a small pop-up Velcro door to provide easy access when the cooler is zipped shut. We wish that small entrance was a tiny bit bigger. It’d also be great to see the door and lid closures upgraded so they don’t leak.
The cooler’s multilayer insulation didn’t keep the ice very well, and the waxed canvas is stylish and soft but soaks up water and gets heavy. According to our ice retention test, this cooler is capable of holding ice for close to 45 hours. It could fit one dozen 12-ounce cans.
Check Price at AmazonCheck Price at Amazon
Choose a soft cooler based on the storage capacity and type of support you need for the load. A super malleable product like the Snow Peak Soft Cooler might not be the best for carrying dozens of heavy cans compared to a more rigid design like the YETI Hopper M30 Soft Cooler.
The larger the group, the more cargo space you’ll need. The soft coolers in our guide range from the Mountainsmith Takeout, which can fit six cans, to the 38L Snow Peak Soft Cooler. Most of our choice soft coolers are either larger — 30 to 38 L — for group multiday trips or more compact, ranging from 12 to 19 L.
Most soft coolers are simple with a central insulated compartment for food and beverages. A handful have an interior zippered compartment inside the lid.
Various exterior pockets are available on some designs, including streamlined fabric and mesh pockets with no closure or bungee straps. Other coolers have external pockets with a Velcro latch, zipper, or waterproof zipper for security.
The weights of soft coolers are typically reflected by their size and capacity. The smallest design in our guide is the Mountainsmith Takeout, which is less than a pound. The heaviest soft cooler is the 7-pound YETI Hopper M30 Soft Cooler, which has a 30L capacity and the best ice retention.
Even the heaviest soft cooler in our guide is lighter than a hard cooler. For comparison, the YETI Tundra 45 Cooler is 23 pounds, and the RovR Products RollR 45 is more than 37 pounds.
Soft cooler totes are long, slender, and streamlined against your side. They’re comfortable to carry over a shoulder. However, taller coolers get trickier with access to buried items, so you have to be mindful when packing the cooler.
Soft coolers that are wider or more bucket-style are easier to access, as far as finding a specific item. But, they can feel more cumbersome to carry over a shoulder. Coolers like the OtterBox Trooper 20 Cooler with a broad, flat surface that rests against you can help absorb that swing and bounce.
Boxier coolers can be easier to stack — as long as the walls and base are rigid — while sleeker coolers can more likely slip behind a seat in your car. Shorter, more compact coolers are easier to fit in tight spaces on a boat.
A soft cooler’s materials include the exterior, insulation, interior liner, and handles. A range of top closures exist. The most common are waterproof and leakproof zippers or non-waterproof and leakproof zippers.
We pay attention to that variable to know if a cooler needs to always be upright. Some unique closures include the powerful magnetic seam of the YETI Hopper M30 Soft Cooler and clasp of the OtterBox Trooper 20 Cooler, which don’t allow leaks. Welded seams also help prevent leaks.
Soft coolers may have shoulder straps — which are typically removable — buckles, attachment points, and interior or exterior pockets. Some pockets have durable, waterproof zipper closures, but many are not weather-resistant or secured with a closure.
The quality of materials influences the waterproofness, durability, insulation value, and whether or not the face fabric produces condensation. The materials also determine the comfort, breathability, support, and overall cost.
Handles and straps are constructed with a variety of materials. Some are more ergonomic, comfortable, and durable than others.
Most soft coolers have side or top handles, two straps that swing up to secure together above the cooler, or a removable shoulder strap. A bunch of designs have a combination of handles and straps, too.
In our testing, we found the side handles of the Fishpond Blizzard Soft Cooler and OtterBox Trooper 20 Cooler were stalwart and comfortable to grab. We liked the wide, soft material of the two swing-up straps on the Snow Peak Soft Cooler.
The handles on the Hydro Flask Day Escape Soft Cooler Tote tote were a great length and easy to slide over one shoulder. We also appreciated the comfortable cushion and traction of the shoulder strap on the YETI Hopper M30 Soft Cooler.
We completed our ice retention test with controlled variables. Each soft cooler was stationed indoors around 65 degrees, shaded, and filled with the same ratio and type of ice.
For a variety of conditions, the soft coolers in this guide provide enough cooling power to serve a range of recreation needs.
When you use a cooler outside, many factors influence a pack’s ice retention, including frequency of opening the cooler, direct sunlight, and ambient temperature. For instance, the REI Co-op Cool Haul Soft Cooler preserved ice for 60 hours during our test but only for 18 hours during one toasty car camp trip.

The prices of soft coolers in our guide range from the $25 Mountainsmith Takeout, which is the smallest cooler, to the $300 YETI Hopper M30 Soft Cooler with top-shelf ice retention.
The price of a soft cooler is reflected by the size, durability, quality of materials, design features, and ice retention.
Additional features on soft coolers include hard clip points, daisy chains, webbing straps, and bungee cords for carrying extra gear. Some packs also include a reflective logo or bottle opener.
Many soft coolers do not have tie-down points, which would be a good feature for river or motorcycle trips.
Our team has developed cooler guides for several years, objectively testing dozens of soft, hard, and backpack coolers in the field from whitewater raft trips to fly fishing adventures. For this soft coolers guide, we examined the most popular, highly acclaimed, and bestselling products with diverse capacities, ice retention ability, and price spectrum.
Our crew took these coolers through a myriad of conditions from summertime park BBQs to camping in Colorado’s Sangre de Cristo Mountains and road-tripping to ski mountaineer in the Pacific Northwest.
We also performed a controlled in-house ice retention test to verify brand claims. For the experiment, we filled each pre-cooled cooler approximately 70% with fresh, frozen cubed ice and set them in a shaded, dry indoor space at a steady average of 65 degrees.
We periodically checked, making notes regarding melt rate, condensation, and leaks. Each reported time is based on when 100% of the ice converted to water.
This data provides a benchmark. But when traveling outdoors, these controlled variables disappear and the ice will likely melt faster.

There’s utility for both designs. Hard coolers are more durable and stout and have a larger size range, given they can hold more weight without collapsing. Hard coolers can also preserve ice for longer durations. If you’re going on a weeklong car camping trip with limited access to ice, it’s advantageous to have a hard cooler for fresh food.
On the other hand, a soft cooler is a preferred choice for being lightweight, easy to carry — especially for one person — and simple to transport. The compact sizes are great for picnics, day trips, overnight camping, and grocery shopping. Another benefit is some soft coolers are collapsible, so they occupy less space in storage than a hard cooler.
For road trips, you can separate daytime beverages and snacks into a soft cooler, which limits opening of the hard cooler and preserves ice.
If the cooler’s seams are not welded and leakproof, they can leak. Soft coolers can also leak through the lid closure if the zipper isn’t waterproof or the clasp isn’t leakproof.
Some soft coolers are superior at ice retention, which is generally reflected in the price tag but not always. Some pricier coolers offer adequate ice retention mixed with other qualities like durability and capacity.
In our side-by-side ice retention test, the soft cooler that retained ice the longest was the YETI Hopper M30 Soft Cooler at a whopping 98 hours. The next chilliest soft coolers were the OtterBox Trooper 20 Cooler, which reached 78 hours. It was followed by the Arctic Zone Titan Deep Freeze Bucket Tote and Orca Walker Cooler, which held ice for 70 hours. The lowest ice retention recorded was 21 hours for the small Mountainsmith Takeout.
In daily adventures, melt speed slightly fluctuates based on the frequency of opening the cooler, how long it’s open, ambient heat, and direct sunlight. A bunch of other variables influence ice retention too, including the type and quantity of ice, extra space in the compartment (which decreases effectiveness), and if the cooler was pre-chilled.
For most soft coolers, dry ice will burn the interior materials. Instead, you should use freshly frozen cubed ice, ice blocks, or reusable ice packs.
For the longest-lasting ice retention and cooling capability, aim to use a 2:1 ratio of ice to contents. You can quickly pre-chill your cooler with a sacrificial bag of ice a few hours before loading it up, especially if the cooler was stored in a hot place. Or, bring the cooler inside a cool room to lower the temperature the night before use.
The type of ice makes a difference. Block ice and fresh cubed ice from freezers are denser than chipped ice or crushed ice from ice machines. If you get super strategic, you can use a mix of block ice — which melts slowly — and cubed ice — which cools down the container quickly.
As the ice melts, it’s ideal to retain the ice water, which helps the other ice stay cold. Limit your access to the cooler because opening it up releases the cold air. Keep your cooler in the shade to prolong that low temperature. If you’re under direct sun, toss a towel or blanket over the cooler to help alleviate a heat spike.

We tested the best camping stoves from Coleman, Camp Chef, Kovea, Snow Peak, and more for this review. Check it out to see how each performs and which stove came out on top. Read more…

Make the most of your home away from home by choosing the best camping tent for your adventure. We found the top car camping and family camping tents for every budget and use. Read more…
The post The Best Soft Coolers of 2021 appeared first on GearJunkie.
GearJunkie
https://cdn.geekwire.com/wp-content/uploads/2021/08/1516157988441.jpeg

Xinova, a Seattle company that operated a network of inventors, is winding down operations, GeekWire has learned.
Xinova spun out of Intellectual Ventures in 2016 and helped match inventor ideas with customers such as PepsiCo, Honda, Funai, and others. It billed itself as an “innovation-as-a-service” platform.
The company raised a $48 million Series A investment to scale the business and grow its network that included more than 12,000 inventors across 118 countries. Xinova would find companies that needed tech solutions; put a call out to its inventor network; and compensate inventors via upfront payment and profit-sharing agreements. Xinova would typically cover development costs and manage intellectual property. The company at one point employed more than 100 people globally across ten offices worldwide.
But Xinova needed more cash and ran into trouble when it tried raising another $100 million. The U.S.-China trade war and the pandemic caused investor wariness, and one firm even backed out of a signed funding commitment.
The company had to trim expenses, laying off staff over the past two years and cutting costs elsewhere. It again tried to raise more capital earlier this year but wasn’t able to convince investors. Xinova tried to work with its creditors on a restructuring plan but that also didn’t pan out, forcing the shutdown decision. The company now has only two employees who are helping wind down operations.
Edward Jung, who helped launch invention business Intellectual Ventures in 2000 and was an early Microsoft engineering leader, was Xinova’s founder and CEO. He said the company was able to run an “economically-sustainable business” but couldn’t renegotiate its legacy liabilities, which made additional equity fundraising impossible.
Jung resigned several months ago, citing a conflict with his position as the largest secured creditor. He said he is responsible for “taking on liabilities and risks in excess to what was sustainable through these unexpected changes.”
“I regret disappointing my most excellent investors, partners, and employees,” Jung added. “But I remain a believer in the vision of global innovation networks and am continuing this vision in new stealth projects.”
Jung launched Intellectual Ventures with former Microsoft technology chief Nathan Myhrvold. In 2007, Jung began heading up the firm’s “Invention Development Fund,” which was spun out in 2016 as Xinova.
Jorma Ollila, former chairman of Royal Dutch Shell and former chairman and CEO of Nokia, was Xinova’s executive chairman. Paul Levins, Xinova co-founder and former chief strategy officer, left in 2019 and is currently helping restaurant tech startup Souszen and agtech startup Beanstalk.
Xinova spun out its own standalone company called Allied Inventors in 2017 to help manage intellectual property assets. We’ve reached out to Allied to learn if it is still in business. Tom Kang, who previously led Xinova, is CEO of Allied, according to the company’s website.
Xinova in 2019 launched a joint venture called Arcnet, an online capital marketplace that lets investors fund innovation projects on one platform across borders.
Xinova Asia will continue to operate. Xinova also had offices in Japan, Finland, Tel Aviv, Vienna, Beijing, Singapore, Sydney, Hong Kong, and Bangalore.
GeekWire
https://static1.makeuseofimages.com/wordpress/wp-content/uploads/2021/08/programmer-wearing-a-headset-and-using-three-computers.jpg
As companies sent their people packing and working from home, they included company gear for them to work on. However, many people have their own personal computers at home.
To support the simultaneous use of multiple systems, developers created software such as Synergy. By using these applications, you can use one mouse and keyboard across multiple computers without having to plug and switch devices.
So aside from Synergy, what other options are there? Here are the five best apps for sharing a mouse and keyboard across different systems.
If you have two computers at home, you can use Share Mouse to control both systems with whatever connected keyboard and mouse you have. No matter if you’re on a Mac or a PC, the peripherals on both systems can crossover to the other device.
For example, if you have a Windows device and a MacBook Pro, you can use the trackpad on the keyboard and trackpad on your MacBook to control your Windows device. It also works vice-versa, with the Windows PC peripherals working on your Mac.
You can use the Share Mouse app as long as both computers are on the same network. It’s free for personal use—but is limited to a maximum of two computers/two displays only. If you want to use the software on up to nine devices, each with up to four monitors, you have to purchase the Pro version.
Related: How to Use a Laptop as an External Monitor
When you get the Pro version, you also get additional features like locking and unlocking all connected devices simultaneously, synced screen savers, and even remote log-in. Best of all, every Share Mouse licenses have a portable version so that you can use it on other computers without extra installation.
Download: Share Mouse for Windows and Mac (Free, other licenses available)
This free, powerful, and feature-rich software keyboard, video, and mouse switch (KVM) offers a range of keyboard, video, and mouse switching options. However, it is only compatible with Windows 10, Windows 8/8.1, and Windows 7. This app won’t work with Apple or Linux systems.
What separates this from Share Mouse is that all its features are available for the free version. It offers multi-monitor support, key-bindings, macros, and even enhanced security options.
You can limit which computers can control your Input Director app by name, IP address, or even subnet. And if you’re planning to employ this in a network to which several other users connect, you can encrypt your data to keep them safe.
Again, this powerful app is free for personal use. But if you want to employ this in a commercial and corporate setting, you have to contact the maker.
Download: Input Director for Windows (Free)

Mouse Without Borders is a side-project created by Microsoft engineers under the company’s Garage program. Likewise, while this is not an official Microsoft product, it is developed and supported by its employees and is recognized as such. However, because of this, it’s also available for Windows devices only.
It’s even available for download on Microsoft’s Garage, the platform designed to push software innovations from their employees and customers. Furthermore, support for its use is available via Microsoft’s Community Forums.
Like the other KVMs above, you can share one keyboard and mouse across four computers connected to the same network. You can also set custom shortcuts to make it easier for you to navigate across devices.
Related: How to Control a PC and Raspberry Pi With One Keyboard and Mous
The single greatest advantage this app has over the other options is its relationship with Microsoft. Since their engineers and programmers created this app, you can expect fewer issues with the operating system. The developers are already familiar with the app’s working environment to issue updates ensuring compatibility faster than other third-party software companies.
Download: Mouse Without Borders for Windows (Free)
This app is one of the more powerful software KVM options. Although it’s only free to try, the paid licenses will let you do so much more than just controlling multiple computers through one keyboard and mouse set.
The KVM and KVM Pro licenses allow you to stream multiple computers on a single monitor. And all licenses can connect to any computer, whether connected to your local network or via a VPN. So even if you’re physically distant from a device, you can use it like it’s right in front of you.
Audio sharing is also enabled across all licenses, so if you play an audio file on one slave device, the sound will output on your main computer. And with Multiplicity, your control inputs are not limited to keyboard and mouse. It also accepts hot-key and touch switching for touchscreen computers, allowing you to use it even with Microsoft tablets and 2-in-1s.
Download: Multiplicity for Windows (Free for 30 Days, Purchase Required)
When using multiple systems together, like Mac, Windows, and PC, you’re bound to run into some compatibility issues. So if you want to use KVM software, it could be challenging to find an app that will work well on all three different operating systems.
That’s where Barrier comes in—it’s a free, open-source KVM software based on the popular Synergy app, which was itself based on the original CosmoSynergy program by Chris Schoeneman. But unlike Synergy, Barrier is a no-frills app designed to work simply.
It only has two features: it lets you control multiple computers with one keyboard and mouse, and it shares clipboards across your devices. But since this is an open-source project, you can tweak the program to your needs if you’re into programming.
So if you want to connect your PC to your Mac for free or connect any system to your Linux computer, Barrier is the only solution for you.
Download: Barrier for Windows | Mac | Linux (Free)
Software KVMs are helpful for automatically connecting multiple devices. You no longer have to press a switch or turn a dial just to control your other device. Having this will save you both time and desk space, letting you get more done.
So whether you’re a programmer, a video editor, or even a writer, if you’re working with multiple systems a lot, a KVM app will make you more efficient.
MUO – Feed
https://media.notthebee.com/articles/6126fc5fe187a6126fc5fe187b.jpg
You ain’t ready:
Not the Bee