How To Build A Tire Hammer

http://blademag.com/wp-content/uploads/Tire-Hammer-Clutch.jpg
How To Build A Tire Hammer
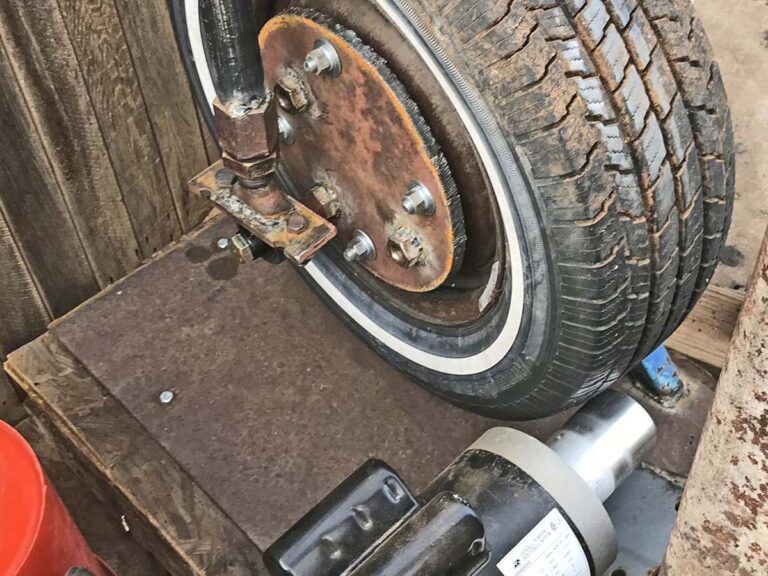
The author’s power hammer uses a tire and a drive wheel. Stepping on the treadle lifts the drive wheel into the tire, engaging the hammer. This is similar to the Clay Spencer tire clutch but in a different configuration. The author added some 3/8-inch plate to the tire rim for weight, and added several attachment points so the stroke can be adjusted.

A clutch player in the knifemaker’s shop, the tire hammer gives more control than other D.I.Y. power hammers.

Like a variable-speed hand drill, your backyard power hammer should be able to run slowly, at full speed or in between, depending on the task. The simplest way to guarantee it does this is to use a slipping clutch.

There are two main designs of slipping clutch. One uses a slack belt, a flywheel and pulleys. The drive pulley rotates within a slack belt. The foot pedal linkage pushes an idler wheel into the slack belt, increasing the belt tension to the point that the belt begins to turn the pulley on the flywheel.
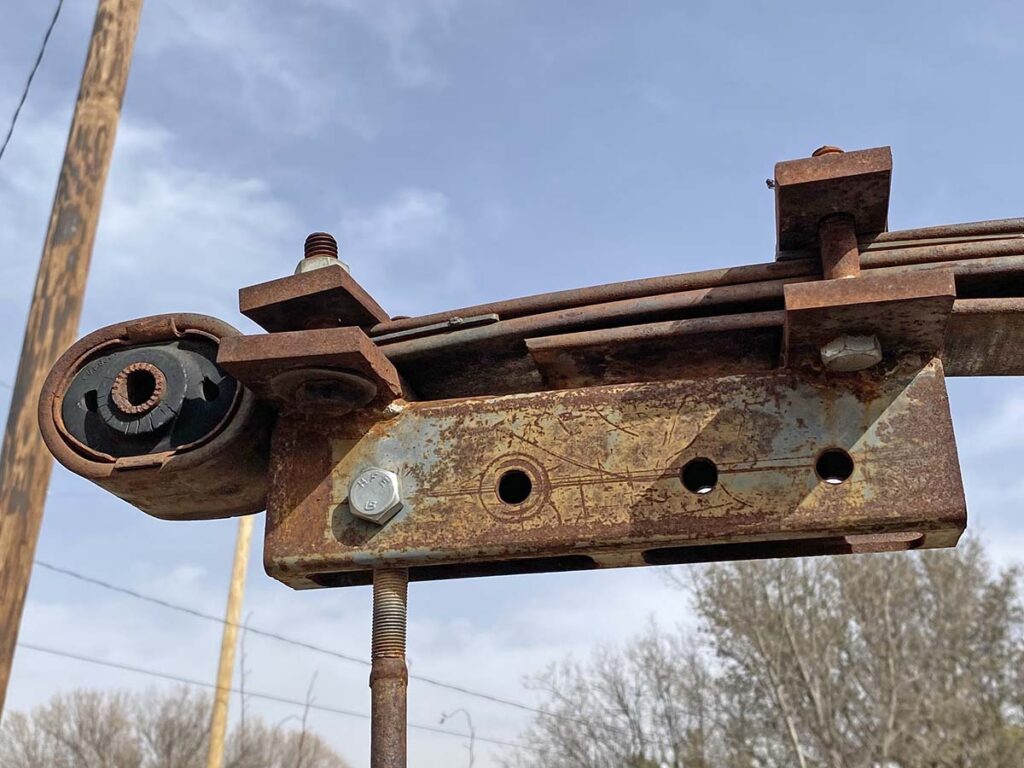
spring-arm-to-pitman attachment
The author modified the spring-arm-to-pitman attachment to make it adjustable. Depending on which attachment point is used, the leverage of the stroke changes.

Another design uses a tire clutch, where the foot pedal linkage pushes a drive wheel into an automobile tire, with the hub of the tire serving as the flywheel. The most common “tire hammer” design uses a similar clutch but turned the other way and connected to a linkage. Your available parts will dictate your design. 

Why A Clutch

A function of the clutch is to reduce the RPM of the motor speed to get the hammer rate of beats per minute (BPM) into a safe and useful range. You want the hammer rate to generally end up between 150 and 250 BPM, though many variables change with each hammer. In general, a heavier tup (aka hammer head assembly) requires a slower BPM, whereas a lighter hammer can have a higher BPM. You do not want your hammer running faster than you can control it, nor so fast that the inherent forces tear it apart. My hammer uses a 24-inch tire and a 3-inch drive wheel for an 8:1 reduction of a 1750 RPM motor, yielding a calculated 218 BPM at full speed. Your hammer will run differently depending on your motor RPM, your drive and driven wheel diameters, and the hammer’s overall design. I rarely run my hammer full speed during general forging work, and the tire clutch gives good speed control. Full speed works acceptably well for drawing out damascus billets or breaking down large stock.

My tire clutch has an integral flywheel bolted to the hub. On the flywheel I welded several different nuts for attaching the pitman arm (for more on the pitman arm, see part three last issue). Each nut is a different distance from the center of the hub. This allows me to vary the length of the stroke, in my case between 6.5, 7 and 7.5 inches, based on where I connect the arm to the flywheel. Coupled with an adjustable-length pitman arm, this setup allows a degree of tuning to get the hammer hitting in a way that transfers the power directly to the workpiece with efficiency, yet in a way that doesn’t place undue stress on the hammer itself.

Choosing A Motor For Your Tire Hammer

As for motors, the size may vary a bit depending on the overall tup weight of your hammer. For most homebuilt hammer sizes, a 1 or 1.5 HP motor is plenty. My 40-pound hammer uses a 1.5 HP motor running on 110v and does not trip a standard 15-amp breaker, suggesting that 1.5 HP is more than plenty for a 40-pound head. Whether the motor runs on 110v or 220v will depend on your shop setup and what you have available, but you’d be best served either way with a motor that runs in the 1700 RPM range, not one that runs in the 3400 RPM range. There’s no need to go three phase or variable speed unless you’re already set up for either.
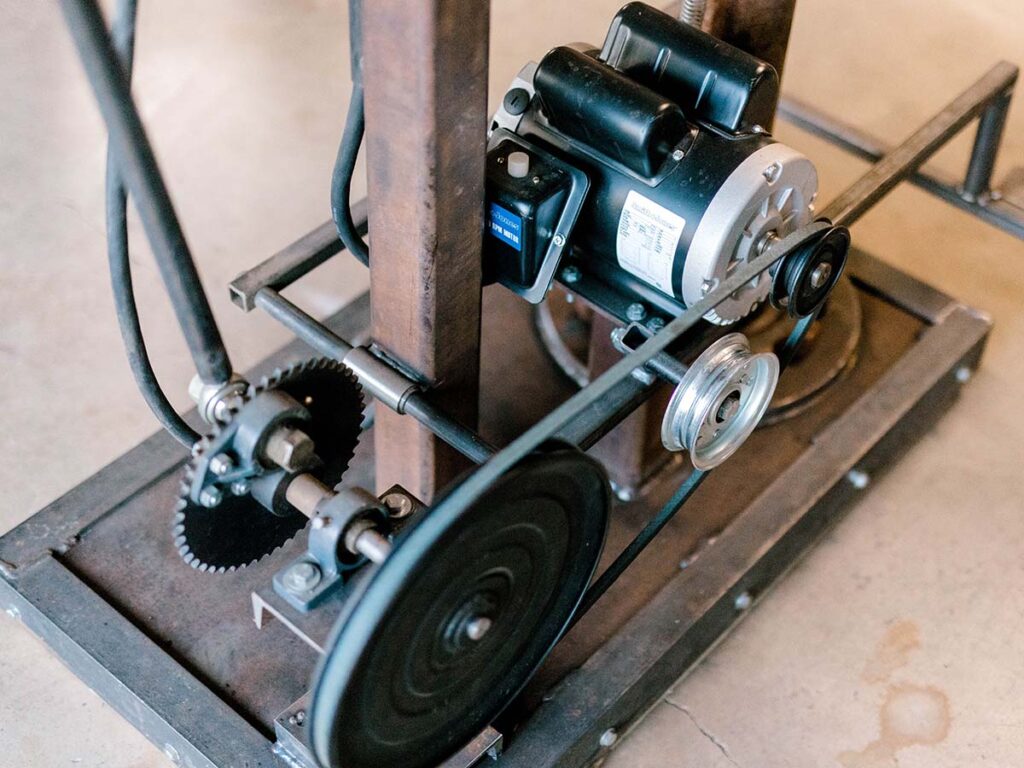
Doug Davis’ homemade hammer
Doug Davis’ homemade hammer uses a series of pulleys and an idler. When you step on the treadle, the idler tightens the belt and engages the hammer.

You will need an on/off switch for your motor. To run the hammer, turn the motor on, then use the foot pedal linkage to engage the clutch.

Sourcing Dies

Most power hammers have a set of dies in between the anvil and the hammer shaft. Dies may be built in a variety of shapes and sizes, depending on how you want your hammer to move the metal. Two basic die designs are flat and crowned. Flat dies move the metal somewhat equally in all four directions, while crowned dies will draw out the length of your workpiece perpendicular to the crown on the dies. Some smiths design their hammers to accommodate various top or bottom tools, or spring swages as well.
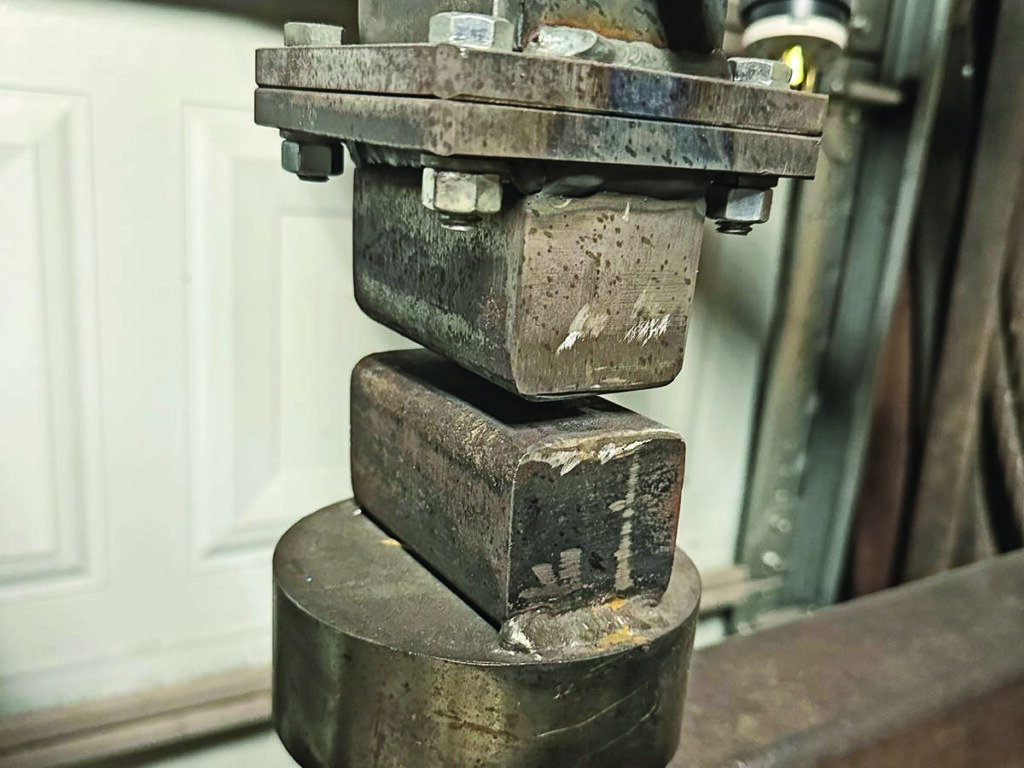
Tire Hammer Die Attachment
The die attachment on Doug Davis’ power hammer is more robust on the ram-to-die connection, but time will tell how the bottom-die direct-weld works out. (Erik Greiner image)

On my personal hammer, the dies are built out of 1.5-inch square 4140 steel bar stock, heat treated and ground essentially flat, with slightly radiused corners. Some hammers are set up with dies that are interchangeable but mine is not. Full disclosure: My die attachment is one point of weakness in my design. I ultimately welded my bottom die plate straight to the anvil, and I’ve had to reinforce the top die connection and re-weld it several times. Perhaps a more skilled welder could have done better!

Creative Necessity

I can’t emphasize enough the creativity necessary to build a functioning power hammer from scrap. It’s one thing to watch a YouTube video and think, “It must be nice to have a power hammer.” It’s another thing entirely to watch the same video and try to discern how the rocker arm connects to the center post, or how the tire clutch axle is set up.

At the time of my hammer build, there was an online gallery hosted in Czechoslovakia that had hundreds of pictures of various homebuilt and factory built hammers. I couldn’t have built mine without those examples. I don’t speak Czech but the pictures tell the story well.

Read More On Power Hammers:

Download BLADE's Knife Guide Issue!NEXT STEP: Download Your Free KNIFE GUIDE Issue of BLADE Magazine

BLADE’s annual Knife Guide Issue features the newest knives and sharpeners, plus knife and axe reviews, knife sheaths, kit knives and a Knife Industry Directory.

Get your FREE digital PDF instant download of the annual Knife Guide. No, really!

We will email it to you right now when you subscribe to the BLADE email newsletter.

BLADE Magazine
Newly updated Laravel Chart.js Package

https://opengraph.githubassets.com/9e1417cda6be8de3b732d6f87a48dfaa325b403c9cc0e961ddac0a1330482fb5/icehouse-ventures/laravel-chartjs

laravel-chartjs – A Chart.js wrapper for Laravel

Simple package to facilitate and automate the use of charts in Laravel
using the Chart.js library.

Setup:

This package provides a wrapper for Chartjs that allows it to be used simply and easily inside a Laravel application. The package supports a number of installation methods depending on your needs and familiarity with JavaScript.

1. Installing this package

composer require icehouse-ventures/laravel-chartjs

For older versions of Laravel (8 and below), add the Service Provider in your file config/app.php:

IcehouseVentures\LaravelChartjs\Providers\ChartjsServiceProvider::class

Publishing the config file to your own application will allow you to customise the package with several settings such as the Chartjs version to be used and the delivery method for the Chartjs files.

php artisan vendor:publish --provider="IcehouseVentures\LaravelChartjs\Providers\ChartjsServiceProvider" --tag="config"

2. Installing Chartjs

Next, you can install and add to your layouts / templates the Chartjs library that can be easily found for download at: http://www.chartjs.org

There are several installation options for Chartjs. By default, this package comes set to use the ‘custom’ self-managed delivery method (to avoid conflict with existing installations). You can also select from several other delivery methods:

CDN

For rapid development and testing between versions, you can easily set the delivery method to ‘CDN’ in the config\chartjs.php settings, this will load the specified Chartjs files via an external content delivery network. Chartjs versions 2, 3 and 4 are available by CDN. These also load Moment.js and Numeral.js which are commonly needed for business charts.

Publish

If you do not use JavaScript packages anywhere else in your application or are new to JavaScript development then you may not already have the Node Package Manager, Laravel Mix or Vite set up. In that case, this package includes pre-compiled versions of Chartjs that you can use in your application. To publish the chart.js binary to your application’s public folder (where JavaScript bundles are stored) you can publish the package’s pre-built distribution assets.

By default, the publish method will install Chartjs version 4 using the latest binary in the package. If you want to publish an older version, we have also included the latest stable Chartjs releases for version 3 and version 2. You can publish these to your public assets folder using the following commands:

// Publish Chartjs version 4 assets
php artisan vendor:publish --provider="IcehouseVentures\LaravelChartjs\Providers\ChartjsServiceProvider" --force --tag="assets"

// Publish Chartjs version 3 assets 
php artisan vendor:publish --provider="IcehouseVentures\LaravelChartjs\Providers\ChartjsServiceProvider" --force --tag="assets-v3

// Publish Chartjs version 2 assets 
php artisan vendor:publish --provider="IcehouseVentures\LaravelChartjs\Providers\ChartjsServiceProvider" --force --tag="assets-v2"

Binary

In some rare circumstances such as local development without an internet connection, private applications, shared servers or where you cannot access the public folder on your server, then you may wish to have end-users directly load the binary files. This method is not recommended because it streams the contents of the files from inside your application. This delivery method will load the Chartjs files normally published to your assets folder directly from inside your vendor folder. To use this method, set the delivery config variable to ‘binary’ and choose the Chartjs version you wish to use in the config file.

NPM (Recommended)

The recommended method to install Chartjs in a web application is to include it in your normal JavaScript and/or CSS bundle pipeline using NPM, Laravel Mix or Vite. For instructions on this method of installation please visit: https://www.chartjs.org/docs/latest/getting-started/

Usage:

You can request to Service Container the service responsible for building the charts
and passing through fluent interface the chart settings.

$service = app()->chartjs
    ->name()
    ->type()
    ->size()
    ->labels()
    ->datasets()
    ->options();

The builder needs the name of the chart, the type of chart that can be anything that is supported by Chartjs and the other custom configurations like labels, datasets, size and options.

In the dataset interface you can pass any configuration and option to your chart.
All options available in Chartjs documentation are supported.
Just write the configuration with php array notations and it works!

Advanced Chartjs options

The basic options() method allows you to add simple key-value pair based options, but it is not possible to generate nested options such as those used to do complex formatting on scales (Chartjs v3 example):

    options: {
        scales: {
            x: {
                type: 'time',
                time: {
                    displayFormats: {
                        quarter: 'MMM YYYY'
                    }
                }
            }
        }
    }

Using the optionsRaw() method it’s possible to add nested Chartjs options in raw format (Chartjs v2 example):

Passing string format like a json

        $chart->optionsRaw("{
 legend: {
 display:false
 },
 scales: {
 xAxes: [{
 gridLines: {
 display:false
 } 
 }]
 }
 }");

Or, if you prefer, you can pass a php array format and the package will convert it to the JSON format used by Chartjs:

$chart->optionsRaw([
    'legend' => [
        'display' => true,
        'labels' => [
            'fontColor' => '#000'
        ]
    ],
    'scales' => [
        'xAxes' => [
            [
                'stacked' => true,
                'gridLines' => [
                    'display' => true
                ]
            ]
        ]
    ]
]);

Examples

1 – Line Chart / Radar Chart:

// ExampleController.php

$chartjs = app()->chartjs
        ->name('lineChartTest')
        ->type('line')
        ->size(['width' => 400, 'height' => 200])
        ->labels(['January', 'February', 'March', 'April', 'May', 'June', 'July'])
        ->datasets([
            [
                "label" => "My First dataset",
                'backgroundColor' => "rgba(38, 185, 154, 0.31)",
                'borderColor' => "rgba(38, 185, 154, 0.7)",
                "pointBorderColor" => "rgba(38, 185, 154, 0.7)",
                "pointBackgroundColor" => "rgba(38, 185, 154, 0.7)",
                "pointHoverBackgroundColor" => "#fff",
                "pointHoverBorderColor" => "rgba(220,220,220,1)",
                'data' => [65, 59, 80, 81, 56, 55, 40],
            ],
            [
                "label" => "My Second dataset",
                'backgroundColor' => "rgba(38, 185, 154, 0.31)",
                'borderColor' => "rgba(38, 185, 154, 0.7)",
                "pointBorderColor" => "rgba(38, 185, 154, 0.7)",
                "pointBackgroundColor" => "rgba(38, 185, 154, 0.7)",
                "pointHoverBackgroundColor" => "#fff",
                "pointHoverBorderColor" => "rgba(220,220,220,1)",
                'data' => [12, 33, 44, 44, 55, 23, 40],
            ]
        ])
        ->options([]);

return view('example', compact('chartjs'));


 // example.blade.php

<div style="width:75%;">
    {!! $chartjs->render() !!}
</div>

2 – Bar Chart:

// ExampleController.php

$chartjs = app()->chartjs
         ->name('barChartTest')
         ->type('bar')
         ->size(['width' => 400, 'height' => 200])
         ->labels(['Label x', 'Label y'])
         ->datasets([
             [
                 "label" => "My First dataset",
                 'backgroundColor' => ['rgba(255, 99, 132, 0.2)', 'rgba(54, 162, 235, 0.2)'],
                 'data' => [69, 59]
             ],
             [
                 "label" => "My First dataset",
                 'backgroundColor' => ['rgba(255, 99, 132, 0.3)', 'rgba(54, 162, 235, 0.3)'],
                 'data' => [65, 12]
             ]
         ])
         ->options([]);

return view('example', compact('chartjs'));


 // example.blade.php

<div style="width:75%;">
    {!! $chartjs->render() !!}
</div>

3 – Pie Chart / Doughnut Chart:

// ExampleController.php

$chartjs = app()->chartjs
        ->name('pieChartTest')
        ->type('pie')
        ->size(['width' => 400, 'height' => 200])
        ->labels(['Label x', 'Label y'])
        ->datasets([
            [
                'backgroundColor' => ['#FF6384', '#36A2EB'],
                'hoverBackgroundColor' => ['#FF6384', '#36A2EB'],
                'data' => [69, 59]
            ]
        ])
        ->options([]);

return view('example', compact('chartjs'));


 // example.blade.php

<div style="width:75%;">
    {!! $chartjs->render() !!}
</div>

Advanced custom views

If you want to customise the appearance of all charts in your application (for example tweaking the mobile responsive css settings), then it is recommended to create a standard blade component and insert the {!! $chartjs->render() !!} reference inside your custom component (be sure to pass down the variable from your controller to your component). If for some reason need to edit the core blade template (for example to adjust the CDN logic or make deeper CSS changes to the canvas styling), then you can publish the blade template to your resources\vendor\laravelchartjs folder and edit the custom-chart-template.blade.php

To activate the custom blade template changes you can set the config option ‘custom_view’ to true.

php artisan vendor:publish --provider="IcehouseVentures\LaravelChartjs\Providers\ChartjsServiceProvider" --tag="views" --force

Issues

This README, as well as the package, is in development, but will be constantly updated, and we will keep you informed. Any questions or suggestions preferably open a discussion first before creating an issue.

License

LaravelChartjs is open-sourced software licensed under the MIT license.

Provenance

Some of the original logic for this package was originally developed by Brian Faust. The main package from which this current version of the package is forked was primarily developed and maintained by Felix Costa. In 2024 the package was adopted by Icehouse Ventures which is an early-stage venture capital firm based in New Zealand. We use Chartjs heavily in our Laravel applications and want to give back to the Laravel community by making Chartjs fast and easy to implement across all major versions and to streamline the upgrade path.

Laravel News Links

Discontinued and unreleased Microsoft peripherals revived by licensing deal

https://cdn.arstechnica.net/wp-content/uploads/2024/01/71V3DbiEJfL._AC_SL1500_-760×380.jpg

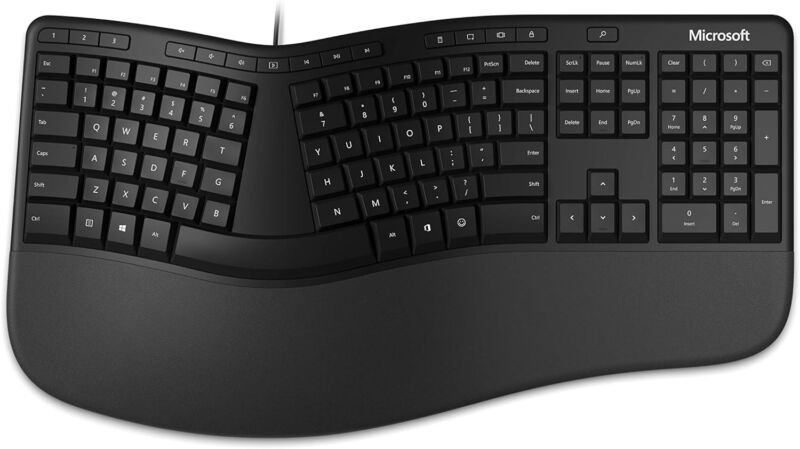
Microsoft Ergonomic Keyboard

Enlarge / The Microsoft Ergonomic Keyboard is making a comeback.

Microsoft

In April, Microsoft announced that it would stop selling Microsoft-branded computer peripherals. Today, Onward Brands announced that it’s giving those discarded Microsoft-stamped gadgets a second life under new branding. Products like the Microsoft Ergonomic Keyboard will become Incase products with "Designed by Microsoft" branding.

Beyond the computer accessories saying "Designed by Microsoft," they should be the same keyboards, mice, webcams, headsets, and speakers, Onward, Incase’s parent company, said, per The Verge. Onward said its Incase brand will bring back 23 Microsoft-designed products in 2024 and hopes for availability to start in Q2.

Some of the Microsoft-designed gear that Incase is relaunching.

Enlarge / Some of the Microsoft-designed gear that Incase is relaunching.

Incase also plans to launch an ergonomic keyboard that Microsoft designed but never released. Onward CEO Charlie Tebele told The Verge that there’s "potential" for Incase to release even more designs Microsoft never let us see.

Licensing deal

The return of Microsoft peripheral designs resurrects (albeit in a new form) a line of computer gear started in 1983 when Microsoft released its first mouse, the Microsoft Mouse.

Neither Onward nor Microsoft shared the full terms of their licensing agreement, but Onward claims that Incase will leverage the same supply chain and manufacturing components that Microsoft did, The Verge noted.

"Microsoft will still retain ownership of its designs, so it could potentially bring back classic mice or keyboards itself in the future or continue to renew its license to Incase," The Verge reported, pointing out that Onward isn’t licensing every single one of Microsoft’s computer peripherals. Some classics, like the Intellimouse or its modern iterations, for example, don’t make the Incase reboot list.

For its part, Microsoft is still "convicted on going under one single" Surface brand, Nancie Gaskill, general manager of Surface, told The Verge.

That said, in Microsoft’s old designs, Incase, whose website is currently filled with backpacks, bags, and laptop and AirPod cases, suddenly finds itself selling keyboards, mice, and other peripherals. Onward’s other brands, Griffin, Incipio, and Survivor, also don’t sell the types of products that Incase is licensing here. If all goes well, Incase could build its own computer accessories portfolio.

Microsoft’s initial departure from Microsoft-brand peripherals meant it would only focus on more expensive, higher-end designs worthy of Surface branding. But that left a gap for the numerous users who felt satisfied with Microsoft’s various designs that were simpler and more affordable. Incase’s venture could help serve those customers, while Microsoft’s legacy with such products can continue without major investment from the tech giant.

Here’s a full list of the Microsoft-designed peripherals that Incase plans to bring back in 2024:

Keyboards

  • Bluetooth Keyboard
  • Bluetooth Number Pad
  • Designer Compact Keyboard
  • Ergonomic Keyboard
  • Sculpt Comfort Desktop
  • Sculpt Ergonomic Desktop
  • Sculpt Ergonomic Keyboard
  • Wired Desktop 600
  • Wired Keyboard 600
  • Wireless Comfort Desktop 5050 AES
  • Wireless Desktop 850
  • Wireless Desktop 900

Mice

  • Bluetooth Ergonomic Mouse
  • Bluetooth Mouse
  • Mobile Mouse 1850
  • Modern Mobile Mouse
  • Sculpt Ergonomic Mouse

Audio

  • Audio Dock
  • Modern USB Headset
  • Modern USB-C Headset
  • Modern USB-C Speaker
  • Modern Webcam
  • Modern Wireless Headset

Ars Technica – All content

How to Call an External API Using Laravel (With Example)

https://laracoding.com/wp-content/uploads/2023/12/laravel-call-external-api.png

In this tutorial, we’ll create a Laravel application that interacts with an external API to fetch and display a paginated list of posts. We’ll also implement buttons that trigger delete and update calls to the external API. Calling external APIs allow us to integrate with any third parties that exposes their functionality accordingly.

Note the data will be fetched externally but the updates and deletes will be simulated since the test API (jsonplaceholder.typicode.com) we’re using is read-only.

We will be using the Laravel built-in Http facade to send the API calls. While you could also use Guzzle to do this, using the Http facade is the recommended way to go about it. Using the Http facade offers a concise syntax that is in line with Laravel and adds more features like mocking HTTP responses for automated testing.

Let’s get started!

Step 1: Set Up Your Laravel Project

Create a new Laravel project or use an existing one:

laravel new blog-cms
cd blog-cms

Step 2: Create Controller

Create a controller by running:

php artisan make:controller PostController

Step 3: Add Controller Code

Now let’s add code to the PostController to implement methods to show, update, and delete posts by triggering calls to the external posts API:

app/Http/Controllers/PostController.php

<?php

namespace App\Http\Controllers;

use Illuminate\Http\Request;
use Illuminate\Support\Facades\Http;

class PostController extends Controller
{
 public function index()
 {
 $response = Http::get('https://jsonplaceholder.typicode.com/posts');
 $posts = $response->json();

 return view('posts.index', ['posts' => $posts]);
 }

 public function edit($id)
 {
 $response = Http::get('https://jsonplaceholder.typicode.com/posts/' . $id);
 $post = $response->json();

 return view('posts.edit', ['post' => $post]);
 }

 public function update(Request $request, $id)
 {
 // Simulates update logic for a real application (not supported by this API)
 $response = Http::put('https://jsonplaceholder.typicode.com/posts/' . $id, [
 'title' => $request->input('title'),
 'body' => $request->input('body'),
 ]);

 // Simulated response for successful or failed update
 if ($response->successful()) {
 return redirect()->route('posts.index')->with('success', 'Post updated successfully!');
 } else {
 return redirect()->route('posts.index')->with('error', 'Failed to update post. Please try again.');
 }
 }

 public function destroy($id)
 {
 // Simulates deletion logic for a real application (not supported by this API)
 $response = Http::delete('https://jsonplaceholder.typicode.com/posts/' . $id);

 // Simulated response for successful or failed deletion
 if ($response->successful()) {
 return redirect()->route('posts.index')->with('success', 'Post deleted successfully!');
 } else {
 return redirect()->route('posts.index')->with('error', 'Failed to delete post. Please try again.');
 }
 }
}

Step 4: Define Routes

Define routes for post actions in routes/web.php as follows:

routes/web.php

use App\Http\Controllers\PostController;

Route::get('/', [PostController::class, 'index'])->name('posts.index');
Route::get('/posts/{id}/edit', [PostController::class, 'edit'])->name('posts.edit');
Route::put('/posts/{id}', [PostController::class, 'update'])->name('posts.update');
Route::delete('/posts/{id}', [PostController::class, 'destroy'])->name('posts.destroy');

Step 5: Create a Base Layout

Let’s use a simple layout that is based on bootstrap 5 that can show any content along with any success or error message that may occur. Create a file resources/views/layouts/app.blade.php and add:

resources/views/layouts/app.blade.php

<!DOCTYPE html>
<html lang="en">
<head>
 <!-- Other meta tags -->
 <link href="https://cdn.jsdelivr.net/npm/bootstrap@5.3.0/dist/css/bootstrap.min.css" rel="stylesheet">
 <link href="https://cdn.jsdelivr.net/npm/bootstrap-icons/font/bootstrap-icons.css" rel="stylesheet">
 <!-- Other CSS -->
</head>
<body>

 <div class="container mt-4">

 <!-- Display success or error messages -->
 @if (session('success'))
 <div class="alert alert-success">
 
 </div>
 @endif

 @if (session('error'))
 <div class="alert alert-danger">
 
 </div>
 @endif

 @yield('content')

 </div>
</body>
</html>

Step 6: Create a View to Show Posts From API

Generate a Blade view to display the paginated list of posts. Create a file resources/views/posts/index.blade.php and add:

resources/views/posts/index.blade.php

@extends('layouts.app')

@section('content')
 <div class="container mt-4">
 <h1>Posts</h1>
 <div class="table-responsive mt-3">
 <table class="table table-striped">
 <thead>
 <tr>
 <th>Title</th>
 <th>Body</th>
 <th>Actions</th>
 </tr>
 </thead>
 <tbody>
 @foreach($posts as $post)
 <tr>
 <td></td>
 <td></td>
 <td>
 <div class="d-flex">
 <a href="" class="btn btn-sm btn-primary me-2">
 <i class="bi bi-pencil"></i>
 </a>
 <form action="" method="POST">
 @csrf
 @method('DELETE')
 <button type="submit" class="btn btn-sm btn-danger">
 <i class="bi bi-trash"></i>
 </button>
 </form>
 </div>
 </td>
 </tr>
 @endforeach
 </tbody>
 </table>
 </div>
 </div>
@endsection

Step 7: Create Blade View for Edit Post From API

Create a Blade view for the post edit form in resources/views/posts/edit.blade.php. Include the form with populated data, the correct action/route, and @csrf:

resources/views/edit.blade.php

@extends('layouts.app')

@section('content')
 <div class="container mt-4">
 <h1>Edit Post</h1>
 <form action="" method="POST">
 @csrf
 @method('PUT')
 <div class="mb-3">
 <label for="title" class="form-label">Title</label>
 <input type="text" class="form-control" id="title" name="title" value="">
 </div>
 <div class="mb-3">
 <label for="body" class="form-label">Body</label>
 <textarea class="form-control" id="body" name="body"></textarea>
 </div>
 <button type="submit" class="btn btn-primary">Update</button>
 </form>
 </div>
@endsection

Step 8: Test the Application

Run your Laravel server using php artisan serve and navigate to http://localhost:8000 in your browser. You’ll have a paginated list of posts with functional delete and edit buttons, and an edit form ready for updates.

Note: The buttons will work to show edit form and trigger updates as well as deletes calls to the external API. However, the data in the API will not actually change since it is a public read-only API made for testing purposes.

Screenshot Showing Posts as Retrieved From The External API
Screenshot Showing a Form to Edit a Single Post as Retrieved From The External API

Conclusion

Good job! You’ve successfully created a Laravel application that fetches and displays posts from an external API. You’ve also added buttons to delete posts and update by sending the respective API calls from your controller. I’ve also covered some basic error handling that redirects with either a success or an error message whichever applies.

While the placeholder API I showed here is read-only and the edits and deletes have no effect on the data, the principle is the same for a real API.

With this knowledge you can go ahead and start integrating real-world REST API’s into your Laravel application. Happy coding!

References:

Laravel News Links

How Many Different Games of Tic-Tac-Toe Are There?

https://theawesomer.com/photos/2024/01/tic_tac_toe_t.jpg

How Many Different Games of Tic-Tac-Toe Are There?

Link

We assumed there were thousands of different ways that a game of tic-tac-toe could turn out. While the game board allows for more than 255,000 combinations of Xs and Os, there are far fewer gameplay outcomes. Musician and coder Marc Evanstein ran the numbers and argues there are only 14 different games to be played. (Thanks, Orion!)

The Awesomer

McMaster-Carr Impressed Me with an Email Update

https://i0.wp.com/toolguyd.com/blog/wp-content/uploads/2024/01/McMaster-Carr-Website-Screen-Capture-2024.jpg?resize=600%2C468&ssl=1

McMaster Carr Website Screen Capture 2024

McMaster-Carr is one of the best online suppliers, period.

I’ve ordered all kinds of tools, parts, and materials from McMaster-Carr over the years. While they are perhaps best known to engineers, fabricators, industrial professionals, and other such users, I’m sure they also cater to artists and all kinds of other people.

Looking back at my email history, I have been ordering from McMaster Carr for more than 17 years.

Not every experience has been perfect, but their excellent customer service is always quick to help.

There’s been one exception – I never succeeded in getting a printed catalog.

McMaster Carr Email Shipping Notification

I placed a new order the other day and received my shipping confirmation today via email.

With this shipping confirmation, I realized that McMaster is now highlighting what’s on the way.

The subject line reads:

Shipped: Dowel Pins, Shafts, and Socket Head Screws

The email more or less says the same, and includes a printable packing slip attachment and UPS tracking information:

We shipped the dowel pins, shafts, and socket head screws on your December 31st order. You will receive them tomorrow. Track your shipment using UPS [redacted]

It’s increasingly rare to see usability improvements like this.

Telling me that order 1234ABCDE has shipped with “2 items on the way” isn’t very helpful if it requires a couple of clicks to get more details.

In general, I feel that McMaster-Carr respects my time more so than a lot of other online suppliers.

When working on larger projects, I might place multiple McMaster orders over the course of a week or month. Highlighting the top parts of an order in the subject line is going to help me sort through order notifications more quickly.

This is a very minor change, but one that provides added convenience. That’s increasingly rare these days, as too often “improvements” end up making things less user friendly.

ToolGuyd

How Gaston Glock rocked the firearms world


The announcement of Gaston Glock’s death last week, at the age of 94, has brought forth a wave of obituaries and reminiscences about "the way things used to be" in the firearms industry.  Very few individuals can be said to have changed the way arms manufacturers designed, built and marketed their products.  Glock stands tall in the most illustrious of that group, including inventors such as John Moses Browning, Samuel Colt and Hiram Maxim.  He does so, not because he improved the technology in the market at the time, but because he drastically streamlined and improved the productivity of the industry.  Since then, no-one’s looked back.

Glock got into semi-auto pistol manufacturing in 1980 when by chance, he overheard two Austrian Army officers discussing the bidding process for a new service sidearm.  Initially rebuffed by the military powers that be, because he’d never built a firearm before and they presumed him to be ignorant, he took his case to the Austrian Minister of Defense and gained permission to compete for the Army’s handgun program.  He won the contest, and – over the next couple of decades – the worldwide handgun market as well.

"That I knew nothing [about guns] was my advantage," Mr. Glock said in an interview. He bought a number of handguns and disassembled them in his workshop, examining each component for its function while weighing potential improvements. He made prototypes and test-fired them with his left hand; if he was maimed by an explosion, he could still draw blueprints with his right. The product of his efforts was a nine-millimeter semi-automatic pistol that he designated the Glock 17 because it was his 17th invention.

Most notably, the frame of the new Glock pistol was built of industrial plastic, making it lighter and more resistant to corrosion than the conventional all-steel guns in use up to that time. The handgun’s various parts were housed in separate subgroups, making them easy to remove and replace. There was no safety or decocking lever to confuse the user. (The safety was built right into the trigger.) All told, the Glock 17 was a revolutionary new version of a weapon that had remained largely unchanged for a century.

There’s more at the link.

Glock was in the right place at the right time, with a thoroughly modern engineering approach to his work that defied older stereotypes.  While more "traditional" manufacturers made each of their successive models an improvement over their predecessor, never differing that much from their forebears, Glock was willing to ask every time, "Why should this be done like that?  Is there any good reason to uphold the status quo, or can we get rid of older, more time-consuming, more material-dependent processes and use modern engineering to come at the problem(s) in a completely new way?"  To everyone’s surprise, asking that question was the key to the handgun market;  and Glock made very sure to grab hold of that key and retain it as long as he possibly could.  Today, his firm dominates the handgun industry, with many clones of his designs available worldwide.

I liked the Glock from the first time I handled one.  It was lighter than most of its early competitors, and had far fewer parts (34 of them in most full-size Glocks).  That’s a major step forward in simplicity.  As one who’d seen combat in the worst terrain in Africa, where complex weapons systems tended to get chewed up and spat out by the surrounding landscape at the drop of a hat, I’d long been a believer in the old proverb, "Keep It Simple, Stupid!" (K.I.S.S.).  In my personal firearms today, I continue to maintain that perspective, which is why I own more Glocks than any other brand of pistol.  They may look and feel clunky compared to a race-tuned competition pistol, and lack all the little details that illustrate that a gun is a prized possession that’s been "tweaked" to express its owner’s pride of ownership;  but they’ve never let out a "Click" instead of a "Bang!" when failure was not an option.  That sort of reliability in a personal defense weapon is worth gold, and then some.

Well, Mr. Glock has now gone to his reward.  I wonder if he was met with an honor guard of Glock-toting angels at the Pearly Gates?  If ever a man deserved such an accolade, it’s him.

Peter

Bayou Renaissance Man