https://production.ams3.digitaloceanspaces.com/2021/07/Social-Sharing-photo-Template-1-4.png
Among all the features that Laravel provides out of the box, the authentication packages get the most attention from any newcomer. The fact that one can get functional authentication flow by executing a single command seems like magic.
Apart from the traditional form-based authentication approach, Laravel comes with two dedicated packages for API authentication. They are Laravel Passport and Laravel Sanctum.
Between the two packages, Sanctum is easier to work with, targeted at SPAs, and uses a cookie-based approach. Passport on the other hand provides a full OAuth2 server implementation for your applications.
Table of Content
- Introduction to OAuth2
- Implementing Authorization Code Grant
- Building The Authorization Server with Laravel and Passport
- Installing and Configuring Passport
- Installing Laravel Breeze
- Registering a New User and a New Client
- Building The Client Application with Vue.js and Bulma.css
- Designing a Simple Home Page with a Navigation Bar
- Implementing The First Phase (Redirect Functionality)
- Implementing The Second Phase (Callback Functionality)
- Properly Persisting Access Tokens
- Making Request to Protected Routes
- Implementing The Logout Functionality
- Implementing Automatic Token Refresh Functionality
- Fixing The Authorize Page Design
- Building The Authorization Server with Laravel and Passport
- Other Grant Types
- Conclusion
Introduction to OAuth2
According to Wikipedia – “OAuth is an open standard for access delegation, commonly used as a way for Internet users to grant websites or applications access to their information on other websites but without giving them the passwords.”
Consider a situation where you want to use a third-party email application like Blue Mail where you don’t submit your login credentials to the client application itself. Instead, the client application redirects you to the official Gmail login page and gets hold of your account once you’ve logged in. That’s OAuth at a basic level.
OAuth was first introduced in 2007 and OAuth2 was introduced in 2012 as a revision to the previous version. Before diving into the implementation of OAuth2 using Passport, you’ll have to understand some fundamental concepts.
- Authorization Server: The authorization server is the application responsible for logging the user in. In the example above, Twitter acts as the authorization server.
- Resource Server: In some cases, the server responsible for authorizing the request and the server responsible for providing the data can be different. Google for example authorizes requests from accounts.google.com and serves resources from other servers.
- Client: The client is the third-party website or application asking for authorization. In the example above, the Blue Mail application is the client.
- Resource Owner: The resource owner or user is the person who owns the data that the client wants to access.
- Grant Types: The grant types in OAuth2 are different authentication flows suitable for different situations. The most common grant type is authorization code grant.
Don’t worry if you don’t understand these clearly. Everything will become much clearer as you start implementing them. Also, this is not a definitive list. I’ve only mentioned the concepts that I think you should know right away.
Implementing Authorization Code Grant
The authorization code grant type is probably the most common flow when it comes to OAuth and can be broken into two phases:
Phase 1: The client redirects the user to a special route on the authorization server with a certain set of parameters. In the case of Laravel Passport, this special route is /oauth/authorize and the required parameters are as follows:
- client_id – This will be provided by the authorization server.
- redirect_uri – This is a route on the client, usually /callback or /auth/callback but can be anything else.
- response_type – The type of code expected by the client. In the first phase, the value should be code.
Once the client makes a successful request with all the above-mentioned parameters, the server lets the user login and redirects back to the client application with an authorization code in the query string.
Phase 2: The second phase begins with the extraction of the authorization code from the query parameter. The client then has to make a second request to another special route on the authorization server.
This time the request has to be a POST request and contain another set of parameters in the request body. In the case of Laravel Passport, this second special route is /oauth/token and the required parameters are as follows:
- client_id and redirect_uri will be the same as was in the previous request.
- client_secret – This will be provided by the authorization server just like the ID.
- grant_type – Indicates the type of grant which in this case is authorization_code.
- code – The code received from the server as a result of the previous request.
If the request is successful, the server will respond with an access token and a refresh token. The access token is your key to the protected data on the resource server and it expires after a certain period. The refresh token can be used for requesting a new access token once the current one expires.
All these functionalities will become much clearer as you implement the authorization grant type by yourself. So, without further ado, let’s jump in.
Building The Authorization Server with Laravel and Passport
I usually use the laravel/installer package to bootstrap my projects. As long as you know what you’re doing, you may use any other approach.
laravel new auth-serverOnce the bootstrapping process is finished, open the project directory in your code editor of choice. If you have MySQL installed on your computer, then you can use that. But for the sake of simplicity, I’ll configure SQLite as the default database connection.
To do so, open up the .env file and replace all the database related variables with the following single line:
# ...
DB_CONNECTION=sqlite
# ...
Now create an empty file database/database.sqlite inside your project directory.
This is the default database name and path for SQLite in Laravel. The final step is to migrate the database by executing the php artisan migrate command.
Installing and Configuring Passport
Like any other PHP package, Laravel Passport can be pulled in using Composer. To do so, open your terminal inside the project directory and execute the following command:
composer require laravel/passportDepending on your internet speed, the installation process may take a few seconds. The package comes with some migration scripts of its own. So, once it’s pulled in, the next step is to migrate your database once again.
php artisan migrate:freshThe migrate:fresh command, as you may already know, drops all your database tables and re-runs the migrations. Now if you open your database using a tool like DB Browser for SQLite, you’ll see that five new database tables have been created with oauth_ prefix.
The third and final step is to generate encryption keys needed to generate secure access tokens. The documentation at this point instructs you to execute the php artisan passport:install command.
This command creates the aforementioned encryption keys and also creates two OAuth clients which we aren’t going to use. So, instead of executing the passport:install command, execute the passport:keys command which skips the client creation step.
php artisan passport:keysNow that the package is installed, you can start modifying your code to utilize it. First, make sure your App\Models\User class is using the Laravel\Passport\HasApiTokens trait.
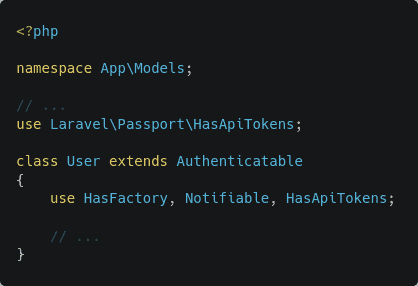
This trait implements the relationship between a user and the clients and tokens. Next, open up your App\Providers\AuthServiceProvider class and in the boot method, add a call to the Laravel\Passport\Passport::routes() method.
This method registers a bunch of new routes necessary for performing Passport-related actions. To make sure that the routes have been registered successfully, execute the following command:
php artisan route:list | grep oauthAs long as you see a bunch of routes prefixed with oauth/ you’re good to go. Finally, you’ll have to change the driver for the api guard inside the config/auth.php file.
Inside the guards array, the default driver for the api guard is token in any new Laravel project. Change that to passport and now your application will use Passport’s TokenGuard when authenticating incoming API requests. Any route that uses the auth:api middleware is now protected by Laravel Passport.
Installing Laravel Breeze
Apart from Laravel Passport, you’ll also need login and register pages for the redirected users to interact with. You can either make your custom register and login routes or use the Laravel Breeze starter kit.
Laravel Breeze will provide you with beautiful-looking auth scaffolding accompanied by the necessary controllers and routes. Execute the following command to install Laravel Breeze in your project:
composer require laravel/breeze --devNext, execute the breeze:install command to publish all the resources that come with Laravel Breeze.
php artisan breeze:installOnce the assets have been published to your project, you’ll have to compile the CSS file. To do so, execute the following commands inside the project directory:
npm install
npm run dev
Finally, migrate your database by executing php artisan migrate:fresh and you’re ready to register a new user.
Registering a New User and a New Client
To create a new user, start the project by executing php artisan serve and visit the http://localhost:8000/register route:
Create a new account using whatever name, email address, and password combination you want. I usually use characters from books I’ve read as dummy users. Now that you have a user, all that is left is creating a new client that can act on behalf of this user.
Clients, as I’ve already said in a previous section, are websites or applications that can act on behalf of a user. For a client to be able to ask for authorization, it has to register with the authorization server. Usually, it’s done through user interfaces, but in this case, we’ll use the terminal.
To create a new client on the auth server, execute the php artisan passport:client command:
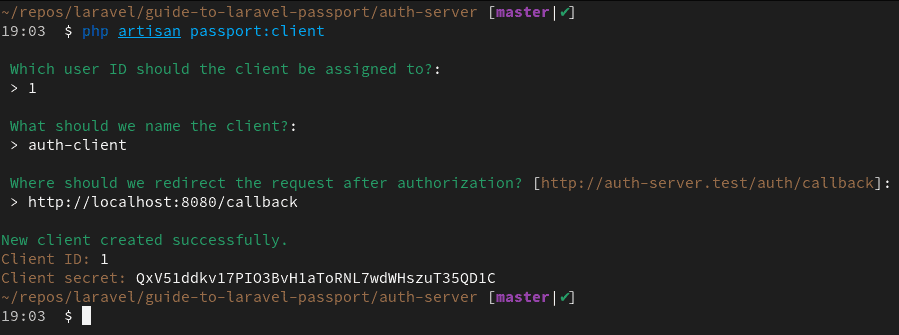
You’ll be asked a bunch of questions. The user ID refers to the owner of this client. In my case, this is 1 because Athelney Jones is the only user I have in my database. The client name can be anything. This is only needed for easy identification of the client.
Finally, the callback URL is where the user will be redirected after they’ve logged in. This is usually a route on the client application. My client application will run on port 8080. That’s why I’ve used http://localhost:8080/callback as the redirect URI. Copy the client ID and client secret somewhere safe – you’ll need them soon.
The server is now ready to handle requests from clients. So in the next section, you’ll learn about creating a client application.
Building The Client Application with Vue.js and Bulma.css
For creating a new project, I usually use Vue CLI 3 for bootstrapping my Vue.js projects. If you want to use something else like React, you may do so. I’ll try my best to keep the explanations simple and easily replicable.
vue create auth-clientIn the next step, manually select features and make sure to select Router from the list of features. Also, make sure that you pick version 2.x and not 3.x to be completely in line with this article. I’m using version 2 of Vue.js as many people are not yet familiar with version 3.
Once the project has been bootstrapped, you’ll have to install axios/axios for making HTTP requests to the server and ljharb/qs for building/parsing query strings. You’ll also have to install the Bulma CSS framework. All these packages can be installed in a single command.
npm install axios qs bulmaThat’s all in terms of package installation for this project. Next, you’ll have to create a .env file on the project root.
Open up the file and add the following environment variables to it:
VUE_APP_OAUTH_CLIENT_ID=
VUE_APP_OAUTH_CLIENT_SECRET=
VUE_APP_OAUTH_CLIENT_REDIRECT=
VUE_APP_OAUTH_AUTH_SERVER=
Make sure you prefix all the variable names with VUE_APP_ or else they won’t be embedded in the client bundle. Populate the VUE_APP_OAUTH_CLIENT_ID, VUE_APP_OAUTH_CLIENT_SECRET, and VUE_APP_OAUTH_CLIENT_REDIRECT fields with the values according to the client you created earlier.
Don’t worry if you didn’t save them somewhere safe – you can retrieve the ID, secret, and redirect URI from the oauth_clients table in your database.
The value of VUE_APP_OAUTH_AUTH_SERVER will be the URL of the authorization server. The authorization server runs on port 8000 by default, so you can put http://localhost:8000 here.
Designing a Simple Home Page with a Navigation Bar
In terms of the user interface, it’ll be a very simple one. I’ll not get into components and other stuff to keep this article simple. Begin by updating the src/App.vue file as follows:
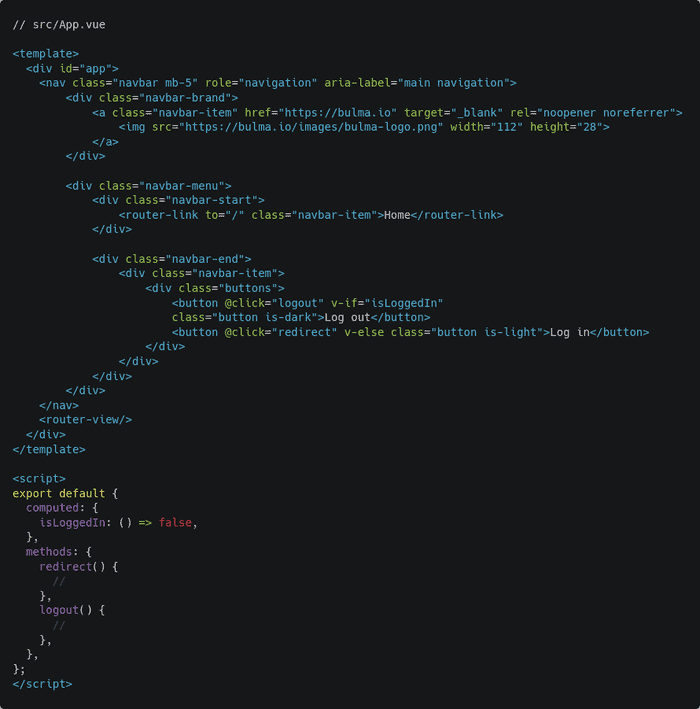
This is the code for a simple navigation bar with a Bulma logo and a log-in button. That isLoggedIn boolean will be replaced by a proper computed property later on. Also, the code for the redirect() and logout() methods will be written later. Next, open the src/views/Home.vue file and update its code as follows:
This code renders a simple message on the screen depending on whether the user is logged in or not. Just like the navigation bar, the isLoggedIn boolean will be replaced by a proper computed property later on.
The views are almost ready to use, but there is only one last thing to do. Open the src/main.js file and add the following line of code in there:
import 'bulma/css/bulma.min.css';Now start the application by executing npm run serve and visit http://localhost:8080 in your browser.
That’s good enough for this article. You’ll have to create one more view for the application to work. Create a new file src/views/OAuthCallbackHandler.vue and put the following code in there:
Finally, open the src/router/index.js file and map this view to /callback route.
You can delete unnecessary files like src/views/About.vue and src/components/HelloWorld.vue from the project. Now that the necessary views are ready, let’s begin implementing the functionalities.
Implementing The First Phase (Redirect Functionality)
I hope that you remember that in the first phase of the authorization process, the client redirects the user to the /oauth/authorize route on the authorization server.
I’ve also mentioned that the client will have to send a bunch of parameters in the query string. The required parameters are client_id, redirect_uri, and response_type.
Open your src/App.vue file and update the code for the redirect() method as follows. Most of the changes are in the script section and there is a minor change in the template section.
The qs.stringify() function converts objects into URL encoded query strings. So the `${process.env.VUE_APP_OAUTH_AUTH_SERVER}/oauth/authorize?${qs.stringify(queryString)}` statement will translate to http://localhost:8000/oauth/authorize?client_id=1&redirect_uri=http%3A%2F%2Flocalhost%3A8080%2Fcallback&response_type=code during runtime. Setting this value to window.location.href causes a redirect. This is basic JavaScript stuff, nothing fancy.
Let’s test it out. Start the auth-server project on port 8000 by executing php artisan serve – port 8000 and start the auth-client project on port 8080 by executing npm run serve commands.
Now open http://localhost:8080 on the browser and you should see something as follows:
Click on the log-in button and you should be redirected to the authorization server running on port 8000 automatically by the client. Put in your email address, password combination, and hit log in.
You should see a pretty nasty-looking page, but don’t worry, that’s completely fine.
This happens because the Laravel Passport package still uses Bootstrap but the new Laravel projects don’t come with Bootstrap built-in. I’ll show you how to fix this later on, but for now, click on the authorize button and you should be presented with the following page:
This means that the server has authorized the request and sent the user back to the client. The callback URL was http://localhost:8080/callback and that’s what you’ll find in the browser’s address bar. You’ll also find a long string of code in the query parameter.
Implementing The Second Phase (Callback Functionality)
The second phase, as I’ve already explained, begins by extracting the authorization code received as a query parameter.
http://localhost:8080/callback?code=def5020090a4967a72ee90c96309c39238622e4f92b7d1801efaf3b38b49dc5f9e00bca0ad249aa5181aeac3d5fb9462104aa28c2daf41c6d7f6412eb45f3c518c183e60656974892c2f430da24699bfde42a0e6f23ad9a10fe8feb239dbf9483cee9f223ee87aa1c74378592597786429e69885a3042783d23932cbed4a06a0dc68143d2162ce5bb82bf7d2038d2069f33984d99fd7acc9bbabeb804f0c0f7ddeb722d6b16dc5aad46199e11457b639b7eb2f07876b087279dfb8cc65a2dac3bc59939812c60b5b13ec9bc42f559ad1a3006eff9c791ee5523bc5c7f3812584c577e646ede4739e0a291fd8203bc23fb4518be06b79f4bcc15c8c4be4899bfdeea7518ac1c1116ca9921c20a124421ff6094e567e4006fe9af0fc432acb6a2d74f5ac1276f0b573f90ee14d9348129aa173d262aaa5068b9c25edb7f25032f6d91cef36e73ca0f270d931b74ec2f3d29f436099ec9e9a6969ade3ce5565This long string labeled as code in the query parameter is the authorization code. The client application will have to make a second request to the /oauth/token route on the authorization server.
Open up the src/views/OAuthCallbackHandler.vue file and add a new mounted hook as follows:
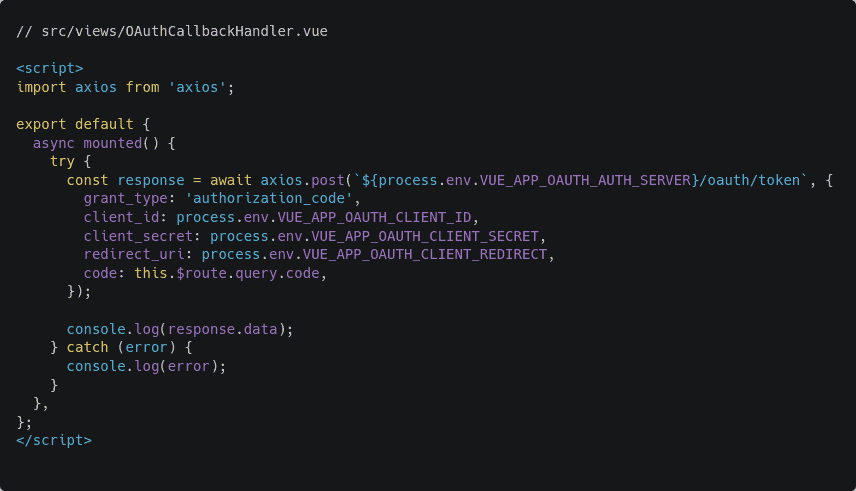
As you can see, the view makes a POST request to the authorization server with a set of parameters in the request body. The client_id and redirect_uri are the same as the previous request.
Three new additional parameters have been added. They are the client_secret, the grant_type, and the code. The code parameter is the authorization code that came back from the authorization server.
To test out the new functionality, restart the client application and perform the entire authorization flow once again. This time, after the server redirects you back to the client, you should see the following output in the browser console:
The server has responded with token_type, an access_token, a refresh_token, and an expires_in variable. This access token is what you need for accessing protected information on the server.
Properly Persisting Access Tokens
Now that the client has received an access token from the server, it has to be persisted. In this article, I’ll save the access token and the refresh token in local storage. Although this approach is not liked by a lot of people, it’s good enough for an article like this.
Open up the src/views/OAuthCallbackHandler.vue file once again and update the mounted hook as follows:
Instead of logging the response to the console, tokens are now saved in the local storage. The router.push() statement sends you to the home page. Restart the application and do the authorization flow from the beginning. This time, you should be redirected to the home page instead of being stuck at the “Logging you in…” message.
Also, check the browser’s local storage and you should see the access token and the refresh token there.
Persisting the access token in the local storage alone is not enough. The access token is a shared piece of data. That means multiple views are dependent on it. Such data should be served from a single source of truth such as Vuex. but using Vuex for a project as simple as this one seems like overkill. A simple DIY store pattern should do the trick. Create a new file src/store.js and put the following content in it:
The Vue.observable() function makes a variable reactive. Assuming that you’re familiar with the concepts of getters, mutations, and actions in Vuex, this code should be pretty self-explanatory. The setToken() mutation sets a given token value in the store. The isLoggedIn() getter returns true or false depending on the existence of a token.
Now go back to the src/views/OAuthCallbackHandler.vue file and update its mounted hook as follows:
The only change I’ve made is importing the mutations from the store and calling the setToken() mutation with the received access token passed as the parameter.
Also, now that you’ve implemented a store, open src/views/Home.vue and src/App.vue files and update the isLoggedIn computed property as follows:
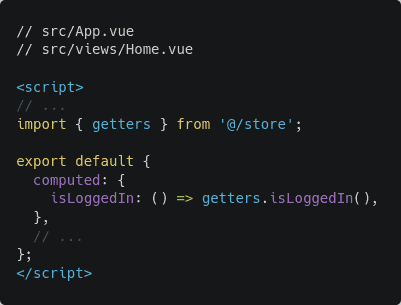
Manually clear the tokens from local storage and perform the entire authentication flow one more time. This time you should be redirected to the home page just like before, but the home page may look a bit different.
Due to the access token being present in the local storage, the isLoggedIn computed variable becomes true. I hope you remember that the “You’re not logged in!” message only shows up if the computed variable is false.
However, this message was supposed to be “Welcome back Athelney Jones!” but you haven’t yet requested the user information from the server. In the next section, I’ll show you how you may use the access token to request such information from the server.
Making Request to Protected Routes
Every Laravel project comes with a protected API route registered inside the routes/api.php file. The /api/user route returns information about the currently authenticated user. In this section, you’ll request the aforementioned route and retrieve the user information.
Open up the src/views/Home.vue file and update its mounted hook as follows:
Once mounted, the home view checks if a user is logged in or not. If yes, the client requests the aforementioned protected route. The client also sends the access token in the Authorization header. Appending Bearer before the access token is required – this is the token type.
Once the data has been fetched, the client then fills the previously defined empty user object with the values from the server. You can look at the user data by simply adding a console.log(response.data); statement somewhere in the function.
Restart the client application and try performing the authentication flow again. This time you should see the user’s name on the home page.
Congratulations if you do see the name. If you don’t, you can always look at the reference repository that comes with this article. Now that you’ve completed the entire authentication flow, the only thing that’s left is implementing a log-out functionality.
Implementing The Logout Functionality
Open up the src/store.js file and add the following snippet of code at the end of the file:
This is a simple logout action that wipes out the tokens from local storage and sets null as the token value in the store.
Now open the src/App.vue file and update the code for the logout() method as follows:
Try hitting the log-out button now and you should be back where you were before logging in.
Also, check the local storage and you should see the tokens disappear. With that, you’ve successfully implemented a complete authentication system with Laravel Passport. In the next sections, I’ll show you some additional functionalities that you should know about.
Implementing Automatic Token Refresh Functionality
I’ve already mentioned in a previous section that all the access tokens and the refresh tokens have a validity period. This plays a big role in your application’s security.
By default Laravel Passport issues tokens with a validity period of 1 year. What if someone manages to steal one of your access tokens and wreaks havoc in your account?
To prevent this from happening, you should issue tokens with much shorter validity periods. When a token expires, you can use the refresh token and the client secret to request a new access token from the server.
Open the App\Providers\AuthServiceProvider file in the authorization server project and update the code for the boot() method as follows:
For this example, I’m configuring my access tokens to be valid for 15 days and the refresh token for 30 days. You can increase or decrease as per your needs. The refresh token can have a longer period of validity. Even if someone manages to steal the refresh token, it’ll be of no use without the client secret.
Next, you’ll have to write an Axios interceptor in your client application project. Create a new file services/http.js file in your client application project and put the following code in there:
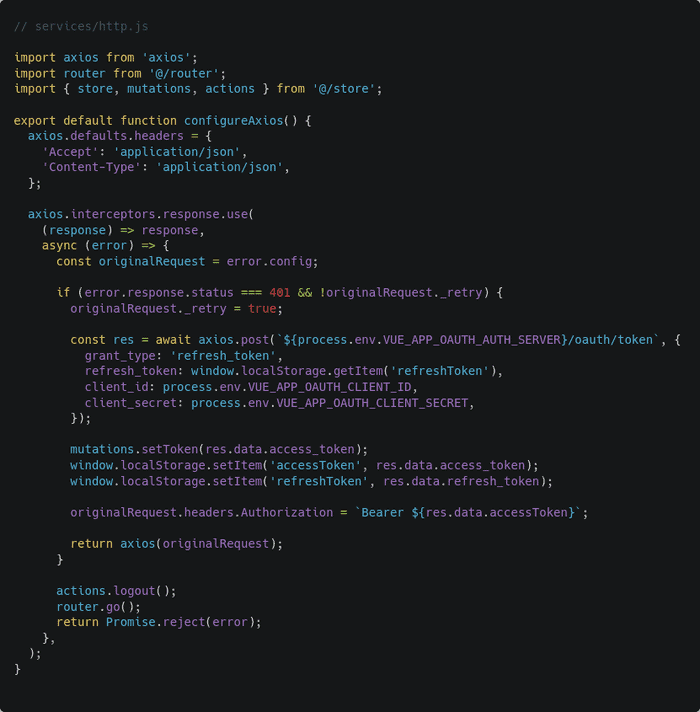
An interceptor, as the name suggests, is capable of intercepting an ongoing request or incoming response. In the code above, I’ve written a very simple response interceptor for refreshing expired tokens automatically.
The axios.interceptors.response.use() function takes two callback functions as parameters. The first one is triggered if the response is successful and the second one is triggered if the response is a failure.
In case of a failure, the failed request configuration is saved inside the originalRequest constant. The originalRequest._retry boolean indicates if the request has already been retried or not.
Laravel Passport returns 401 status code for expired token. So if the error code is 401 and Axios hasn’t retried the request yet, the client sends a request to /oauth/token in the authorization server just like in the callback route. This time, however, the grant_type is refresh_token instead of authorization_code.
The client receives a set of new tokens from the server. It then saves the tokens to the local storage, updates the access token in the failed request, and returns the updated request for Axios to retry.
If the request fails again then the client will fire the logout action and refresh the page. The router.go() function, when called without any parameter, refreshes the current view.
To use this interceptor in your application, add following lines code in the /src/main.js file:
Rest of the code remains unchanged. That’s it. Axios is now globally configured to use the interceptor.
Let’s test out this functionality. First, go back to App\Providers\AuthServiceProvider file in the authorization server project and replace the Passport::tokensExpireIn(now()->addDays(15)); line with Passport::tokensExpireIn(now()->addSeconds(15)); line. This will reduce the validity of access tokens from 15 days to 15 seconds.
Now restart the client application. Clear any previous tokens from the local storage and do the entire authentication flow. Make sure that you keep the browser console open.
Once you’re logged in, wait for 15 seconds on the home page. Once the token has expired, refresh the page. If everything goes fine, you should see the user name appear on the home page just like before but, pay attention to the console window.
As you can see, the request failed with a code of 401. But then the refresh functionality kicked in, refreshed the token, and resent the request to the server with the new access token.
You can look at the network tab as well and you should see something as follows:
As you can see, the fourth request from the top has received a 401. The seventh request then fetched a new token from the server. Finally, the last request has successfully fetched the user information using the new access token.
Fixing The Authorize Page Design
In a previous section, you saw that the authorization page’s design was completely broken.
This can be fixed very easily. Open a terminal window inside your authorization server project and execute the following command:
php artisan vendor:publish --tag=passport-viewsThis publishes a file resources/views/vendor/passport/authorize.blade.php on your project directory. Open that file and replace the following line:
<link href="" rel="stylesheet">With the following line:
<link href="https://cdn.jsdelivr.net/npm/[email protected]/dist/css/bootstrap.min.css" rel="stylesheet" integrity="sha384-+0n0xVW2eSR5OomGNYDnhzAbDsOXxcvSN1TPprVMTNDbiYZCxYbOOl7+AMvyTG2x" crossorigin="anonymous">This is the link to the latest Bootstrap CSS file. That’s it, now the design should be fixed.
Other Grant Types
Apart from the authorization code grant type, Laravel Passport supports some other grant types. These are as follows:
- Password Grant Tokens
- Implicit Grant Tokens
- Client Credentials Grant Tokens
On oauth.net, the password grant tokens and the implicit grant tokens are labeled as legacy types and should be avoided. The client credential grant type, on the other hand, has very small use cases.
There is another concept called proof key code exchange, or PKCE for short, that can be useful when you don’t want to use a client secret. If you’ve understood the general authorization grant type properly, you should be capable of understanding PKCE from the official docs.
Conclusion
I would like to thank you for the time you’ve spent reading this article. I hope you’ve enjoyed it and have learned all the essentials of API authentication with Laravel Passport.
You can find the reference code for this article on this GitHub repository – https://github.com/fhsinchy/guide-to-laravel-passport. Although the code is almost the same as the article, there may be some minor changes here and there.
Laravel News Links