https://static1.makeuseofimages.com/wordpress/wp-content/uploads/wm/2025/05/private-dns-settings-on-android-smartphone.jpg
There are all sorts of different ways to speed up your internet connection. Believe me, I’ve tried most of them, stuck on an aging internet connection that doesn’t get much more than 60Mbps across the whole household. So I was surprised to find that this small tweak actually made a real difference. Best of all, it was super simple to set up.
Why Your Internet Speed Is Slower Than It Should Be
When I think about "slow internet," I immediately imagine a poor Wi-Fi signal or my ISP throttling my incoming connection. And while those can be factors, there’s often more going on. Even with a good plan and a decent router, several bottlenecks can creep in:
- ISP speed vs. real speed: The speed you pay for and the speed you get can differ, especially at peak times.
- Router placement: Sticking your router in a corner, behind furniture, or inside a cabinet can hurt Wi-Fi range and speed.
- Network congestion: Too many devices streaming or downloading at once can slow down the network for everyone.
- Outdated settings: Your devices and router have default configurations that might not be optimal for performance.
Think of your connection like a motorway. Even if you have the fastest car (a good ISP package), a traffic jam (inefficient settings) can still slow you down. This internet speed tweak tackles one of those hidden jams waiting to snarl you up.
Change Your ISP’s DNS Settings
The tiny change is to ditch your ISP’s default DNS settings for a faster and more reliable alternative.
Now, DNS (Domain Name System) is like the phonebook of the internet. When you type in a website like makeuseof.com, your device asks a DNS server to find its matching IP address. See, computers don’t look up the specific website name, MakeUseOf.com. Each website name corresponds to a specific numerical address on the internet. And when you hit Enter and start the search, the Domain Name System translates that human-readable name into a numerical IP address, and begins to locate the specific server hosting the website.
It feels like magic. But if your DNS server is slow, which is frequently the case with default ISP settings, it adds tiny delays to every page you attempt to load. This also extends to gaming, streaming, sending files, and so on. Basically, if you’re using a slow DNS, everything about your internet connection will feel like a drag.
Switching to a faster DNS can cut down those lookup times and make your internet connection feel faster.
I’ll caveat this by saying that you won’t suddenly find multiple extra megabytes of connection speed. That’s not how it works. However, it can bring marked improvement in responsiveness and page loading times, which, at the end of the day, contribute to your internet feeling faster than before.
Try These Alternative DNS Providers for Faster Internet Speeds
You’re probably wondering how on Earth you find a new DNS provider. Well, don’t worry; I’ve got you covered. There are two ways of doing this.
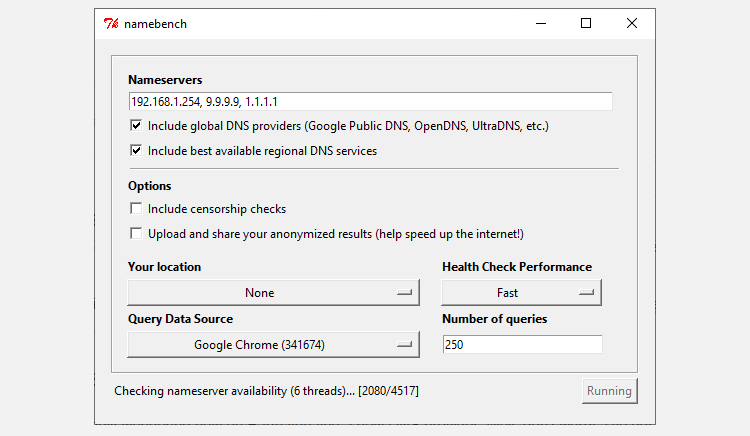
You could use a tool like Google’s Namebench to find out exactly which DNS provider will provide the absolute fastest DNS settings for your machine. It’s free and easy to use, but takes some time. However, it does provide the most accurate results. Namebench creates a unique list of DNS providers specific for your computer, which is super handy.
Alternatively, and this is the easy option, you can opt for one of the top alternative DNS providers that are known to be faster and more reliable, cutting out the testing phase. These alternative DNS providers include Google DNS, Cloudflare, and OpenDNS, and all frequently rank towards the top of DNS provider rankings. In that, you can’t go wrong using the following settings for your DNS provider:
|
Provider |
IPv4 DNS Addresses |
IPv6 DNS Addresses |
|---|---|---|
|
Google DNS |
|
|
|
Cloudflare |
|
|
|
OpenDNS |
|
|
|
Quad9 |
You’ll need some of these addresses to change your DNS settings in the next section.
How to Change Your DNS Settings
Thankfully, changing your DNS settings on almost any device is a straightforward process.
Take a screenshot of your existing settings in case you need them later or want to revert to your old DNS configuration.
How to Change Your Windows 11 DNS Settings
- Press Win + X to open the Power User Menu and select Network Connections.
- Select Advanced network settings. Then, select the network adapter you’re using, be that Wi-Fi or Ethernet.
- From the dropdown, alongside More adapter options, select Edit.
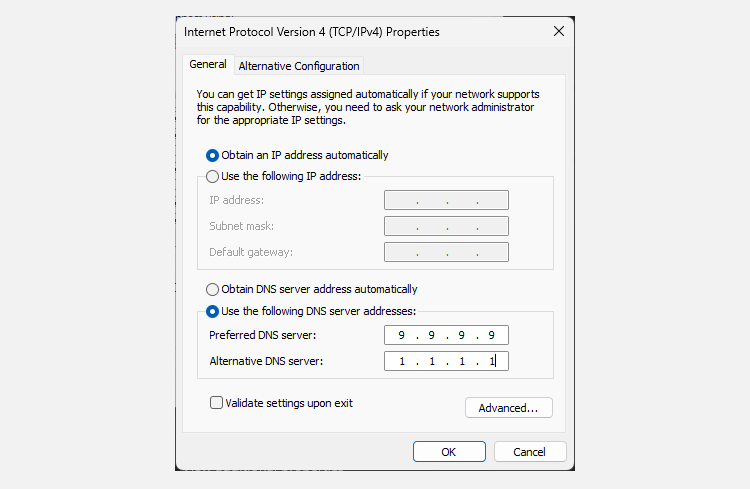
- Highlight Internet Protocol Version 4 (TCP/IPv4) and click Properties. Then, navigate to the Use the following DNS server addresses option. Now, enter one of the IP addresses from the section above, depending on which DNS provider you want to use. Once entered, click OK to save these settings.
- You’ll be returned to the Properties menu. From here, select Internet Protocol Version 6 (TCP/IPv6) and click Properties. Repeat the process for IPv6 DNS servers. Click OK to save your IPv6 DNS settings.
Once you’re done, close the settings window. You can start browsing the web once again.
How to Change Your macOS DNS Settings
To change your DNS on macOS:
- Open System Preferences.
- Click Network > Advanced.
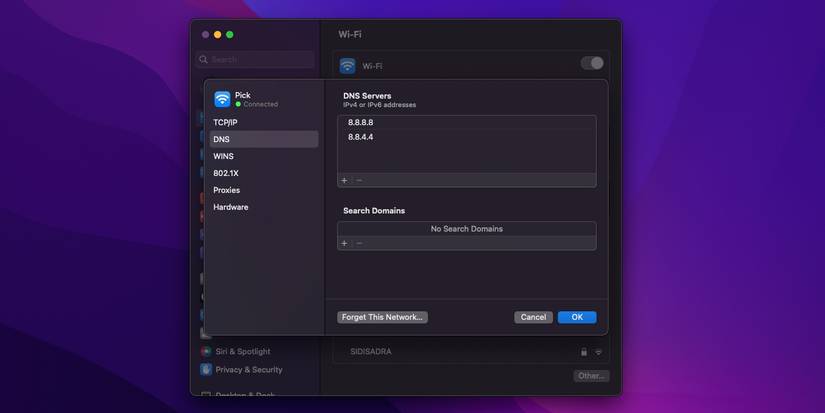
- Navigate to the DNS tab.
- Unlike on Windows, you can add and remove DNS servers using the + and – buttons on the window’s bottom left. Once you’ve clicked the + icon, you can enter the IP address of your desired provider.
Like Windows, once you confirm the settings, your new DNS provider will be in use.
How to Change Your DNS Settings on Linux
Given that there are so many Linux distros, the method for changing DNS varies. Furthermore, you can change your DNS settings on Linux via the user interface or through the command line, adding extra options. Considering this, I’m not going to delve into how to change DNS settings on each Linux distro; that would be a mammoth undertaking. However, you can check out how to change your Linux DNS settings in GNOME, KDE, and using the terminal, as well as how to change your DNS settings on Ubuntu.
How to Change Your iPhone DNS Settings
It’s similarly simple to change your DNS settings on an iPhone.
- First, head to Settings > Wi-Fi.
- Tap the ‘i‘ icon next to your connected network. This will open a settings page for the network you want to adjust. Scroll the page until you reach the DNS header.
- Tap the Configure DNS option. By default, this will be set to Automatic. Select Manual to enable further options. The Add Server field will appear Under DNS Server.
- Tap the button and enter the IP address of your desired provider.
Once complete, tap Save at the top right of the screen.
How to Change Your DNS Settings on Android Devices
The steps to change your DNS on Android vary depending on your device. However, for stock Android 9.0 and above, the steps are relatively similar (you may have to account for your specific version of Android, though).
- Open Settings > Network and Internet.
- Tap on the arrow to expand the Advanced settings. By default, the Private DNS field will be set to Automatic. Selecting that option will open an input window.
-
Tap Private DNS provider hostname. Here, you will need to use the DNS server’s hostname rather than the IP address, as below.
- Google DNS: dns.google.com
- Cloudflare: 1dot1dot1dot1.cloudflare-dns.com
- OpenDNS: doh.opendns.com
- Quad9: dns.quad9.net
Once you’re done and confirm the settings, your Android device will begin using the new DNS settings.
How to Change Your DNS Settings on Chrome OS
Chromebooks use Chrome OS. It’s a nimble, web-focused operating system frequently found in schools, but millions of people use it worldwide.
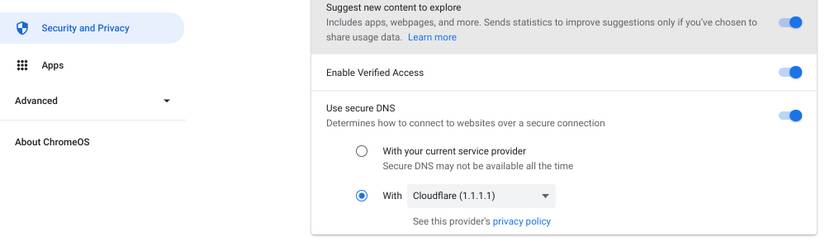
- Head to Settings > Security and Privacy.
- Find the Use Secure DNS setting and toggle it on.
- Now, select the With option, then use the dropdown menu to select either Cloudflare (1.1.1.1) or enter a custom DNS.
Your new DNS settings will work on any network you connect your Chromebook to.
As I’ve said, tweaking your DNS settings is a great way to optimize your internet settings and will definitely speed up your connection. Just don’t expect multiple-digit bandwidth increases.
MakeUseOf