You get a little of that in this first trailer for the May 5 release, which brings back all the original stars, and a few new ones too. Chris Pratt, Dave Bautista, Pom Klementieff, Karen Gillan, and Sean Gunn make up the current Guardians (along with the voices of Vin Diesel and Bradley Cooper, of course). And after dying, traveling back through time, and now once again existing, Zoe Saldaña is back as well. Will Poulter joins the story as the much-anticipated Adam Warlock, Maria Bakalova is the voice of Cosmo, and, well, check out the trailer to see the rest.
Marvel Studios’ Guardians of the Galaxy Volume 3 | Official Trailer
Next year will serve fans a sandwich of theatrical MCU films and Guardians of the Galaxy Vol. 3 is the meat. It starts with Ant-Man and the Wasp: Quantumania on February 17, moves on to Guardians 3 in May, and then The Marvels on July 28. All three should be fun but you just look at Guardians, especially after this trailer, as something special. Gunn completing his trilogy of films, really putting his stamp on not just these characters, but the MCU. The fact it’s going to bring together Rocket’s story while also introducing Adam Warlock, leaving more space for the universe to go. There’s just so much potential here. We’re very excited, what about you?
Written and directed by James Gunn, Guardians of the Galaxy Vol. 3 will kick off the summer movie season on May 5, 2023.
Every year, the firearms industry launches a variety of new guns for the market. It is usually a spectrum of new blasters that range from high-end bolt guns and ARs to special shotguns and pistols. While small themes have appeared in the past, they have been centered on a small sector of the industry. That changed this year, as multiple companies decided to hop on the .22 rimfire bandwagon. In the past, these guns were not anything new, and each year we saw a new plinker hit the market.
Best New .22 Pistols for 2022
This year though, we have seen major companies build serious guns chambered in our beloved .22 LR. They are well designed and, in almost all cases, designed to mimic a full-size gun in their lineup. The benefits of this design are numerous, and they have been warmly welcomed by the shooting public. While there have been many released in this space, there are three that have really stood out.
FN 502 Tactical
While some may argue this, it is my opinion that the release of the FN 502 Tactical really started this “tactical .22” trend. The FN 502 Tactical is the first .22 LR from FN and is the industry’s first slide-mounted, optics-ready rimfire handgun that has ever existed. This is truly a tactical plinker. FN really started this “tactical pistol” trend with the FNX Tactical chambered in .45 ACP all those years ago. The FN 502 follows that DNA and represents a new trend in guns designed for training. The gun is a product of a partnership with Umarex based in Germany. While some know Umarex for their air guns, they have extensive experience in the .22 rimfire world. FN worked closely with Umarex during the design and engineering process and ended up with a gun that meets what people expect from an FN pistol.
This hammer-fired .22 LR comes optic ready with a threaded barrel to mount your suppressor. Many of you recognize the gun as very close in appearance and size to its big brother, the FN 509. Like its centerfire counterpart, the FN 502 has solid ergonomics as well as ambidextrous controls. The slide is aircraft-grade anodized aluminum and steel. It has well-designed front and rear cocking serrations for easy manipulation as well as a loaded chamber indicator. In that FN designed the gun to run optics and a can, it comes with suppressor-height fixed front and rear sights. It ships with both 10-round and 15-round magazines. This is essentially a full-size gun and fits in most holsters made for the 509. This is not an accident, as the 502 is designed to be a rimfire trainer.
Rounds Downrange
On the range, the FN 502 lives up to the hype. The gun has a full-size feel while running the soft-shooting .22 LR round. While the trigger is officially listed at 5 pounds, the gun I had broke well under 4 pounds. The trigger is one area that is different from the 509 and, by necessity, because of design. It is a bit long but not a deal breaker. I ran a variety of ammo including Federal 36-grain CCI Clean-22 and Aguila Sniper subsonic. Each of these flavors ran well in the 502, and I had no issues.
I also ran it suppressed, and the gun continued to run. A quick disassembly following the range session showed that while the FN 502 is a “tactical trainer,” it is still a .22 and was filthy inside. This was compounded by my extensive use of a suppressor. No worries though, as it cleaned up easily. I give the FN 502 high marks and tip my hat to FN for really pushing the tactical trainer market. (fnamerica.com)
Sig Sauer P322
Next in our lineup is the Sig P322. Like FN’s offering, the P322 is a tactical-style, optics-ready pistol with a threaded barrel. Sig has come up with 21 reasons to own this gun, but I will break it down to what I feel are the most important. First up, the gun has a 21-round capacity. The gun comes with two easy-to-load 20-round mags, and Sig also included a mag loader. Optics-wise, the gun is cut to fit all the most common micro red-dots including the Sig Romeo Zero.
Unlike the FN, the Sig P322 uses a threaded barrel adapter. To move to the threaded option, the low-profile thread protector on the barrel is unscrewed, and the threaded adapter is put in its place. It is a very simple and reliable design that will allow you to run your new .22 suppressed. Adding a suppressor does not affect performance at all. When Sig did their testing on the gun, they ran a wide variety of suppressors to make sure it did not affect performance.
Some of the other features include a 1913 rail, manual safety, ambidextrous controls and well-designed cocking serrations. One of the most interesting things about the gun is its ability to use either a flat face trigger or a traditional rounded version. Sig includes both with the gun, and they are very easy to switch out. They are essentially a face that sits on a metal trigger frame. The P322 has a fixed barrel, which improves accuracy. With that, Sig has included an adjustable rear sight to help you fine-tune your gun.
Ergonomic Design
The P322 has an ergonomic design and is easy to disassemble. With an eye on lifespan as well as recoil reduction, Sig has made the frame from stainless steel. With a stainless steel frame, the obvious balance for weight was to make the slide out of aluminum. This does help keep the gun light yet durable. In fact, it is an aluminum alloy that helps increase the long-term life of the slide. Simply put, you will not wear out the slide. The gun also has a well-designed and fast integrated mag well.
Performance-wise, the gun is a shooter. The P322 is designed to run 1,000 rounds between stoppages. Sig even has a designated testing gun that is at 24,000 rounds and still running. The key to all this is a fluted barrel that allows the P322 to eat anything you feed it. I ran the same ammo in the Sig as I did with the FN and had the same results. The lightweight nature of the gun made it very fast and easy to shoot. When suppressed, it became “Hollywood” quiet and still ran fine. The P322 is everything you would expect from Sig. It has a close resemblance to the P320 and handles like a full-size gun. The P322 is a solid choice for not only training but enjoyable range time as well. (sigsauer.com)
Walther WMP
The last in our trio of .22s is the Walther WMP. This gun is a little bit of a departure from our previous two guns because we move from .22 LR to .22 WMR. This new pistol starts to cross over into a more serious caliber that some consider viable for personal protection. That debate will have to wait for another day, but the new WMP is a very nice gun. Like our other guns, the WMP is optics ready. I was disappointed to note it did not come with a threaded barrel, but it is obviously not a deal breaker. For those familiar with Walther, you will recognize the ambidextrous triggerguard magazine release.
Walther has gone a step further though and made a patented mag release mechanism that uses both a paddle release and a button release. This is a 15+1 capacity gun and comes with two magazines in the box. The Walther WMP features a lightweight machined slide that is made of premium 7075 aluminum, reducing the pistol’s weight and making it very comfortable to carry. Sight-wise, the WMP features a fiber-optic front sight and a serrated rear sight. The pistol comes with two different height rear sights to change the point of impact if needed. Like the Sig, the gun’s chamber has been fluted to work across a wider variety of ammunition types. Lastly, the trigger is a good double-action design that features Walther’s trigger safety.
Fun to Shoot
On the range, the gun was very enjoyable to shoot. Compared to its .22 LR range mates, the WMR had significantly more punch. Running a Trijicon RMR seemed to be the perfect fit for this gun. While I was not hard focused on testing for groups, I did take time to see what I could get. I was pleasantly surprised with a 1.5-inch group at 25 yards. The gun ran well, and I fed it CCI Maxi-Mag 40 grain. I had no malfunctions during the testing but know of some issues other writers have had.
Walther provides a recommended ammo list on their website, and I encourage you to follow it. While I would prefer a gun that runs everything, the .22 ammo market is a weird creature sometimes that makes it hard for gun companies to work around. The Walther WMP is a very enjoyable gun to run and would make a great addition to anyone’s collection.
The .22 pistol market has grown up and is no longer just the place for plinkers. These three guns are serious and allow us to get trigger time at a fraction of the cost we see with standard guns. They are well made and are great training options. On top of that, they are fun to shoot and can be a great way to teach people to shoot. As Phil Strader, director of Firearms Product Management at Sig, shared with me, “This is a gateway gun.” While he was referring to the P322, the same holds true for all these pistols. (waltherarms.com)
FN 502 Specs
Caliber: .22 LR
Barrel Length: 4.6 inches
OA Length: 7.6 inches
Weight: 23.7 ounces (empty)
Grips: Polymer
Sights: Suppressor-height, fixed front and rear
Action: Semi-auto
Capacity: 10+1, 15+1
MSRP: $519
Sig Sauer P322 Specs
Caliber: .22 LR
Barrel Length: 4 inches
OA Length: 7 inches
Weight: ounces 17.1 ounces (empty)
Grips: Polymer
Sights: Fiber-optic front, adjustable rear
Action: Semi-auto
Capacity: 20+1
MSRP: $399
Walther WMP Specs
Caliber: .22 WMR
Barrel Length: 4.5 inches
OA Length: 8.2 inches
Weight: 27.8 ounces (empty)
Grips: Polymer
Sights: Fiber-optic front, serrated rear
Action: Semi-auto
Capacity: 15+1
MSRP: $549
THE .22 HITS KEEP ON COMING IN 2022
Browning Buck Mark Plus Vision Black/Gold Suppressor Ready
The Browning Buck Mark Plus Vision Black/Gold Suppressor Ready is a good-looking .22 LR pistol. Its good looks are based on the mix of a black frame and a gold Cerakote barrel. The gun features a green TruGlo/Marble Arms fiber-optic front sight, a gold-plated trigger and a superb black radial ported muzzle brake. The gun uses straight blowback, recoil-operated engineering. The barrel runs 5.88 inches long and is suppressor ready. The gun’s hexagonal-cut sleeve encapsulates the narrower diameter barrel.
The gun’s weight is minimal at just 27 ounces and is 9.9 inches long overall. The pistol has many ergonomic touches. The slide even features protruding grip wings behind the serrations for easier racking. The Picatinny rail slide top, thread protector and trigger’s inner curve are all serrated either for glare-cutting or a better grip. The matte black racetrack oval alloy triggerguard has an ergonomic undercut behind it with an ambidextrous magazine release just above that. The short-pull trigger is gold plated alloy, echoing the gold Buck Mark under the triggerguard. The gun shoots as good as it looks. (browning.com)
Caliber: .22 LR
Barrel: 5.88 inches
OA Length: 9.9 inches
Weight: 27 ounces (empty)
Sights: Fiber-optic front, white outline pro target rear
Grips: Polymer
Finish: Black anodized
Capacity: 10 rounds
MSRP: $779
Charter Arms Target Pathfinder
The new Target Pathfinder is a great introductory revolver for the novice shooter or anyone who needs a low-recoil revolver. It has the look, feel and weight of a higher-caliber revolver, allowing you to gain proficiency while using relatively inexpensive .22 ammo.
The .22 Pathfinder can turn a few tin cans into an afternoon of fun. As with other 22s, it is equally effective at eliminating pests. Its stainless finish with black rubber grips with finger grooves rounds out the overall aesthetic. (charterarms.com)
Caliber: .22 LR
Barrel: 4.2 inches
OA Length: 9.07 inches
Weight: 24 ounces (empty)
Sights: Ramp front with a wide post, adjustable rear
Grips: Rubber with finger grooves
Finish: Anodized/stainless steel
Capacity: 8
MSRP: $426
Colt King Cobra Target .22
One of the most iconic revolvers of all time is the Colt Python. In fact, their entire line of “snake” guns is considered the gold standard of wheelguns. Well, the snake lovers now have a new gun to add to the collection. Colt has launched the King Cobra Target .22 LR, bringing a competition, plinking and game-getting revolver to the market. The King Cobra Target packs 10 rounds of .22 LR into its cylinder. The gun fits a variety of applications and is equally capable on the farm or in competition The one-piece stainless steel barrel delivers accuracy as well, according to Colt. It comes topped with an adjustable target rear sight and fiber-optic front sight and is fitted with Hogue overmolded rubber grips. The King Cobra Target in .22 LR comes fitted with either a 4- or 6-inch barrel and has the classic stainless finish. (colt.com)
Caliber: .22 LR
Barrel: 4 and 6 inches
OA Length: 11.5 inches
Weight: 32 ounces (empty)
Sights: Fiber-optic front, adjustable rear
Grips: Hogue
Finish: Stainless
Capacity: 10 rounds
MSRP: $999
Heritage Rough Rider Tactical Cowboy
Heritage says it best when they said, ”For making tin cans dance in the backyard, pinging steel, or controlling pests and varmints around the farm, nothing beats the low-cost, high-adrenaline thrill of a single-action rimfire revolver.” Heritage Rough Rider Tactical Cowboy fits that role perfectly. While chambered in .22 LR, it is also compatible with the .22 WMR cylinder, allowing you to shoot either .22 LR or .22 WMR ammo. The new Heritage Rough Rider Tactical Cowboy features modern-day technology into an old classic world design. The barrel is threaded for accessories like compensators and suppressors. The Picatinny rail allows the user to add different optics if desired but also works as a rear open sight to be used with the bright front fiber-optic sight.(heritagemfg.com)
Caliber: .22 LR
Barrel: 6.5 inches
OA Length: 11.85 inches
Weight: 32.1 ounces (empty)
Sights: Fiber-optic front, rear Picatinny rail
Grips: Carbon fiber
Finish: Black standard
Capacity: 6
MSRP: $213
KelTec CP33
KelTec felt the .22 market needed an update, so they released the CP33. CP stands for Competition Pistol, and 33 because it holds a staggering 33 rounds in the magazine. Equipped with a Picatinny-style top rail and a Magpul M-Lok slot built into the dust cover, the CP33 is ready to accept your favorite optics and accessories. Train, compete, plink and repeat. If you’d like to do it quietly, simply attach your favorite .22 suppressor. As ambidextrous as this handgun can be, the CP33 offers a safety lever on both sides of the grip, a heel catch magazine release and a unique charging handle located at the back of the receiver. Adjustable fiber-optic sights, a 9-inch sight radius and threaded barrel come standard, making short work of bullseyes and other targets. (keltecweapons.com)
Caliber: .22 LR
Barrel: 5.5 inches
OA Length: 10.6 inches
Weight: 1.5 pounds (empty)
Sights: Adjustable fiber optics
Grips: Polymer
Finish: Anodized
Capacity: 33+1
MSRP: $600
Ruger Mark IV 22/45 Lite
Let’s take a look at Ruger’s new Mark IV 22/45 Lite. This is a small and versatile .22 LR pistol built to fill a variety of needs. If you’re looking for a rimfire pistol for Steel Challenge, a .22 LR to mount a suppressor on or just something to plink with at the range, you may be interested in picking one up. The Mark IV line of Ruger pistols was introduced in 2016 and is the fourth-generation successor of the Ruger Standard. This pistol is yet another extension of Ruger’s popular .22 pistol lineup. Accurate, fun to shoot and reliable, the Mark IV 22/45 Lite promises to be a solid part of the Ruger legacy. (ruger.com)
Caliber: .22 LR
Barrel: 4.4 inches
OA Length: 8.4 inches
Weight: 25 ounces (empty)
Sights: Blade front, adjustable rear
Grips: Polymer
Finish: Anodized
Capacity: 10+1
MSRP: $699
Ruger Wrangler 2016 Birdshead Revolver
When you think of .22 wheelguns, one of the first companies to come to mind is Ruger. This year, Ruger is adding to its Wrangler single-action .22 Long Rifle revolver line with a more compact version featuring a gracefully curved birdshead grip, smooth black polymer grip panels and a barrel that has been shortened from 4.62 inches to 3.75 inches. This gun is based on the company’s six-shot Single-Six and similarly features steel cylinders and cold-hammer-forged steel barrels. The revolver is offered in a variety of colors with a black, silver or burnt bronze Cerakote finish. A transfer-bar safety system and a loading gate interlock safety guard against unintentional discharges. Wranglers employ the same classic blade front sights and fixed notch rear sights found on Ruger’s Vaquero and Bearcat models. It is a great new member of their lineup. (ruger.com)
Caliber: .22 LR
Barrel: 3.75 inches
OA Length: 8.62 inches
Weight: 28 ounces (empty)
Sights: Blade front, integral rear
Grips: Synthetic
Finish: Silver Cerakote
Capacity: 6
MSRP: $279
Standard Mfg. SG22
Standard Manufacturing brings a classic look back to life with their SG22. This new .22 LR semi-automatic pistol is reminiscent of the well-loved Colt Woodsman. This beautiful gun possesses the classic styling and design elements of the quintessential guns of yesteryear. The Standard SG22 features a button magazine release, target grips and sights, which make it ideal for target shooting. A 6.62-inch barrel allows for superb accuracy and handling. If you are looking for a classic look with the benefits of modern manufacturing, Standard’s SG22 needs to be on your list. (stdgun.com)
Caliber: .22 LR
Barrel: 6.62 inches
OA Length: 10 inches
Weight: 30 ounces (empty)
Sights: Blade front, adjustable rear
Grips: Walnut
Finish: Blued
Capacity: 10+1
MSRP: $1,099
S&W 317 Kit Gun
Smith & Wesson J-Frame revolvers have been around since 1950. These small revolvers were designed to fire a full-power round and are as simple and easy to use as they are reliable. Available in various calibers and with three diverse hammer designs, it is no surprise that the Smith & Wesson J-Frame has become the most popular small-frame defense revolver on the market. Now you can get that J-Frame happiness in .22 LR with the 317. Built on an aluminum-alloy J-frame and chambered in .22 Long Rifle, this lightweight revolver is small enough to be carried inside a hunter or fisherman’s kit bag, as its name suggests. It is a classic S&W J-Frame and enjoyable to shoot. (smith-wesson.com)
Caliber: .22 LR
Barrel: 3 inches
OA Length: 7.19 inches
Weight: 11.7 ounces (empty)
Sights: HI-VIZ fiber-optic green front, adjustable rear
Grips: Synthetic
Finish: Matte silver and stainless
Capacity: 8
MSRP: $826
Taurus TX 22 Competition
Taurus enters the field with their TX 22 Competition. This full-size, semi-auto rimfire was re-engineered by Taurus to meet your most rigorous performance demands. The upgraded, optics-ready slide and 5-inch threaded bull barrel assembly bring match-grade accuracy and versatility to any shooting discipline, giving today’s competitive shooters the unique opportunity to shatter records without breaking the bank. While built with competition in mind, the gun is equally as much fun on the range shooting cans. (taurususa.com)
Caliber: .22 LR
Barrel: 5 inches
OA Length: 8.15 inches
Weight: 23 ounces (empty)
Sights: Fixed white-dot front, adjustable rear white dot
Grips: Polymer
Finish: Hard anodize
Capacity: 16+1/10+1
MSRP: $589
This article originally appeared in the September-October issue of Tactical Life magazine. Get your copy or subscribe at OutdoorGroupStore.com.
The primary key is mandatory in cluster environments (InnoDB Cluster / Galera / Xtradb Cluster).
Better query performance
From 8.0.30, no need to maintain a separate column for the primary key in the table. We have a feature of sql_generate_invisible_primary_key (GIPK), a dynamic global variable. We can enable it online without any downtime.
By enabling this variable, the primary key and invisible column will be automatically created in the table if any of the created tables have an absent primary key. The default name of the auto-generated column name is my_row_id.
The main advantage of this feature is that we can ease cluster migrations and faster replication synchronization.
The structure will be replicated to the replicas only for the ROW-based replication.
Requirements:
Binlog format
ROW
MySQL Version
>= 8.0.30
Engine
InnoDB
Enabling GIPK:
It is a global variable, we can enable it dynamically without any downtime. By default, it will be off.
+------------------------------------+-------+
| Variable_name                      | Value |
+------------------------------------+-------+
| sql_generate_invisible_primary_key | OFF   |
+------------------------------------+-------+

mysql> set global sql_generate_invisible_primary_key=1;
Query OK, 0 rows affected (0.00 sec)

+------------------------------------+-------+
| Variable_name                      | Value |
+------------------------------------+-------+
| sql_generate_invisible_primary_key | ON    |
+------------------------------------+-------+
Post enabling the GPIK restart the connection to get it applied.
In the above example, in the create statement I have mentioned two columns name and number. But MySQL has automatically created 1 more invisible primary key column named my_row_id.
We can make the column invisible or visible based on our use case. We just need to perform the alter statement to switch between invisible and visible columns.
mysql> ALTER TABLE gipk ALTER COLUMN my_row_id SET VISIBLE;
Query OK, 0 rows affected (0.00 sec)
Records: 0  Duplicates: 0  Warnings: 0

mysql>  show create table gipk\G
*************************** 1. row ***************************
       Table: gipk
Create Table: CREATE TABLE `gipk` (
  `my_row_id` bigint unsigned NOT NULL AUTO_INCREMENT,
  `name` varchar(50) DEFAULT NULL,
  `number` int DEFAULT NULL,
  PRIMARY KEY (`my_row_id`)
) ENGINE=InnoDB DEFAULT CHARSET=utf8mb4 COLLATE=utf8mb4_0900_ai_ci

1 row in set (0.00 sec)
Even though it is an auto-generated column, It will be visible in the show create a statement and in information_schema.columns as well.
mysql>  show create table gipk\G
*************************** 1. row ***************************
       Table: gipk
Create Table: CREATE TABLE `gipk` (
  `my_row_id` bigint unsigned NOT NULL AUTO_INCREMENT /*!80023 INVISIBLE */,
  `name` varchar(50) DEFAULT NULL,
  `number` int DEFAULT NULL,
  PRIMARY KEY (`my_row_id`)
) ENGINE=InnoDB DEFAULT CHARSET=utf8mb4 COLLATE=utf8mb4_0900_ai_ci

1 row in set (0.00 sec)
mysql> SELECT COLUMN_NAME,DATA_TYPE FROM INFORMATION_SCHEMA.COLUMNS WHERE TABLE_NAME = "gipk";
+-------------+-----------+
| COLUMN_NAME | DATA_TYPE |
+-------------+-----------+
| my_row_id   | bigint    |
| name        | varchar   |
| number      | int       |
+-------------+-----------+
3 rows in set (0.00 sec)
By turning off show_gipk_in_create_table_and_information_schema, we may fully obscure it. By doing so, the column details will fully disappear from the show and create statements as well as from information schema.columns.
It is a dynamic variable, by default it will be on.
+--------------------------------------------------+-------+
| Variable_name                                    | Value |
+--------------------------------------------------+-------+
| show_gipk_in_create_table_and_information_schema | ON    |
+--------------------------------------------------+-------+

mysql> set global show_gipk_in_create_table_and_information_schema=0;
Query OK, 0 rows affected (0.00 sec)

+--------------------------------------------------+-------+
| Variable_name                                    | Value |
+--------------------------------------------------+-------+
| show_gipk_in_create_table_and_information_schema | OFF   |
+--------------------------------------------------+-------+
mysql> SELECT COLUMN_NAME,DATA_TYPE FROM INFORMATION_SCHEMA.COLUMNS WHERE TABLE_NAME = "gipk";
+-------------+-----------+
| COLUMN_NAME | DATA_TYPE |
+-------------+-----------+
| name        | varchar   |
| number      | int       |
+-------------+-----------+
2 rows in set (0.00 sec)

mysql> show create table gipk\G
*************************** 1. row ***************************
       Table: gipk
Create Table: CREATE TABLE `gipk` (
  `name` varchar(50) DEFAULT NULL,
  `number` int DEFAULT NULL
) ENGINE=InnoDB DEFAULT CHARSET=utf8mb4 COLLATE=utf8mb4_0900_ai_ci

1 row in set (0.00 sec)
Now the column is completely invisible.
Handling GIPK:
We can’t change the column name when the column is in an invisible state.
mysql> ALTER TABLE gipk RENAME COLUMN my_row_id to id;

ERROR 4110 (HY000): Altering generated invisible primary key column 'my_row_id' is not allowed.
To achieve this, first, we need to make the column visible and then we need to perform the rename column to change the column name based on our convenience.
mysql>  show create table gipk\G
*************************** 1. row ***************************
       Table: gipk
Create Table: CREATE TABLE `gipk` (
  `my_row_id` bigint unsigned NOT NULL AUTO_INCREMENT,
  `name` varchar(50) DEFAULT NULL,
  `number` int DEFAULT NULL,
  PRIMARY KEY (`my_row_id`)
) ENGINE=InnoDB DEFAULT CHARSET=utf8mb4 COLLATE=utf8mb4_0900_ai_ci

1 row in set (0.00 sec)

mysql> ALTER TABLE gipk RENAME COLUMN my_row_id to id;
Query OK, 0 rows affected (0.02 sec)
Records: 0  Duplicates: 0  Warnings: 0

mysql> show create table gipk\G
*************************** 1. row ***************************
       Table: gipk
Create Table: CREATE TABLE `gipk` (
  `id` bigint unsigned NOT NULL AUTO_INCREMENT,
  `name` varchar(50) DEFAULT NULL,
  `number` int DEFAULT NULL,
  PRIMARY KEY (`id`)
) ENGINE=InnoDB DEFAULT CHARSET=utf8mb4 COLLATE=utf8mb4_0900_ai_ci

1 row in set (0.00 sec)
Benchmarking
We have done a benchmark on the same to identify if there is any issue occurring post-enabling GIPK.
Table structure :
mysql> show create table gipk\G
*************************** 1. row ***************************
       Table: gipk
Create Table: CREATE TABLE `gipk` (
  `my_row_id` bigint unsigned NOT NULL AUTO_INCREMENT /*!80023 INVISIBLE */,
  `id` int unsigned NOT NULL,
  `k` int unsigned NOT NULL DEFAULT '0',
  `c` char(120) NOT NULL DEFAULT '',
  `pad` char(60) NOT NULL DEFAULT '',
  PRIMARY KEY (`my_row_id`)
) ENGINE=InnoDB DEFAULT CHARSET=latin1

1 row in set (0.01 sec)

mysql> show create table non_gipk\G
*************************** 1. row ***************************
       Table: non_gipk
Create Table: CREATE TABLE `non_gipk` (
  `id` int unsigned NOT NULL,
  `k` int unsigned NOT NULL DEFAULT '0',
  `c` char(120) NOT NULL DEFAULT '',
  `pad` char(60) NOT NULL DEFAULT ''
) ENGINE=InnoDB DEFAULT CHARSET=latin1

1 row in set (0.00 sec)
We have created tables with GIPK and without Primary key. I have used mysql random data load for loading data to tables. The surprise is, the time taken for data loading is the same with GIPK and without the Primary key. So there won’t be much latency when bulk loading is happening even if GIPK is enabled.
Full table scan :
mysql> select * from gipk order by id limit 1;
+----+------------+------------------------------------------------------------------------+------------------------------+
| id | k          | c                                                                      | pad                          |
+----+------------+------------------------------------------------------------------------+------------------------------+
|  9 | 1542554247 | fugit sapiente consectetur ab non repudiandae ducimus laboriosam quas! | dolore veritatis asperiores. |
+----+------------+------------------------------------------------------------------------+------------------------------+
1 row in set (2 min 56.14 sec)

mysql> select * from non_gipk order by id limit 1;
+----+------------+---------------------------------------+--------------------------------------+
| id | k          | c                                     | pad                                  |
+----+------------+---------------------------------------+--------------------------------------+
|  9 | 1542554247 | voluptas facere sed dolore iure nisi. | at ipsam id voluptatem et excepturi. |
+----+------------+---------------------------------------+--------------------------------------+
1 row in set (4 min 22.99 sec)
We have done the full table query execution on both with GIPK and without Primary key table, the performance improvement is there in the GIPK table. The time taken for the execution has been reduced by half.
Online alter and archival :
For performing safer online alter and archival of data chunk by chunk, the percona toolkit plays a vital role. For percona toolkit operations ( pt-osc / archiver) , The basic requirement is the primary key. If there is no primary key on the table, the tool won’t work on that table.
The advantage of enabling GPIK is, we will have the invisible primary key. By using that primary key, the Percona tool is able to perform like online alter or archival, etc.
[root@localhost mydbopslabs]# pt-archiver --source h=localhost,D=mydbops,t=non_gipk,u=root,p='*****' --where "1=1" --limit 5000 --progress 5000 --statistics --no-check-charset --commit-each --bulk-delete --purge --file '/home/mydbopslabs/non_gipk_%d_%m_%Y_%H_%m_%s.csv' --output-format=csv --dry-run
perl: warning: Setting locale failed.
perl: warning: Please check that your locale settings:
	LANGUAGE = (unset),
	LC_ALL = (unset),
	LC_CTYPE = "UTF-8",
	LANG = "en_US.UTF-8"
    are supported and installed on your system.
perl: warning: Falling back to the standard locale ("C").
Cannot find an ascendable index in table at /bin/pt-archiver line 3261.

[root@localhost mydbopslabs]# pt-archiver --source h=localhost,D=mydbops,t=gipk,u=root,p='******' --where "1=1" --limit 5000 --progress 5000 --statistics --no-check-charset --commit-each --bulk-delete --purge --file '/home/mydbopslabs/non_gipk_%d_%m_%Y_%H_%m_%s.csv' --output-format=csv --dry-run
perl: warning: Setting locale failed.
perl: warning: Please check that your locale settings:
	LANGUAGE = (unset),
	LC_ALL = (unset),
	LC_CTYPE = "UTF-8",
	LANG = "en_US.UTF-8"
    are supported and installed on your system.
perl: warning: Falling back to the standard locale ("C").
/home/mydbopslabs/non_gipk_06_10_2022_02_10_05.csv
SELECT /*!40001 SQL_NO_CACHE */ `my_row_id`,`id`,`k`,`c`,`pad` FROM `mydbops`.`gipk` FORCE INDEX(`PRIMARY`) WHERE (1=1) AND (`my_row_id` < '100000000') ORDER BY `my_row_id` LIMIT 5000
SELECT /*!40001 SQL_NO_CACHE */ `my_row_id`,`id`,`k`,`c`,`pad` FROM `mydbops`.`gipk` FORCE INDEX(`PRIMARY`) WHERE (1=1) AND (`my_row_id` < '100000000') AND ((`my_row_id` >= ?)) ORDER BY `my_row_id` LIMIT 5000
DELETE FROM `mydbops`.`gipk` WHERE (((`my_row_id` >= ?))) AND (((`my_row_id` <= ?))) AND (1=1) LIMIT 5000
While performing archival on the Non-primary key table, the archival got failed, but it got succeeded on the GIPK table since it has an invisible primary key.
[root@localhost mydbopslabs]# pt-online-schema-change h=localhost,D=mydbops,t=non_gipk --user='root' --password='*****' --no-check-alter  --critical-load "Threads_running=900" --recursion-method=none --max-load  "Threads_running=1000" --no-check-plan --alter "engine=innodb" --dry-run
perl: warning: Setting locale failed.
perl: warning: Please check that your locale settings:
	LANGUAGE = (unset),
	LC_ALL = (unset),
	LC_CTYPE = "UTF-8",
	LANG = "en_US.UTF-8"
    are supported and installed on your system.
perl: warning: Falling back to the standard locale ("C").
# A software update is available:
Operation, tries, wait:
  analyze_table, 10, 1
  copy_rows, 10, 0.25
  create_triggers, 10, 1
  drop_triggers, 10, 1
  swap_tables, 10, 1
  update_foreign_keys, 10, 1
Starting a dry run.  `mydbops`.`non_gipk` will not be altered.  Specify --execute instead of --dry-run to alter the table.
Creating new table...
Created new table mydbops._non_gipk_new OK.
Altering new table...
Altered `mydbops`.`_non_gipk_new` OK.
The new table `mydbops`.`_non_gipk_new` does not have a PRIMARY KEY or a unique index required for the DELETE trigger.
Please check you have at least one UNIQUE and NOT NULLABLE index.
2022-10-06T02:48:59 Dropping new table...
2022-10-06T02:48:59 Dropped new table OK.
Dry run complete.  `mydbops`.`non_gipk` was not altered.
[root@localhost mydbopslabs]# pt-online-schema-change h=localhost,D=mydbops,t=gipk --user='root' --password='*****' --no-check-alter  --critical-load "Threads_running=900" --recursion-method=none --max-load  "Threads_running=1000" --no-check-plan --alter "engine=innodb" --dry-run
perl: warning: Setting locale failed.
perl: warning: Please check that your locale settings:
	LANGUAGE = (unset),
	LC_ALL = (unset),
	LC_CTYPE = "UTF-8",
	LANG = "en_US.UTF-8"
    are supported and installed on your system.
perl: warning: Falling back to the standard locale ("C").
Operation, tries, wait:
  analyze_table, 10, 1
  copy_rows, 10, 0.25
  create_triggers, 10, 1
  drop_triggers, 10, 1
  swap_tables, 10, 1
  update_foreign_keys, 10, 1
Starting a dry run.  `mydbops`.`gipk` will not be altered.  Specify --execute instead of --dry-run to alter the table.
Creating new table...
Created new table mydbops._gipk_new OK.
Altering new table...
Altered `mydbops`.`_gipk_new` OK.
Not creating triggers because this is a dry run.
Not copying rows because this is a dry run.
Not swapping tables because this is a dry run.
Not dropping old table because this is a dry run.
Not dropping triggers because this is a dry run.
2022-10-06T02:49:15 Dropping new table...
2022-10-06T02:49:15 Dropped new table OK.
Dry run complete. `mydbops`.`gipk` was not altered.
Online alter has failed on the Non-primary key table, and the archival failed, but it succeeded on the GIPK table since it has an invisible primary key.
Limitations:
GIPK will fail if the CREATE table statement has an auto-increment column.
It supports only InnoDB Engine.
GIPK supports only row-based replication.
Conclusion:
No more need to worry about creating and maintaining a primary key separately. GPIK also solves the problem in migration to Inn0DB Cluster, where the Primary key is mandatory. By enabling sql_generate_invisible_primary_key , we have an auto primary key in place now as a lifesaver.
Well, we can’t argue that Windows is the key platform for database development and management software—but what if you are a Mac user? Who said you can’t have equal opportunities to set up easy daily work with, for instance, MySQL databases? Simply take a closer look and you’ll see an abundance of top-tier MySQL tools […]
Building Laravel projects that are well-tested with a high test automation coverage can be a lot of work. At the same time it is realistically the only way for smaller teams without dedicated QA teams to continue adding more features with confidence without the constant risk of breaking existing things. In this article I want to provide an introduction to testing Laravel projects that covers all bases.
Our team is building a test management tool, so naturally our goal is to have a high test coverage with high quality releases ourselves (the saying “The shoemaker always wears the worst shoes” does not apply here). Our users are usually software testers, so they expect a lot from us when it comes to software quality and usability (they are good at finding and breaking even the smallest issues). So we invest a lot of work into our test strategy and below I will give an overview of how we test Laravel projects.
Backend Tests with PHPUnit
The easiest way to get started with testing in Laravel is to build unit tests using PHPUnit. Laravel already comes pre-configured to run unit tests out of the box and there’s great documentation on setting up and running your tests. Before you get started though, I would recommend thinking about what exactly you can and should test in your backend code, as there are different types of tests you can build. We use PHPUnit to implement different, separate test suites that focus on different aspects of our code.
Unit tests for helpers and libraries: Code that is completely independent of the rest of the app can be easily tested in small, discrete unit tests. Think about helpers that format data such as dates/times, convert color values or libraries that generate specific export formats.
Queue jobs and commands: Background jobs and commands often perform important operations on data such as archiving older entries that are no longer needed, or generating scheduled reports. Having automated tests for jobs and commands is thus quite critical, so you should have separate test suites.
Controllers & models: The tests for your API, models and views of your app will likely be one of your largest test suites. Laravel makes it easy to build fast API & controller tests to cover everything.
Database migrations: If you are improving your app and add new features over time, you often need to change the database schema and possible migrate existing data. This can be tricky to test without solid automated tests that consider all edge cases, so make sure to take your time to build these.
The good news is that building these tests also usually makes development much easier. For example, our team is often building the backend tests to develop and try the backend functionality first before any UI is added in a later step. It would be difficult to build new functionality without writing these tests first. We use Testmo ourselves for test automation reporting so we can track all our backend tests.
UI Browser Tests with Dusk
We write our end-to-end browser UI tests with Laravel Dusk. Laravel Dusk uses Selenium under the hood and you can use it to easily automatically test your application against Chrome, Firefox and Edge (plus Safari with some limitations). You could alternatively use a generic browser automation framework such as Cypress or Playwright. But having access to your app’s database model to set up test data and to use the same asserts as your backend tests, I would recommend sticking to PHP-based browser testing.
Here’s a word of warning: writing Laravel Dusk tests (and browser-based tests in general) can be very time consuming (and sometimes frustrating). We have an extensive library of Dusk tests for Testmo that automatically test every feature we add to Testmo. But you don’t necessarily have to do the same. Any browser tests are better than having no tests at all. So if you decide to only test certain happy paths in your app, or build some initial smoke tests to click through the most important features, that’s a great start.
We covered backend testing and UI browser-based testing above. You might be wondering why we now also need additional, separate frontend tests to test our JavaScript code. The reason is quite simple: nowadays more and more code runs in the browser, so we also want to have a way to run unit tests in JavaScript to test such code in addition to our end-to-end UI tests.
Here’s a simple example. In Testmo we allow users to import existing data for test case management. Customers can import data from Excel or migrate from older, legacy products and take their test cases with them.
Customers might have huge existing test case libraries they want to import. To speed up importing and parsing the data, we are actually processing the import files in the browser before submitting them to Testmo. To do this, we have built import parsers for different formats such as CSV/Excel files. It would be difficult and slow to test such code with pure Selenium-based tests, so we have additional frontend tests for our JavaScript libraries and helpers.
There are various options for writing and running JavaScrip tests. We ourselves use Mocha/Chai for our tests and have been quite happy with this.
Laravel Testing CI Integration
Tests are only useful if you run them regularly. The best way to ensure that all tests are run when you make changes to your app is to integrate them with your CI pipeline. This is usually implemented with popular platforms such as GitHub Actions, GitLab CI/CD or CircleCI. This has a couple of advantages:
If you get in the habit of only deploying builds that pass all the tests, you are automatically motivated to build better (and faster) tests
Running your tests in your CI environment usually helps finding flaky tests that fail due to timing issues. This is often the case when you are new to writing browser tests, so it’s a good idea to learn this early.
You can more easily set up and run your tests with parallel test jobs to significantly speed up test execution. For example, for Testmo, running all our tests sequentially would take hours. With parallel testing we can run all our test suites in less than 30 minutes.
Last but not least, we also still do a fair amount of exploratory testing and manual testing for new features, or as smoke tests for new builds and releases. If you have a dedicated testing team, then using a tool such as Testmo is usually important so you plan, manage, assign and track all your tests. If you are a solo developer or a development team without dedicated testers, then starting with spreadsheets is usually a good alternative.
If I could only give one piece of advice on building better Laravel apps, I would recommend starting to think about testing early. It is much much easier to build tests parallel to development instead of trying to fix things later. Without extensive automated tests, more complex apps become difficult to maintain very quickly, so the initial time spent on building your test suites will save you a lot of time later.
This guest posting was written by Dennis Gurock, one of the founders of Testmo. Testmo is built using Laravel and helps teams manage all their software tests in one modern platform. If you are not familiar with QA tools, Testmo recently published various tool guides to get started:
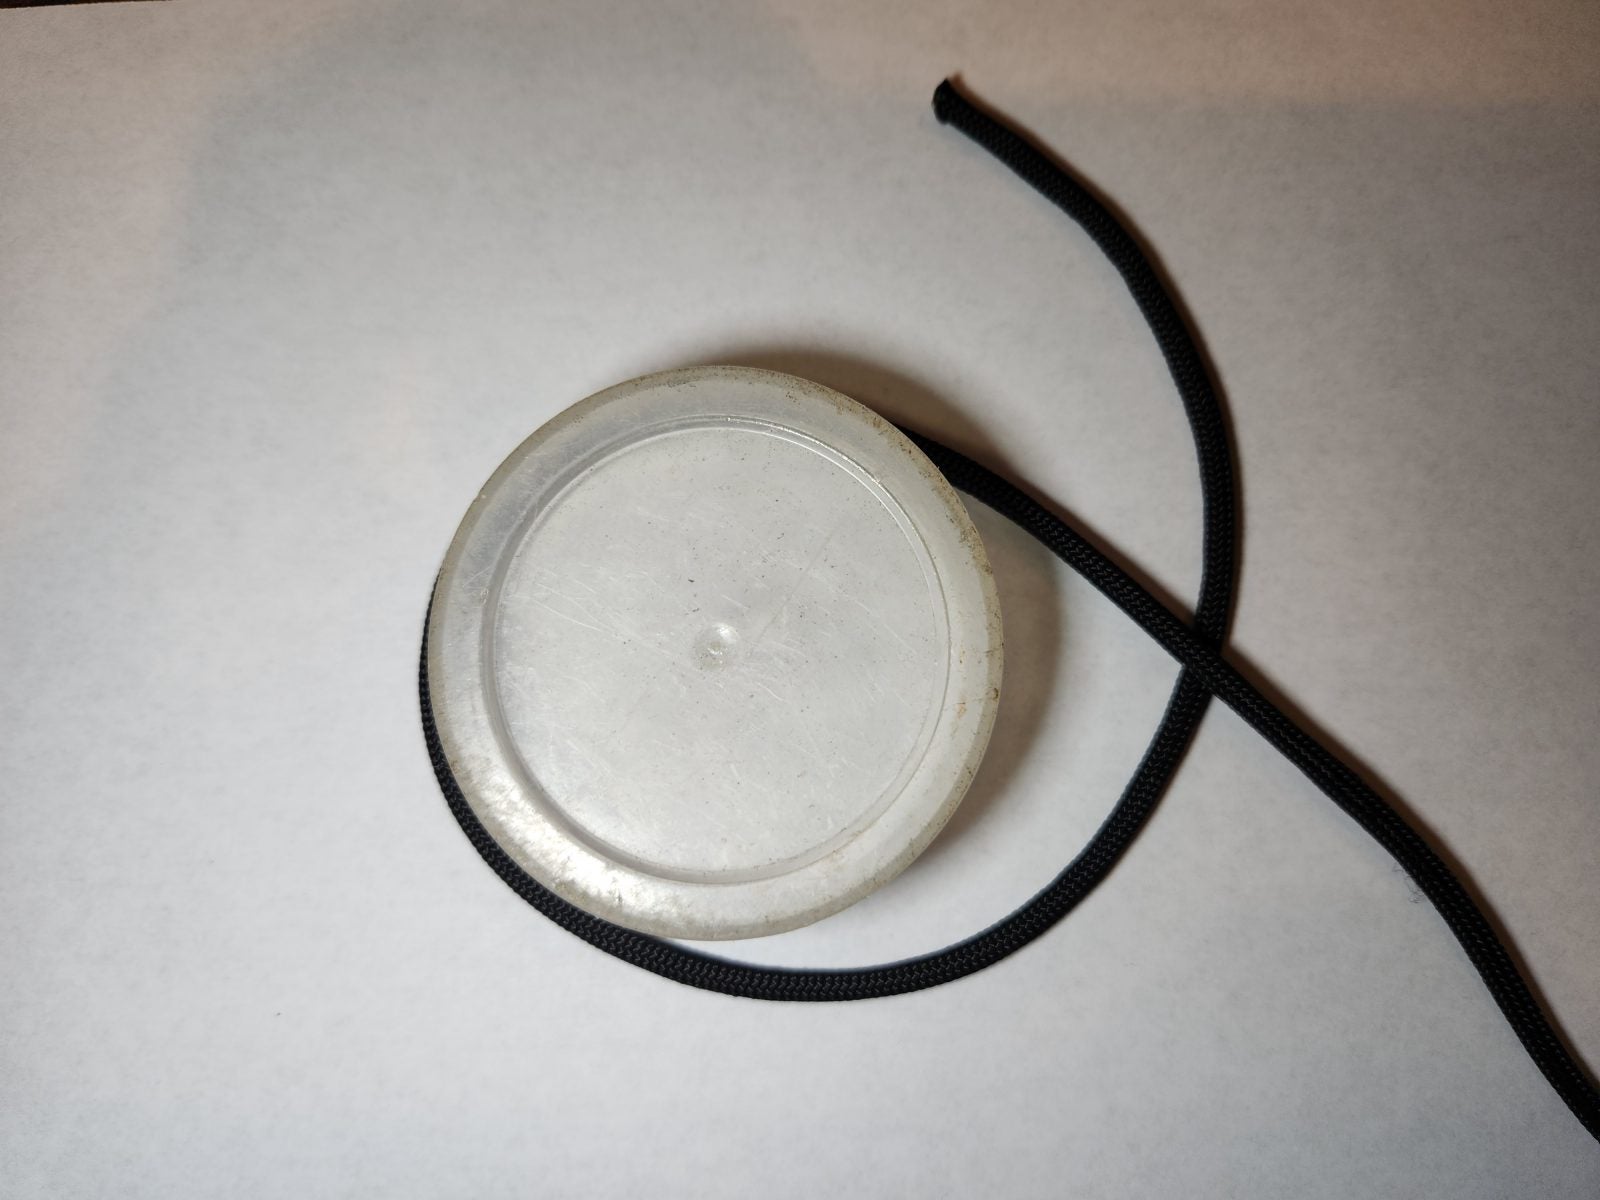
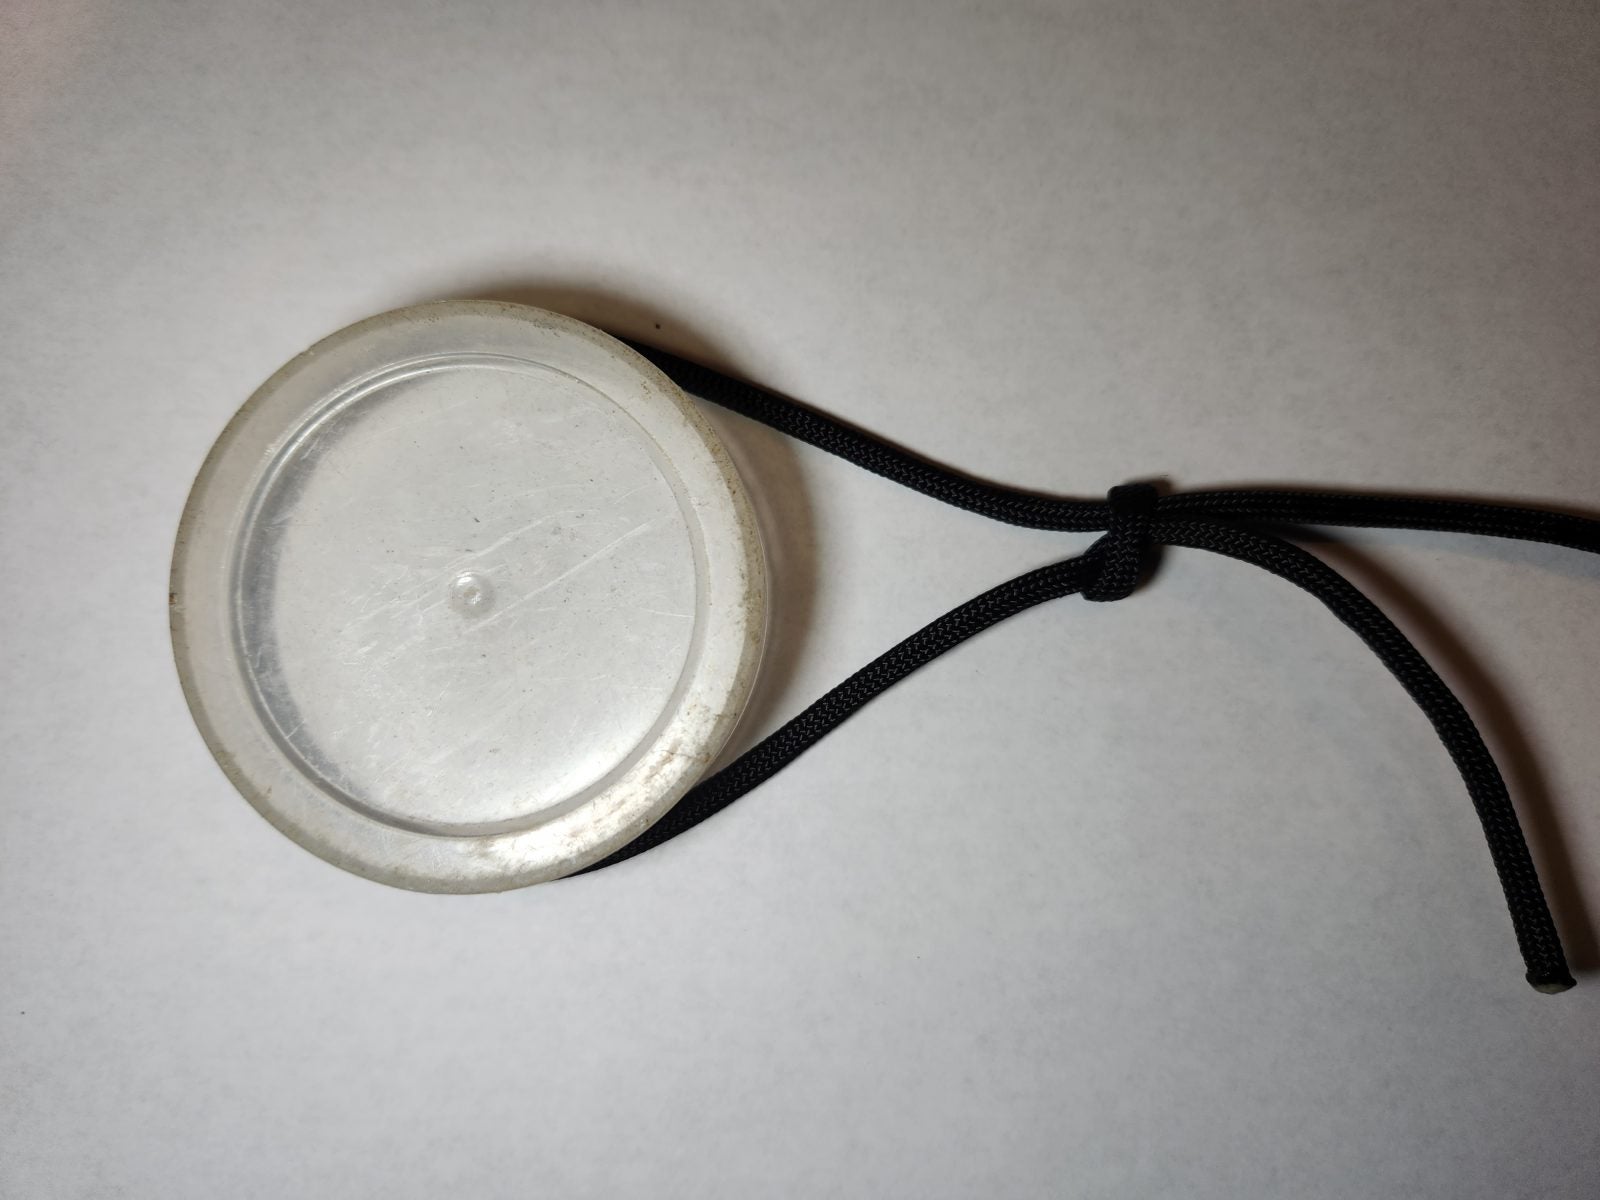
Today we’re going to be covering the Arbor Knot, a very simple knot with only one purpose in fishing. The only reason you will ever tie an Arbor Knot is because you are spooling up a fishing reel up with line. As the name implies its used to attach line to the “arbor” which in this case is the center of fishing reel spool. It is based on a noose knot so it pulling on the mainline tightens it up. It consists of two overhand knots, so if you’re capable of tying your shoes you can tie the Arbor Knot. When it comes to spooling up your fishing reel, if you are using monofilament fishing line you don’t need to use any sort of tape for grip to the spool. But if you are spooling up braided fishing line you need to put down some sort of backing for grip on the reel or the braided fishing line can slip. For this you can use a small piece of electrical tape, some lines even give you a small sticker for you to use for just that purpose.
The plastic “arbor” is a stand-in for a fishing reel spool
Step 1
The first step is getting your main line and running it around the spool, “arbor” of the reel.
Step 2
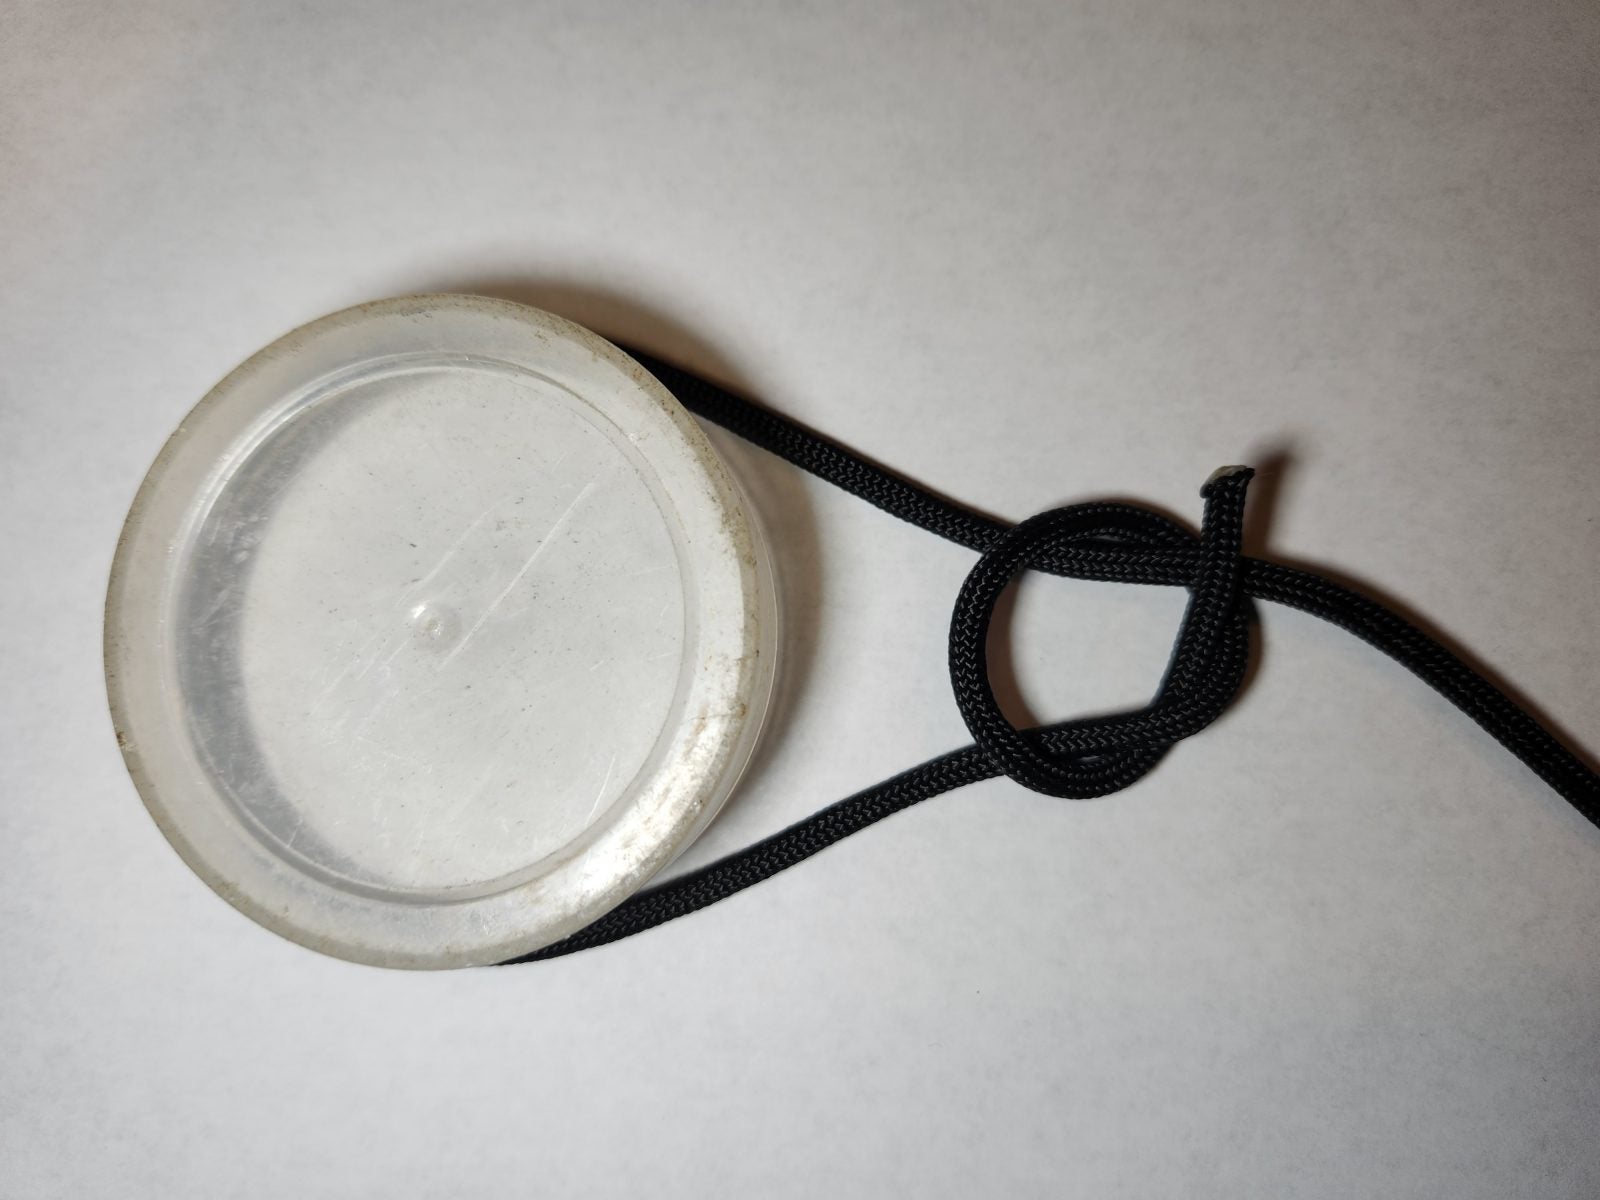
The next thing to do is, using the tag end of the main line make an overhand knot around the main line, then cinch it down.
Step 3
After you cinch down the first overhand knot around the main line, using the tag make another overhand knot with just the tag of the line. Cinch that second overhand knot down.
Step 4
Once the overhand knots are done you can pull on the mainline to tighten up the arbor knot to the spool, then clip the tag end of the line short and you are ready to spool up your fishing reel.
For his latest experiment, rocket scientist and entertainer Mark Rober teamed up with Joe Barnard of BPS Space to launch an egg into space to see if they could catch it safely a mattress when it dropped back to earth. But the project proved far more challenging than they thought and required huge amounts of trial and error.
https://miro.medium.com/max/1200/1*2FP4crjpM8C48kAnqAjv5A.pngThis is very useful to anyone using the previously announced Laravel Workflow package.Laravel News Links