Whilst not part of the LAMP stack per-se, you will need a MySQL client in order to be able to upload and make changes to your database schema. MySQL clients that could be used include: the traditional MySQL client; MySQL shell; MySQL Workbench as well as phpMyAdmin. At the stage the most efficient of these clients will be MySQL Shell.Planet MySQL
How to Setup a LAMP Stack with MySQL HeatWave – Part 2/5
To build the infrastructure you will both need an account and a tenancy within Oracle Cloud Infrastructure (OCI) account. If you do not have these, then please click here. Note the Oracle very often offers a free trial period which provides more than enough credits to complete the architecture described in this blog.Planet MySQL
Goodbye M16: A Look at the Modern Marine Infantry Rifle M27
https://www.pewpewtactical.com/wp-content/uploads/2022/09/Marines-training-with-the-M27-Photo-Cpl.-Michaela-Gregory-2.webp
In the last few years, the Marine Corps has been modernizing its infantry forces en masse.
The average Marine Infantryman has seen a significant upgrade in their guns and gear in the last decade.

In the wake of F-35s, remote control missile launching trucks, and drones, the infantry rifle doesn’t seem all that special.
Or is it?
Today, we’re going to walk through the current infantry rifle and the gear that adorns it. If you’ve been curious about what Marines are carrying (or what to grab similar gear for your own rifle), keep reading!
Table of Contents
Loading…
How Did We Get Here?
The Marine Corps created the A2, for better or worse, and stuck to the A4 model of the gun.
Everyone moved to the M4, but the Marine Corps clung to the M16A4 for longer than necessary.
The M4 saw adoption by the infantry in 2015, and only two years later, the M27 would go on to be the rifle fielded by infantry forces.

Marines picked up the M27 in 2009 and began issuing the gun in 2010, starting with the 2nd Battalion 7th Marine regiment.
The M27 would replace the M249 SAW and would become an automatic rifle tasked with laying down suppressive fire. Marines in Afghanistan fell in love with the weapon, and the Marine Corps was impressed.

Impressed enough, they replaced the M4 for infantry forces without needing a very long and drawn-out testing procedure.
By now, the average active-duty infantryman is armed with an M27. It seems as though Marines in weapons platoons and companies are still carrying the M4.
The Infantry Rifle
Look at the M27 and the M4. They look pretty dang similar, right? We can call it Stoner’s grandchild.
Well, not just Stoner’s. It has some Hans in it too.
HK designed the HK 416, a piston-driven rifle that’s very clearly related to the M4 series of rifles. To put it simply, the HK 416 is an M4 with the short-stroke gas piston of the G36.

HK took the 416, made a few changes to accommodate the Marine Corps, and called it good. The differences are minimal, and it’s the same rifle at its core.
That base Marine Corps rifle utilizes a 16.5-inch barrel, features a collapsible stock, and utilizes the same STANAG magazines.
Clearly, we aren’t ready for M-LOK in the military because the Marines clung to the quad rail they know and love.

This was the first time Marines got an ambidextrous safety, but they didn’t bring the HK 416 A5 total ambidextrous controls. The rifle might be considered a carbine, but it can be rather hefty at 7.9 pounds.
While the M27 might be the primary rifle, we also need to mention the M38.
The M38 is the DMR variant of the weapon, and the only real difference is the optic equipped to the weapon.

Marine Corps Optics
Speaking of optics, the Marine Corps is in a transition period. They are currently fielding three optics with the various rifles in their infantry squads.
Trijicon 3.5×35 BAC with RMR

When the M27 hit the fleet, the first optic adopted was the Trijicon 3.35×35 with an RMR riding backup.
Marines have long used the ACOG series of optics on M4s and M16A4s, and it’s been a successful team-up. The new model, the SU-258/PVQ Squad Day Optic, dialed magnification back a hair.

We also saw the move from the chevron optic to the donut. Marines were often trained to use an occluded shooting method with the old ACOG.
Prices accurate at time of writing
Prices accurate at time of writing
-
25% off all OAKLEY products – OAKLEY25
Copied!
Visit Merchant
It works but isn’t perfect. The Marine Corps added a Trijicon RMR to the top of the optic to fix this.

Using a red dot is more straightforward than using the occluded shooting technique and seemingly faster and potentially more precise.
This setup presents Marines with a durable and straightforward design for engagements at the average infantry range.
Prices accurate at time of writing
Prices accurate at time of writing
-
25% off all OAKLEY products – OAKLEY25
Copied!
Visit Merchant
Trijicon 1-8X VCOG
The Marine Corps plans to replace the ACOG with the Trijicon VCOG. The VCGO presents the first mass-adopted LPVO for the United States military and will give Marines a very versatile and capable 1-8X level of magnification.
LPVOs are taking over the world of optics, and it’s interesting to see the Marines being early adopters.

The VCOG allows Marines to have an optic that works equally well at close and long ranges. From the ground up, the optic is designed to address the needs of the military.
Trijicon designed the optic with a first focal plane configuration, so the reticle grows and shrinks as the magnification increases and decreases. The reticle’s design ensures it can be used effectively at nearly any range.
Inside sits a segmented circle that’s massive. Since it shrinks when the magnification is low, it works much like a red dot at lower magnifications.

As the magnification increases, the BDC, wind calls, and illuminated crosshair becomes large and more in play for longer-range shots.
It’s a well-designed reticle that’s simple but versatile. Trijicon equipped the VCOG with 11 brightness settings, including two night vision settings.
Marines are amphibious by nature, and the VCOG can be submerged to 66 feet, so ship to shore won’t be an issue.
Prices accurate at time of writing
Prices accurate at time of writing
-
25% off all OAKLEY products – OAKLEY25
Copied!
Visit Merchant
Leupold TS-30A2 MARK 4 MR/T 2.5-8X
Designated marksmen will have their M38s equipped with the Leupold TS-30A2 MARK 4 MR/T optic.
Marines wielded this optic on the Mk 12 DMRs used by Marine Corps designated marksmen, so the Marines had them in inventory and had institutional knowledge of the platform.
Plus, Marines didn’t break it in the GWOT, so it’s tough. This optic uses a 2.5-8X magnification range with a 36mm objective lens.

The turrets are fingertip adjustable, the reticle allows for range estimation, and the optic is rugged, well made, and water, shock, and fog proof.
Interestingly, with the adoption of the VCOG 1-8X being the new optic of choice, the older MARK 4 might give DMs an outdated optic. The MARK 4 is an SFP design and doesn’t have the same versatility as the 1-8X.
Marine Corps Gear
Harris 9-13 S-LM Bipod

Marines love the Harris bipods. They’ve been in use in various precision rifles and DMRs for decades now. Automatic fire requires stability to control, and bipods lend stability.
As soon as the M27 replaced the SAW, the Marine Corps adopted a bipod to provide supportive fire.
From photos, the bipod doesn’t seem to be equipped for every M27 in the Marine Corps and seems to be reserved for Marines in the DMR and automatic rifleman role.

The 9-13 numbers reference the 9-13 inches of adjustable height. The S-LM bipod uses notched legs that can be adjusted independently of each other.
With the S-LM series, the bipod legs deploy automatically with spring-loaded action. These legs make the bipods easier to adjust when prone and when dealing with uneven terrain.
Harris bipods are surprisingly affordable for their quality. They can take a serious beating and cost less than $100.
Prices accurate at time of writing
Prices accurate at time of writing
-
25% off all OAKLEY products – OAKLEY25
Copied!
Visit Merchant
Magpul Gen3 PMAG
With the adoption of the Magpul Gen3 PMAG, the circle is complete.
What do I mean? Well, Magpuls founder served as a Marine, and with the adoption of their flagship product, the circle of Jarhead completed itself.
What can I say about PMAGs?

They are the premier polymer magazine. Every generation sees massive improvements that most shooters never notice.
When the M27 first rolled out, the Gen3 hadn’t seen the light of day, and the Gen2 magazines had issues with the M27.
This led the Marine Corps to ban the use of PMAGs, and my unit banned them while we were deployed, even though we had zero M27s at this time. Common sense isn’t always common.

Anyway, Magpul went back to the drawing board and made changes that allowed the Gen3 PMAGs to work flawlessly in the M27. The Gen3 Pmags use a stronger polymer, a more aggressive grip texture, and improved upon the famed design.
This made the most dependable PMAG ever created, and they are now the standard-issue magazine of the United States Marine Corps.
Prices accurate at time of writing
Prices accurate at time of writing
-
25% off all OAKLEY products – OAKLEY25
Copied!
Visit Merchant
Blue Force Gear VCAS Sling
Before the advent of the Blue Force Gear VCAS sling, it was a dark time. As a Marine, you had only a few choices. You could use a 3-Point, but 3-points are a mess of straps and buckles that is a real pain in the ass.
You could use a 1-point which meant the rifle would be bouncing around and occasionally swinging into your crotch area and often made letting the weapon hang quite uncomfortable.
Then the VCAS or Vickers Combat Application Sling rescued us.

My unit got them fairly early, and it changed my life and how I carried my rifle. The tactical 2-point became the dominant option, and the VCAS remains the issued sling of the Marine Corps and the M27.
The VCAS is made from durable 1.25-inch webbing and features a ton of adjustment. You can adjust the sling for armored or nonarmored use. A quick-adjust pull tab makes it easy to adjust the sling rapidly.

When properly set up, a user can adjust the sling to have the rifle hanging loose and easy to maneuver, but it can be tight enough to go hands-off in the pull of a tab.
When tightened, it’s easy to climb, carry a wounded comrade, and more. In terms of durability, well, I still have mine, going on over a decade now, and it still functions perfectly.
Prices accurate at time of writing
Prices accurate at time of writing
-
25% off all OAKLEY products – OAKLEY25
Copied!
Visit Merchant
Knights Armament NT4 Suppressor
Every Marine infantryman will also have his rifle equipped with a suppressor.
Yep, it’s one of the first wide-scale issuing of cans amongst a conventional military force. The USMC has been experimenting with suppressors in the infantry for years and only recently pulled the trigger.
The suppressor of choice is the Knight’s Armament NT4.
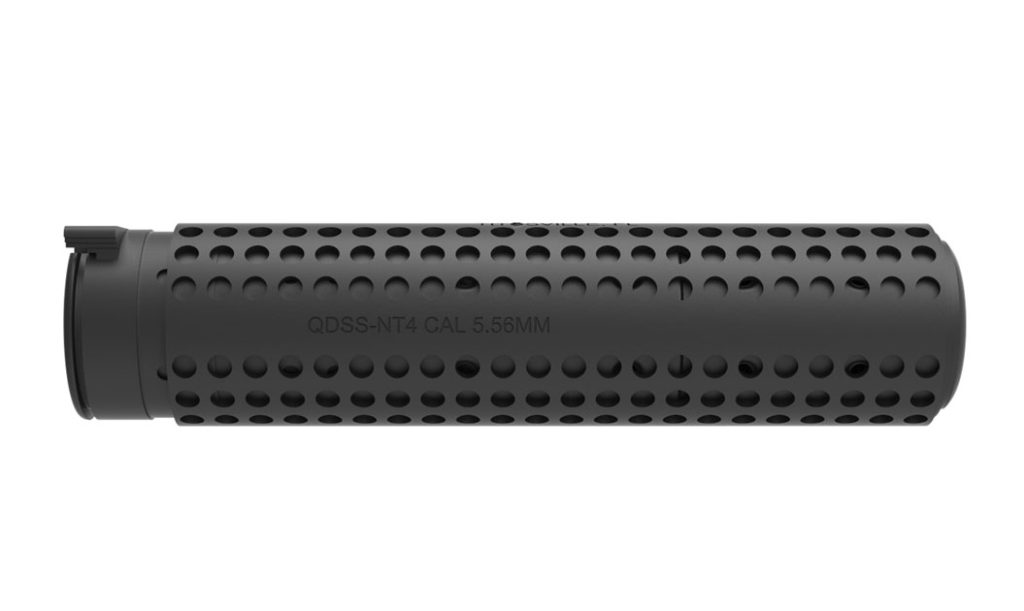
The NT4 is an absolute workhorse and has been kicking around since the late 90s. It’s not the most modern suppressor but seems to offer exactly what the Marine Corps wants as a price point they can stomach.
It’s known to be quite rugged, and you want rugged when it comes to Marines.
Prices accurate at time of writing
Prices accurate at time of writing
-
25% off all OAKLEY products – OAKLEY25
Copied!
Visit Merchant
PEQ 16 Laser Aiming Unit
The Marine Corps officially adopted the PEQ-16 to replace the older PEQ-15. The PEQ 16 offered Marines a laser aiming unit with a built-in weapon light. The weapon light is pitiful, with a mere 125 lumens of white light.

Although it’s rare to use white lights when NVGs and IR lasers typically dominate night fighting, in the face of lights from Cloud Defensive, Modlite, and even Surefire, designed in 2008, the 125 lumens of light is a penlight.
The device also has visible IR lasers, an IR flood setting, and more. It allows Marines to effectively and efficiently aim at night, mark targets, and more.
Final Thoughts
For as long as I can remember, the Marine Corps was the hand-me-down branch, but they seem to be leading the way in gear and rifles these days.
The Marine Corps modernization is equipping Marines with some pretty high-speed gear. The rifles will soon be outfitted with cans and LPVOs making them quite modern, albeit quite heavy.

Is that a sweet modern setup? Or is a dang near 13-pound rifle just too much? Let me know in the comments below. For guns you can buy, check out our guide to Military Surplus Rifles & Shotguns.
The post Goodbye M16: A Look at the Modern Marine Infantry Rifle M27 appeared first on Pew Pew Tactical.
Pew Pew Tactical
Database Job Chains for Laravel
https://laravelnews.imgix.net/images/laravel-haystack-featured.png?ixlib=php-3.3.1
Laravel Haystack is a package for beautifully simple but powerful database-driven job chains.
The post Database Job Chains for Laravel appeared first on Laravel News.
Join the Laravel Newsletter to get Laravel articles like this directly in your inbox.
Laravel News
Star Trek: Picard’s First Season 3 Trailer Gives Us an Old Crew and a New Ship
https://i.kinja-img.com/gawker-media/image/upload/c_fill,f_auto,fl_progressive,g_center,h_675,pg_1,q_80,w_1200/80b074910823a81785edccab64c0dc98.png
We knew they were coming, but now we’ve got an idea of the threat that is going to reunite Captain Picard with his classic TNG crew—but they’re going to need a new ship to boldly go in.
As part of today’s Star Trek Day celebrations, Paramount has released the first full trailer for Star Trek: Picard’s third and final season. It teases a mysterious threat to the Federation, that sees Beverly Crusher (the returning Gates McFadden) call on Picard for help—as long as he brings a few old friends along for the ride too.
The new trailer has a lot going on, beyond our first looks at the returning Doctor Crusher, Riker (Jonathan Frakes), Troi (Marina Sirtis), Geordi (LeVar Burton), and Worf (Michael Dorn). There’s a seemingly dire assault on Federation HQ, mysterious ships latching on to Starfleet vessels, and then there’s Commander Seven of Nine (Jeri Ryan) on a ship called the Titan—but seemingly not the U.S.S. Titan we’ve seen Riker aboard in Lower Decks, unless the trailer’s decieving us with some cleverly spliced footage. Is this perhaps the new Enterprise Patrick Stewart teased back at Comic-Con?
We’ve got a while to speculate. Star Trek: Picard returns to Paramount+ one last time from February 16.
Want more io9 news? Check out when to expect the latest Marvel and Star Wars releases, what’s next for the DC Universe on film and TV, and everything you need to know about House of the Dragon and Lord of the Rings: The Rings of Power.
Gizmodo
Laravel Over-Engineering: Service Injection, DB Transactions, and Livewire [VIDEO]
http://img.youtube.com/vi/G-ajJERYIUw/0.jpgThe first part of a code review of an open-source repository called Skuul. This time, we’re talking about the typical over-engineering thinking of junior developers.Laravel News Links
Shocking!: Liberal is blown away by the kindness of conservatives at a Trump rally.
https://www.louderwithcrowder.com/media-library/image.png?id=31533386&width=980
Midterms are only two short months away, and Democrats are busy attempting to make the case that all "MAGA Republicans" are evil people and threats to democracy. And while I could turn around and list all the reasons why leftists are the actual threat, that would defeat the purpose of this post, which is to celebrate someone who had the initiative to actually go hang out with some of these dreaded "MAGA Republicans."
The video features Samuel Donner, a self-described liberal who hails from Los Angeles, and he traveled all the way to Memphis Tennessee to attend a Trump rally with the mission of making 100 friends.
Now, I’m not saying one has to agree with the entire video–there are certain flourishes I think could have been eschewed–but I’m willing to give credit where credit is due, and a few kudos are in order.
Liberal Tries to Make 100 Friends at Trump Rally
youtu.be
I couldn’t help but chuckle a little when I heard the words, "Who the f*ck is Brandon?"
Sam came across numerous people during his time in Memphis, but I’d like to focus on those he met at the rally. There was a Mexican man who lived in Canada who, when asked, told Same he believed Trump’s thoughts on Mexico in 2016 were true and supported the former president still. There was another man who was so friendly he just handed Same the keys to his RV when asked if he could get a tour. Even Donner was taken aback when he was allowed to just walk into the vehicle, keys in hand and unaccompanied.
What’s especially funny is when fellow liberal Jordan Klepper totally rejected Sam. Most of the conservatives were open to being friends, and none of them outright rejected him.
He even finished his visit to Tennessee by attending a church women’s group with someone he met at the rally! It was great. His conclusion at the end is one that gives me hope for the future, too.
"On this journey, we connected with so many people that didn’t share our politics at all, and it left me wondering if this divided–Trump vs. Biden, red vs. blue, Democrat vs. Republican–is a way of thinking that doesn’t serve anyone."
What do you think? Who are the friendlier people: Republicans or Democrats? "MAGA stochastic terrorists" or leftists? Can we be friends?
The Louder with Crowder Dot Com Website is on Instagram now! Follow us at @lwcnewswire and tell a friend!
Dave’s Robot "Friend" RUINS The Show | Louder With Crowder
www.youtube.com
Louder With Crowder
spatie/laravel-ciphersweet
laravel-ciphersweet maintained by spatie
Description
Use ciphersweet in your Laravel project
Last update
2022/07/26 07:23 (dev-main)
Last update
2022/07/26 07:23
Require
- php ^8.1
- illuminate/contracts ^9.19
- paragonie/ciphersweet ^4.0.1
- spatie/laravel-package-tools ^1.12.0
Last update
2022/07/26 07:22
Require
- php ^8.1
- illuminate/contracts ^9.19
- paragonie/ciphersweet ^4.0.1
- spatie/laravel-package-tools ^1.12.0
Last update
2022/07/15 14:49
Require
- php ^8.1
- illuminate/contracts ^9.19
- paragonie/ciphersweet ^4.0.1
- spatie/laravel-package-tools ^1.12.0
Last update
2022/07/11 06:48
Require
- php ^8.1
- illuminate/contracts ^9.19
- paragonie/ciphersweet ^4.0.1
- spatie/laravel-package-tools ^1.12.0
Last update
2022/06/30 08:08
Require
- php ^8.1
- illuminate/contracts ^9.19
- paragonie/ciphersweet ^4.0.1
- spatie/laravel-package-tools ^1.12.0
Last update
2022/06/30 08:01
Require
- php ^8.1
- illuminate/contracts ^9.19
- paragonie/ciphersweet ^4.0.1
- spatie/laravel-package-tools ^1.12.0
Packalyst :: Latest Packages
Comic for September 07, 2022
https://assets.amuniversal.com/98f3659006ea013bbf71005056a9545d
Thank you for voting.
Hmm. Something went wrong. We will take a look as soon as we can.
Dilbert Daily Strip
The 5 Characteristics of Highly Dysfunctional Groups
https://content.artofmanliness.com/uploads/2022/09/group2.jpg

Humans are social animals.
Anthropologists argue that humans have been so successful as a species because we’re great at coordinating and cooperating.
This high degree of sociability allowed hunter-gatherer tribes to kill giant mastodons and modern societies to land people on the moon.
When human groups function in a healthy and coherent way, we can do some amazing things.
But when a group is dysfunctional, it can create significant discontent and chaos.
A rabbi and family therapist named Edwin Friedman spent a lot of time working with dysfunctional groups, from families to church congregations to global corporations.
He observed that no matter what type of group he worked with or in what country or culture that group was embedded, the dysfunctional ones all shared similar characteristics.
Friedman wrote about these characteristics in a book called A Failure of Nerve: Leadership in the Age of the Quick Fix. Someone recommended this book to me a few years ago, and it’s become one of my “quake books” — a book that fundamentally changed my perspective on things. I think about this book and the ideas contained in it a lot.
A Failure of Nerve was published posthumously in 1997 based on a rough manuscript Friedman had written before his death. While its contents aren’t fully fleshed out, it’s still a highly prescient book. The issues around dysfunctional groups that Friedman highlighted have only intensified in the quarter century since its release.
Below we summarize Friedman’s ideas on what makes for dysfunctional groups. But to understand those ideas, you first need to understand a concept he borrowed from something called the “Bowen family systems theory.”
Chronic Anxiety in Groups
The psychiatrist Murray Bowen developed a systems theory of family therapy back in the 1950s. Instead of focusing on individual family members to understand their problems, Bowen believed that you have to examine the “emotional system” of a family as a whole.
So, for example, if a kid is acting out at school and at home, traditional therapy would focus on the individual child and introduce techniques to help him or her become better adjusted.
In family systems theory, a therapist would take a step back and look at the family as a unit to figure out what might be causing the kid to act up. Maybe mom and dad have some issue that’s causing tension in the family. Perhaps the way the family reacts to this issue is exacerbating the problem. According to Bowen, the family operates out of a particular emotional/psychological system that shapes how its members behave within that family, and you can’t understand the problems of individual family members without understanding that familial milieu.
Friedman took this idea and developed the concept of “chronic anxiety” in a family.
By chronic anxiety, Friedman doesn’t mean mild angst or worry, nor that one or all family members manifest anxiety individually. For him, chronic anxiety is a high level of tension/nervousness that is shared by the family as a whole. It pervades the ether of the familial ecosystem. He puts it like this:
[The expression of chronic anxiety] is not dependent on the time or events, even though specific happenings could seem to trigger it, and it has a way of reinforcing its own momentum. Chronic anxiety might be compared to the volatile atmosphere of a room filled with gas fumes. Any sparking incident could set off a conflagration, yet rather than trying to disperse the fumes, people blame the person who struck the match.
The issues over which chronically anxious systems become concerned, therefore, are more likely to be the focus of their anxiety rather than its causes.
If you’ve been in a dysfunctional family or have seen a dysfunctional family up close, you’ve likely experienced what Friedman describes. Even when things seem okay, there’s an underlying tension that’s simmering beneath the surface. Things just feel off.
Friedman argues in A Failure of Nerve that you can see this debilitating dynamic in groups beyond families. Churches, non-profits, and companies can have this kind of chronic, systemic anxiety too. Friedman also believed that chronic anxiety could consume entire nations. He argued that many of the societal problems faced today in countries like the United States are due to chronic anxiety.
The 5 Characteristics of Highly Dysfunctional Groups
So how does chronic anxiety take hold within a group?
Friedman argued that when leaders aren’t willing to make tough choices — because of a failure of nerve — the following five characteristics emerge within the group. Each forms a vicious circle: anxiety in the group develops the dynamic, and the dynamic only deepens the group’s anxiety.
Reactivity
The vicious cycle of intense reactions of each member to events and to one another.
People in dysfunctional groups viscerally and automatically respond to stressful events and to each other’s responses to those stressful events. Instead of reacting to stressors with the human capacity for calmness and reason, people in dysfunctional groups react with their reptilian brains.
Reactivity in families and other social groups manifests itself in outsized uproars over perceived slights. The threshold of pain from these slights is extremely low. Even the most innocuous statement can be turned into an extreme offense by a highly reactive person. Instead of focusing on the problems they’re facing, reactive groups make things personal.
When discussing issues, members of reactive groups stake out positions along illogical extremes. They think and talk with the cognitive distortions that make people miserable S.O.B.s. They assume ill-will with others and see things in black and white. Charity or forgiveness are not allowed. Giving the benefit of the doubt? That’s for suckers.
People in highly reactive groups lack personal boundaries and are quick to make their problem everyone else’s problem. Reactive people try to diffuse their anxiety by spreading it to those around them.
Friedman argues that reactivity also manifests itself in a lack of playfulness in the group. Everyone becomes incredibly serious. There’s no room for the social benefits of friendly teasing because everyone is so thin-skinned. People begin to form entrenchments to protect themselves.
With reactivity, it doesn’t matter what the problem is. Highly reactive people will make the problem into a bigger deal than it needs to be.
Take a couple that furiously argues about how the dishes should be washed. The problem really isn’t about the dishes. The problem is the maladaptive reactivity the husband and wife have about how the dishes should be washed and the maladaptive reaction each have to each other about this issue. You could substitute any other issue and see the same dynamic play out. The reactivity is the actual issue.
You’ve likely seen this dynamic in other groups you belong to. Some guy at work has a hair-trigger anger issue. Any little thing sets him off. This guy blows a gasket if the coffee pot is empty. He reacts, and you react to him by getting angry yourself or resorting to passive aggression.
While all the characteristics on this list feed back on themselves, the vicious circle effect is particularly strong with reactivity: reactivity creates chronic anxiety, and chronic anxiety only makes people more reactive. The result is a highly fraught group dynamic; everyone is on pins and needles, waiting for the next stupid shoe to drop so they can go at each other again.
Herding
A process through which the forces of togetherness triumph over the forces of individuality and move everyone to adapt to the least mature members.
Groups tend to organize around a weakness.
When a group experiences a threat, they’re apt to circle the wagons. Group cohesion becomes the most important goal.
This instinct to come together with others when we’re feeling anxious and uncertain can be healthy in moderation. But according to Friedman, the herding instinct becomes dysfunctional when togetherness becomes an end in and of itself, rather than a means to group and individual flourishing.
In fact, making unity the sole aim often jettisons the potential for the majority of a group to flourish for the sake of appeasing a minority of the group’s least mature and most troublesome members.
You see this play out in dysfunctional families. Take the family with an alcoholic mom. Instead of telling Mom to get into rehab and get counseling to sort herself out, all the other family members begin to organize their lives around Mom’s problem. The kids walk on eggshells to ensure she doesn’t get stressed or anxious, because when Mom gets stressed and anxious, she starts to drink. Family members don’t share their problems with her and try to solve issues before she’s even aware of them, so she doesn’t start spiraling.
Telling Mom she needs to get her life together is hard and painful — it takes nerve. Hence, family members instead choose to contort themselves into psychological and emotional knots to ensure everything stays copacetic so that Mom doesn’t get upset. They sacrifice their own well-being, not even to make things good, but to keep them from going bad.
Families that organize around a weakness remind me of The Twilight Zone episode “It’s a Good Life.” A little boy named Anthony Freemont can kill anyone just by thinking it. He usually knocks someone off when that person does something that makes him unhappy. His family (and the whole community as well) is naturally terrified of Anthony, so they constantly tiptoe around, trying to keep him happy. They have to pretend he’s a good boy, even when he acts like a monster. They’ve organized themselves around a weakness: Anthony.
You see this same dysfunctional dynamic in groups outside of families. Instead of firing toxic and incompetent employees (which would be hard and painful), many workplaces will just figure out a way to organize themselves so that these people do the least damage. But that doesn’t solve the problem, and the group continues to suffer as a whole.
Or think about a church group where the most annoying and emotionally immature person effectively takes the congregation hostage. This individual complains about the dumbest things and takes extreme offense at minor slights. Instead of telling this member to shape up or ship out, the pastor or the other members of the group, who think of themselves as “nice Christian guys,” try to be “compassionate” and “empathetic” and lovingly reason with the person.
But this person can’t be reasoned with. They’re emotionally unhealthy. There’s a good chance they’ll take advantage of your empathy and reasoning by weaponizing it and turning it back against you.
“Isn’t it the Christian thing to do to help me?! What would Jesus do, brother?”
Friedman doesn’t have a problem with empathy and compassion. He was a rabbi and family counselor, after all. Being empathetic and compassionate was part of the gig. He just had an issue with “unbounded empathy.” You need to combine empathy with reason. When you try to be empathetic with someone who’s emotionally unhealthy, you can end up being un-empathetic to everyone else; in changing the group’s structure or culture to accommodate the demands of a vocal minority, you can sabotage the group’s ability to meet the needs of the majority.
Friedman also doesn’t necessarily have a problem with families or groups organizing around a weakness, as long as it’s done for a healthy purpose. Think of a family in which one of the family members has cancer. That’s a weakness, so it’s good and natural that a family comes together to help that family member out. Schedules will need to be rearranged so that oncology appointments can be attended. Other family members may need to pick up some slack in terms of chores.
But in a healthy family, weakness doesn’t become the main event. They’ll still seek to make life as “normal” as possible for everyone else. Group togetherness is a means to an end: the family and its individual members living a flourishing life.
Think of the herding instinct as an immune response. In a healthy organism, the immune response is calibrated so that when the body is sick, it kicks into gear at the right time and intensity so that it only kills the outside pathogen while doing as little damage to the body as possible. That’s what healthy herding looks like.
Unhealthy herding is like an autoimmune disease in which the immune system is constantly firing and damaging the body and making it sicker. The cure becomes deadlier than the disease.
Blame Displacement
An emotional state in which family members focus on forces that have victimized them rather than taking responsibility for their own being and destiny.
Friedman observed that when dysfunctional families have an underlying group anxiety issue, instead of each member taking responsibility for themselves and making changes to themselves to reduce the anxiety, they blame other members of the family.
“Well, I wouldn’t be so angry if the kids weren’t so annoying!”
Besides shifting blame onto their fellow members, dysfunctional families and groups will also shift the responsibility for their chronic anxiety onto outside people or institutions. Suppose Gunnar is having a behavioral problem in school. In that case, a dysfunctional family won’t look within to see what they can do to help little Gunnar but instead will cast aspersions on the school’s teachers and administrators and place all the blame on them.
Quick-Fix Mentality
A low threshold for pain that constantly seeks symptom relief rather than fundamental change.
Mom and dad are always fighting, and brother and sister are constantly bickering. So Dad plans a big vacation to Disneyland to bring the family together and distract them from their problems. The family does have fun, but since they didn’t solve the underlying problem of chronic anxiety in their family, it rears its ugly head again once they get back home. So Dad buys the family a new flatscreen TV. On and on the cycle of quick-fixes goes.
You also see this dysfunctional dynamic in struggling companies or volunteer organizations that develop “programs” to pull the group out of a rut. They’ll spend tons of money on team-building retreats or consultants that provide communication tools that will supposedly create better group cohesion.
These programs and initiatives might temporarily relieve the tension and discontent in the group, but because they’re not tackling the underlying issue — chronic anxiety — nothing changes in the long run. Members are still unmotivated, cynical, and untrusting.
Lack of Well-Differentiated Leadership
A failure of nerve that both stems from and contributes to the first four characteristics.
According to Friedman, the most significant characteristic that leads to and drives debilitating, chronic anxiety in a family or group is an absence of real leadership.
A lack of leadership — the lack of nerve to make hard decisions — creates the kind of uncertainty and disorganization that generates anxiety in an organization in the first place. As anxiety increases, the impulse towards all the above characteristics rises, and these dynamics deepen the anxiety.
This first vicious circle creates a second: Poor leadership creates dysfunction; a dysfunctional group struggles to attract good leaders; a lack of leadership exacerbates the dysfunction.
Friedman argues that the essence of poor leadership is the degree to which a leader embodies and exemplifies the characteristics of dysfunction.
Poor leaders are highly reactive and spend most of their time putting out the latest fire.
Poor leaders are reluctant to take decisive action for the good of the group when a group member is making everyone else miserable. Instead, they’ll try to make sure everyone “feels” good, even if that means the group’s most immature person feels good and doesn’t feel left out, while everyone else suffers.
Poor leaders won’t take responsibility for the problems of a group and instead will shift blame to other members of the group or outside people or institutions. The buck never stops with them.
Poor leaders will implement gimmicky programs or initiatives that might temporarily boost morale but do nothing to solve the underlying issue of chronic anxiety.
In contrast to the poor leader who gets caught up in the same reactivity, herding, blame-shifting, and quick-fix-thinking that the rest of the group’s members struggle with, an effective leader is what Friedman calls “well-differentiated.” He’s able to differentiate himself — separate himself — from these anxieties and maladaptive behaviors. A well-differentiated leader maintains a “non-anxious, well-principled presence” in the face of the stressors swirling outside and within the group.
How do you become this kind of well-differentiated leader?
We’ll answer that question next.
The post The 5 Characteristics of Highly Dysfunctional Groups appeared first on The Art of Manliness.
The Art of Manliness
