https://i.kinja-img.com/gawker-media/image/upload/c_fill,f_auto,fl_progressive,g_center,h_675,pg_1,q_80,w_1200/1c2ff8c7229ce469bb24f14cb0effd63.gif
Google today announced a new operating system, Chrome OS Flex, free-to-use, cloud-based OS built to convert old PCs or Macs into Chromebooks.
The new OS was developed by Google a few years after acquiring Neverware—the makers of Cloudready—and was primarily made for schools and businesses with fleets of old PCs or Macs that have been bogged down after years of use. Google argues these systems could be revitalized by stripping out Windows or macOS and installing Chrome OS Flex, a lightweight operating system that can run on weaker hardware and remain stable for years due to its reliance on the cloud. Most importantly, Chrome OS Flex will get the same attention from Google as Chrome OS—that is, it relies on an identical code base and will receive the same release cadence.
Thomas Riedl, director of product for enterprise and education on Chrome OS, told us that Google invested heavily in ensuring that UIs are consistent across both operating systems and brought primary Chrome OS features, including the Google Assistant, Chrome browser, and cross-device Android tools, to Flex.
“With such similar end-user and IT experiences, it’s also easy to transition from Chrome OS Flex to Chrome OS devices when you’re ready to purchase new hardware: With Chromebooks, Chromeboxes, and Chromebases, you’ll experience end-to-end optimization across hardware and software with the strongest security and largest app ecosystem through the Google Play Store,” Riedl wrote in a blog post.
Chrome OS Flex could be a saving grace for businesses attempting to operate with a mixed fleet of older Mac or PCs and newer Chromebooks. Those aging systems could not only be given new life running Chrome OS Flex but with Chrome Enterprise Upgrade, they can be managed within the same Google Admin console as newer Chrome OS devices. It would also be much easier to move everything over from Flex to a new Chromebook when it’s time for a hardware upgrade.
“Oftentimes, Windows forces them [consumers] to use systems for shorter than they should. We have Chrome ready for you and you don’t have to buy new hardware,” Riedl said. He went on to say that the first 100 Chrome OS releases were on Google’s own devices, but the next will be on “whatever hardware you throw at it.”
Google also makes a sustainability argument in that moving to Chrome OS Flex could rejuvenate laptops that are on life support before they’re shipped off to a landfill. Businesses might also switch to Chrome OS Flex for specialized hardware like kiosks and digital signage, and in one extreme use case, a Scandinavian hotel chain switched to Chrome OS (using CloudReady) to flee from a ransomware attack.
Google says Chrome OS Flex can run efficiently on devices that are up to 13 years old—a bold claim we are eager to try out once we can get our hands on an Apple PowerBook G4.
“You can go back 10 or more years and people are still getting a really good experience. I do think you’ll get some advantages with speed or performance but one of the more profound things is that Windows won’t stay as performant on year five as on year one. Chrome OS Flex won’t age as poorly and won’t accrue that baggage over time,” Forrest Smith, a product manager for Chrome OS, told Gizmodo.
There are some notable limitations with Flex, most of which stem from using hardware made for another OS. For example, Chrome OS Flex devices running on PC or Mac hardware won’t have the same key shortcuts as Chromebooks. Moreover, certain device drivers aren’t compatible with Flex; as a result, the webcam on some MacBook models won’t function properly.
Riedl also concedes that while Flex is supposedly more secure than a PC, it isn’t quite as safe as a Chromebook given the software/hardware disconnect. Google says it will be transparent with customers in describing the risks of switching to Flex and plans to publish a list of certified device models with notes outlining which features do and don’t work.
While testing Chrome OS Flex is as easy as booting it from a USB drive—a process that should take about 30 minutes—replacing an OS with another across an entire fleet is non-trivial. Smith says that while IT admins are comfortable with the installation process, it isn’t something anyone can pull off. The long-term goal, however, is to simplify the process and broaden the adoption of Chrome OS Flex to individual users.
“At Google, we were very tempted to just go big and to put it out to everybody, but over the years, we’ve learned that having a focus is good. Our most loyal fans are those who tinker with it and try it out so what you’ll see is that you have an installer and can try it out yourself,” Riedl said.
These are still early days for Chrome OS Flex, and Google admits it hasn’t done any large-scale testing just yet. With this early access period, the company is giving users a chance to play around with the OS and provide feedback before it pushes it out to market. Those who want to give Chrome OS Flex a try can do so by loading it from a USB; this method gives you a “risk-free” way to try Chrome OS Flex before doing a full OS swap.
Google says a stable version of Chrome OS Flex will be made available “in the coming months” and to expect bugs in its current state. Those who were using CloudReady will be upgraded to Chrome OS Flex free of charge.
Gizmodo


 Note: Do you want to create your own thriving coding business online? Feel free to check out our
 Tip: An excellent start to turbo-charge your freelancing career (earning more in less time) is our
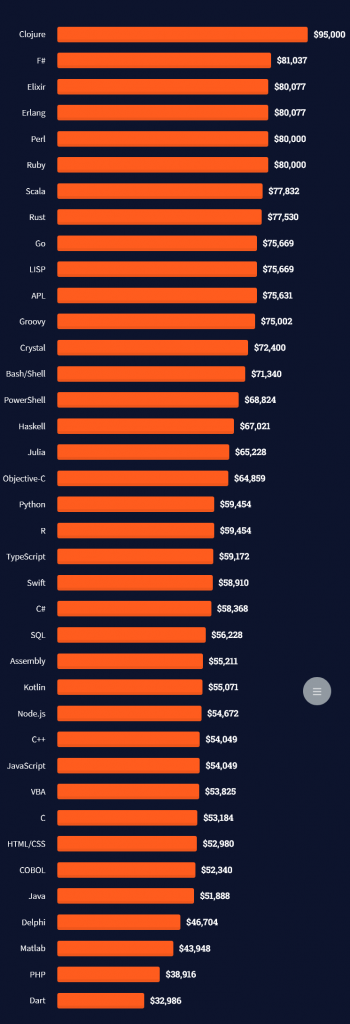
  The average annual income of professional developers in the US is between $70,000 and $177,500 for various programming languages.