https://miro.medium.com/v2/resize:fit:1024/1*nCy08NPtCpERqC09SVBFfg.jpegShows how to run a single workflow across multiple Laravel apps. (microservices)Laravel News Links
Mary UI – Laravel blade components for Livewire 3
https://mary-ui.com/mary-banner.pngGorgeous Laravel blade components made for Livewire 3 and styled around daisyUI + Tailwind.Laravel News Links
5 SQL Constraints to Guarantee Good Database Structure
https://static1.makeuseofimages.com/wordpress/wp-content/uploads/2023/08/database-drives.jpg
Key Takeaways
- Use SQL constraints to maintain data integrity and ensure uniformity in your database. The NOT NULL constraint forces columns to reject NULL values.
- Implement primary key constraints to ensure uniqueness of values in a column or set of columns. This prevents duplicate records in a database table.
- Foreign key constraints establish relationships between tables and prevent actions that would destroy links between them. They ensure that a record in the child table references the parent table.
A database is essential for many applications, but it can get messy if you don’t have guidelines for storing and processing data.
SQL constraints specify rules for storing data in a table. When you set constraints, the database will throw an error if you try to store data that violates these rules. Constraints help to maintain data integrity and ensure uniformity in your database.
There are several types of SQL constraints that you can use; here are some of the most useful.
1. NOT NULL Constraint
Database columns, by default, accept data with NULL values. NULL essentially means that no value exists. The NOT NULL constraint forces a column to reject NULL values.
This constraint ensures that each column must contain a value. You cannot add a record to the database without supplying data for any columns with the NOT NULL constraint.
Take the example of a Customers table. There are some necessary details about each customer that you want on record, like their name. Add the NOT NULL constraint to the mandatory fields to ensure that customers provide this information.
Here’s an example showing how you can use the NOT NULL constraint in a PostgreSQL database:
 CREATE TABLE Customers (
    ID int NOT NULL,
    LastName varchar(255) NOT NULL,
    FirstName varchar(255) NOT NULL,
    Mobile_No int NOT NULL,
    Age int
);
If you try inserting a customer record without the Age field, the database will accept it with no errors:
 INSERT INTO Customers (ID, LastName, FirstName, Mobile_No)
VALUES (123456, 'Dior', 'Christian', 0723000000);
However, if you try inserting a record without the FirstName field, the database will reject it with an error message:
 ERROR: null value in column "firstname" violates not-null constraint
Detail: Failing row contains (123456, Dior, null, 723000000, null).
2. PRIMARY KEY Constraint
A KEY is a unique attribute set to a column or field that identifies a table’s tuple (or a record) in database systems. A PRIMARY KEY constraint ensures the uniqueness of values in a column or set of columns. It acts as a unique identifier in a row, preventing duplicate records in a database table.
Primary keys contain unique values and cannot contain NULL values. Each SQL database table must have only one primary key. The PRIMARY KEY can have single or multiple columns.
For example, you are creating a database of customer records. You need each customer to enter their ID numbers differently from everybody else. You can apply the primary key constraint to ensure that none of your customers have the same ID number.
The following code shows how you can introduce a primary key constraint in a MySQL database:
 CREATE TABLE Customers (
    ID int NOT NULL,
    LastName varchar(255) NOT NULL,
    FirstName varchar(255),
    Age int,
   PRIMARY KEY (ID)
);
The database will not accept that value if a user enters another record with a similar ID. Instead, it will throw an error indicating duplication. The user tries to insert two records with the same ID in the following example:
 INSERT INTO Customers (ID, LastName, FirstName, Age)
VALUES (1, 'John', 'Doe', 35 );

INSERT INTO Customers (ID, LastName, FirstName, Age)
VALUES (1, 'Mary', 'Jane', 35 );
The database will show an error message:
Duplicate entry '1' for key 'PRIMARY'
But if you change the ID of the second customer, the database accepts the entry. Therefore, the primary key ensures no duplicate IDs in your customer records.
3. FOREIGN KEY Constraint
Foreign keys establish relationships between two tables. You can add a foreign key to a field/column in one table that references the primary key in another table.
The table with the primary key is the parent table, while the table with the foreign key is the child table. A record cannot then exist in the child table without a reference to the parent table.
The foreign key constraint prevents actions that would destroy links between tables. For example, you cannot DROP one table if it links to another with a foreign key. You will have to drop both tables at once.
Unlike a primary key, you can duplicate a foreign key and have more than one in a single table. Foreign key values can also be NULL. In the following example, you must use the customer_id to create an order.
 CREATE TABLE Customers (
    customer_id INT PRIMARY KEY,
    first_name VARCHAR(50),
    last_name VARCHAR(50)
);

CREATE TABLE Orders (
    order_id INT PRIMARY KEY,
    customer_id INT,
    order_date DATE,
    FOREIGN KEY (customer_id) REFERENCES Customers(customer_id)
);

INSERT INTO Customers(customer_id, first_name, last_name)
VALUES (1, 'Christian', 'Dior');

INSERT INTO Orders(order_id, customer_id, order_date)
VALUES (1, 1, '2023-08-07');
If you try creating an order without an existing customer_id, the database shows an error message:
 Cannot add or update a child row: a foreign key constraint fails
(`db_9_4ee205c`.`orders`, CONSTRAINT `orders_ibfk_1` FOREIGN KEY
(`customer_id`) REFERENCES `customers` (`customer_id`))
4. UNIQUE Constraint
This constraint ensures that no two rows can have the same values for a specific column. Like primary keys, a unique constraint maintains data integrity and prevents duplicate entries. If you work with a poorly designed database without the UNIQUE constraint, you may end up having to find and delete the duplicates.
Unlike primary keys, you can have many UNIQUE constraints on one table. For example, when creating a Customers table, you may want to have unique IDs and phone numbers. To add such a constraint using MySQL server, use this syntax:
 CREATE TABLE Customers (
    ID int NOT NULL UNIQUE,
    LastName varchar(255) NOT NULL,
    FirstName varchar(255),
    Mobile_No BIGINT UNIQUE
);
If you insert records with the same mobile number in the database, it will then show an error message.
 INSERT INTO Customers (ID, LastName, FirstName, Mobile_No)
VALUES (123456, 'Dior', 'Christian', 254000000 );

INSERT INTO Customers (ID, LastName, FirstName, Mobile_No)
VALUES (7891011, 'Dedan', 'Kimathi', 254000000 );
The error message will be something like this:
Duplicate entry '254000000' for key 'Mobile_No'
This UNIQUE constraint ensures the database won’t have customers with the same IDs or mobile numbers.
5. CHECK Constraint
The CHECK constraint limits the value range put in a column. Adding a CHECK constraint on a column will allow only specified values for that column. It enforces data integrity by ensuring a user only inserts valid data in a table.
The CHECK constraint must evaluate a value as TRUE or UNKNOWN for each specified row or table entry. If the value is FALSE, the database shows an error message.
For example, in the Customers table, you may want only to serve customers over 18 years. You can add a CHECK constraint to ensure you don’t serve underage customers. You may add the constraint in a PostgreSQL database, as shown in the following code:
 CREATE TABLE Customers (
    ID int NOT NULL,
    Age int CHECK(Age>=18),
    LastName varchar(255) NOT NULL,
    FirstName varchar(255),
    Mobile_No BIGINT UNIQUE
);
Now if you try to insert a customer’s age below the age of 18:
 INSERT INTO Customers (ID, Age, LastName, FirstName, Mobile_No)
VALUES (123456, 15, 'Dior', 'Christian', 1254000000 );
The database will show an error message like this:
 ERROR: new row for relation "customers" violates check constraint
"customers_age_check"
Detail: Failing row contains (123456, 15, Dior, Christian, 1254000000)
How to Add and Remove SQL Constraints From Databases
SQL constraints are not cast in stone. You can add or remove constraints on existing tables using the ALTER TABLE statement. The ALTER statement allows you to work with constraints to suit your data needs.
There are many more SQL constraints you can learn to design a database to your liking. You can start with the ones listed in this article.
MakeUseOf
Someone explain to me how this year’s yo-yo world champions are even human ????
https://media.notthebee.com/articles/64e4ca44533f764e4ca44533f8.jpg
This year’s yo-yo world championships were held live in Osaka, Japan for the first time since being made virtual in 2020 for the Covid-19 pandemic, and these contestants brought their A-game for the live crowds.
Not the Bee
How to Teach Your Kids to Code With a Raspberry Pi
https://static1.makeuseofimages.com/wordpress/wp-content/uploads/2022/09/how-to-boot-a-raspberry-pi-from-ssd-and-use-it-for-permanent-storage-1.jpeg
Teaching children to code at a young age helps them thrive in today’s technological world by developing skills in critical thinking, creativity, and problem-solving.
The Raspberry Pi, with its low price and ease of use, is a fantastic device for introducing young people to computing and programming. With applications in robotics, computer programming, and even home automation, it’s ideal for kids to learn to code.
1. Get Started With the Raspberry Pi
In an effort to make computers and digital creation accessible to everyone, the Raspberry Pi Foundation created the inexpensive and widely available Raspberry Pi computer. Several models and revisions have been made available since the first Raspberry Pi was introduced in 2012.
If you do not already have a Pi, you can get one for as little as $35. Be sure to get the flagship Raspberry Pi 4, although the older Raspberry Pi models have some merit. You can also purchase the Raspberry Pi 400, which offers much the same features as the Pi 4 and comes in a keyboard form factor.
The official Raspberry Pi 4 desktop kit costs more money but comes with most of the components you need to use the Raspberry Pi, including a keyboard, mouse, case, power supply, and microSD card. After that, all you will require is a compatible HDMI display that you can connect to the computer.
The microSD in the official kit comes preloaded with the Raspberry Pi OS, a Linux distribution created specially for Raspberry Pi computers. You can also follow our guide on how to install an operating system on a Raspberry Pi.
Your children can begin their coding journey as soon as the initial setup is complete. A good place to start is at the Raspberry Pi Foundation’s projects site.
2. Choosing a Kid-Friendly Programming Language
It is essential to choose a kid-friendly programming language in order to make programming enjoyable and interesting for your children. Scratch, Python, and Ruby are just a few of the most well-known choices.
Scratch
Scratch is an interactive programming environment that uses a block-based visual interface. It is one of the few languages designed to be used by children. Due to the visual programming style, Scratch is straightforward and intuitive to learn. Concepts introduced in Scratch can be applied to more advanced languages such as Python and Java.
The Scratch website has numerous tutorials dedicated to teaching you how to use the language. It is also possible to remix user-created projects on the website.
Aside from learning programming, Scratch can also serve as a springboard for your children to explore their artistic ideas in other areas of interest such as visual art and music.
Python
Python’s syntax is simple and intuitive for newcomers. The language is widely used: arguably, it’s the most popular programming language for the Raspberry Pi. For this reason, there are many resources available to help beginners get started.
It provides access to libraries of pre-written code that may be integrated into personal applications. This is a key benefit of Python as it makes it easier to interface with physical electronic components connected via the Raspberry Pi’s GPIO header and enables you to create advanced projects.
Ruby
Yukihiro “Matz” Matsumoto created Ruby in the 1990s in Japan. It’s a general-purpose language that’s been called “a programmer’s best friend” and has a lot in common with Python. It is also one of the easiest languages to begin programming with.
Like Python, Ruby’s syntax is both straightforward and expressive. It also does not rely on indentation to separate code blocks. It however places a greater emphasis on object-oriented programming than Python. It has waned in popularity over the years, but it is still an amazing language that is well-loved by developers and programmers.
Apart from the languages listed above, other excellent options for teaching your child coding include Lua, JavaScript, Swift, and Java (for older children).
3. Hands-On Projects and Challenges
To solidify their programming skills, it is important to encourage your kids to work on hands-on projects and challenges using the Raspberry Pi. Here are some ideas:
Create a Simple Game
A video game is a project that holds a lot of appeal for most children. There are several ways to make a gaming machine using your Raspberry Pi. You can start by creating a retro gaming console with a Raspberry Pi with no coding involved and then move on to the more engaging projects in our list of the best Raspberry Pi gaming projects.
Build an RC Car
This can be a good project if your child already has an RC car. It is possible to hotwire it so that it is controlled from the Raspberry Pi rather than the remote that came with it. The process is outlined in an Instructables guide that uses a Traxxas remote control car and a long-range Wi-Fi USB antenna.
If you would rather not go through the stressful but rewarding process of hacking an RC car, you can buy a Raspberry Pi RC car kit such as the PiCar-V from Sunfounder that already comes with programming functionality in the box.
Security Camera With Motion Detection
If your kid is interested in home security and surveillance technology, they can also find installing a motion-activated security camera to be an engaging pastime.
Using a Raspberry Pi and a Camera Module, kids can create a surveillance camera that records still images or video and can also detect motion. The Raspberry Pi can be programmed in Python to trigger a recording of every motion it detects and save the files to a USB drive or an online cloud storage service.
Our tutorial on how to create a multi-camera CCTV system with a Raspberry Pi and motionEyeOS is a great place to start.
4. Join Coding Communities and Clubs
Apart from choosing a programming language and working on projects, coding clubs allow your child to develop essential skills such as collaboration and communication faster.
You should encourage your children to join coding groups or other offline platforms that cater to young programmers in order to keep the momentum going and to build a sense of community. They can usually find collaborators and get advice from professionals in these settings. These groups also offer constant encouragement and help those new to coding develop their skills.
You can also try to look for a Code Club or CoderDojo near you. These organizations are supported by the Raspberry Pi Foundation, but they are not limited to Raspberry Pi hardware.
Help Your Kids Learn Coding Using a Raspberry Pi
The original intention of the Raspberry Pi was to make computers affordable and get more young people interested in coding. If your kids are eager to explore coding as a way to express their creativity and intuition, a Raspberry Pi can be a great investment to help them bring that vision to life.
With the aid of online resources, offline communities, and hands-on projects, the single-board computer can be a perfect tool for guiding your kids into the world of coding.
MakeUseOf
The Top 8 Websites for Finding High-Paying Freelance Tech Jobs
https://static1.makeuseofimages.com/wordpress/wp-content/uploads/2021/12/Job-Posting-Sites-Featured-Image.jpeg
If you’ve been searching for remote tech freelance jobs without success, it’s possible you haven’t explored the right job portals. Freelance tech jobs that pay well are a niche category of jobs, and you need to know where to look for them to ensure success.
Some well-known job portals facilitate and offer well-paying freelance tech jobs for aspiring candidates. You can check out some of these job portals and apply for suitable projects.
Toptal, an acronym for Top Talent, advertises itself as a recruitment board catering to the top 3% of candidates applying for freelance technical jobs. The portal’s screening process entails multiple rounds, making hiring suitable talent for the open positions easier.
The rounds are split into multiple categories, as follows:
- Language and Personality: The first round checks the candidate’s English language and communication prowess.
- In-Depth Skill Review: Since you are applying for a technical role, your problem-solving and technical skills will move you to the next round.
- Live Screening: If you pass the first two rounds, you move to the Live Screening round, wherein Toptal screeners test your skills on live exercises to gauge your expertise for the role.
- Test Projects: Test projects are the fourth stage of the evaluation process and can take one to three weeks. During this test, you must demonstrate competence, professionalism, and thoroughness within your projects to impress the screeners.
- Selection: Finally, if you complete all the steps, you move on to the possibility of applying for the available jobs on the network.
As the name aptly suggests, Authentic Jobs is a targeted job board for web and creative professionals looking for remote jobs. The company has been headquartered in Hingham, Massachusetts, ever since its inception in 2005. Since Authentic Jobs is a global job platform, it connects IT designers and developers with interested employers worldwide.
As an interested freelancer, you can apply for various jobs, such as freelance, contractual, full-time, and internship positions. Some additional features include a job monitoring dashboard, flexible payment options, and a 30-day full refund policy. If you have the basic skills of a freelance tech analyst, you can succeed in all your endeavors.
Since the pandemic, the remote working option has become an ever-increasing hit with freelancers and the public. We Work Remotely is one of the largest remote working websites, with a whopping 4.5 million visitors.
If you are looking for a technical job, you can choose from the following list of technological niches:
- Programming
- Design
- DevOps
- Product
The list is not exhaustive, as the job board offers many other options for non-technical groups. There are a few job categories, such as contractual and full-time positions. As a job seeker, you should choose a futuristic tech job with high earning potential
Remote OK offers plenty of jobs for Developers, Designers, Sales Professionals, and Project Managers. The job platform is rapidly becoming one of the top-notch job boards for aspiring freelancers looking for a steady freelance gig.
Its tech focus and job flexibility strongly focus on its Dutch roots. Remote OK has tie-ups with well-known brands, including ESPN, easyJet, Amazon, Microsoft, Stripe, etc. While Remote OK offers tech jobs, some non-tech jobs are also available to ensure everyone benefits equally from the portal’s offerings.
Many remote tech job seekers are familiar with freelance platforms like Upwork, Freelancer.com, and Fiverr. These websites are online marketplaces where employers update their jobs, and freelancers can pitch for their favorite positions.
Once an employer identifies a suitable candidate and agrees on the proposed rate, they can hire the freelancer and establish milestones for the task. Each pitch differs in its monetary value, so there is no set amount for each technical job.
However, what stands out is that these platforms charge a hefty fee from the freelancers, making them a little expensive to be associated with.
Like many freelancing portals, Flexiple connects freelancers with employers seeking technical expertise. Freelancers have to undergo elaborate proficiency tests. As a freelancer, your profile and skills are shared with employers once you clear your tests. This process helps bridge the gap between talents and job requirements.
Some common job profiles revolve around the following language requirements:
- JavaScript
- LAMP
- ReactJS
- AWS
- Vue.js
- C#
- Swift
- C++
- Go
- Kotlin
- PHP
There are plenty more languages on this list. Flexiple advertises tech jobs that require coding and programming skills only. So make sure you have a solid background in the required languages before investing your time and effort in completing your application.
If you are not getting high-paying tech jobs, you are not on the right platform. As a freelancer, targeting the most searched and high-performing websites, such as Arc(), is always advisable, which promises to be better than their competitors.
Arc vets developers basis their capabilities by putting them through various screening rounds. For example, your application goes through the following stages:
- Manual profile screening
- Self-introduction video
- Technical Interview & Pair Programming
- Final Candidate Review
- Candidate Onboarding
- Ongoing Review
Arc proudly states that only 1.1% of developer applications meet their standards, which proves that only the best are given some of the highest-paying remote tech jobs in the market.
LinkedIn is a famous job engagement and enrichment platform which caters to all technical and non-technical jobs for freelancers and full-time professionals. You can connect with different hiring companies, follow people from a network, or apply for your favorite job; the choice is yours.
You can always do a little extra on LinkedIn via its job portal. The global platform has become the hub for people looking to hire and collaborate with people from all professional realms, making it one of the most revered job portals on the internet.
Technical Jobs and Their Associated Remote Working Mistakes
When looking for good, well-paying remote tech jobs, nothing can beat the internet. There is no dearth of options, from varied job portals to fancy marketplaces.
However, even if you have the required skill sets to land a good gig, you must avoid some of the most common tech career mistakes to make the most of the available opportunities. When you heed the job requirements, you can harvest the opportunity and create a spot for yourself in the technical world.
MakeUseOf
Making the case for Laravel as a Next.js alternative
https://aschmelyun.com/assets/images/meta/blog/making-the-case-for-laravel-as-a-nextjs-alternative.jpg
Next.js is a powerhouse of a full-stack web framework with features like page-based routing, static-site generation, and dynamic React components, but what if I told you that you could get all of that with just PHP?
![]()
Laravel is a PHP framework that’s been in development for almost a decade. In that time it has solidified itself as one of the most-loved options for building web applications powering the needs of both startups and some of the largest companies around. It also has amassed a massive community of individuals and organizations that provide world-class packages and libraries to enhance its already renown developer experience.
Within the last year or two, first-party upgrades to the framework and package developers have added a suite of functionality to make Laravel a powerhouse for developing truely full-stack web applications fast and efficiently. In this article I’m going to go through some of the biggest features that Next.js is known for, and offer up examples of similarities found in the Laravel framework.
This isn’t meant to be a “who’s better” between the two, but instead a showcase of what Laravel can do out of the box. Let’s start!
Page-based routing
Next.js is famous for its simple and intuitive page-based routing system. But did you know that Laravel has a similar functionality now? Up until this year, if you wanted to create a new route in Laravel you’d have to specify it in a main routes file. However, a first-party package called Laravel Folio was recently released that enables purely page-based routing, and it works surprisingly similarly to Next.js.
Let’s take a look at an example file structure:
resources/
└─ views/
   ├─ pages/
   │  ├─ index.blade.php
   │  ├─ uses.blade.php
   │  └─ blog/
   │     ├─ index.blade.php
   │     └─ [slug].blade.php
   ├─ dashboard.blade.php
   └─ welcome.blade.php
In the above, anything under the resources/views/pages follows the convention of page-based routing. So the uses.blade.php file’s content will be visible at our site under /uses .
An index.blade.php file is used to denote the default root view for that particular directory. That means that the blog/index.blade.php content will be visible at /blog. This should seem straightforward and similar to Next.js.
Except, what about dynamic routes? Well, that’s covered too!
In the above example, you’ll see a [slug].blade.php file. This creates a dynamic route where anything visited under the blog route will be resolved by this view file, with a $slug variable being included that contains the data passed through to the route.
For example, visiting /blog/my-example-post will resolve to that [slug].blade.php page, and if you referenced a $slug variable in it, will contain the value “my-example-post”. This can then be used with an internal function to grab a related model, make an API request, or however else you want to use the value passed through.
But we can take dynamic routes one step further.
For our blog, if we were using a Laravel model called Article to hold data for a single blog article, we can actually use route-model binding in our dynamic page-based routes by just renaming that file to [Article].blade.php. Now inside the blade file, the variable $article will be available, containing the entire Article model’s attributes!
Static-site generation
Next.js recommends using static generation whenever possible, and it’s enabled by default on most pages. Basically anything that doesn’t require heavy user interaction can be statically generated on build time and then served up via your server (or better yet, a CDN).
By default Laravel generates every route dynamically. It’s not slow since there is a route cache which helps cut down on a lot of the PHP interpretation, but the fact still remains that a Laravel app relies on dynamic markup generation.
We can change that though!
There’s a package, laravel-export, that comes from a well-respected third party. After installation there’s zero necessary configuration before our entire site can be statically generated with a single command, php artisan export.
This will crawl our site, following links on pages, and save the rendered markup to a dist folder in our application’s folder structure. It also works well with the Folio page-based routing mentioned above.
Like with Next.js, we can modify the behavior of this through some small configuration changes in our app.
We can specify paths to exclude from the crawler, programmatically turn it on or off, and write hooks that fire off commands before or after the export runs (for example, if we wanted to deploy the exported site files to a production server).
Unlike Next.js, there’s no equivalent of a getStaticProps method that runs when building the exporter. You can always include a function in the body of the Blade template if you’re using something like Folio, which will run as each page is compiled, although that’ll also occur outside of the exporting as well.
Server-side rendering
While using Next.js you need to include a getServerSideProps method to enable SSR, but PHP comes with server side rendering on by default!
In normal circumstances, PHP is rendered on each request through the server. This means that writing PHP code in your blade files guarantees that the content of your functions will be hidden from the generated markup that comes back to the browser. Those files are never accessed directly, and so this adds a layer of security to your application by default.
Going deeper than just blade files, Laravel is a full MVC framework and so includes things like Models and Controllers out of the box that can be used to organize your server-rendered code. Authentication is also baked in by default, and with first-party packages like Breeze, Sanctum, or Socialite, you can include user registration, login, API-based authentication, social sign-ups, and role-based permissions with near zero configuration.
A similar out of the box piece to look for is a database. Laravel includes an abstraction layer called Eloquent that makes it easy to interact with your database of choice. It’s a full ORM that can be used to create, read, update, and delete records, and can be used to build out more complex relationships between models.
Single page components
Some of the beauty of Next.js comes from the fact that you’re using the React library, and all of the wonderful developer experience that comes with it. This enables you to easily build dynamic user interfaces and responsive views with relative ease.
Everything can also be self-contained inside a single page component. Can this be done inside of our Laravel app since everything is server rendered by default?
Up until recently we’ve had to install and configure a frontend framework to get that functionality, but that requires a separation of concerns and the maintanence of two different codebases. Instead, we can use LiveWire and Volt to give us dynamic, single-page components with just PHP.
Let’s say that in our [Article].blade.php page mentioned way above that after each page’s content we have a subscription form. We can use these two packages to build a dynamic component into our existing page using PHP and Laravel. It might look like this.
<?php

use App\Livewire\Forms\SubscribeForm;
use function Livewire\Volt\{form};

form(SubscribeForm::class);

$save = fn () => $this->form->store();

?>

<form wire:submit="save">
    <input type="email" wire:model="form.email">
    @error('form.title') <span class="error"></span> @enderror

    <button type="submit">Subscribe</button>
</form>
Now when our page is visited or rendered, we’ll have a form at the bottom that the user can fill out and submit without needing to perform a full page refresh!
Unlike Next.js though, this interactivity is dependant on server rendering. LiveWire uses JavaScript on the frontend to hydrate these components and provide client-side interactivity, but the core functionality and reactivity depends on the server to manipulate state and perform the functions requested.
Development environment included
With Next.js, you have an included development server that’s ran with npm. With Laravel, there’s a few different options for a local development environment.
First, if you have PHP installed locally on your system, then it’s as easy as running:
php artisan serveThis boots up a local PHP server instance, included in the actual language itself. It’s a bit limited, blocking by nature and without a database, but it gets the job done and is responsive enough to use for 90% of local development cases.
If you want something more complex with additional features like a MySQL server, Redis instance, or Mailpit box, then you can use the first-party Laravel Sail which comes pre-installed to new Laravel apps. It’s a bash script wrapper for Docker that boots up a network of containers and handles your local dev environment setup.
Ease of deployment
Alright, you’re ready to release your application to a production environment, now what? Let’s assume that we have a mixture of static content and server-side rendered routes, which means we’ll need to have a setup that can run our applications dynamically.
For Next.js, this means that we need to have a server provisioned with Node.js. Something like a basic Amazon EC2 instance or a DigitalOcean Droplet can handle that, and the installation and configuration is pretty straightforward. What about Laravel?
Since Laravel runs on PHP, and PHP has been around for decades, getting a server provisioned with the requirements for a LAMP (or LEMP) stack is not too difficult of a task. There’s a plethora of options available, from shared hosting to VPS providers. Even managed services like Laravel Forge that can handle the provisioning and configuration of your server for you, similarly to how Next.js has managed application instances with Vercel.
What else?
This article wasn’t meant to be a competition between Next.js and Laravel. They’re both fantastic batteries-included, full-stack web frameworks that enable you to build applications and ship awesome features.
However, if you’re looking for an alternative to Next.js, maybe with something that’s a bit more batteries-included, Laravel could be what you’re looking for. With a robust ecosystem, a passionate community behind it, and the ubiquity of a language powering over 70% of the web, it’s definitely an option to keep in mind.
Laravel News Links
Capture Your Family History With These Tools
https://i.kinja-img.com/gawker-media/image/upload/c_fill,f_auto,fl_progressive,g_center,h_675,pg_1,q_80,w_1200/b2dea49a7c3b0f4b22fdf23d46d9b7d6.jpg
Imagine popping your head into the attic of your childhood home and finding a box overflowing with recordings, photos, documents, and diaries compiled by relatives who have long passed. Congratulations: you’ve won the family history lottery.
Even if no such stash has been left behind for you, you can easily become the person who starts documenting family stories and events for curious progeny to discover one day. We’ve listed the best tools to capture your family history—from fill-in-the-blank workbooks to decent recording tools for saving audio and video.
Grab a notebook
For starters, you might want a book to record historical facts and connections you discover in your research and conversations.
One simple option is the Genealogy Organizer, a notebook to record facts like vital statistics and family connections with space for photos and notes. It’s a portable size (6×9 inches) with 100 pages for records and additional pages for notes.
For a little more guidance, try the Family Tree Workbook: 30+ Step-by-Step Worksheets to Build Your Family History. It’s the starting point for a heftier research project you can work on with other family members both older and younger than you are.
Record your relatives’ voices
You probably already have the only tool you need to start recording conversations (with proper legal consent, of course): your phone. Congratulations, you are a documentarian.
If you’re recording an in-person conversation, just center the phone between you and your subject(s) and start recording through the Voice Memo app on your iPhone. Android phones have a similar built-in audio recording app called Recorder or Voice Recorder, depending on your phone. To up your audio quality a little more, try a wireless lapel mic like the Maybesta Professional Wireless Lavalier Lapel Microphone.
Recording phone calls is trickier. Because phones can’t record a call in progress (and apps that claim to are unreliable), you probably need one device to make the call and a second device to record. Ethically, it’s nice to inform the person you are talking to that the conversation is being recorded, but it’s not always legally required. Check here to see what’s required by law in your state.
If you find yourself recording a lot of audio, you might want to pick up a separate digital recorder like the Sony ICD-PX370 Mono Digital Voice Recorder. It has space for 59 hours of recorded audio and room for an SD card if you need more. Transfer your recordings with the built-in USB.
Capture video too
If you want to record the look on Dad’s face when he talks about returning to his hometown after hitchhiking across the country, your phone will, again, do the trick. For face-to-face interviews, at least set up a small, flexible tripod so you are not fumbling with the phone.
You may also want to record videos when speaking to family members long-distance. Zoom, Skype, and Google Meet all support recording calls as a basic feature. You can also use these apps to record audio, if your family member doesn’t want video recorded for whatever reason.
Apps for recording memories
StoryCorps (available for Apple and Android)
You may recognize StoryCorps, the NPR staple that has been helping people record and share their stories for 20 years. The free app will help you with interview guidance and recording instructions. You have the option to add photos and keywords to your stories and save to your device or upload recordings to the StoryCorps Archive, which is administered by the Library of Congress.
Storycatcher (available for Apple, $4.99)
Feel like a real filmmaker when you record, edit, and share your work with others. The app comes with story prompts for your interviews and includes access to learning modules that teach you the whole process from interview tips to adding music and captions.
Remento (free for Apple phones)
Remento also includes prompts and recording tools for capturing conversations with family members. The spirit of Remento is to deepen connections with family members in the present by recording their stories and personalities as you discuss memories. Your recordings are stored locally on your device, and you decide who to share with.
More resources for starting conversations
“Tell me your life story” would be an overwhelming prompt at the start of your family history journey. Take advantage of StoryCorps’ experience by choosing some options from their list of great questions. It includes interview questions sorted by topic like raising children, religion, working, love and relationships. Compile your questions in advance and consider giving your interviewee a preview so they can give it some thought.
Even if you’re not interested in DNA tests or going down the rabbit hole of deep family genealogy, consider browsing Ancestry.com with a 14-day trial. Browsing genealogy and DNA records with a family member should elicit some stories. If that doesn’t work, try their conversation prompts to get conversation rolling.
If you do get the itch to look more deeply into your family’s genealogy, check out the National Archives for research tips.
Tips for getting reticent family members to open up
You might get a few strange looks or “no, thanks” when you start asking relatives to share stories. For family members who are hesitant to be recorded or clam up face to face, try these sideways approaches to uncovering family history:
- Ask them to help the kids with a family tree project. Every kid does one eventually. Let that be your opportunity to sneak in some questions about Great Aunt Beulah.
- Give them a guided journal they can respond to in private, at their own pace. There are many versions of this concept, like the Tell Me Your Life Story series. You can even create your own guided journal by taking the questions from resources above and adding them to a blank notebook.
- Try a service like Storyworth. It’s an investment—for $99 you get a year of weekly story prompts emailed to your family member and one printed book that compiles all the stories and photos. You can also buy additional copies of the book. This is ideal if you have a family member who dreams of writing a book, but needs some encouragement. They will receive one email per week and can respond in their own time. Everything is compiled at the end of the year. You get to choose what questions are sent each week.
Finally, when you go in search of family stories, don’t leave out your own generation. Cousins and siblings may have different recollections of events you consider canon, and they can be great co-conspirators for getting parents and grandparents to open up.
Lifehacker
How to use the new Kanban feature in Reminders on macOS Sonoma
https://photos5.appleinsider.com/gallery/55951-113589-000-lead-Kanban-Reminders-xl.jpg
Reminders now optionally features this visual layout of tasks, known as a Kanban view
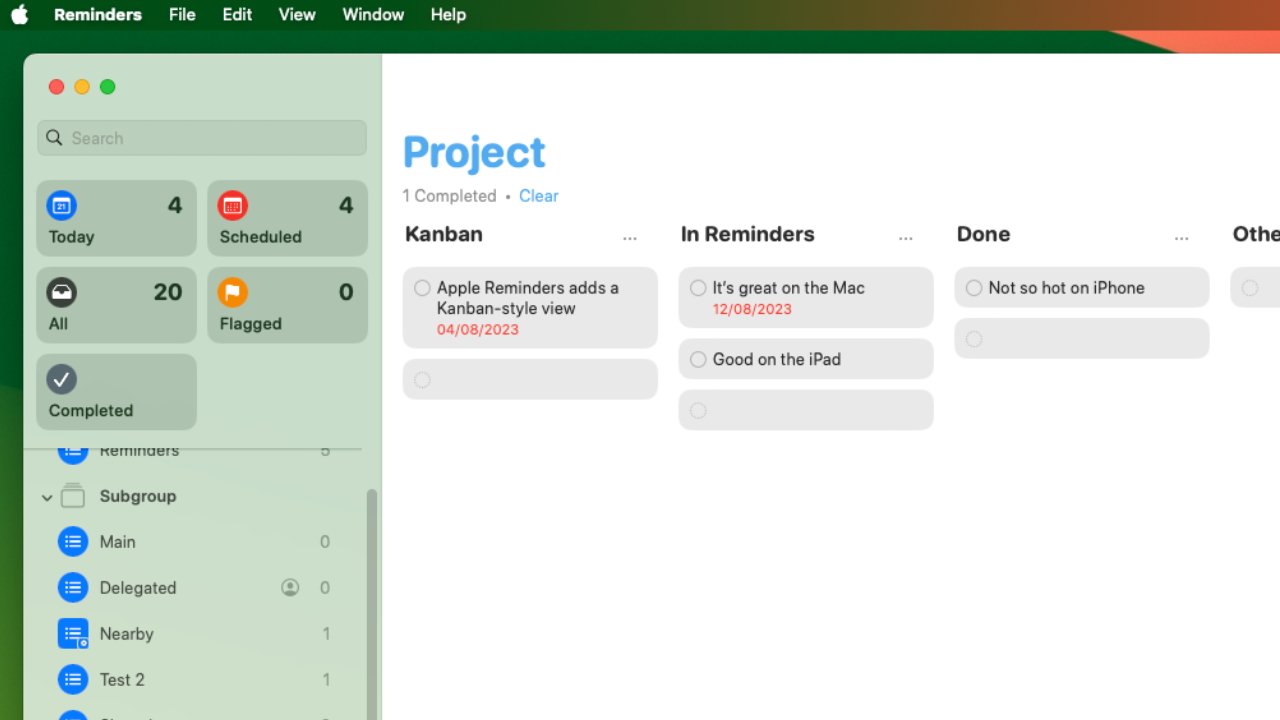
Apple has added a view to Reminders which shows you tasks in the Kanban column style. Here’s how to use it on the Mac, and also the iPad, plus why not to bother on the iPhone.
Kanban has come to Reminders in macOS Sonoma, iPadOS 17, and iOS 17, and is yet another tucked away feature in an app that now only pretends to be simple. It pretends very well, but Reminders is ever more powerful and for some people, this Kanban feature could be what makes them choose Apple’s app over third-party alternatives.
Apple doesn’t actually call this new feature Kanban within the Reminders app, though, so more than ever, it’s hard to find it. But if you’ve ever seen another Kanban app, such as Trello, then you’ll immediately recognize it when you see it in Reminders.
Instead of a straight list of tasks, a Kanban layout shows each To Do as its own separate graphic. It’s very simple graphic: just the text of the To Do written over a grey extended lozenged-shaped background.
Kanban lets you drag tasks around between columns to give you a visual sense of your project
But you can click and grab on that lozenge and drag the task around. So pretty much invariably, a Kanban task list will have columns for tasks that are just started, in progress, or completed.
You can tick any task as done, just like with any other task in Reminders. But you can instead drag them from column to column so that you have a visual sense of everything that’s going on.
How to setup a Kanban list in Reminders on macOS Sonoma
- Open Reminders and click Add List at the bottom left
- Give the list a name and optionally set the icon and a color
- Leave the List Type set to Standard and click OK
- Right click in the empty list and choose New Section
- Give that a name, and add more New Sections as you want
- Choose the View menu and select as Columns
You don’t have to right click to add a New Section. You can alternatively choose the New Section from the File menu, or press Option-Command-N.
Apple thinks that sections will be useful in regular Reminders lists, too, and that may be so. But changing the view to as Columns is what makes this a Kanban list — at least on the Mac and the iPad.
Using the Kanban list
Each column in a Reminders Kanban list has a blank To Do already present. You can’t tick it as done, even though it has the Done circle icon, but you can click in it to write a new task.
You can also paste tasks in that you’ve copied from other lists.
You can edit and rename the Kanban columns that Apple calls Sections
When you drag a task from one Kanban column to another, it can be a little fiddly. You tend to have to drag it to just above another task, or just above the top blank one, before you can let go.
As for sections, you can choose File, Edit Sections and get a dialog listing each of them that you’ve created. Next to every section listed, there’s an edit icon and that lets you rename the sections.
Where Reminders scores and falls short
No question, this new feature lets you present your tasks more like a project plan than, say, a shopping list. You can work the tasks as normal, but you can also much more readily see that you’re ahead or behind.
You can see, perhaps, that one particular aspect of your work is somehow being slowed down and you need to look at it again. Or you can see more clearly that you have several similar tasks and so you could do them all together.
So it’s an excellent addition to Reminders, but it isn’t perfect.
For instance, you’ll tend to stop ticking tasks as done. That’s because when you tick a task in Reminders, it vanishes from the list and once you’ve got all these columns done, you’ll want to see the end one growing.
Then the fact that each column in the Kanban list automatically has a blank task in it is a little ugly for Apple. It only happens when you have created sections, either in the Kanban column view, or a regular list.
Otherwise, a Reminders list will stay completely blank, except for the title you’ve given it. And that just seems neater.
Then the whole point of Kanban is to have columns that you can drag tasks between, and the iPhone won’t show columns. It will solely show the sections as headings in a list.
Still, the more intensely you use To Do apps, it does tend to be that you do most serious work on the Mac or perhaps the iPad. The iPhone is perfect for adding new tasks, and it can be used to find what your next task is, but you won’t tend to want to study everything visually like a project manager.
AppleInsider News