https://ahtesham.me/storage/posts/September2023/ArvAX1SWmKiwnDU1yCrG.jpg
In this tutorial, we will learn how to make web requests in Laravel 10 using Guzzle. We’ll explore the basics of making GET, POST, PUT, and DELETE requests with the Guzzle HTTP client library. It’s an essential skill in web development, and Guzzle makes it user-friendly in Laravel 10.
In the past, developers used cURL for similar tasks, but now we have more powerful tools like Guzzle, which we’ll look at here.
We’ll cover the following examples:
Laravel 10 HTTP Guzzle GET Request Example: How to perform a GET request using Guzzle in Laravel 10.
Laravel 10 HTTP Guzzle POST Request Example: Sending POST requests with Guzzle in Laravel 10.
Laravel 10 HTTP Guzzle PUT Request Example: Making PUT requests with Guzzle in Laravel 10.
Laravel 10 HTTP Guzzle DELETE Request Example: Sending DELETE requests with Guzzle in Laravel 10.
By the end of this tutorial, you’ll have a clear understanding of how to use Guzzle for different types of HTTP requests in Laravel 10. This knowledge will enable you to work more effectively with external APIs and web services.
Step 1: Download Laravel
Let us begin the tutorial by installing a new laravel application. if you have already created the project, then skip following step.
composer create-project laravel/laravel example-app
Step 2 : Laravel 10 HTTP cURL GET Request Example:
Here, we will see how to send curl http get request in laravel 10, let’s update route file code and controller file code. you can see output as well:
routes/web.php
<?php

use Illuminate\Support\Facades\Route;

use App\Http\Controllers\HttpPostController;

/*
|--------------------------------------------------------------------------
| Web Routes
|--------------------------------------------------------------------------
|
| Here is where you can register web routes for your application. These
| routes are loaded by the RouteServiceProvider within a group which
| contains the "web" middleware group. Now create something great!
|
*/

Route::get('posts', [HttpPostController::class, 'index']);
php artisan make:controller HttpPostControllerapp/Http/Controllers/HttpPostController.php
<?php

namespace App\Http\Controllers;

use Illuminate\Http\Request;
use Illuminate\Support\Facades\Http;

class HttpPostController extends Controller
{
    /**
     * Write code on Method
     *
     * @return response()
     */
    public function index()
    {
        $response = Http::get('https://jsonplaceholder.typicode.com/posts');

        $jsonData = $response->json();

        dd($jsonData);
    }
}
Step 3 : Laravel 10 HTTP cURL POST Request Example:
Here, we will see how to send curl http post request in laravel 10, let’s update route file code and controller file code. you can see output as well:
routes/web.php
<?php

use Illuminate\Support\Facades\Route;

use App\Http\Controllers\HttpPostController;

/*
|--------------------------------------------------------------------------
| Web Routes
|--------------------------------------------------------------------------
|
| Here is where you can register web routes for your application. These
| routes are loaded by the RouteServiceProvider within a group which
| contains the "web" middleware group. Now create something great!
|
*/

Route::get('posts/store', [HttpPostController::class, 'store']);
app/Http/Controllers/HttpPostController.php
<?php

namespace App\Http\Controllers;

use Illuminate\Http\Request;
use Illuminate\Support\Facades\Http;

class HttpPostController extends Controller
{
    /**
     * Write code on Method
     *
     * @return response()
     */
    public function store()
    {
        $response = Http::post('https://jsonplaceholder.typicode.com/posts', [
                    'title' => 'This is test from Nicesnippest.com',
                    'body' => 'This is test from Nicesnippest.com as body',
                ]);

        $jsonData = $response->json();

        dd($jsonData);
    }
}
Output:
Array
(
    [titile] => This is test from Nicesnippest.com
    [body]  => This is test from Nicesnippest.com as body
    [id] => 101
)
Step 4 : Laravel 10 HTTP Curl PUT Request Example:
Here, we will see how to send curl http put request in laravel 10, let’s update route file code and controller file code. you can see output as well:
routes/web.php
<?php

use Illuminate\Support\Facades\Route;

use App\Http\Controllers\HttpPostController;

/*
|--------------------------------------------------------------------------
| Web Routes
|--------------------------------------------------------------------------
|
| Here is where you can register web routes for your application. These
| routes are loaded by the RouteServiceProvider within a group which
| contains the "web" middleware group. Now create something great!
|
*/

Route::get('posts/update', [HttpPostController::class, 'update']);
app/Http/Controllers/HttpPostController.php
<?php

namespace App\Http\Controllers;

use Illuminate\Http\Request;
use Illuminate\Support\Facades\Http;

class HttpPostController extends Controller
{
    /**
     * Write code on Method
     *
     * @return response()
     */
    public function update()
    {
        $response = Http::put('https://jsonplaceholder.typicode.com/posts/1', [
                    'title' => 'This is test from Nicesnippets.com',
                    'body' => 'This is test from Nicesnippets.com as body',
                ]);

        $jsonData = $response->json();

        dd($jsonData);
    }
Output:
Array
(
    [titile] => This is test from Nicesnippest.com
    [body]  => This is test from Nicesnippest.com as body
    [id] => 1
)
Step 5 : Laravel 10 HTTP cURL DELETE Request Example:
Here, we will see how to send curl http delete request in laravel 10, let’s update route file code and controller file code. you can see output as well:
routes/web.php
<?php

use Illuminate\Support\Facades\Route;

use App\Http\Controllers\HttpPostController;

/*
|--------------------------------------------------------------------------
| Web Routes
|--------------------------------------------------------------------------
|
| Here is where you can register web routes for your application. These
| routes are loaded by the RouteServiceProvider within a group which
| contains the "web" middleware group. Now create something great!
|
*/

Route::get('posts/delete', [HttpPostController::class, 'delete']);
app/Http/Controllers/HttpPostController.php
<?php

namespace App\Http\Controllers;

use Illuminate\Http\Request;
use Illuminate\Support\Facades\Http;

class HttpPostController extends Controller
{
    /**
     * Write code on Method
     *
     * @return response()
     */
    public function delete()
    {
        $response = Http::delete('https://jsonplaceholder.typicode.com/posts/1');

        $jsonData = $response->json();

        dd($jsonData);
    }
}
Step 6 : Laravel 10 API with Response:
We will create very simple http request full example. we need to create simple route to call controller method. so let’s create it:
routes/web.php
<?php

use Illuminate\Support\Facades\Route;

use App\Http\Controllers\HttpPostController;

/*
|--------------------------------------------------------------------------
| Web Routes
|--------------------------------------------------------------------------
|
| Here is where you can register web routes for your application. These
| routes are loaded by the RouteServiceProvider within a group which
| contains the "web" middleware group. Now create something great!
|
*/

Route::get('posts', [HttpPostController::class, 'index']);
app/Http/Controllers/HttpPostController.php
<?php

namespace App\Http\Controllers;

use Illuminate\Http\Request;
use Illuminate\Support\Facades\Http;

class HttpPostController extends Controller
{
    public function index()
    {
        $response = Http::get('http://jsonplaceholder.typicode.com/posts');

        $jsonData = $response->json();

        echo "<pre> status:";
        print_r($response->status());
        echo "<br/> ok:";
        print_r($response->ok());
        echo "<br/> successful:";
        print_r($response->successful());
        echo "<br/> serverError:";
        print_r($response->serverError());
        echo "<br/> clientError:";
        print_r($response->clientError());
        echo "<br/> headers:";
        print_r($response->headers());
    }
}
Output:
status:200
ok:1
successful:1
serverError:
clientError:
headers:Array
(
    [Date] => Array
        (
            [0] => Thu, 12 Mar 2020 06:08:58 GMT
        )
    [Content-Type] => Array
        (
            [0] => application/json; charset=utf-8
        )
    [Transfer-Encoding] => Array
        (
            [0] => chunked
        )
    .....
)
Read More : Laravel 10 Accessor and Mutator Example
I hope it can help you…
Laravel News Links
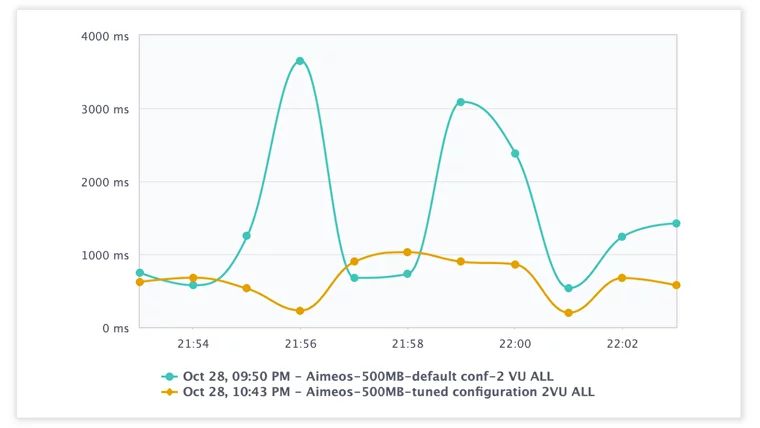 Response Time (ms), Aimeos Tuned MySQL Configuration vs Default
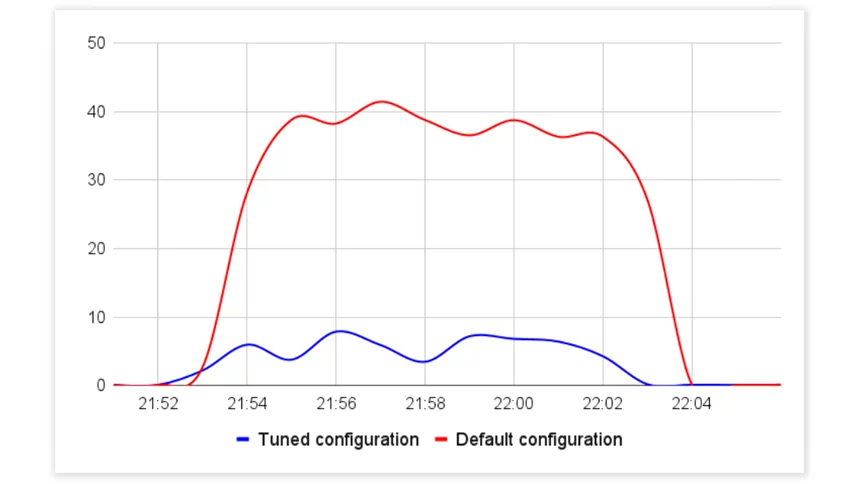 CPU Utilization (%), Aimeos Tuned MySQL Configuration vs Default
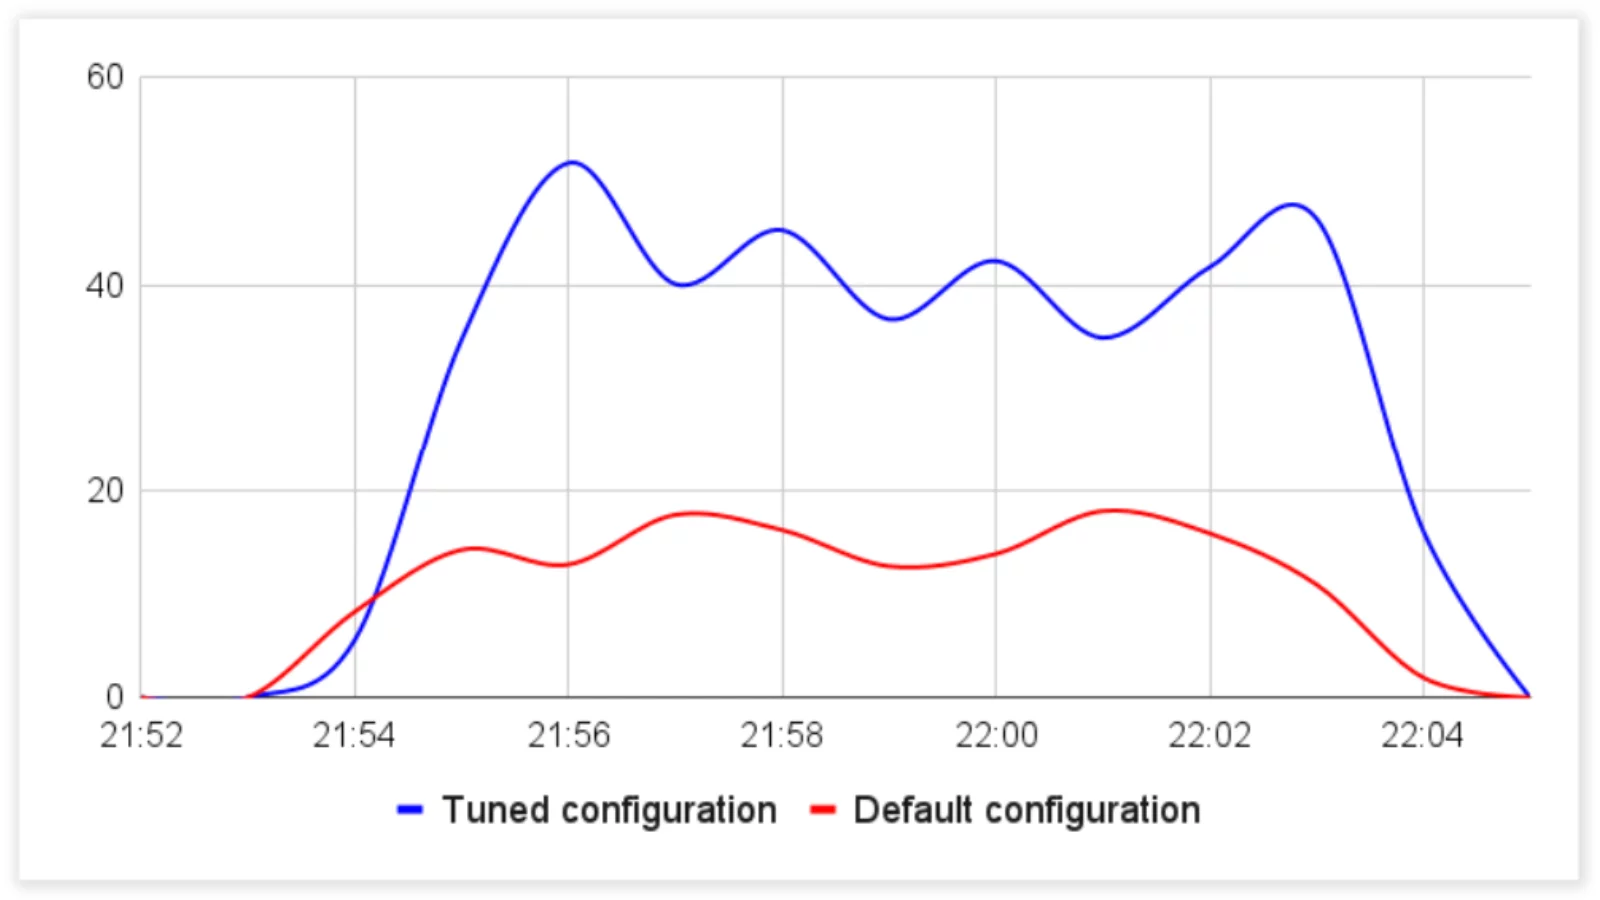 Queries Per Seconds, Aimeos Tuned MySQL Configuration vs Default
 When looking for ways to get free AWS credits to be used on AWS services such as LLM training for your