FreeNAS vs. OpenMediaVault vs. Amahi: Which Is Best for a DIY NAS?

best-for-diy-nas

Whether it’s too many family photos or an ever-expanding movie collection, you’re going to need enough data storage. If you need a safe place to save your data, using a network-attached storage device is the way to go, but high-quality NAS devices can be costly.

Thankfully, you can build your own at a much lower cost if you’re using software like FreeNAS, OpenMediaVault, and Amahi, but which is best for your DIY NAS? Let’s compare them and find out.

FreeNAS

FreeNAS Web Portal Splash Page
Image Credit: FreeNAS/iXsystems

FreeNAS is probably the best known NAS operating system out there. It’s been in development since 2005 and has over 10 million downloads to its name. It’s also got the biggest development team, thanks to corporate backing from its parent company, iXsystems.

Unlike our other two contenders, FreeNAS is based around FreeBSD, a Unix-based cousin to the Linux kernel, used in Amahi and OpenMediaVault. It uses the OpenZFS file system, which supports pooled and scalable storage.

FreeNAS has features you’d find in enterprise-level NAS devices, like data snapshots and practically unlimited storage limits. Whatever your disk management, FreeNAS supports it; RAID, hot-swapping, and disk striping are all supported under the OS.

It covers almost every data sharing protocol, such as Samba and NFS. This means it’ll work great with devices running any OS—Windows, macOS, and Linux included. It also supports integration with cloud storage providers like Amazon S3 and Google Cloud out of the box.

Want to add other features? FreeNAS has support for third-party plugins to expand your NAS capabilities further. You can even control virtual machines and Docker containers through the FreeNAS web interface to turn it into a server. The web interface isn’t complicated to use, thanks to a clear breakdown of features, and it’s the most modern of the three.

It’s well supported, regularly updated and the active development means you get cutting edge features when they’re stable enough for release. The downside? This isn’t an OS for low powered systems.

FreeNAS recommends at least 8GB of RAM and a multi-core processor as a minimum. You should also invest in reliable storage drives to keep your data safe. If you don’t want to DIY it, the company offers it’s own NAS devices for sale.

Download: FreeNAS

OpenMediaVault

OpenMediaVault Web Interface Services List
Image Credit: OpenMediaVault

OpenMediaVault has a strong NAS pedigree. It’s been around since 2009 and was created as a successor to FreeNAS by one of its original developers when that project was facing a major re-write. It’s open source, so it’s completely free to use and distribute and has had over 4 million downloads.

Unlike FreeNAS, OpenMediaVault is based around Debian, one of the best Linux distributions thanks to its stability and active development. Talking of active development, OpenMediaVault gets minor updates on a monthly basis, with major releases occurring nearly every year.

OpenMediaVault and FreeNAS have some crossover features, such as storage monitoring, Samba/NFS file sharing, and RAID disk management. However, it doesn’t have some of the more advanced features that FreeNAS has, like hot-swapping or the OpenZFS file system. As it’s Debian-based, ext4 is the default file system, but you can install others like JFS or XFS.

Using Debian as it’s base means that OpenMediaVault installations get to take advantage of the large number of Debian packages available. You don’t get cloud integration included as standard with OpenMediaVault, but you can add this with additional plugins, or by using a relevant Debian package.

You can set up a web server, BitTorrent client, or even a Plex media server if you wanted to, thanks to OpenMediaVault plugins.

There’s only one primary developer for OpenMediaVault, but others play a small part in developing patches and creating plugins. One of OpenMediaVault’s best features, compared to FreeNAS, is it’s low system requirements. You can run OMV on low-powered devices like the Raspberry Pi, where you can combine it with media software like Plex to create a Raspberry Pi Plex server.

Download: OpenMediaVault

Amahi

Amahi Server Web Interface Storage
Image Credit: Amahi

FreeNAS and OpenMediaVault are both NAS-focused, but Amahi is a little different. It doesn’t try to just be a NAS operating system—it wants to be the only Linux media server OS you’ll ever need.

Amahi is based around Fedora, another well known Linux distro. Stable releases of Amahi are based around stable Fedora releases, the latest being Amahi 11 matching Fedora 27. Five main developers form a core team keeping Amahi up-to-date and with new features.

It’s not a technical OS, and the web interface is designed to be simple for end users. You can install “apps” that extend Amahi, from media server software like Plex to game servers.

You can use Amahi as a VPN server for your network, set up a local wiki or calendar for your family, and turn it into a backup server for all of your PCs. It supports all the standard file sharing protocols like Samba and NFS as standard, and these can be easily configured in the web interface.

On a technical note, Amahi uses typical Fedora file systems such as ext4 and XFS. Amahi even competes with some of the enterprise-level features that FreeNAS supports, with storage pooling using Greyhole. This combines all of your storage into one to help prevent data loss.

Stable updates and a wide feature set make Amahi a good choice for beginners who want a NAS server that does everything.

Download: Amahi (Initial signup required)

The Best NAS Software for Your Needs

Which of these would make the best operating system for a NAS device? That depends on your own requirements, as they each have their own strengths and weaknesses. Choose the best NAS software for your own needs:

  • FreeNAS: Best for enterprise users or home users with lots of storage.
  • OpenMediaVault: Best for home users and small businesses, especially with low powered equipment.
  • Amahi: Best for users looking for a full media server experience with NAS features included.

Whether you choose FreeNAS, OpenMediaVault or Amahi, you’ll have software that’s in active development, well supported and with plenty of available features. You’ll just need to make sure you choose the best parts for your own server to make sure it’s reliable to use as an always-on storage solution.

Read the full article: FreeNAS vs. OpenMediaVault vs. Amahi: Which Is Best for a DIY NAS?

via MakeUseOf.com
FreeNAS vs. OpenMediaVault vs. Amahi: Which Is Best for a DIY NAS?

Scientists Have Discovered a Shape That Blocks All Sound

Scientists have developed an "acoustic meta-material" that can catch certain frequencies passing through the air and reflect them back toward their source. When a loudspeaker was placed into one end of a PVC pipe with a 3D-printed ring of the metamaterial, the ring "cut 94% of the sound blasting from the speaker, enough to make it inaudible to the human ear," reports Fast Company. From the report: Typical acoustic paneling works differently, absorbing sound and turning the vibrations into heat. But what’s particularly trippy is that this muffler is completely open. Air and light can travel through it — just sound cannot. The implications for architecture and interior design are remarkable, because these metamaterials could be applied to the built environment in many different ways. For instance, they could be stacked to build soundproof yet transparent walls. Cubicles will never be the same.
The researchers also believe that HVAC systems could be fitted with these silencers, and drones could have their turbines muted with such rings. Even in MRI machines, which can be harrowingly loud for patients trapped in a small space, could be quieted. There’s really no limit to the possibilities, but it does sound like these silencers will need to be tailored to circumstance. "The idea is that we can now mathematically design an object that can blocks the sounds of anything," says Boston University professor Xin Zhang, in a press release. You can see a demo of the noise cancellation device here.


Share on Google+

Read more of this story at Slashdot.

via Slashdot
Scientists Have Discovered a Shape That Blocks All Sound

Laravel 5.8 Tutorial: Build your First CRUD App with Laravel and MySQL (PHP 7.1+)

Throughout this tutorial for beginners you’ll learn to use Laravel 5.8 – the latest version of one of the most popular PHP frameworks – to create a CRUD web application with a MySQL database from scratch and step by step starting with the installation of Composer (PHP package manager) to implementing and serving your application.

Note: Laravel 5.8 is recently released and this tutorial is upgraded to the latest version.

Laravel 5.8 New Features

Let’s start our tutorial by going through the most important features introduced in this version.

  • The hasOneThrough Eloquent relationship.
  • Better email validation,
  • Auto-Discovery Of Model Policies provided that the model and policy follow standard Laravel naming conventions
  • DynamoDB cache and session drivers,
  • Added support for PHPUnit 8.0 for unit testing,
  • Added support for Carbon 2.0, an easy to use PHP API extension for DateTime,
  • Added support Pheanstalk 4.0: a pure PHP 5.3+ client for the beanstalkd workqueue, etc.

The Laravel 5.8 version has also corrected numeroous bugs and introduced many improvements of the Artisan CLI.

Check out the official docs for details features of Laravel 5.8

Prerequisites

This tutorial assumes you have PHP and MySQL installed on your system. Follow the instructions for your operating system to install both of them.

You also need to be familiar with Linux/macOS bash where we’ll be executing the commands in this tutorial.

Familiarly with PHP is required since Laravel is based on PHP.

For development I will be using a Ubuntu 16.04 machine so the commands in this tutorial are targeting this system but you should be able to follow this tutorial in any operating system you use.

Installing PHP 7.1

Laravel v5.8 requires PHP 7.1 or above so you need the latest version of PHP installed on your system. The process is straightforward on most systems.

On Ubuntu, you can follow these instructions.

First add the ondrej/php PPA which contains the latest version of PHP:

$ sudo add-apt-repository ppa:ondrej/php
$ sudo apt-get update

Next, install PHP 7.1 using the following command:

$ sudo apt-get install php7.1

If you are using Ubuntu 18.04, PHP 7.2 is included in the default Ubuntu repository for 18.04 so you should be able to install it using the following command:

$ sudo apt-get install php

This tutorial is tested with PHP 7.1 but you can also use more recent versions like PHP 7.2 or PHP 7.3

Installing the Required PHP 7.1 Modules

Laravel requires a bunch of modules. You can install them using the following command:

$ sudo apt-get install php7.1 php7.1-cli php7.1-common php7.1-json php7.1-opcache php7.1-mysql php7.1-mbstring php7.1-mcrypt php7.1-zip php7.1-fpm php7.1-xml

Installing PHP Composer

Let’s start our journey by install Composer, The PHP package manager.

Navigate in your home directory, then download the installer from the official website using curl:

$ cd ~
$ curl -sS https://getcomposer.org/installer -o composer-setup.php

You can then install composer globally on your system by using the following command:

$ sudo php composer-setup.php --install-dir=/usr/local/bin --filename=composer

As of this writing Composer 1.8 will be installed on your system. You can make sure your installation works as expected by running composer in your terminal:

$ composer

You should get the following output:

   ______
  / ____/___  ____ ___  ____  ____  ________  _____
 / /   / __ \/ __ `__ \/ __ \/ __ \/ ___/ _ \/ ___/
/ /___/ /_/ / / / / / / /_/ / /_/ (__  )  __/ /
\____/\____/_/ /_/ /_/ .___/\____/____/\___/_/
                    /_/
Composer version 1.8.0 2018-12-03 10:31:16

Usage:
  command [options] [arguments]

Options:
  -h, --help                     Display this help message
  -q, --quiet                    Do not output any message
  -V, --version                  Display this application version
      --ansi                     Force ANSI output
      --no-ansi                  Disable ANSI output
  -n, --no-interaction           Do not ask any interactive question
      --profile                  Display timing and memory usage information
      --no-plugins               Whether to disable plugins.
  -d, --working-dir=WORKING-DIR  If specified, use the given directory as working directory.
  -v|vv|vvv, --verbose           Increase the verbosity of messages: 1 for normal output, 2 for more verbose output and 3 for debug

For more information check out this tutorial.

If you’ve successfully installed Composer in your system, you are ready to create a Laravel 5.8 project.

Installing and Creating a Laravel 5.8 Project

In this section we’ll introduce Laravel and then proceed it to install and create a Laravel 5.8 project.

About Laravel

Laravel docs describe it as:

Laravel is a web application framework with expressive, elegant syntax. We believe development must be an enjoyable and creative experience to be truly fulfilling. Laravel attempts to take the pain out of development by easing common tasks used in the majority of web projects, such as:

Laravel is accessible, yet powerful, providing tools needed for large, robust applications.

Generating a Laravel 5.8 project is easy and straightforward. In your terminal, run the following command:

$ composer create-project  --prefer-dist  laravel/laravel laravel-first-crud-app

This will install laravel/laravel v5.8.3.

Note: Make sure you have PHP 7.1 installed on your system. Otherwise, composer will use Laravel 5.5 for your project.

You can verify the installed version in your project using:

$ cd laravel-first-crud-app
$ php artisan -V
Laravel Framework 5.8.19

Installing the Front-End Dependencies

In your generated project, you can see that a package.json file is generated which includes many front-end libraries that can be used by your project:

  • axios,
  • bootstrap,
  • cross-env,
  • jquery,
  • laravel-mix,
  • lodash,
  • popper.js,
  • resolve-url-loader,
  • sass,
  • sass-loader,
  • vue.

Note: You can use your preferred libraries with Laravel not specifically the ones added to package.json.

The package.json file in your Laravel project includes a few packages such as vue and axios to help you get started building your JavaScript application.

It also includes bootstrap to help you get started with Bootstrap for styling your UI.

It include Laravel Mix to help you compile your SASS files to plain CSS.

You need to use npm to install the front-end dependencies:

$ npm install

After running this command a node_modules folder will be created and the dependencies will be installed into it.

Note: You need to have Node.js and npm installed on your system before you can install the front-end dependencies.

Creating a MySQL Database

Let’s now create a MySQL database that we’ll use to persist dat ain our Laravel application. In your terminal, run the following command to run the mysql client:

$ mysql -u root -p

When prompted, enter the password for your MySQL server when you’ve installed it.

Next, run the following SQL statement to create a db database:

mysql> create database db;

Open the .env file and update the credentials to access your MySQL database:

DB_CONNECTION=mysql
DB_HOST=127.0.0.1
DB_PORT=3306
DB_DATABASE=db
DB_USERNAME=root
DB_PASSWORD=******

You need to enter the database name, the username and password.

At this point, you can run the migrate command to create your database and a bunch of SQL tables needed by Laravel:

$ php artisan migrate

Note: You can run the migrate command at any other points of your development to add other SQL tables in your database or to later your database if you need to add any changes later.

Creating your First Laravel Model

Laravel uses the MVC architectural pattern to organize your application in three decoupled parts:

  • The Model which encapsulates the data access layer,
  • The View which encapsulates the representation layer,
  • Controller which encapsulates the code to control the application and communicates with the model and view layers.

Wikipedia defines MVC as:

Model–view–controller is an architectural pattern commonly used for developing user interfacesthat divides an application into three interconnected parts. This is done to separate internal representations of information from the ways information is presented to and accepted from the user.

Now, let’s create our first Laravel Model. In your terminal, run the following command:

$ php artisan make:model Contact --migration

This will create a Contact model and a migration file. In the terminal, we get an output similar to:

Model created successfully.
Created Migration: 2019_01_27_193840_create_contacts_table

Open the database/migrations/xxxxxx_create_contacts_table migration file and update it accordingly:

<?php

use Illuminate\Support\Facades\Schema;
use Illuminate\Database\Schema\Blueprint;
use Illuminate\Database\Migrations\Migration;

class CreateContactsTable extends Migration
{
    /**
     * Run the migrations.
     *
     * @return void
     */
    public function up()
    {
        Schema::create('contacts', function (Blueprint $table) {
            $table->increments('id');
            $table->timestamps();
            $table->string('first_name');
            $table->string('last_name');
            $table->string('email');
            $table->string('job_title');
            $table->string('city');   
            $table->string('country');            
        });
    }

    /**
     * Reverse the migrations.
     *
     * @return void
     */
    public function down()
    {
        Schema::dropIfExists('contacts');
    }
}

We added the first_name, last_name, email, job_title, city and country fields in the contacts table.

You can now create the contacts table in the database using the following command:

$ php artisan migrate

Now, let’s look at our Contact model, which will be used to interact with the contacts database table. Open the app/Contact.php and update it:

<?php

namespace App;

use Illuminate\Database\Eloquent\Model;

class Contact extends Model
{
    protected $fillable = [
        'first_name',
        'last_name',
        'email',
        'city',
        'country',
        'job_title'       
    ];
}

Creating the Controller and Routes

After creating the model and migrated our database. Let’s now create the controller and the routes for working with the Contact model. In your terminal, run the following command:

$ php artisan make:controller ContactController --resource

Laravel resource routing assigns the typical "CRUD" routes to a controller with a single line of code. For example, you may wish to create a controller that handles all HTTP requests for "photos" stored by your application. Using the make:controller Artisan command, we can quickly create such a controller:

This command will generate a controller at app/Http/Controllers/PhotoController.php. The controller will contain a method for each of the available resource operations.

Open the app/Http/Controllers/ContactController.php file. This is the initial content:

<?php

namespace App\Http\Controllers;

use Illuminate\Http\Request;

class ContactController extends Controller
{
    /**
* Display a listing of the resource.
*
* @return \Illuminate\Http\Response
*/
    public function index()
    {
        //
    }

    /**
* Show the form for creating a new resource.
*
* @return \Illuminate\Http\Response
*/
    public function create()
    {
        //
    }

    /**
* Store a newly created resource in storage.
*
* @param \Illuminate\Http\Request $request
* @return \Illuminate\Http\Response
*/
    public function store(Request $request)
    {
        //
    }

    /**
* Display the specified resource.
*
* @param int $id
* @return \Illuminate\Http\Response
*/
    public function show($id)
    {
        //
    }

    /**
* Show the form for editing the specified resource.
*
* @param int $id
* @return \Illuminate\Http\Response
*/
    public function edit($id)
    {
        //
    }

    /**
* Update the specified resource in storage.
*
* @param \Illuminate\Http\Request $request
* @param int $id
* @return \Illuminate\Http\Response
*/
    public function update(Request $request, $id)
    {
        //
    }

    /**
* Remove the specified resource from storage.
*
* @param int $id
* @return \Illuminate\Http\Response
*/
    public function destroy($id)
    {
        //
    }
}

The ContactController class extends Controller class available from Laravel and defines a bunch of methods which will be used to do the CRUD operations against the Contact model.

You can read the role of the method on the comment above it.

Now we need to provide implementations for these methods.

But before that, let’s add routing. Open the routes/web.php file and update it accordingly:

<?php
Route::get('/', function () {
    return view('welcome');
});

Route::resource('contacts', 'ContactController');

Using the resource() static method of Route, you can create multiple routes to expose multiple actions on the resource.

These routes are mapped to various ContactController methods which will need to implement in the next section:

  • GET/contacts, mapped to the index() method,
  • GET /contacts/create, mapped to the create() method,
  • POST /contacts, mapped to the store() method,
  • GET /contacts/{contact}, mapped to the show() method,
  • GET /contacts/{contact}/edit, mapped to the edit() method,
  • PUT/PATCH /contacts/{contact}, mapped to the update() method,
  • DELETE /contacts/{contact}, mapped to the destroy() method.

These routes are used to serve HTML templates and also as API endpoints for working with the Contact model.

Note: If you want to create a controller that will only expose a RESTful API, you can use the apiResource method to exclude the routes that are used to serve the HTML templates:

Route::apiResource('contacts', 'ContactController');

Implementing the CRUD Operations

Let’s now implement the controller methods alongside the views.

C: Implementing the Create Operation and Adding a Form

The ContactController includes the store() method that maps to the POST /contacts API endpoint which will be used to create a contact in the database and the create() that maps to the GET /contacts/create route which will be used to serve the HTML form used to submit the contact to POST /contacts API endpoint.

Let’s implement these two methods.

Re-open the app/Http/Controllers/ContactController.php file and start by importing the Contact model:

use App\Contact;

Next, locate the store() method and update it accordingly:

    public function store(Request $request)
    {
        $request->validate([
            'first_name'=>'required',
            'last_name'=>'required',
            'email'=>'required'
        ]);

        $contact = new Contact([
            'first_name' => $request->get('first_name'),
            'last_name' => $request->get('last_name'),
            'email' => $request->get('email'),
            'job_title' => $request->get('job_title'),
            'city' => $request->get('city'),
            'country' => $request->get('country')
        ]);
        $contact->save();
        return redirect('/contacts')->with('success', 'Contact saved!');
    }

Next, locate the create() method and update it:

    public function create()
    {
        return view('contacts.create');
    }

The create() function makes use of the view() method to return the create.blade.php template which needs to be present in the resources/views folder.

Before creating the create.blade.php template we need to create a base template that will be extended by the create template and all the other templates that will create later in this tutorial.

In the resources/views folder, create a base.blade.php file:

$ cd resources/views
$ touch base.blade.php

Open the resources/views/base.blade.php file and add the following blade template:

<!DOCTYPE html>
<html lang="en">
<head>
  <meta name="viewport" content="width=device-width, initial-scale=1.0">
  <title>Laravel 5.8 & MySQL CRUD Tutorial</title>
  <link href="" rel="stylesheet" type="text/css" />
</head>
<body>
  <div class="container">
    @yield('main')
  </div>
  <script src="" type="text/js"></script>
</body>
</html>

Now, let’s create the create.blade.php template. First, create a contacts folder in the views folder:

$ mkdir contacts

Next, create the template

$ cd contacts
$ touch create.blade.php

Open the resources/views/contacts/create.blade.php file and add the following code:

@extends('base')

@section('main')
<div class="row">
 <div class="col-sm-8 offset-sm-2">
    <h1 class="display-3">Add a contact</h1>
  <div>
    @if ($errors->any())
      <div class="alert alert-danger">
        <ul>
            @foreach ($errors->all() as $error)
              <li></li>
            @endforeach
        </ul>
      </div><br />
    @endif
      <form method="post" action="">
          @csrf
          <div class="form-group">    
              <label for="first_name">First Name:</label>
              <input type="text" class="form-control" name="first_name"/>
          </div>

          <div class="form-group">
              <label for="last_name">Last Name:</label>
              <input type="text" class="form-control" name="last_name"/>
          </div>

          <div class="form-group">
              <label for="email">Email:</label>
              <input type="text" class="form-control" name="email"/>
          </div>
          <div class="form-group">
              <label for="city">City:</label>
              <input type="text" class="form-control" name="city"/>
          </div>
          <div class="form-group">
              <label for="country">Country:</label>
              <input type="text" class="form-control" name="country"/>
          </div>
          <div class="form-group">
              <label for="job_title">Job Title:</label>
              <input type="text" class="form-control" name="job_title"/>
          </div>                         
          <button type="submit" class="btn btn-primary-outline">Add contact</button>
      </form>
  </div>
</div>
</div>
@endsection

This is a screenshot of our create form!

Laravel 5.8 CRUD Tutorial

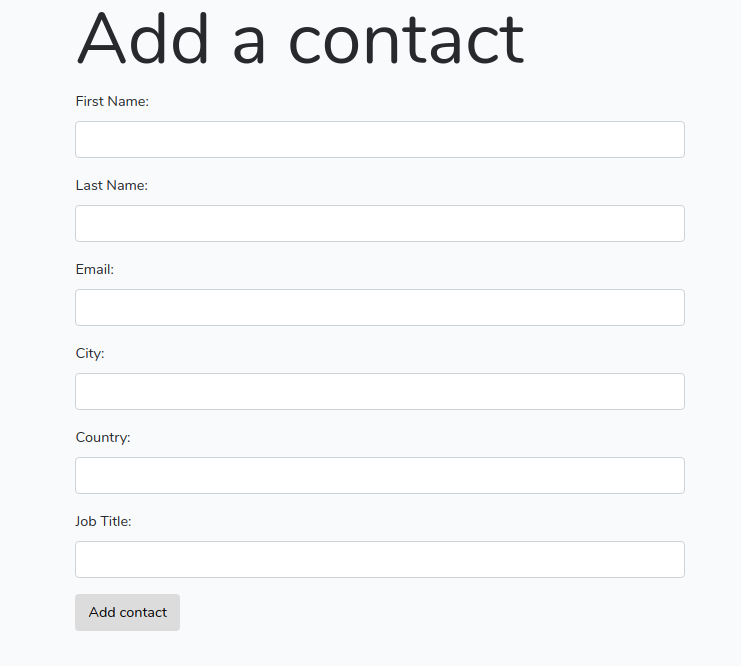
Fill out the form and click on the Add contact button to create a contact in the database. You should be redirected to /contacts route which doesn’t have a view associated to it yet.

R: Implementing the Read Operation and Getting Data

Next, let’s implement the read operation to get and display contacts data from our MySQL database.

Go to the app/Http/Controllers/ContactController.php file, locate the index() method and update it:

    public function index()
    {
        $contacts = Contact::all();

        return view('contacts.index', compact('contacts'));
    }

Next, you need to create the the index template. Create a resources/views/contacts.index.blade.php file:

$ touch index.blade.php

Open the resources/views/contacts/index.blade.php file and add the following code:

@extends('base')

@section('main')
<div class="row">
<div class="col-sm-12">
    <h1 class="display-3">Contacts</h1>    
  <table class="table table-striped">
    <thead>
        <tr>
          <td>ID</td>
          <td>Name</td>
          <td>Email</td>
          <td>Job Title</td>
          <td>City</td>
          <td>Country</td>
          <td colspan = 2>Actions</td>
        </tr>
    </thead>
    <tbody>
        @foreach($contacts as $contact)
        <tr>
            <td></td>
            <td> </td>
            <td></td>
            <td></td>
            <td></td>
            <td></td>
            <td>
                <a href="" class="btn btn-primary">Edit</a>
            </td>
            <td>
                <form action="" method="post">
                  @csrf
                  @method('DELETE')
                  <button class="btn btn-danger" type="submit">Delete</button>
                </form>
            </td>
        </tr>
        @endforeach
    </tbody>
  </table>
<div>
</div>
@endsection

U: Implementing the Update Operation

Next, we need to implement the update operation. Go to the app/Http/Controllers/ContactController.php file, locate the edit($id) method and update it:

    public function edit($id)
    {
        $contact = Contact::find($id);
        return view('contacts.edit', compact('contact'));        
    }

Next, you need to implement the update() method:

    public function update(Request $request, $id)
    {
        $request->validate([
            'first_name'=>'required',
            'last_name'=>'required',
            'email'=>'required'
        ]);

        $contact = Contact::find($id);
        $contact->first_name =  $request->get('first_name');
        $contact->last_name = $request->get('last_name');
        $contact->email = $request->get('email');
        $contact->job_title = $request->get('job_title');
        $contact->city = $request->get('city');
        $contact->country = $request->get('country');
        $contact->save();

        return redirect('/contacts')->with('success', 'Contact updated!');
    }

Now, you need to add the edit template. Inside the resources/views/contacts/, create an edit.blade.php file:

$ touch edit.blade.php

Open the resources/views/contacts/edit.blade.php file and add this code:

@extends('base') 
@section('main')
<div class="row">
    <div class="col-sm-8 offset-sm-2">
        <h1 class="display-3">Update a contact</h1>

        @if ($errors->any())
        <div class="alert alert-danger">
            <ul>
                @foreach ($errors->all() as $error)
                <li></li>
                @endforeach
            </ul>
        </div>
        <br /> 
        @endif
        <form method="post" action="">
            @method('PATCH') 
            @csrf
            <div class="form-group">

                <label for="first_name">First Name:</label>
                <input type="text" class="form-control" name="first_name" value= />
            </div>

            <div class="form-group">
                <label for="last_name">Last Name:</label>
                <input type="text" class="form-control" name="last_name" value= />
            </div>

            <div class="form-group">
                <label for="email">Email:</label>
                <input type="text" class="form-control" name="email" value= />
            </div>
            <div class="form-group">
                <label for="city">City:</label>
                <input type="text" class="form-control" name="city" value= />
            </div>
            <div class="form-group">
                <label for="country">Country:</label>
                <input type="text" class="form-control" name="country" value= />
            </div>
            <div class="form-group">
                <label for="job_title">Job Title:</label>
                <input type="text" class="form-control" name="job_title" value= />
            </div>
            <button type="submit" class="btn btn-primary">Update</button>
        </form>
    </div>
</div>
@endsection

U: Implementing the Delete Operation

Finally, we’ll proceed to implement the delete operation. Go to the app/Http/Controllers/ContactController.php file, locate the destroy() method and update it accordingly:

    public function destroy($id)
    {
        $contact = Contact::find($id);
        $contact->delete();

        return redirect('/contacts')->with('success', 'Contact deleted!');
    }

You can notice that when we redirect to the /contacts route in our CRUD API methods, we also pass a success message but it doesn’t appear in our index template. Let’s change that!

Go to the resources/views/contacts/index.blade.php file and add the following code:

<div class="col-sm-12">

  @if(session()->get('success'))
    <div class="alert alert-success">
        
    </div>
  @endif
</div>

We also need to add a button to takes us to the create form. Add this code below the header:

    <div>
    <a style="margin: 19px;" href="" class="btn btn-primary">New contact</a>
    </div>  

This is a screenshot of the page after we created a contact:

Laravel 5.8 CRUD Example

Conclusion

We’ve reached the end of this tutorial. We created a CRUD application with Laravel 5.8, PHP 7.1 and MySQL.

Hope you enjoyed the tutorial and see you in the next one!

via Planet MySQL
Laravel 5.8 Tutorial: Build your First CRUD App with Laravel and MySQL (PHP 7.1+)

Withings adds sleep apnea detection to its tracking mat

There are countless products available that help you track your sleep, giving you insights into your sleep patterns and quality. But there’s been nothing to help snoozers identify sleep apnea, a potentially-serious condition that could traditionally only be diagnosed by a sleep clinic. Now, health device maker Withings has released a new update to its sleep tracking mat that could help users recognize the symptoms of this disorder.

Around 22 million Americans suffer from sleep apnea, which is characterized by pauses in breathing, or periods of shallow breathing, during sleep. As well as symptoms of fatigue, sleep apnea can result in headaches and depression, and in serious cases, stroke and heart failure. The update to Withings’ sleep tracking mat ($100) will monitor breathing disturbances during the night, and give users educational content about the signs of sleep apnea via the Health Mate app.

The update also helps set the company’s sleep mat apart from its competitors — Apple’s Beddit Sleep Monitor, for example, costs $150 but doesn’t have this function. But this is just the first step for Withings in this area. The company says it’s working on even more advanced diagnostics for sleep apnea, and aims to have medical-grade certified tracking for the condition in place by the end of the year.

Via: 9to5mac

Source: Withings

via Engadget
Withings adds sleep apnea detection to its tracking mat

‘We don’t even use computers!’: Watch a Microsoft PowerPoint presentation get mocked on ‘SNL’

It’s the first Monday back at work after daylight saving time and hopefully you don’t have to make a PowerPoint presentation today. If you do, it surely can’t be worse than what “Saturday Night Live” stars Kate McKinnon and Aidy Bryant came up with this weekend.

The late-night comedy took a run at Microsoft’s presentation program, in a skit starring actor Idris Alba and cast member Mikey Day as employees for the software giant, helping some office workers brush up on the PowerPoint skills.

“We don’t even use computers, just the phone, so we will see,” said Bryant, playing one of two receptionists charged with making a mock presentation. It only got worse from there.

With each slide, the receptionists fell further and further into despair, saying they had no idea what they were doing with PowerPoint. “This is not my world! … Honestly I’m at the point in my life where I feel that I can’t learn.”

Check out the video above, and take some time to brush up on your own skills today.

via GeekWire
‘We don’t even use computers!’: Watch a Microsoft PowerPoint presentation get mocked on ‘SNL’

7 Ultimate Typing Games If You Want to Type Really Fast

typing-games

Learning to type quickly and accurately is an essential skill. Whether you are learning for the first time, upgrading to touch typing or an alternate keyboard layout, repetition is key to improvement. But repetition with practice can feel like a drag.

Let’s face it—playing games is way more fun. So we went out and picked seven excellent typing games that will challenge you.

Why Should You Play These Typing Games?

There are numerous websites and pieces of software to help improve your keyboard skills. Many of them employ game mechanics, but can’t claim to be computer games. Many typing games are lacking in content and do not give a satisfying experience when compared to mainstream games—but there are exceptions.

This article will focus on fully fledged games that feature typing. Some are speed typing games, others are word games requiring fast keyboard skills, and there are even some arty indie typing experiences.

1. Typefighters

Typefighters multiplayer typing game

Singleplayer: Yes (Play against A.I.)

Multiplayer: LAN and Online

By far the most traditional typing game on this list, Typefighters takes a well-worn idea and does it well. While there are several modes to choose from, the general gameplay stays the same.

Type the words on the screen faster than your AI or real life opponent to gain points. Whoever reaches a certain point cap or who is scoring highest when the time is up wins.

This game is pure typing. You can even navigate the menus by typing, which feels incredibly satisfying for those who know keyboard shortcuts for everything!

Multiple modes can be played against friends online and over LAN. What this game provides in comparison to standard typing instruction software is game feel. Every keystroke has a satisfying sound, and completion of words shakes the text and the screen giving excellent user feedback.

Available on Steam: Typefighters

2. God Of Word

God Of Word - Wordplay Adventure

Singleplayer: Yes

Multiplayer: Online

God Of Word is a wordplay and typing game of epic proportions. You play a young actor, tasked with recreating famous battles of history for the gods of Olympus. Weapons, potions, and upgrades are all essential to progress. But without quick wits and fast fingers you won’t get far!

The core gameplay consists of word scramble puzzles, along with speed typing challenges to defeat groups of enemies. Each boss (a computer controlled enemy) brings a mechanic that needs more impressive wordplay and tactics. The campaign plays out over 5 acts, with two endless modes.

The multiplayer mode allows online play against friends or other strangers and comes with a separate upgrade system to customize your character.

Available on Steam: God Of Word

3. The Textorcist: The Story of Ray Bibbia

The Textorcist: The Story of Ray Bibbia

Singleplayer: Yes

Multiplayer: No

Do you like Bullet Hell games, horror movie themes, and adult humor? The Textorcist: The Story of Ray Bibbia is all of these things, along with being an incredibly challenging typing game. You play the titular role, a self-styled exorcist/detective tasked with investigating a string on strange possession cases.

Each battle consists of dodging vast numbers of enemy attacks while typing the words required to banish each demon. Failing to avoid attacks causes you to drop your prayer book, and you can’t continue the incantation until it is retrieved. The game is challenging from the get-go, and the ramp up to “full on bullet hell while typing Latin” is severe. Be prepared for a challenge.

Fantastic pixel artwork and pumping electronic soundtrack add to the experience. The story is incredibly dark yet comical, and this game is most certainly NSFW! Nevertheless, this is one of the most original typing games ever created, and a must for any quick-fingered gamer.

Available on Steam: The Textorcist: The Story of Ray Bibbia

4. The Typing Of The Dead: Overkill

Typing of the Dead: Overkill

Singleplayer: Yes

Multiplayer: Local Co-op

We couldn’t make a list like this without including The Typing Of The Dead. It was one of the most unusual arcade games ever devised. A near direct adaption of the popular House Of The Dead 2 from Sega, the arcade cabinets shuns guns for computer keyboards.

In-game, the characters also had keyboards (with rucksack mounted computers no less), and gun-play is replaced with typing at speed to stop the invading hordes. A mixture of quick-fire words, and (sometimes bizarre) phrases need constant vigilance to avoid getting eaten.

While the original release is now hard to run, Sega released a modern addition in 2013 in the form of The Typing Of The Dead: Overkill. The newer version retains the original’s gameplay but updates the graphics for modern hardware. There is plenty of content to keep you busy after the primary campaign, with cheap DLC bundles which add to the base game.

Available on Steam: The Typing Of The Dead: Overkill

5. Secret of Qwerty

Secret Of Qwerty

Singleplayer: Yes

Multiplayer: No

Lovers of all things retro will find plenty to like about Secret of Qwerty. This loving indie recreation of old school RPGs (right down to the dodgy translation of dialogue) has a crucial difference. You guessed it—typing replaces standard combat.

Like the much-loved adventure RPGs of old, you must explore a fantasy world, clear dungeons, and survive random encounters. Each battle rewards the player with XP and Gold which can be used to buy more powerful items to help you on your quest to defeat an evil wizard arch enemy. This game is a nod to much adored old games, and at a “Pay What You Like” cost, is worth your time.

Available on Itch.io: Secret of Qwerty

6. Monologue

Monologue - Browser Typing Game

Singleplayer: Yes

Multiplayer: No

Monologue is the only browser game on this list, and what it lacks in game depth it makes up for in charm and humor. You play as the antagonist who has placed their foe in the path of an oncoming train. Rush to finish your victory speech before they escape! You must type your speech correctly, as any mistake knocks you back to the start of the current word, thus wasting precious time.

Fun but straightforward graphics, jaunty old west music, and the mumbles and coughs of the player character complement the hilarious randomly generated speech. Monologue was an entry in the 2015 Train Game Jam and is free to play online.

Available at Itch.io: Monologue

7. Epistory – Typing Chronicles

Epistory - Typing Chronicles

Singleplayer: Yes

Multiplayer: No

There are few typing games which can boast gorgeous 3d graphics, a story, voice acting, and puzzle-based gameplay. In this third-person RPG, you play as a girl riding a three-tailed fox through a series of beautifully Origami-like stylized worlds. All interaction happens by typing words. The game adapts to your typing speed as you clear enemies and environmental elements.

The player gathers XP through exploration, trials with waves of enemies, and memory puzzles which also unlock new areas. You can buy new skills with experience points that grant movement speed increases and aids to combat. A particularly nice touch comes in the form of languages you cannot speak until a skill is learned.

The game adds harder words if your going is too easy. This game also supports alternate keyboard layouts including AZERTY, Dvorak, and Colemak. If you are looking for a full game experience in a typing game, Epistory – Typing Chronicles is one of the strongest contenders around.

Available on Steam: Epistory – Typing Chronicles

A Twist on the Usual Touch Typing Games

Good typing games can seem to be thin on the ground. But there are some great examples out there. Mixing games into your practice will improve your typing skills. And a good routine always reinforces good habits, and a good mechanical keyboard while not essential really improves the typing experience.

Of course, you need to learn those good habits in the first place, and learning the proper touch typing technique is just as important as its practice.

Read the full article: 7 Ultimate Typing Games If You Want to Type Really Fast

via MakeUseOf.com
7 Ultimate Typing Games If You Want to Type Really Fast

The Skeleton

As we do in many series at Laracasts, we’ll begin with laravel new project. Following that, we’ll incrementally pull in all necessary npm dependencies and construct the base skeleton for our "assets" website.
View the source code for this episode on GitHub.
via Laracasts
The Skeleton

5 Tips for a Successful Software Migration to the Latest and Best Tools

Photo by Startup Stock Photos from Pexels

Businesses need to stay on the cutting edge of technology. That’s why it’s essential to use the most advanced tools. Your business is only as good as your data. Moreover, if you’re running outdated, unresponsive data-handling software, you should consider scheduling a software migration to the latest and best tools.

What we mean by that is that you need to move your data over to software that has the capacity, security, and functionality you need. If you don’t, your old software will put you behind your competition and cost you money.

However, getting the best software systems for your business isn’t cheap, and data migration is challenging. But industry experts are clear—the total cost of operating old technology rises sharply over time and outpaces the return on investment. For your business to stay relevant in today’s marketplace, your technology infrastructure needs to offer the right performance, scale, and flexibility for your expanding needs. Think of new software as an investment rather than an expense.

Recently, we helped a company that does porta-potty rentals in Dallas to transition their systems. The process was tough, but we made our deadline, and the results were worth waiting for. Here’s what we learned during the process. We hope our software migration experience helps make yours a success.

Give Yourself Plenty of Time

Software migration is complex, and you still have a business to run. Moreover, transition time varies considerably based on factors like the quality of source data, hardware capability, and the compatibility of data fields between the old system and the new.

It’s nearly inevitable that something will go wrong. However, because that’s not unexpected, you can compensate for it by starting sooner rather than later. Nick-of-time timelines don’t cut it. Be patient and prepare for what is to come.

RELATED ARTICLE: SOME USEFUL TIPS FOR BUYING THE PERFECT HR SOFTWARE FOR YOUR BUSINESS

Build a Migration Dream Team

With data, it’s garbage in, garbage out. So if you’re using your staff instead of hired help, it pays to choose the most qualified individuals to assist with the transition. Databases are always more disorganized than anyone expects them to be. On the other hand, one of the benefits of a software migration is that incorrect or corrupt data can be culled.

The best candidates to work on the project are those who know how to retrieve information from your current system effectively. These people will recognize bad data. What’s more, they can clean it up before they migrate it over to the new system.

Software migration is a big project. That means there are roles for team members from testing to data entry. To lead the charge, choose tech-savvy people who are willing to learn the new software first and teach others the ropes. For leaders, make sure your software provider offers comprehensive support.

Know the Process

Learn, do, teach, lead—it’s an educator’s mantra, and it will help you better navigate your transition. Software migration is a top-down project, and training everyone on the new system is a priority. However, no matter the size of your company, its leaders need to learn the process, practice it, and be able to demonstrate it to others before rolling it out.

Ensuring that a solid training schedule is in place to bring your team up to speed with the new software minimizes costly downtime and errors. However, if you’re ready to take point, you can quickly mobilize an entire team and confidently delegate responsibility to others. This concept is especially critical if you’ve made changes in data-handling procedures to reflect the change in software.

Consider Auto-Migration Options

A significant part of the cost of software migration is the time it takes to do the job. It’s painstaking work. Moreover, if your staff is too busy taking care of your customers or they’re not knowledgeable enough to be useful helpers in the transition process, it’s worth considering auto-migration.

Auto-migration is an automated process that transfers the bulk of data for you. But not all business software providers offer that option. Also, there may be technological barriers, including deep software incompatibilities and poor-quality legacy data. The cost of auto-migration may be higher upfront depending on the complexity of the systems. However, it relieves some of the pressure on staff. What’s more, in some cases, it may be a more economical option.

Hire Help for Your Software Migration

In our recent migration effort, we weren’t able to use company staff because of their responsibilities. But even when auto-migration is an option, you’ll still need extra hands to address hardware interface issues. Additionally, legacy data might not transfer to the new system correctly. In any case, you’ll need to educate staff about the new system.

A software migration can disrupt business-as-usual. But hiring help with the right expertise and credentials smooths the transition.

Data handling technology has evolved markedly in the past decade, but going forward, it will advance by leaps and bounds. Businesses that fail to adapt will be left behind. Information is a strategic asset that needs to be harnessed and used to its fullest potential. Using the latest and best tools makes the job easier and more profitable.

The post 5 Tips for a Successful Software Migration to the Latest and Best Tools appeared first on Business Opportunities.


via Business Opportunities Weblog
5 Tips for a Successful Software Migration to the Latest and Best Tools

Check Out These 5 Brilliantly Simple Woodworking Hacks, That Actually Are Hacks

Everyone loves shop tips and time saving ideas. Not all of these ideas qualify for the overly used word “hacks” , however, I feel like Glen from the youtube channel DIY Creators really nailed it with this one.

I started watching this, totally expecting the typical hyperbole associated with “hacks” and as I watched I was totally surprised. I didn’t think the milk jug on the circular saw would work, but he shows it working over and over, and I’m totally going to do this on mine.  The janky caulk gun is ridiculous but I could see actually using this in a pinch. Fantastic job Glen!

via MAKE Magazine
Check Out These 5 Brilliantly Simple Woodworking Hacks, That Actually Are Hacks