Gathered from around the Internet over the past week. There are fewer than usual, thanks to a three-day road trip to attend the wedding of a friend, during which time I had limited Internet access. Click any image for a larger view.
The Wyoming Senate has voted 16 to 14 to eliminate the U. of Wyoming Gender Studies program. (Bill below). This will not only eliminate not only the gender studies department, but also courses and non-academic programs related to gender.
Laravel Notifications are an awesome tool that provides built-in support for sending notifications, in dozens of different channels, like Slack, Telegram, SMS, etc.
In this tutorial, we will see how we can customise Laravel Notifications core to accommodate a multi-tenant setup in a single database.
Note: This tutorial is using Laravel 9.x but should be working for older Laravel versions as well.
Step 1: The Notifications Table
The first thing we need to do is publish the default notifications table using
php artisan notifications:table
You should now have a new migration file under database/migrations which should look like this
<?php

use Illuminate\Database\Migrations\Migration;
use Illuminate\Database\Schema\Blueprint;
use Illuminate\Support\Facades\Schema;

return new class extends Migration {

    public function up()
    {
        Schema::create('notifications', function (Blueprint $table) {
            $table->uuid('id')->primary();
            $table->string('type');
            $table->morphs('notifiable');
            $table->text('data');
            $table->timestamp('read_at')->nullable();
            $table->timestamps();
        });
    }
};
Ideally, we would like to have a foreign key to the tenant model.
Schema::create('notifications', function (Blueprint $table) {
     $table->uuid('id')->primary();
     $table->string('type');
     $table->morphs('notifiable');
     $table->text('data');
     $table->timestamp('read_at')->nullable();
     $table->timestamps();

     $table->foreignId('tenant_id')->constrained(); // <- Add this
});
If tenants are supposed to be receiving notifications you might want to make the tenant_id column nullable.
Step 2: Override Laravel’s Database Channel
The next step would be to find a way to fill in that column whenever a notification is being stored in the database. For that, we need to extend the default DatabaseChannel class and replace our version in the Laravel Container.
What we need is a new class called DatabaseChannel which extends Illuminate\Notifications\Channels\DatabaseChannel.
<?php

namespace App\Notifications\Channels;

use Illuminate\Notifications\Notification;

class DatabaseChannel extends \Illuminate\Notifications\Channels\DatabaseChannel
{
    public function buildPayload($notifiable, Notification $notification)
    {
        return [
            'id' => $notification->id,
            'type' => get_class($notification),
            'data' => $this->getData($notifiable, $notification),
            'read_at' => null,
            'tenant_id' => $notification->tenant_id,
        ];
    }
}
Step 3: Create a tenant-aware Notification
Now, whenever we create a new notification we need to inject the tenant_id property so that we can insert it into the database.
<?php

namespace App\Notifications;

use Illuminate\Notifications\Notification;

class BaseNotification extends Notification
{
    public $tenant_id;

    public function __construct($tenant_id)
    {
        $this->tenant_id = $tenant_id;
    }

    public function via()
    {
        return ['database'];
    }

    public function toDatabase($notifiable)
    {
        return [
             // your payload
        ];
    }
}
Step 4: Use our implementation of the DatabaseChannel
Finally, we need to switch Laravel’s implementation of the DatabaseChannel with ours. To do that we just need to set this up inside the boot method of the AppServiceProvider.
<?php

namespace App\Providers;

use App\Notifications\Channels\DatabaseChannel;
use \Illuminate\Notifications\Channels\DatabaseChannel as BaseDatabaseChannel;

class AppServiceProvider extends ServiceProvider
{
    public function boot()
    {
        $this->app->instance(BaseDatabaseChannel::class, new DatabaseChannel());
    }
}
Ready!
And that’s it!
You now have multi-tenant notifications set up in your Laravel project!
A little bit ago, I released a blog post comparing the backup performance of different MySQL tools such as mysqldump, the MySQL Shell feature called Instance Dump, mysqlpump, mydumper, and Percona XtraBackup. You can find the first analysis here:
However, we know the backups are just the first part of the story. What about the restore time? And which tool performs better for the complete operation (backup+restore)?
Let’s see the results and the conclusion in the following sections.
Benchmark Results
I ran the benchmark on an m5dn.8xlarge instance, with 128GB RAM, 32 vCPU, and two io1 disks of 600GB (one for backup and the other one for MySQL data) with 5000 provisioned IOPS. The MySQL version was 8.0.26 and configured with 89Gb of the buffer pool, 20Gb of redo log, and a sample database of 96 GB (more details below).
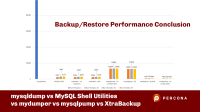
When we sum the backup time and the restore time, we can observe the results in the chart below:
And if we analyze the chart without mysqldump to have a better idea of how the other tools performed:
The backup size created by each tool:
Note that the backup size of XtraBackup (without compression) is the size of the datadir without the binary logs. Next, we can see the backup time:
And the restore time:
Analyzing The Results
When we sum backup and restore times, we observe that the fastest tool is Percona XtraBackup. The main point of XtraBackup is not even the speed but its capacity to perform PITR backups. Also, the tool supports compression and encryption.
We can also observe that mydumper/myloader and MySQL Shell utilities produce good results in both phases. The difference from Xtrabackup is that both tools perform logical backups, which means that these tools connect to MySQL and extract the data to dump files. Because they have to extract data from MySQL, these tools are more sensitive for the MySQL configuration and backup/restore parametrization. For example, MyDumper/MyLoader has some extra options that can improve the backup and restore performance, such as --rows, --chunk-filesize, and --innodb-optimize-keys.
Note that XtraBackup, MyDumper, and mysqldump support stream restore, reducing overall timing to perform the backup and restore operation.
The tool that has the most inconsistent behavior is mysqlpump where the tool can make speedy backups, but the restore performance is terrible since it is single-threaded the same way as mysqldump.
Based on the tests, we can observe that compression, TLS, socket, or TCP/IP do not significantly impact the time needed to perform the whole operation. Because there is no significant impact, tools that can perform compression and use TLS like MySQL Shell, mydumper/myloader, and XtraBackup have a good advantage since their backups are safer and use less disk space (less disk space = fewer costs). The trade-off between the features of these tools and the time spent to backup and restore the database is something that all DBAs should evaluate.
And to answer some questions/comments about this topic:
The difference you see between MySQL Shell and mydumper can be explained by the use of SSL in one and clear transfer in the other. Encryption has a cost, unfortunately.
A: Indeed, SSL has a cost. However, when we put the security benefits of the SSL and consider the whole process, it is a small cost (in the same way as compression).
Does XtraBackup support ZSTD?
A: At this moment, no. However, there is a feature request for this (you can follow the JIRA ticket to receive updates about it):
Is there any difference substituting mysqldump | gzip with a different compression tool?
A: The difference is neglectable piping with gzip or sending the uncompressed dump to the disk. The mysqldump tool is the most inefficient option due to its single-thread nature, severely impacting performance. Because of its single-thread nature, the tool cannot extract maximum performance from hardware resources (in particular I/O).
How is the performance impact on MySQL when running the backups?
A: Unfortunately, I did not measure this. Based on my experience, there is a dedicated replica server for backup most of the time. If the MySQL community is interested in this test, I can write another post about this (leave in the comments your opinion).
It is possible to squeeze more juice from MySQL in the restore phase. We can take some actions like disabling the binary log and making asynchronous writes. You can check the advice (pros and cons) in these two blog posts:
To conclude, this blog post is intended to give an overall idea of how these tools perform. I tried to stick with the default options of each tool (except the number of threads) to keep the test as fair as possible. Also, time is not the only thing that companies consider to adopt a backup method (security, encryption, and data protection are very important). In my daily tasks, I use mydumper/myloader and XtraBackup because I’m more familiar with the commands, and I have used them for a long time. However, I would advise keeping an eye on the MySQL Shell utilities since it is becoming a fascinating tool to perform many tasks (backup and restore have excellent results).
Hardware and Software Specs
These are the specs of the benchmark:
32 CPUs
128GB Memory
2x io1 disks 600 GB with 5000 IOPS each
Centos 7.9
MySQL 8.0.26
MySQL shell 8.0.26
mydumper 0.11.5 – gzip
mydumper 0.11.5 – zstd
Xtrabackup 8.0.26
Useful Resources
Finally, you can reach us through the social networks, our forum, or access our material using the links presented below:
When we browse through a webpage, we see some blue text with an underline underneath. These are called anchor texts. That’s because when you click on these texts, they take you to a new webpage.
The anchor tags, or the <a> tags of HTML, are used to create anchor texts, and the URL of the webpage that is to be opened is specified in the href attribute.
Refer to the below image to understand it better.
In almost all web scraping projects, fetching the URLs from the href attribute is a common task.
In today’s article, let’s learn different ways of fetching the URL from the href attribute using Beautiful Soup.
To fetch the URL, we have to first find all the anchor tags, or hrefs, on the webpage. Then fetch the value of the href attribute.
Two ways to find all the anchor tags or href entries on the webpage are:
soup.find_all()
SoupStrainer class
Once all the href entries are found, we fetch the values using one of the following methods:
tag['href']
tag.get('href')
Prerequisite: Install and Import requests and BeautifulSoup
Throughout the article, we will use the requests module to access the webpage and BeautifulSoup for parsing and pulling the data from the HTML file.
To install requests on your system, open your terminal window and enter the below command:
The href entries are always present within the anchor tag (<a> tag). So, the first task is to find all the <a> tags within the webpage.
Using soup.find_all()
Soup represents the parsed file. The method soup.find_all() gives back all the tags and strings that match the criteria.
Let’s say we want to find all the <a> tags in a document. We can do as shown below.
import requests
from bs4 import BeautifulSoup
url = "https://www.wikipedia.org/"
# retrieve the data from URL
response = requests.get(url)
# parse the contents of the webpage
soup = BeautifulSoup(response.text, 'html.parser')
# filter all the <a> tags from the parsed document
for tag in soup.find_all('a'):
print(tag)
We can also use the SoupStrainer class. To use it, we have to first import it into the program using the below command.
from bs4 import SoupStrainer
Now, you can opt to parse only the required attributes using the SoupStrainer class as shown below.
import requests
from bs4 import BeautifulSoup, SoupStrainer

url = "https://www.wikipedia.org/"
# retrieve the data from URL
response = requests.get(url)

# parse-only the <a> tags from the webpage
soup = BeautifulSoup(response.text, 'html.parser', parse_only=SoupStrainer("a"))
for tag in soup:
   print(tag)
Now that we know how to fetch the value of the href attribute, let’s look at some of the real-time use cases.
Example 1: Fetch all the URLs from the webpage.
Let’s scrape the Wikipedia main page to find all the href entries.
from bs4 import BeautifulSoup
import requests

url = "https://www.wikipedia.org/"
# retrieve the data from URL
response = requests.get(url)
if response.status_code ==200:
   soup=BeautifulSoup(response.text, 'html.parser')
   for tag in soup.find_all(href=True):
       print(tag['href'])
Let’s say we need to find only the outbound links. From the output, we can notice that most of the inbound links do not have "https://" in the link.
Thus, we can use the regular expression ("^https://") to match the URLs that start with "https://" as shown below.
Also, check to ensure nothing with ‘wikipedia’ in the domain is in the result.
from bs4 import BeautifulSoup
import requests
import re

url = "https://www.wikipedia.org/"
# retrieve the data from URL
response = requests.get(url)
if response.status_code ==200:
   soup=BeautifulSoup(response.text, 'html.parser')
   for tag in soup.find_all(href=re.compile("^https://")):
       if 'wikipedia' in tag['href']:
           continue
       else:
           print(tag['href'])
Example 3: Fetch the URLs based on the value of different attributes
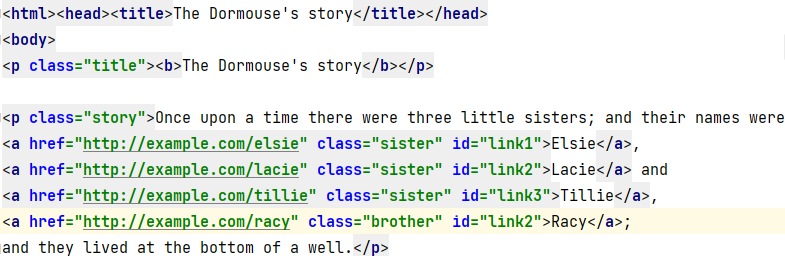
Consider a file as shown below:
Let’s say we need to fetch the URL from the class=sister and with id=link2. We can do that by specifying the condition as shown below.
from bs4 import BeautifulSoup

#open the  html file.
with open("sample.html") as f:
   #parse the contents of the html file
   soup=BeautifulSoup(f,'html.parser')
   # find the tags with matching criteria
   for tag in soup.find_all('a',{'href': True, 'class' : 'sister' ,'id' : 'link2' }):
       print(tag['href'])
Output:
http://example.com/lacie
Conclusion
That brings us to the end of this tutorial. In this short tutorial, we have learned how to fetch the value of the href attribute within the HTML <a> tag. We hope this article has been informative. Thanks for reading.
Fourteen years ago, we covered a brilliantly-designed pair of eyeglasses with water-filled lenses. Created for users in developing nations by British inventor and Oxford professor Joshua Silver, the glasses obviate the need for opticians (who are in short supply in poor countries), as the user can tune their own prescription.
The way the glasses work is, a water-filled syringe is temporarily mounted on each stem and plugged into the lenses:
The user rotates the syringes back and forth, which adjusts the amount of water within each lens, until they can see perfectly.
Once the user’s got their prescription dialed in, the syringes are removed, and the user’s got 20-20.
It looks pretty cool in action:
<pundefined< em="">
Today Silver runs an organization called the Centre for Vision in the Developing World, which has provided 100,000 pairs of his adaptive glasses to people in over 30 countries. They reckon they will have to multiply that a bit, as "More than 2 billion people in the world today need glasses but don’t have them." They also cite that "100 million school-aged children cannot read the blackboard in class."
CVDW ran a crowdfunding campaign in 2017 to raise the funds to distribute 50,000 pairs of glasses to children in developing nations. The funding target was $67,971, but they wound up with a paltry $4,671–just 6% of their goal.
According to CBC Radio, the adaptable glasses cost just $1 to produce. So I’m wondering:
Might a retooled campaign succeed if they appealed to people’s selfishness, rather than just the ability to donate? What if it was "Buy a pair for yourself, pay enough to send some multiple of pairs to children"?
For instance, I would happily buy a pair of these glasses to use as reading glasses at home or in my shop, where I need to wear a different prescription in order to do woodworking, and I’d pay for an extra 50 or 100 pairs to send to the countries that need it. (I might even leave the syringes on, to fine-tune for detailed work.)
Similarly, I bet you could get people to pay anywhere from $20 to $100 for a pair of these to use as a backup/emergency set of eyeglasses. Target disaster preppers.
I personally wouldn’t wear these out in public, for fear of drawing attention (I’m a minority and I live in a rural area where let’s just say, there is no one who looks like me). But if you could give these glasses a hash-taggable name and get Kanye to wear a pair, perhaps people more carefree in their appearance would find them hip enough to wear outside of the house, and buy themselves a pair and pay for many multiples.
I do hope that Silver re-tools the campaign and re-launches it at some point.
Speaking of crowdfunding, don’t forget that this week Craighton Berman, serial crowdfund-ee, is giving a free crash course in how designers can tackle it. It’s on Wednesday, Feb. 23rd at 2pm EST and you can sign up here. Professor Silver, if by some chance you’re reading this, do tune in–I can guarantee the information will be worth your time, and your invention is too good to not fulfill its ambition.


 A little bit ago, I released a blog post comparing the backup performance of different MySQL tools such as