Developing modern full-stack web applications has become much easier thanks to Laravel but deploying them on a real server is another story.
There are just so many options.
PaaS like Heroku or AWS Elastic Beanstalk, unmanaged virtual private servers, shared hosting, and so on.
Deploying a Laravel app on a shared server using cPanel is as easy as zipping up the source code along with all the dependencies and uploading it to the server. But on shared hosting, you don’t have much control over the server.
PaaS like Heroku or AWS Elastic Beanstalk strikes a good balance between ease of usage and control, but they can be expensive at times. A standard 1x dyno from Heroku, for example, costs $25 per month and comes with only 512MB of RAM.
Unmanaged virtual private servers are affordable and provide a lot of control on the server. You can avail a server with 2GB of RAM, 20GB of SSD space, and 2TB of transfer bandwidth, costing only $15 per month.
Now the problem with unmanaged virtual private servers is that they are unmanaged. You’ll be responsible for installing all necessary software, configuring them, and keeping them updated.
In this article, I’ll guide you step-by-step in the process of how to deploy a Laravel project on an unmanaged virtual private server (we’ll refer to it as VPS from now on). If you want to check out the benefits of the framework first, go ahead and get an answer to the question of why use the Laravel framework. If you are ready, without any further ado, let’s jump in.
Prerequisites
The article assumes that you have previous experience with working with the Linux command-line. The server will use Ubuntu as its operating system, and you’ll have to perform all the necessary tasks from the terminal. The article also expects you to understand basic concepts like Sudo, file permissions, differences between a root and non-root user, and git.
Project Code and Deployment Plan
I’ve built a dummy project for this article. It’s a simple question board application where users can post a question, and others can answer that question. You can consider this a dumbed-down version of StackOverflow.
The project source code is available on https://github.com/fhsinchy/guide-to-deploying-laravel-on-vps repository. Make a fork of this repository and clone it on your local computer.
Once you have a copy of the project on your computer, you’re ready to start the Laravel deployment process. You’ll start by provisioning a new VPS and setting up a way for pushing the source from your local computer to the server.
Provisioning a New Ubuntu Server
There are several VPS providers out there, such as DigitalOcean, Vultr, Linode, and Hetzner. Although working with an unmanaged VPS is more or less the same across providers, they don’t provide the same kind of services.
DigitalOcean, for example, provides managed database services. Linode and Vultr, on the other hand, don’t have such services. You don’t have to worry about these differences.
I’ll demonstrate only the unmanaged way of doing things. So regardless of the provider, you’re using, the steps should be identical.
Before provisioning a new server, you’ll have to generate SSH keys.
Generating New SSH Keys
According to Wikipedia – “Secure Shell (SSH) is a cryptographic network protocol for operating network services securely over an unsecured network.” It allows you to connect to a remote server using a password or a key-pair.
If you’re already familiar with SSH and have previously generated SSH key-pairs on your computer, you may skip this subsection. To generate a new key-pair on macOS, Linux, or Windows 10 machines, execute the following command:
ssh-keygen -t rsa
You’ll see several prompts on the terminal. You can go through them by pressing enter. You don’t have to put any password either. Once you’ve generated the key-pair, you’ll find a file named id_rsa.pub inside the ~/.ssh/ directory. You’ll need this file when provisioning a new VPS.
Provisioning a New VPS
I’ve already said there are some differences between the VPS service providers, so if you want to be absolutely in line with this article, use DigitalOcean.
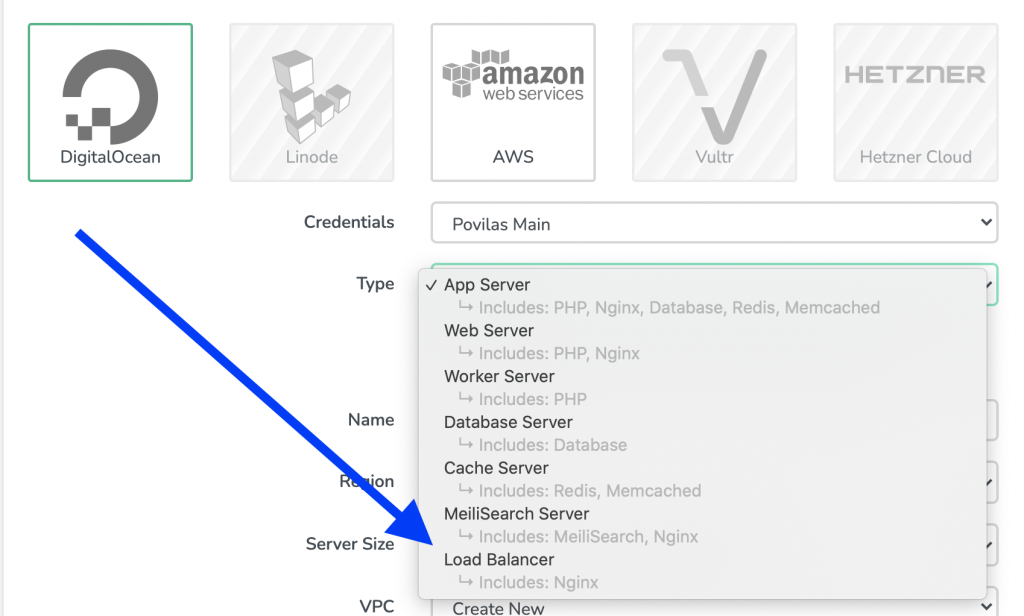
A single virtual private server on DigitalOcean is known as a droplet. On Vultr, it’s called an instance, and on Linode, it’s called a linode. Log into your provider of choice and create a new VPS. Use Ubuntu 20.04 LTS as the operating system.
For size, pick the one with 1GB of RAM and 25GB of SSD storage. It should cost you around $5 per month. For the region, choose the one closest to your users. I live in Bangladesh, and most of my users are from here, so I deploy my applications in the Singapore region.
Under the SSH section, create a new SSH key. Copy the content from the ~/.ssh/id_rsa.pub file and paste it as the content. Put a descriptive name for the key and save.
You can leave the rest of the options untouched. Most of the providers come with an automatic backup service. For this demonstration, keep that option disabled. But in a real scenario, it can be a lifesaver. After the process finishes, you’ll be ready to connect to your new server using SSH.
Performing Basic Setup
Now that your new server is up and running, it’s time to do some basic setup. First, use SSH with the server IP address to log in as the root user.
ssh [email protected]
You can find the server’s IP address on the dashboard or inside the server details. Once you’re inside the server, the first thing to do is create a new non-root user.
By default, every server comes with the root user only. The root user, as you may already know, is very mighty. If someone manages to hack your server and logs in as the root user, the hacker can wreak havoc. Disabling login for the root user can prevent such mishaps.
Also, logging in using a key-pair is more secure than logging in using a password. So, disabling logging in using a password should be disabled for all users.
To create a new user from the terminal, execute the following command inside your server:
adduser nonroot
The name nonroot can be anything you want. I used nonroot as the name to make the fact clear that this is a non-root user. The adduser program will ask for a password and several other information. Put a strong password and leave the others empty.
After creating the user, you’ll have to add this new user to the sudo group. Otherwise, the nonroot user will be unable to execute commands using sudo.
usermod -aG sudo nonroot
In this command, sudo is the group name, and nonroot is the username. Now, if you try to log into this account, you’ll face a permission denied error.
It happens because most of the VPS providers disable login using a password when you add an SSH key to the server, and you haven’t configured the new user to use SSH key-pairs. One easy way to fix this is to copy the content of /root/.ssh directory to the /home/nonroot/.ssh directory. You can use the rsync program to do this.
rsync --archive --chown=nonroot:nonroot /root/.ssh /home/nonroot
The –archive option for rsync copies directories recursively preserving symbolic links, user and group ownership, and timestamps. The –chown option sets the nonroot user as the owner in the destination. Now you should be able to log in as the new user using SSH.
After logging in as a non-root user, you should update the operating system, including all the installed programs on the server. To do so, execute the following command:
sudo apt update && sudo apt upgrade -y && sudo apt dist-upgrade -y
Downloading and installing the updates will take a few minutes. During this process, if you see a screen titled “Configuring openssh-server” asking about some file changes, select the “keep the local version currently installed” option and press enter.
After the update process finishes, reboot the server by executing the sudo reboot command. Wait a few minutes for the server to boot again and log back in as a non-root user.
Deploying Code on the Server
After completing the basic setups, the next thing you’ll tackle is deploying code on the server. I’ve seen people cloning the repository somewhere on the production server and logging into the server to perform a pull whenever there are some new changes to the code.
There is a much better way of doing this. Instead of logging into the server to perform a pull, you can use the server itself as a repository and push code directly to the server. You can also automate the post-deployment steps like installing dependencies, running the migrations, and so on, which will make the Laravel deploy to server an effortless action. But before doing all these, you’ll first have to install PHP and Composer on the server.
Installing PHP
You can find a list of PHP packages required by Laravel on the official docs. To install all these packages, execute the following command on your server:
sudo apt install php7.4-fpm php7.4-bcmath php7.4-json php7.4-mbstring php7.4-xml -y
Depending on whether you’re using MySQL or PostgreSQL, or SQLite in your project, you’ll have to install one of the following packages:
sudo apt install php7.4-mysql php7.4-pgsql php7.4-sqlite3 -y
The following package provides support for the Redis in-memory databases:
sudo apt install php7.4-redis
Apart from these packages, you’ll also need php-curl, php-zip, zip, unzip, and curl utilities.
sudo apt install zip unzip php7.4-zip curl php7.4-curl -y
The question bank project uses MySQL as its database system and Redis for caching and running queues, so you’ll have to install the php7.4-mysql and the php7.4-redis packages.
Depending on the project, you may have to install more PHP packages. Projects that work images, for example, usually depend on the php-gd package. Also, you don’t have to mention the PHP version with every package name. If you don’t specify a version number, APT will automatically install whatever is the latest.
At the writing of this article, PHP 7.4 is the latest one on Ubuntu’s package repositories but considering that the question board project requires PHP 7.4 and PHP 8 may become the default in the future, I’ve specified the version number in this article.
Installing Composer
After installing PHP and all the required packages on the server, now you’re ready to install Composer. To do so, navigate to the official composer download page and follow the command-line installation instructions or execute the following commands:
php -r "copy('https://getcomposer.org/installer', 'composer-setup.php');"
sudo php composer-setup.php --install-dir /usr/local/bin --filename composer
php -r "unlink('composer-setup.php');"
Now that you’ve installed both PHP and Composer on your server, you’re ready to configure the automated deployment of your code.
Deploying Code Using Git
For automating code deployment on the server, log in as a non-root user and create a new directory under the /home/nonroot directory. You’ll use this directory as the repository and push production code to it.
mkdir -p /home/nonroot/repo/question-board.git
The -p option to the mkdir command will create any nonexistent parent repository. Next, cd into the newly created directory and initialize a new bare git repository.
cd /home/nonroot/repo/question-board.git
git init --bare
A bare is the same as a regular git repository, except it doesn’t have a working tree. The practical usage of such a git repository is as a remote origin. Don’t worry if you don’t understand what I said just now. Things will become lucid as you keep going.
Assuming you’re still inside the /home/nonroot/repo/question-board.git directory, cd inside the hooks subdirectory and create a new file called post-receive.
cd hooks
touch post-receive
Files inside this directory are regular shell scripts that git invokes when some major event happens on a repository. Whenever you push some code, git will wait until all the code has been received and then call the post-receive script.
Assuming you’re still inside the hooks directory, open the post-receive script by executing the following command:
nano post-receive
Now update the script’s content as follows:
#!/bin/sh

sudo /sbin/deploy
As you may have already guessed, /sbin/deploy is another script you’ll have to create. The /sbin directory is mainly responsible for storing scripts that perform administrative tasks. Go ahead and touch the /sbin/deploy script and open it using the nano text editor.
sudo touch /sbin/deploy
sudo nano /sbin/deploy
Now update the script’s content as follows:
#!/bin/sh

git --work-tree=/srv/question-board --git-dir=/home/nonroot/repo/question-board.git checkout -f
Evident by the #!/bin/sh line, this is a shell script. After that line, the only line of code in this script copies the content of the /home/nonroot/repo/question-board.git repository to the /srv/question-board directory.
Here, the –work-tree option specifies the destination directory, and the –git-dir option specifies the source repository. I like to use the /srv directory for storing files served by this server. If you want to use the /var/www directory, go ahead.
Save the file by hitting Ctrl + O and exit nano by hitting Ctrl + X key combination. Make sure that the script has executable permission by executing the following command:
sudo chmod +x post-receive
The last step to make this process functional is creating the work tree or the destination directory. To do so, execute the following command:
sudo mkdir /srv/question-board
Now you have a proper work tree directory, a bare repository, and a post-hook that in turn calls the /sbin/deploy script with sudo. But, how would the post-receive hook invoke the /sbin/deploy script using sudo without a password?
Open the /etc/sudoers file on your server using the nano text editor and append the following line of code at the end of the file:
nonroot ALL=NOPASSWD: /sbin/deploy
This line of code means that the nonroot user will be able to execute the /sbin/deploy script with sudo on ALL hosts with NOPASSWD or no password. Save the file by pressing Ctrl + O and exit nano by pressing the Ctrl + K key combination.
Finally, you’re ready to push the project source code. Assuming that you’ve already forked and cloned the https://github.com/fhsinchy/guide-to-deploying-laravel-on-vps repository on your local system, open up your terminal on the project root and execute the following command:
git remote add production ssh://[email protected]/home/nonroot/repo/question-board.git
Make sure to replace my IP address with the IP address from your server. Now assuming that the stable code is no the master branch, you can push code to the server by executing the following command:
git push production master
After sending the code to the server, log back in as a non-root user and cd into the /srv/question-board directory. Use the ls command to list out the content, and you should see that git has successfully checked out your project code.
Automating Post Deployment Steps
Congratulations on you being able to deploy Laravel project on the server directly but, is that enough? What about the post-deployment steps? Tasks like installing or updating dependencies, migrating the database, caching the views, configs, and routes, restarting workers, and so on.
Honestly, automating these tasks is much easier than you may think. All you’ve to do is create a script that does all these for you, set some permissions, and call that script from inside the post-receive hook.
Create another script called post-deploy inside the /sbin directory. After creating the file, open it inside the nano text editor.
sudo touch /sbin/post-deploy
sudo nano /sbin/post-deploy
Update the content of the post-deploy script as follows. Don’t worry if you don’t clearly understand everything. I’ll explain each line in detail.
#!/bin/sh

cd /srv/question-board

cp -n ./.env.example ./.env

COMPOSER_ALLOW_SUPERUSER=1 composer install --no-dev --optimize-autoloader
COMPOSER_ALLOW_SUPERUSER=1 composer update --no-dev --optimize-autoloader
The first line changes the working directory to the /srv/question-board directory. The second line makes a copy of the .env.example file. The -n option makes sure that the cp command doesn’t override a previously existing file.
The third and fourth commands will install all the necessary dependencies and update them if necessary. The COMPOSER_ALLOW_SUPERUSER environment variable disables a warning about running the composer binary as root.
Save the file by pressing Ctrl + O and exit nano by pressing Ctrl + X key combination. Make sure that the script has executable permission by executing the following command:
sudo chmod +x /sbin/post-deploy
Open the /home/nonroot/repo/question-board.git/hooks/post-receive script with nano and append the following line after the sudo /sbin/deploy script call:
sudo /sbin/post-deploy
Make sure that you call the post-deploy script after calling the deploy script. Save the file by pressing Ctrl + O and exit nano by pressing the Ctrl + K key combination.
Open the /etc/sudoers file on your server using the nano text editor once again and update the previously added line as follows:
nonroot ALL=NOPASSWD: /sbin/deploy, /sbin/post-deploy
Save the file by pressing Ctrl + O and exit nano by pressing the Ctrl + K key combination. You can add more post deploy steps to this script if necessary.
To test the new post-deploy script, make some changes to your code, commit the changes and push to the production master branch. This time you’ll see composer packages installation progress on the terminal and outputs from other artisan calls.
Once the deployment process finishes, log back into the server, cd into the /srv/question-board directory, and list the content by executing the following command:
ls -la
Among other files and folders, you’ll see a newly created vendor directory and an env file. At this point, you can generate the application encryption key required by Laravel. To do so, execute the following command:
sudo php artisan key:generate
If you look at the content of the .env file using the nano text editor, you’ll see the APP_KEY value populated with a long string.
Installing and Configuring NGINX
Now that you’ve successfully pushed the source code to the server, the next step is to install a web server and configure it to serve your application. I’ll use NGINX in the article. If you want to use something else like Apache, you’ll be on your own.
This article will strictly focus on configuring the webserver for serving a Laravel application and will not discuss NGINX-related stuff in detail. NGINX itself is a very complex software, and if you wish to learn NGINX from the ground up, The NGINX Handbook is a solid resource.
To install NGINX on your Ubuntu server, execute the following command:
sudo apt install nginx -y
This command should install NGINX and should also register as a systemd service. To verify, you can execute the following command:
sudo systemctl status nginx
You should see something as follows in the output:
You can regain control of the terminal by hitting q on your keyboard. Now that NGINX is running, you should see the default welcome page of NGINX if you visit the server IP address.
You’ll have to change the NGINX configuration to serve your Laravel application instead. To do so, create a new file /etc/nginx/sites-available/question-board and open the file using the nano text editor.
sudo touch /etc/nginx/sites-available/question-board
sudo nano /etc/nginx/sites-available/question-board
This file will contain the NGINX configuration code for serving the question board application. Configuring NGINX from scratch can be difficult, but the official Laravel docs have a pretty good configuration. Follows is the code copied from the docs:
server {
listen 80;
server_name 104.248.157.172;
root /srv/question-board/public;

add_header X-Frame-Options "SAMEORIGIN";
add_header X-Content-Type-Options "nosniff";

index index.php;

charset utf-8;

location / {
    try_files $uri $uri/ /index.php?$query_string;
}

location = /favicon.ico { access_log off; log_not_found off; }
location = /robots.txt  { access_log off; log_not_found off; }

error_page 404 /index.php;

location ~ \.php$ {
    fastcgi_pass unix:/var/run/php/php7.4-fpm.sock;
    fastcgi_param SCRIPT_FILENAME $realpath_root$fastcgi_script_name;
    include fastcgi_params;
}

location ~ /\.(?!well-known).* {
    deny all;
}
}
You don’t have to make any changes to this code except the first two lines. Make sure you’re using the IP address from your server as the server_name , and the root is pointing to the correct directory. You’ll replace this IP address with a domain name in a later section.
Also, inside the location ~ \.php$ { } block, make sure that the fastcgi_pass directive is pointing to the correct PHP version. In this demonstration, I’m using PHP 7.4, so this configuration is correct. If you’re using a different version, like 8.0 or 8.1, update the code accordingly.
If you cd into the /etc/nginx directory and list out the content using the ls command, you’ll see two folders named sites-available and sites-enabled.
The sites-available folder holds all the different configuration files serving applications (yes, there can be multiple) from this server.
The sites-enabled folder, on the other hand, contains symbolic links to the active configuration files. So if you do not make a symbolic link of the /etc/nginx/sites-available/question-board file inside the sites-enabled folder, it’ll not work. To do so, execute the following command:
sudo ln -s /etc/nginx/sites-available/question-board /etc/nginx/sites-enabled/question-board
sudo rm /etc/nginx/sites-enabled/default
The second command gets rid of the default configuration file to avoid any unintended conflict. To test if the configuration code is okay or not, execute the following command:
sudo nginx -t
If everything’s alright, reload the NGINX configuration by executing the following command:
sudo nginx -s reload
If you visit your server IP address, you’ll see that NGINX is serving your application correctly but the application is throwing a 500 internal server error.
As you can see, the application is trying to write to the logs folder but fails. It happens because the root user owns the /srv/question-board directory, and the www-data user owns the NGINX process. To make the /srv/question-board/storage directory writable by the application, you’ll have to alter the directory permissions.
Configuring Directory Permissions
There are different ways of configuring directory permissions in a Laravel project but, I’ll show you the one I use. First, you’ll have to assign the www-data user that owns the NGINX process as the owner of the /srv/question-board directory as well. To do so, execute the following command:
sudo chown -R :www-data /srv/question-board
Then, set the permission of the /srv/question-board/storage to 755, which means read and execute access for all users and write access for the owner by executing the following command:
sudo chmod -R 775 /srv/question-board/storage
Finally, there is one more subdirectory that you have to make writable. That is the /srv/question-board/bootstrap/cache directory. To do so, execute the following command:
sudo chmod -R 775 /srv/question-board/bootstrap/cache
If you go back to the server IP address now and refresh, you should see that the application is working fine.
Installing and Configuring MySQL
Now that you’ve successfully installed and configured the NGINX web server, it’s time for you to install and configure MySQL. To do so, install the MySQL server by executing the following command:
sudo apt install mysql-server -y
After the installation process finishes, execute the following command to make your MySQL installation more secure:
sudo mysql_secure_installation
First, the script will ask if you want to use the validate password component or not. Input “Y” as the answer and hit enter. Then, you’ll have to set the desired level of password difficulty. I recommend setting it as high. Although picking a hard-to-guess password every time you want to create a new user can be annoying, but for the sake of security, roll with it. In the next step, set a secure password for the root user. You can put “Y” as the answer for the rest of the questions. Give the questions a read if you want to.
Now, before you can log into your database server as root, you’ll have to switch to the root user. To do so, execute the following command:
sudo su
Log into your database server as root by executing the following command:
mysql -u root
Once you’re in, create a new database for the question board application by executing the following SQL code:
CREATE DATABASE question_board;
Next, create a new database user by executing the following SQL code:
CREATE USER 'nonroot'@'localhost' IDENTIFIED BY 'password';
Again, I used the name nonroot to clarify that this is a non-root user. You can use whatever you want as the name. Also, replace the word password with something more secure.
After that, provide the user full privilege of the question_board database to the newly created user by executing the following SQL code:
GRANT ALL PRIVILEGES ON question_board . * TO 'nonroot'@'localhost';
In this code, question_board.* means all the tables of the question_board database. Finally, quit the MySQL client by executing the \q command and exit the root shell by invoking the exit command.
Now, try logging in as the nonroot user by executing the following command:
mysql -u nonroot -p
The MySQL client will ask for the password. Use the password you put in when creating the nonroot user. If you manage to log in successfully, exit the MySQL client by executing the \q command.
Now that you have a working database server, it’s time to configure the question board project to make use of it. First, cd into the /srv/question-board directory and open the env file using the nano text editor:
cd /srv/question-board
sudo nano .env
Update the database configuration as follows:
DB_CONNECTION=mysql
DB_HOST=localhost
DB_PORT=3306
DB_DATABASE=question_board
DB_USERNAME=nonroot
DB_PASSWORD=password
Make sure to replace the username and password with yours. Save the file by pressing Ctrl + O and exit nano by pressing Ctrl + X key combination. To test out the database connection, try migrating the database by executing the following command:
php artisan migrate --force
If everything goes fine, that means the database connection is working. The project comes with two seeder classes, one for seeding the admin user and another for the categories. Execute the following commands to run them:
php artisan db:seed --class=AdminUserSeeder
php artisan db:seed --class=CategoriesSeeder
Now, if you visit the server IP address and navigate to the /questions route, you’ll see the list of categories. You’ll also be log in as the admin user using the following credentials:
email: [email protected]
password: password
If you’ve been working with Laravel for a while, you may already know that it is common practice to add new migration files when there is a database change. To automate the process of running the migrations on every deployment, open the /sbin/post-deploy script using nano once again and append the following line at the end of the file:
php artisan migrate --force
The –force option will suppress an artisan warning about running migrations on a production environment. Unlike migrations, seeders should run only once. If you add new seeders on later deployments, you’ll have to run them manually.
Configure Laravel Horizon
The question board project comes with Laravel Horizon pre-installed and pre-configured. Now that you have Redis up and running, you’re ready to start processing jobs.
The official docs suggest using the supervisor program for running Laravel Horizon on a production server. To install the program, execute the following command:
sudo apt install supervisor -y
Supervisor configuration files live within your server’s /etc/supervisor/conf.d directory. Create a new file /etc/supervisor/conf.d/horizon.conf and open it using the nano text editor:
sudo touch /etc/supervisor/conf.d/horizon.conf
sudo /etc/supervisor/conf.d/horizon.conf
Update the file’s content as follows:
[program:horizon]
process_name=%(program_name)s
command=php /srv/question-board/artisan horizon
autostart=true
autorestart=true
user=root
redirect_stderr=true
stdout_logfile=/var/log/horizon.log
stopwaitsecs=3600
Save the file by pressing Ctrl + O and exit nano by pressing the Ctrl + X key combination. Now, execute the following commands to update the supervisor configuration and starting the horizon process:
sudo supervisorctl reread
sudo supervisorctl update
sudo supervisorctl start horizon
To test out if Laravel Horizon is running or not, visit your server’s IP address and navigate to the /login page. Log in as the admin user and navigate to the /horizon route. You’ll see Laravel Horizon in the active state.
I’ve configured Laravel Horizon to only let the admin user in, so if you log in with some other user credential, you’ll see a 403 forbidden error message on the /horizon route.
One thing that catches many people off guard is that if you make changes to your jobs, you’ll have to restart Laravel Horizon to read those changes. I recommend adding a line to the /sbin/post-deploy script to reinitiate the Laravel Horizon process on every deployment.
To do so, open the /sbin/post-deploy using the nano text editor and append the following line at the end of the file:
sudo supervisorctl restart horizon
This command will stop and restart the Laravel Horizon process on every deployment.
Configuring a Domain Name With HTTPS
For this step to work, you’ll have to own a custom domain name of your own. I’ll use the questionboard.farhan.dev domain name for this demonstration.
Log into your domain name provider of choice and go to the DNS settings for your domain name. Whenever you want a domain name to point to a server’s IP address, you need to create a DNS record of type A.
To do so, add a new DNS record with the following attributes:
Type: A Record
Host: questionboard
Value: 104.248.157.172
Make sure to replace my IP address with yours. If you want your top-level domain to point to an IP address instead of a subdomain, just put a @ as the host.
Now go back to your server and open the /etc/nginx/sites-available/questionboard config file using the nano text editor. Remove the IP address from the server_name directive and write your domain name. Do not put HTTP or HTTPS at the beginning.
You can put multiple domain names such as the top-level domain and the www subdomain separated by spaces. Save the configuration file by pressing Ctrl + O and Ctrl + X key combination. Reload NGINX configuration by executing the following command:
sudo nginx -s reload
Now you can visit your application using your domain name instead of the server’s IP address. To enable HTTPS on your application, you can use the certbot program.
To do so, install certbot by executing the following command:
sudo snap install --classic certbot
It is a python program that allows you to use free SSL certificates very easily. After installing the program, execute the following command to get a new certificate:
sudo certbot --nginx
First, the program will ask for your email address. Next, it’ll ask if you agree with the terms and agreements or not.
Then, It’ll ask you about sharing your email address with the Electronic Frontier Foundation.
In the third step, the program will read the NGINX configuration file and extract the domain names from the server_name directive. Look at the domain names it shows and press enter if they are all correct. After deploying the new certificate, the program will congratulate you, and now you’ve got free HTTPS protection for 90 days.
After 90 days, the program will attempt to renew the certificate automatically. To test the auto-renew feature, execute the following command:
sudo certbot renew --dry-run
If the simulation succeeds, you’re good to go.
Configuring a Firewall
Having a properly configured firewall is very important for the security of your server. In this article, I’ll show you how you can configure the popular UFW program.
UFW stands for uncomplicated firewall, and it comes by default in Ubuntu. You’ll configure UFW to, by default, allow all outgoing traffic from the server and deny all incoming traffic to the server. To do so, execute the following command:
sudo ufw default deny incoming
sudo ufw default allow outgoing
Denying all incoming traffic means that no one, including you, will be able to access your server in any way. The next step is to allow incoming requests in three specific ports. They are as follows:
Port 80, used for HTTP traffic.
Port 443, used for HTTPS traffic.
Port 22, used for SSH traffic.
To do so, execute the following commands:
sudo ufw allow http
sudo ufw allow https
sudo ufw allow ssh
Finally, enable UFW by executing the following command:
sudo ufw enable
That’s pretty much it. Your server now only allows HTTP, HTTPS, and SSH traffic coming from the outside, making your server a bit more secure.
Laravel Post-deployment Optimizations
Your application is now almost ready to accept requests from all over the world. One last step that I would like to suggest is caching the Laravel configuration, views, and routes for better performance.
To do so, open the /sbin/post-deploy script using the nano text editor and append the following lines at the end of the file:
php artisan config:cache
php artisan route:cache
php artisan view:cache
Now, on every deployment, the caches will be cleared and renewed automatically. Also, make sure to set the APP_ENV to production and APP_DEBUG to false inside the env file. Otherwise, you may unintentionally compromise sensitive information regarding your server.
Conclusion
I would like to thank all Laravel developers for the time they’ve spent reading this article. I hope you’ve enjoyed it and have learned some handy stuff regarding application deployment. If you want to learn more about NGINX, consider checking out my open-source NGINX Handbook with tons of fun content and examples.
Also, if you want to broaden your knowledge of Laravel, you can check the Laravel vs Symfony, the Laravel Corcel, and Laravel Blockhain articles.
If you have any questions or confusion, feel free to reach out to me. I’m available on Twitter and LinkedIn and always happy to help. Till the next one, stay safe and keep on learning.
 It’s no secret that the ammunition market has been volatile (to say the least) since the Covid pandemic took hold, but some calibers seem to be easing off while others rise. Redditor, Chainwaxologist, owns a web-based hunting and fishing retail store, FoundryOutdoors.com, so to keep his ammo cost and supply competitive, he set out to […]
 It is a common use case to synchronize data in two tables inside MySQL servers. This blog post describes one specific case: how to synchronize data between two different tables on the same MySQL server. This could be useful, for example, if you test DML query performance and do not want to affect production data. After few experiments, tables get out of sync and you may need to update the test one to continue working on improving your queries. There are other use cases when you may need to synchronize the content of the two different tables on the same server, and this blog will show you how to do it.