http://img.youtube.com/vi/OdxH1KZbjOY/0.jpg
Babylon Bee: “We Asked AI To Simulate If The U.S. Had A Second Civil War.”
Here are the results:
Lawrence Person’s BattleSwarm Blog
Just another WordPress site
http://img.youtube.com/vi/OdxH1KZbjOY/0.jpg
Babylon Bee: “We Asked AI To Simulate If The U.S. Had A Second Civil War.”
Here are the results:
Lawrence Person’s BattleSwarm Blog
https://www.ammoland.com/wp-content/uploads/2026/06/AR-15-Rifle-Scott-Witner-500×281.jpg

The Supreme Court of the United States issued a landmark ruling in Wolford v. Lopez that struck down Hawaii’s so-called “vampire law,” but the decision’s impact extends far beyond that single victory. The opinion provides crucial clarification that lower courts cannot employ certain procedural strategies to evade rulings against restrictive gun control measures.
On the surface, Wolford addresses whether private property owners must post “gun welcome” signs before individuals may lawfully carry firearms on their premises. However, like many other landmark Second Amendment decisions, Wolford transcends this narrow issue. It delivers important guidance on how courts must properly apply the constitutional framework established in Bruen and Heller.
The most significant clarification is that courts may no longer shoehorn gun-control reasoning into Step One of the Bruen analysis.
Step One focuses strictly on the plain text of the Second Amendment. If the regulated individual is part of “the people” and the arm in question is “bearable,” the conduct is presumptively protected. Liberal courts have repeatedly attempted to dismiss cases at this early stage by asserting that certain popular arms, such as AR-15-style rifles, fall outside constitutional protection.
The Wolford decision firmly rejects this tactic, making clear that such maneuvering cannot be used to bypass Step Two’s historical-tradition analysis.
In Footnote 1, Associate Justice Amy Coney Barrett wrote: “No one disputes that the Second Amendment’s text has a fixed meaning that must be satisfied before a law is deemed presumptively unconstitutional.” She noted the disagreement centers on whether courts can improperly import additional limits from regulatory tradition into the plain-text inquiry. “The answer is and always has been no.”
Associate Justice Samuel Alito reinforced the two-step structure from Bruen, emphasizing that courts must first determine whether the challenged law implicates the core protections of the Amendment regarding “the people,” “keep[ing],” and “bear[ing]” Arms.
Another common tactic courts have used to uphold “assault weapons” bans is to claim that firearms like AR-15s are not “in common use” specifically for self-defense. In Heller, the Court held that arms in common use cannot be banned, yet anti-gun courts have tried to append “for self-defense” to narrow that protection. This strained interpretation has been deployed to justify not only bans on commonly owned rifles but also restrictions on magazines and other accessories.
Wolford firmly rejects this reasoning. It clarifies that the Second Amendment protects “weapons customarily used for offensive or defensive purposes,” not merely those carried for self-defense.
Heller never intended to confine the right to a narrow self-defense test; rather, it safeguards arms for all lawful purposes. Wolford confirms that bearable arms in common use are protected regardless of whether they are handguns or other types of firearms. A defensive firearm is one someone might carry outside the home for self-defense, such as a pistol that millions of Americans carry every day. Firearms kept mainly inside the home can be used for defensive purposes, but they can also be used legally for offensive purposes, such as clearing a house in case of an intruder. Also, guns like AR-15s can be used for hunting. This is not a defensive purpose. It is an offensive purpose.
Wolford makes it clear these arms are protected under the Second Amendment and deviates from the anti-gun idea that the primary function of a gun must be for self-defense to be protected by the Second Amendment. Since many anti-gun defendants have argued that the Second Amendment only applies to firearms that are primarily used for self-defense, their arguments now fall short.
Thanks to this ruling, anti-gun courts will face significantly greater difficulty in upholding unconstitutional restrictions. By closing off these procedural loopholes, Wolford strengthens the Second Amendment’s safeguards and ensures more faithful application of constitutional text and history.
This opinion will have lasting ramifications far beyond Hawaii’s “vampire rule,” providing a powerful tool for defenders of the right to keep and bear arms across the country for years to come.
About John Crump
Mr. Crump is an NRA instructor and a constitutional activist. John has written about firearms, interviewed people from all walks of life, and on the Constitution. John lives in Northern Virginia with his wife and sons, follow him on X at @right2bear, or at www.crumpy.com.

AmmoLand Shooting Sports News
https://belderbos.dev/images/og/build-minimal-ai-agent-python.png
Everybody talks about agents, and a lot of people assume they’re some new kind of model. They aren’t. An agent is a small amount of plumbing around an LLM you already understand. Let’s build one from scratch in Python and see exactly what that plumbing is.
An agent is: Model + Instructions + Memory + Tools + Execution Loop.
Five parts. None of them is magic. The model is a brain in a jar: useful, fast, but stateless. It generates text; the code around it decides what to do with that text. That second half is the entire job and it’s code we can reason about.
I made the same argument about the control layer being the real product. Here it is as a program.
Start with the model. A real one calls an LLM API; we use a fake one that satisfies the same interface:
from dataclasses import dataclass
from typing import Protocol

@dataclass(frozen=True)
class Say:
 text: str

@dataclass(frozen=True)
class Call:
 tool: str
 arg: str

Reply = Say | Call

class Model(Protocol):
 def respond(self, system: str, history: list[str]) -> Reply: ...
The Model protocol has a single method, respond, which takes the system prompt and the conversation history and returns a Reply. It’s a Protocol, so any object with a matching respond method counts as a Model, no inheritance required.
For this minimal agent, the Reply type captures the two actions we support: say something to the user, or call a tool with an argument. The model is free to return either one, and the agent will execute it. (Real models can also emit plans, ask clarifying questions, or request several tool calls at once; we keep it to two to stay legible.)
The agent’s entire decision space is those two variants. The match in the loop below reads as a clean two-way branch, one case per reply, instead of a tangle of flags.
from dataclasses import dataclass, field
from typing import Callable

Tool = Callable[[str], str]

@dataclass
class Agent:
 model: Model # 1. Model
 system: str # 2. Instructions
 history: list[str] = field(default_factory=list) # 3. Memory
 tools: dict[str, Tool] = field(default_factory=dict) # 4. Tools
In this example, a tool is a function taking a string and returning a string. The agent holds the other four parts as plain fields:
Model protocol: a fake model goes in for testing and a real one for production.The part that turns a well-instructed chatbot into something agent-like is the fifth piece: an execution loop that lets the model observe outcomes and decide what to do next. Observe, think, act, check, repeat. Greatly simplified, of course, but this is the piece that does the work.
Because the model is stateless, the agent must keep track of what happened and feed the history back into the model until the model decides the job is done.
 def run(self, user_input: str) -> str:
 self.history.append(f"user: {user_input}")
 while True: # real agents cap the iterations; see termination guards below
 match self.model.respond(self.system, self.history):
 case Say(text):
 self.history.append(f"agent: {text}")
 return text
 case Call(tool, arg):
 fn = self.tools.get(tool)
 result = fn(arg) if fn else f"no such tool: {tool}"
 self.history.append(f"tool[{tool}]: {result}")
 # loop again: the model sees the result and decides what's next
Read it as the cycle:
There is no separate "check" block in the code. The check happens implicitly when the loop restarts and calls respond again with the new history. That step is the one that matters, because a model has no native sense of when a job is finished, and nothing stops it from asking for one more tool forever. The loop keeps going until the model returns Say instead of Call.
To run the whole thing without an API key, swap in a fake model and a real tool:
from pathlib import Path

def read_file(path: str) -> str:
 try:
 return f"{len(Path(path).read_text())} bytes"
 except OSError as e:
 return f"error: {e}"

class FakeModel:
 def respond(self, system: str, history: list[str]) -> Reply:
 last = history[-1] if history else ""
 if last.startswith("tool["):
 return Say(f"Done: {last}")
 if last.startswith("user: read "):
 return Call("read_file", last.removeprefix("user: read ").strip())
 return Say("I can read files. Try: read <path>")
Wire it into a small main that builds the agent, reads a line, calls agent.run, and prints the reply:
def main() -> None:
 agent = Agent(
 model=FakeModel(),
 system="You can read files.",
 tools={"read_file": read_file},
 )
 while True:
 try:
 line = input("> ")
 except EOFError:
 break
 print(agent.run(line.strip()))

if __name__ == "__main__":
 main()
Now you can talk to it with no API key. Run it with python agent.py and type at the prompt:
> read pyproject.toml
Done: tool[read_file]: 76 bytes
That one exchange is a complete agent loop: the model asked for a tool, the loop ran it, fed the byte count back, and the model wrapped up on the second pass. The main thing standing between it and a real one is replacing FakeModel.respond with an HTTP call that returns the same Reply.
The whole thing as one runnable file is here as a GitHub gist. Save it, run python agent.py, and type at the prompt.
Sure, this is a simplified example, and the hard parts are exactly what FakeModel stubs out: prompt design, retries, tool schemas, context compaction, error recovery, and termination guards that stop the loop when a model keeps hallucinating tools. But the core of an agent is 60 lines and easy to reason about. The engineering lives in the control layer around the model.
Build the loop by hand once and frameworks stop feeling magical. LangChain’s agent executor, AutoGen’s shared memory, a coding agent’s plan mode are all variations on these same five parts: engineering tradeoffs, not magic.
Planet Python
https://theawesomer.com/photos/2026/06/the_price_is_right_t.jpg

Dallas Taylor’s Inside Sound goes behind the scenes of TV shows and musicals to learn how they capture the show’s audio. In this episode, broadcast mixer Henry Muehlhausen takes us on a tour of The Price Is Right. Along the way, we see where they hide microphones and a look at the game show’s iconic set pieces, including The Big Wheel and Plinko.
The Awesomer
https://theawesomer.com/photos/2026/06/bluegrass_star_wars_t.jpg

Modern bluegrass band Punch Brothers yet again shows off their ability to bend genres, taking on The Empire’s ominous theme song on fiddle, mandolin, upright bass, acoustic guitar, and banjo. Concertgoer Bill Hutt captured crisp footage of this fantastic performance during a recent show at Archer Music Hall in Allentown, PA.
The Awesomer
https://datadock.devium.be/assets/og-image.png
Projects → environment folders → connections. Color-coded, encrypted at rest, shareable, with a read-only safe mode.
PostgreSQL · MySQL/MariaDB · SQLite · SQL Server · MongoDB · Redis · InfluxDB — all from one app.
Browse keys by prefix, inspect any value type, run raw commands — plus a realtime queue dashboard with framework auto-detect (Laravel/Horizon · BullMQ · Sidekiq · RQ · Celery).
Reach databases behind a bastion via private key, password or agent.
Paginate, sort, filter, inline- and bulk-edit — every change committed in a transaction.
Click-through foreign keys, a record Explorer, an interactive ER diagram and a dependency map.
Create/drop tables and edit columns, types, foreign keys & indexes — no hand-written DDL.
Multi-tab editor, schema-aware autocomplete, history, snippets, variables, formatter & EXPLAIN.
NL→SQL, explain, fix-with-AI and chat-with-your-data — Claude, Gemini, Mistral, Grok or Ollama.
Slow-query dashboard, index hints, pool diagnostics, table sizes & column search.
CSV · Excel · JSON · SQL · zipped whole-DB dumps · result → new table.
Anonymize columns with realistic fake data on export — safely copy production into a local database.
Databases, users & roles and a process list (with kill).
Dark / light themes, a ⌘K command palette and collapsible panels.
Laravel News Links
https://cdn-blog.adafruit.com/uploads/2026/06/2023-11-06_8df0f406c74fc.png.webp

Shared by Hamstah on MakerWorld:
A print-in-place planetary gear spinner that rotates freely straight off the plate. Two profiles included — standard and heavy outer ring (43g) for added inertia
Download the files and learn more

Every Thursday is #3dthursday here at Adafruit! The DIY 3D printing community has passion and dedication for making solid objects from digital models. Recently, we have noticed electronics projects integrated with 3D printed enclosures, brackets, and sculptures, so each Thursday we celebrate and highlight these bold pioneers!
Have you considered building a 3D project around an Arduino or other microcontroller? How about printing a bracket to mount your Raspberry Pi to the back of your HD monitor? And don’t forget the countless LED projects that are possible when you are modeling your projects in 3D!
3D printing – Adafruit Industries – Makers, hackers, artists, designers and engineers!
https://photos5.appleinsider.com/gallery/67946-143244-macosminecraft1-xl.jpg
Playing Minecraft is better with Bedrock, but it’s not directly available for macOS. Here’s how to get around the limitation and improve your building experience.
Minecraft is one of the longest-running online games that is still actively being played by a lot of people. Originally playable since 2009 and officially released in 2011, it has stood the test of time.
However, while it has been improved over the years, Mac gamers have missed out on one important update: Bedrock Edition. It’s a version that is available on many other platforms, but never made its way to macOS.
Though you can continue using the original Java version on Mac, it is possible to get Bedrock working. It takes a little work, a GitHub project, and buying the game from the Google Play Store.
The original version of Minecraft was made in Java, which enabled it to be easily ported to multiple platforms without much trouble. It’s also a version that is very easily modded by the community, without necessarily requiring permission from Microsoft beforehand.
However, the Java edition has a key issue, in that it’s not natively built for any specific platforms. It wasn’t really intended to build a game as complex as Minecraft at all.
As an interpreted language, Java has to be compiled into an intermediate "bytecode" format before being run by a Java Virtual Machine. This just-in-time interpretation means that processing performance is impacted directly compared to a compiled native version.
There is also the issue of the earliest iterations of Minecraft being developed by Markus "Notch" Persson, and later by his studio, Mojang. Eventually, Microsoft got involved with its purchase of the studio in 2014.

Tim Cook introduced Minecraft on Apple TV in 2016. It survived until 2018.
Since it was made by Notch alone at first, it meant that there were elements of code that he would be able to manage, but a team of developers would struggle with. After years of development, there was enough technical debt to prompt a rethink by those managing the game.
Cue the development of a C++ version, which started off with a demo of Pocket Edition in 2011. Over time, the codebase was expanded and improved upon, until it was rebranded as Bedrock Edition in 2022.
With that change, it became a more widely available version, including a release for Windows. The change also made it possible to create versions of Minecraft for other platforms, and for the games to more easily communicate with each other between different platforms.
The change also meant Microsoft could incorporate an in-game store, monetizing their expensive acquisition, as well as other elements.
While there’s Minecraft: Bedrock Edition for Windows, Xbox, PlayStation, Nintendo Switch, Android, and iOS, there is not a specific macOS version. You also can’t use the workaround of buying the iOS version and trying the iPadOS game in macOS, as that has been disabled.
There’s nothing wrong with sticking to the Java edition of Minecraft on your Mac, but there are ways to use the Bedrock edition. Just not by officially buying a macOS app.
A legitimate way of doing it is through using Windows on your Mac. Software like Parallels will let you run the Windows version of Minecraft Bedrock, but you again get that dreaded performance penalty.

Phases of installing the Minecraft Launcher
There’s also the possibility of sideloading an iOS or iPadOS version, but we’d rather not anger Apple with that method.
Another way is to use the Linux Minecraft Launcher. There’s a build available for macOS, which works using the Android version of the game.
If you happen to have a Google account with Minecraft Bedrock already on it, you can use that. If not, you will have to pay for it from the Google Play Store.
This can be a bit tricky if you don’t have an Android device on the account. By running the launcher and trying to download the game without the purchased version on your Google account, it will come up as a device under the Google Play Store.
Once completed, the game will run in a window, which you can make larger from the edges. There are also video settings available, both in a menu at the top and in the game’s settings.

You should see this if installing the Minecraft launcher goes correctly.
Feel free to push things like the draw distance and frame rate up, as well as the resolution. It’s arguably one of the best features of Bedrock edition over Java, and you can use it to the fullest on your Mac desktop.
Now, go mine some redstone.
AppleInsider News
https://planetscale.com/assets/see-what-your-database-is-doing-right-now-social-B8T8hdB0.png
Much of database debugging eventually turns into carefully inspecting what each connection is doing. In Postgres, this means watching pg_stat_activity in a loop. In Vitess, it means watching SHOW FULL PROCESSLIST the same way.
Tools like Query Insights are useful for exploring the recent history of queries. They can tell you what was slow, what’s consuming resources, and where to spend tuning effort.
But during an active incident, the questions are more immediate. What’s happening this second? Did the last thing I changed fix it?
Here’s a manual version of this workflow in Postgres:
SELECT pid, state, wait_event_type, wait_event,
 now() - xact_start AS tx_age,
 pg_blocking_pids(pid) AS blocked_by,
 left(query, 60) AS query
FROM pg_stat_activity
WHERE state <> 'idle'
ORDER BY tx_age DESC;
Run it over and over again in a terminal and it’s a pretty effective view of the database.
It’s also a rough interface.
You’re scanning rows as they move around, trying to reconstruct what’s blocking progress, and hunting for the one detail that actually matters for the fix.
The worst version of this problem is when you can’t connect at all because the database has exhausted all of its connections. You can’t fix what you can’t connect to.
That workflow shaped the design of Connections, a new feature of the pscale CLI available today for PlanetScale Postgres and Vitess (MySQL) databases.
Here’s that same debugging flow using the new pscale branch connections top functionality with a Postgres database, instead of pasting that pg_stat_activity query in a loop and comparing output:
pscale branch connections top <database> <branch>
Connections opens an interactive live view that refreshes about once a second and sorts the sessions most likely to matter toward the top. There are keyboard shortcuts to navigate the list of connections and inspect each one in more detail.
Columns in the list include the Process ID (PID), status, number of blocked queries, why they’re waiting, and more.
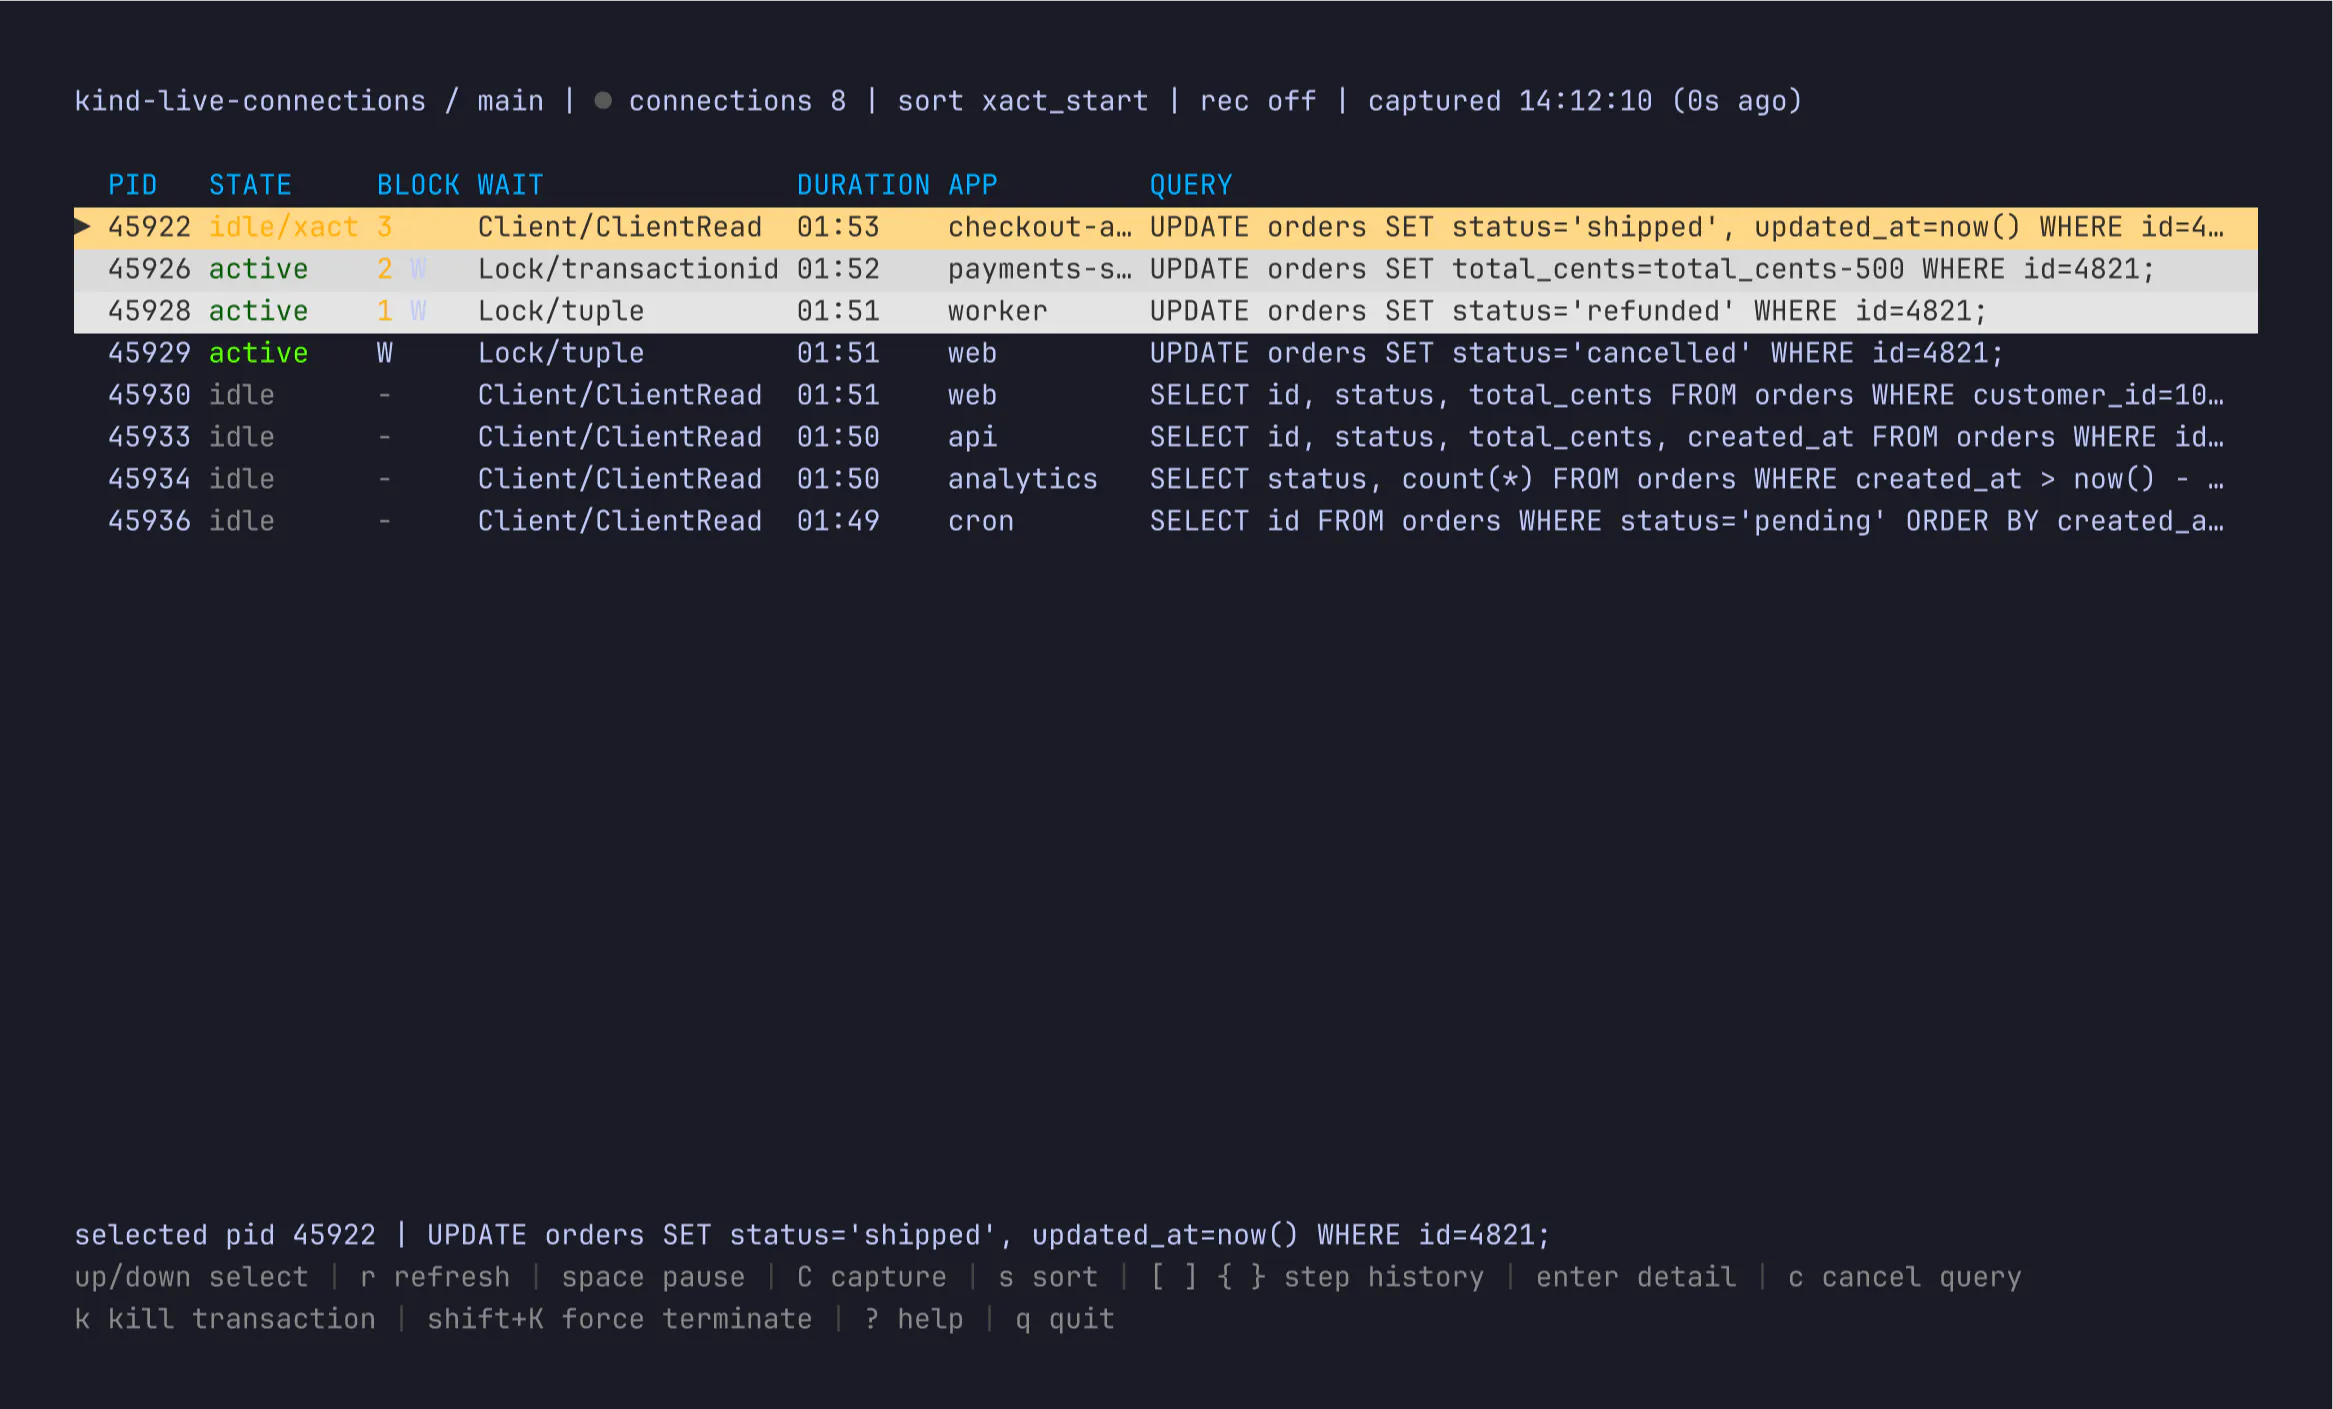
Say your writes are backing up and the app is timing out. In this example, an idle transaction from checkout-api is holding up three other writes. Open the row, and the blocker tree shows the queue behind it:
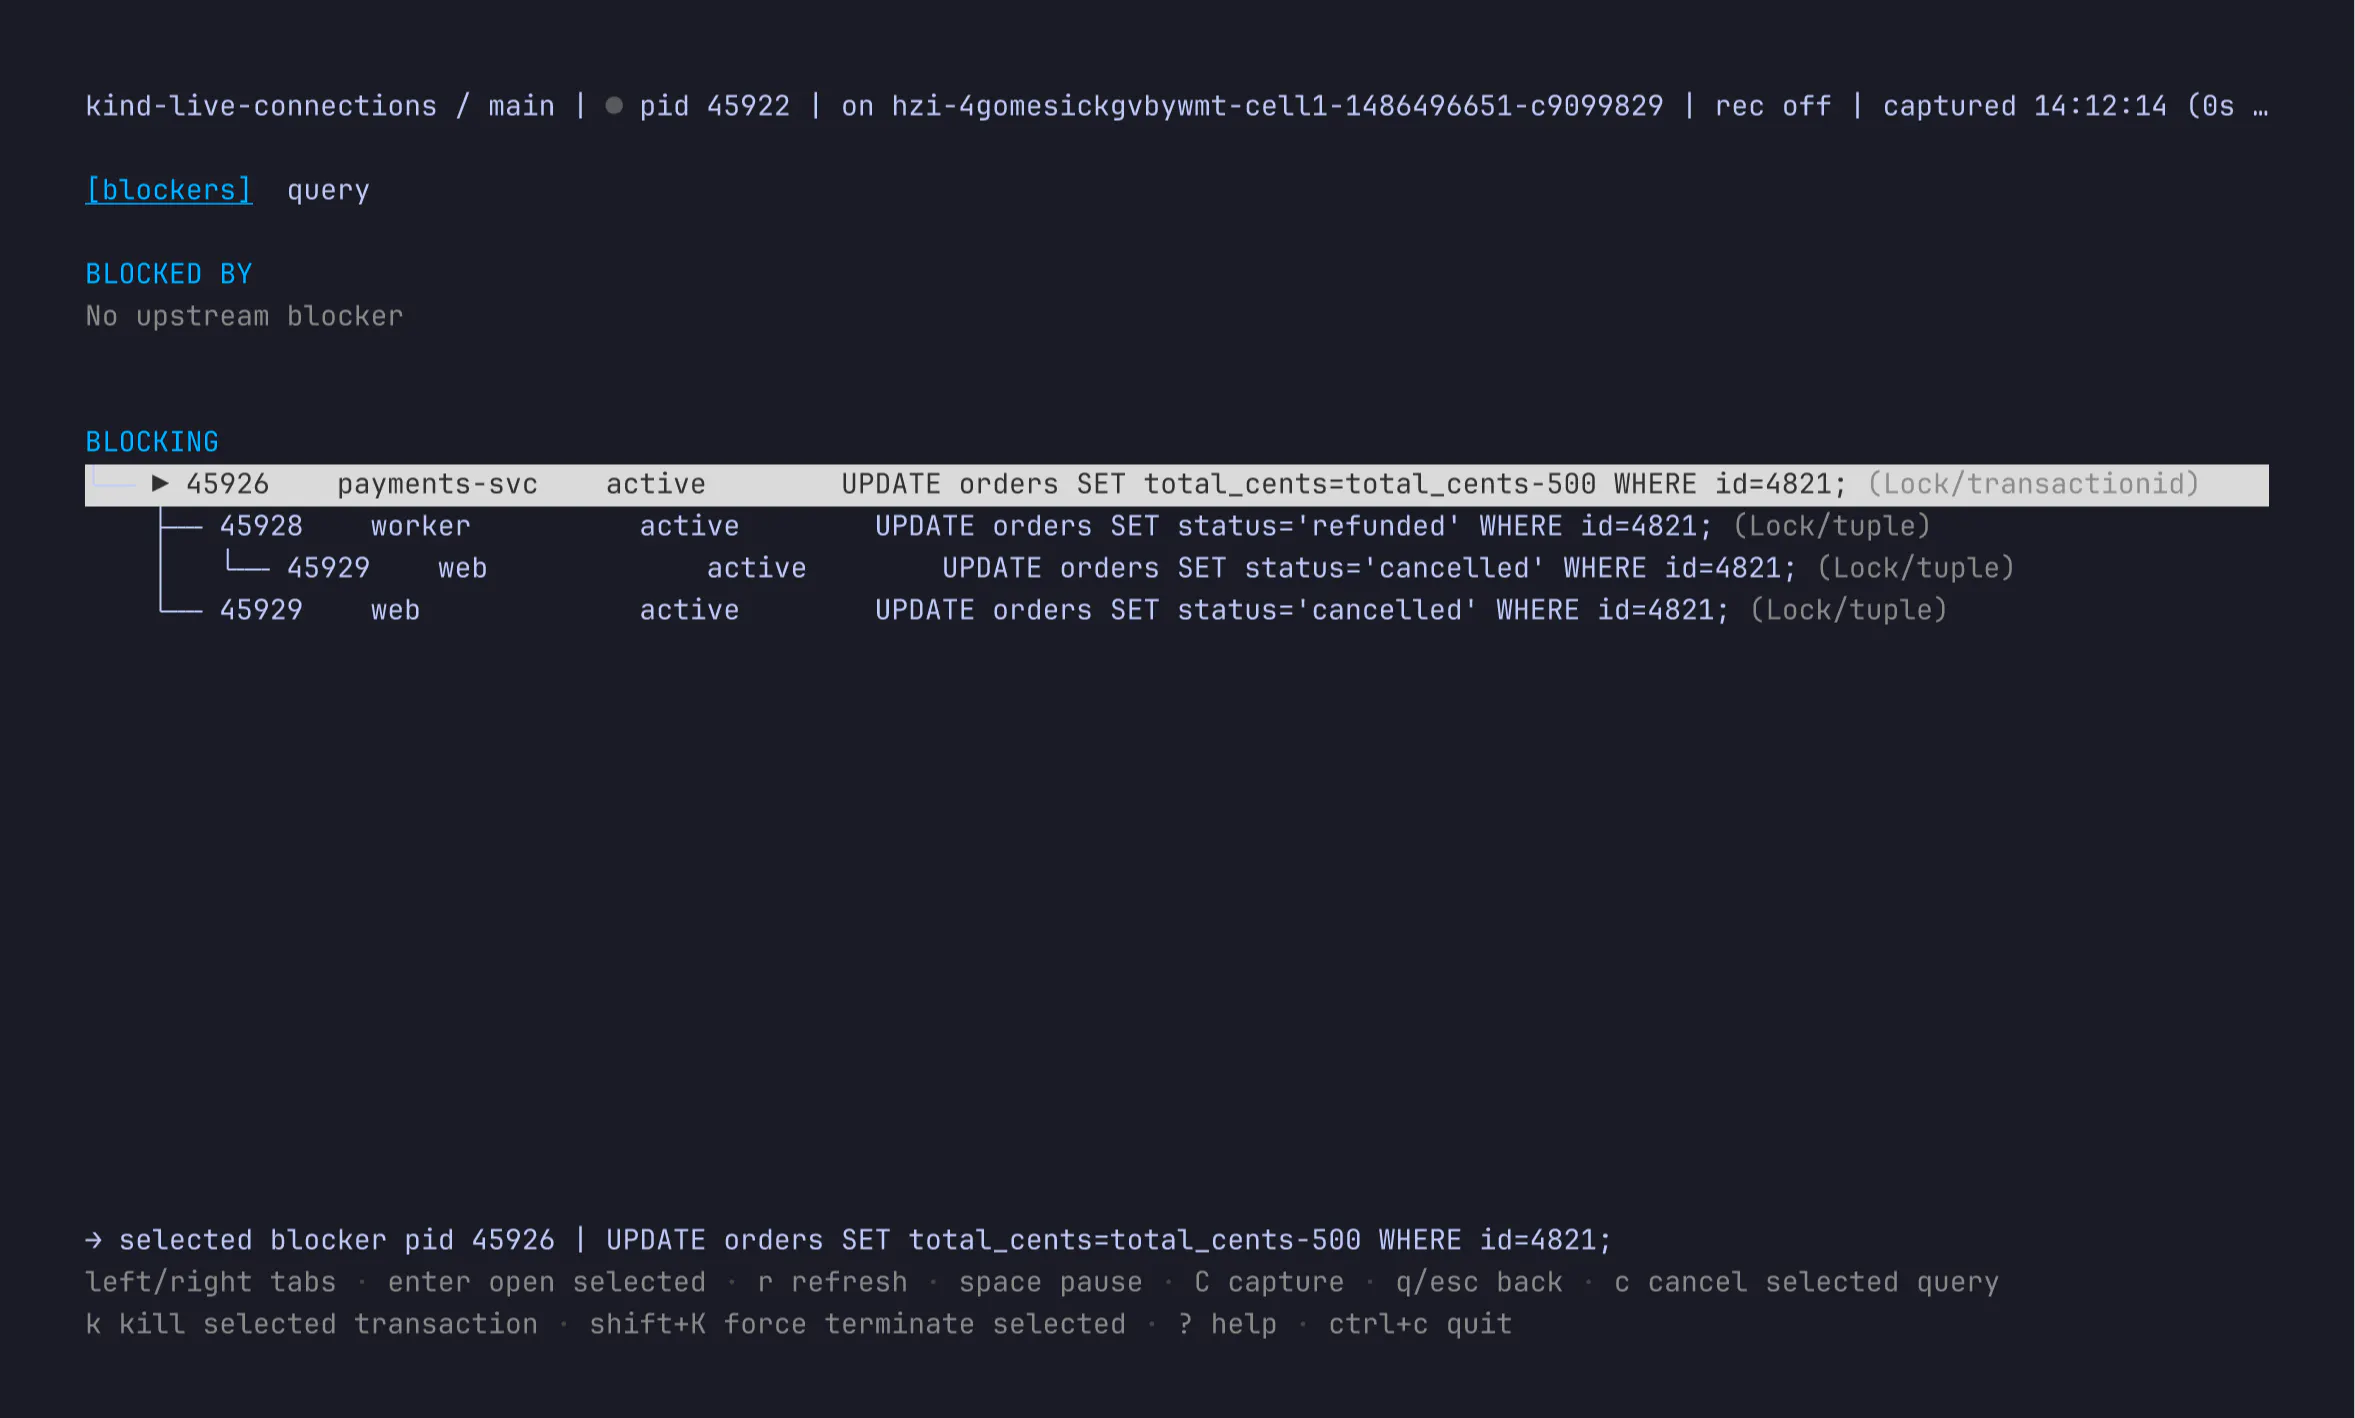
From there you can decide whether the right fix is to cancel a query or terminate the connection. You no longer need to remember the syntax of pg_stat_activity, retrace the blocker chain by hand or copy and paste PIDs around.
Another problem with running that query in a loop is that the interesting moment flies by. Connections keeps a recent rolling history, so you can pause, step forward and backward with [ and ], and see how the state has changed.
You can also capture a session to a file. You can record everything you see in Connections by pressing C. This includes the recent history already buffered in memory and keeps appending from there. Perfect for handing off logs to agents to assist with debugging.
That also makes it easier to write a postmortem, share what happened with a teammate, or replay the same view later instead of describing it from memory.
The stress of debugging an active incident is worse when you can’t even connect to the database yourself.
Connections uses a reserved administrative connection, so the inspection path still works when regular application connections are exhausted.
Managed databases should remove the need to SSH into a box, not remove your ability to debug an incident.
You can still get in, see what is running, and act from there.
The PlanetScale CLI’s new Connections feature also works with Vitess databases (MySQL). In this case, the live view is the PlanetScale version of watching SHOW FULL PROCESSLIST, with the ability to cancel the current query or terminate the connection from this unified interface.
The main difference is scope. Vitess connections are shown for one keyspace (and one shard) at a time. If a branch has multiple keyspaces, or a sharded keyspace, pass --keyspace and --shard to choose the tablet:
pscale branch connections top <database> <branch> --keyspace <keyspace> --shard <shard>
The same live monitoring, pause, history, capture, and replay workflow applies. The actions are MySQL-specific: canceling a query runs KILL QUERY, and terminating a connection runs KILL. See the Inspect live Vitess connections guide for the full command behavior.
Connections is available for PlanetScale Postgres and Vitess. Update to the latest version of pscale and run:
pscale branch connections top <database> <branch>
See the CLI reference, the Inspect live Postgres connections guide, and the Inspect live Vitess connections guide for more details.
Try it next time you need to troubleshoot active database connections.
Planet for the MySQL Community
https://cdn-fastly.thefirearmblog.com/media/2026/06/03/06061/potd-fischer-development-fd-silencer-one-click-to-robocop.jpg?size=720×845&nocrop=1
Austrian company Fischer Development has taken a notably different approach to pistol suppression. Where virtually every other suppressor on the market threads onto the barrel, the FD-Silencer mounts to the frame accessory rail: no barrel threading, no gunsmithing, no modifications to the weapon whatsoever. One click onto the rail and you’re done. I’ve tried it, and it works!
The result is a suppressor that looks like it was designed for a dystopian sci-fi franchise rather than a civilian shooting range, which is part of the appeal. Mounted on a Glock 17 or HK SFP9, the overall silhouette transforms the pistol into something Robocop or Judge Dredd would holster without a second thought. The FD-Silencer adds around 165mm in front of the muzzle and sits low along the frame, giving the whole package an unmistakably aggressive, angular profile.
The engineering is clever beyond the aesthetics. Because it doesn’t thread to the barrel, it works with subsonic and supersonic ammunition alike, doesn’t affect the point of impact, and lets you use your standard iron sights without any riser or adapter. The tradeoff is weight (at 380 grams, it’s a substantial addition), but for a range toy or a duty pistol in jurisdictions where suppressors are permitted, the no-modification approach is genuinely practical. Coverage includes the Glock 17, 19, 34, 45, and the HK SFP9, in black or FDE. Which one would you go for?
Fischer Development is based in Austria. Make of that what you will: Glock country producing a suppressor that makes a Glock look like it belongs in Old Detroit.
Photo by ScaarAT.
The Firearm Blog