Race tiny, real-life RC cars in ‘Mario Kart Live: Home Circuit’
https://ift.tt/3gZpDMS
Nintendo is celebrating the 35th anniversary of Super Mario Bros. with lots of truly wild announcements, but the most peculiar by far is a new Mario Kart game that only partially plays out on the Switch.
When it launches on October 16th, Mario Kart Live: Home Circuit will let racers steer tiny Mario-themed RC cars around their houses at (relatively) high speeds — meanwhile, cameras on those cars relay video back to the Switch, which overlays the track boundaries, item boxes and the rest of the usual accoutrements on top of the feed. The end result is one of the most physical manifestations of the Mario Kart experience since Nintendo sued that one go-kart touring company out of existence.
This is a decidedly unusual twist for the Mario Kart franchise, so it’s perhaps little surprise Nintendo had some outside help with this one. The game was developed in partnership with Velan Studios, a relatively young studio founded by Guha and Karthik Bala, who started Vicarious Visions in the early 90s.
To be absolutely clear, this is a real thing, and we’re here for it. For now though, some key details remain unclear. Players will be able to create tracks — even seemingly complex ones — by peppering their floors with "course gate markers" but the process hasn’t been fully fleshed out yet. (Presumably, at least some of the course design happens on the Switch.) And while Nintendo’s trailer shows off a slew of in-game opponents, we’ve only seen two actual RC cars, one for each of the Mario brothers. Whether you get both of those tiny, adorable race cars for the game’s $99 asking price is also unclear, but we’ll update this story as we confirm the details. In the meantime, consider joining us in taking a few minutes today to visualize how best to squeeze a series of hairpin turns into the kitchen.
Google Offering $400, Six-Month Online Certificate in UX Design, “the Equivalent of a Four-Year Degree”
https://ift.tt/32Uq3PB
In an effort to both boost the economy and train the types of workers they themselves need, Google will shortly be rolling out an ambitious initiative: Google Career Certificates, which one gains by taking their online courses, requiring "about six months to complete."
For a reported tuition of $300-$400, the company is betting they can teach you enough in a half-year’s time (rather than you having to attend a traditional university for four years) to land a job. And while you don’t have to apply for a job specifically with Google, pursuing it sounds advantageous: "At Google we will consider our new career certificates as the equivalent of a four-year degree for related roles," writes Kent Walker, Google’s SVP of Global Affairs.
Unsurprisingly there are no ID degrees on offer. The closest we could find to the Core77 wheelhouse was UX Designer.
User experience (UX) designers make technology easier and more enjoyable to use. They create or refine products and interfaces to make them useful, usable, and accessible to users.
This certificate teaches learners the foundations of UX design and research, building low-fidelity designs and wireframes, creating high-fidelity prototypes, and testing.
The median annual wage for UX designers: $75,000
Other fields and salaries mentioned are Data Analyst ($66,000), IT Support Specialist ($54,760), and Project Manager ($93,000). Google also mentions that enrolling in their Certificate program provides "access to career resources: Learners will have access to resources to facilitate their job search and interview preparation."
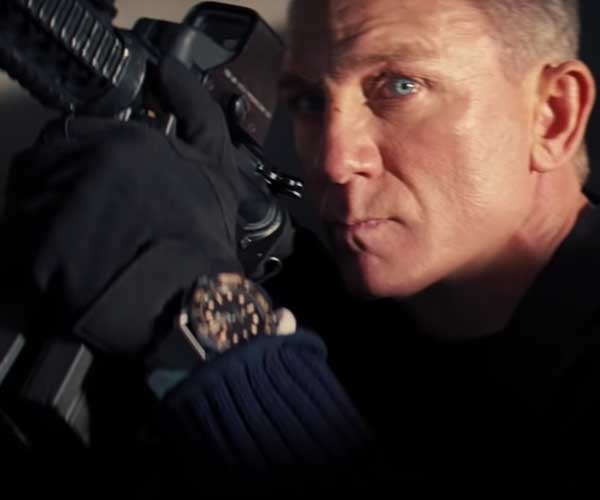
Daniel Craig’s final turn as 007 has been delayed until November 2020, but from the look of the intense action and stunt sequences in the latest trailer, it’ll be worth the wait. We also get a closer look at Rami Malek’s pockmarked face as the villainous Safin.
Before we dive into the new features in Laravel 8, let’s first pull in the latest version of the Laravel Installer tool. This new version includes the ability to generate the necessary Jetstream scaffolding when creating a Laravel app. Next, we’ll install a fresh copy of Laravel 8.
Westminster Abbey’s Hidden Gallery Space, Sealed to the Public for 700 Years
https://ift.tt/31zyVKY
Westminster Abbey is perhaps the UK’s most famous Gothic cathedral, with instantly-recognizable interior views like this:
One area of the church, however, may not look so familiar. The triforium, a walled interior space located 52 feet above the cathedral floor, was closed off to the public for some 700 years. The Abbey’s administrators used it for storage, and for seven centuries the space was unseen by the masses.
Recently, however, the decision was made to repurpose the triforium as a gallery, open to the public. Two years ago the space was rechristened the Queen’s Diamond Jubilee Galleries, hosting a rotation of 300 historical artifacts.
Providing physical access was initially an issue. Westminster Abbey’s construction began over 1,000 years ago, and because wheelchair access was not a design consideration in the year 960, in 2018 a modern exterior tower was constructed to house an elevator and stairs that the public could use to access the triforium. Designed by Ptolemy Dean Architects and fabricated by contractors McNealy Brown, the Weston Tower was the first structural element added to the building in 300 years.
And while Westminster Abbey was around for the Bubonic Plague back in the 14th century, it is of course currently closed on account of the current COVID pandemic. Once it, and London, opens back up, add the hidden gem of the triforium to your sightseeing bucket list.
Consider using subdomains for your app areas and also splitting routes in files. It’s not that difficult! 1. Put your domains in your “hosts” file 2. All route groups with respective domains 3. Session domain 4. php artisan serve –port=80@laravelphp@laravelnewspic.twitter.com/SnTuMSZYAk
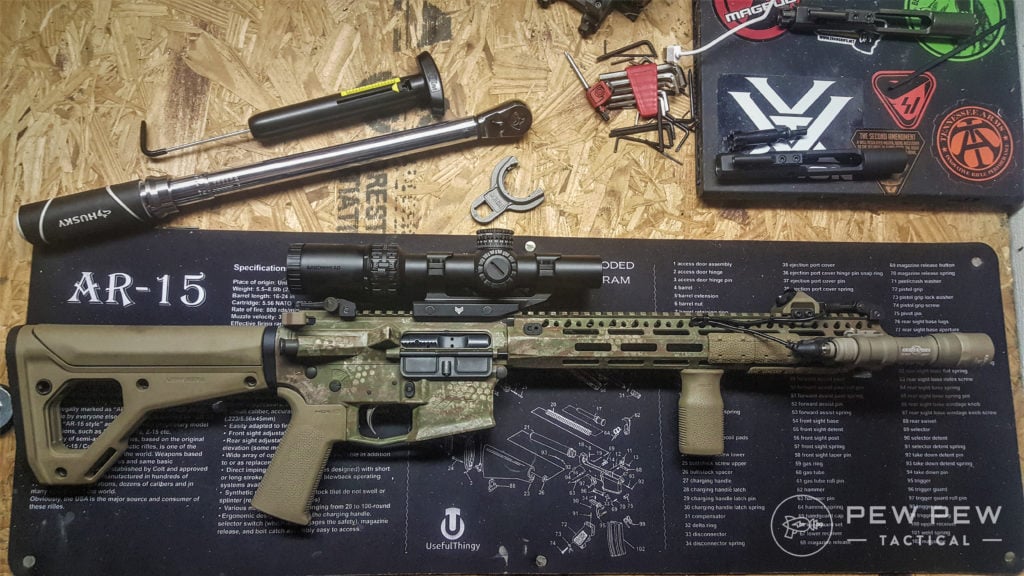
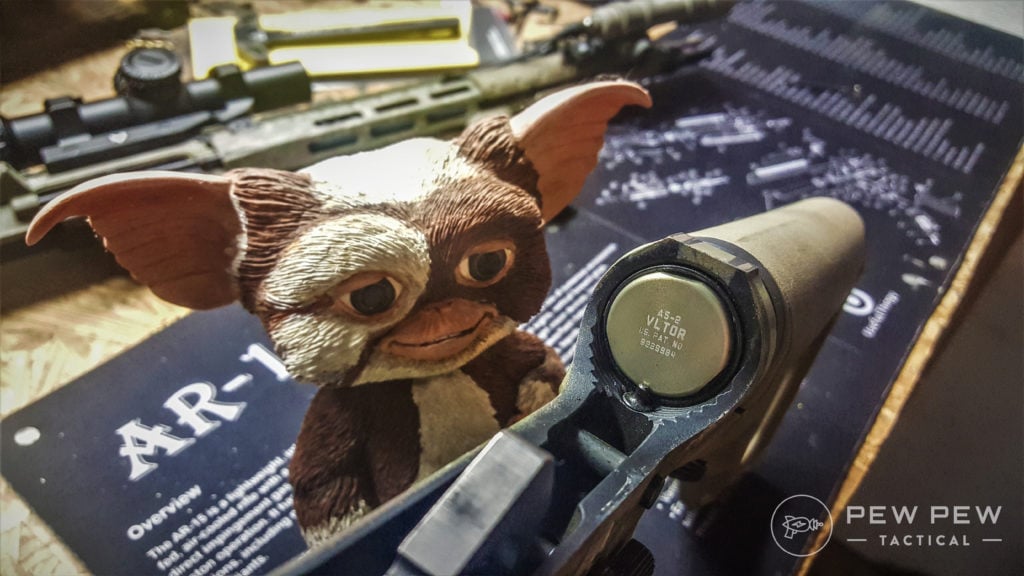
If you’ve been on any social media page devoted to the AR, you’re seeing a lot of hype over 13.7-14” barrels lately. The hype is real. It’s a versatile length for an AR for multiple reasons.
The final product!
But why would someone go with that size of barrel?
How can you run a sub-16” barrel with a stock, and not have to worry about NFA legislation and the $200 donation to the crown?
Let’s dig into my new favorite build, all the DIY “gunsmithing” options I performed, and how to pin and weld a muzzle device to bypass unconstitutional gun legislation like the National Firearms Act.
Table of Contents
Loading…
Reasons to Go Short
First and foremost, why go under 16” of barrel?
Simple.
Shorter is lighter, handier, and with a permanently attached muzzle device, you can keep the overall length of the barrel to legal minimum lengths. Velocity is still effective for a 300+ meter carbine as well.
A 16” barrel with a typical muzzle device adds length to the rifle overall. It may not seem like much, but shaving off 2”+ is noticeable when handling a rifle.
With a shorter handguard, it makes the rifle balance well while using a thumb over bore grip with your support arm.
It may not seem like much, but in your hands, there is a huge difference.
With the plethora of muzzle devices on the market that doubles as a suppressor mount, you can permanently attach a muzzle device to add overall length to a barrel that is 13.7-14.0”. The SOLGW NOX, the Dead Air Flashhider and Brake, and FCD options are just a few that will work.
If you plan on using a can on your rifle, this efficiently keeps the overall length shorter since most QD cans have the muzzle device inside of the blast chamber. For example, running a Sandman S becomes more manageable than a 16” barrel with a Key Mount from Dead Air.
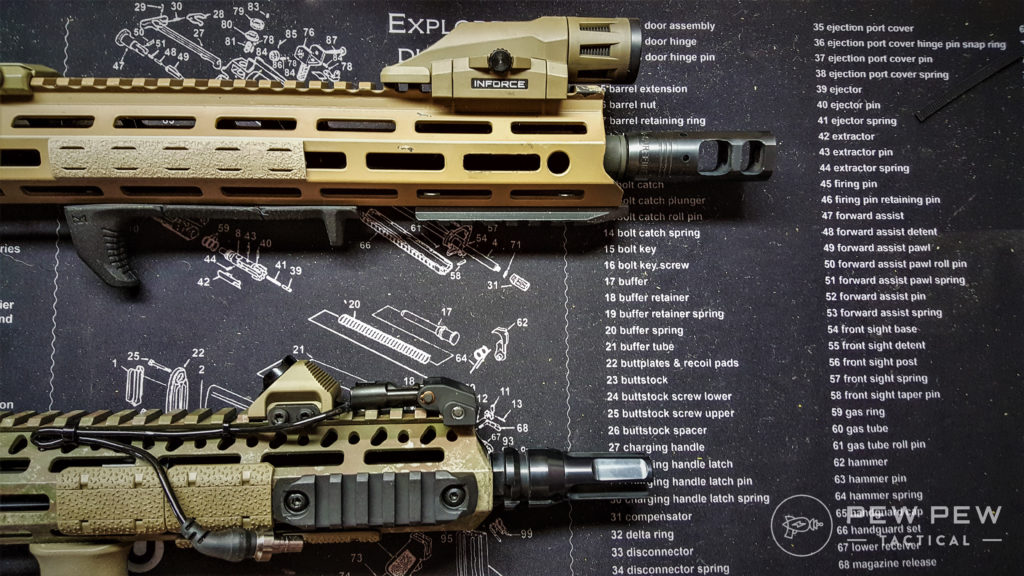
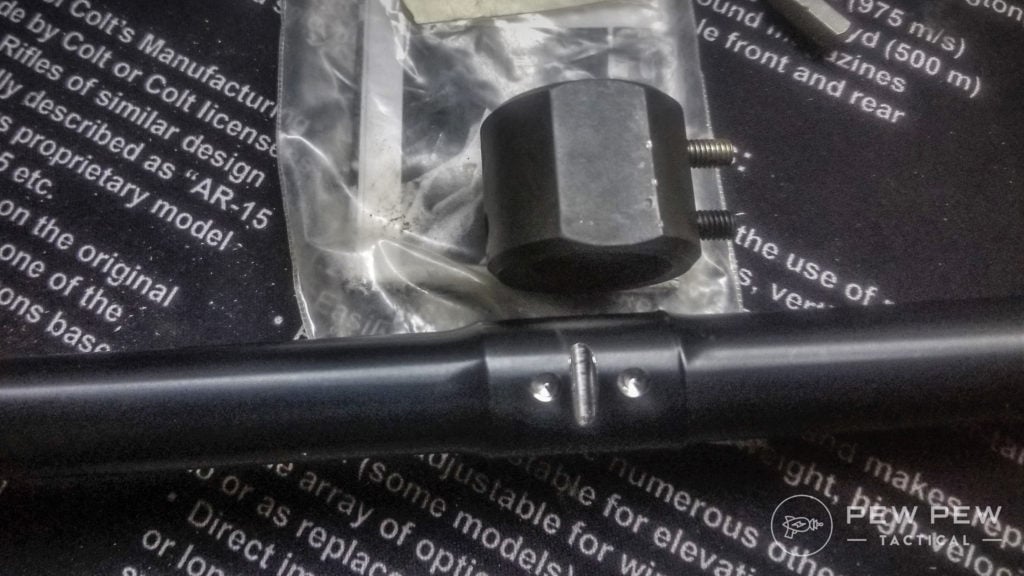
The barrel has a QPQ (nitride) finish with a FailZero nickel boron coated M4 barrel extension. It has a carbine gas length and comes predrilled to pin the gas block that is included.
Speaking of the predrilled and included gas block, I decided to take it a step further.
While the included roll pin would serve well in fixing the gas block to the barrel, I typically can’t leave well enough alone.
Nothing screams bomb-proof like a taper pinned gas block.
I decided to dimple the barrel for the gas block set screws and ream the drilled hole out with a 2/0 taper pin reamer. It’s easy to do with thejigs I purchased from Black Rifle Engineering.
If you build a few rifles, they are worth adding to your gunsmithing tools and make the process quick.
Dimpling a barrel is quick and painless with a BRD Engineering jig.
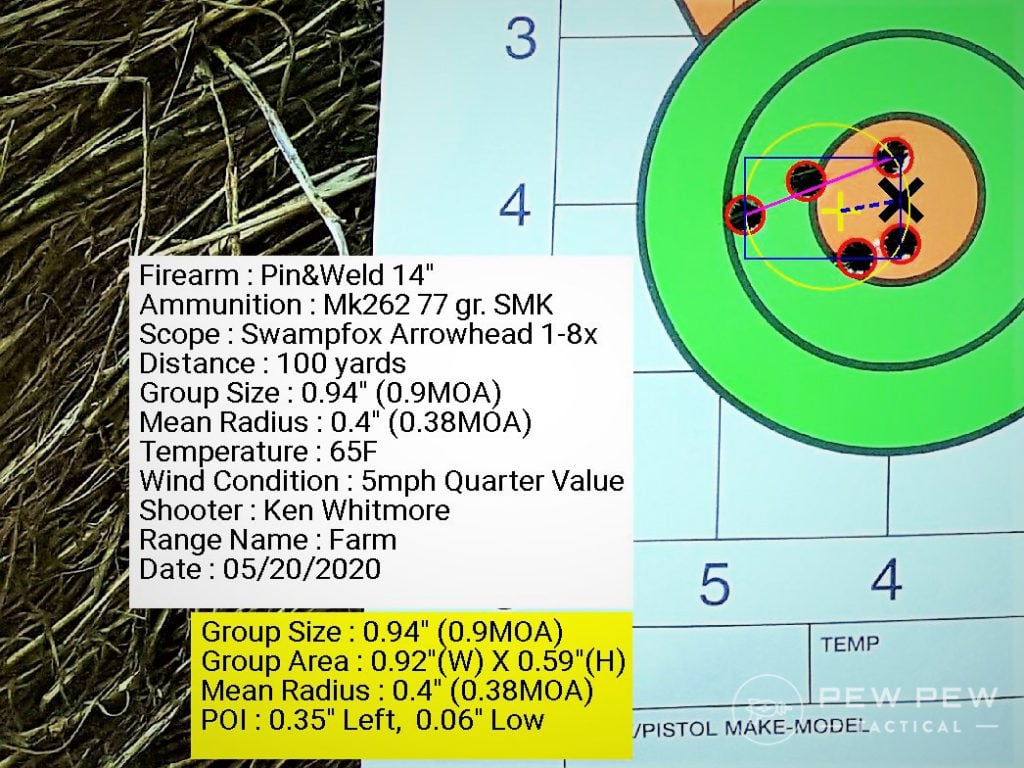
Like most BA Hanson barrels, accuracy is everything you’d expect. Its typically a sub-2MOA barrel, and when I do my part with match grade ammunition, the rifle will shoot consistently 1 MOA or under. It happens to prefer Mk262, and Remington 62 grain BTHPs.
Typical group at 100 yards with 77 grain SMKs.
The Pin and Weld
The dimpling didn’t end there.
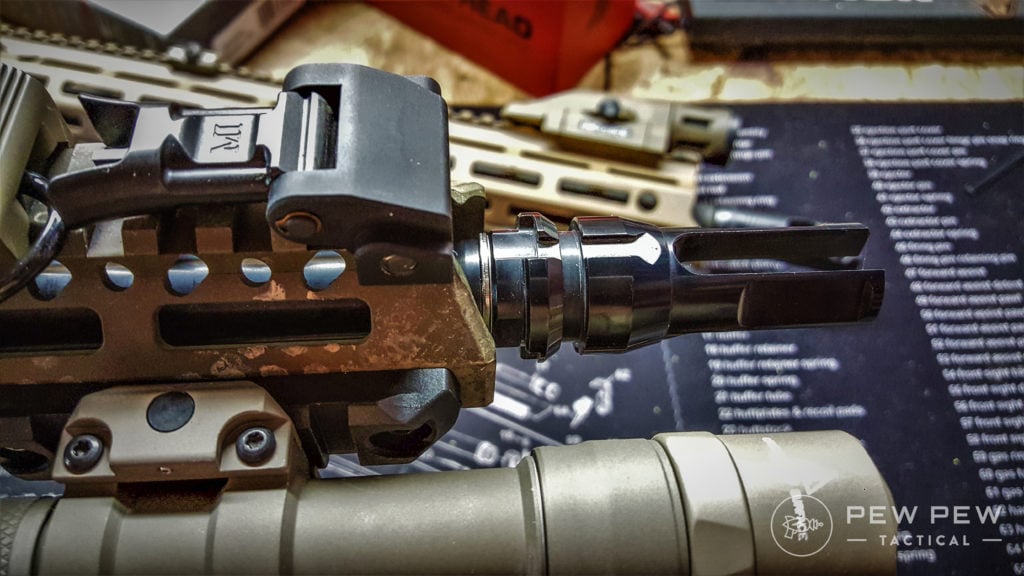
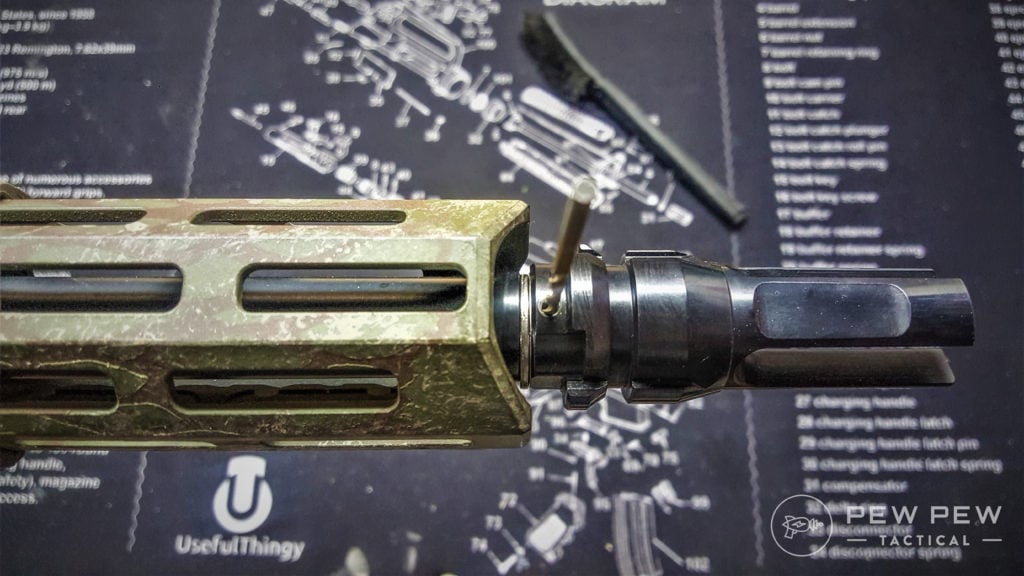
To make the 14” BA Hanson barrel legal to use with a stock, I needed to make the overall length at a minimum of 16”. I decided to go with the tried and true Dead Air Key Mount Flash Hider.
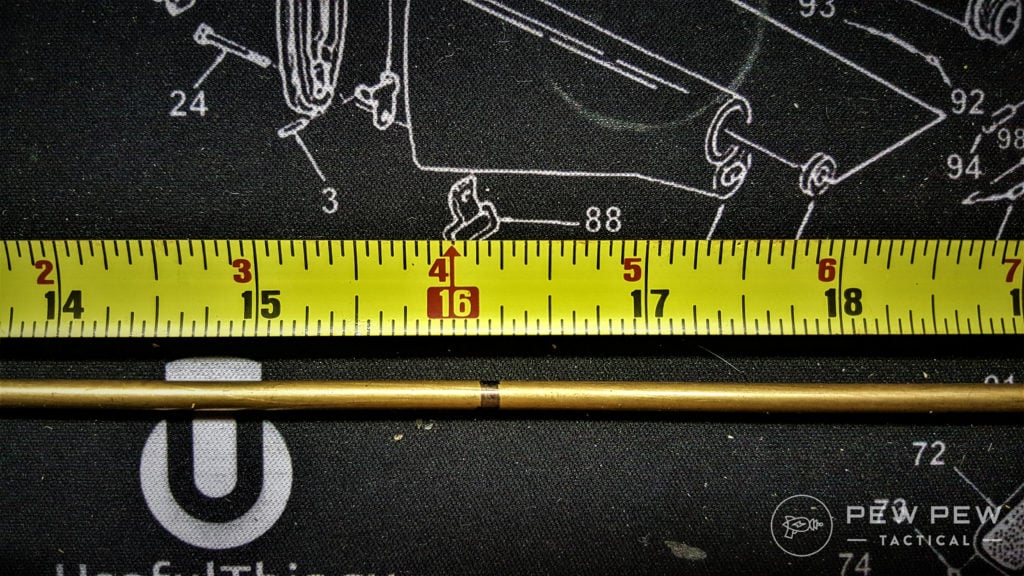
Before anything else is done, you need to verify that the overall barrel length is at least 16” to legally be a rifle. To measure the overall length, you must install the muzzle device and any shims needed for proper timing.
Muzzle device properly installed and timed with shims.
A simple cleaning rod pushed up against the bolt face and marked with a marker can give you an accurate measurement to verify a 16” overall length.
This is the ONLY WAY to measure overall length per ATF guidelines.
It must be measured from the BOLT FACE. Mine happened to measure at 16.125” with the shims.
Over 16” with a little wiggle room to be safe.
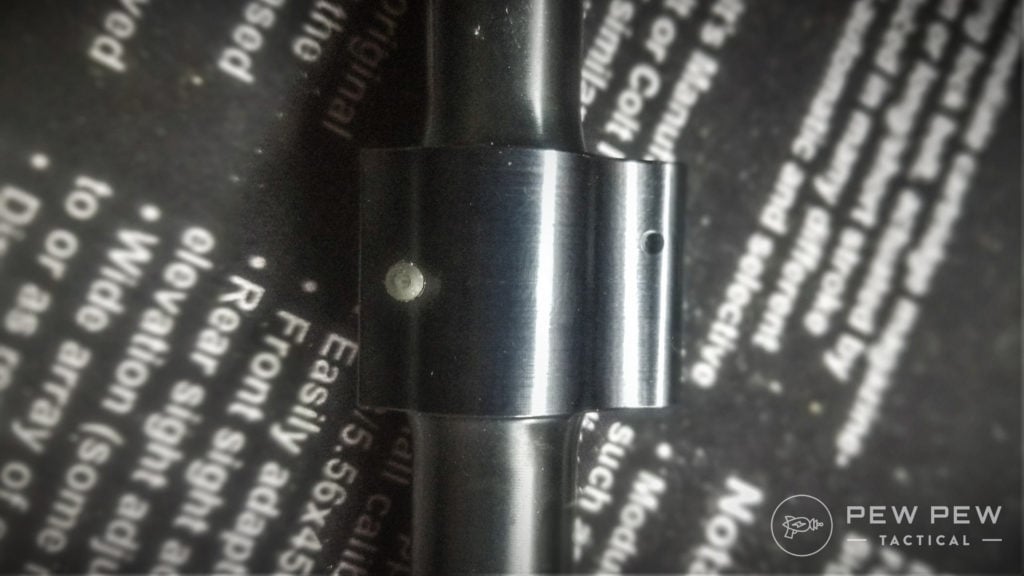
The Dead Air FH has a hole predrilled at the bottom of the muzzle device specifically for pinning. It is also sized perfectly to use a takedown pin detent to act as the pin.
The detent works perfectly since it is beveled, and you will need to dimple the threads of the muzzle for the pin.
Admit it. You have a bunch of these lying around because they are so easy to lose.
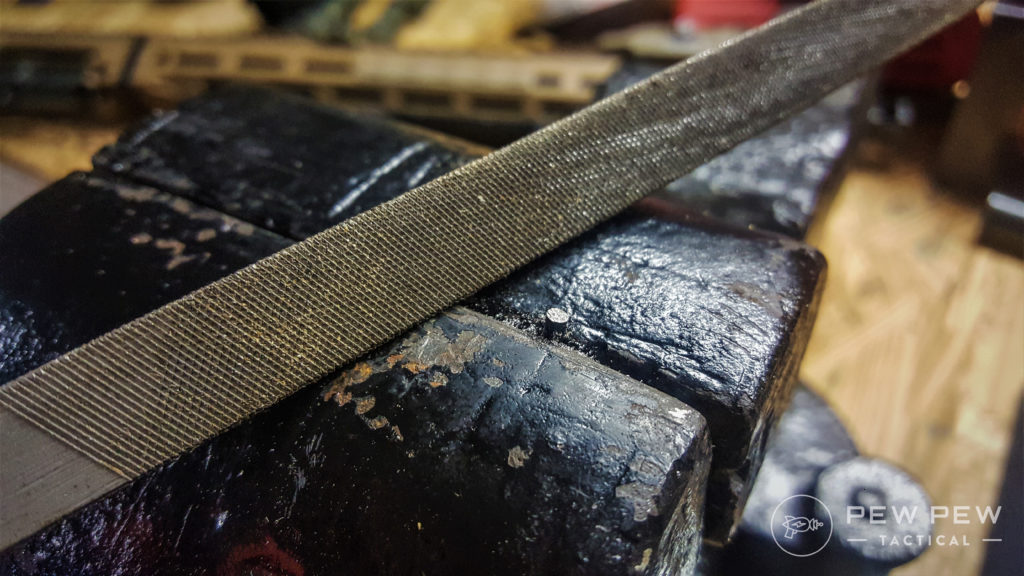
Dimpling the threads of the muzzle should be done slowly and methodically. The last thing you want to do is punch through the muzzle and create a hole. Just like a golfball, you only want to make a small dimple in the material for the pin to properly lock into place.
Using the predrilled hole as a guide, dimpling is easy if you take your time.
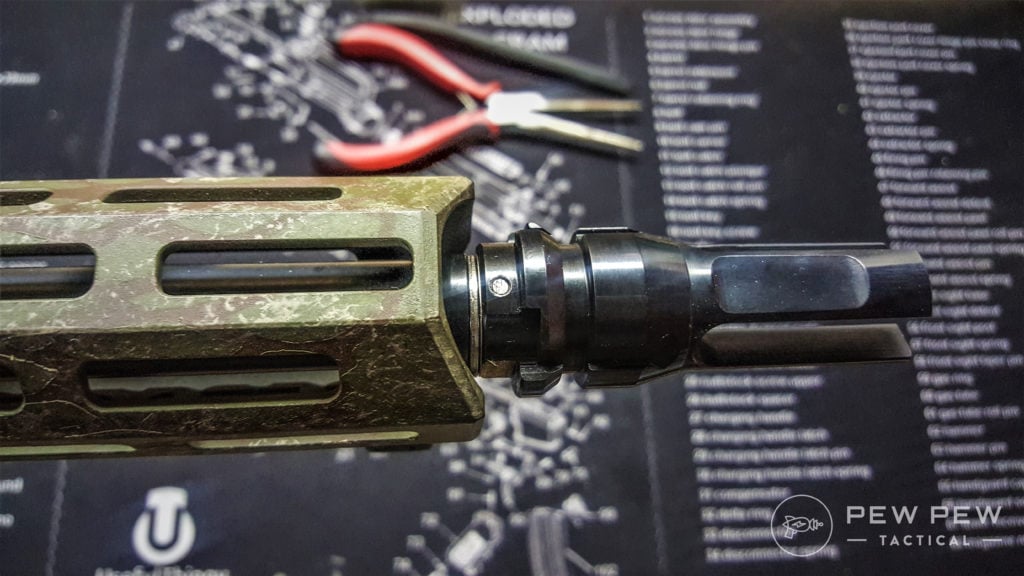
Once you have dimpled the barrel’s muzzle, all that is required for prep work is to size the pin. Dropping the pin into the hole will give you an idea of how short it needs to be. It’s a good idea to take a hammer and give the pin a few taps to make sure it’s fully seated into the dimple.
Sizing the pin is easy to do. Taking your time yields a cleaner result.
After marking for a cut, you can either file the pin down or use a small cut off wheel. I took my time and filed the pin down for a proper size. It takes a little extra time, but it makes for a perfectly sized pin for your weld. You want the pin barely shorter than flush with the outside of the muzzle device.
A properly sized pin, beveled nicely for the dimple, just before welding
I would also recommend countersinking around the hole. This allows the weld to pool which gives a cleaner look and won’t require as much grinding or clean up. I am by no means a welder, so I still cleaned the weld up a little. Some cold blue, or even some spray paint, will protect the exposed weld.
It won’t win any beauty awards, but my muzzle device is now permanently attached and legal.
For an excellent resource, check out IraqVeteran8888’s channel. They go through step by step on how to properly pin and weld a muzzle device, which helped me out a lot.
There are other ways to permanently fix a muzzle device. I prefer a pin and weld, but you can also silver solder the threads, or weld the seam where the muzzle device meets the shoulder of the barrel towards the muzzle.
Receivers and Handguard
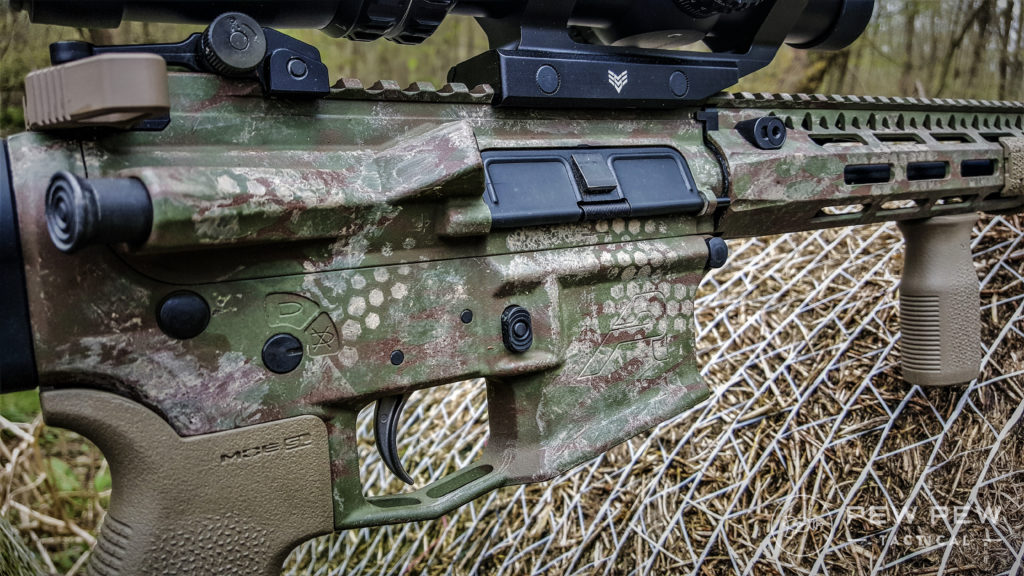
To stick with the blue-collar approach, I went with an Aero Precision M4E1 receiver set. I have yet to be disappointed with these receivers and they look great. When these receiver sets go on sale, it’s a great value for a budget-minded AR build.
The upper and lower receivers have a small amount of play between the two. It’s not enough to worry about, but a nice touch with the M4E1 lower is it has a tension screw to take out any slop between the receivers. I tightened mine up a little and it locks up like a bank vault.
For my handguard, I decided to go with a 13” Bravo Company MCMR. It measures at 13.4” to the end of the flare of the handguard, which should work perfectly for a near flush fit once I finally buy a Dead Air Sandman-S.
BCM MCMR handguards just might be my favorite go-to handguard. Installation can be a pain because of the tight tolerances for fitment, but in the end, it gives a shooter an impressively solid handguard for almost any condition. The hardware and anti-rotation tab provide for a perfect lock up at the barrel nut.
If you don’t rattle can an AR, do you even oper8?
To finish off the receivers, I played around with some templates and did a rattle can job. The stencil I used looked like a mixture of reptile scales and tree bark. I thought it was too dark at first, so I used a honeycomb pattern with desert sand to lighten it up.
The Guts
For a rifle you want to rely on, the guts are important. I went with a Sons of Liberty Gunworks Blaster Kit for all the small parts. Their detents and takedown pins are some of the smoothest I have used when building ARs. I chose a BCM PNT trigger and hammer and I have been happy with it at about 5.5 lbs pull weight.
The BCG that I chose was a Brownell’s phosphate model that is individually HPT and MPI. It uses a C158 steel bolt that is shot-peened. After lubing it up, this bolt hasn’t missed a beat.
I even sent it to Instructor Chad of the School of the American Rifle. Check out his video!
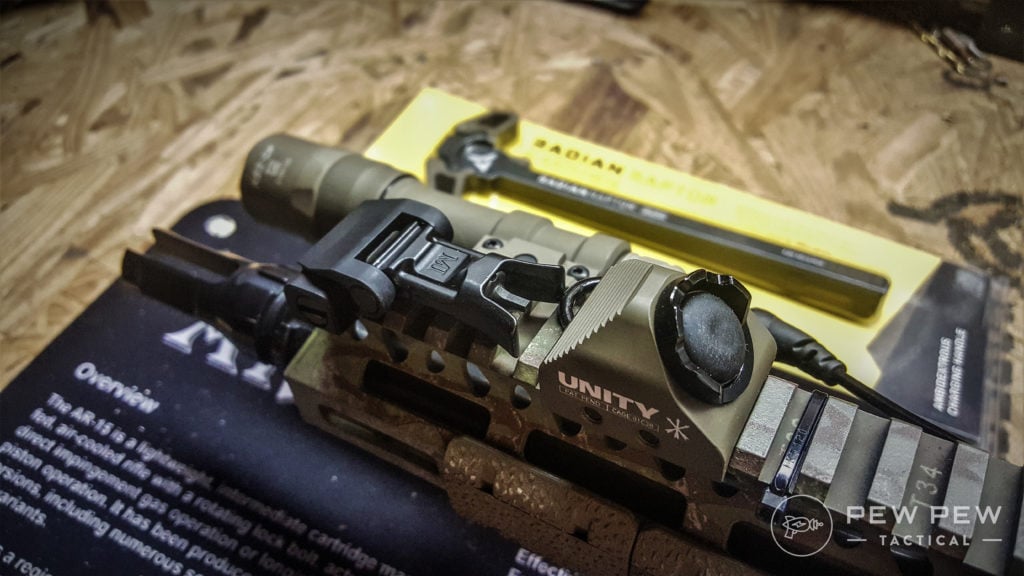
Properly buffering a carbine length gas system is important. I decided to go with the best and ordered a VLTOR A5H2 buffer using a green rifle length spring from Sprinco. These two go together like peanut butter and chocolate.
Best buffer in the business, the A5 system from VLTOR.
Overall, that pair housed in my Magpul UBR stock makes for a flat shooting rifle.
For a proper bang-around rifle, its settled science on three things to have on your rifle.
A weapon light must be mandatory for any defensive use.
You can’t shoot what you can’t identify.
An optic, whether red dot or LPVO provides a consistent aiming point regardless of lighting conditions. And lastly, a sling is like a holster to a handgun.
While you can get more candella with better throw from Modlite or Arisaka Defense, Surefire has been battle-tested and is an excellent light for defensive use.
The M600DF in conjunction with a Unity Hot Button makes for an ergonomic setup.
The optic I currently have on my rifle is the Swampfox Optics Arrowhead in a 1-8x. I tested, reviewed, and beat up the optic. Its FOV is excellent and works well on a defensive rifle set up with its bright reticle. Check out my review of the Arrowhead!
There are a lot of great slings out there, but I prefer the Blue Force Gear Vickers 2-to-1 Red sling. It’s quick to adjust, can convert into a 1-point sling if you like smashing your grapes, and comes with QD sling swivels. It’s simple, and that’s exactly why I love it.
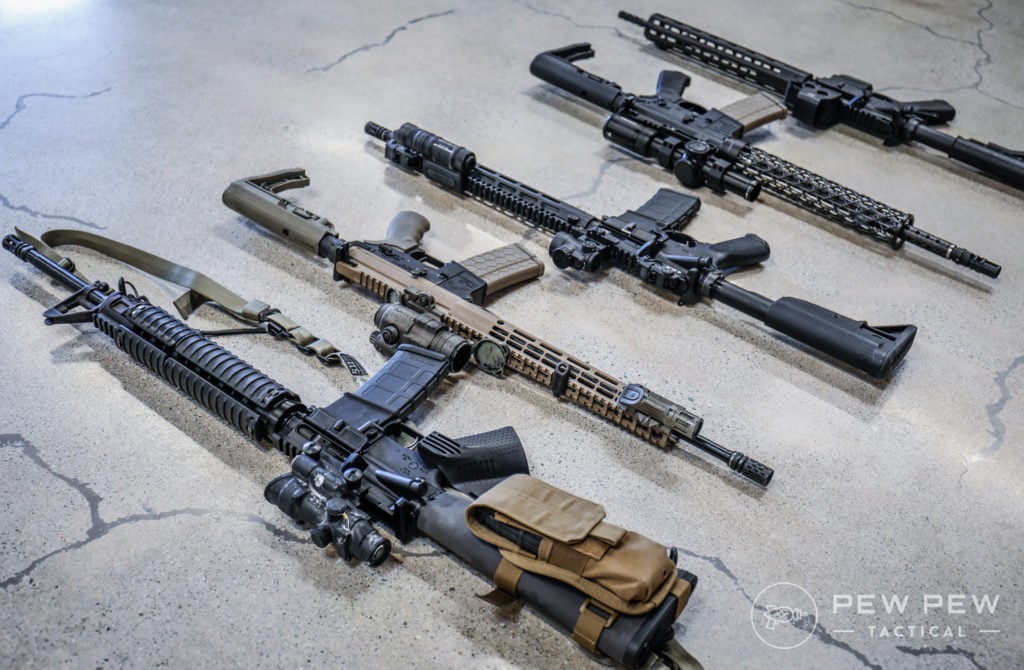
There are A LOT of great choices on the market to build your own blue-collar defensive rifle. These are just a few great choices to use.
Have you ever built a rifle for defensive use with a practical budget? Have you ever tried to pin and weld a muzzle device? Let us know in the comments below! Trick out your gat with the Best AR-15 Upgrades, stem to stern!
How to establish a startup and draw up your first contract
https://ift.tt/3je9Lb0
Founders are encouraged, incentivized and pressured to begin transacting with customers as quickly as possible to drive growth and revenue. But making legal mistakes early in the game can create costly liabilities down the road.
That’s why we invited James Alonso from Magnolia Law and Adam Zagaris from Moonshot Legal to join us at TechCrunch Early Stage to give us a 360 overview of the legal side of running a startup. We’ve shared highlights from their presentations below, along with a video of the entire panel discussion.
Corporate law 101 for startup founders
James Alonso gave us a presentation on company formation and getting funding. Maybe you’ve already created your startup, but if you’re still working on your own and don’t have any clients or employees yet, these tips are essential before you get your startup off the ground.
When you’re setting up a new company, it forces you to have a discussion about capital structure — who owns shares, how many shares and what kind of shares. There isn’t a single way to design a company on this front and we’ll look at some options later in this article. And because you’re starting a startup, you want to structure your company in a way that makes future financing easy.
Setting up a company also lets you put your IP in a single entity that you’re sharing with other shareholders. “One of the key things you’re doing when you’re forming a company is assigning the IP related to that company into a single entity that holds it all,” Alonso said.
Charged with moving the pistons in and out, a crankshaft is like the beating heart of an engine. While crankshafts need to be finished by machining, they start by forging and stamping steel, then twisting the molten metal to form the journals and counterweights that comprise this critical car part.