Every time there’s a mass shooting, gun owners routinely comment that we only wish there’d been a good guy with a gun there to stop the attack. Anti-gunners routinely scoff at such a suggestion, arguing that good guys with a gun don’t stop mass shootings.
Citizens, both armed and unarmed, successfully intervened in eight active shooter incidents over the last two years, according to a new report from the FBI.
The agency said the “selfless actions” of those who thwarted the attacks “likely saved many lives.” In total, the FBI recorded 943 casualties — 221 deaths and 722 injuries — across 50 mass shootings, including 20 in 2016 and 30 in 2017. All the shooters were male, ranging in age from 14 to 66, according to the report.
“The enhanced threat posed by active shooters and the swiftness with which active shooter incidents unfold support the importance of preparation by law enforcement officers and citizens alike,” the report concludes.
In one instance of citizen-involvement, an armed volunteer firefighter restrained a 14-year-old who opened fire at an elementary school playground in Townville, South Carolina, killing two and injuring three others. In another case, a citizen held an attacker at gunpoint inside a church in Antioch, Tennessee after he killed a person in the parking lot and wounded six others.
The most high profile was Stephen Willeford who famously stopped the shooter at Sutherland Springs last year.
However, what we see time and again is a simple statement that anti-gunners refuse to acknowledge. Guns save lives. They’ve saved an untold number of lives in just these eight incidents.
You never know when something like this is going to go down, which is why armed citizens are so important. The more places there are and the more of them there are, the greater the chance of an armed citizen being able to stop it.
The police, despite their best efforts and desires, simply can’t stop these things. They’re almost never in the right place at the right time. While I have little doubt that just about every police officer in the nation, with some exceptions, wouldn’t hesitate to rush into a such a situation, they don’t have the opportunity most of the time. By the time they get there, it’s too late for far too many people.
But an armed citizen can act. They can be there, ready to respond to the threat.
Meanwhile, anti-gun zealots spend all their time trying to disarm these people, the good people who put their lives on the line for their fellow man and fail to understand that the bad guys won’t stop. At most, they’ll shift weapons to something else. That’s only if they don’t know how to get their hands on firearms illegally, which many of them do.
It’s the armed citizen that stands against these atrocities. It’s also the armed citizen that is the one who will ultimately suffer for every policy proposed by anti-gun jihadis. Not that the anti-gunners care.
After all, in their minds, the good guy with a gun doesn’t exist, even though the FBI says otherwise.
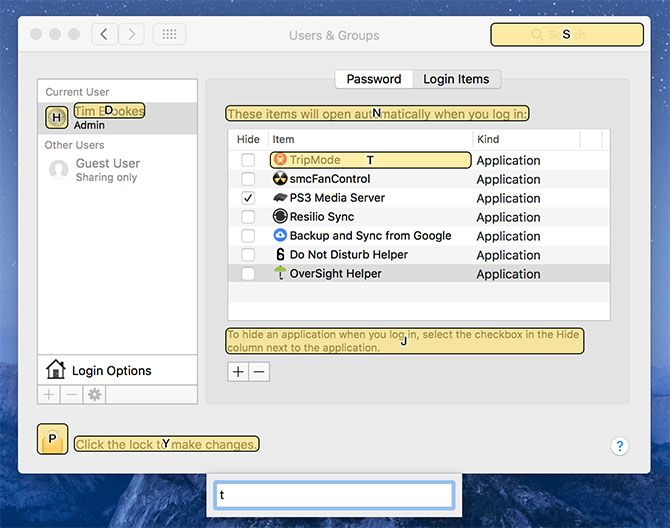
Do you want your Mac’s function keys back? Does the Caps Lock key seem like a waste of space? Would you rather put the unused right Shift key to better use?
If you’re looking for a way to customize basic keyboard behavior, add new shortcuts, remap keystrokes, or navigate quickly without reaching for your mouse, you can do it all with a few (mostly free) apps.
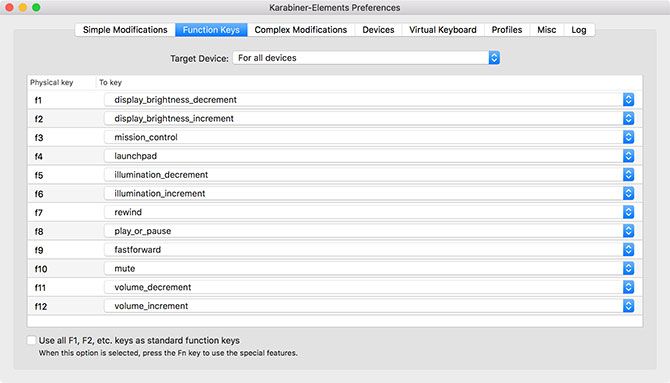
1. Karabiner-Elements
Previously known as “keyremap4macbook” and just “Karabiner” before that, Karabiner-Elements has been rebuilt for scratch specifically for macOS Sierra and above.
You can use it remap your entire keyboard, whether it’s a MacBook, Magic Keyboard, or third-party USB input. It can make simple modifications, like remapping one key to behave as if it was another, or make complex modifications based on rules of your choosing. Many of these rules are available for download so you don’t have to build them yourself.
Reclaim your function keys by disabling special functions like brightness and volume control. You can assign those media keys to entirely different functions, and apply the special functions to regular old keys—like Caps Lock or right Shift.
The app lets you set up profiles, apply your changes on a per-keyboard basis, or create blanket rules that affect all input devices. It’s one of those apps that you don’t need until you realize what it can do, and how much productivity you’ve been missing out on.
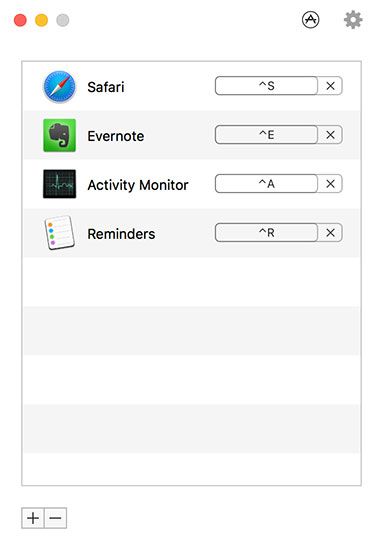
Thor is a simple lightweight tool for switching to the right application with a dedicated shortcut. The app’s beauty lies in its simplicity: pick an app, click Record Shortcut, and specify a combination of keys. Thor will instantly switch to or launch the app of your choosing when you trigger the shortcut.
You can quickly disable Thor by double-tapping a modifier key of your choosing. The worst part is deciding on which shortcuts to use. I found the Control key most useful, since it doesn’t get in the way like some of the other modifiers. Plus, shortcuts like Control + S for Safari or Control + E for Evernote are easy to remember.
There are other apps that can do what Thor does, but they’re usually far more complex and built around other functions. They’re also nowhere near as lightweight; Thor clocks in with a download size of 2.8MB from the Mac App Store.
Easily one of the most powerful apps of its kind on macOS, Keyboard Maestro provides a dizzying array of customization for those who need it. The app is built around the principle of triggers and actions, and its usefulness isn’t just limited to keystroke triggers either.
, allowing you to replace a trigger phrase like myname with a longer string like John Doe.
This is just the tip of what Keyboard Maestro can do, hence its $36 price tag. For your money you’ll get:
A fully-featured clipboard manager
AppleScript and XPath support
Window and mouse cursor manipulation
An application launcher and iTunes remote
Action-based macros, like the ability to open or delete specific files with a trigger
Touch Bar manipulation on the latest MacBook Pro
MIDI control, for triggering actions with MIDI input devices
Hundreds of actions and triggers
Fortunately, you can download Keyboard Maestro and try it out for yourself before you buy. If you’re an automation nerd, or simply looking for a way to trigger scripts, macros, and other desktop events, Keyboard Maestro is the ultimate app.
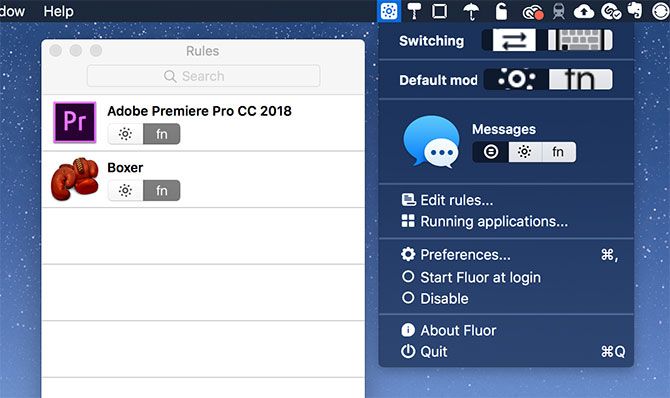
Just like Thor, Fluor is a simple app with a single goal: to define function key behavior depending on the currently active application. This is particularly handy when apps have a lot of keyboard shortcuts that require use of the function keys, or when playing games.
The app simply switches the behavior of the function keys, so in order to access the special (media) key functions, you have to hold the Fn key. You can create a custom set of rules for each app. Or you can activate an app, click on the Fluor icon in the menu bar, and select a preferred behavior.
It’s a great way to set up custom rules for particular apps, without having to pay for a more complex piece of software. This works best when used sparingly, so you don’t get confused about the default behavior when you hit a key.
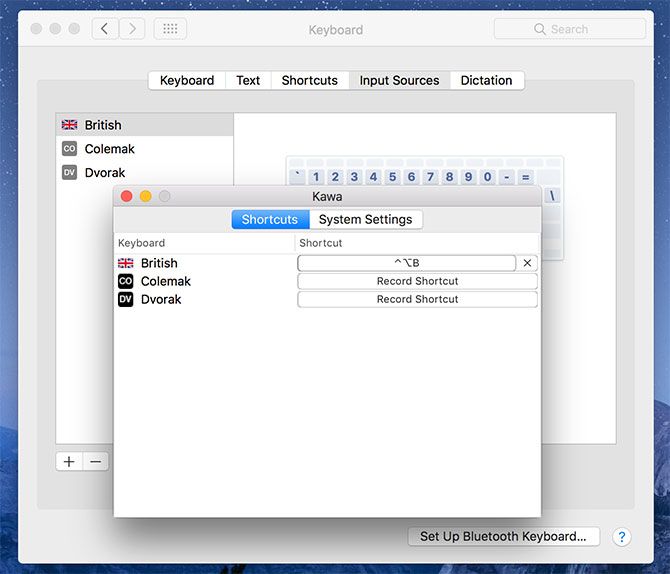
Another basic app with one purpose, Kawa lets you bind a keyboard shortcut to a particular language input. It was designed out of necessity by the developer who frequently switched between keyboard layouts.
macOS uses the Command + Space shortcut to switch between input sources, but adding a third complicates this. Kawa lets you record language-specific keyboard shortcuts which instantly change the input to that of your choosing.
For best results, enable Show Input menu in menu bar under System Preferences > Keyboard > Input Sources so you can quickly glance at your currently selected language. Unfortunately the app is unsigned, so you’ll need to circumvent Gatekeeper restrictions to use it.
It’s no secret that taking your fingers off the keyboard slows you down. Shortcat aims to solve that problem by removing the need to reach for your mouse and trackpad. All you need to do is activate Shortcat with the keyboard shortcut, then start typing the name of an on-screen element.
Shortcat will highlight anything that matches your typed query. You can then “click” on the right element by holding Control and the relevant shortcut displayed on screen. You can also Tab between elements and click, double-click, or hover using the relevant shortcut.
If you’re willing to put the time into learning how to use Shortcat, you’ll be navigating your Mac without a pointing device like a pro. It works system-wide and in applications like Skype, though it won’t work for every third-party app you come across (I couldn’t get it working in Slack, for example).
How do MySQL tables get corrupted? There are many ways to spoil data files. Often, corruption is due to defects in the underlying platform, which MySQL relies on to store and retrieve data – disk subsystem, controllers, communication channels, drivers, firmware or other hardware faults. Data corruption can also occur if the MySQL server daemon restarts suddenly, or your server reboots due to a crash of other OS components. If the database instance was in the middle of writing data to disk, it could write the data partially which may end up with a page checksum that is different than expected. There have also been bugs in MySQL so even if the server hardware is ok, MySQL itself can cause corruption.
Usually when MySQL data gets corrupted the recommendation is to restore it from the last backup, switch to DR server or take down the affected node if you have Galera cluster to serve data immediately from other nodes. In some cases you can’t – if the backup is not there, the cluster was never set up, your replication is down for a very long time, or the DR procedure was never tested. Even if you have a backup, you may still want to take some actions to attempt recovery as it may take less time get back online.
MyISAM, the bad and ugly
InnoDB is more fault-tolerant than MyISAM. InnoDB has auto_recovery features and is much safer as compared to the older MyISAM engine.
MyISAM tables can easily get corrupted when lots of writes happen and a lot of locks happen on that table. The storage engine "writes" data to the filesystem cache, which may take some time before it is flushed to disk. Therefore if your server restarts suddenly, some unknown amount of data in the cache is lost. That’s a usual way for MyISAM data to be corrupted. The recommendation is to migrate from MyISAM to InnoDB, but there may be cases where this is not possible.
Primum non nocere, the backup
Before you attempt to repair corrupted tables, you should back your database files first. Yes, it’s already broken but this is to minimize the risk of possible further damage which may be caused by a recovery operation. There is no guarantee that any action you take will not harm untouched data blocks. Forcing InnoDB recovery with values greater than 4 can corrupt data files, so make sure you will do it with prior backup and ideally on a separate physical copy of the database.
To back up all of the files from all of your databases, follow these steps:
Stop the MySQL server
service mysqld stop
Type the following command for your datadir.
cp -r /var/lib/mysql /var/lib/mysql_bkp
After we have a backup copy of the data directory, we are ready to start troubleshooting.
Data corruption identification
The error log is your best friend. Usually, when data corruption happens, you will find relevant information (including links to documentation) in the error log. If you don’t know where it’s located, check my.cnf and variable log_error, for more details check this article https://dev.mysql.com/doc/refman/8.0/en/error-log-destination-configuration.html. What you should also know is your storage engine type. You can find this information in the error log or in information_schema.
mysql> select table_name,engine from information_schema.tables where table_name = '<TABLE>' and table_schema = '<DATABASE>';
The main tools/commands to diagnose issues with data corruption are CHECK TABLE, REPAIR TABLE, and myisamchk. The mysqlcheck client performs table maintenance: It checks, repairs (MyISAM), optimizes or analyzes tables while MySQL is running.
mysqlcheck -uroot -p <DATABASE>
Replace DATABASE with the name of the database, and replace TABLE with the name of the table that you want to check:
mysqlcheck -uroot -p <DATABASE> <TABLE>
Mysqlcheck checks the specified database and tables. If a table passes the check, mysqlcheck displays OK for the table.
employees.departments                              OK
employees.dept_emp                                 OK
employees.dept_manager                             OK
employees.employees                                OK
Employees.salaries
Warning  : Tablespace is missing for table 'employees/salaries'
Error    : Table 'employees.salaries' doesn't exist in engine
status   : Operation failed
employees.titles                                   OK
Data corruption issues may be also related to permission issues. In some cases, OS can switch mount point to read-only mode due to R/W issues or this can be caused by a user who accidentally changed ownership of the data files. In such cases, you will find relevant information in the error log.
[root@node1 employees]# ls -rtla
...
-rw-rw----. 1 mysql mysql  28311552 05-10 06:24 titles.ibd
-rw-r-----. 1 root  root  109051904 05-10 07:09 salaries.ibd
drwxr-xr-x. 7 mysql mysql      4096 05-10 07:12 ..
drwx------. 2 mysql mysql      4096 05-10 07:17 .
MySQL Client
MariaDB [employees]> select count(*) from salaries;
ERROR 1932 (42S02): Table 'employees.salaries' doesn't exist in engine
Error log entry
2018-05-10  9:15:38 140703666226944 [ERROR] InnoDB: Failed to find tablespace for table `employees`.`salaries` in the cache. Attempting to load the tablespace with space id 9
2018-05-10  9:15:38 140703666226944 [ERROR] InnoDB: Operating system error number 13 in a file operation.
2018-05-10  9:15:38 140703666226944 [ERROR] InnoDB: The error means mysqld does not have the access rights to the directory.
2018-05-10  9:15:38 140703666226944 [ERROR] InnoDB: Cannot open datafile for read-only: './employees/salaries.ibd' OS error: 81
2018-05-10  9:15:38 140703666226944 [ERROR] InnoDB: Operating system error number 13 in a file operation.
2018-05-10  9:15:38 140703666226944 [ERROR] InnoDB: The error means mysqld does not have the access rights to the directory.
2018-05-10  9:15:38 140703666226944 [ERROR] InnoDB: Could not find a valid tablespace file for `employees/salaries`. Please refer to http://dev.mysql.com/doc/refman/5.7/en/innodb-troubleshooting-datadict.html for how to resolve the issue.
ClusterControl
Single Console for Your Entire Database Infrastructure
If you are using the InnoDB storage engine for a database table, you can run the InnoDB recovery process.
To enable auto recovery MySQL needs innodb_force_recovery option to be enabled. Innodb_force_recovery forces InnoDB to start up while preventing background operations from running, so that you can dump your tables.
To do this open my.cnf and add the following line to the [mysqld] section:
[mysqld]
innodb_force_recovery=1
service mysql restart
You should start from innodb_force_recovery=1 save the changes to my.cnf file, and then restart the MySQL server using the appropriate command for your operating system. If you are able to dump your tables with an innodb_force_recovery value of 3 or less, then you are relatively safe. In many cases you will have to go up to 4 and as you already know that can corrupt data.
[mysqld]
innodb_force_recovery=1
service mysql restart
If needed change to the higher value, six is the maximum and most dangerous.
Once you are able to start your database, type the following command to export all of the databases to the databases.sql file:
Start mysql, and then try to drop the affected database or databases using the DROP DATABASE command. If MySQL is unable to drop a database, you can delete it manually using the steps below after you stop the MySQL server.
service mysqld stop
If you were unable to drop a database, type the following commands to delete it manually.
cd /var/lib/mysql
rm -rf <DATABASE>
Make sure you do not delete the internal database directories.
After you are done, comment out the following line in the [mysqld] to disable InnoDB recovery mode.
#innodb_force_recovery=...
Save the changes to the my.cnf file, and then start the MySQL server
service mysqld start
Type the following command to restore the databases from the backup file you created in step 5:
mysql> tee import_database.log
mysql> source dump.sql
Repairing MyISAM
If mysqlcheck reports an error for a table, type the mysqlcheck command with -repair flag to fix it. The mysqlcheck repair option works while the server is up and running.
mysqlcheck -uroot -p -r <DATABASE> <TABLE>
If the server is down and for any reason mysqlcheck cannot repair your table, you still have an option to perform recovery directly on files using myisamchk. With myisamchk, you need to make sure that the server doesn’t have the tables open.
Stop the MySQL
service mysqld stop
cd /var/lib/mysql
Change to the directory where the database is located.
cd /var/lib/mysql/employees
myisamchk <TABLE>
To check all of the tables in a database, type the following command:
myisamchk *.MYI
If the previous command does not work, you can try deleting temporary files that may be preventing myisamchk from running correctly. To do this, change back to the data dir directory, and then run the following command:
ls */*.TMD
If there are any .TMD files listed, delete them:
rm */*.TMD
Then re-run myisamchk.
To attempt repair a table, execute the following command, replacing TABLE with the name of the table that you want to repair:
myisamchk --recover <TABLE>
Restart the MySQL server
service mysqld start
How to avoid data loss
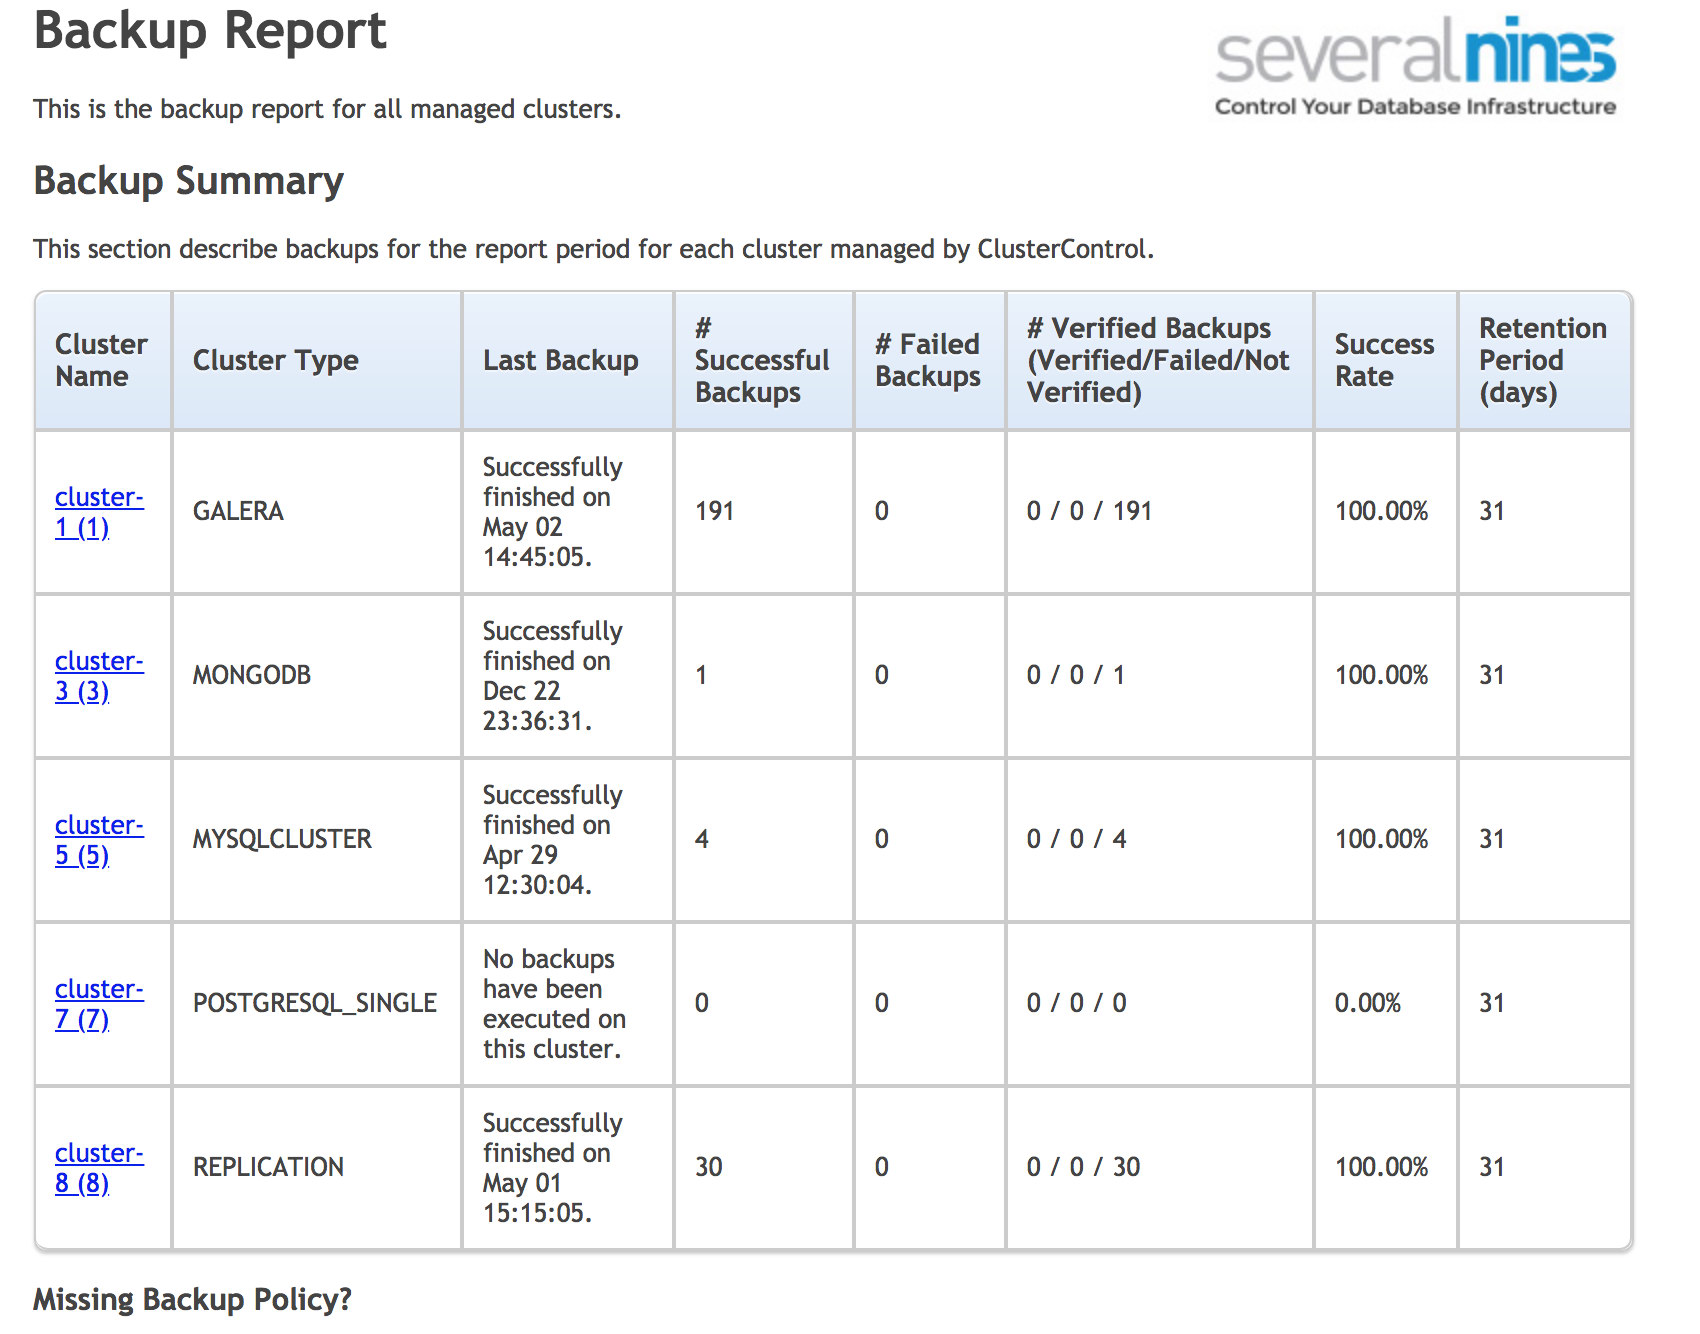
There are several things you can do to minimize the risk of unrecoverable data. First of all backups. The problem with backups is that sometimes they can be overlooked. For cron scheduled backups, usually we write wrapper scripts that detect problems in the backup log, but that does not include cases when the backup didn’t start at all. Cron can sometimes hang and often there is no monitoring set on it. Another potential issue could be the case when the backup was never set up. The good practice is to run reports from a separate tool that will analyze the backup status and inform you about missing backups schedules. You can use ClusterControl for that or write your own programs.
ClusterControl operational backup report
To reduce the impact of the possible data corruption you should always consider clustered systems. It’s just a matter of time when the database will crash or get corrupted, so it’s good to have a copy which you can switch to. It could be Master / Slave replication. The important aspect here is to have safe automatic recovery to minimize the complexity of the switchover and minimize the recovery time (RTO).
This week we hacked a theme park instead of a city, with a frankly intimidating 275 comments full of tips on visiting Disney World. (Would have loved some tips for living at Disney World; maybe next time.) Here are some of the best.
Each Monday on Hack Your City, we ask readers for your best tips on a city: driving tips, restaurant recs, things to do, and any other advice for visitors and locals. Then on Thursday, we present the best comments. We’re working our way around the U.S. and around the globe.
Save money
“Bring your own food and drinks. Disney allows coolers and bags up to a certain size into the park (it will be checked at the gate for any contraband) but you are free to bring food and drinks into the park (no glass and no alcohol). Also, anywhere you can get fountain soft drinks will give you free cups of water.”—gatorbait28
“If you have an Amazon Prime Pantry account, we have items like snacks and water shipped directly to the room. We usually get items that we can make quickly and eat while waiting for transportation like instant oatmeal or doughnuts.”—Ron Jones
“When you get a burger, order a double burger and an extra bun. Conversely, some places will let you order just the entree without the sides (chicken nuggets without fries). This will save you about $2.”—echo125488
You can buy plenty of Disney souvenirs cheaper at other stores, which might seem weird, but as gatorbait points out, you can get a cheaper autograph book for the costumed characters to sign.
Characters also trade pins with guests. Mel buys about 50 pins on eBay before going to the park, so they and their son have plenty of pins to trade in for new ones. “My son always asks them for trivia questions. If you get the question right, they’ll show you what their mystery pins are prior to a trade.”
“If you’re going for more than 10 days over a 1 year period, the annual pass is the best deal. Annual passholders receive free parking at the parks. You also receive a discount at some dining locations and on some merchandise.”—PurpleWaterBottle
The Tree of Life at the Animal Kingdom
Use the meal plan
The meal plan isn’t for saving money; it could actually cost more. It’s for guaranteeing spots at the best restaurants, and saving yourself the time and decision-making process once you get into the park.
“I am a huge fan of the deluxe meal plan. The best way to use it is to have a big breakfast/brunch at one of the buffets, use your snacks throughout the day if you get hungry, and then use two meal credits for dinner at the nicest places in the resort. It sounds like a waste to use two meals at once (especially considering the price), but a lot of them are really worth it. Our best memory from our last trip was watching the fireworks from the California Grill at the Contemporary.”—jodathejoda
“If you get a package deal and get a meal plan, you can also make use of it at Disney Springs (formerly Downtown Disney) at a number of their restaurants.”—Texas Native
“It is way cheaper to just pay for meals out of pocket. Even if it is offered free, do not get it as taking the free meal plan means that you do not qualify for room discounts, which have a higher value.”—Jamie McKillop
“The Dining Plan is cheaper than buying the same foods al a carte. I think for 5 nights it’s about $1200 for 4 people (one child). That’s $60/day/person. Yes, you *can* eat more cheaply, but I really appreciate sitting down in a real restaurant a few times as a break from the heat and crowds. The quick service places are usually a nightmare.”—NotYeezus
Plan ahead
“Make sure to book your 3 fast passes before going to the park. If you are staying at a resort on property, you can book fast passes up to 60 days in advance. If you are not staying on property, you can book fast passes up to 30 days in advance.”—gatorbait28
“Once you decide to go on a trip, if you have a Target Red card, start buying Disney gift cards. You will get 5% off the face value (or 10-15% if they are having a gift card promotion). You can use the gift cards for anything in the parks, including food. We think of the cards as the Disney ‘savings’ account.”—Ron Jones
On certain days, resort guests can enter the park before anyone else for “magic hours,” say bnceo and Taipans. Check Disney’s calendar when planning your trip.
Sorcerer’s Hat at Hollywood Studios
Use these resources
Get Disney’s official app. “I cannot emphasize downloading the app and bringing spare battery chargers enough,” says Zoom. “Downloading the app lets you maximize your FastPass usage because it tells you the current wait times. It also lets you plan your route around the park more efficiently.”
Undercover Tourist’s crowd calendar predicts crowd sizes for each park on any given day. Some commenters disagree on how well these third-party guides really work, but at least most of them are cheap or free.
For $15, you can plan your trip on the Touring Plans app, which helps you optimize which rides to take in what order. “They keep tons of data for every ride, every day and can predict within ~30 seconds how long every ride wait will be,” says Ridley90.
AllenaTapia recommends looking up all the suggestions of “Tour Guide Mike,” a.k.a. Michael’s VIPs. Five years ago Allena used Mike’s strategies and “never waited in line more than 30 minutes, high season.”
“Use a Disney Travel Agent,” says jodathejoda. “They are free, and they help a ton in getting everything scheduled and making reservations.”
WinglessVictory has a tip from The Unofficial Guide to Disney World. “For rides that aren’t continuously loading (like Dumbo, and the tea cup ride) they recommend the Bubba Relay. Dad gets in line with the kids and Mom counts back however many people the ride will hold and gets in line. By the time Dad gets off with the kids, Mom will be toward the front of the line and she can take the kids on again.”
Time it right
Disney World is never quite out of season, but its crowds do ebb and flow. “Generally,” says WoodenRobot, “Orlando is least crowded after Labor Day weekend and before fall break.” Gatorbait28 also recommends January and February. But avoid marathon week in January, says dakpluto.
Show up early, 30-60 minutes before the morning “rope drop.” “You’ll have the run of the park for a few hours,” says MarkK. “My family has gotten there early enough that our bodies were brushing up against the chain they drop to let people in. We got on all the popular, slow-loading rides in the first two hours,” says HGHyouworksogood.
Nap in the afternoon! Many many commenters recommend this, especially if you’ve gotten to the park early. Get indoors, chill at your resort or hotel, then go back for the evening.
Prep your kids
Commenters agreed that strollers will save you. “If your kids are small enough to fit into a stroller, stuff them in one,” says HGHyouworksogood. “I did for my 5- and 3-year-old. It gets you around the park faster, saves their legs from walking fatigue and keeps them from wandering off.”
Or (and of course this depends on the kid) wait until your kids are older. “It may sound kinda harsh, but DO NOT go to Disney with kids under 5 years old. The simple fact is that they can’t endure it, don’t comprehend it and won’t remember it. Conversely, kids in the 8, 9, 10 range are enthralled by the experience, have much more physical and emotional stamina and will remember it forever.”—andrewb812
Spaceship Earth at Epcot
Get in position
For a good view of the Magic Kingdom parade, Brad Kuhn recommends standing near the very end of the route in the Main Street square. There’s a store next to the doors that the parade exits through; if you stand by the doors of the store, says Brad, you’ll see everyone straight on, then from the side. “Everyone keeps up their act until they’re way beyond the doors and out of sight so you don’t even see them break character watching them out the exit.”
“Proceed to the BACK of the park first. People tend to queue up for the first things they see,” says dakpluto. Read their comment for specific things to hit first in each park.
“It’s easy to miss, but there’s a Coca-Cola attraction in Epcot called Club Cool where you can try free Coke products from around the world. Some are great, like Kinley, a lemon-flavored soda from Israel.”—WoodenRobot
“Animal Kingdom is notorious for having rare characters standing outside of their park entrance. We always make sure to pay attention to the right side when entering or leaving the park because you never know who you’ll see.”—Mel
“At Magic Kingdom, one great way to pass up the time when it’s crowded is to do the Sorcerers of the Magic Kingdom card game. It’s fun for kids and adults alike and you get some souvenir cards for free. You can get a pack of cards per person per day.”—echo125488
“If you are at Epcot and want to watch Illuminations, the restaurant (the rose and crown) in UK is the best seat in the house. While the entire show is intended to be watched from any country, they actually load the fireworks frm directly across England.”—Shannon
“There are a ton of incredibly designed and themed resorts that are a treat just to explore. You can spend a whole day hopping from one resort to the next. If they ask why you’re there, tell them you’re eating at their full service restaurant. You can take buses either from the parks or Disney Springs. The best resorts are on the monorail in front of Magic Kingdom: The Grand Floridian, the Polynesian, and the Contemporary.”—mouseclicker (read their comment for more resort suggestions)
“MK has a barber shop right near the front which has reasonably priced haircuts ($15-20 from what I remember). They also offer first hair cuts for kids. This can be a relatively cheap, memorable experience for parents. The staff there are great and make the experience easy and fun for the kids.”—gatorbait28
Tell the staff what you’re celebrating
Whatever makes you or your trip special, tell someone on staff. “My wife and I honeymooned at the park, we mentioned that’s why we were there,” says Peter M. Smith. “A couple of pins were handed to us, we stuck them on our bags, and for the rest of the week we’d get random free things. An extra appetizer, glass of wine, etc…”
Really, “anything can be a cause for celebration,” says tweak45. “I talked to a woman on the shuttle who was there to celebrate successfully losing 100lbs. She got a celebration pin from her resort and everyone congratulated her the whole time, which I’m sure provided a hell of a lot of warm fuzzies.” Tweak45 and their partner got special pins on an anniversary trip, and the staff consistently congratulated them.
“When we’re celebrating birthdays, the birthday boy or girl will often get a free cupcake,” says PurpleWaterBottle. “Get one of the ‘First Time Visitor’ pins, and smile a lot,” says whiskeytango.
There are so many more tips that we don’t have time to list here. Go read the original thread, where we’ve starred over 50 tips under the “Staff” tab. Leave your own tips in the comments right here, and come back next week when we go to the second-happiest place on earth: Australia.
Paul Harrell opens this video by talking about some “TV shows where people are prepping for doomsday,” and I really got a kick out of this:
There’s a guy on there that had his buckskins on, and he supposed to be some sort of kung-fu mountain man, showing you how to use a tomahawk as a weapon.”
My next laugh came after he’d thrown and stuck five tomahawks into a log.
Now I’m just just your average spaz. I’ve actually won a lot of competitions for tomahawk and knife throwing.
It’s always nice to know you’re not listening to an average spaz.
His final conclusion?
A tomahawk is a formidable weapon. Throwing it, that’s a parlor trick. Because what happens when you throw a tomahawk at somebody, then you don’t have a weapon because you threw it away, and now he’s got two: the gun he brought, and the tomahawk you just gave him.
Nothing like a little practical wisdom.
Editor & Contributing Writer Russ Chastain is a lifelong hunter and shooter who has spent his life learning about hunting, shooting, guns, ammunition, gunsmithing, reloading, and bullet casting. He started… [Learn More]
Jolie Kerr is a cleaning expert, advice columnist and author of the New York Times bestselling book, My Boyfriend Barfed In My Handbag … And Other Things You Can’t Ask Martha. Her flagship column, “Ask a Clean Person,” debuted in 2011. Here on Offspring, we’ve launched a new iteration of it, focusing on parenting and all the messes it brings.
Have you ever covered how to clean your trampoline? What if you are like me and have not touched the trampoline all winter and now it is covered in sap and bird poo and other caked-on disgustingness? What should I do?
Advertisement
I have actually never been asked how to clean a trampoline, making this a unicorn of a question! Well done, it’s actually a feat to find a topic I’ve not only not covered but that I’ve never even been asked about before—but if you have the question, someone else does too, so let’s do this thing.
Cleaning a trampoline is a simple endeavor—soap and water is really all you need!—but there are some important safety considerations to take into account that make them different from how other backyard equipment can be cleaned.
Before you introduce water and detergent to the trampoline, sweep the mat off using a broom or a dustpan and brush. You may be tempted to skip this considering that you’re just going to (spoiler alert!) turn a hose on the thing, but don’t: It will make the rest of the job easier if you take a minute or so to sweep away loose dirt, twigs, leaves, etc. before the wet cleaning begins.
Advertisement
This is also the time to do a preliminary check for damage, and clearing leaves and such away will better allow you to look to see if there are holes, tears or snags in the jumping mat. If the jump pad is damaged, it should be replaced. It’s also important to use the right tools and cleaning agents on the pad, to avoid causing damage during the cleaning process, which is actually very straightforward and definitely a job the kids can get involved in.
Hose down the mat until it’s soaking wet
Start by really soaking the mat; trying to scrub it while it’s dry can lead to tears, but the water will provide a lubrication of sorts that will allow you to scrub it without causing damage.
Soapy water and a soft scrub brush or rags are all you need
Because the jumping pad can be easily torn or abraded in a way that will make it unsafe to use, it’s important to stick with either a soft nylon brush or rags when cleaning it. Stay away from steel wool or scrubbing sponges, or even heavy duty scrub brushes, unless they’re specifically soft-bristled ones. Make sure to scrub not only the mat, but the springs and pads too.
It’s also important to stay away from cleaning agents that are any stronger than regular old dish soap; the chemicals used in other household cleaners can degrade the mat, making it unsafe to use.
Hose it off until the water runs clear
After scrubbing the mat well, there should be some satisfyingly gross brown suds that show you how much dirt and grime you cleaned off. Now it’s time to rinse the mat, and you’ll want to do that really, really well to ensure no soap residue is left behind. So: Hose the mat down until the runoff is entirely clear.
Dry with towels and sunshine
Do an initial pass of wiping the mat and frame dry with towels, and then let the trampoline dry entirely before using it. A wet mat is unsafe for jumping. This is also the time to do a second pass to check for damage to the mat that may have been revealed during the cleaning process.
Advertisement
This is definitely a job the kids can help with, but it’s important to note that the mat will become quite slick when covered in soapy water; make sure no one climbs or walks on it to avoid slips and injuries. The slickness issue is also why it’s so important to rinse the mat very well, and to not go hog wild with the use of soap—using too much soap will make the rinsing interminable.
Once your trampoline is clean and thoroughly dry, get back on that baby and jump! And also maybe buy a trampoline cover to protect it from twigs and leaves and bird poop when it’s not in use.
ClusterControl 1.6 comes with tighter integration with AWS, Azure and Google Cloud, so it is now possible to launch new instances and deploy MySQL, MariaDB, MongoDB and PostgreSQL directly from the ClusterControl user interface. In this blog, we will show you how to deploy a cluster on Amazon Web Services.
Note that this new feature requires two modules called clustercontrol-cloud and clustercontrol-clud. The former is a helper daemon which extends CMON capability of cloud communication, while the latter is a file manager client to upload and download files on cloud instances. Both packages are dependencies of the clustercontrol UI package, which will be installed automatically if they do not exist. See the Components documentation page for details.
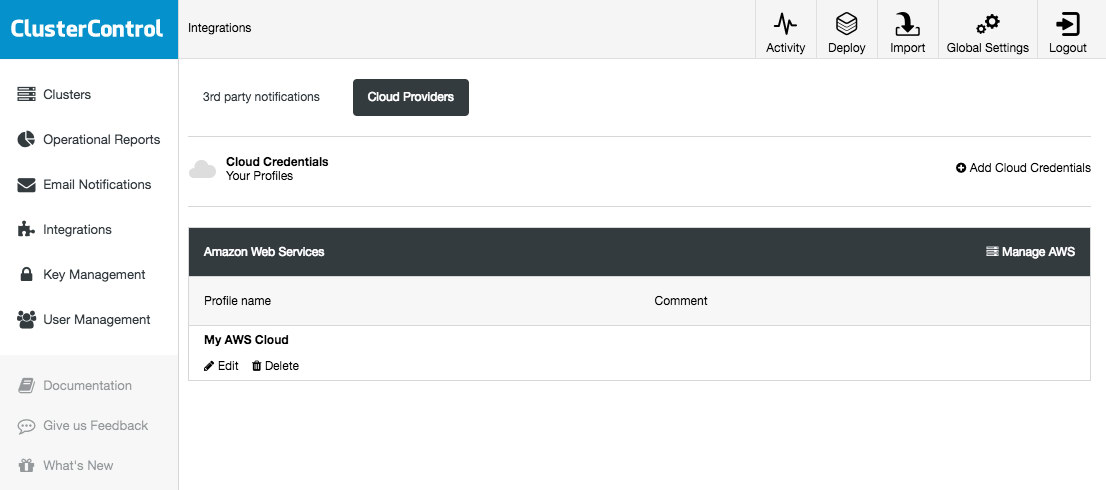
Cloud Credentials
ClusterControl allows you to store and manage your cloud credentials under Integrations (side menu) -> Cloud Providers:
The supported cloud platforms in this release are Amazon Web Services, Google Cloud Platform and Microsoft Azure. On this page, you can add new cloud credentials, manage existing ones and also connect to your cloud platform to manage resources.
The credentials that have been set up here can be used to:
Manage cloud resources
Deploy databases in the cloud
Upload backup to cloud storage
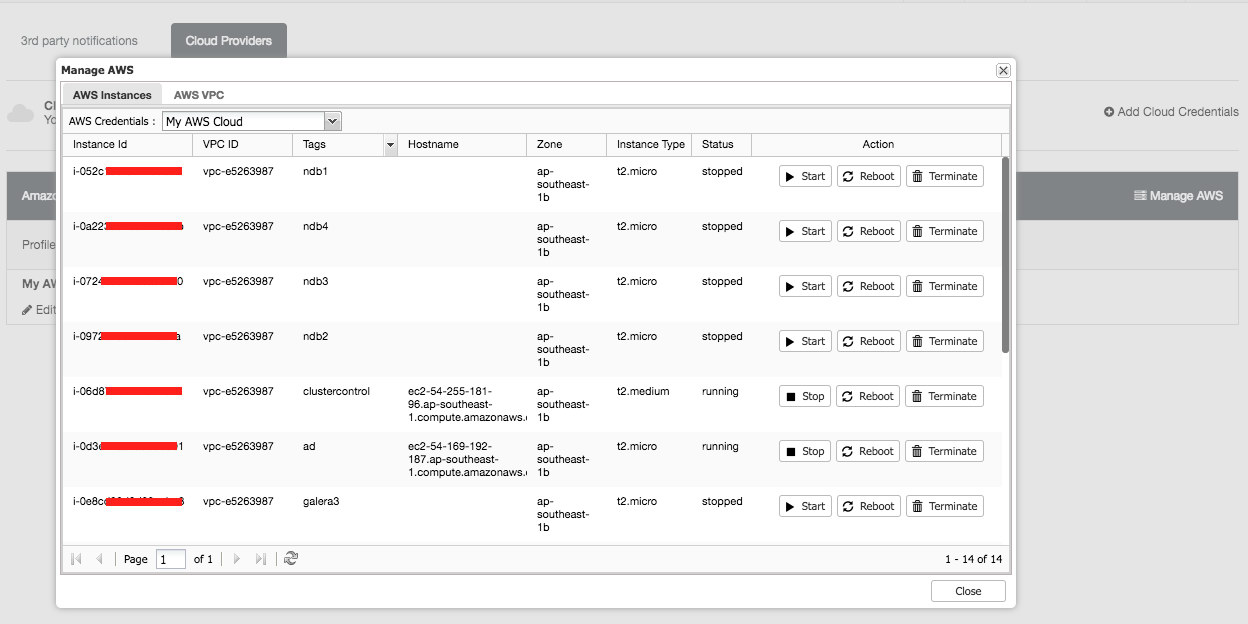
The following is what you would see if you clicked on "Manage AWS" button:
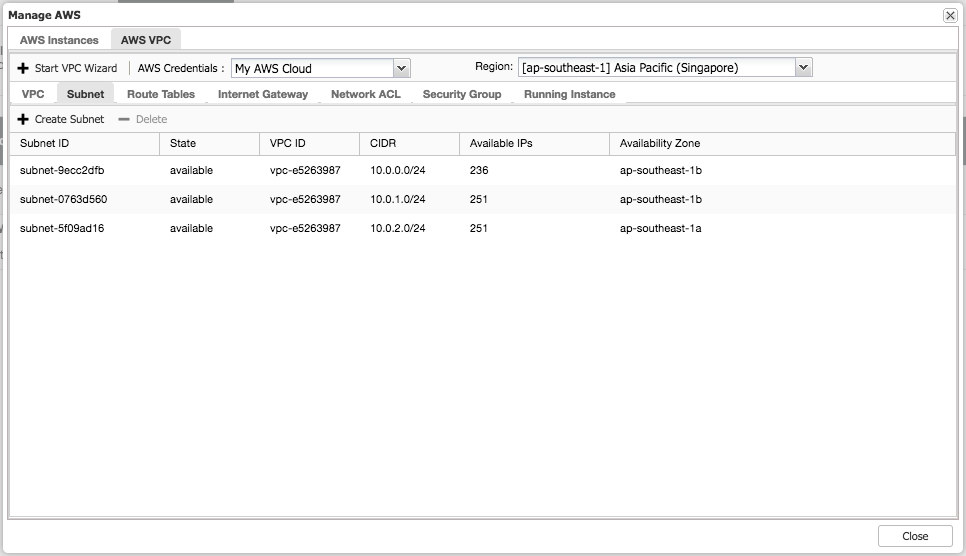
You can perform simple management tasks on your cloud instances. You can also check the VPC settings under "AWS VPC" tab, as shown in the following screenshot:
The above features are useful as reference, especially when preparing your cloud instances before you start the database deployments.
Database Deployment on Cloud
In previous versions of ClusterControl, database deployment on cloud would be treated similarly to deployment on standard hosts, where you had to create the cloud instances beforehand and then supply the instance details and credentials in the "Deploy Database Cluster" wizard. The deployment procedure was unaware of any extra functionality and flexibility in the cloud environment, like dynamic IP and hostname allocation, NAT-ed public IP address, storage elasticity, virtual private cloud network configuration and so on.
With version 1.6, you just need to supply the cloud credentials, which can be managed via the "Cloud Providers" interface and follow the "Deploy in the Cloud" deployment wizard. From ClusterControl UI, click Deploy and you will be presented with the following options:
At the moment, the supported cloud providers are the three big players – Amazon Web Service (AWS), Google Cloud and Microsoft Azure. We are going to integrate more providers in the future release.
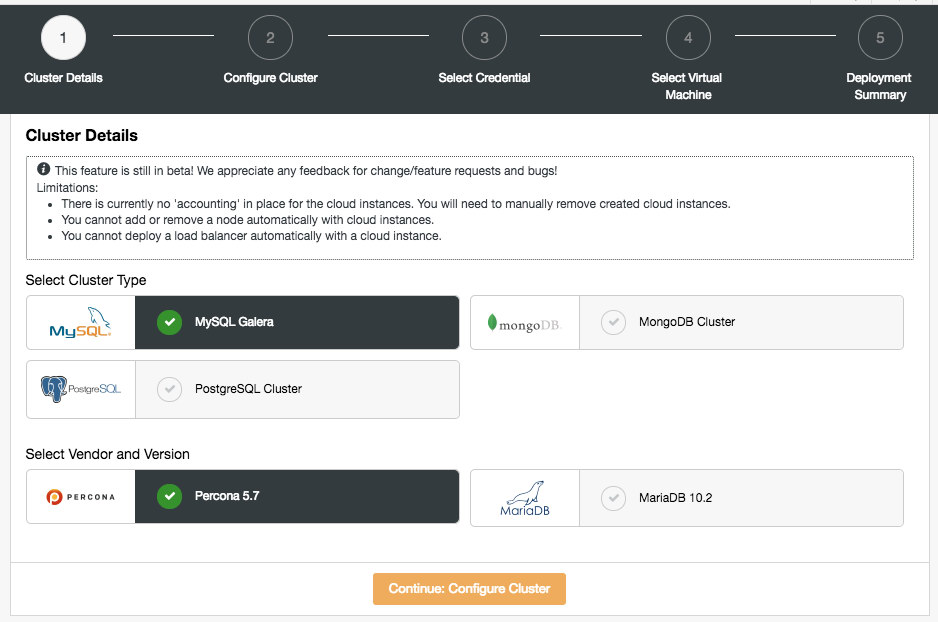
In the first page, you will be presented with the Cluster Details options:
In this section, you would need to select the supported cluster type, MySQL Galera Cluster, MongoDB Replica Set or PostgreSQL Streaming Replication. The next step is to choose the supported vendor for the selected cluster type. At the moment, the following vendors and versions are supported:
MySQL Galera Cluster – Percona XtraDB Cluster 5.7, MariaDB 10.2
MongoDB Cluster – MongoDB 3.4 by MongoDB, Inc and Percona Server for MongoDB 3.4 by Percona (replica set only).
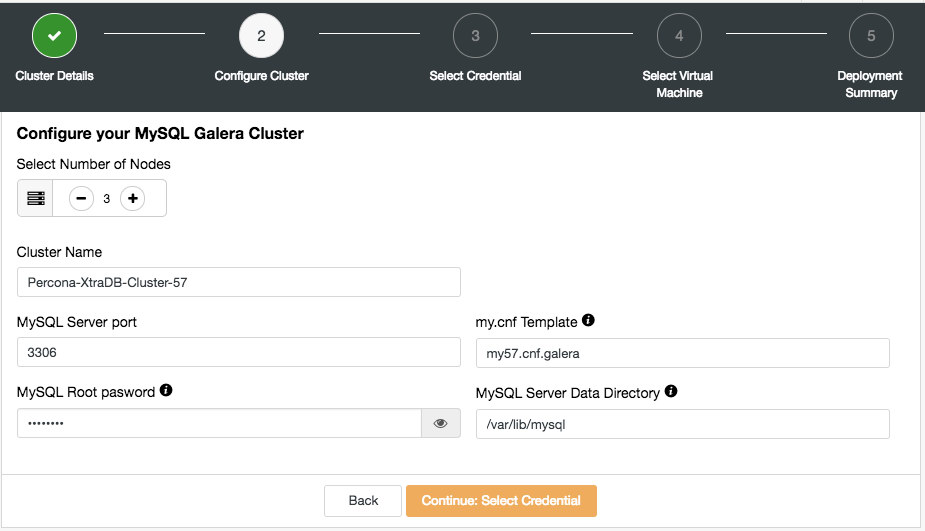
In the next step, you will be presented with the following dialog:
Here you can configure the selected cluster type accordingly. Pick the number of nodes. The Cluster Name will be used as the instance tag, so you can easily recognize this deployment in your cloud provider dashboard. No space is allowed in the cluster name. My.cnf Template is the template configuration file that ClusterControl will use to deploy the cluster. It must be located under /usr/share/cmon/templates on the ClusterControl host. The rest of the fields are pretty self-explanatory.
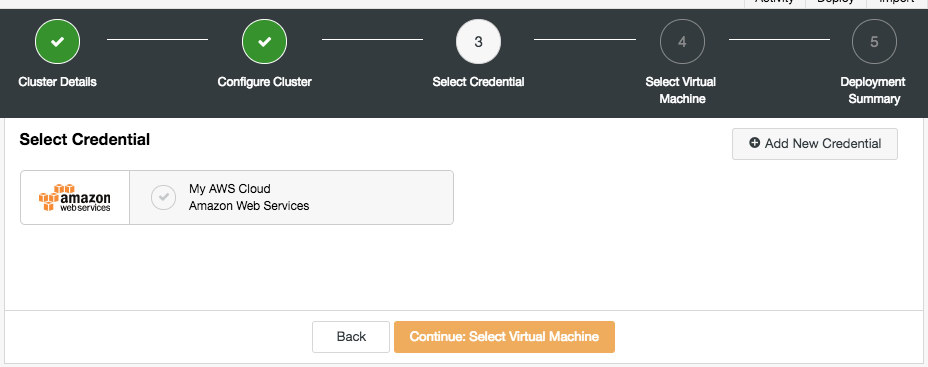
The next dialog is to select the cloud credentials:
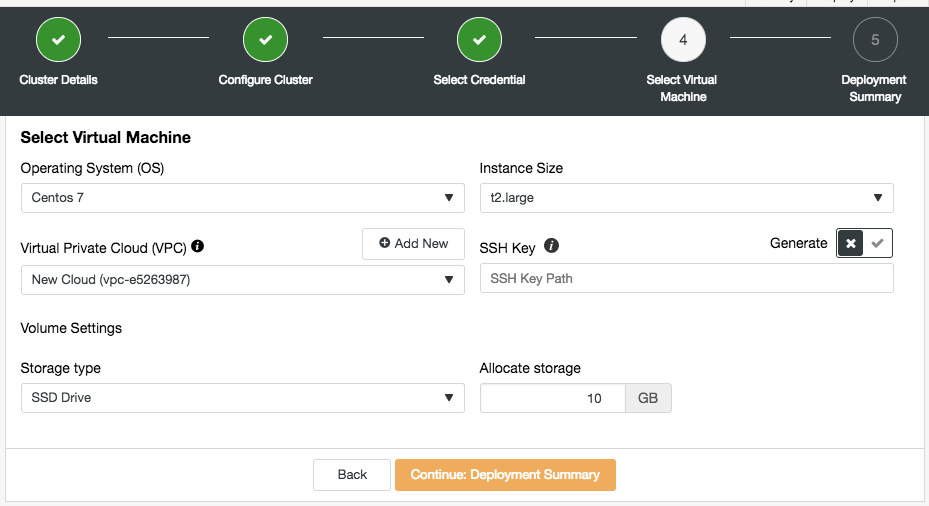
You can choose the existing cloud credentials or create a new one by clicking on the "Add New Credential" button. The next step is to choose the virtual machine configuration:
Most of the settings in this step are dynamically populated from the cloud provider by the chosen credentials. You can configure the operating system, instance size, VPC setting, storage type and size and also specify the SSH key location on the ClusterControl host. You can also let ClusterControl generate a new key specifically for these instances. When clicking on "Add New" button next to Virtual Private Cloud, you will be presented with a form to create a new VPC:
VPC is a logical network infrastructure you have within your cloud platform. You can configure your VPC by modifying its IP address range, create subnets, configure route tables, network gateways, and security settings. It’s recommended to deploy your database infrastructure in this network for isolation, security and routing control.
When creating a new VPC, specify the VPC name and IPv4 address block with subnet. Then, choose whether IPv6 should be part of the network and the tenancy option. You can then use this virtual network for your database infrastructure.
ClusterControl
Single Console for Your Entire Database Infrastructure
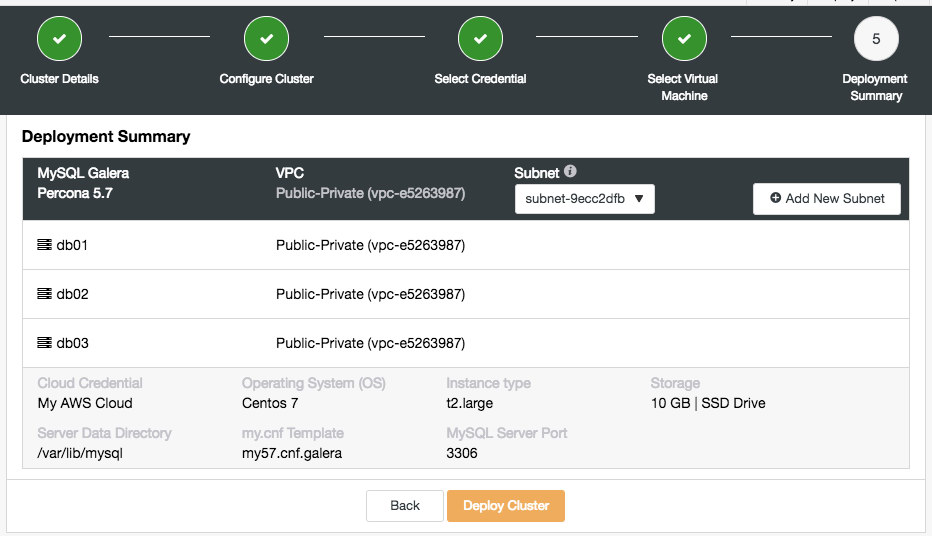
In this stage, you need to choose which subnet under the chosen virtual network that you want the database to be running on. Take note that the chosen subnet MUST have auto-assign public IPv4 address enabled. You can also create a new subnet under this VPC by clicking on "Add New Subnet" button. Verify if everything is correct and hit the "Deploy Cluster" button to start the deployment.
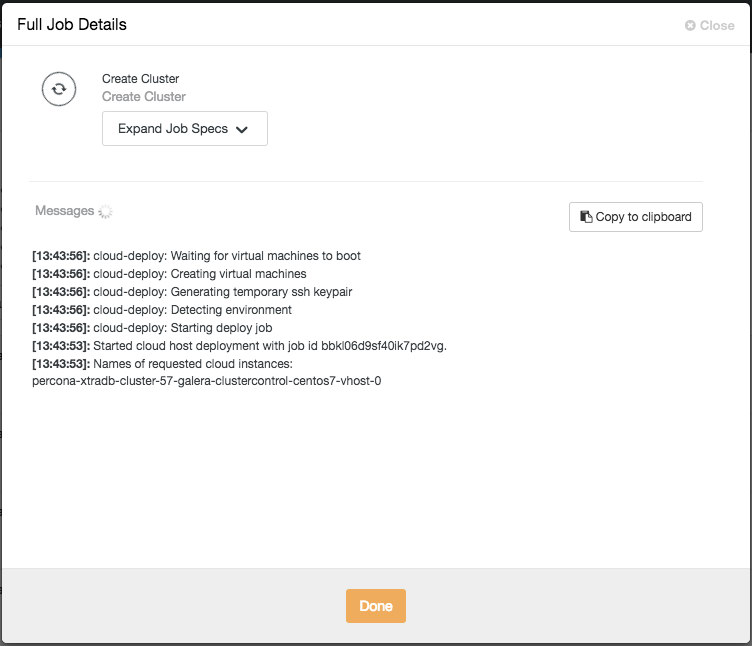
You can then monitor the progress by clicking on the Activity -> Jobs -> Create Cluster -> Full Job Details:
Depending on the connections, it could take 10 to 20 minutes to complete. Once done, you will see a new database cluster listed under the ClusterControl dashboard. For PostgreSQL streaming replication cluster, you might need to know the master and slave IP addresses once the deployment completes. Simply go to Nodes tab and you would see the public and private IP addresses on the node list on the left:
Your database cluster is now deployed and running on AWS.
At the moment, the scaling up works similar to the standard host, where you need to create a cloud instance manually beforehand and specify the host under ClusterControl -> pick the cluster -> Add Node.
Under the hood, the deployment process does the following:
Create cloud instances
Configure security groups and networking
Verify the SSH connectivity from ClusterControl to all created instances
Deploy database on every instance
Configure the clustering or replication links
Register the deployment into ClusterControl
Take note that this feature is still in beta. Nevertheless, you can use this feature to speed up your development and testing environment by controlling and managing the database cluster in different cloud providers from a single user interface.
Database Backup on Cloud
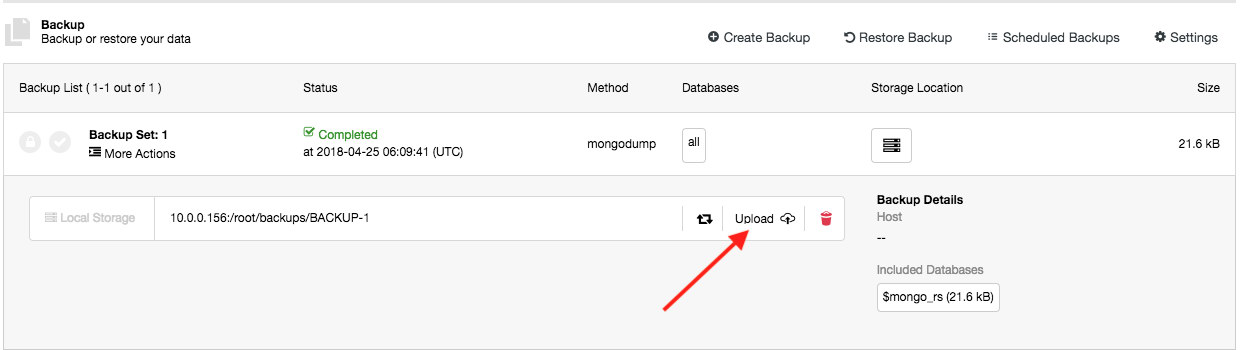
This feature has been around since ClusterControl 1.5.0, and now we added support for Azure Cloud Storage. This means that you can now upload and download the created backup on all three major cloud providers (AWS, GCP and Azure). The upload process happens right after the backup is successfully created (if you toggle "Upload Backup to the Cloud") or you can manually click on the cloud icon button of the backup list:
You can then download and restore backups from the cloud, in case you lost your local backup storage, or if you need to reduce local disk space usage for your backups.
Current Limitations
There are some known limitations for the cloud deployment feature, as stated below:
There is currently no ‘accounting’ in place for the cloud instances. You will need to manually remove the cloud instances if you remove a database cluster.
You cannot add or remove a node automatically with cloud instances.
You cannot deploy a load balancer automatically with a cloud instance.
We have extensively tested the feature in many environments and setups but there are always corner cases that we might have missed out upon. For more information, please take a look at the change log.
An upgraded charging handle doesn’t mean an extended charging handle, or a latch-less charging handle, or really anything crazy at all.
Even the most basic Mil-Spec style charging handle can be well made and can stand above other Mil-Spec options (Improving on Mil-Spec is easy when it isn’t being made by the lowest bidder).
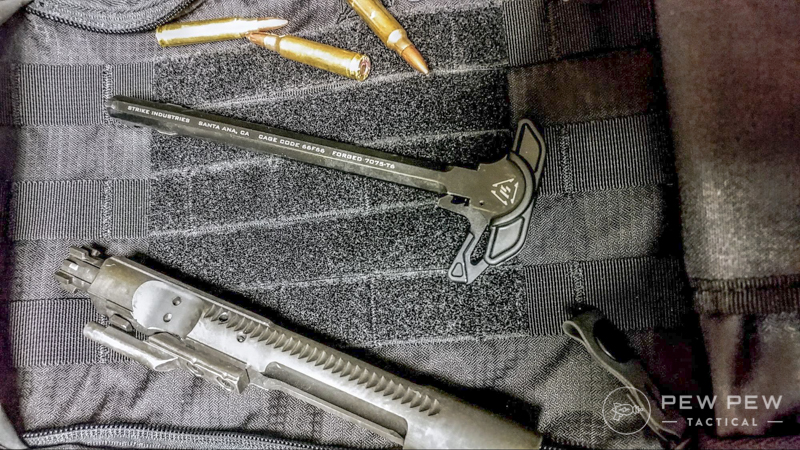
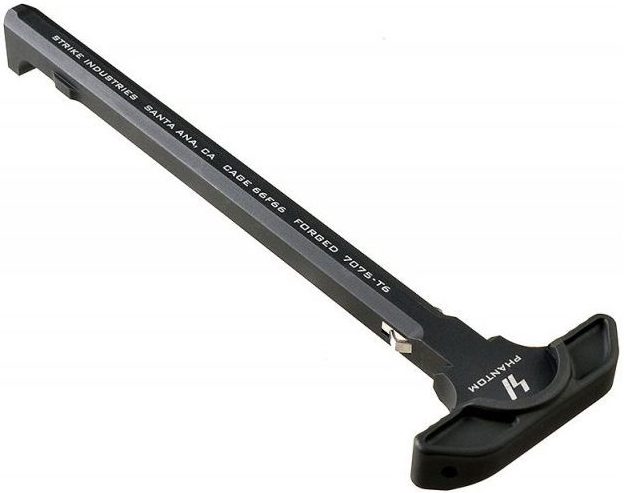
Strike Industries in AR-15
If you want an affordable, and Mil-Spec option, then Strike Industries has you covered.
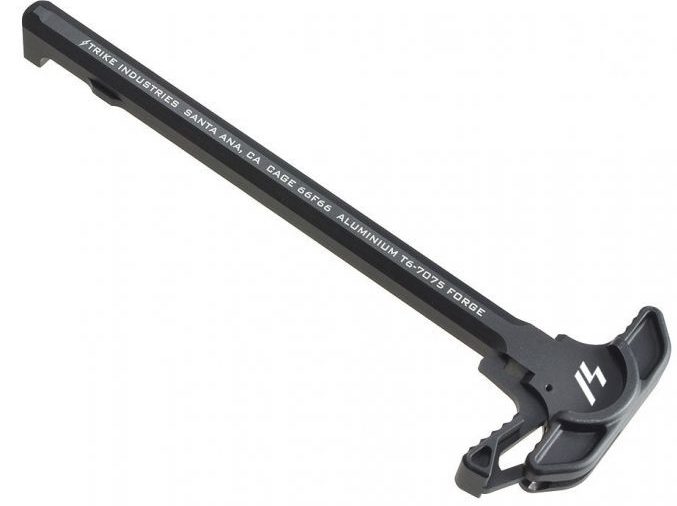
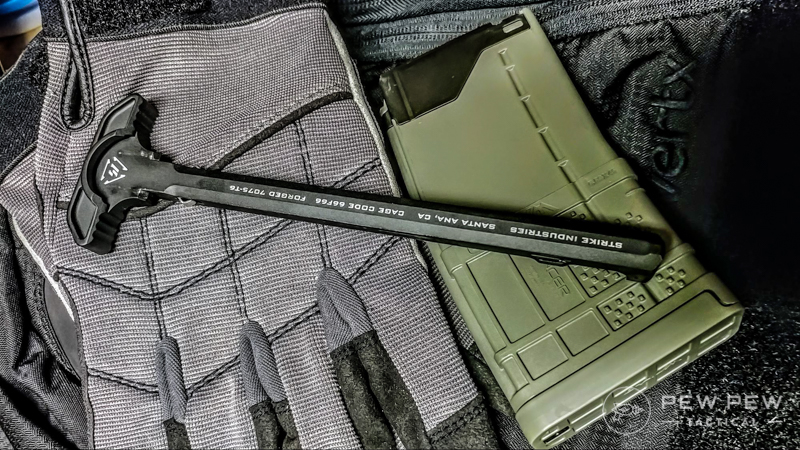
On the outside, this is a pretty standard looking charging handle, but upon closer inspection, you can tell Strike put some work into this simple charging handle.
The SI ARCH is hard anodized and is exceptionally smooth.
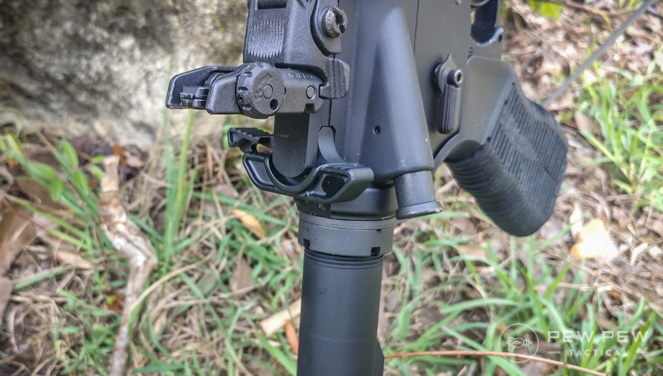
This smooth finish allows it to glide rearwards with ease. The most significant difference you’ll see is near the rear of the charging handle.
It’s rounded off at the back but features a sharp straight angle on the inside of the charging handle.
Strike Industries Out of Rifle
The inside is also textured for a better grip, and the latch is only as large as it needs to be. While the differences are subtle, once you start running the charging handle, they are significant.
A textured grip is excellent for clearing jams when your hands are sweaty or if you are wearing gloves.
The smoother finish makes the charging handle glide backward, it reduces the effort needed to charge the weapon, clear jams, and more.
Plus it just feels nice, really lovely. The SI ARCH isn’t necessarily sexy, or fancy, but it functions and does so well.
Budget is relative to what you are getting for the money. So yes, cheaper charging handles exist, but they don’t deliver as much value as the SI ARCH with the extended latch.
For right around 30 bucks you get an excellent charging handle that takes the best features of the Standard ARCH and makes it a little quicker and easier to grasp.
Strike Extended Latch
The extended latch sticks out about an extra half inch that gives the user a little more space to grip the charging handle.
This additional purchase gives you the ability to quickly charge the weapon and clear malfunctions. It also gives you more room to grab the charging handle if you are rocking a variable power optic.
Strike Extended Latch on Rifle
The Strike Industries ARCH is already an outstanding charging handle, we just covered it above, and all the same features there are present here.
One detraction from this design is that the extended portion of the handle is only on the left-hand part of the charging handle. This charging feature is somewhat useless for left-handed shooters.
Side view of the Strike Industries Extended Latch
The Strike Industries ARCH charging handle is a great option and comes in at a low price. It’s a lot like Starbucks, basic, but not bad.
Strike Industries likes to experiment and does so quite well. The latchless charging handle is one such experiment.
The lack of a latch is an interesting idea as it reduces the movements needed to release the latch and manipulate the weapon.
Strike Industries Latchless
I could charge the weapon with a compromised grip. Compromised means rushed, crappy, and in a hurry.
The lack of a latch allowed to load the gun from either side with ease. If my left arm is out of the fight, I can still find a way to manipulate the charging handle.
AR-15s are getting smaller and lighter. Guns come in at well under 6 pounds these days, and some builders are taking that to the extreme. My friend Rex Nanorum over at the Loadout Room has built his lightweight AR that comes in under 6 pounds when it’s outfitted with a suppressor and optic.
Radian Raptor-LT
From talking with him I’ve learned that guys taking on these projects are looking to trim ounces, and even half ounces as much as possible.
If you are chasing this kind of build and still looking for a lightweight, but functional charging handle then the Radian LT is an excellent choice.
Coming in at only 1.2 ounces the Radian LT is a functional choice.
It’s got two massive wings on the sides that make the charging handle easy to grip and rip regardless of the situation. This is especially true when it comes to using the charging handle with an optic.
Raptor LT on Rifle
The Radian Raptor LT is made from 7075 aluminum and is hard anodized with a Mil-Spec Type 3 finish.
It is also reinforced with high strength reinforced polymer for saving weight, but maintaining strength.
The Radian Raptor LT is a lightweight, well made, and priced well. It’s a great option for your lightweight build or just a standard build that needs a great charging handle that’s priced affordably.
If we are going to name the lighter weight choice we can’t leave out the classic Radian Raptor. The Radian Raptor was one of the OG modern, extended charging handles.
An ambidextrous design features two extended handles for lots of space to grip.
Original Radian Raptor
The extended charging handles are big enough to allow a blading technique for those of us with tough hands. Blading is when you are catching the charging handle with your palm and rapidly pull it rearward.
The third and final Radian Raptor is one specifically designed for suppressed guns. The Radian Raptor SD is the same old Raptor grip we know and love but vented explicitly for suppressed ARs.
Left Side Ejecting AR-15 with Raptor Charging Handle
AR-15s have quite a bit of gas blowback when they are suppressed. This gas blowback hits the shooter in the face and occasionally carries carbon to the shooter’s face.
This gas can be a mild inconvenience that gets worse and worse the more rounds you put downrange.
Radian Raptor SD
The Radian Raptor SD is vented extensively down the sides to decrease gas blowback by venting it out the sides. This makes shooting your suppressed AR a much lovelier experience. If you are shooting suppressed, you can stop reading now; this is the charging handle you need.
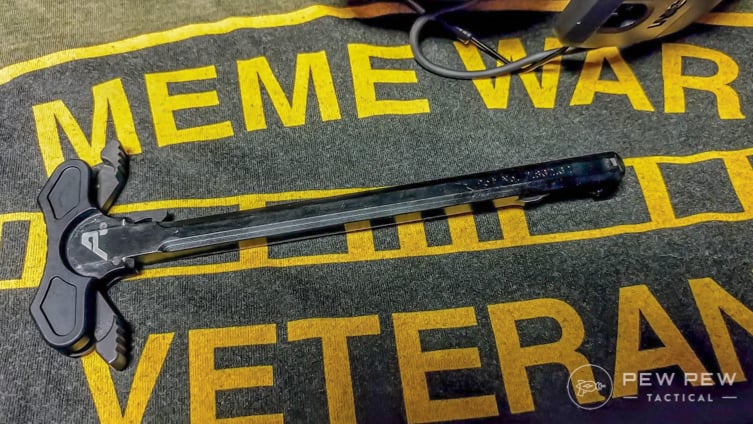
If you want a massive charging handle, then Aero Precision has you covered. The Aero Precision Ambidextrous charging handle is quite likely one of the most significant charging handles on the market.
Aero Precision Charging
This makes it perfect for optic’s equipped AR-15s. Especially when it comes to large variable optics. These handles will clear the eyepiece of any modern scope and is my go to on my budget Recce rifle.
Aero Precision Charging Handle
This ambi charging handle sports two massive latches, and it’s simple to blade the weapon, even with an optic on the gun. The Aero Precision charging handle is one of my favorite all around charging handles ever. I like it on any rifle, and its large size works with my massive hands pretty well.
The 7075-T6 aluminum design makes it a rugged and capable charging handle for your build. I love how it glides backward when pulled, and the extra size means extra leverage. This makes blading pretty easy, and not too painful on the hands.
Aero Precision and The Meme War
The Aero Precision charging handle is my personal favorite, and it functions as an absolute champ.
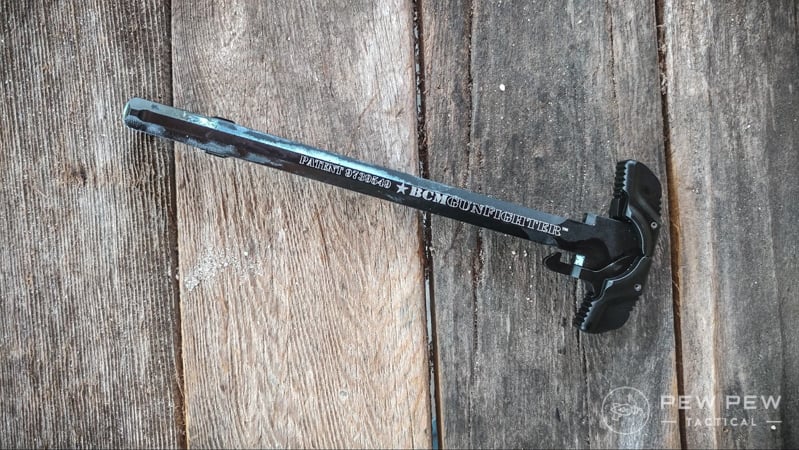
BCM redesigned the traditional charging handle to take the force off the roll pin and placing it to the rear of the charging handle.
The GFH MOD 4 features the medium latch on the left-hand side for right-handed shooters. This particular extended model is a little shorter than an inch past the main body of the charging handle.
BCM Gunfighter MOD 4 Ready to Rock (Get it Rock Sorry.)
The BCM GFH MOD 4 is primarily designed to be used with the blading technique and is designed so that the pressure applied via this technique won’t damage the charging handle or latch.
It’s not often that you see a firearms technique incorporated into the design of a part, this is the kind of extra-level of effort that I’ve come to expect from BCM.
The BCM Gunfighter MOD 4
It catches the hand perfectly and is perfect if you are new to this technique. The Gunfighter is a thoroughly modern option for your next AR-15 build and Bravo company has an outstanding reputation for producing high-quality AR components and even full rifles.
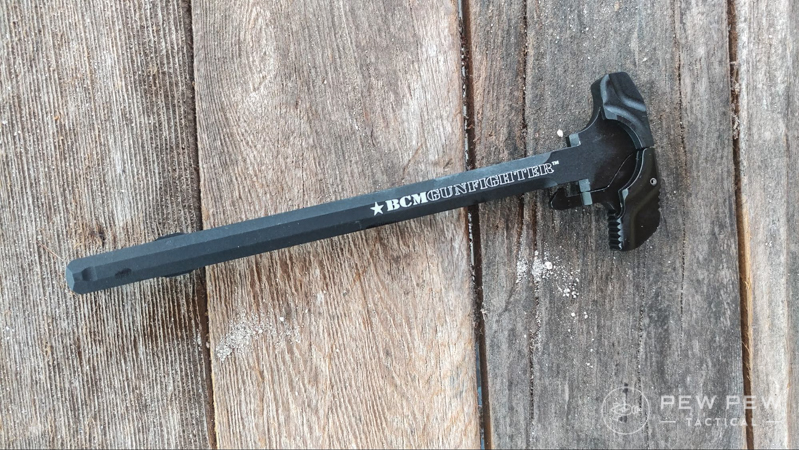
If you want to keep things simple, the BCM Gunfighter MOD 4B is the option for you. It’s a compact and small charging handle that meets the standard Mil-Spec dimensions. This charging handle is designed for shooters used to the standard manual of arms associated with military training.
BCM Mod 4B Charging
While it functions as a standard charging handle, it’s made to last.
It’s made from 7075-T6 aluminum so its strong as hell and outfitted with a type 3 hard anodized finish for long lasting durability. The MOD 4B is available in both a mil-spec design and an ambidextrous model.
BCM Mod 4B
This particular model is the mil-spec model, and it excels for those of us who’ve spent a little time in the armed forces. It’s also a great low profile option for those of you who don’t need or want an extended latch system. The MOD 4B is textured for a more comfortable grip and outfitted with BCM’s load eliminating design. This reduces wear on the pivot pin and paces it midline of the rifle.
The 4X4 from BCM is an ambidextrous option for Bravo Company. It’s mil-spec size and dimensions makes it nice and compact, at least compared to the other charging handles on this list. Each side features a latch that releases the charging handle with ease.
BCM Mod 4×4
The GFH 4X4 is a great option for lefties seeking a mil-spec sized charging handle. It’s straightforward to use and is made from 7075-T6 aluminum.
I’m a right-handed shooter, so maybe I can’t get the full effect of this charging handle, but I get the concept.
BCM 4×4 in Rifle
Even though it feels unnatural for me to charge the rifle with my right hand, I find it surprisingly easy to do with this charging handle. The MOD 4X4 is a great little charging handle, and it’s priced affordably for a premium grade charging handle.
Charged Up
I’ve gone through a lot of charging handles; I mean a lot of them. So much so that when testing these designs I got a nice case of tennis elbow and a bruised palm. Maybe it’s charging handle elbow?
Whatever you want to call it I got it. I did, however, learn a ton about charging handles, and there is more to learn than I expected. The best thing I learned was I have a ton of options when it comes to AR-15 builds of all kinds.
Interested in more AR-15 upgrades? Check out Best AR-15 Upgrades for everything from triggers to handguards and more.
This is our Top 10 list, but we want to know if you think we missed any? If so let us know what we missed and why it deserves a place on the list!
Narrator: Dogbert The Reporter. Dogbert: How did hackers get access to your customer data? CEO: I’m told they used something called “our A.P.I.” to suck out all the data. Dogbert: I’ll just say you’er stupid. CEO: Why does everyone always say that?
There’s one thing we humans can’t go very long without, and that’s water. Whether the government has forced you to connect to a municipal water supply or you’re concerned that a lack of electrical power might prevent you from pumping water from your existing deep well, it’s certainly worthwhile to know how to create your own shallow well, should you ever need to.
I’m from Florida, where wells are not that complicated and many people have their own wells to supply water to their homes. In many, but not all, areas of Florida, groundwater can be found fairly close to the surface. This would be a great source of hand-pumped H2O in a pinch.
I recently ran across an article at Mother Earth News, in which Al Adams describes his experience designing and building “a do-it-myself shallow well.”
To begin the project, I dug a three-foot-square hole at a point where a natural spring (“seep” might be a more accurate term) was located. I was careful to position my pit back from, and a bit above, a nearby marshy area. (Ideally, a well hole should be dug in late summer, when the water table is at its lowest. At that season you’ll need to bail less while digging and can be reasonably sure of an adequate flow of water during the wetter parts of the year.) I was relieved to hit bedrock at a depth of 5 1/2 feet, since I would have had difficulty excavating deeper with hand tools.
Once the pick-and-shovel work was behind me, I obtained two 55-gallon drums (they had formerly held glue) with locking ring-sealed removable lids. A friend kindly volunteered the use of his oxyacetylene torch, and before long the bottoms of the two barrels were removed and I’d brazed the cylinders together end to end …producing a sturdy steel tube about two feet in diameter and six feet long.
He used a campfire to burn off the old glue and paint from the steel drums, and experienced something that would have ruined his day if he hadn’t been lucky during the torch-cutting process: intense burnoff of the glue residue.
Much to my surprise, a column of yellow flame was soon shooting some 15 feet into the air, accompanied by the earthquake—like rumble of a very violent draft. Within an hour the paint had been vaporized by the intense heat and—after waiting for the metal to cool—I wire-brushed the remaining residue from the metal and rolled the assembly down to the hole.
He next describes how he shoveled in some gravel to filter the water and made a mount for a hand-operated pitcher pump. After pumping out a bunch of mud, he chlorinated the well with bleach.
I also decided to chlorinate the water, to kill any bacteria that might have been introduced during the construction process. To do so, I mixed one quart of household bleach with an equal amount of water, making a solution capable of purifying 100 gallons of drinking liquid. The mixture was then dumped into the well and the system resealed with its locking ring and silicone caulk. I pumped until a strong smell of chlorine was evident at the hose outlet, then let the purifying chemical do its work overnight. On the following morning, I pumped the well out a few more times to remove all detectable traces of bleach. After that my low-cost shallow well was ready for use!
Here’s an addendum from the editors of that site:
Anyone duplicating Mr. Adams’s well might want to consider using only barrels — of heavy plastic or otherwise — that are approved for food storage. The author reports that his metal drums did eventually introduce some rust into the water, which forced him to install a filter. In addition, it’s best to have any new supply of water tested for purity if it’s to be used by humans, and to install a locking assembly on the lid to prevent curious children from opening the well and, perhaps, falling in.
This sounds like a reasonable way to approach the process of creating a shallow well. What do you think?