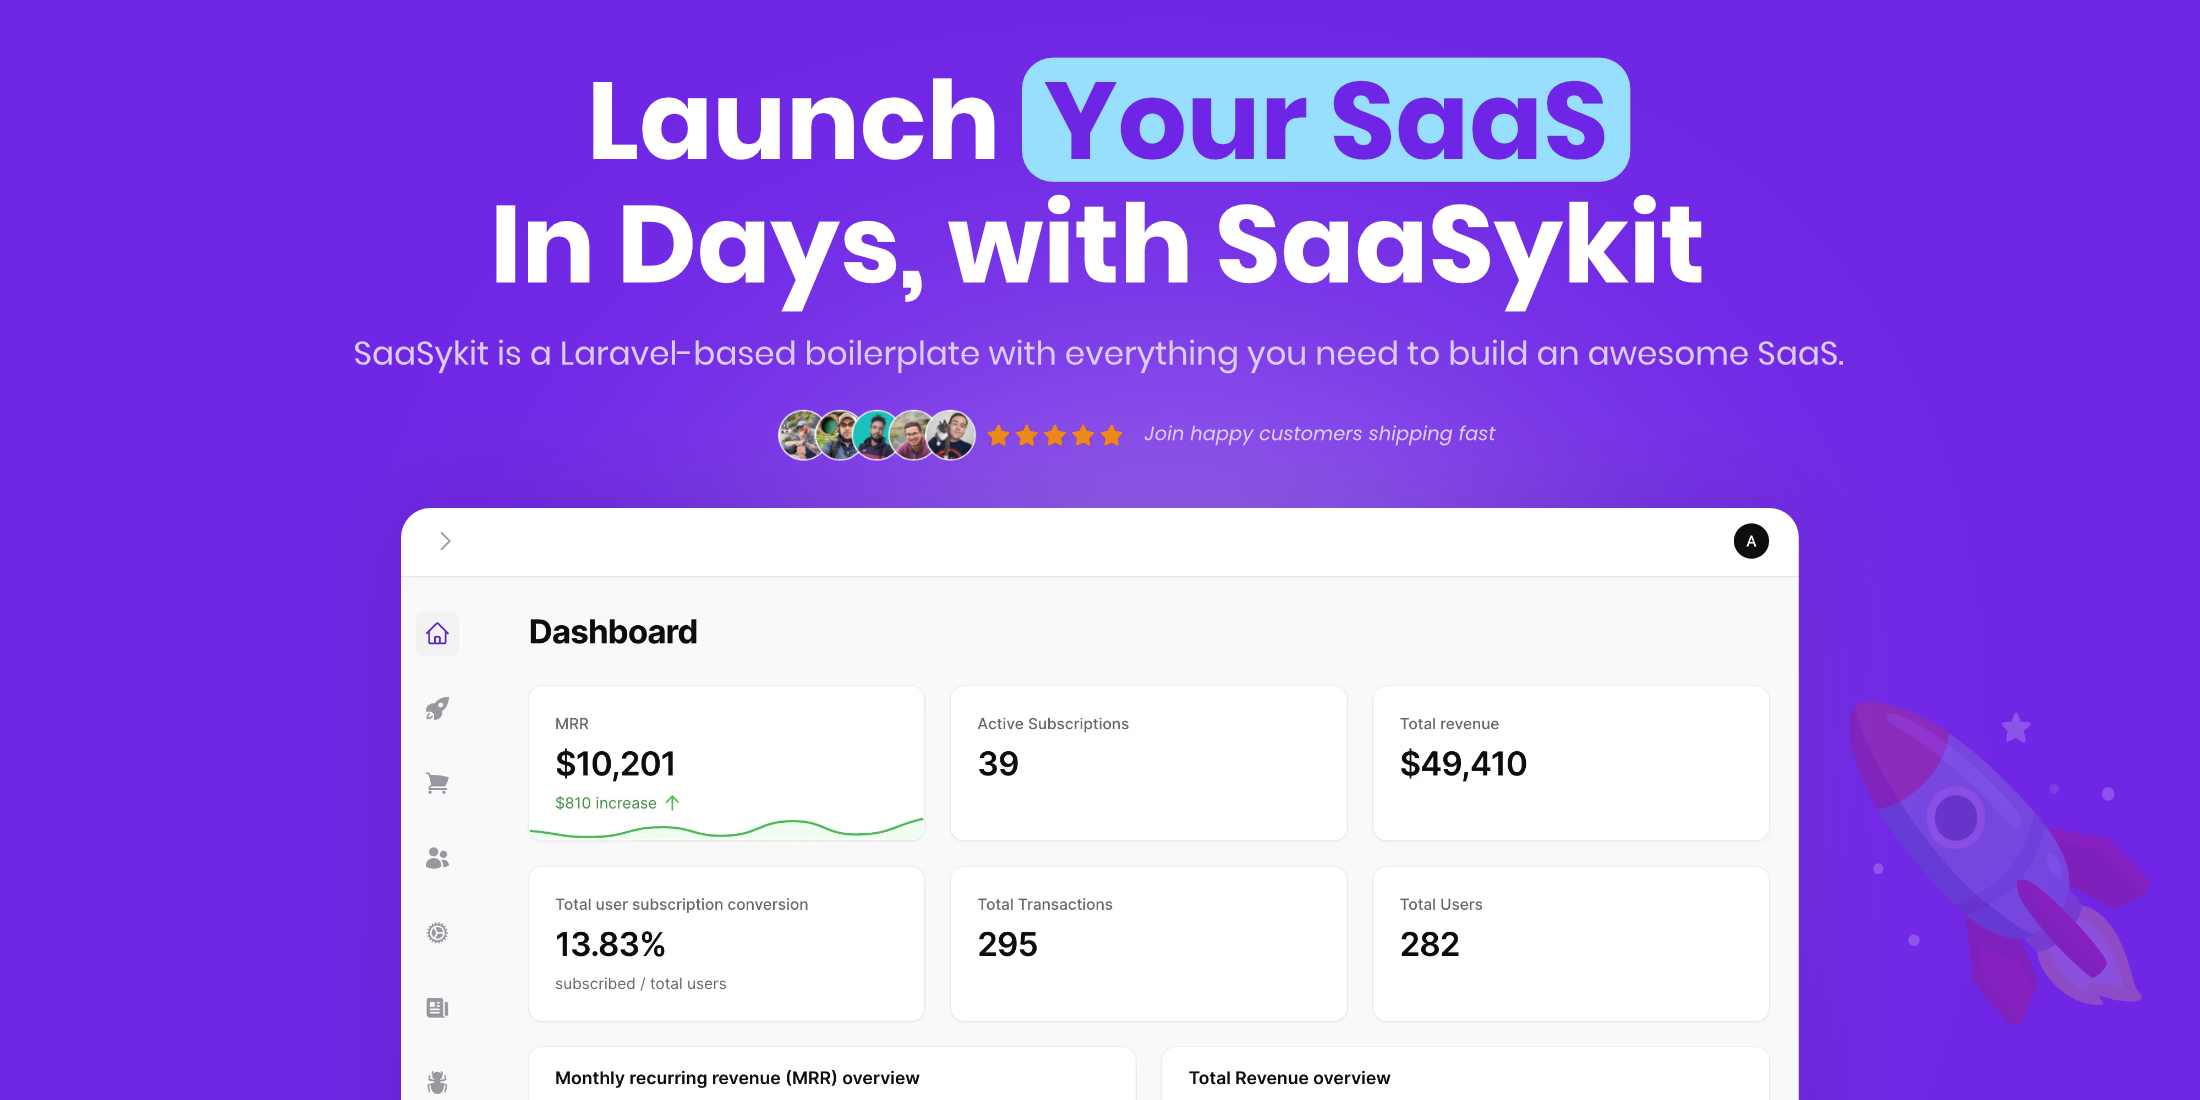
NSA Shares Top Ten Cybersecurity Misconfigurations

The National Security Agency (NSA), in partnership with the Cybersecurity and Infrastructure Security Agency (CISA), have highlighted the ten most common cybersecurity misconfigurations in large organizations. In their join cybersecurity advisory (CSA), they also detail the tactics, techniques, and procedures (TTPs) actors use to exploit these misconfigurations. From the report: Through NSA and CISA Red and Blue team assessments, as well as through the activities of NSA and CISA Hunt and Incident Response teams, the agencies identified the following 10 most common network misconfigurations: 1. Default configurations of software and applications 2. Improper separation of user/administrator privilege 3. Insufficient internal network monitoring 4. Lack of network segmentation 5. Poor patch management 6. Bypass of system access controls 7. Weak or misconfigured multifactor authentication (MFA) methods 8. Insufficient access control lists (ACLs) on network shares and services 9. Poor credential hygiene 10. Unrestricted code execution NSA and CISA encourage network defenders to implement the recommendations found within the Mitigations section of this advisory — including the following — to reduce the risk of malicious actors exploiting the identified misconfigurations: Remove default credentials and harden configurations; Disable unused services and implement access controls; Update regularly and automate patching, prioritizing patching of known exploited vulnerabilities; and Reduce, restrict, audit, and monitor administrative accounts and privileges. NSA and CISA urge software manufacturers to take ownership of improving security outcomes of their customers by embracing secure-by-design and-default tactics, including: Embedding security controls into product architecture from the start of development and throughout the entire software development lifecycle (SDLC); Eliminating default passwords; Providing high-quality audit logs to customers at no extra charge; and Mandating MFA, ideally phishing-resistant, for privileged users and making MFA a default rather than opt-in feature. A PDF version of the report can be downloaded here (PDF).

Read more of this story at Slashdot.

Slashdot

Testing Your Multi-database Multi-tenant Laravel Application

https://media.licdn.com/dms/image/D4D12AQF1GggB9-6qzg/article-cover_image-shrink_720_1280/0/1695238380041?e=2147483647&v=beta&t=8W5yL5H_xSLyU2j2LlLeUK50wJ_feX1ITiPs7aPStQE

For some months now I have been working on a multi-tenant loan management system which uses the Tenancy For Laravel package. Find it here on Github. Following their documentation, everything works perfectly so far. The only issues I have had is setting up my feature tests. The documentation on the testing doesn’t seem to work very well and it made me want to pull out my hair. After hours of trying, I finally came up with a simple solution to set up my tests.

First of, let’s talk about what was not working. From the docs here, the only thing to do is to initialize tenancy in the test setUp method and everything should work fine. This failed and I had to find another way.

Here is what I did:


Quick explanation of what is going on here. The setUp method is initializing tenancy so that everything works as if the application is being accessed through a tenant subdomain. I had to call withoutMiddleware because, those middlewares were causing the requests to fail.

Note: they were being used in my routes/web.php file.

tearDown was for cleaning things up.

All my test classes extended this as the base test class like so:


And that’s it, my tests were finally running. Hope this helps someone. If you found this useful, let me know in the comments. If you have implemented this in a different way as well, let me know in the comments.

Laravel News Links

Deploy your Laravel app in under five minutes, for free!

https://opengraph.githubassets.com/bdf97517a898b7f003d8826f8d3f7a35101514411eee0e9f704facdb103b8ada/fly-apps/fly-laravel

Fly-Laravel was created by Fly.io and is a quick way to get a Laravel app running on Fly.io. It was built using Laravel Zero.

Fly-Laravel assumes that you have flyctl installed, and that you have it connected to your Fly.io account. If you need help with this, check out https://fly.io/docs/speedrun/.

These commands will help you set up apps on Fly.io. Remember that running these apps can cost money!

You can find more about Fly.io’s free allowance and pricing here.

Run composer require fly-apps/fly-laravel to install the latest version.

By default, commands are invoked using the vendor/bin/fly-laravel script. To avoid have to type all that for ecery command, you may configure a shell alias:

alias fly-laravel='vendor/bin/fly-laravel'

To make sure this is always available, you may add this to your shell configuration file in your home directory, such as ~/.zshrc or ~/.bashrc, and then restart your shell.

With this package, you can spin up Laravel, MySQL and/or Redis apps on Fly.io . There are two commands for every type of app: launch and deploy.

  • Launch will create a new application on Fly.io in the organization you choose.
  • Deploy will (re)deploy the app. This will update the app you’ve already created with launch.
  • You have an account on Fly.io
  • You have created an organization on Fly.io
  • You have installed the flyctl agent.

Run fly-laravel launch to create a new Laravel application. You will be able to pick the name, what organization to deploy in and what extra services you want to set up.

  • App name: What the app on Fly.io will be called. This can only contain alphanumeric characters and hyphens, for DNS reasons.
  • Primary Region: The primary region to deploy your app in. You should pick the region closest to your users. You can always add more regions, as specified in the Scaling Documentation
  • Organization: On Fly.io, apps can be grouped into organizations. Organizations are a great way to divide up apps, share access with team members and manage billing. If there’s only one organization available we’ll auto-select that one.
  • Services: you can pick if you want to run cron or a queue worker in the app. This will create a process group for each extra service, to scale independently.

To set up the app, a number of steps will occur to set up a basic Laravel app:

  • The locally installed Node and PHP versions are detected
  • The fly.toml app configuration file is generated. If you want to make changes to your app later on, this is where to do it.
  • Some folders and files are copied over, most notably the Dockerfile.
  • A randomly generated APP_KEY will be set as a secret on your app.

A note on the configured SESSION_DRIVER in the fly.toml file:

  • By default, your Laravel app will be configured with Cookie-based session storage. This allows sessions to work across multiple instances of your web app without the need of an external session service like Redis to make session data available to all the instances. Of course Cookie-based session storage has limits on how much session data it can store, so you might want to consider replacing this to allow storage of larger data.

After set up, your app will be ready to deploy! In your project root, a .fly folder will be added alongside a Dockerfile and a fly.toml file.

When launching databases you will need to deploy again so launch those before deploying the laravel app.

Run fly-laravel deploy to deploy your Laravel app. This will update the running app (if any) to include your latest changes. Add the --open flag to open the app in your browser when it has been deployed.

Run fly-laravel launch:mysql to create a new MySQL application. You will be able to pick the app name, what organization to deploy in, the MySQL username and the volume name. If a Laravel app is detected, you can opt to use the same organization and primary region.

  • App Name: What the app on Fly.io will be called. This can only contain alphanumeric characters and hyphens, for DNS reasons. By default, [laravel app name]-db will be proposed as the app name.
  • Organization: On Fly.io, apps can be grouped into organizations. Organizations are a great way to divide up apps, share access with team members and manage billing. If there’s only one organization available we’ll auto-select that one.
  • Primary Region: The primary region to deploy your app in. You should pick the region closest to your users. You can always add more regions, as specified in the Scaling Documentation
  • Volume Name: For data persistence, a volume will be needed for database applications. If there’s a volume with this name available, we’ll use that. If no volume with this name can be found, a 1GB volume will be created on deploy. More about volumes here: Volume Documentation.

Some notes when launching a MySQL database:

  • During the launch, some environment variables will be updated in the fly.toml configuration of the Laravel app. Redeploying the Laravel app will be necessary to reflect these changes.
  • The DB_CONNECTION env var in fly.toml will be set to ‘mysql’
  • On deploy, a small scale machine will be provisioned with a 1x shared CPU and 256Mb of memory. Consider scaling up the database for better performance.
  • By default, the innodb buffer pool size will be set to 64MB. Consider optimizing this based on your performance requirements. You can find this in .fly/mysql/fly.toml, in the [processes] section.
  • For the networking to work properly, the Laravel app and MySQL app should be in the same organization.

Run fly-laravel deploy:mysql to deploy the MySQL application. After the deployment we’ll run a quick check of the machine resources, and show a warning if the memory is smaller than 1GB.

Run fly-laravel launch:redis to launch a Redis application. You will be able to pick the app name, what organization to deploy in and the volume name. If a Laravel app is detected, you can opt to use the same organization and primary region.

  • App Name: What the app on Fly.io will be called. This can only contain alphanumeric characters and hyphens, for DNS reasons. By default, [laravel app name]-db will be proposed as the app name.
  • Organization: On Fly.io, apps can be grouped into organizations. Organizations are a great way to divide up apps, share access with team members and manage billing. If there’s only one organization available we’ll auto-select that one.
  • Primary Region: The primary region to deploy your app in. You should pick the region closest to your users. You can always add more regions, as specified in the Scaling Documentation
  • Volume Name: For data persistence, a volume will be needed for database applications. If there’s a volume with this name available, we’ll use that. If no volume with this name can be found, a 1GB volume will be created on deploy. More about volumes here: Volume Documentation.

Some notes when launching a Redis application:

  • During the launch, some Laravel environment variables will be updated in its fly.toml configuration. Redeploying the Laravel app will be necessary to reflect these changes.
  • The CACHE_DRIVER and SESSION_DRIVER env vars in fly.toml will be set to ‘redis’
  • On deploy, a small scale machine will be provisioned with a 1x shared CPU and 256Mb of memory. Consider scaling up the database for better performance.
  • For the networking to work properly, the Laravel app and Redis app should be in the same organization.

Run fly-laravel deploy:redis to deploy the Redis application. After the deployment we’ll run a quick check of the machine resources, and show a warning if the memory is smaller than 1GB.

For more information about fly.io, check out the Fly.io Docs.

For more Laravel-related content, check out the Laravel-Bytes blog.

Fly-Laravel is an open-source software licensed under the MIT license.

Laravel News Links

phpcrypter: A PHP Source Code Encrypter

https://opengraph.githubassets.com/b6210f37aab8b86ce927256862837411f1839184f9f4377681f1e007d859a3ca/chr1sc0des/phpcrypter

The goal of this open source package is security through obscurity.

It aims to offer an alternative to delivering your closed source projects in plaintext. Instead, you can opt to deliver them in ciphertext (encrypted), alongside a binary PHP extension which will decrypt them on the fly.

This package uses symmetric encryption, therefore the AES-256 key (which is only known to you as the developer), can be unique per project and/or release. To avoid being detected by hex editors (e.g. Hex Fiend) and the strings command, the key is stored within the binary as an XOR cipher, split into 32 parts. Additionally, the XOR key is also split into 32 parts. All 64 key parts are then shuffled together along with 64 random key parts (128 parts in total) to ensure that the AES-256 and XOR key parts never appear in the same place twice.

If you search for an obfuscation package, there is almost always a complimentary deobfuscation package available (written by someone else), which renders the original package obsolete (unfortunately). On the other hand, AES-256 encryption hasn’t been broken (yet)!

That being said, I would certainly consider obfuscation as a compliment to encryption. If your source code is obfuscated first (before encryption) and someone tries to reverse engineer your project by looking at the opcodes and stepping through it, it would be much more difficult to understand.

Typically, obfuscation focuses on altering the execution flow of your source code, combined with the scrambling of the names of your classes, methods, functions, variables and string literals. Because obfuscation essentially rewrites your code, it inevitably comes with a few “gotchas” along the way. Encryption, on the other hand, keeps your code intact (exactly as you wrote it).

  1. PHP ^8.2
  2. phpize

This package was built with support for Windows in mind, however, it has not been tested yet.

The below assumes that you’re currently in your application’s root directory.

$ composer require chr1sc0des/phpcrypter --dev
$ ./vendor/bin/phpcrypter generate [--clean] [--] <name> [<payload>]

The below command will generate a unique AES-256-CBC symmetric key named foo:

$ ./vendor/bin/phpcrypter generate foo

Additionally, a .phpcrypter/foo directory will be created in your application’s root, containing a PHP extension skeleton. The symmetric key is the ❤️ of the skeleton 🦴 — they will both be used to later build a binary PHP extension of the same name (foo.so).

A good rule of thumb is one key (and therefore one PHP extension) per project.

The output of the above command will be similar to the following:

Success!
Payload: pAYL0AD==

❗ Please remember to add /.phpcrypter to your .gitignore file.

‼️ Additionally, it is important to save the payload in a password manager, such as 1Password or pass.

$ cd .phpcrypter/foo
$ phpize
$ ./configure
$ make
$ make install

The above commands will build a PHP extension named foo.so and copy it into your PHP extension directory. The directory can be found via the following command:

$ php -i | grep ^extension_dir

You should then add the following line to your php.ini configuration file:

extension=foo.so
foo.decrypt=1

The location of the loaded php.ini configuration file can be found via the following command:

$ php -i | grep "Loaded Configuration File"

Next, verify that the extension is loaded:

$ ./vendor/bin/phpcrypter encrypt <payload> <path>...

The below encrypts multiple directories and files at once. You must specify the previously obtained payload as the first argument.

$ ./vendor/bin/phpcrypter encrypt "pAYL0AD==" \
  "dir-1" \
  "dir-2" \
  "file-1.php" \
  "file-2.php"

❗ The contents of any PHP files found in the above paths will be overwritten. It is highly recommended that you create a new Git branch for these files:

$ git checkout -b encrypted

If you’re just experimenting, it’s useful to be able to encrypt and decrypt at will. The below decrypts any directories and/or files previously encrypted with the payload argument:

$ ./vendor/bin/phpcrypter decrypt <payload> <path>...

❗ Again, the contents of any PHP files found in the above paths will be overwritten.

<?php // @foo
if (! extension_loaded('foo')) exit('The "foo" extension is not loaded');
#pAYL0AD==

The PHP code block should be self explanatory, however, the final line contains a base64 encoded string containing the phpcrypter version, the IV (initialization vector) and the encrypted source code.

By default, when the extension is loaded, it simply hooks into the internals of PHP, namely the zend_compile_file() function, but it doesn’t do anything, unless the foo.decrypt configuration option is set to 1.

In production, it is recommended that you set foo.decrypt to 0 in your php.ini configuration file. This means that there’s no additional overhead for unencrypted PHP files (which will typically be any open source packages in your Composer dependencies).

Then, it is recommended that you use ini_set('foo.decrypt', 1) in any unencrypted PHP files which include/require encrypted files. For example, if you would like to encrypt a controller, you should use ini_set() within an unencrypted base controller. You cannot use ini_set() within encrypted PHP files because zend_compile_file() works at a lower level.

Below are some autocannon benchmarks (10 connections for 10s):

Extension Loaded Extension Enabled File Encrypted Avg. Latency
No No No 2860.78 ms
Yes php.ini No 2923.03 ms
Yes php.ini Yes 2970.96 ms
Yes ini_set() Yes 2890.86 ms

When you’re ready to deploy your encrypted files, you should build an extension for that platform if it differs from your workstation, for example, Linux vs. macOS.

In the event that you need to install multiple extensions on the same server (for different projects), you should consider installing phpcrypter globally:

$ composer global require chr1sc0des/phpcrypter

You must specify the previously obtained payload as the second argument, so that the same key becomes the ❤️ of this skeleton 🦴 too.

$ cd ~/.composer

$ export HISTCONTROL=ignorespace
$  ./vendor/bin/phpcrypter generate foo "pAYL0AD=="
$ unset HISTCONTROL

💡 Using HISTCONTROL=ignorespace prevents any commands that are prefixed with a space from appearing in your shell’s history.

You should refer to the previous section, following the appropriate steps for this particular platform.

You are now ready to deploy your encrypted PHP files! 🚀

The MIT License (MIT).

Laravel News Links

A complete history of Laravel’s versions from 2011 to 2023

https://life-long-bunny.fra1.digitaloceanspaces.com/media-library/production/178/conversions/sngqsGxoLry9qHLY5j7XaXm5dLJ5C5-metabGFyYXZlbC5qcGc%3D–optimized.jpg

A complete history of Laravel’s versions (2011-2023)

Updated on

A complete history of Laravel's versions (2011-2023)

If you’re a Laravel enthusiast like me, take a journey through history and explore a detailed timeline of Laravel’s evolution from its inception in 2011 to 2023.

As we dive into each version release, we’ll highlight the game-changing features and improvements that Laravel brought along. Whether you’re planning an upgrade or just curious about how far Laravel has come—this comprehensive guide seals the deal.

Laravel News Links

Don’t Start Using Your MySQL Server Until You’ve Configured Your OS

https://www.percona.com/blog/wp-content/uploads/2023/09/Dont-Start-Using-Your-MySQL-Server-Until-Youve-Configured-Your-OS-150×150.pngDon’t Start Using Your MySQL Server Until You’ve Configured Your OS

Whenever you install your favorite MySQL server on a freshly created Ubuntu instance, you start by updating the configuration for MySQL, such as configuring buffer pool, changing the default datadir director, and disabling one of the most outstanding features – query cache. It’s a nice thing to do, but first things first. Let’s review the best practices we usually follow in Managed Services before using your MySQL server in production and stage env, even for home play purposes.

Memory

Our usual recommendation is to use specific memory parameters, which we suggest to ensure optimal performance.

  • To prevent out-of-memory (OOM) episodes, the OOM Score has to be set to -800.
  • vm.swappiness = 1
  • Disable Transparent Huge Pages
  • Install and enable jemalloc. Let’s briefly go through each setting to understand why adjustments are needed. Afterward, we will see how to configure these settings on your OS.

OOM

The OOM killer checks oom_score_adj to adjust its final calculated score. This file is present in /proc/$pid/oom_score_adj. You can add a sizable negative score to this file to ensure that OOM killer is less likely to pick up and terminate your process. The oom_score_adj can vary from -1000 to 1000. If you assign -1000 to it, it can use 100% memory and avoid getting terminated by OOM killer. On the other hand, if you assign 1000 to it, the Linux kernel will keep killing the process even when it uses minimal memory.

Swappiness

Swappiness is a Linux kernel parameter determining how aggressively the Linux virtual machine swaps pages between memory and the swap space on the system’s disk. The default value of vm.swappiness is 60, representing the percentage of free memory before activating the swap. Lower values reduce swapping and keep more memory pages in physical memory. Changing the value directly influences the performance of the Linux system. These values are defined as:

  • 0: swap is disabled
  • 1: Minimum amount of swapping without disabling it entirely
  • 10: recommended value to improve performance when sufficient memory exists in a system
  • 100: aggressive swapping

Transparent Huge Pages and Jemalloc

When it comes to Transparent Huge Pages (THP), they can take up more memory. The kernel’s memory allocation function allocates the requested page size, and sometimes more, rounded up to fit within the available memory. In other words, even if your application requires a small amount of memory, it will still be allocated at least a full page.

Additionally, pages must be contiguous in memory, which applies to ‘huge pages.’ This means that if the server cannot find a full page available in a row, it will defragment the memory before allocating it. This can negatively impact performance and cause delays.

InnoDB is built on a B*-Tree of indices, meaning that its workload will usually have sparse rather than contiguous-memory access, and, as such, it will likely noticeably perform worse with THP.

If you use jemalloc in conjunction with THP, the server may run out of memory over time because unused memory cannot be freed. Therefore, disabling Transparent Huge Pages for database servers is advisable to avoid this situation.

Using jemalloc instead of glibc memory allocator for MySQL results in less memory fragmentation and more efficient resource management. This is especially true when Transparent Huge Pages are disabled.

Action steps for memory settings

Before we change what needs to be adjusted, we need to know the current situation on our DB instance. By the way, I assume you installed the pt-toolkit and your favorite MySQL server to make your life easier. If you haven’t, please install it (Percona Toolkit documentation).

echo " -- THP check";cat /sys/kernel/mm/transparent_hugepage/enabled;  cat /sys/kernel/mm/transparent_hugepage/defrag;echo " --Swappiness";sysctl vm.swappiness ; cat /etc/sysctl.conf | grep -i swap;echo " -- OOM for MySQL";cat /proc/$(pidof mysqld)/oom_score ; cat /proc/$(pidof mysqld)/oom_score_adj;echo " -- jemalloc"; sudo pt-mysql-summary | grep -A5 -i "memory management" ; sudo grep -i jem /proc/$(pidof mysqld)/maps

We want to see something like below, but I am sure we are not.

> echo " -- THP check";cat /sys/kernel/mm/transparent_hugepage/enabled;  cat /sys/kernel/mm/transparent_hugepage/defrag;echo " --Swappiness";sysctl vm.swappiness ; cat /etc/sysctl.conf | grep -i swap;echo " -- OOM for MySQL";cat /proc/$(pidof mysqld)/oom_score ; cat /proc/$(pidof mysqld)/oom_score_adj;echo " -- jemalloc"; sudo pt-mysql-summary | grep -A5 -i "memory management" ; sudo grep -i jem /proc/$(pidof mysqld)/maps  -- THP check always madvise [never] always defer defer+madvise madvise [never]  --Swappiness vm.swappiness = 1 vm.swappiness = 1  -- OOM for MySQL 0 -800  -- jemalloc # Memory management library ################################## jemalloc enabled in mysql config for process with id 29584 Using jemalloc from /usr/lib/x86_64-linux-gnu/libjemalloc.so.1 # The End #################################################### 7f3456ac1000-7f3456af4000 r-xp 00000000 08:01 63812                      /usr/lib/x86_64-linux-gnu/libjemalloc.so.1 7f3456af4000-7f3456cf3000 ---p 00033000 08:01 63812                      /usr/lib/x86_64-linux-gnu/libjemalloc.so.1 7f3456cf3000-7f3456cf5000 r--p 00032000 08:01 63812                      /usr/lib/x86_64-linux-gnu/libjemalloc.so.1 7f3456cf5000-7f3456cf6000 rw-p 00034000 08:01 63812                      /usr/lib/x86_64-linux-gnu/libjemalloc.so.1

Let’s quickly fix it.

Disable THP

Let’s create a service which will disable THP for us:

sudo su - cat <<EOF > /usr/lib/systemd/system/disable-thp.service [Unit] Description=Disable Transparent Huge Pages (THP) [Service] Type=simple ExecStart=/bin/sh -c "echo 'never' > /sys/kernel/mm/transparent_hugepage/enabled && echo 'never' > /sys/kernel/mm/transparent_hugepage/defrag" [Install] WantedBy=multi-user.target EOF

And the below command to enable this service:

sudo systemctl daemon-reload sudo systemctl start disable-thp sudo systemctl enable disable-thp

vm.swappiness = 1

Change swappiness at runtime.

echo 1 > /proc/sys/vm/swappiness

And let’s persist it in the config file:

echo "# Swappiness" >> /etc/sysctl.conf echo "vm.swappiness = 1" >> /etc/sysctl.conf

And enable this change.

sudo sysctl -p

OOM and Jemalloc

We are halfway through improving things, but let’s keep pushing for better memory usage. Let’s install jemalloc.

sudo apt-get install libjemalloc1

Please confirm that we have it on the correct path:

ls -l /usr/lib/x86_64-linux-gnu/libjemalloc.so.1

And the last thing we need to push our MySQL service to use our magic jemalloc library, let’s create an override for systemd:

Note: Depending on the system, it can be shown as mysql or mysqld. You can use systemctl | grep mysql to get the proper mysql service name.

sudo systemctl edit mysql

Add the specified content to the file below immediately.

[Service] Environment= "LD_PRELOAD=/usr/lib64/libjemalloc.so.1" OOMScoreAdjust=-800

To apply this change, we need to reload daemon and mysql service.

sudo systemctl daemon-reload sudo systemctl restart mysql

The optimization of our memory settings has been completed successfully. You can verify it by executing the same check above.

echo " -- THP check";cat /sys/kernel/mm/transparent_hugepage/enabled;  cat /sys/kernel/mm/transparent_hugepage/defrag;echo " --Swappiness";sysctl vm.swappiness ; cat /etc/sysctl.conf | grep -i swap;echo " -- OOM for MySQL";cat /proc/$(pidof mysqld)/oom_score ; cat /proc/$(pidof mysqld)/oom_score_adj;echo " -- jemalloc"; sudo pt-mysql-summary | grep -A5 -i "memory management" ; sudo grep -i jem /proc/$(pidof mysqld)/maps

Mount point option for disk

Another thing I want to address in this article is how to reduce IO stress on our disks. It’s one of the most straightforward tasks we have, but it will give us a lot of performance for our powerful disks, which keeps our databases healthy and durable.

By default, when most disks are mounted using the relatime option, the system updates the metadata statistics for files each time they are accessed or changed on the mount point. This process can result in a significant amount of IO usage, which can be particularly problematic when running a database on that mount point. Given that MySQL typically accesses and writes numerous files concurrently, we must prioritize IO for more critical processes within the database rather than for updating metadata. Therefore, it is advisable to refrain from using the relatime option by default in such scenarios. To make this happen, we need to update it to noatime,nodiratime.

How to check the current options we have: I assume that you are using a separate mount point for the MySQL database attached to /var/lib/mysql path.

sudo mount | grep "/var/lib/mysql"

The result you will more likely get is:

/dev/sdb on /var/lib/mysql type ext4 (rw,relatime)

Action steps to apply best practices for disk settings

Let’s find out where we have these disk settings for that fstab coming to help.

> cat /etc/fstab |  grep "/var/lib/mysql" /dev/sdb      /var/lib/mysql     ext4 defaults     0   0

So it’s easy to update the fstab file and add the required options for mount point = noatime, nodiratime.

sudo vim  /etc/fstab /dev/sdb         /var/lib/mysql     ext4 defaults,noatime,nodiratime    0   0

From that moment, we are almost done, but we can’t apply these changes until our MySQL server is running, so we need to stop our mysql service, umount datadir directory, and mount it with new options.

sudo systemctl stop mysql

Once MySQL service is stopped, we can unmount our /mysql directory,

sudo umount /var/lib/mysql

and mount it again using updated /etc/fstab settings:

sudo mount -av

At that point, disk settings should be good, but it’s worth verifying that we have the desired mount point options. Afterward, we can start the MySQL service:

> sudo mount | grep  grep "/var/lib/mysql" /dev/sdb on /var/lib/mysql type ext4 (rw,noatime,nodiratime)

We see the options are correct, so we can start the mysql service.

sudo systemctl start mysql

Conclusion

Optimizing memory and disk settings for MySQL can greatly improve the performance and stability of your database. Following the steps outlined in this article, you can reduce IO stress on your disks, prioritize IO for critical processes within the database, and improve memory usage. Remember always to verify your changes and consult with a professional if you have any questions or concerns. With these optimizations in place, your MySQL database will be better equipped to handle the demands of your applications and users.

Percona Distribution for MySQL is the most complete, stable, scalable, and secure open source MySQL solution available, delivering enterprise-grade database environments for your most critical business applications… and it’s free to use!


Try Percona Distribution for MySQL today!

Planet MySQL

Building Efficient Applications with MySQL Stored Procedures

https://kongulov.dev/assets/images/posts/building-efficient-applications-with-mysql-stored-procedures.png

Building Efficient Applications with MySQL Stored Procedures

MySQL stored procedure is a powerful database function that allows you to store and execute a set of SQL statements in the database, similar to functions in programming. The storage process can greatly improve the performance, security and maintainability of the database. This article will introduce the use of MySQL stored procedures in detail.

What is a MySQL stored procedure?

MySQL stored procedures are a set of precompiled SQL statements that are stored in the database with a name and can be called and executed at any time. Stored procedures can accept input arguments, perform a series of operations, and return results. These characteristics make stored procedures an ideal tool for handling complex queries, data manipulation, and transaction management.

Create a stored procedure

To create a MySQL stored procedure, you use CREATE PROCEDURE statements. Here is a simple example:

DELIMITER //
CREATE PROCEDURE GetUser(IN user_id INT)
BEGIN
    SELECT * FROM users WHERE id = user_id;
END //
DELIMITER ;
  • DELIMITERU sed to define the separator. Because the stored procedure contains multiple SQL statements, a separator different from the semicolon is required.
  • CREATE PROCEDURE Create a stored procedure that accepts an user_id input argument named and contains a set of SQL statements between BEGIN and END

Call stored procedure

Once the stored procedure is created, you can CALL execute it using the statement:

This will call the stored procedure named and pass it GetUser the arguments 1

Arguments to stored procedure

Stored procedures can accept arguments, which can be input arguments, output arguments, or input/output arguments. In the above example, user_id it is an input argument because it is used to pass values to the stored procedure. You can define different types of arguments using the following syntax:

  • IN: Indicates that the argument is an input argument and can be used to pass values to the stored procedure.
  • OUT: Indicates that the argument is an output argument and can be used to return a value from a stored procedure.
  • INOUT: Indicates that the argument is an input/output argument and can be used to pass values and return values from stored procedures.

Stored procedure logic

The body of the stored procedure is contained BEGIN between END and and can contain various SQL statements, such as SELECT, INSERT, UPDATE, DELETE, IF statement, LOOP statement, etc. This allows you to perform complex logic in stored procedures, such as transaction processing, conditional judgments, and loop operations.

Advantages of the storage process

Using stored procedures has the following advantages:

  1. Performance Optimization: Stored procedures are generally faster than individual SQL statements because they are compiled and cached on the database server, reducing communication overhead.
  2. Security: Stored procedures can be used to encapsulate sensitive operations, thereby improving the security of the database. The user only needs to call the stored procedure without directly accessing the table.
  3. Maintainability: Stored procedures allow commonly used business logic to be encapsulated in one place, reducing program code redundancy and making it easier to maintain.
  4. Transaction management: Stored procedures can be used to manage complex transaction logic to ensure data consistency and integrity.
  5. Reduce network latency: The storage process is executed on the database server, which can reduce network communication with the user.

Disadvantages of storage process

While the storage process has many advantages, there are also some disadvantages:

  1. Complexity: Writing and maintaining complex stored procedures can become difficult, especially for developers who are unfamiliar with stored procedures.
  2. Portability: The syntax and functionality of stored procedures vary between database systems and may not be portable enough.
  3. Difficult to debug: Debugging stored procedures can be more challenging than debugging application code because they execute in a database.

Modify and delete stored procedures

To modify a stored procedure, you use ALTER PROCEDURE statements. To delete a stored procedure, you can use DROP PROCEDURE the statement.

These commands allow you to update the logic of a stored procedure or delete a stored procedure that is no longer needed.

Conclusion

MySQL stored procedures are a powerful tool that can improve the performance and security of the database, but they also need to be used with caution to ensure good code quality and maintainability. Stored procedures are often used to encapsulate complex business logic, optimize queries, and provide better database management and security. Whether you are processing large-scale data or performing complex transactions, stored procedures are a powerful tool for MySQL database management.

Laravel News Links

Query Builder – Where method the full guide

https://ahmedash.dev/images/thumbs/laravel/laravel-where.png

Introduction

The simples way to use where is just to statically call it on your model as Model::where('name', 'Ahmed')->first()

Laravel Query builder is very powerful. It offers a rich set of methods that makes it easy for you to write SQL queries in a very easy way.

One of those methods is the Where method and it has many ways to simplify complex queries

The Query Builder

First of all, you need to understand that where and all its siblings lives in the Builder class. and when you call a static method on the model directory. Most of the times, it will be forwarded to the Eloquent query builder

1public static function __callStatic($method, $parameters)
2{
3    return (new static)->$method(...$parameters);
4}
 1public function __call($method, $parameters)
 2{
 3    if (in_array($method, ['increment', 'decrement', 'incrementQuietly', 'decrementQuietly'])) {
 4        return $this->$method(...$parameters);
 5    }
 6
 7    if ($resolver = $this->relationResolver(static::class, $method)) {
 8        return $resolver($this);
 9    }
10
11    if (Str::startsWith($method, 'through') &&
12        method_exists($this, $relationMethod = Str::of($method)->after('through')->lcfirst()->toString())) {
13        return $this->through($relationMethod);
14    }
15
16    return $this->forwardCallTo($this->newQuery(), $method, $parameters);
17}

The forwardCallTo, forwards the method call to the $this->newQuery() which returns an instance of Builder class

1/**
2 * Get a new query builder for the model's table.
3 *
4 * @return \Illuminate\Database\Eloquent\Builder
5 */
6public function newQuery()
7{
8    return $this->registerGlobalScopes($this->newQueryWithoutScopes());
9}

So by looking into the where method in the Builder class. it’s about 100 lines
. That’s because it can handle many cases. So let’s take them one by one

Simple where condition

The first easy simple way to write a condition in laravel is to just pass the key and value to the where.

1User::where('email', 'root@admin.com')->first()

This will translate to

1SELECT * FROM users WHERE `email` = 'root@admin.com' LIMIT 1

Multiple where

Chain wheres

You can also chain several wheres

1User::where('email', 'root@admin.com')
2	->where('is_active', true)->first()

This will translate to

1SELECT * FROM users WHERE `email` = 'root@admin.com' AND `is_active` = true LIMIT 1

Array of Wheres

Another way to do so is to use an array of where

1User::where([
2	'email' => 'root@admin.com',
3	'is_active' => true
4])->first()

This will translate to

1SELECT * FROM users WHERE `email` = 'root@admin.com' AND `is_active` = true LIMIT 1

Using OrWhere

The OrWhere method is used to add an OR constraint to your queries. It functions similarly to the where method, but adds the condition as an “OR” clause rather than an “AND” clause.

1User::where('email', 'root@admin.com')
2	->orWhere('username', 'admin')->first()

But how we do the is_active when we use OR?

Grouped Conditions

We can use grouped conditions by passing a closure to the where method

1User::where(function($q) {
2  $q->where('email', 'root@admin.com')
3	  ->orWhere('username', 'admin');
4})
5->where('is_active', true)
6->first()

And this will translate to

1SELECT
2*
3FROM `users`
4WHERE (`email` = 'root@admin.com' or `username` = 'admin')
5AND `is_active` = 1
6
7LIMIT 1

And you can have as many nested groupings as you want

When and Where

You can also apply specific wheres only when a condition is true

1$onlyActive = true;
2
3User::where('email', 'root@admin.com')
4->when($onlyActive, function($q) {
5	$q->where('is_active', true);
6})->first()

The where is_active = true will be only applied if the $onlyActive is true

Shortcuts

There are also some shortcuts that can be applied to simplify how you write eloquent

Where{Column}

1User::whereEmail('root@admin.com')->first()

Translates to

1SELECT * FROM `users` WHERE `email` = 'root@admin.com' LIMIT 1

Where{Column}And{Column}

1User::whereEmailAndStatus('root@admin.com','active')->first()

Translates to

1SELECT * FROM `users` WHERE `email` = 'root@admin.com' AND `status` = 'active' LIMIT 1

Where{Column}Or{Column}

1User::whereEmailOrUserName('root@admin.com','admin')->first()

Translates to

1SELECT * FROM `users` WHERE `email` = 'root@admin.com' OR `user_name` = 'admin' LIMIT 1

WhereNull

You can also look for records where the column value is null

1User::whereNull('confirmed_at')->get()
1SELECT * FROM `users` WHERE `confirmed_at` IS NULL

WhereNot

There is also WhereNot to apply “NOT EQUAL TO” condition in your queries.

1User::whereNot('status','active')->all()

Which translates to

1SELECT * FROM `users` WHERE NOT `status` = 'active'

WhereNotNull

A combination of the previous two

1User::whereNotNull('confirmed_at')->all()

Which translates to

1SELECT * FROM `users` WHERE `confiremd_at` IS NOT NULL

Conclusion

We checked together what are the possible ways to use the where method. Let me know if you have any tips or tricks or maybe missed cases I did not cover in the comments.

Laravel News Links

A James Bond "movie" I’d never heard of before

http://img.youtube.com/vi/yH8mVTDylXI/0.jpg


I wasn’t aware that, according to Wikipedia:

To promote the film ["You Only Live Twice"], United Artists Television produced a one-hour colour television programme titled Welcome to Japan, Mr. Bond, which first aired on 2 June 1967 in the United States on NBC. Bond regulars Lois Maxwell and Desmond Llewelyn appeared, playing respectively Miss Moneypenny and Q. Kate O’Mara appears as Miss Moneypenny’s assistant. The programme shows clips from You Only Live Twice and the then four existing Bond films, and contained a storyline of Moneypenny trying to establish the identity of Bond’s bride.

The James Bond Wiki notes:

The feature stars Lois Maxwell and Desmond Llewelyn in character as Miss Moneypenny and Q respectively as well as Kate O’Mara as Miss Moneypenny’s unnamed assistant. They all reflect on James Bond’s previous adventures in Dr. No, From Russia with Love, Goldfinger and Thunderball through the use of archival footage. In addition they speculate on Bond’s current and future assignments, showing preview clips of You Only Live Twice.

A subplot is included about a woman (who is never directly shown, akin to Ernst Stavro Blofeld) who is obsessed with becoming Bond’s next lover. She is seen holding a Pan paperback copy of On Her Majesty’s Secret Service, possibly as a teaser to the audience that it would be the next novel to be adapted into a film (which it was).

Fortunately for us, the entire TV special is available on YouTube.  Enjoy!

It’s a bit dated, of course, compared to modern high-tech gee-whiz Bond movies, but I still enjoyed it – and it stars Sean Connery, who as far as I’m concerned is still the best of the actors who played Bond.

Peter

Bayou Renaissance Man