GitHub Actions for PHP Developers

If you’re a developer using GitHub, you probably have heard of GitHub Actions. GitHub’s new automated workflow system (similar to the CI feature of GitLab). It has been announced in October 2018 and is currently still in beta (You can sign up here to get access).

I recently got access to the beta and began developing Actions suited for my projects. As I currently spend most of my time writing code in PHP, the Actions mentioned in this article are focused on that language. The logic can be easily ported to other languages though.

What are Workflows and Actions and what can I do with them?

A Workflow is a collection of multiple Actions which can be triggered by multiple GitHub webhook events (for example when code is pushed to the repository, a Pull Request has been merged or when a new Issue has been created)

An Action can basically do everything: run your test suite, publish a package to npm, deploy your site to your server, send a Slack message. You name it.
The code for an Action can live in the project repository itself, in a separate public GitHub repository or in a Docker Hub image.

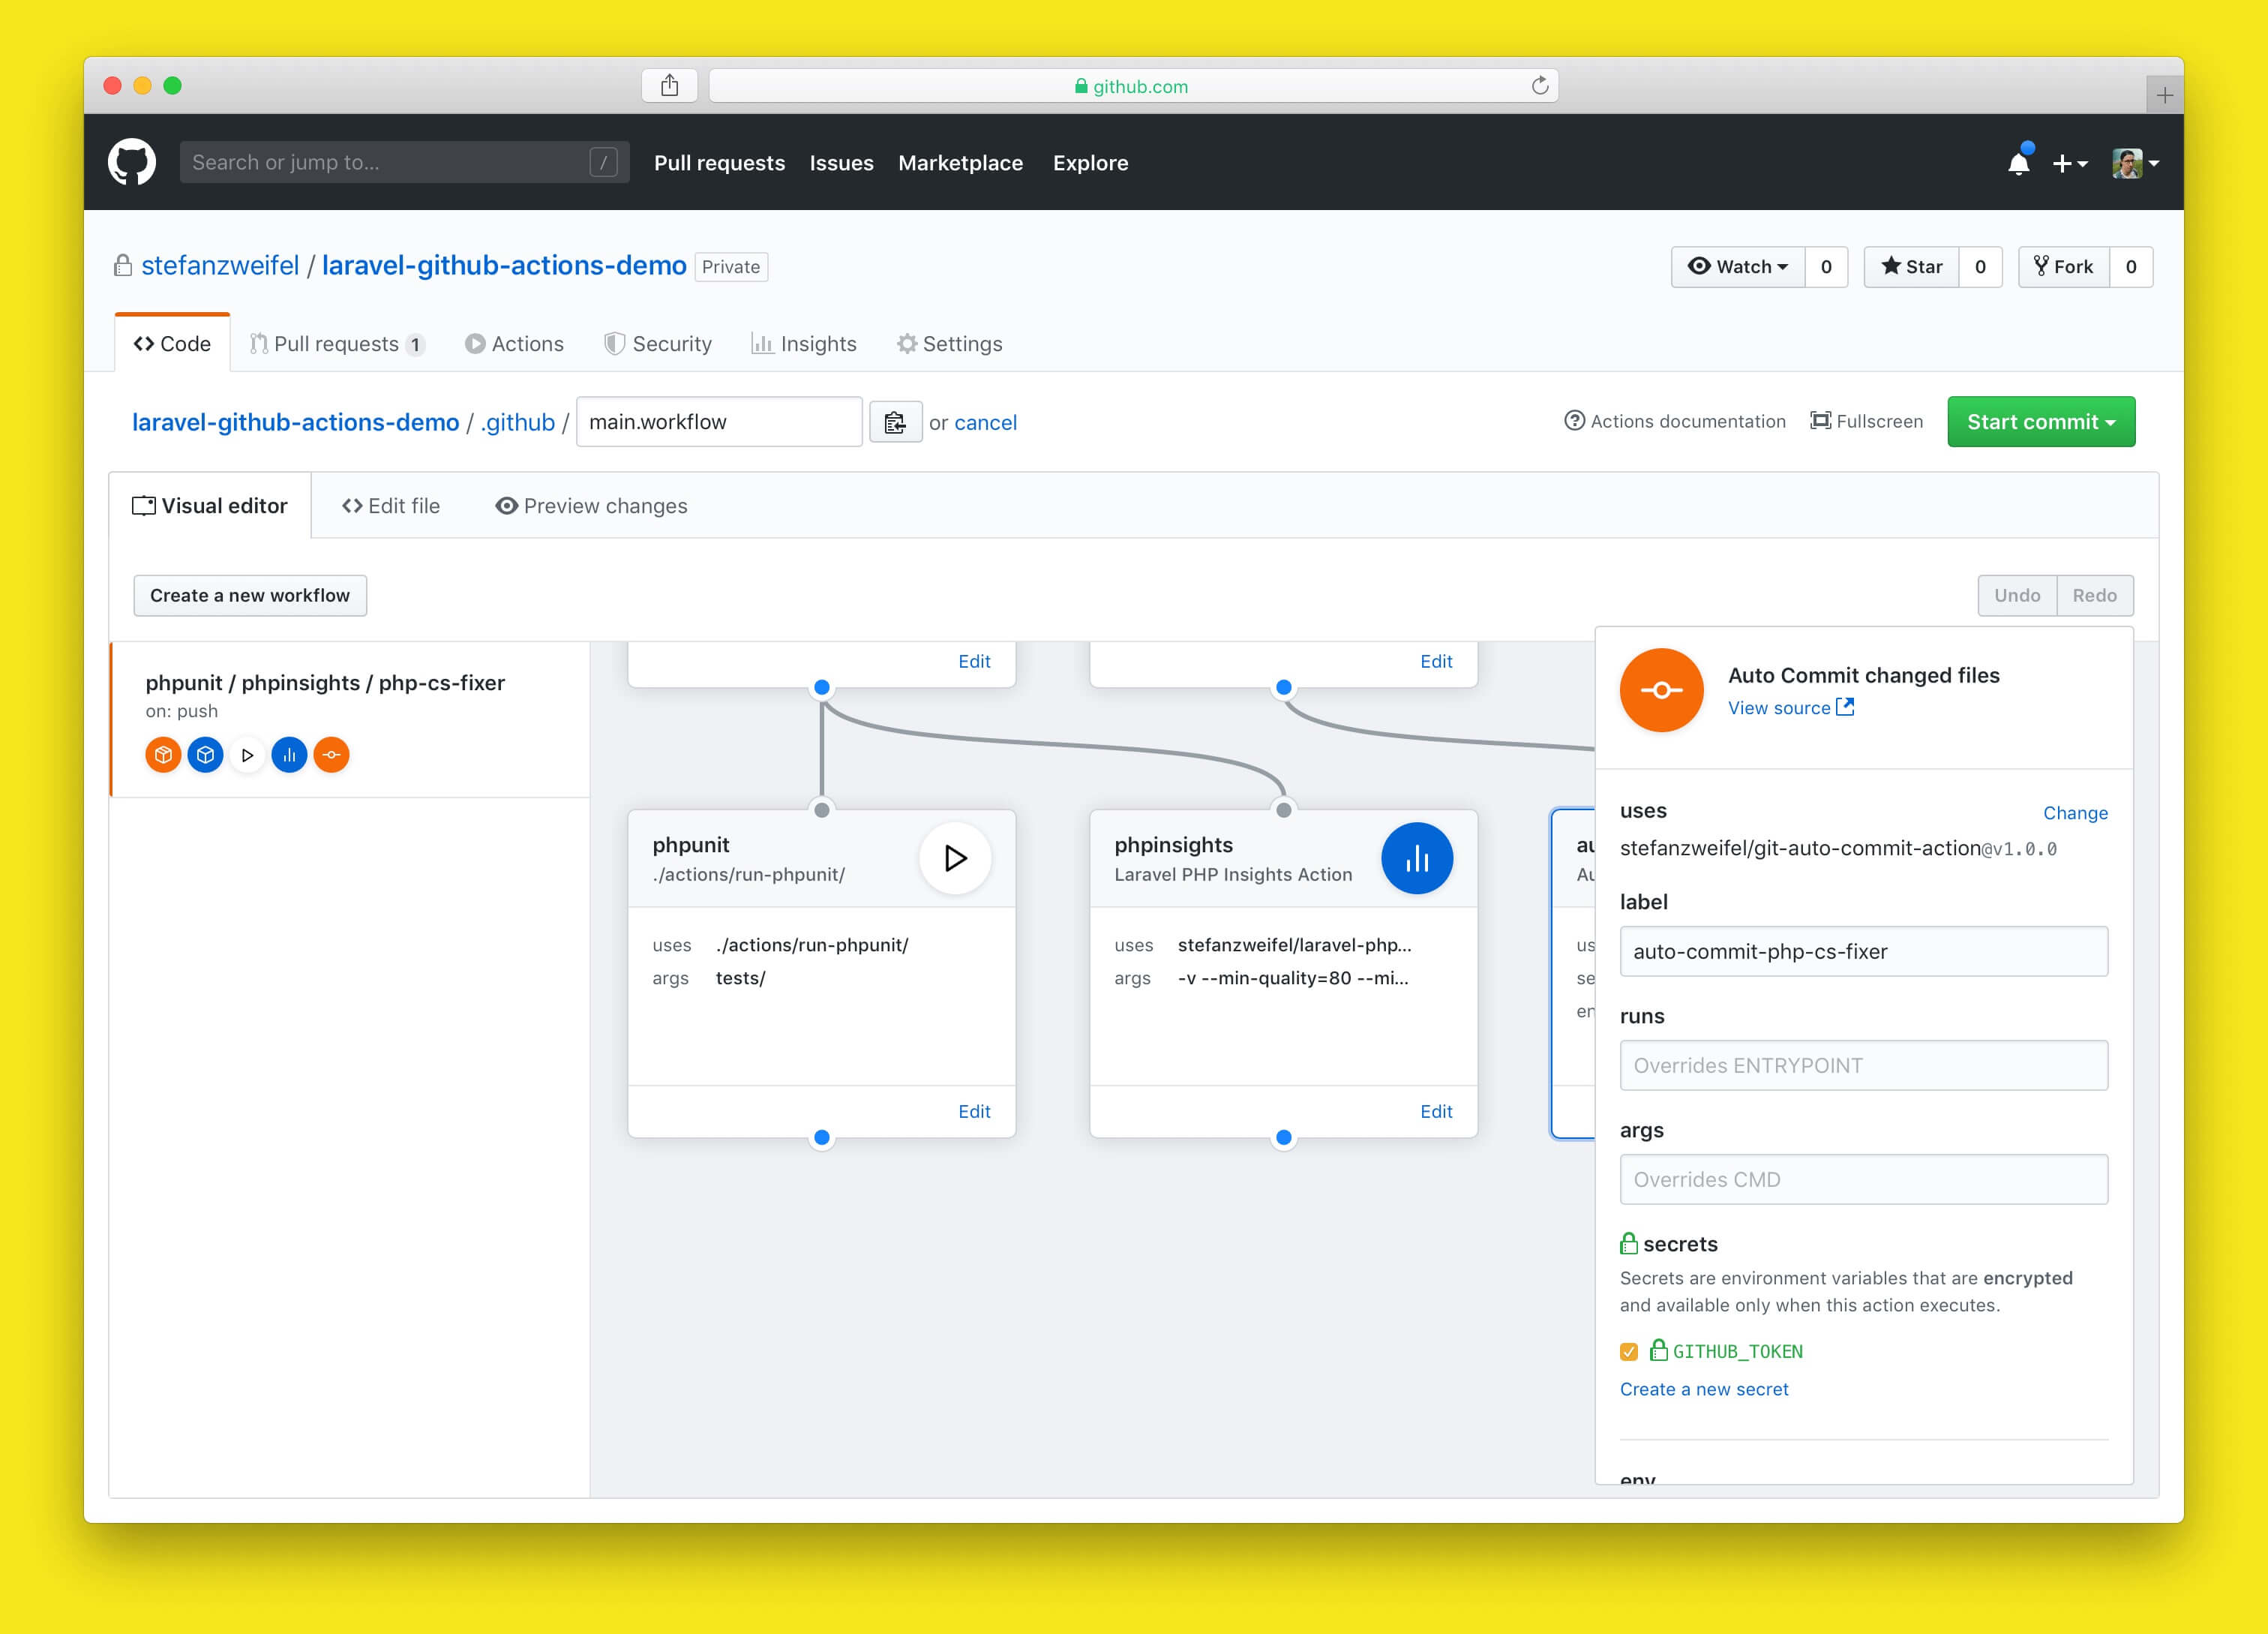
Your Workflow is defined in the main.workflow file in the .github folder in your repository. This means your Actions are written in code and are in version control. If you like to work with a GUI, Workflows and Actions can also be configured and edited in a visual editor on github.com.

Screenshot of the Visual Editor for GitHub Actions on github.com

In this post I’m going to cover 3 Actions which I think could be useful for PHP developers in their daily workflows:

  • Run your phpunit test suite
  • Run phpinsights
  • Run php-cs-fixer

I’ve published a sample Laravel application, with all three Actions configured, on GitHub. You can clone it, fork it and see for yourself how the Actions are set up.
The process of adding those Actions is documented in this Pull Request.

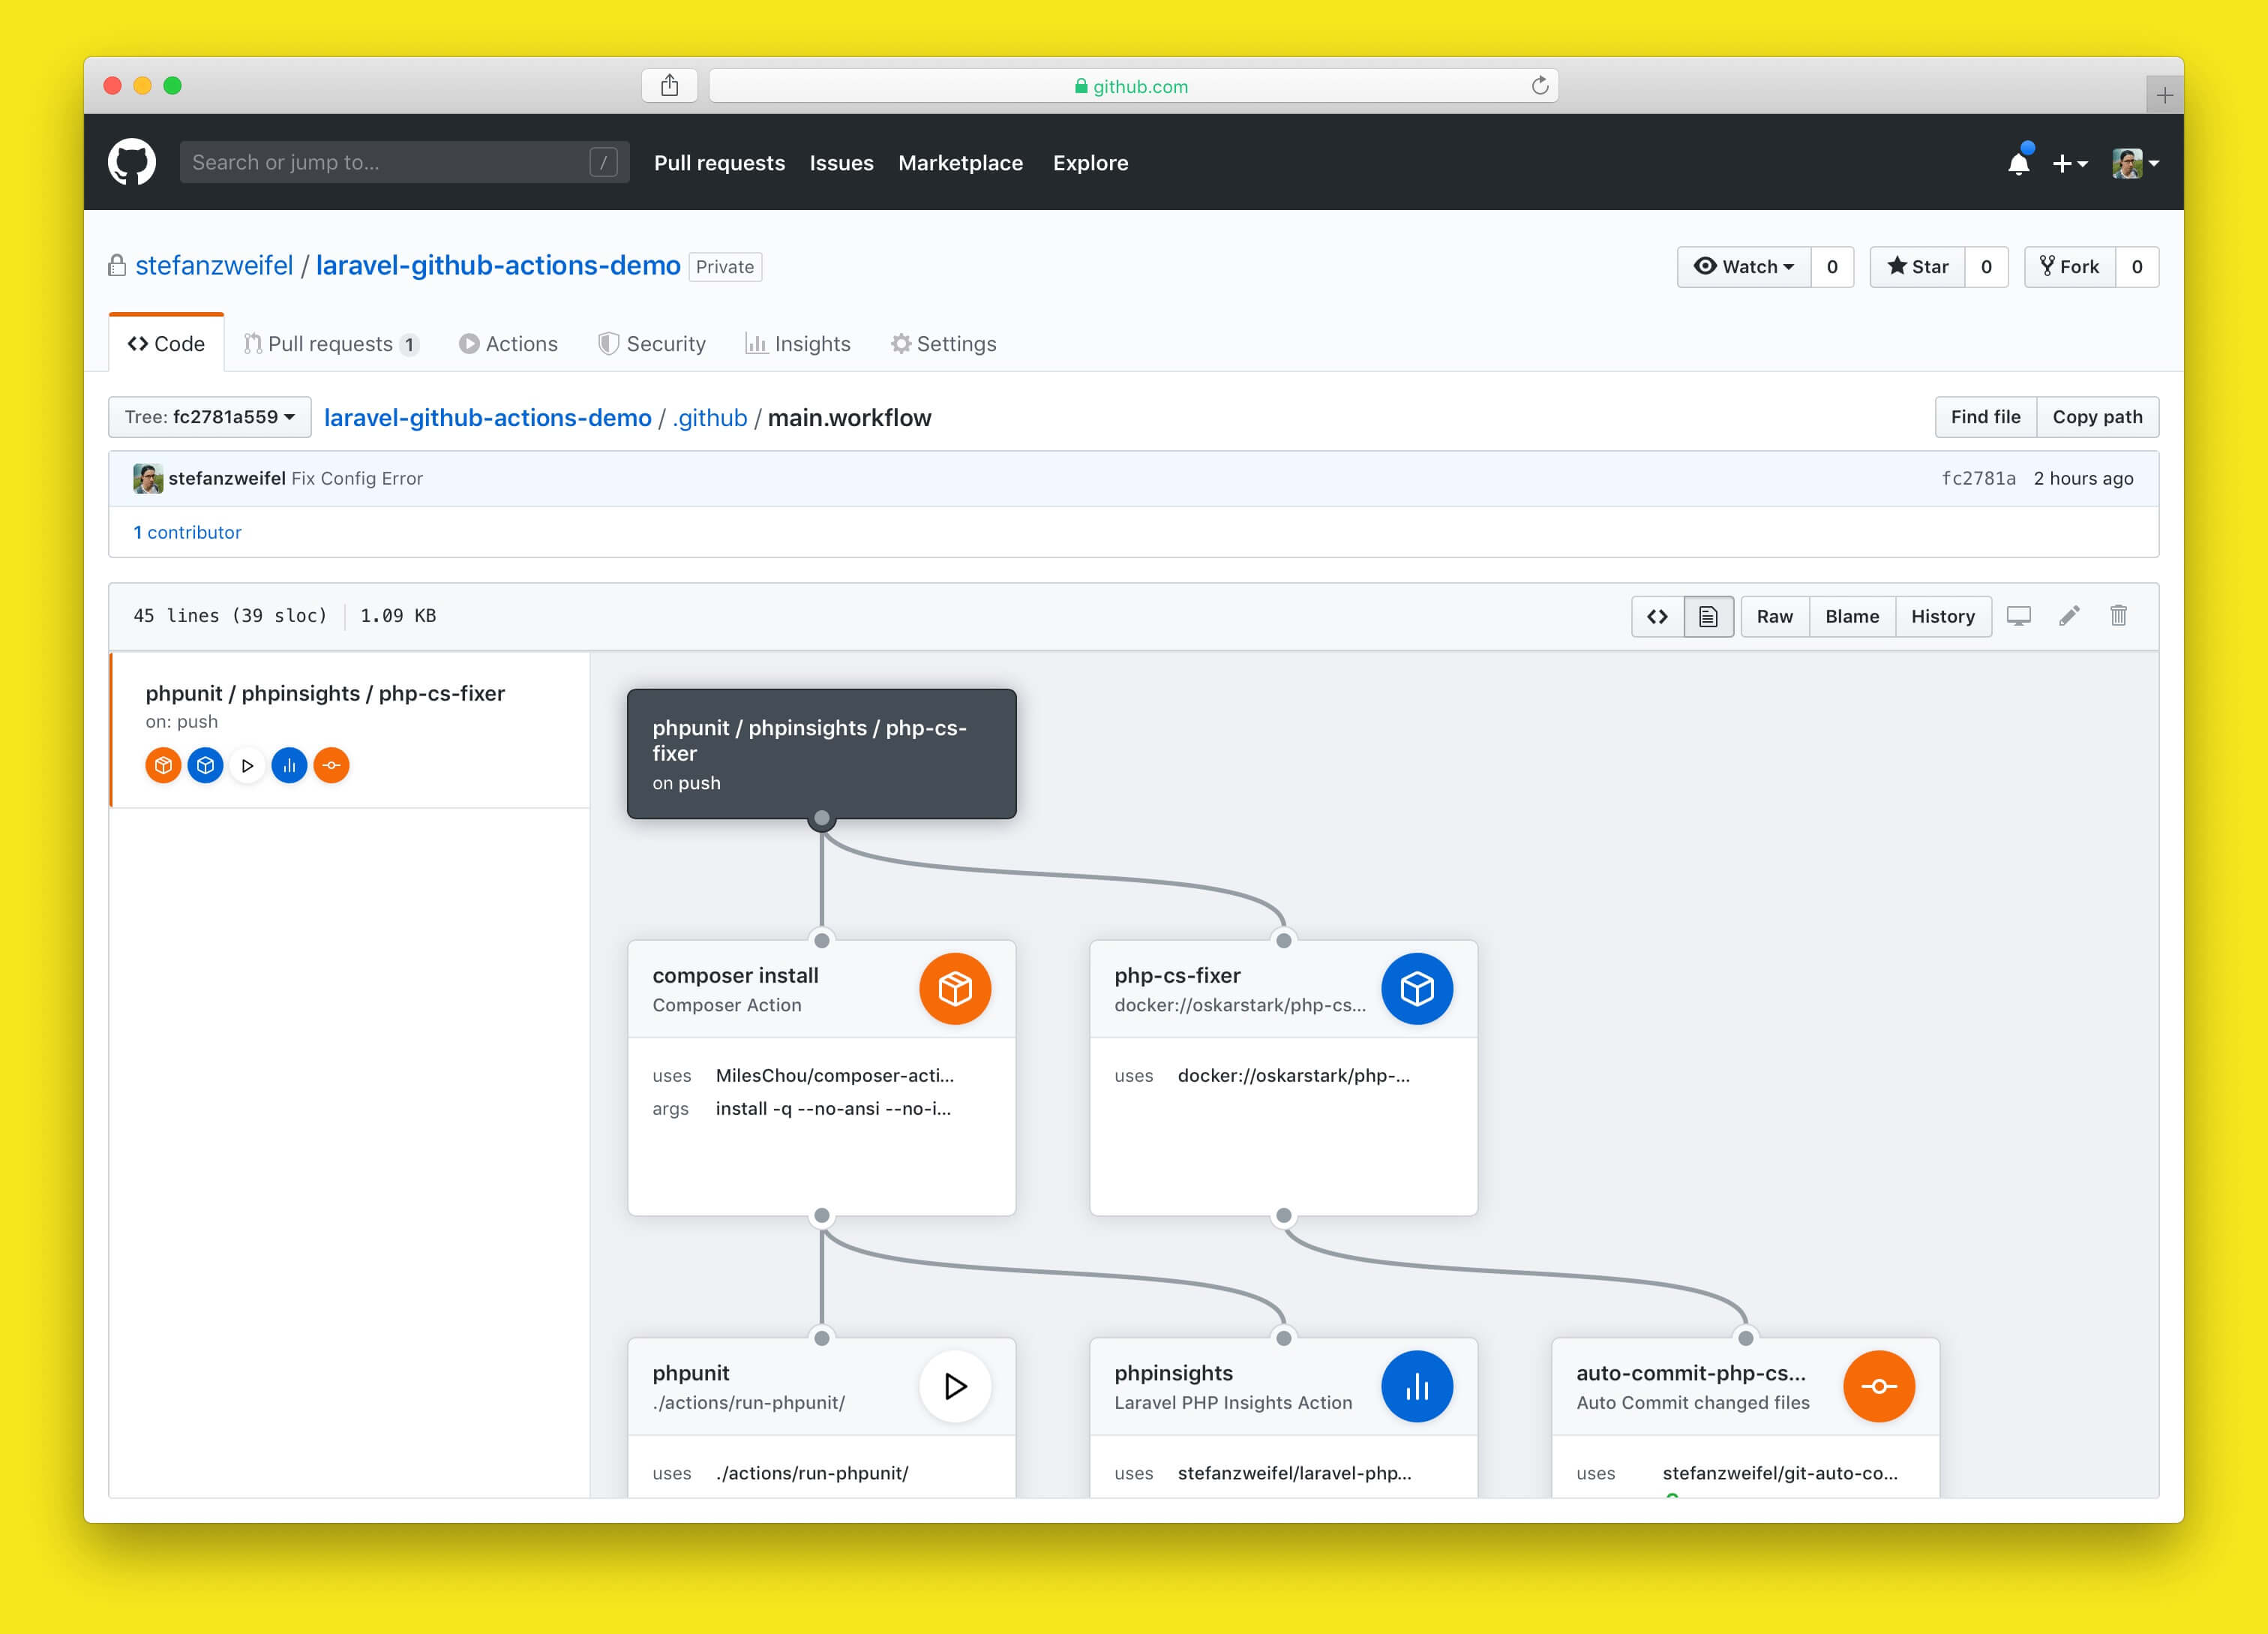
As mentioned earlier, your Workflow and Actions are defined in a main.workflow file. The final file for our sample application looks like this:

workflow "phpunit / phpinsights / php-cs-fixer" { on = "push" resolves = [ "phpunit", "phpinsights", "auto-commit-php-cs-fixer", ] } action "composer install" { uses = "MilesChou/composer-action@master" args = "install -q --no-ansi --no-interaction --no-scripts --no-suggest --no-progress --prefer-dist" } action "phpunit" { needs = ["composer install"] uses = "./actions/run-phpunit/" args = "tests/" } action "phpinsights" { needs = ["composer install"] uses = "stefanzweifel/laravel-phpinsights-action@v1.0.0" args = "-v --min-quality=80 --min-complexity=80 --min-architecture=80 --min-style=80" } action "php-cs-fixer" { uses = "docker://oskarstark/php-cs-fixer-ga" } action "auto-commit-php-cs-fixer" { needs = ["php-cs-fixer"] uses = "stefanzweifel/git-auto-commit-action@v1.0.0" secrets = ["GITHUB_TOKEN"] env = { COMMIT_MESSAGE = "Apply php-cs-fixer changes" COMMIT_AUTHOR_EMAIL = "jon.doe@example.com" COMMIT_AUTHOR_NAME = "Jon Doe" } }

GitHub Actions are not written in YAML or JSON, but in HSL. If you’ve worked with Terraform in the past, the syntax might look familiar to you.

I won’t go deep what each keyword in the Workflow syntax does (uses, needs, secrets, etc.). You should rather read the documentation.

The most important keywords for us right now are:

  • uses: Set which Action in a Workflow should be used
  • needs: Set which Action must successfully run, before this Action runs. (Similar to Dependencies)
  • env: Environment variables defined in the Workflow file itself. Allows you as a Action consumer to change things within an Action
  • secrets: Secret environment variables like API keys which should not be stored in the repository

Dockerfile? Oh no!

Each Action is executed in a Docker container. Therefore, each Action needs a Dockerfile. If you now think: "Oh no! I don’t know Docker!", then we have something in common. I’ve read and heard a lot about Docker over the years, but never really worked with it.

The good thing is that you don’t have to be a Docker expert to create or work with Actions. All you need to do is set a base image and then you’re good to go. The "core" Actions code can basically be written in any language.

One caveat you have to keep in mind when working with Actions, is that even though each Action is run in its own container, the underlying filesystem is shared with other Actions. Meaning: If one Action changes repository files, these changes are also available in other Actions.

So let’s get started with our first PHP Action.

Install Composer dependencies

To do anything with a Laravel project, we first have to install its dependencies with composer.

This can be accomplished by using the general composer Action developed by MilesChou.

workflow "composer install" { on = "push" resolves = [ "composer install" ] } action "composer install" { uses = "MilesChou/composer-action@master" args = "install -q --no-ansi --no-interaction --no-scripts --no-suggest --no-progress --prefer-dist" }

As all following task depend on composer dependencies, all other task should have "composer install" defined in the needs keyword. The "composer install" Action is therefore executed before all other Actions. (GitHub is clever enough though, to only run the Action once).

Action 1: Run phpunit test suite

One of the most common things to do in Continuous Integration is running your projects test suite on each code push.

As the test suite setup differs from project to project, I won’t use a publicly available Action to run phpunit. I will use an Action defined in the project itself. In the root of my project I create an actions/run-phpunit-folder and within it the following files:

Dockerfile

FROM php:7.3-cli-alpine LABEL "com.github.actions.name"="phpunit-test" LABEL "com.github.actions.description"="Run phpunit test suite" LABEL "com.github.actions.icon"="check-circle" LABEL "com.github.actions.color"="green" ADD entrypoint.sh /entrypoint.sh ENTRYPOINT ["/entrypoint.sh"]

entrypoint.sh

 set -eu cp .env.example .env php artisan key:generate vendor/bin/phpunit $*

In the Dockerfile we tell Actions that we want to use PHP 7.3 and that we want to execute the entrypoint.sh-file next.

The entrypoint.sh-file is where the logic of the Action lives. To run the test suite, we first create a copy of the example Laravel environment file and generate a fresh application key.

Next, phpunit is executed. Any provided arguments (args) are passed down and will be placed where the $* variable is.

If your project needs more PHP extensions or a MySQL database, the entrypoint.sh would be the place where you set these things up. (That’s why I didn’t use an already existing Action. The setup differs from project to project.)

In our Workflow file, we can now add the Action:

workflow "phpunit" { on = "push" resolves = [ "phpunit" ] } action "composer install" { uses = "MilesChou/composer-action@master" args = "install -q --no-ansi --no-interaction --no-scripts --no-suggest --no-progress --prefer-dist" } action "phpunit" { needs = ["composer install"] uses = "./actions/run-phpunit/" args = "tests/" }

Even though this was quite easy to set up, I personally wouldn’t use GitHub Actions to run the test suite for my bigger projects yet.

Other CI services like Travis or Circle CI are much better suited for this task. These services give you richer notifications and better performance features like parallelism and dependency caching out of the box. With GitHub Actions you would have to implement this on your own.

However, I think Actions is perfectly fine for smaller projects.

Action 2: Run php insights

Our next Action is going to run phpinsights on each push. As we don’t have to set up a database or PHP extensions to run insights we can use an existing Action. As no phpinsights Actions existed when I wrote this article, I wrote my own: phpinsights-action and laravel-phpinsights-action.

As we’re working with a Laravel app, we’re going to use the Laravel version of the Action.

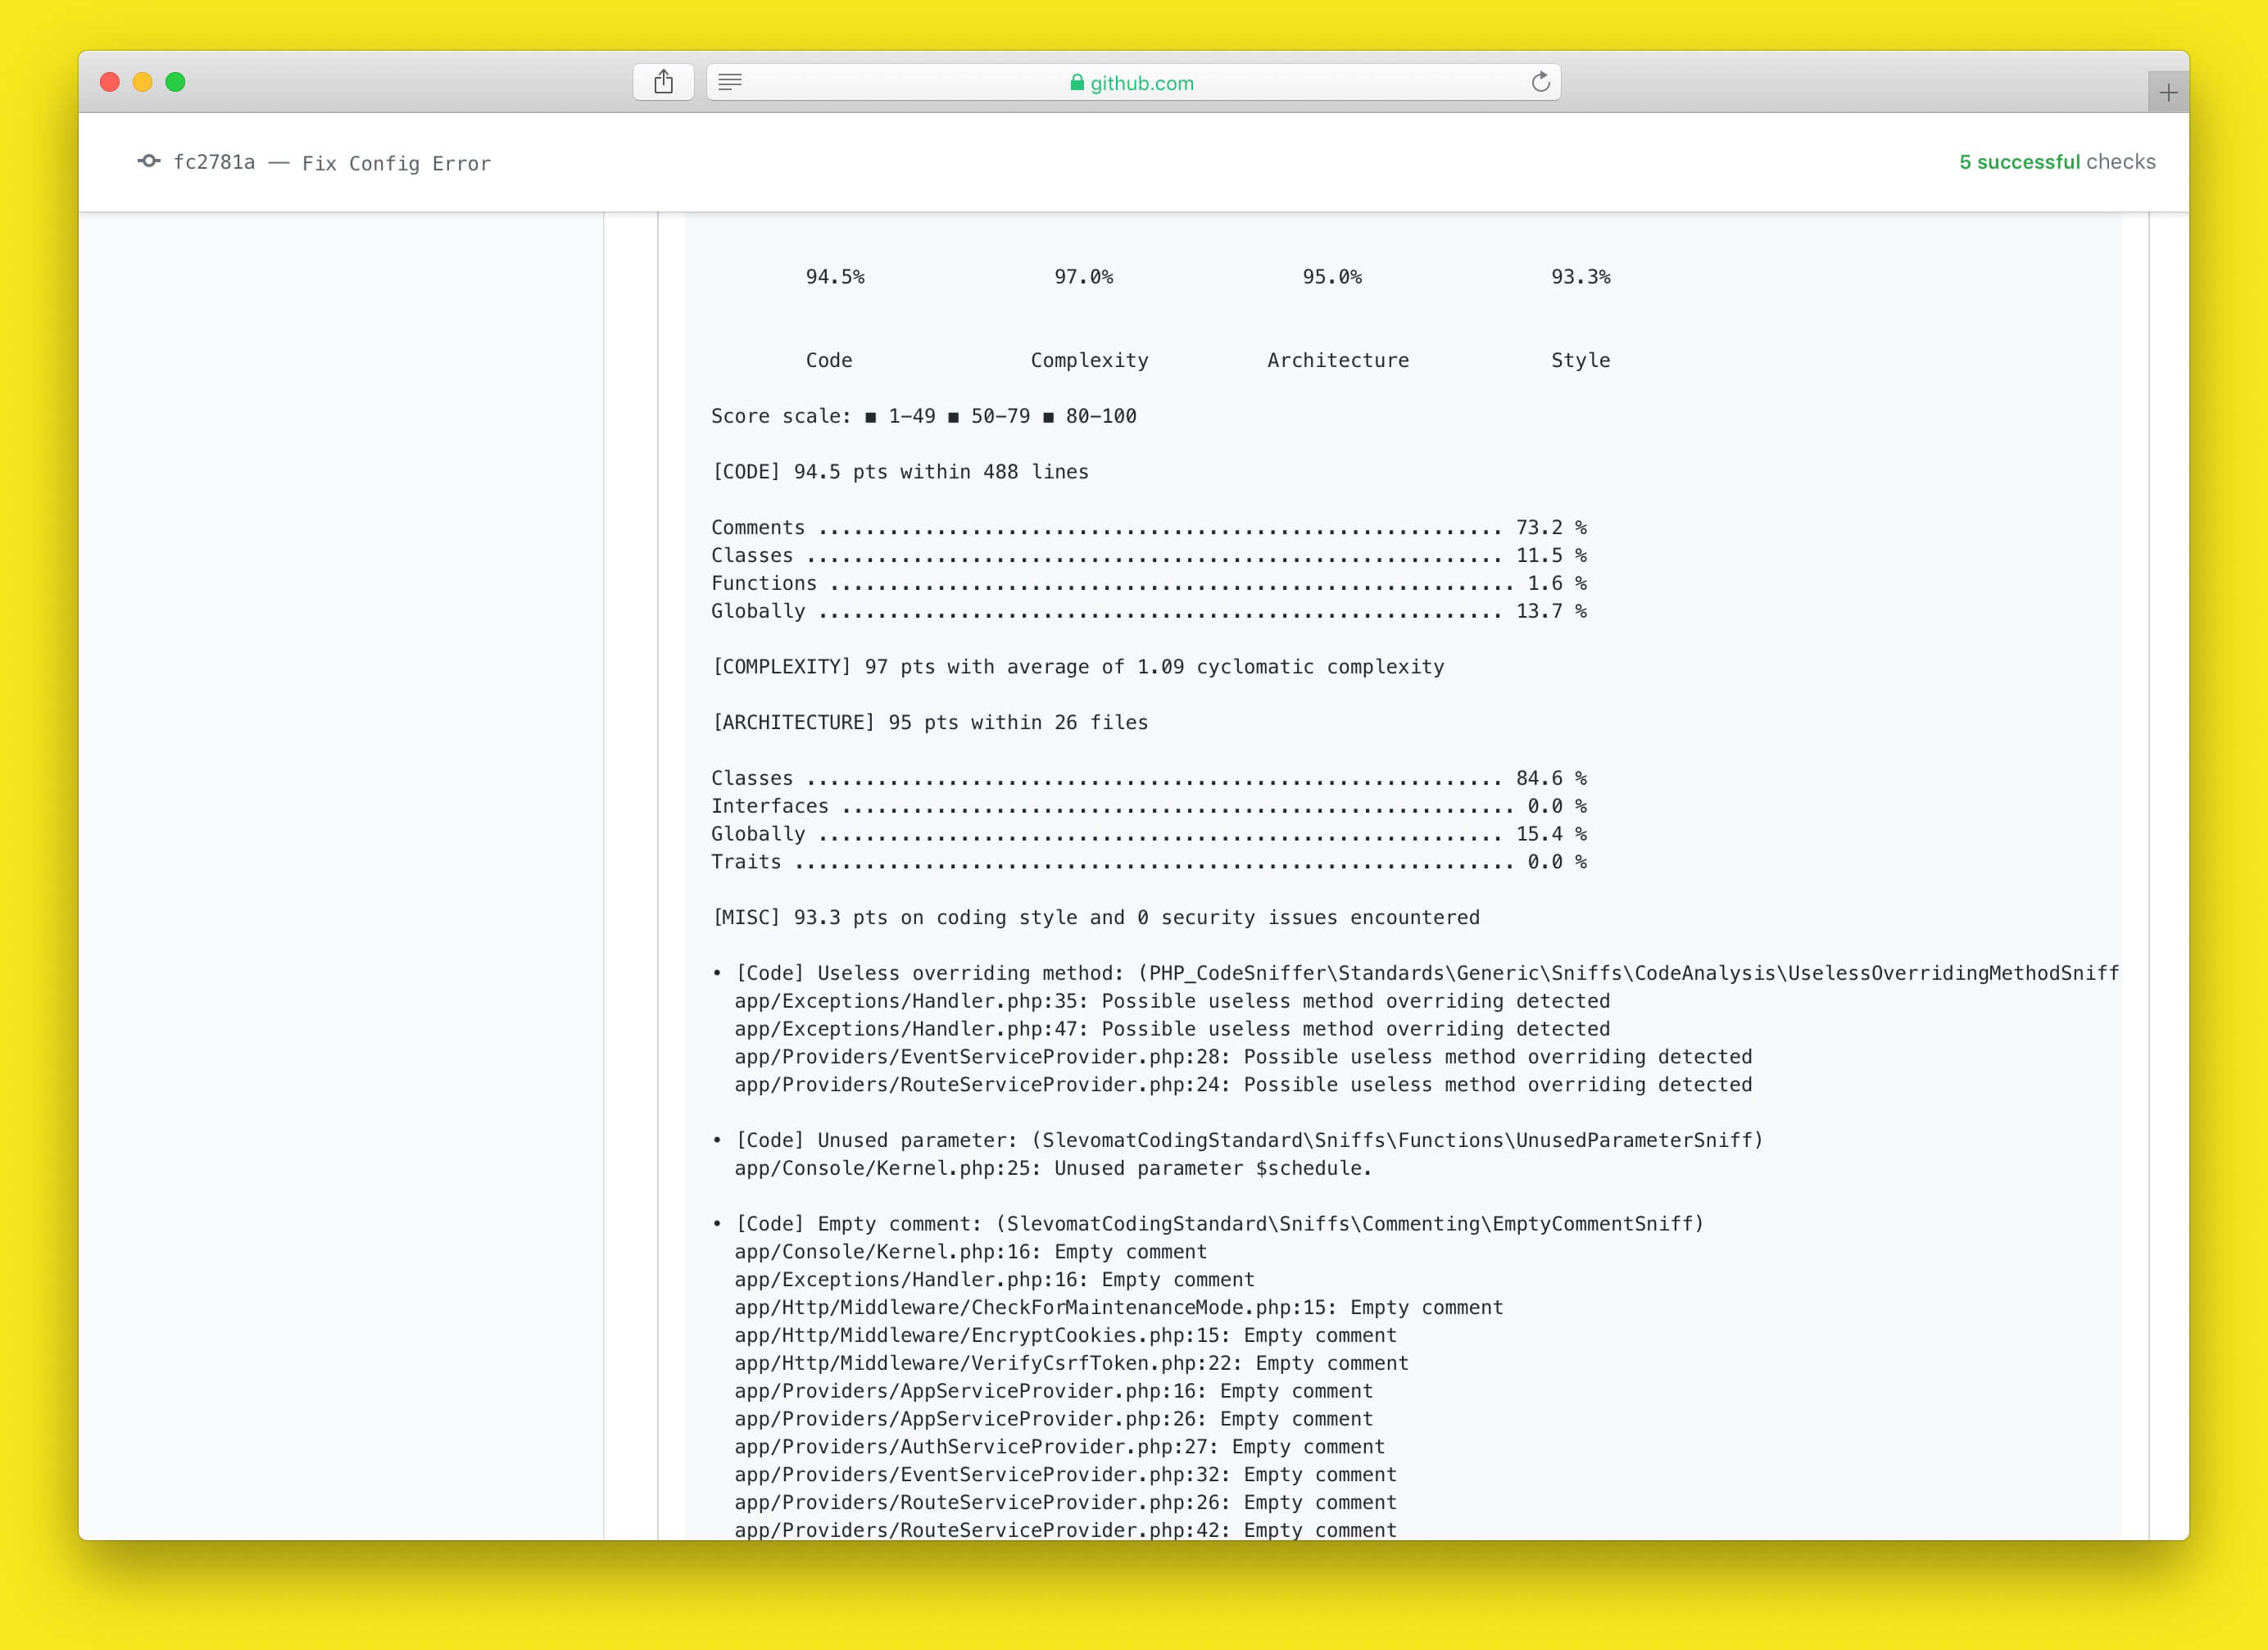
workflow "phpunit / phpinsights / php-cs-fixer" { on = "push" resolves = [ "phpunit", "phpinsights" ] } action "phpinsights" { needs = ["composer install"] uses = "stefanzweifel/laravel-phpinsights-action@v1.0.0" args = "-v --min-quality=80 --min-complexity=80 --min-architecture=80 --min-style=80" }

As you can see, I’m passing the --min-xxx arguments to the Action. If the code quality of my app would drop in a future Pull Request, the Action would return a "failed" status code which in turn would mark the Pull Request as failed.

To see the reported issues of phpinsights you can open the log on github.com

Screenshot of PHP Insights output

Action 3: Run php-cs-fixer

Another common use case to use a CI service, is to check if your code follows the code convention and style guide you or your team has defined.

This can be accomplished by running an existing php-cs-fixer Action developed by Oskar Stark.

workflow "phpunit / phpinsights / php-cs-fixer" { on = "push" resolves = [ "phpunit", "phpinsights", "php-cs-fixer", ] } action "php-cs-fixer" { uses = "docker://oskarstark/php-cs-fixer-ga" }

Here we’ve used another way to define an Action: By using the docker:// protocol, you can directly point to an image on DockerHub.

The Action uses your existing .php_cs configuration and runs php-cs-fixer on your project. However, the Action always returns a "successful" status code. It doesn’t matter if violations happen.

Screenshot of Output of php-cs-fixer Action

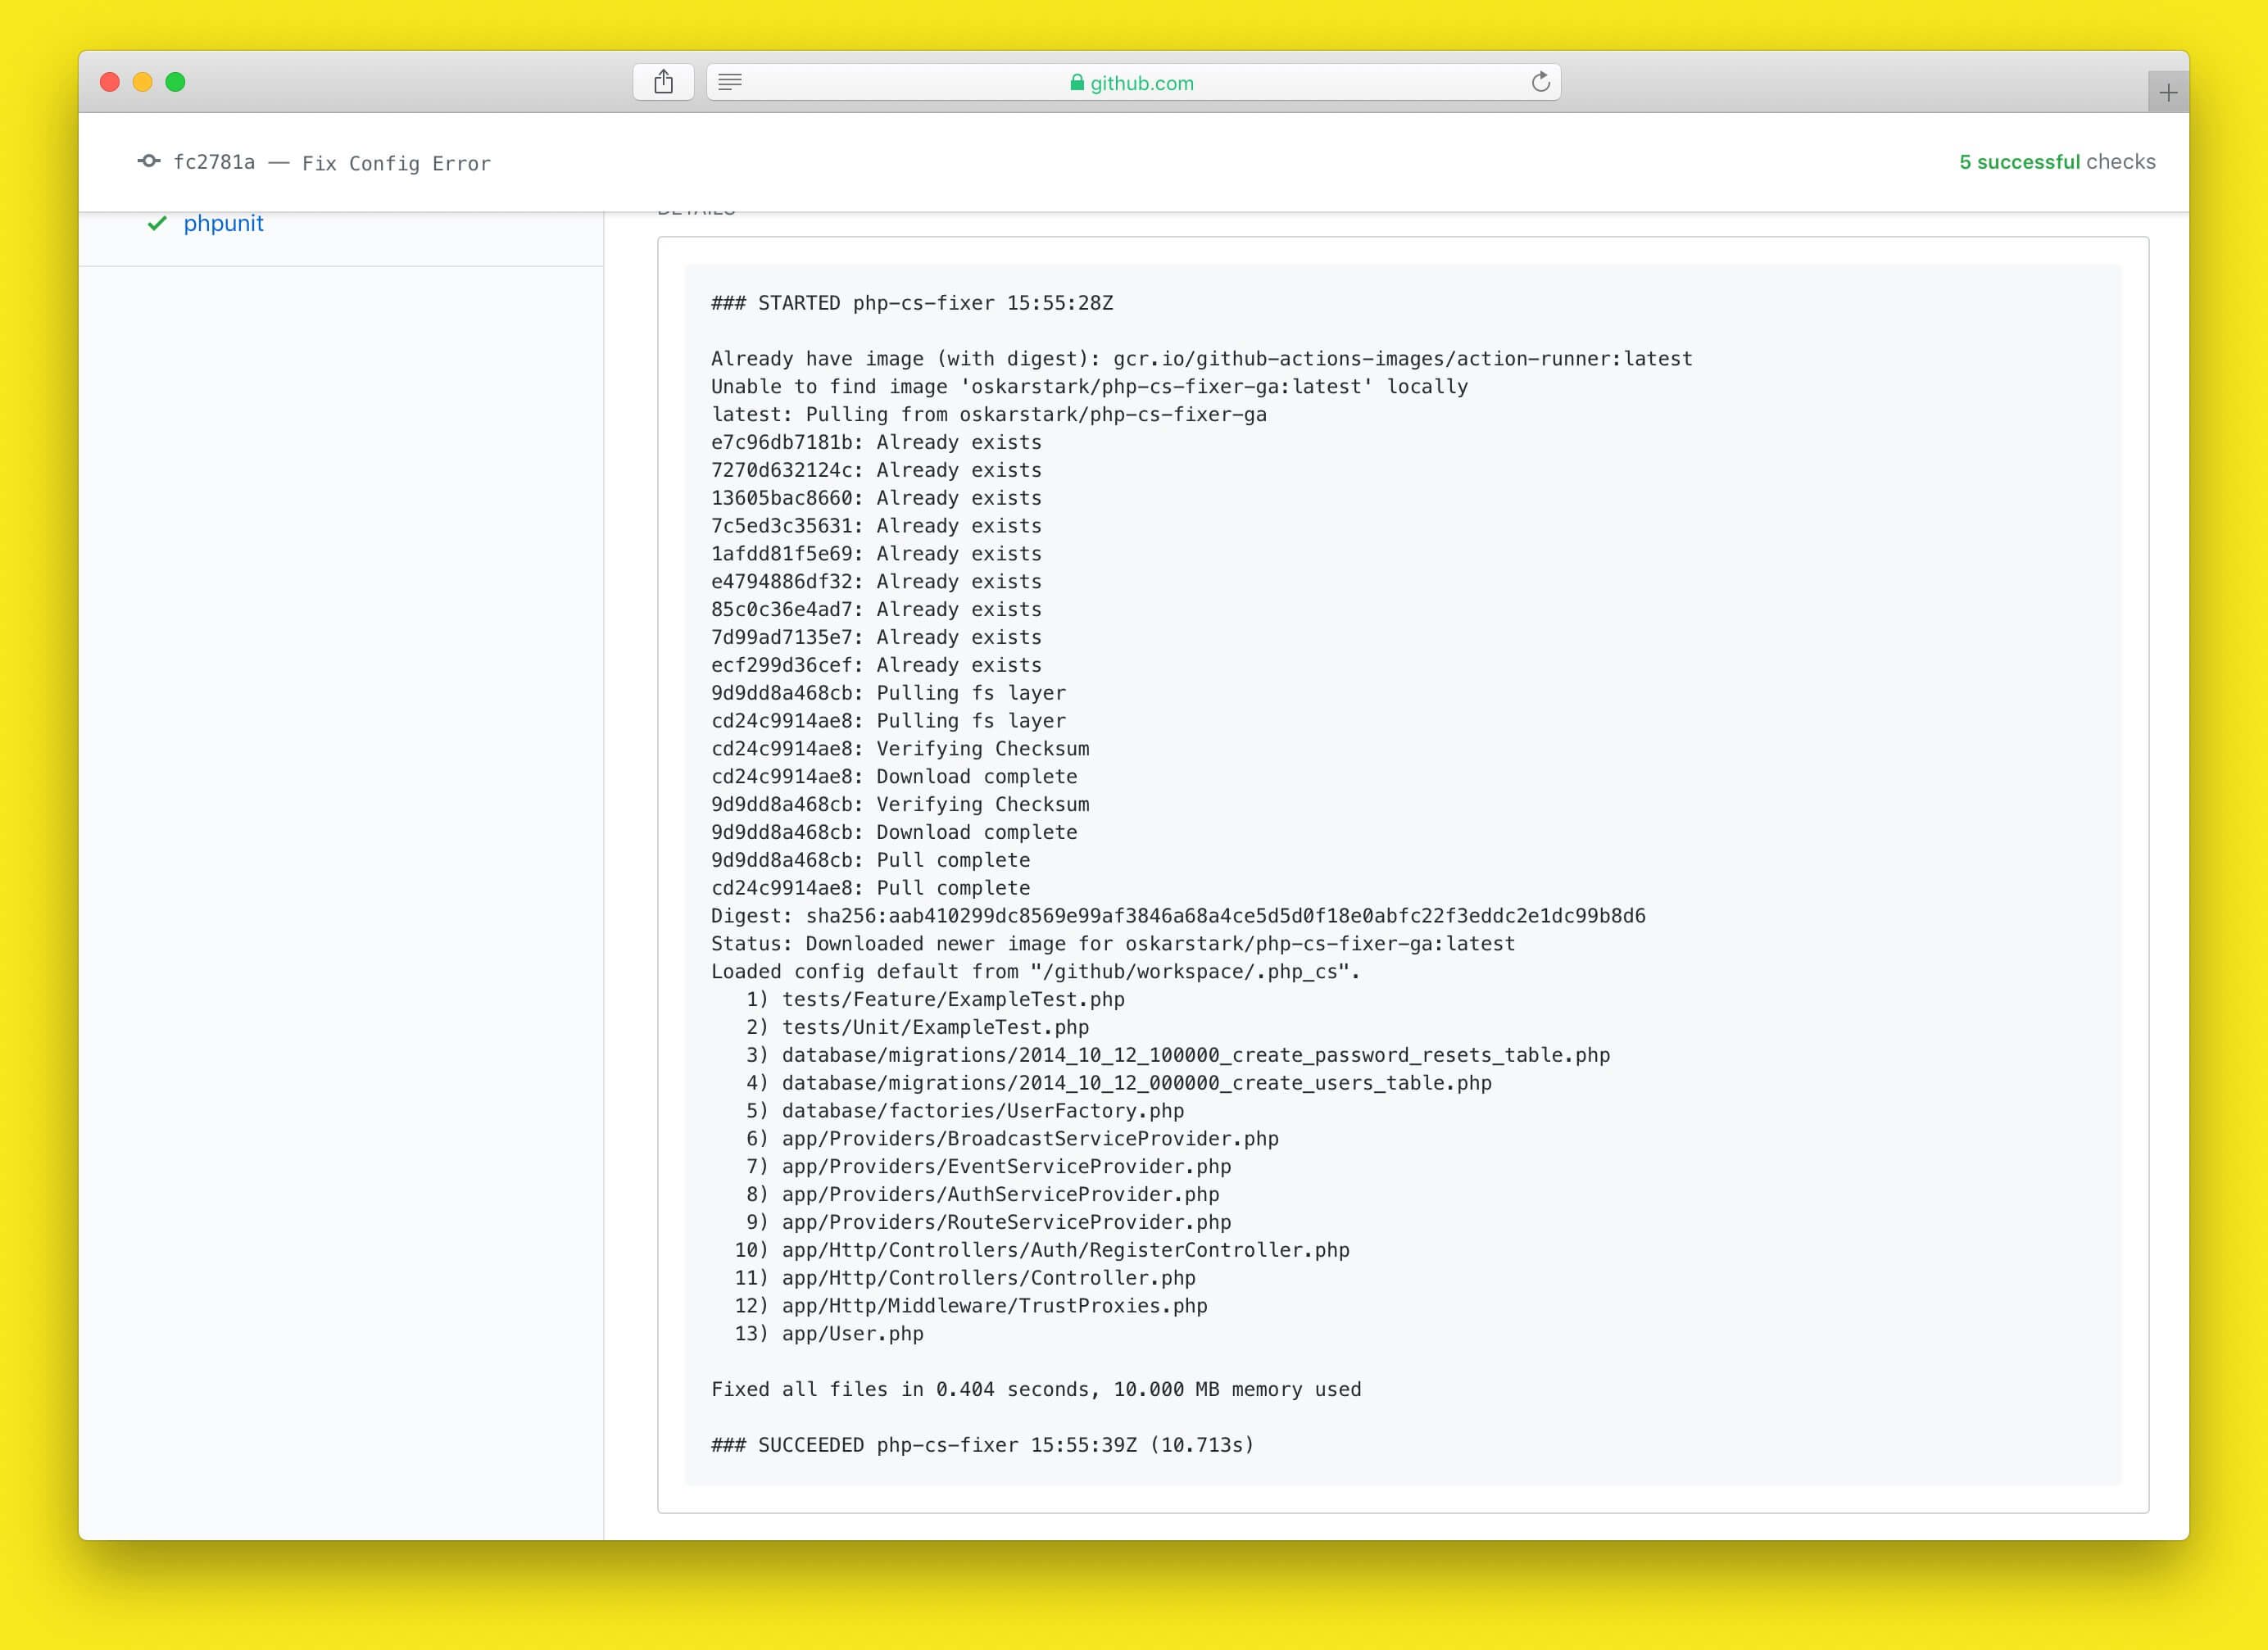
But if violations would happen, php-cs-fixer automatically fixes them. So wouldn’t it be cool if the fixed files would automatically be committed and pushed back to your branch? đŸ€”

Action 3 Bonus: Commit fixed files

As I said in the beginning of this article, the underlying file system is shared between multiple Actions in a Workflow. So committing the fixed files is just "an Action away".

I’ve created a git-auto-commit-Action which commits all changed files and pushes the commit back to the repository.

Our updated main.workflow file now looks like this.

workflow "phpunit / phpinsights / php-cs-fixer" { on = "push" resolves = [ "phpunit", "phpinsights", "auto-commit-php-cs-fixer", ] } action "php-cs-fixer" { uses = "docker://oskarstark/php-cs-fixer-ga" } action "auto-commit-php-cs-fixer" { needs = ["php-cs-fixer"] uses = "stefanzweifel/git-auto-commit-action@v1.0.0" secrets = ["GITHUB_TOKEN"] env = { COMMIT_MESSAGE = "Apply php-cs-fixer changes" COMMIT_AUTHOR_EMAIL = "john.doe@example.com" COMMIT_AUTHOR_NAME = "John Doe" } }

Now on every push, possible style changes are automatically committed and pushed back to your repository. No need to run the command manually or for a Third-Party-service.

Screenshot of auto-commit. Two committers have been attributed with the commit.

We now also added our first secret: GITHUB_TOKEN. This is a special secret which is available to all Actions in a repository. But it’s not enabled by default. You have to add it manually in the visual editor on github.com

Add the GITHUB_TOKEN by checking the corresponding checkbox in the editor.

As this Action uses the GITHUB_TOKEN to authenticate the git push-command, GitHub won’t trigger a second run of the Workflow. (Keep that in mind!)

Outlook

I think this covers the basics of GitHub Actions for PHP developers. I’m very excited about Actions and what the future holds. I hope the feature leaves the beta soon, so that more people can use it in their projects.

GitHub already announced support for Scheduled Workflows which opens a big realm of possibilities. (Jason Etcovitch writes here how he uses Scheduled Workflows to automatically create weekly meeting notes). Or for example, you could also build an Uptime-Monitoring Action which is triggered every few minutes and would send Slack or Email notifications.

Personally, I would like to use the Scheduling feature to fully automate Laravel Download Statistics (a side project of mine). A workflow could trigger the update of download numbers, create a new HTML export and push everything to Netlify.
No need for humans any more đŸ€–đŸ€Ż.

Start developing your own Actions

If I could excite you about Actions and you want to start developing your own Actions, here are a few resources I’ve found while working on this article:

And here’s a list of Actions I found, which I actually would like to implement in my projects.

Acknowledgments

Thanks to Peter Brinck, CĂ©lien Boillat and Max Almonte for proof reading this article and giving feedback.

via Laravel News Links
GitHub Actions for PHP Developers

We sell our pizzas for $16.50. Here’s how the costs break down.

Photo: shironosov (iStock)
FeaturesStories from The Takeout about food, drink, and how we live.  

The day my boyfriend put giardiniera on a pizza changed my life forever. That boyfriend, now my husband, is a third-generation pizza maker, and his suburban Chicago family pizzeria has served tavern-style pies and other Chicago-style Italian fare since the 1950s. As much as I’d love to shout out the pizzeria’s name, you’ll soon see why I’m going to keep that detail to myself.

Being married to pizza has many perks, undeniably. But as a pizza aficionado since I could eat solid food, it’s eye-opening to experience owning a pizza restaurant. I’m now immersed in the world of independent restaurants, for all its joys and heartaches. My husband grew up in an entire family that ran pizzerias, so treating a Tuesday afternoon (the slowest business day of the week) like most people’s Saturday is his norm. But for me, the responsibilities of owning a small business have been a huge adjustment.

There are certainly bright sides to owning a pizzeria—yes, I mean free pizza. But, there are downsides, too. Many. My family doesn’t get many holidays; we work Christmas Eve, Mother’s Day, New Year’s Eve and/or Day, Valentine’s Day. Those are big business occasions for the catering side of our mom-and-pop, and those are the days that the regular, already intense hustle goes into overdrive.

Restaurant owners like my husband are always working. Even if he has a day or evening off, something can come up—an employee not showing up to work or the pizza oven breaking in the middle of the Saturday-night rush. It’s a life of early mornings and late nights, whether to meet a contractor to repair an appliance or to organize and deep clean the restaurant.

But one of the more frustrating economic aspects of owning a pizzeria is competing with fast-food pizza chains. Fast-food pizza franchises have Super Bowl-sized advertising budgets, the support of a corporate force behind them, and national name recognition. When their pizza ovens break, there’s protocol. They also notoriously sell cheap pies made with mass-produced ingredients, whereas independent pizzerias like ours stake our reputations on high-quality, homemade pies at higher—but fair—prices.

So why do our pies cost more? What are you buying when you order pizza from us? Let’s break down the costs that go into our pizzeria’s 15-inch cheese pizza (large), which we sell for $16.50.

Photo: danilsnegmb (iStock), Graphic: Kevin Pang

Ingredients and materials: $3.91

A simple cheese pizza in an independent pizzeria can be anything but simple to make—especially when you’re making the dough and sauce from scratch, and using high-quality, gooey cheese. According to Pizza Today, cheese prices are set by the “open outcry spot market” in a 10-minute daily trading session at the Chicago Mercantile Exchange. As I write this, the price for whole milk mozzarella is $2.08 per pound (we figure half a pound of cheese for each large pizza—$1.04). Wholesale supplies are cost-saving, especially when you’re ordering tomato paste and puree by the case, but together, all the ingredients that go into homemade pizza sauce can cost $1.99 per pizza. Throw in the flour and other ingredients used in the homemade dough, which amount to 45 cents, as well as 30 cents for a pizza box and 13 cents for a pizza circle.

Labor: $1.60

Minimum wage is a hot topic these days, and varies based on geography. At our pizzeria, the average hourly rate for employees is about $12 an hour. If you calculate the time it takes for one phone operator/cashier to take your order, one cook to make the pizza (roll the dough, add the sauce and cheese, slide it into the oven), cut it, box it and set aside for pickup or delivery, it is roughly 8-10 minutes in total—excluding cooking time.

Rent, Utilities, Odds/Ends: $5.65

Our suburban space is leased, so while the rent is a significant chunk of money per month, it is most likely lower than, say, a pizzeria in downtown Chicago. But adding up the cost for rent, heat, electricity, water, phone and internet services, the point-of-sale system and the loan repayment (which secured items like the pizza oven, dough mixer, prep tables, refrigerators, pizza rollers and other tools), plus periodic orders and maintenance of odds and ends like kitchen mats, menus, towels and aprons and cleaning supplies, it’s not insignificant.


The overhead cost for one large cheese pizza at our independent pizzeria is $11.16, which leaves a $5.34 profit. Keep in mind, though, the one variable a restaurant owner can’t control is how many orders they will get in a given day. It’s the make-or-break factor for any independent restaurant. Regardless of the foot traffic, online orders or calls, owners are still paying hourly wages, utilities and rent for the minutes that tick by without orders ringing in.

Growing up, I would visit family-owned restaurants across Chicago and dream of how cool it would be to own a restaurant and have complete creative control, feeding happy people, and hanging out at a place with unlimited soda.

From working nights, weekends and holidays to finding good help to customer complaints, the business can be a lot less glamorous than most people realize. Sure, the unlimited soda helps, but the job is not clock-in, clock-out. The first few years are a complete struggle, and we often refer to the pizzeria as a baby, because it always comes first. It requires a lot of care and attention, it teaches you a lot and can tear you down before bringing you back up. I don’t expect you to think about all that struggle—or math—while you’re eating our pizza, though. I just hope you think it’s the best pizza you’ve ever tasted, and well worth the money.

via Lifehacker
We sell our pizzas for $16.50. Here’s how the costs break down.

The Best Charcoal for Grilling

The Best Charcoal for Grilling

After four years of testing and a total of 115 hours of research, including conversations with charcoal obsessives, barbecue champions, and professional colliers, we’re convinced that Royal Oak Ridge Briquets are the best charcoal for your grill. This charcoal burns hotter, lasts longer, and produces less ash than nearly every other briquet we tested. It’s competitively priced, and it’s available all year from stores such as Home Depot, Kmart, and Walmart.

via Wirecutter: Reviews for the Real World
The Best Charcoal for Grilling

Don’t Let the Bedbugs, Mosquitoes, Ticks, or Ants Bite

Don’t Let the Bedbugs, Mosquitoes, Ticks, or Ants Bite

A version of this post was sent to our weekly newsletter mailing list. If you’d like to receive this in your inbox, subscribe here.

It’s almost officially summer, which for a lot of people means the beginning of battles with entomological enemies. I’m very allergic to mosquito bites, which was fine here in Los Angeles until last year when the area got invaded by the ankle-biting, striped Aedes aegypti, potential transmitters of all kinds of diseases. I recently had to fend off some ants that had discovered a drip from the cap of a bottle of honey in my cabinet. And Lyme disease, a tick-borne illness, seems to be striking people I know with more frequency; the CDC says that between 2004 and 2016, the number of reported tick-borne illnesses has doubled.

When allergies and diseases are potentially involved, I don’t take risks with untested essential oils. That’s why I love our approach—science-backed recommendations with real-world testing.

To ward off mosquitoes, we have a few options. For the body, we recommend Sawyer Products Premium Insect Repellent with 20% Picaridin in our guide to the best bug repellent; the CDC endorses picaridin at 20% concentrations, and picaridin doesn’t smell as strong as DEET (which is an equally effective and safe bug repellent if you can’t find picaridin).

For ticks, wear long pants, tuck the legs into your socks, and spray your shoes with permethrin. We recommend Sawyer Premium Permethrin Clothing Insect Repellent, which can last through six washings or six weeks of wear. The 12-ounce bottle is enough to treat two outfits, so if you want to treat everyone in your family, get multiple bottles.

And to counter ants, we recommend Terro T300 Liquid Ant Baits in our new guide to the best ant killer. It’s a favorite among homeowners, including people on our staff who deal with a multitude of Texas ants, because it’s simple to use and can eliminate the whole colony. But if you think you have carpenter ants—the kind that eat up wood—call an exterminator.

Did you know that bedbug infestations are more prevalent in the summer? You can take steps to reduce the chance of bringing the critters home from your travels. Here’s some basic advice on how not to bring bedbugs home with you. In short, check every bed you sleep in (it takes only two minutes), know what you’re looking for (flat, teardrop-shaped bugs about the size of an apple seed, or their brown-black flecks of fecal stains), and don’t let fear ruin your vacation.

New this week

The Best Double-Oven Ranges
Updated June 10

The Best Blood Pressure Monitors for Home Use
Updated June 11

The Best Projector for a Home Theater
Updated June 12

List: Ready to Clean Out Your Closets for Summer? Here’s How.
Published June 12

List: Great Gear for Outdoor Fun With Kids
Published June 13

The Best USB-C Laptop and Tablet Chargers
Updated June 13

The Best Smart Scales
Updated June 13

Is Flight-Crew Luggage Worth Buying? We Tore Some Apart to Find Out.
Published June 14

The Best Online Framing Services
Published June 14

The Best RGB Gaming Keyboards
Updated June 14

The Best Business Laptops
Updated June 14

Things we’ve been enjoying lately

Some good listening, watching, and reading you may like

Listen: Hadestown [Spotify]

“Hadestown is a wonderful Broadway show about hope and love in dark times, and they are releasing tracks from the original Broadway cast recording all through the summer.”

—James Austin, updates writer

Listen: Punch Up The Jam [Headgum]

“Demi Adejuyigbe and Miel Bredouw perform the public service we never knew we needed by giving some of the most earwormy and unequivocally bad songs in music history a much needed punch-up. Each episode, they take a fine-tooth comb to every note and lyric, and in the end present their own impressively polished and hilarious version. In episode 061, Edgar Momplaisir joins them to break down the cloyingly classic Train song ‘Drops of Jupiter’ and present a version that even Neil deGrasse Tyson could get behind.”

—Eleanor Ford, producer

Exhalation: Stories [Penguin Random House]

“The follow-up to Ted Chiang’s collection Stories of Your Life and Others (which got adapted into the film Arrival). This is another volume of deep and wondrous fiction. Each story is thoughtful, considered, and above all hopeful in ways that we so need right now. My only sadness is that we’ll have to wait another 15 years for his next collection.”

—Tim Barribeau, editor

via Wirecutter: Reviews for the Real World
Don’t Let the Bedbugs, Mosquitoes, Ticks, or Ants Bite

Tips for Laravel Performance Optimization

Since its release in 2011, Laravel has become popular choice for the development of business focused applications. One reason Laravel is too much popular in developers is its performance optimization that allows developers to fine tune Laravel based apps.

In this tutorial I will guide on how to optimize Laravel based application when in production.

Prerequisites

For this purpose of tutorial, I assume you have installed Laravel on your server. I have following setup:

Config Caching

Laravel provides outstanding command Artisan Cache Config which is very help full in boosting performance. The basic usage of command is as follows:

php artisan config:cache

Once you run this command, the changes you make will not have any effect. If you wish to refresh the cache, run this command once again. In order to clear the config cache, use the following command:

php artisan config:clear

To further optimize performance of your application you can use OpCache, that caches the php code, so you don’t have to recompile it again and again.

Routing Cache

Routes caching is very important optimization feature when you have lots of routes. The routes cache is a simple array and helps in speeding up Laravel Performance. Run the following command:

php artisan route:cache

Remember to run the command every time when you have made changes in routes file or added any new route. For clearing cache use following command:

php artisan route:clear

Remove Unused Service

In the context of Laravel optimization, an important tip is to not to load all services from the config, it is always important to disable unused services from config files.

Composer Optimize Autoload

It is a good idea to use Composer scan the application and create one-to-one association of the classes and files in the application. Use the following command:

composer dumpautoload -o

Limit Included Libraries

It is always important to review all the libraries that are called within the code. If you think you could do it without using a library remove it from config/app.php to speed up Laravel application.

JIT Compiler

On every request, converting PHP code to bytecode and then executing it is a resource intensive process. Therefore, go-between such as Zend Engine are required to execute the C subroutines. To reduce time, it is essential to repeat this process just once, this is where the Just-in-time (JIT) compiler has proven to be very useful. For Laravel based applications the recommended JIT compiler is HHVM by Facebook.

Cache Queries Results

By caching the results of the queries which are used frequently is a great way to optimize your Laravel based application. For this my recommendation is as follows:

$posts = Cache::remember('index.posts', 30, function() {return Post::with('comments', 'tags', 'author', 'seo')->whereHidden(0)->get();}); 

Use Eager Loading for Data

When Eloquent uses eager loading it loads all associated object models in response to the initial query. Let’s compare Eager loading and Lazy loading.  

The Lazy loading query will look as follows:

$books = App\Book::all(); foreach ($books as $book) { echo $book->author->name;} 

The Eager loading query will look as follows:

$books = App\Book::with('author')->get(); foreach ($books as $book) { echo $book->author->name;} 

Precompile Assets

For Laravel tuning developers often distribute code in separate files. While this keeps the code clean and manageable, but it doesn’t contribute to efficient production. To help developers in this context Laravel provides simple commands:

php artisan optimize php artisan config:cache php artisan route:cache 

via Laravel News Links
Tips for Laravel Performance Optimization

Transporting Firearms and Ammunition, a Frequent Flyer’s Perspective

Pelican 1510 “Carry-On Case” open to show storage.

U.S.A. –-(Ammoland.com)- Recently I was talking with a few fellow gun owners about air travel and the transporting of firearms. I was surprised at how some of them thought that flying with firearms was more of a hassle than it is in reality. These were not casual shooters, either. Industry professionals would be a better term.

For decades flying with guns has been part of my way of life when traveling from point A to point B, whether to attend a trade show, go on a hunting trip, take a class or simply visit family and friends and want the security of my carry guns.

Airport Security Gun Ammo Ban istock

Air travel with firearms can be as difficult or complex as you want to make it or it can be very simple.

The most important thing to ensure is that your firearms and ammunition are legal in both your point of origin and destination.

The Rules

According to the TSA (Transportation Security Administration):

“When traveling, comply with the laws concerning possession of firearms as they vary by local, state and international governments. If you are traveling internationally with a firearm in checked baggage, please check the U.S. Customs and Border Protection website for information and requirements prior to travel. Declare each firearm each time you present it for transport as checked baggage. Ask your airline about limitations or fees that may apply. Firearms must be unloaded and locked in a hard-sided container and transported as checked baggage only. Only the passenger should retain the key or combination to the lock. Firearm parts, including magazines, clips, bolts and firing pins, are prohibited in carry-on baggage, but may be transported in checked baggage. Replica firearms, including firearm replicas that are toys, may be transported in checked baggage only. Rifle scopes are permitted in carry-on and checked baggage. Declare the firearm and/or ammunition to the airline when checking your bag at the ticket counter. Contact the TSA Contact Center with questions you have regarding TSA firearm regulations and for clarification on what you may or may not transport in your carry-on or checked baggage.”

“Unloaded firearms may be transported in a locked hard-sided container as checked baggage only. The container must completely secure the firearm from being accessed. Locked cases that can be easily opened are not permitted. Be aware that the container the firearm was in when purchased may not adequately secure the firearm when it is transported in checked baggage. Ammunition is prohibited in carry-on baggage, but may be transported in checked baggage. Small arms ammunition, including ammunition not exceeding .75 caliber and shotgun shells of any gauge, may be carried in the same hard-sided case as the firearm. Firearm magazines and ammunition clips, whether loaded or empty, must be securely boxed or included within a hard-sided case containing an unloaded firearm. Read the requirements governing the transport of ammunition in checked baggage as defined by 49 CFR 175.10 (a)(8).”

The Container

You have basically two routes you can go here as far as a container.

  • Use a dedicated hard-sided container for firearms
  • If flying with a pistol or two, place your locked pistol case inside another piece of checked luggage.

When I fly, I always go with the first option. You may think that this only makes sense when traveling with a long gun and using a $300 wheeled and lockable rifle case and that certainly is an option. However, I found a case that fits not only my needs for flying with a few handguns but other valuables I do not trust to the good graces of an airport’s baggage crew.

Pelican 1510

It is the Pelican 1510 “Carry-On Case”, but do not let the name fool you, Pelican calls it that as it meets the maximum dimensions for carry-on baggage with most commercial airlines: 22.00″ x 13.81″ x 9.00″ (55.9 x 35.1 x 22.9 cm). Although, to be honest, it is a lot smaller than what I see most air travelers fly with as carry-on items.

Pelican 1510 “Carry-On Case”

Seriously, when did one bag and one personal item become two steamer trunks made in the 1920s with wheels and collapsible handles?

The interior gives you 19.75″ x 11.00″ x 7.60″ (50.2 x 27.9 x 19.3 cm) of secure storage space and the case can be ordered in a variety of colors (black, orange, yellow, red, green and tan). Additionally, you can configure the interior to how you want it.

Most shooters opt for the foam configuration and pluck out the shape of their firearm(s). I find this wasteful and recommend either the Trek Pak Divider system or the padded dividers. This allows me to use a second internal pistol case with my firearms and gives me plenty of room for other items I like to keep under lock and key such as cameras, night vision, thermal imagers, rifle parts, suppressors, ammunition and custom knives.

That is the second benefit of flying with a firearm; since it is transported in a locked case you can place other valuables with it for their protection.

Pelican’s 1510 case is small enough that it is easy to get around with due to its strong polyurethane wheels with stainless steel bearings and retractable extension handle, yet big enough that it cannot be secreted out of a secure area within an airport by a baggage thief. The padlock inserts are reinforced with stainless steel hardware and if you use quality padlocks, your guns and gear will usually arrive safe and sound.

If you think this is too much luggage to haul around with your other bags and are just transporting a handgun or two for concealed carry, you can place a small locked pistol case inside another piece of luggage. The pistol case must be locked, but the outer case cannot be. In my opinion this still leaves your pistol case open to theft as someone can reach in, remove the locked case and get it to a location where it can be pilfered or (if the case is small enough) stolen outright.

You can simply lock your unloaded handgun and ammo in a pistol case and put it inside your unlocked suitcase. The author recommends against this, however.

Firearms

“United States Code, Title 18, Part 1, Chapter 44, firearm definitions includes: any weapon (including a starter gun) which will, or is designed to, or may readily be converted to expel a projectile by the action of an explosive; the frame or receiver of any such weapon; any firearm muffler or firearm silencer; and any destructive device. As defined by 49 CFR 1540.5 a loaded firearm has a live round of ammunition, or any component thereof, in the chamber or cylinder or in a magazine inserted in the firearm.”

On one occasion while flying through Phoenix International Airport with firearms, a fellow passenger took note of us putting padlocks on my Pelican case and asked me how I was able to do that. He routinely transported high end electronics and did not trust the security of “TSA Approved Locks”.

I told him that I was transporting firearms and suggested he could do the same, by placing a firearm in his secured case with proper locks. He seemed hesitant but then relieved when I told him that TSA considers a pellet gun or starter pistol a fully-fledged firearm and a $20 non-gun would protect his case’s other more valuable contents.

Ammunition

When flying with handguns for CCW, I take along about 150 rounds in the original factory boxes. If I am attending a class that requires more (say 500 to 2000 rounds) I either buy it locally or have it shipped to the final destination.

Various ways to store ammo when flying: factory box, aftermarket plastic box or in a magazine.

As noted previous, ammunition may be stored in magazines, plastic reloading cases or the original cardboard containers.

If you are flying with a substantial amount, this is where the rules of the airlines come into play as many have specific weight allowances for ammunition. The limit seems to be 11 pounds on average.

Documentation

Oftentimes, ticket counter agents or even TSA Agents may not completely know the rules. I advise printing out copies of the regulations governing firearms from the TSA Website as well as the airline’s requirements for the same in advance of your trip to present it when difficulties in communication occur.

When you declare your firearm, you will be given a declaration form to place in the case containing the firearm after you complete it.  You may be asked to wait nearby for up to 30 minutes as the bag is checked in case TSA feels the need to inspect it. If TSA does not arrive, proceed to passenger screening and on to the gate.

Firearm Declaration Form

When you reach your destination and retrieve your baggage it may come out on the carousel. Some airports will take secured baggage to an office near the baggage claim or a roped off area in the vicinity. Claim your bags and be on your way, it is that easy.


About Mike Searson

Mike Searson

Mike Searson’s career as a shooter began as a Marine Rifleman at age 17. He has worked in the firearms industry his entire adult life as a Gunsmith, Ballistician, Consultant, Salesman, Author and was first certified to teach firearms safety in 1989.

Mike has written over 2000 articles for several magazines, websites and newsletters including Blade, RECOIL, OFF-GRID, Tactical Officer, SWAT, Tactical World, Gun Digest, Examiner.com and the US Concealed Carry Association as well as AmmoLand Shooting Sports News.

  • Home page: www.mikesearson.com
  • FB: www.facebook.com/mike.searson
  • TWITTER: www.twitter.com/mikesearson

The post Transporting Firearms and Ammunition, a Frequent Flyer’s Perspective appeared first on AmmoLand.com.

via AmmoLand.com
Transporting Firearms and Ammunition, a Frequent Flyer’s Perspective

Watch: Clay Pigeons on ‘How It’s Made”

I think we all know what a “clay pigeon” is — and most if not all of us have been entranced by watching “How It’s Made,” the TV documentary that shows how stuff is manufactured in “Reader’s Digest condensed” form. I haven’t watched it in years, and back when I did my wife constantly complained about the monotonous narrator. These days there’s a different narrator, but I think he might be related to the original one because he’s just about as bland.

This 5-minute episode is about the making of clay targets, sometimes called skeet, and early on we’re told they’re not made of clay at all, but of petroleum pitch or resin mixed with talc.

After they’re molded, they’re flipped with the hollow side down — the way we are used to seeing them stacked in boxes — and they’re still soft. Check out this guy squishing one. This explains the weirdly distorted ones we sometimes find amongst the good ones.

After they cool & harden, they’re coated with a water-based paint and conveyed through a hot-air tunnel to cure the paint. Finally, they’re machine-stacked into nice neat columns.

Nice. I only wish I could hit more of them during a round of skeet!

The post Watch: Clay Pigeons on ‘How It’s Made” appeared first on AllOutdoor.com.

via All Outdoor
Watch: Clay Pigeons on ‘How It’s Made”

Synchronize and migrate data between the application and the database

Data migrations from Laravel

This package simplifies the migration and synchronization of data between the application and the database, allowing you to control for example settings or permissions lists. Provides resources to view the status and changes not yet made, migrate and synchronize the data.

Installation

composer require fndmiranda/data-migration 

Usage

You may generate an data migration of the data-migration:make Artisan command:

php artisan data-migration:make PermissionDataMigration 

This command will generate a data migration at app/DataMigrations/PermissionDataMigration.php. The data migration will contain the model, data, and options methods.

<?php  namespace App\DataMigrations;  use Fndmiranda\DataMigration\Contracts\DataMigration;  class PermissionDataMigration implements DataMigration {  /**  * Get the model being used by the data migration.  *  * @return string  */  public function model()  {  //  }   /**  * Get the data being used by the data migration.  *  * @return mixed  */  public function data()  {  //  }   /**  * Get the data options being used by the data migration.  *  * @return mixed  */  public function options()  {  //  } }

Method model

Method to specify the model bound to the data migration class.

/**  * Get the model being used by the data migration.  *  * @return string  */ public function model() {  return \App\Permission::class; }

Method data

Method to specify the data to be migrated.

/**  * Get the data being used by the data migration.  *  * @return mixed  */ public function data() {  return [  ['name' => 'product.products.index', 'title' => 'List products', 'group' => 'Product'],  ['name' => 'product.products.show', 'title' => 'Show product', 'group' => 'Product'],  ['name' => 'product.products.store', 'title' => 'Create product', 'group' => 'Product'],  ['name' => 'product.products.update', 'title' => 'Update product', 'group' => 'Product'],  ['name' => 'product.products.destroy', 'title' => 'Delete product', 'group' => 'Product'],   ['name' => 'product.brands.index', 'title' => 'List brands', 'group' => 'Product'],  ['name' => 'product.brands.show', 'title' => 'Show brand', 'group' => 'Product'],  ['name' => 'product.brands.store', 'title' => 'Create brand', 'group' => 'Product'],  ['name' => 'product.brands.update', 'title' => 'Update brand', 'group' => 'Product'],  ['name' => 'product.brands.destroy', 'title' => 'Delete brand', 'group' => 'Product'],  ]; }

Method options

The options method to specify the parameters to be used in the migration.

/**  * Get the data options being used by the data migration.  *  * @return mixed  */ public function options() {  return [  'identifier' => 'name',  'show' => ['name', 'title'],  ]; }

The following keys are available as options:

Key Description Type
identifier Column with unique value to validate status. string
show Columns to show in commands output. array
relations Relationships options, see the usage with relationships. array

Run a data migration

You can run a data migration via command or facade.

Show the status of each data with the database with data-migration:status Artisan command:

php artisan data-migration:status App\\DataMigrations\\PermissionDataMigration 

Output:

+--------------------------+------------------------+--------+ | name | title | status | +--------------------------+------------------------+--------+ | product.products.index | List products | Create | | product.products.show | Show product | OK | | product.products.store | Create product updated | Update | | product.products.destroy | Delete product | OK | | product.brands.show | Show brand | Create | | product.brands.store | Create brand updated | Update | | product.brands.update | Update brand | OK | | product.brands.destroy | Delete brand | OK | | product.products.update | Update product | Delete | | product.brands.index | List brands | Delete | +--------------------------+------------------------+--------+ 

Or with DataMigration facade:

$status = DataMigration::status(\App\DataMigrations\PermissionDataMigration::class);

Show changes between data migration and database with data-migration:diff Artisan command:

php artisan data-migration:diff App\\DataMigrations\\PermissionDataMigration 

Output:

+--------------------------+------------------------+--------+ | name | title | status | +--------------------------+------------------------+--------+ | product.products.index | List products | Create | | product.products.store | Create product updated | Update | | product.brands.show | Show brand | Create | | product.brands.store | Create brand updated | Update | | product.products.update | Update product | Delete | | product.brands.index | List brands | Delete | +--------------------------+------------------------+--------+ 

Or with DataMigration facade:

$diff = DataMigration::diff(\App\DataMigrations\PermissionDataMigration::class);

Migrate data from a data migration to the database. Only necessary operations with status to create will be executed with data-migration:migrate Artisan command:

php artisan data-migration:migrate App\\DataMigrations\\PermissionDataMigration 

Output:

+--------------------------+------------------------+--------+ | name | title | status | +--------------------------+------------------------+--------+ | product.products.index | List products | Create | | product.brands.show | Show brand | Create | +--------------------------+------------------------+--------+ 

Or with DataMigration facade:

$migrated = DataMigration::migrate(\App\DataMigrations\PermissionDataMigration::class);

Synchronize data from a data migration with the database. All necessary create, update, and delete operations will be performed with data-migration:sync Artisan command:

php artisan data-migration:sync App\\DataMigrations\\PermissionDataMigration 

Output:

+--------------------------+------------------------+--------+ | name | title | status | +--------------------------+------------------------+--------+ | product.products.index | List products | Create | | product.products.store | Create product updated | Update | | product.brands.show | Show brand | Create | | product.brands.store | Create brand updated | Update | | product.products.update | Update product | Delete | | product.brands.index | List brands | Delete | +--------------------------+------------------------+--------+ 

Or with DataMigration facade:

$synchronized = DataMigration::sync(\App\DataMigrations\PermissionDataMigration::class);

Usage with relationships

Example of a permissions model with a relationship for dependencies of type belongsToMany with pivot_example_1 and pivot_example_2, and a relationship for brand of type belongsTo to exemplify a data migration.

<?php  namespace App;  use Illuminate\Database\Eloquent\Model;  class Permission extends Model {  /**  * The attributes that are mass assignable.  *  * @var array  */  protected $fillable = [  'name', 'title', 'group', 'brand_id',  ];   /**  * The dependencies that belong to the permission.  */  public function dependencies()  {  return $this->belongsToMany(Permission::class)->withPivot(['pivot_example_1', 'pivot_example_2']);  }   /**  * Get the brand of the permission.  */  public function brand()  {  return $this->belongsTo(Brand::class);  } }

Method data with relationships

The data method to specify the data to be migrated with relationships.

/**  * Get the data being used by the data migration.  *  * @return mixed  */ public function data() {  return [  ['name' => 'product.products.index', 'title' => 'List products', 'group' => 'Product', 'brand' => ['name' => 'Brand test 1']],  ['name' => 'product.products.show', 'title' => 'Show product', 'group' => 'Product'],  ['name' => 'product.products.store', 'title' => 'Create product', 'group' => 'Product', 'dependencies' => [  ['name' => 'product.brands.index', 'pivot_example_1' => 'Pivot value 1'], ['name' => 'product.categories.index'],  ], 'brand' => ['name' => 'Brand test 2']],  ['name' => 'product.products.update', 'title' => 'Update product', 'group' => 'Product', 'dependencies' => [  ['name' => 'product.brands.index'], ['name' => 'product.categories.index', 'pivot_example_2' => 'Pivot value 2'],  ]],  ['name' => 'product.products.destroy', 'title' => 'Delete product', 'group' => 'Product'],   ['name' => 'product.brands.index', 'title' => 'List brands', 'group' => 'Product', 'brand' => ['name' => 'Brand test 1']],  ['name' => 'product.brands.show', 'title' => 'Show brand', 'group' => 'Product'],  ['name' => 'product.brands.store', 'title' => 'Create brand', 'group' => 'Product'],  ['name' => 'product.brands.update', 'title' => 'Update brand', 'group' => 'Product', 'brand' => ['name' => 'Brand test 2']],  ['name' => 'product.brands.destroy', 'title' => 'Delete brand', 'group' => 'Product'],  ]; }

Method options with relationships

The options method with relationships to specify the parameters to be used in the data migration.

/**  * Get the data options being used by the data migration.  *  * @return mixed  */ public function options() {  return [  'identifier' => 'name',  'show' => ['name', 'title'],  'relations' => [  [  'type' => 'belongsToMany',  'relation' => 'dependencies',  'identifier' => 'name',  'show' => ['name'],  ],  [  'type' => 'belongsTo',  'relation' => 'brand',  'identifier' => 'name',  'show' => ['name'],  ],  ],  ]; }

The following keys are available as relationships options:

Key Description Type
relation Name of the relationship of the model. string
type Model relationship type, belongsToMany or belongsTo. string
identifier Column with unique value to validate status. string
show Columns to show in commands output. array

Security

If you discover any security related issues, please email fndmiranda@gmail.com instead of using the issue tracker.

License

The MIT License (MIT). Please see License File for more information.

via Laravel News Links
Synchronize and migrate data between the application and the database

Laravel Tip: 5 examples of why you should be using Macros


Go to the profile of Peter Fox

Photo by Lance Asper on Unsplash

Macros in Laravel are something that I think are still not talked about enough in the framework. They’re really power and really useful. I don’t think there’s a project I’ve created in the last year or two that isn’t using a macro somewhere.

To cover what a macro is briefly, it’s a way of extending a class’ methods but without using inheritance and instead it works by adding a Closure to a class. This then means that all instances of that class has that newly added method. Any class that has uses the Macroable trait found in the Laravel framework can have macros applied to them.

In this article I want to cover a range of simple use cases that will improve things for you, reducing duplicating code, making code more readable or simply getting around problems you might have in testing.

How to make them and where to put them

This isn’t an obvious thing from the get go. There’s one of two places I would advise putting your macros. The first is by using a simple PHP file loaded up via Composer. I generally make this new file in the app folder and call it macros.php Then you simply edit the autoloader key in composer.json to have a files property and within that array list you should add the relative path to the fileapp/macros.php. This then just requires running composer dump-autoloader so the newly added file will be loaded and executed at runtime, setting up our macros for the entire application.

The other place to put Macros is in the boot method of service providers. This can get a bit messy to be honest as your application grows and you add more macros but there will be the odd Macro that can’t be configured in the macros.php file, namely when adding macros to the Route class as it’s tied to the instance stored in the service container. We won’t be using the Route class in this article though.

Collections

Ok, this is a boring one, but it’s where most people will have been introduced to Macros in Laravel so I wanted to cover this one quickly. A nice little example of one macro I’ve had to use before is converting keys for array, something that could be quite tedious if you wrote it out as a function.

Instead we can add it as a macro. First we can make a macro to do all the mapping for us and manage it recursively.

Then we’ll make another just to wrap it up nicely.

That’s it. Now we can use it like the following example.

Eloquent Queries

This is probably one of the most important places where macros really make a difference. For example it would be near impossible to extend the query builder yourself but with a macros you don’t have to.

For example, often you might want to make direct use of functionality in your database server and often you’ll do this with raw queries.

But this can become very repetitive if you’re doing this in your application a lot, let alone when mixing trying to do multiple wheres in one statement.

One way to get around this might be to use a scope but then this still requires added the scope to any model you need to use it with. We can really just make a macro for this. In this example we’ll make a macro for filter results in MySQL using the built in geospatial functions of the server.

Then we can add another macro just so we can do orWhere statements with it as well.

Now when we want to do filtering by MySQL we can call it directly like any other where statement.

Testing Responses

Writing feature tests are common and really effective but it can get quite repetitive. Worst yet, maybe you have something custom, like an API that always returns the HTTP status as 200 but returns something like

{"error"=>true,"message"=>"bad API call"}

You might end up needing write tests like this

Which is fine for one test, but what about all of them. Maybe a macro could solve this, and guess what it can.

Firstly, we’re going to want to make a tests/macros.php this time and add it to composer.json instead under the autoload-dev then files array that we need to likely add ourselves. We also need to reload the autoloader with composer dump-autoloader afterwards.

Then in the new macro file tests/macros.php file we can add the following.

Now we can use it our tests.

It’s a very simple snippet but it really can make your tests far more readable when you start reducing repetitive behaviors into reusable macros.

File operations (for mocking)

Another time where a macro is useful is when you want to make use of Facades and their ability to be mocked swifty for your unit tests. No better scenario exists for mocking than using the built in PHP classes that will touch the file system during a test.

For example, see this code using the ZipArchive class.

I can’t mock this, it’s a totally new instance of a ZipArchive class. At best I could make some ZipArchive factory to make the class but it seems a bit overkill just to use a simple bit of PHP’s built in functionality. Instead we’ll macro it (in our app/macros.php file).

So when it comes to production code all we need to do is use the facade.

But for our tests we just mock the method using the Facade.

This means we not longer have to worry about cleaning up the file system for our tests. We’ve neatly wrapped up our Zip Archive logic into something reusable but also something easily mockable.

Validation Rules

The last of the examples is really simple but again will help hugely when it comes to managing your code.

For example, often I’ve come across this and it’s no surprising because I used to do it too.

It’s not very clean looking on it’s own, let alone when there’s multiple fields and multiple rules per field like this.

Instead we’re be much better off with something like the following

And with a macro we can.

Bonus Tip: What to do when you’ve got too many macros in one really long file?

You’ve seen the example now but what about when you now have so many macros that you find it hard to actually find or just organise them? The instant go to might be to just make more files like app/validation_macros.php but you’d be wrong. This is where Mixins come in (not to be confused with Traits which are sometimes thought of as Mixins due to other languages having mixins as a concept).

A mixin is a class that defines lots of Macros that can then be provided to your macroable class to implement all of them in one go.

Lets look at an example by creating a new class app/RulesMixin.php.

As you can see from the code above, all the mixin has to go is implement a method with no arguments that returns the closure that will be our macro, using the method name for the macro as well.

Now in our app/macros.php we can just set up the class to use the macro like the following

This then means the Rule class will not only still have the before method, it’ll now have the after, beforeOrEqual and afterOrEqual validation rules in a more accessible format.

Conclusions

Overall I really enjoy the use of Macros in Laravel and can’t emphasise enough how useful they can be for extending the functionality of the framework to suit your needs without lots of work to do so.

If you want to see more classes that use the Macroable trait I’ve put together a quick list for Laravel 5.8.

If you want to see the project implementation you can view the code on GitHub.


I’m Peter Fox, a software developer in the UK who works with Laravel among other things. If you want to know more about me you can at https://www.peterfox.me and feel free to follow me @SlyFireFox on twitter for more Laravel tips and tutorials.

via Laravel News Links
Laravel Tip: 5 examples of why you should be using Macros

Eager Load Relations of Morphed Models in Laravel 5.8.22

Eager Load Relations of Morphed Models in Laravel 5.8.22

The Laravel team released v5.8.22 yesterday with a new morphWith method to eager load relationships of morphed models. This release is packed with new features so be sure to check out the full release notes and a few notes about some of the new features below.

First, a new @componentFirst directive was added, which is similar to how @includeFirst works:

<div> @componentFirst(['missing/file', 'found/file']) @slot('title', 'Test Component') @endcomponent </div> 

Next, a new withMorph method was added when you want to load relations of morphed models eagerly:

$comments = Comment::query() ->with(['commentable' => function (MorphTo $morphTo) { $morphTo->morphWith([Post::class => ['user']]); }]) ->get(); 

I would recommend checking out Pull Request #28647 for a better understanding of how this works. One benefit of this approach is that nested relationships are supported by using with (as seen in the above example).

Next, a new containsAll method was added to the Str utility class which determines if a given string contains all array values:

// true Str::containsAll('taylor otwell', ['taylor', 'otwell']); // false Str::containsAll('taylor otwell', ['taylor', 'xxx']); 

Next, error handling for maintenance mode commands was introduced which now outputs a failed message and an exit code of 1 if either up or down commands fail.

Next, the TestResponse::assertJsonValidationErrors method now has message value assertions which enables you to check both error keys and messages:

$response->assertJsonValidationErrors([ 'key' => 'validation message' ]); 

The JSON validation errors message still allows index arrays which will assert a matching key, and a mix of both indexed array values and associative arrays of key and message values.

This assertion also accepts an array of messages:

$response->assertJsonValidationErrors([ 'key' => ['validation message', 'another validation message'], ]); 

I also wanted to give a massive shout-out to Tetiana Blindaruk for handling the changelog and releases for Laravel. It’s not an easy job to consolidate all the merged pull requests and commits and format them into a clean changelog. Thank you, Tetiana!

You can see the full list of fixes below, and the whole diff between 5.8.21 and 5.8.22 on GitHub. The full release notes for Laravel 5.8 are available in the GitHub 5.8 changelog:

v5.8.22

Added

  • Added @componentFirst directive (#28783)
  • Added support for typed eager loads (#28647, d72e3cd)
  • Added Related and Recommended to Pluralizer (#28749)
  • Added Str::containsAll() method (#28806)
  • Added: error handling for maintenance mode commands (#28765, 9e20849)
  • Added message value assertion to TestResponse::assertJsonValidationErrors() (#28787)
  • Added: Automatically bind the viewAny method to the index controller action (#28820)

Fixed

  • Fixed database rules with where clauses (#28748)
  • Fixed: MorphTo Relation ignores parent $timestamp when touching (#28670)
  • Fixed: Sql Server issue during dropAllTables when foreign key constraints exist (#28750, #28770)
  • Fixed Model::getConnectionName() when Model::cursor() used (#28804)

Changed

  • Made force an optional feature when using ConfirmableTrait. (#28742)
  • Suggest resolution when no relationship value is returned in the Model::getRelationshipFromMethod() (#28762)

Filed in: News / Releases


Enjoy this? Get Laravel News delivered straight to your inbox every Sunday.

No Spam, ever. We’ll never share your email address and you can opt out at any time.

via Laravel News
Eager Load Relations of Morphed Models in Laravel 5.8.22