You Should Set Up Two-Step Verification on Your Nintendo Account Right Now
https://ift.tt/3cy3JOV
If you have a Nintendo account, now’s a good time to make sure that you have two-step verification set up on that account to keep it secure.
Nintendo makes two-step verification optional for its accounts but has recently started a small social media campaign encouraging users to opt in.
This weekend a number of Nintendo Switch owners have posted about third-party logins happening on their accounts, some resulting in the loss of funds, Nintendo Life reports. Nintendo has also recently issued a warning to account holders in Japan citing an increase in credit card fraud through Nintendo accounts.
My own account was accessed by someone in Thailand in late March. Although I luckily was able to catch it and change my password before any damage was done, my secure password clearly wasn’t secure enough, and I’m embarrassed I didn’t have two-step set up prior to that unauthorized login
To set up two-step verification on your account, go to the Nintendo website and then sign into your account.
Afterward, go to “Sign-in and security settings” and then go down to “2-step verification” and click “Edit.”
While some services use your phone number for two-step services, Nintendo only allows two-step verification via an Authenticator app.
Screenshot: E.Price / Nintendo
When you click “2-Step Verification setup” on Nintendo’s site you’ll be sent an email with instructions on how to complete the verification process using Google Authenticator—which should also work on any third-party app you prefer.
As part of that process, you’ll be given some codes to use as backup if you need to access your account and don’t have the app handy. Make sure you store those in a safe place where you’ll be able to find them if need be.
Two-step authentication will make it a tiny bit harder for you to login to your Nintendo account going forward, but it will make it infinitely harder for would-be attackers.
These waterproof LED lights add a wash of color indoors or out. The brightest model punches out 60 watts of illumination, and comes with a 44-key remote to change colors and brightness, as well as fade and strobe modes. The 15-watt Wi-Fi model is compatible with Google Home and Amazon Alexa. Sold in sets of two.
The Best Mosquito Control Gear for Your Patio or Yard
https://ift.tt/2MI9yjy
To keep mosquitoes away from your deck or patio without slathering your skin in bug repellent, get the Thermacell Radius Zone Mosquito Repellent Gen 2.0. After 45 hours researching a category full of marketing hype and debunked methods (including popular options like citronella candles), we found that the Radius stands out by actually being effective. Its rechargeable six-and-a-half-hour battery lasts long enough to odorlessly keep a bedroom-sized area mosquito-free for an entire evening—as long as there’s no breeze.
technology
via Wirecutter: Reviews for the Real World https://ift.tt/2gcK1uO
If You Want to Build a Gigantic House on the Cheap, Look Into “Barndominiums”
https://ift.tt/2XFuM6T
While most homes in America have frames made of wood, a barndominium is a steel-framed house that offers a lot of advantages over wood: Lower costs, both in construction and maintenance, and flexibility of design, whether you prefer open-plan or filled with lots of rooms.
The average cost of building a home in America is $100 to $155 per square foot, according to HomeGuide, a web portal between customers and homebuilders. And while that price will vary depending on what materials the structure of the house is made out of, the 2018 U.S. Census shows that 92.6% of single-family homes built that year were wood-framed.
But there is a far cheaper alternative that’s starting to gain traction, primarily in the South: Steel-framed homes known as "barndominiums" (see bottom for etymology).
The first cost savings comes in the construction costs: "If you include slab commissioning and finishing into the equation, expect to pay around $80 to $90 per square foot," writes Allied Steel Buildings, who should know; their business is to manufacture and erect them.
We spoke with Mark Kisenwether, a consultant and machine designer with decades of experience in construction and heavy industry. Kisenwether has erected 65 steel buildings in his career, "everything from a 12-by-12 guard shack to a 275-by-372 waste oil facility," he says, and he confirmed that $80 per square foot is do-able. "And if I was doing it myself, I could get it down to $50 per square foot, but I’m Mr. Frugal," he laughs. (He also cautions that he has 34 years of experience, so that $50 price is probably not within the range of your average DIY’er).
In any case, when you go with a barndominium, the initial cost savings isn’t the whole story:
Maintenance Savings. Unlike wood, steel is impervious to rot, mold and termites, and "you don’t have to repaint it every season," Kisenweather points out.
Energy Savings. Structures made of steel move and settle less than wood-framed ones, making them less likely to spring air leaks. With proper insulation installed, the structures are well-poised to protect against the elements.
Insurance Savings. Steel structures obviously don’t burn, and can better withstand earthquakes and tornadoes, which results in lower insurance rates.
Given those savings, the barndominium has become a thing, particularly in the South. And as you’ll see, there is no common architectural style associated with them, it’s really up to the homeowner:
As you can see by many of the interior shots here, steel construction affords a lot of design flexibility inside: "You can get spans of over 30 feet, no problem," Kisenwether states. You can live open-plan, "or you can subdivide, put up walls wherever you want, you don’t have to worry about load-bearing."
Why are barndominiums primarily built in the South?
According to the National Association of Home Builders, "Non-wood based framing methods are primarily concentrated in the South due to resiliency requirements [i.e. natural disasters]…Approximately two-thirds of steel framed homes built in 2018 were located in the South, with another one-third in the West."
As for why they’re not popular in the Northeast: According to General Steel Buildings, the American South has the cheapest concrete, insulation and building erection costs. The West is the second cheapest. The most expensive is in the Northeast.
Since steel homes must be built on concrete slabs and will of course need insulation, the savings of steel framing can evaporate in the Northeast.
Where did the name "barndominium" come from?
According to Allied Steel Buildings, the name has been around for decades. "Barnodominium was a name given to barns that had been modified to include living quarters," i.e. a condominium.
In 2016, however, the term jumped from the industry into the minds of millions of TV viewers. On a season three episode of the HGTV show "Fixer Upper," designers/remodelers Chip and Joanna Gaines renovated a 1980 horse barn that had been modified to have an apartment upstairs. Chip referred to it as a barndominium, and given the popularity of the show, awareness of and demand for the structures increased.
If you want to test drive a barndominium, all you have to do is wait until the COVID-19 crisis is over and you can travel again. The Gaines-renovated one you see above is actually up on AirBNB.
Things That Don’t Suck: Electronic Shooters Protection, Stealth Ear Plugs
https://ift.tt/2yjLIoL
I haven’t changed my mind. I still love my Walker’s Razor Slim Electronic Ear Muffs (see my review here). However, when I shoot rifles or shotguns, the Ear Muffs are not the easiest option for protecting my hearing.
Recently this was pointed out in painfully clarity. Unfortunately it happened to my wife, Frances. She was shooting a rifle we were reviewing and was using my Walker’s Razor Slims.
Unnoticed to me or Frances, when getting a good cheek weld on the rifle, the muff slipped up and when she touched off the round it blasted her right ear. She had tinnitus for sometime afterwards.
The same has happened to me in the past and I’ve tried to avoid this with using additional foam plugs in my ear canals.
In January, at the Dallas Safari Club Convention, Frances and I had the opportunity to interview Jack Homa of Electronic Shooters Protection about their ESP electronic ear plugs. Needless to say, my interest was peaked, and shortly after getting back home to Georgia I sent Jack results from a hearing test and ear impressions – both supplied by my audiologist.
Ten days later a pair of Stealth ear plugs arrived in my mailbox.
At the range
There are two crucial requirements that electronic hearing protection — muffs or plugs — must fulfill. First, they have to block out damaging sound frequencies. Second, they must allow the shooter or hunter to hear quiet conversation from guides or companions as well as game movements.
As I stated in the video, when I inserted the Stealth ear plugs and turned them up, I could easily hear normal conversations. My question was whether they would block out damaging decibels when shooting at the range or hunting.
I took my Walker’s muffs along with me for my first outing to my gun club. I needed to complete a review of a Daniel Defense PDW and could not afford to find out that the ESP Stealth plugs sucked without a fallback.
The first round I touched off through the 300 Blackout PDW was accompanied by an involuntary wince. The sound didn’t hurt, but I was definitely ready for the effect of the lack of full-coverage (as provided by my Walker’s ear muffs) to let in painful sound.
The Stealth ear plugs didn’t let such sound through. However, Daniel Defense equips their PDWs with a linear compensator to direct muzzle blast away from the shooter, so that may have helped.
That thought came to me about the time my range buddy, positioned two benches to my right, touched off a round with his muzzle brake-equipped rifle. The shock wave pushed against my face, but my ear heard only a low boom.
He actually kept apologizing throughout the morning for the noise he was making (with all four of his similarly-equipped rifles), but I assured him that he was helping me test the ear plugs I was using. The range work with the PDW included a lot or rounds down range, with the ESP product worn throughout.
Needless to say, I was relieved that the ESP Stealth electronic ear plugs came through.
My next opportunity to use the STEALTH ear plugs came when Frances and I headed to the Government Training Institute’s ranges near Barnwell, South Carolina. This was where Frances experienced the problem with the Walker’s Ear Muffs. I, on the other hand, found the ESP products able to handle a very different environment.
We had a stiff wind blowing most of the day, but I was able to hear Frances’ comments when she called my shots
The two rifles being tested that day were both equipped with muzzle brakes, but the extreme decibels were quelled whether standing next to Frances to call her shots or shooting the rifles.
They just work
As a hunter, especially one who mainly hunts with shotguns or rifles, I was particularly interested in how the ESP Stealth ear plugs would perform when I went after game. My chance for this final test of the Stealths came recently when I hunted quail with my host and friend, Keane Phillips. Keane is a member at Dorchester Shooting Preserve near Savannah, Georgia.
Cutting to the chase, when out hunting at Dorchester, I could hear not only my guide Jeff’s sotto voce directions, but also Keane’s low chuckles as I missed time and again. What I did NOT hear were the damaging frequencies from Keane’s or my shotguns.
I could also hear the friendly yaps of our companions.
The price tag of the ESP Stealth ear plugs is not inconsequential. The MSRP is $2100 (they have other models that range from $900 to $2400). But the custom-molded fit, the quality of sound they produce along with the capacity to hear people and game while providing excellent hearing protection make this a good example of a ‘pay once, cry once’ accessory.
If I went cheaper, I would worry that I would risk my longterm hearing or lose the capacity to hear the voices and natural sounds at the range or the hunting field.
Mike Arnold writes for a number of outlets; links to other articles can be found here.
[All photos and video courtesy of Frances Arnold, Keane Phillips and Mike Arnold.]
Here at dPS, we’d like to know what post-processing software you use to edit your photos so that we can deliver some post-production tutorials that better suit you.
Let us know below. You can vote for more than one if you use multiple editing platforms. If the software isn’t listed, please let us know what you use in the comments section!
Note: There is a poll embedded within this post, please visit the site to participate in this post’s poll.
Up until a few days ago, the real-time UI of Oh Dear (an uptime monitoring SaaS I run) was powered with web sockets. We recently replaced this with Livewire components.
In this blog post, I’d like to explain why and how we did that.
I’m going to assume that you already know what Livewire is. If not, head over to the Livewire docs. There’s even a short video course on there. In short, Livewire enables you to create dynamic UIs using server-rendered partials.
There are hundreds of uptime checking services, but most of them look pretty crappy. When my buddy Mattias and I created Oh Dear, we set out the goal to create a beautiful service that is easy to use. We believe that our service doesn’t necessarily has to be unique. By providing a good design, UX, and docs, you can get ahead of a large part of the competition.
One of the things we decided on very early on was that our UI needed to be real-time. We don’t want users to refresh to see the latest results of their checks. When a new user adds their first site to our service, we wanted the whole process to be snappy and display results fast.
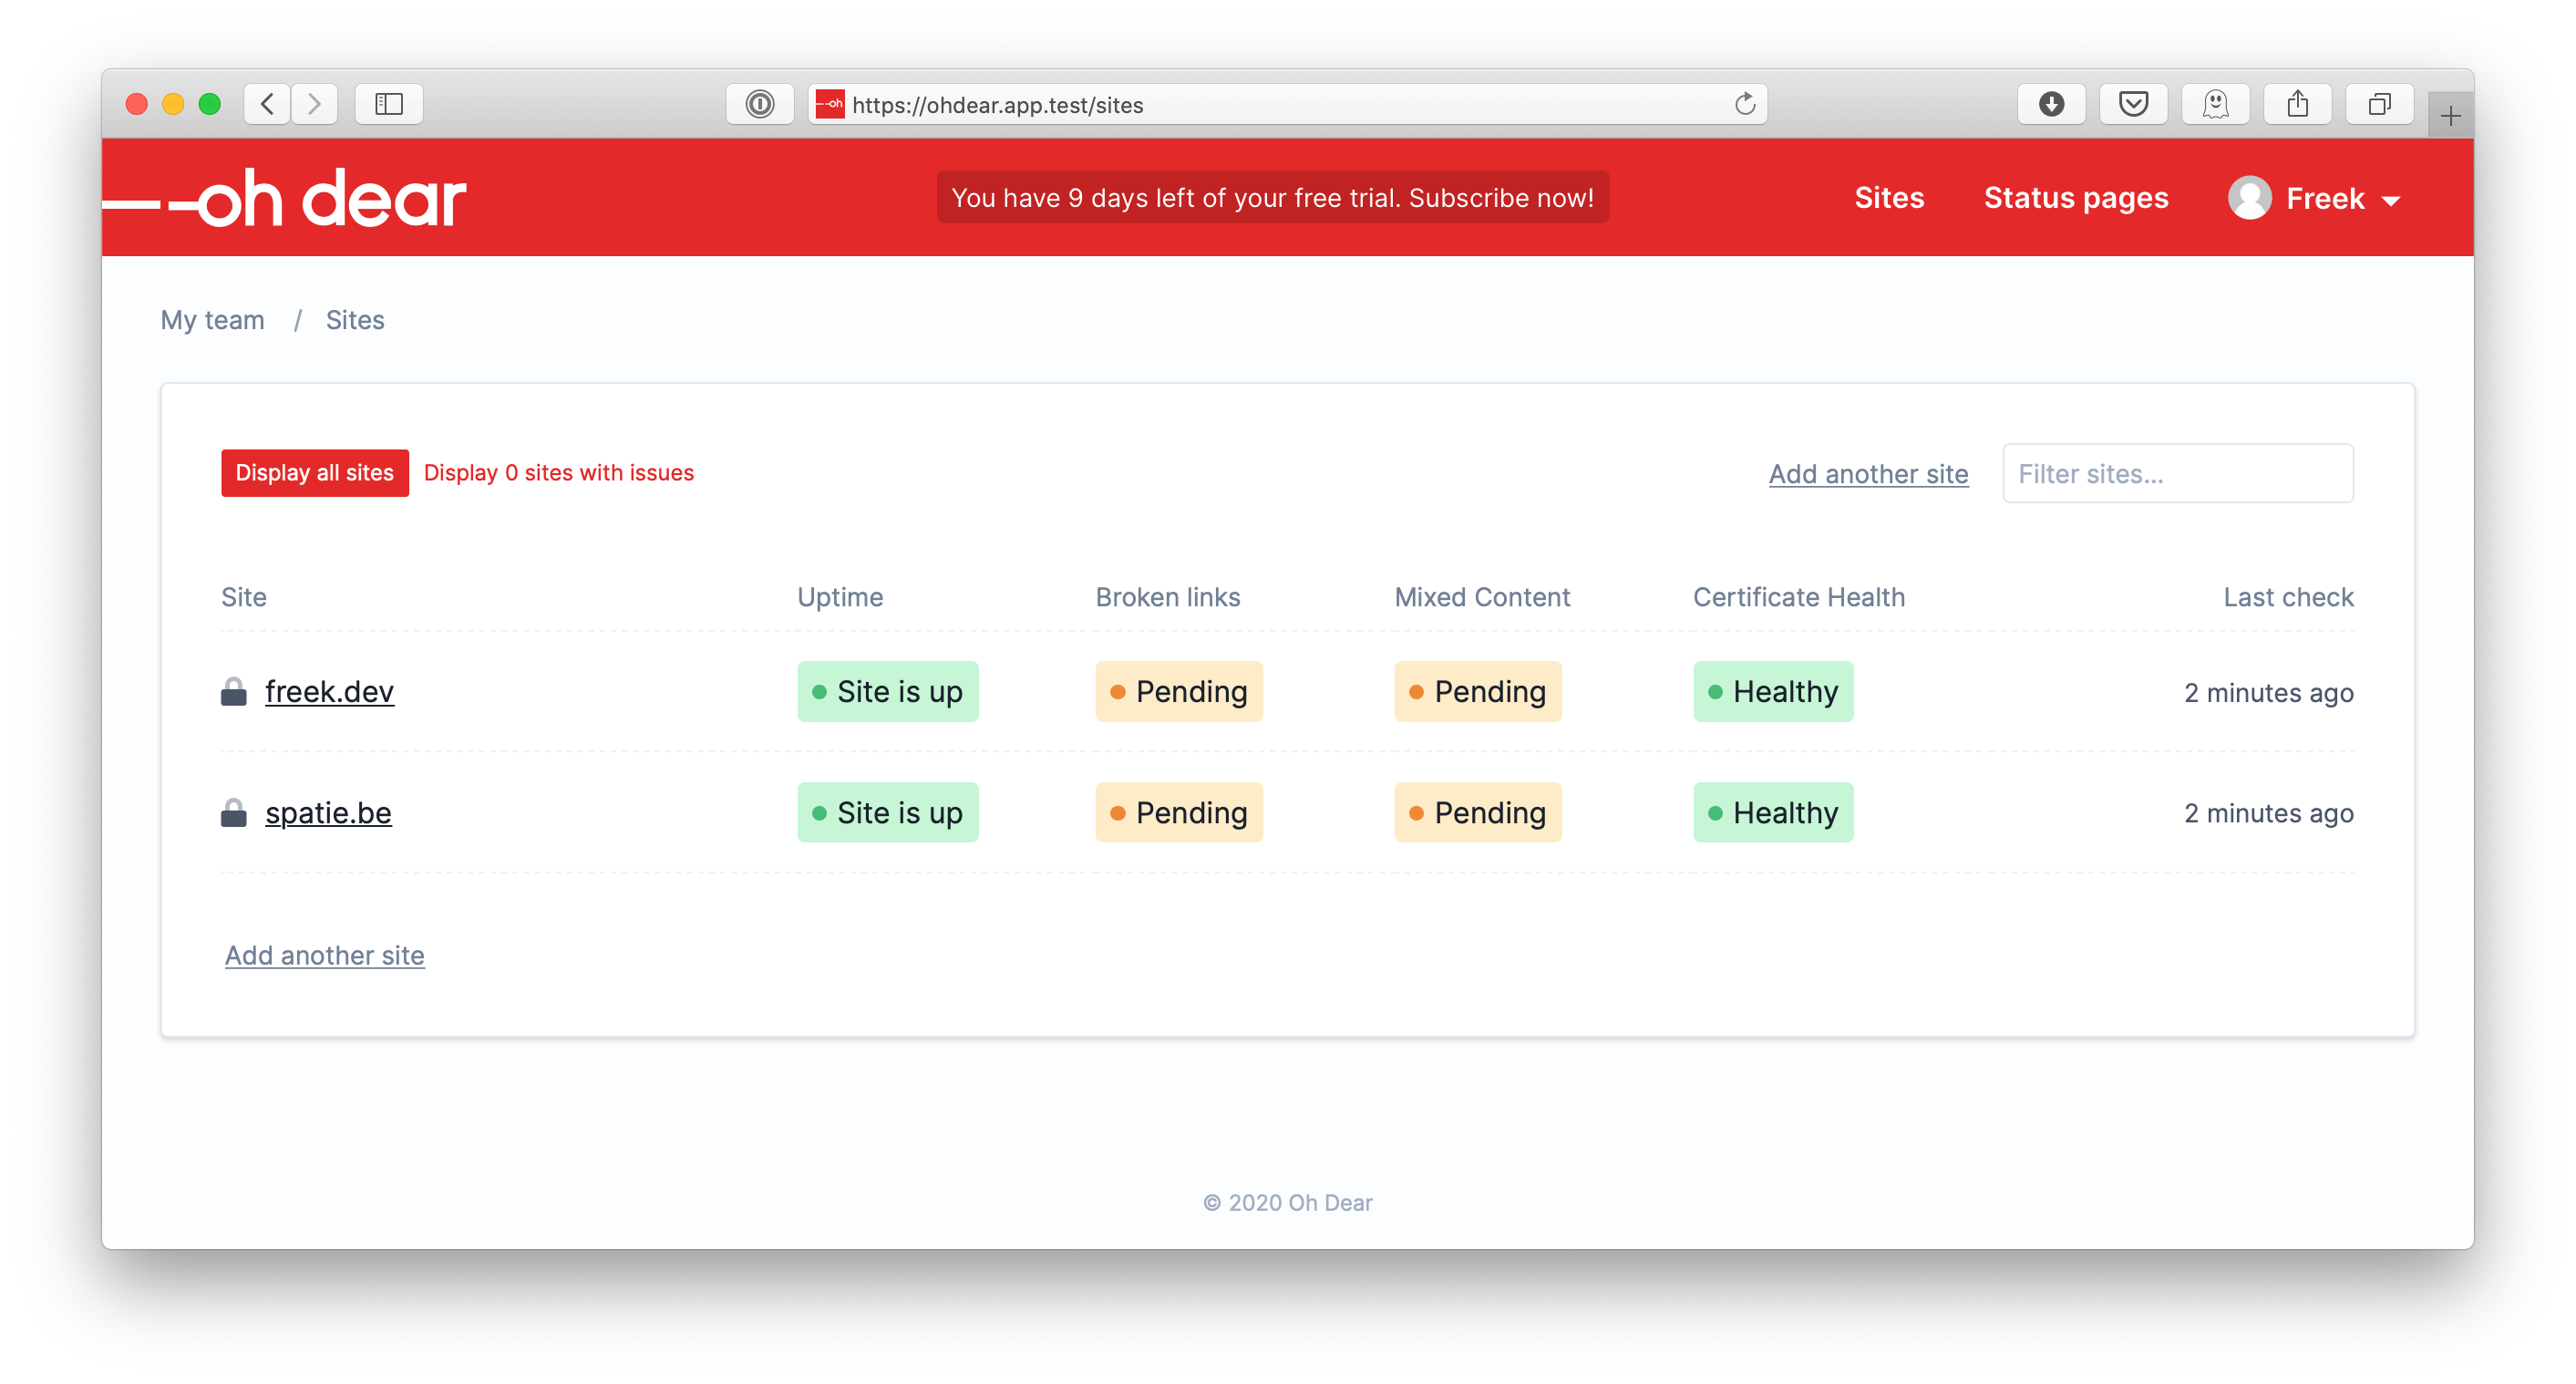
This is what that looks like in Oh Dear. After signing up, users can fill out this form. When pressing enter, it gets added to the list, and results are immediately displayed as they come in.
This behavior used to be powered by web sockets. Whenever Oh Dear started and completed a check, it would broadcast events to the front end. The broadcasting itself would be done using Laravel’s native broadcasting features and the Laravel WebSockets package that Marcel and I created. On the front end, we used Laravel Echo to receive the events and a couple of Vue components.
It all worked fine, but it sure added some complexity to our stack. Also, most of the time, once users have set up their sites, they won’t visit our website often again. But we’d still keep broadcasting events. We could avoid this by tracking presence in some way, but this would complicate things even further.
By moving to Livewire, we can ditch all of the things mentioned above entirely. There’s no need for a web sockets server, Echo, and Vue to create the experience in the movie above. In fact, in that movie, Livewire is already being used.
Next, let’s take a look at the SiteListComponent class and its underlying view. You don’t have to understand it all now. After the source code, I’m going to explain some parts, but I think it’s good that you already take a look at the component as a whole, so you have some context.
Notice that $this->onlySitesWithIssues check? Let’s see how that variable is being set. If you take a look at the screenshot of the site list, you’ll notice a little filter on the top with “Display all sites” and “Display sites with issues”.
This is the part of the view that renders that.
<divclass="switcher"><buttonwire:click="showAll"class="switcher-button ">Display all sites </button><buttonwire:click="showOnlyWithIssues"class="switcher-button "> Display with issues </button></div>
Notice that wire:click="showOnlyWithIssues". When the user clicks an element with wire:click the method whose name is in the attribute value will be executed, and the component will be re-rendered. So, in this case, showOnlyWithIssues is executed.
So, here our onlySitesWithIssues instance variable is changed, causing our component to re-render. Because onlySitesWithIssues is now set to true, the sites() method will now filter on sites having issues.
if ($this->onlySitesWithIssues) { $query = $query->hasIssues(); }
When the component gets rendered, only sites with issues are displayed. Under the hood, Livewire takes care of a lot of things, most notably calling the method on the component when that wire:click element is called, and replacing the HTML of the component on the page when the HTML of the re-rendered version.
In the top right corner of the site list, you see a search box. When you type something there, you will only see sites who’s name contain your query. Here’s how that works.
Here, another Livewire directive is used: wire:model. This directive will make sure that each time you type something in that element, Livewire will update the instance variable with the same name in the component and re-render the component. By default, this behavior is debounced, meaning that when you type fast, only one request will be made every 150ms.
So, because the search instance variable is changed on the component, it will re-render. In the first line of the sites() method, the value is being used.
And with this in place, searching sites works. I think it’s kinda amazing that you can have this behavior by merely adding livewire:model in your view, and using that value to scope your query. Sure, you could do this with Vue, but this is way simpler.
For completeness, here’s the scopeSearch that’s on the Site model.
// in the sites() methodreturn $query ->orderByRaw('(SUBSTRING(url, LOCATE("://", url)))') ->paginate($this->perPage);
Calling $sites->links() in the view will render URLs with a page parameter. Under the hood of the paginate() method, that query parameter is used to fetch the results of that page. That’s in short how pagination works in Laravel.
Adding pagination support to a Livewire component is super easy with Livewire. You just have to use the Livewire\WithPagination trait on your component. This trait does some magic so the render links don’t contain a URL to your page, but to an internal Livewire route. This is the output of $sites()->links() in the view of Livewire component.
When clicking such a link, Livewire will set the page query parameter in the URL and re-render the component. It’s an elegant solution, and I like that it hooks in so nicely with Laravel’s default pagination.
As a Livewire user, the only thing you needed to do extra was to apply that WithPagination trait. Beautiful.
As stated earlier, want to have our UI to display the current state, without users having to refresh. If one of the sites displayed in the list goes down, the list should get updated automatically.
The solution for this is straightforward: we’re just going to poll for changes. Livewire comes with support for polling out of the box. At the top of the view you might have noticed this:
<divwire:poll.5000ms>
This will make Livewire refresh the component automatically every five seconds. To re-render the component in the browser, Livewire makes use of morphdom. This will compare the HTML of the component with the HTML of the re-rendered version. Only the changes will get updated in the DOM, making the cost for re-rendering in the browser very low.
While typing this blog post, I can already feel the screams of some readers: “Freek, what are you doing!?!? This is highly inefficient: it will perform queries and make requests the whole time…”. And yes, that is true.
Using Livewire with polling is a trade-off. One the one hand, we have some more requests/queries, but this only happens when users are looking at their site lists. This won’t happen often. To know the state of their sites, the vast majority of our users rely on the alerts we sent out (via Slack, Mail, Telegram, …), and they won’t be staring at the site list the whole time.
It’s also very nice that Livewire only polls if the browser is displaying the page. When a browser tab is in the background, polling is paused.
By using a little bit of polling, we don’t need to set up web sockets or Vue, and we don’t need to broadcast events the whole time, … It vastly simplifies our tech stack. I think in this case, the trade-off that Livewire / polling brings to the table is worth it.
I hope you enjoyed this dissection of our site list Livewire component. Other place in our UI, where realtime info is being displayed, was refactored in a similar fashion.
Working with Livewire was a pleasure. The API makes sense, the docs are well written, and it’s easy to create powerful components in a short amount of time.
If you want to see the Livewire components discussed in this blogpost in action, head over to Oh Dear and start your ten-day trial (no credit card needed).
After ten days, you might want to get a subscription. What sets Oh Dear apart from the competition is that we not only monitor your homepage, but your entire site. We can alert you when a broken link, or mixed content, is found on any pages of your website. And we also monitor certificate health and provide beautiful status pages like this one.
Should you have questions about these Livewire components, or Oh Dear in general, let me know in the comments below.
Whether it’s an everyday-carry pocket light, a stationary work light, or a fully featured flashlight for hunting and fishing, Ledlenser makes a product to meet your needs.
A field-worthy flashlight is one that can easily adjust from spotlighting the trail ahead to a strong, focused beam for locating the next cairn. Or maybe you’ll sleep better once you’re sure what you saw in the woods was just an odd-shaped tree.
Ledlenser lights have high-intensity LED beams, metal cases, and ergonomically designed features. Like knives and other outdoor essentials, you can find cheaper alternatives. But low-cost options often aren’t built with longevity in mind.
Flashlights, Headlamps, Lanterns, and More
These nine products exemplify the range of lighting options made by Ledlenser. And yes, the full line runs deep.
The flagship (and brightest) of Ledlenser’s headlamps, the MH11 was built to run 100 hours at 10 lumens, or switch over to Boost mode to light up surroundings at 1,000 lumens.
The companion Ledlenser Connect App lets you create and adjust the light to personalized settings within that range. In addition, there’s an RGB front light, a battery status indicator, and a magnetic charging cable.
We wrote about its best-selling predecessor, the MH10, here.
Its slim aluminum case houses an LED that Ledlenser claims produces up to 60 lumens in a wide array. Smaller than most car key fobs, the light clips onto keys or bags with a metal snap hook and is rechargeable via USB.
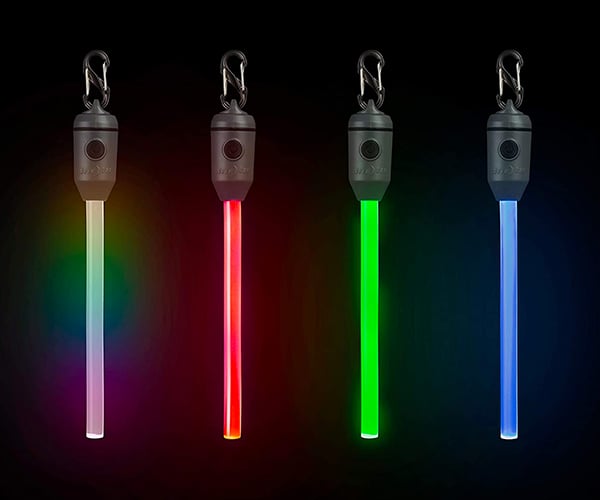
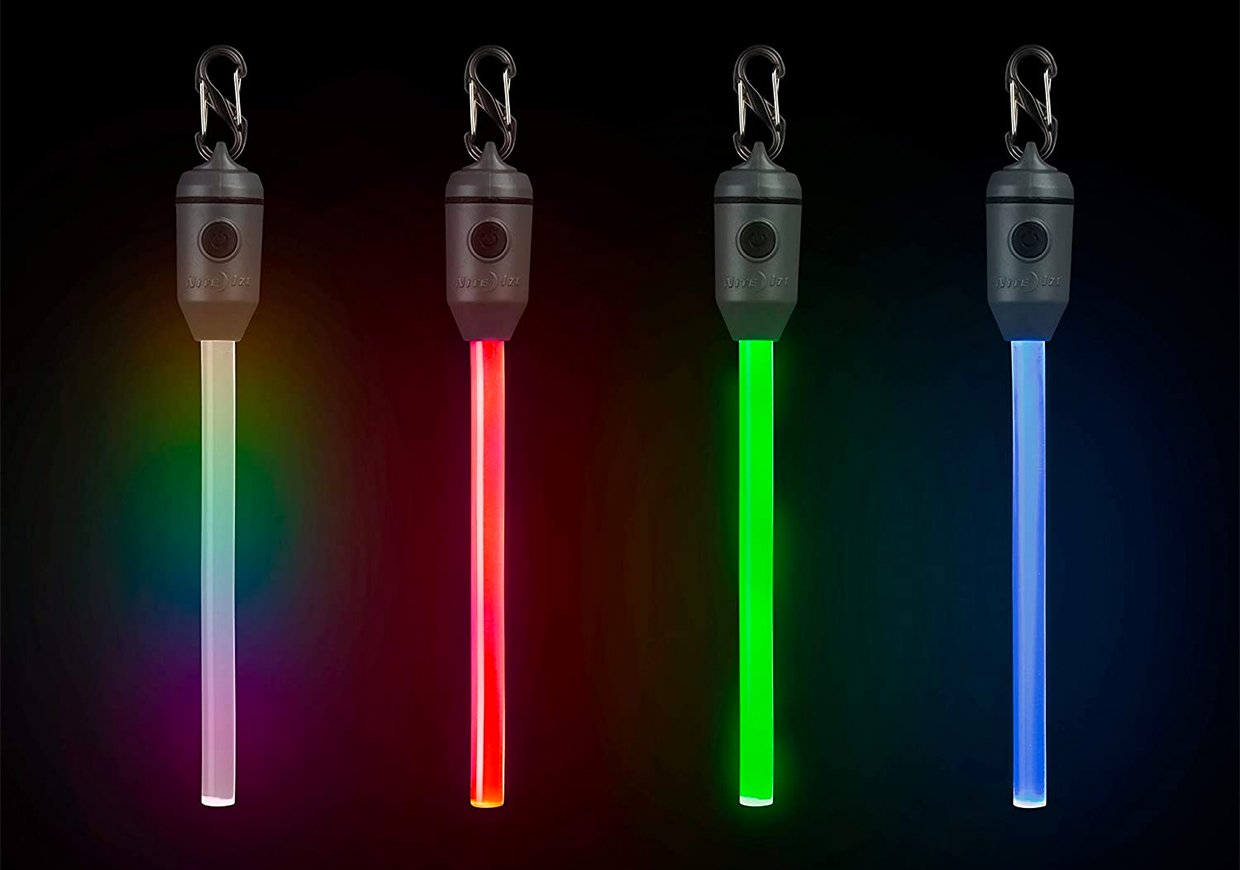
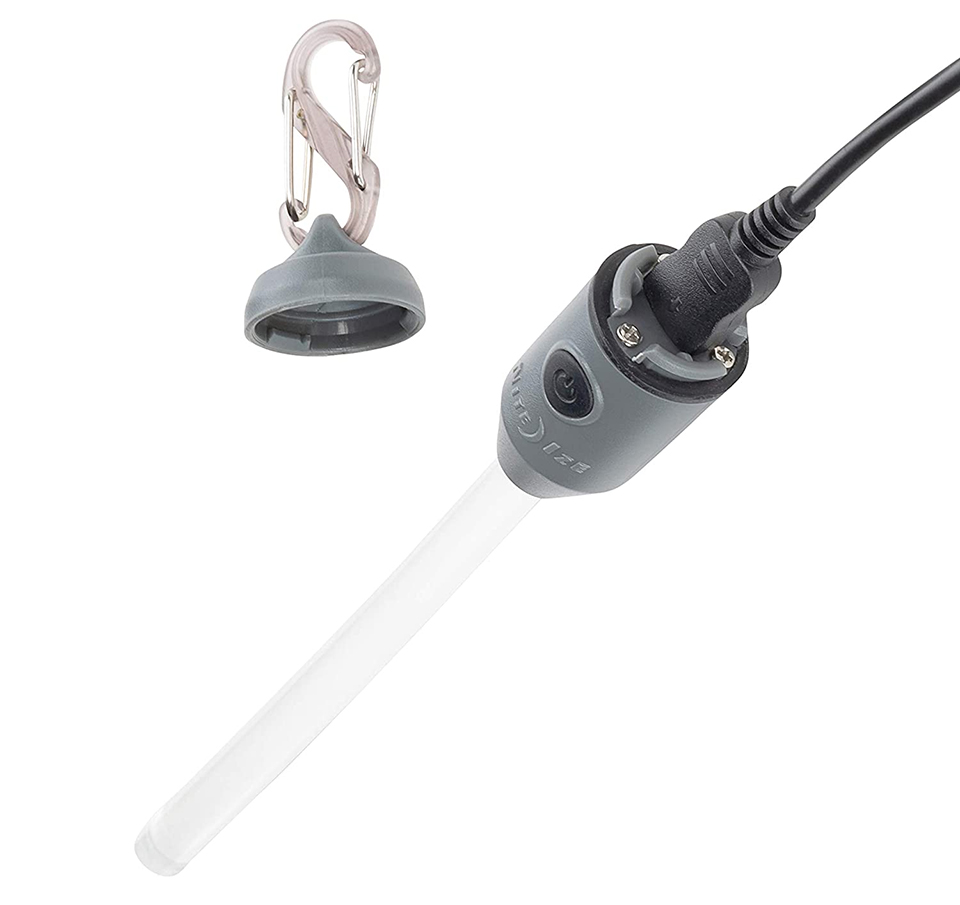
A pocket-friendly flashlight for hunting, fishing, or camping, this “Quatro Color” torch can toggle between white, red, green, and blue for observing and tracking game.
One of Ledlener’s best-sellers, the P7R showcases three power modes. The brand touts its ability to produce up to 1,000 lumens at 688 feet or be turned down to act as a floodlight. And the P7R uses a “floating” magnetic charging station (it doesn’t plug or clip in) designed for quick-grab use.
From the Intrinsically Safe line, the EX7 is designed for use in nearly any environment (Ex-Zone 0/20). The light’s oversized case shape and large magnetic switch aim to facilitate easier handling and operation while wearing safety equipment.
According to Ledlenser, the MT14 includes multiple technologies, like an adjustable ray that transitions from ambient floodlight to concentrated, long-distance beam. In all, it has four light functions for different outdoor scenarios.
One more feature the brand touts is a battery status indicator on the switch that serves as a visible reminder of when it’s time to recharge via its USB 3.0 port.
The iF8R aims to provide a solution for lighting up a variety of spaces. Ledlenser promises a bright, consistent beam up to 4,500 lumens that can be controlled from a mobile phone while standing in the work area. The idea is to reduce the number of trips up and down a ladder.
Ledlenser designed the iF8R with a cooling system to keep it running for hours without overheating. The iF8R’s adjustable base has a built-in magnet for fastening it to metal surfaces and providing adjustability to angle the light just so.
The Ledlenser ML6 camp light can also be used to charge accessories via a USB port
Designed to deliver glare-free LED to light up a campsite with 750 lumens, the ML6 Lantern has an oversized handle shape for carrying by hand or hanging from oversized branches. The ML6 also doubles as a power bank to recharge other electronics (via micro-USB).
The ML4 is a 2.5-ounce lantern built to fit in a palm. The brand claims its latest micro-prism technology is powerful enough to provide glare-free light up to 300 lumens. And it achieves that with just nine LEDs.
Campers, take note: It measures less than 4 inches, comes with a red-light lens, and can run on AA batteries between charges.
Glow sticks can add a splash of color and light to nighttime festivities. But they’re also filled with hazardous chemicals and only last a short time. Nite Ize’s version uses LEDs instead, and lasts for up to 8.5h per charge. It offers multiple colors to choose from, is IPX7-rated waterproof, and includes an S-biner clip for attachment.
With no signs of the COVID-19 pandemic slowing anytime soon, more and more Americans are finding themselves unemployed. These economically tragic times are anxiety-filled for those in their 40s. They are back on the career hunt with fierce competition in the millions. So starting an ecommerce business in your 40s may not be a bad idea right now.
The ecommerce industry has taken a few hits during the coronavirus pandemic. However, if you are serious about getting into ecommerce, have a viable niche, and employ essential ecommerce solutions, you could achieve success.
Success right now may be a bit different in the beginning, though. You might not make what you were making while climbing the corporate ladder. However, you could make enough money to cover your bills and save a bit of cash. Keep in mind, though, that success will not come overnight. So be ready to roll your sleeves up and get to work.
To help, we compiled a few tips and tricks to start an ecommerce business in your 40s. Let’s dive in!
1. Niche Down for Quick Growth
Due to the competitiveness in the ecommerce industry, it is essential to find a micro-niche, especially if you’re starting out in your 40s. For instance, selling baby clothes online is way too broad. You will have a difficult time ranking in search engines for just baby clothes. Instead, niche down as far as you can go.
Here are a few questions to ask yourself when finding a micro-niche in the baby clothes segment:
What age group will be my demographic?
What will my price points be?
Will I sell boys’ and/or girls’ clothing?
What buyer persona is my target (mom, dad, grandparents, etc.)?
What is my unique selling point (differentiator)?
Find the micro-niche in the wider segment to grow faster. Your aim should be those first 1,000 followers and consumers.
2. Collaborate with Micro-Influencers
Since you are niching down as far as possible to achieve fast growth, consider collaborating with micro-influencers in your micro-niche. Why build your own audience base when you can tap into the loyal audience of a micro-influencer? This is a powerful tip when it comes to starting an ecommerce business in your 40s.
For example, let’s say you have $1,000 to dump into a marketing strategy. You could go the traditional route and pay for Facebook and Instagram ads. But how confident are you in doing this on your own? It might be better to pay an influencer in your micro-niche to raise brand awareness for your online store.
This strategy allows you to reach 5,000 people who are already interested in the products you are selling online. Fast growth and sales are the aim here.
3. Test Your Market Viability Before Investing Too Much Money
One of the biggest mistakes new ecommerce business owners make is going all-in before testing the market. Did you know that the number-one reason startups fail is because there is little to no market for what they’re selling? This means testing the market is a must-do right from the start.
To test your market, set up a simple website using Shopify. A simple ecommerce website with SEO at the forefront will show you how much interest you have over a specific time period. Having this data and the projections it will give you will allow you to get a clear picture of the market.
4. Don’t Ignore Amazon or eBay
This is a very important tip to start an ecommerce business in your 40s. Did you know that many ecommerce businesses that sell on their own online marketplace also sell on Amazon and/or eBay? The reason behind this is consumer trust. Consumers know Amazon. This means they are more willing to buy on Amazon instead of a site they have never heard of.
However, there is a bit of work to setting up an Amazon and/or eBay seller account. You will need to meet the seller requirements for each platform. Amazon is a bit more challenging to get on than eBay. Here’s how to start selling on Amazon.
5. Buy an Ecommerce Business and Skip Early-Stage Issues—Because, After All, You’re in Your 40s
Another way to start an ecommerce business in your 40s is to not start one at all. Instead, buy an already-viable ecommerce business online using sites like Flippa. Going this route can save you a lot of the time and energy it would take to set up a brand new business.
The only downside to this is money. The price tag of an ecommerce platform that will net quick return on your investment ranges from $5,000 to $15,000. Therefore, be sure to do your due diligence when buying an existing business.
So Go Ahead and Start an Ecommerce Business in Your 40s
The above tips and tricks to start an ecommerce business in your 40s are among the most important. From testing your market with basic online tactics to buying an existing ecommerce platform, there is certainly a lot to consider. But if you are looking for an industry that allows you to make money on your terms, ecommerce may be an option.


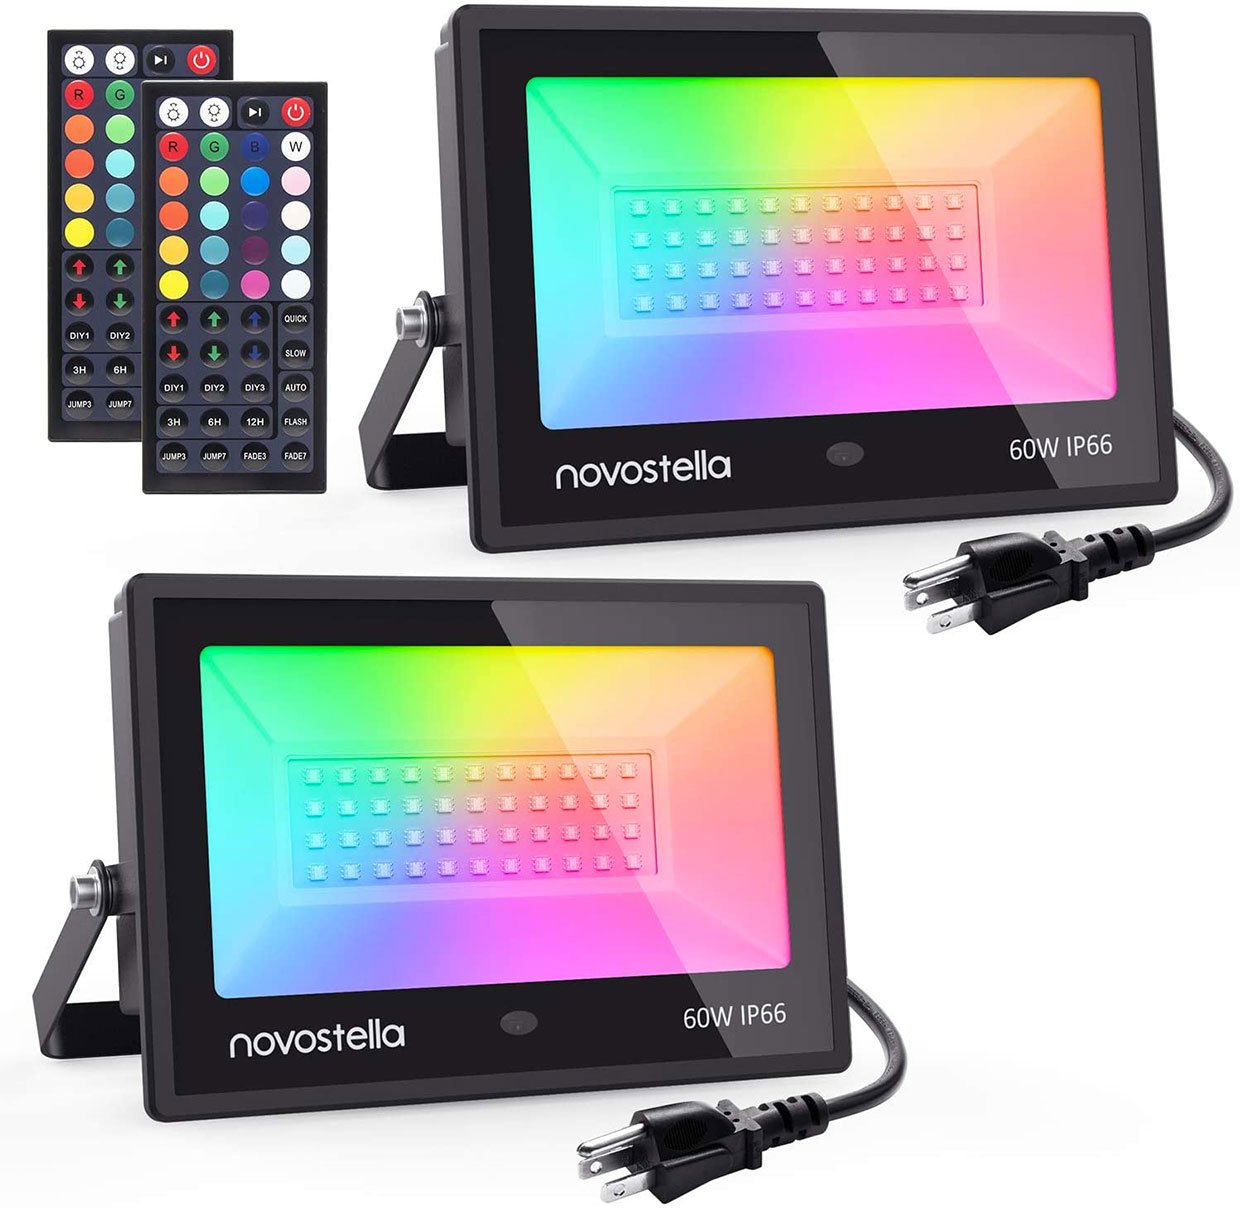
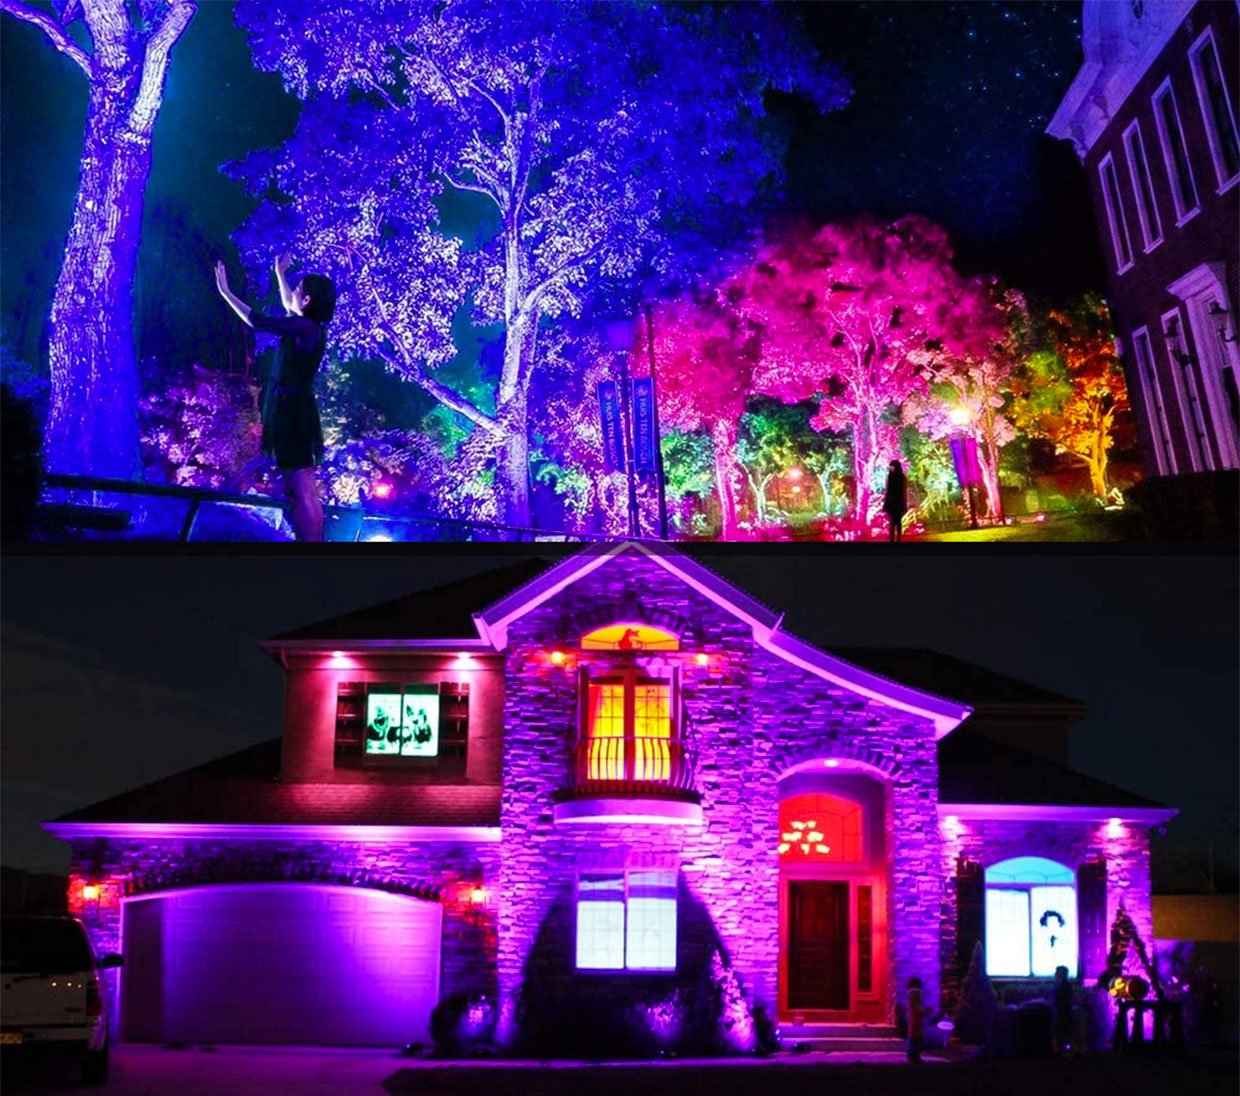
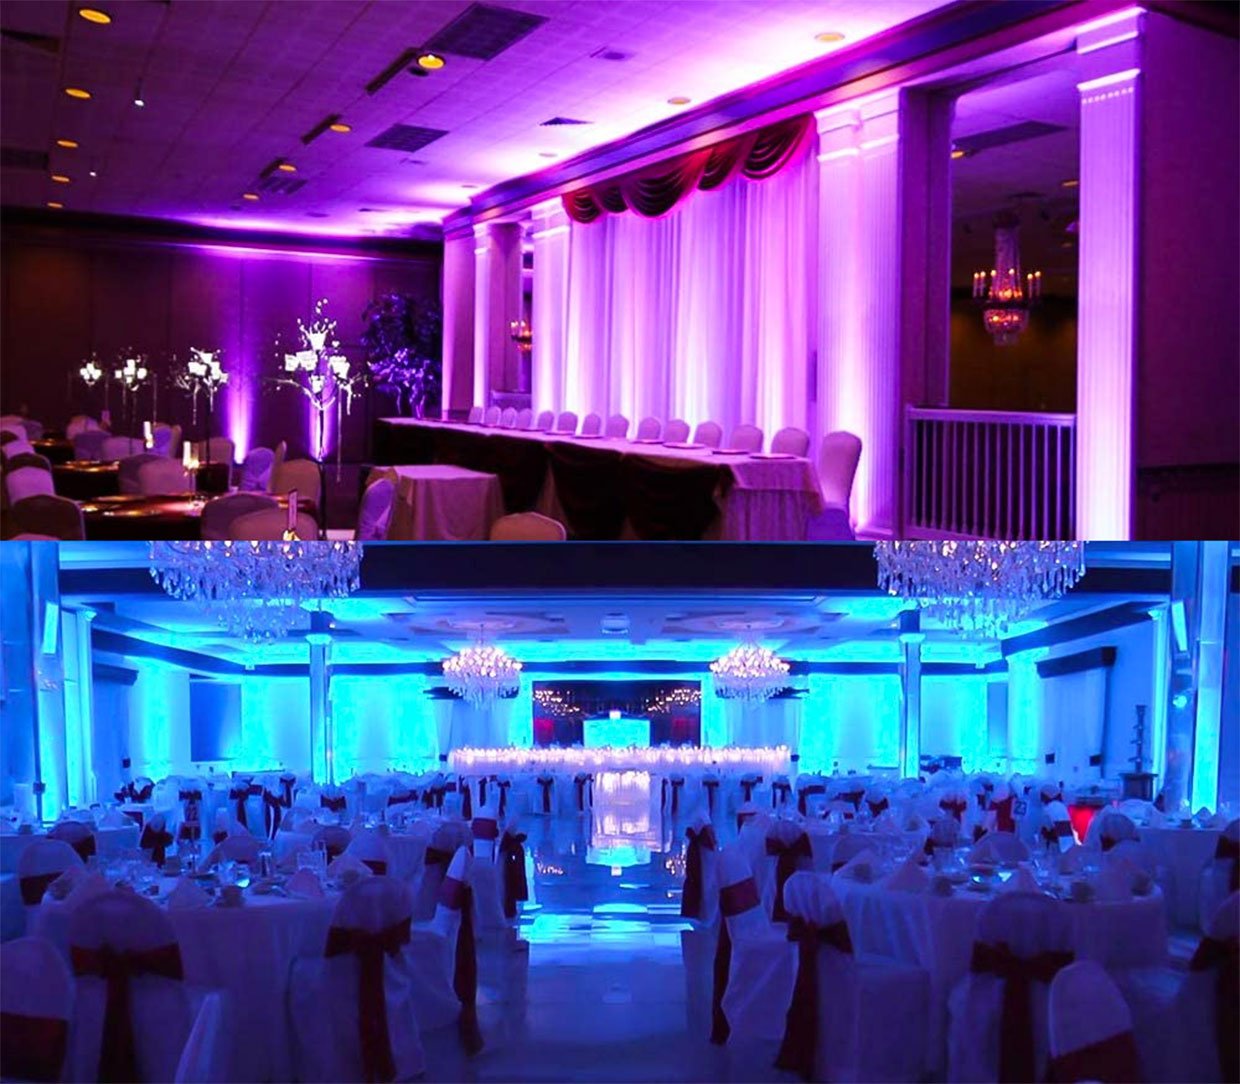
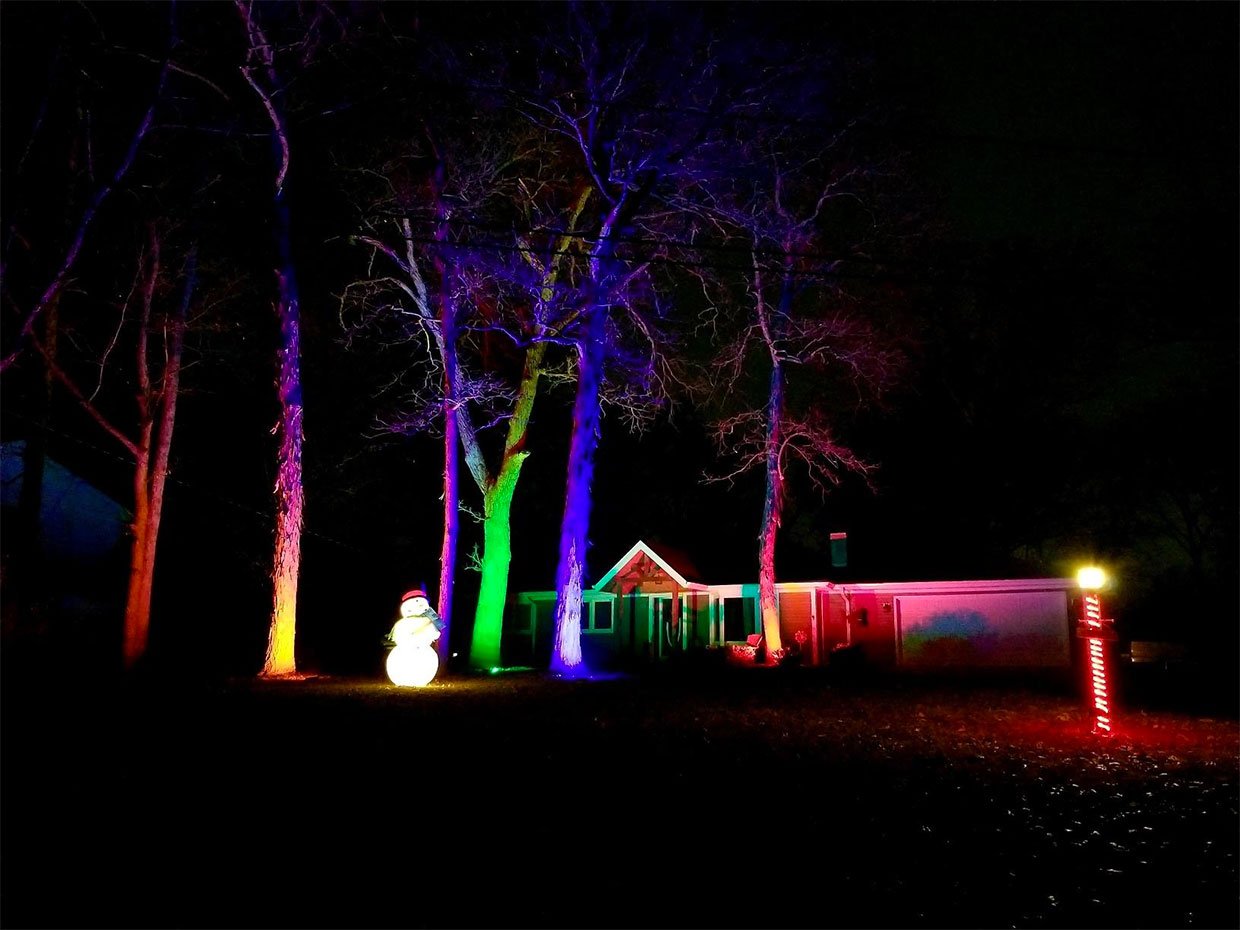

 Image:


 Image:
 Image:
  Image:
  Image:
  Image:
  Image:
  Image:
  Image:
  Image:
  Image:
  Image:
  Image:
  Image:
  Image:
 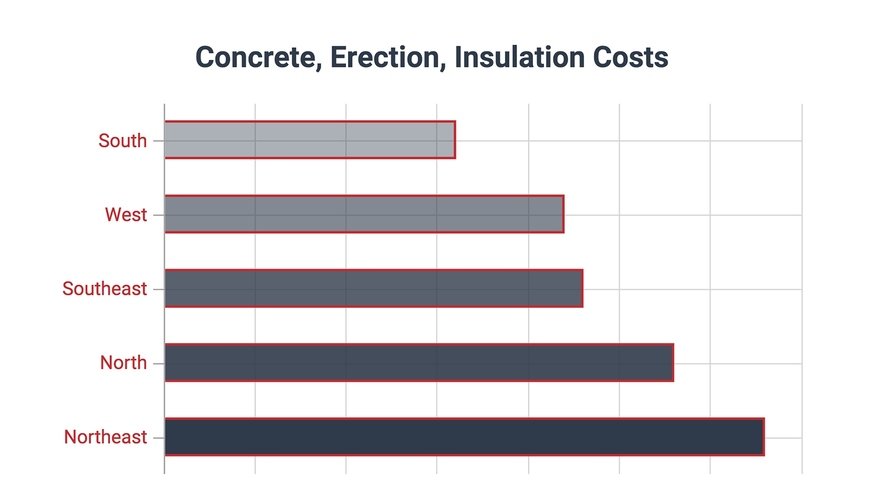 Chart by
  Image:
  Image:
  Image:
  Image:
  Image:
  Image: