Hangar raises $15 million for its venture studio for government technology startups
https://ift.tt/3kW7X81
Josh Mendelsohn, the former Bloomberg digital campaign advisor and venture studio founder, thinks that cash-constrained government agencies from the local to the federal level aren’t using technology effectively enough to meet the challenges they face.
That’s why the founder of Engine and former managing director of Hattery launched Hangar with a $15 million commitment from his former boss and the Kresge Foundation to build companies that will help solve problems that governments haven’t tackled effectively.
“We’re at an unprecedented moment for our country, and our companies are addressing several significant challenges all at once, from combatting Covid-19, to rebuilding our economy, to reducing the cost of higher education, to addressing disparate outcomes in healthcare,” said Mendelsohn, in a statement.
The company has already hired an in-house team of technologists and business consultants to build businesses to nab some of the $2 trillion that governments across the U.S. spend every year on information technology.
In the year-and-a-half since Mendelsohn first began operating the company building studio in stealth mode, Hangar has already created four businesses including: Camber, which provides mobility data to governments and is being used by public health researchers to monitor and manage COVID-19 outbreaks,
Camber is currently the authoritative provider of mobility data insights to public health researchers, epidemiologists, and state governments tackling COVID-19; Cornea, a predictive toolkit for disaster planning and management; Outcome, a new service for student loans; and Roster, which uses technology to enhance the efforts of community health workers.
“There are so many areas–from healthcare to disaster planning–that are ripe for innovation and new technologies that help to improve the lives and well-being of people and help solve real problems,” said Brian O’Kelley, a New York-based serial entrepreneur and Hangar investor who previously founded AppNexus (and sold it to AT&T for over $1 billion). “With a veteran team that blends deep Silicon Valley and policy experience, Hangar is already making an impact and I’m proud to be supporting their next phase.”
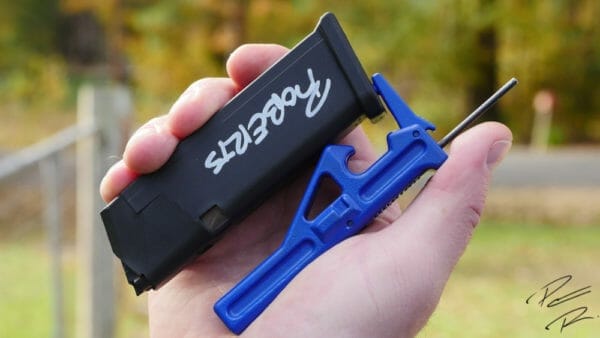
U.S.A. -(AmmoLand.com)- It isn’t often that I come across a tool that is as simple as the VISM G5+ Glock Tool that is as invaluable as it has been. When I was at NRAAM 2018, I thought that my friend (and unofficial non-biological father) Steve Fisher of Sentinel Concepts was on some potent drugs when he told me that I had to swing by the NcSTAR booth to check it out.
Spoiler: It turns out that Papa Fisher wasn’t on drugs and had stumbled onto the greatest all in one Glock tool that either of us had seen to date. While this is a bit of a spoiler, I like it enough to have purchased a couple and often give them as gifts.
The VISM G5+ Glock Tool features five distinct tools in one with a bonus bottle opener built-in. Over the last couple of years, I have owned one; it has become a staple in my range bags as well as my tool kit.
The Glock punch is one of the most used tools in my kit due to the sheer volume of shooting I do with my range guns. When it comes time to do a deep clean every couple thousand rounds, the pistol gets stripped to a completely bare frame.
Part of the reason for this is the internals need to be cleaned exceptionally well. The other purpose is I want to remove as much metal as possible so I can use a toothbrush and dish soap to scrub the hell out of the stippled frames. You wouldn’t believe the amount of dead skin some of my more aggressive frames collect over time.
I do rather like the fact that the tool body has a place to rest your thumb so you can get a great grip on it should you have some stubborn pins.
While there are a bunch of punches out there that will do the job, the 3/32″ hardened steel punch has a nice chamfer on the tip to make sure that you don’t gouge the polymer should your aim not be dead on as the pin is pushed through.
Not only is the hardened steel 3/32″ punch the right diameter, but unlike other all-in-one Glock tools, it is also the right length as well.
One of the most significant failings with other punches on the market is they aren’t long enough to drive the pin out of the frame entirely. Thankfully this isn’t a problem with the VISM G5+ Glock Tool with its 1 7/16″ long punch. Nothing is more annoying than being forced to pull a pin out the rest of the way with your fingers when it should just drop into your parts tray.
Glock Pin Centering Tool
There has been some confusion about the reason that the factory Glock tool has a square handle with rounded corners. Some seem to think that it is because Glock is cheap; others believe that it was designed to prevent the tool from rolling off a workbench.
Regardless of frame mods or generation of your pistol, the G5+ tool has two radiuses that will seat the pin to the right depth with ease.
It turns out that its real purpose is to help you center the pins in the frame during reassembly. The VISM G5+ tool has two different radiuses that allow you to quickly seat the pins to just the right depth for your gun.
Striker Takedown Tool
During the Glock Armorer’s course, they teach you to use the slide to take apart the striker assembly for service. While it is nice to have the tool essentially built into the gun, it isn’t as stable as I would like when working on several pistols in a row or doing something like trying different combinations of trigger bars, connectors, and strikers to fine tune trigger feel.
The striker disassembly tool is one of the more clever features on the VISM G5+ Glock Tool.
I rather like the additional stability that the VISM G5+ tool provides and have pretty much stopped using the striker channel as Glock teaches in the armorer’s course when maintaining pistols.
Glock Floorplate Tool
While all the other tools built into the VISM G5+ tool are helpful, none of them are as awesome as the MagPopper. If you have ever taken the baseplate off a Glock magazine, you know exactly how much of a pain in the butt it can be.
The magazine baseplate tool is the best part of the VISM G5+ in my opinion.
The Glock armorer’s manual teaches you to insert a Glock punch into the baseplate fully until it is held captive by the floorplate retainer, then to use your thumb to push the baseplate past the two retaining tabs. Let me tell you… it isn’t a smooth operation.
The simplicity of the MagPopper is what makes it so dang good.
With the G5+ tool’s MagPopper, what used to be a giant pain is a simple operation. Funny how the right tool can make a difficult task a cinch.
Once you slide the hook into the baseplate hole, you only need to squeeze the tool and magazine body together and the baseplate pops right off.
All you need to do is insert the hook into the baseplate hole and squeeze the mag body and tool together. As the name implies, there is a satisfying pop as the baseplate slides right off.
I have to say, the MagPopper is hugely superior to how Glock teaches magazine disassembly in their armorer’s course.
Glock Front Sight Tool
The front sight tool on the VISM G5+ tool is yet another tool that is significantly better than other tools I have used in the past. To get the front sight tool out of the handle, you need to push the button to release it. Once the tool is in the open position, it locks in place with the same button.
The folding front sight screw tool is well thought out.
Once the front sight tool is extended, NcSTAR added a magnet inside the nut driver so that you no longer have to do gymnastics with your sight post, the screw, your slide, and the tool.
No more weird hand yoga to make sure that the screw doesn’t fall into oblivion.
One of the things that many other front sight tools get wrong is the nut driver is just too thick. For example, the Strike Industries All-In-One Glock Tool has a nut driver that is too thick and prevents you from removing the front sight on roughly 1 out of every four pistols I have tried it on over the years.
Bonus Tool: Bottle Opener
I don’t much like the idea of consuming alcohol and handling firearms but do understand it happens when cleaning guns after a long range trip. I don’t drink much myself, so I resorted to some delicious Jarritos sodas, which the G5+ opened like a champ.
I can’t recommend using the bottle opener while handling firearms, it is there, and I am sure that some will appreciate the heck out of it.
I guess there isn’t much reason not to include the bottle opener since the MagPopper fulcrum needs to be there anyhow, just be responsible when handling firearms.
Should You Buy A VISM G5 Glock Tool?
If you own a Glock, yes. There isn’t anything else on the market that is a better tool to include the tools that Glock offers to its certified armorers. It is well designed and made from pretty stout materials, so it should last quite a while.
After using the hell out of mine for a few years on my personal guns that get reconfigured often as well as servicing rental guns at the range I instruct at, I am impressed at how well it has held up after being my primary Glock armorer’s tool.
Aside from some slight finish wear and a bit of rust from leaving it in the bed of my truck, the VISM G5+ Glock Tool looks pretty dang good for a tool that has serviced several hundred pistols.
The VISM G5+ Glock Tool carries an MSRP of $27.99 but can be found for a street price of less than $20 should you shop around some. Learn more about the VISM G5+ Glock Tool on the NcSTAR website.
About Patrick R.
Patrick is a firearms enthusiast that values the quest for not only the best possible gear setup but also pragmatic ways to improve his shooting skills across a wide range of disciplines. He values truthful, honest information above all else and had committed to cutting through marketing fluff to deliver the truth. You can find the rest of his work on FirearmRack.com as well as on the YouTube channel Firearm Rack or Instagram at @thepatrickroberts.
How’d you like to spend your weekends in a lunar lander? Catamaran designer Kurt Hughes turned his skills towards building an earthbound structure inspired by the iconic space vehicle. His 250 sq.ft. “fishing shack” sits along the banks of the Columbia River, and is made from carbon fiber panels, plywood, and epoxy.
One of the simplest examples that people have used over the years of demoing Docker is quickly standing up and running a Minecraft server. This shows the power of using Docker and has a pretty practical application!
Recently I wanted to set up a server but I wanted to persist one and as I have given away my last raspberry pi I needed to find a new way to do this. I decided that I would have a go at running this in Azure using the $200 free credits you get in your first month.
The first thing I decided to do was to check out the existing Docker Images for Minecraft servers to see if there were any that looked good to use, to do this I went to Docker Hub and searched for minecraft:
I liked the look of minecraft-server repo, so I clicked through to have a look at the image and link through to the Github repo.
To start I decide to just test out running this locally on my machine with the ‘simple get started’ Docker Run command:
$ docker run -d -p 25565:25565 --name mc -e EULA=TRUE
 itzg/minecraft-server
In the Docker Desktop Dashboard, I can see I have the container running and check the server logs to make sure everything has been initialized properly:
If I load up Minecraft I can connect to my server using local host and my open port:
From there, I can try to deploy this in Azure to just get my basic server running in the cloud.
With the Docker ACI integration, I can log into Azure using:
$ docker login azure
Once logged in, I can create a context that will let me deploy containers to an Azure resource group (this proposes to create a new azure resource group or use an existing one):
$ docker context create aci acicontext
Using only available subscription : My subscription (xxx)
? Select a resource group  [Use arrows to move, type to filter]
> create a new resource group
  gtardif (westeurope)
I can then use this new context :
$ docker context use acicontext
I will now try to deploy my minecraft server using the exact same command I ran previously locally :
$ docker run -d -p 25565:25565 --name mc -e EULA=TRUE itzg/minecraft-server
[+] Running 2/2
 ⠿ Group mc  Created                     4.6s
 ⠿ mc        Done                        36.4s
mc
Listing my azure containers, I’ll see the public IP that has been provided for my Minecraft server:
$ docker ps
CONTAINER ID        IMAGE                   COMMAND             STATUS         PORTS
mc                  itzg/minecraft-server                       Running        51.105.116.56:25565->25565/tcp
However, if I follow the logs of the ACI container, the server seems to be stuck in the initialization, and I cannot connect to it from Minecraft.
$ docker logs --follow mc
In the logs we see the Minecraft server reserves 1G of memory, which happens to be the default memory allocated to the entire container by ACI ; let’s increase a bit the ACI limit with the –memory option :
$ docker run -d --memory 1.5G -p 25565:25565 --name mc -e EULA=TRUE
itzg/minecraft-server
The server logs from ACI now show that the server initialized properly. I can run $ docker ps again to get the public IP of my container, and connect to it from Minecraft and start playing !
This is great, but now I want to find a way to make sure my data persists and reduce the length of the command I need to use to run the server.
To do this I will use a Compose file to document the command I am using, and next I will add a volume to this that I can mount my data to.
Looking at our command from before we have moved our image name into the image section, our -p for ports into the ports and added our EULA acceptance into the environment variables. We also ensure the server container has enough memory to start.
The command to start this locally is now much simpler:
$ docker-compose --project-name mc up
And to deploy to ACI, still using the ACI context I created previously:
$ docker compose --project-name mc2 up
[+] Running 2/2
 ⠿ Group mc2  Created                                6.7s
 ⠿ minecraft  Done                                   51.7s
Of course with compose, this allows the compose application to include multiple containers (here we only have the “minecraft” one). The containers are visible in the progress display (here the “minecraft” line). And listing the containers shows the application name and the container name mc2_minecraft :
$ docker ps
CONTAINER ID                   IMAGE                  COMMAND      STATUS      PORTS
mc                             itzg/minecraft-server               Running     20.50.245.84:25565->25565/tcp
mc2_minecraft                  itzg/minecraft-server               Running     40.74.20.143:25565->25565/tcp
Next we will want to add a volume to include our Minecraft data and where we can load in other maps if we want. To do this I need to know what folder has the Minecraft data in the Docker image, if I go and inspect our running container in the Docker Dashboard I can see that it is the /Data directory:
If I wanted to add this back in my command line I would need to extend my command with something like:
docker run -d -p 25565:25565 --v /path/on/host:/data --name mc -e
EULA=TRUE itzg/minecraft-server
I can add this under the volumes in my Compose file:
Now when I do a docker compose up and come back to inspect I can see the /data folder in the container is now mounted to my local folder as expected. Navigating to this local folder I can see all Minecraft data.
Now let’s create an Azure File Share and deploy our application to mount /data to the Azure shared persistent folder so we can do the same thing in ACI.
First I need to create an Azure storage account. We can do this using the Azure “az” command line, or through the Azure portal, I have decided to use the portal :
I need to specify a name for the storage account, select the resource group to attach to it, then I let the other options default for this example.
Once the ”minecraftdocker” storage account is created, I’ll create a file share that will hold all Minecraft files:
I just need to specify a name for this file share and a size quota ; let’s call it “minecraft-volume”:
I’ll need to specify an access key to reference that in my compose file, I can get the storage account access key in the left hand side menu, Settings > Access keys.
Then in my compose file, I’ll update the volume specification to point to this Azure File Share:
Note that the syntax for specifying ACI volumes in Compose files is likely to change in the future.
I can then redeploy my compose application to ACI, still with the same command line as before:
$ docker --context acitest compose  --project-name minecraft up
[+] Running 2/2
 ⠿ Group minecraft  Created                                5.3s
 ⠿ minecraft        Done                                  56.4s
And I can check it’s using the Azure File Share, just selecting the minecraft-volume Share in the Azure portal:
I can connect again to my server from Minecraft, share the server address and enjoy the game with friends!
To get started running your own Minecraft server you can download the latest Edge version of Docker Desktop. You can find the Minecraft image we used on Docker Hub, or start creating your own content from Dockers Official images. Or if you want to create content like this to share, create a Docker account and start sharing your ideas in your public repos.
The FBI handgun qualification is a well known standard demonstration of handgun proficiency. This longstanding course of fire was updated in 2019 and includes some new challenges which will push yours skills!
The 50-round course of fire covers distances from 3 to 25 yards and includes single hand shooting, off hand shooting, holster work, standing and kneeling positions.
There are two levels of qualifications: 80/100 for standard qualification and 90/100 for instructor level.
The 10 strings of fire offer some very challenging time limits. Lets see if you have what it takes to measure up against America’s G-Men.
This challenge is courtesy of our non-profit FASTER Saves Lives program, which trains school employees how to protect our children.
How FASTER Challenges Work:
Each month we will issue a new challenge to help you practice self defense skills. Just for TRYING the challenge you will receive a custom FASTER Challenge patch to commemorate your effort and support.
The patch is a standard embroidered Velcro-backed 2″ x 3″ patch suitable for putting on hats, jackets, book-bags, range bags, and anywhere else Velcro will stick.
So get out, take the challenge, support FASTER, and have some fun!
1) Go to FASTERSavesLives.org and scroll to the bottom of the page where you will see the heading “Upcoming FASTER Training.” Click that link to begin registration for each challenge.
2) You will see a link that lets you download the course of fire.
3) The "Join the Challenge Now" button is where you actually sign up for the challenge. The cost monthly will be $20 for the challenge patch and for the official targets if you need them. Join the challenge now, because once the month is over, if you still want to take the challenge you can, but the price goes up on the first of the following month.
4) Go to the range or an appropriate space of land, use top-notch gun safety, and take the challenge! Make sure you learn and have fun while you do it! There is no required score. And it’s on the honor system.
5) Please take pics and tag us on our social media accounts and help us spread the word and fund the mission of FASTER Saves Lives! #FASTERChallenge
Facebook: @FASTERSavesLives
Twitter: @FASTERSaves
Instagram: @FASTERSavesLives
6) When your patch arrives in 2-4 weeks, wear it proudly and get others to take the challenges with you.
7) Sign up for the next challenge. We plan on offering a different challenge each month.
If you have questions, contact the Challenge Program leader:
Tom Hall Tom@FASTERSavesLives.org
740-550-4159
guns
via Buckeye Firearms Association https://ift.tt/2h9uK1x
Twenty years ago today, Joel Spolsky (who later co-founded Stack Overflow) published The Joel Test: 12 Steps to Better Code listing 12 metrics for rating the quality of a software development team. The premise is simple: you get 1 point for each “yes” answer, for a total score of up to 12 points.
It’s presented a bit tongue-in-cheek: he freely acknowledges it as “sloppy” and even “highly irresponsible”. But the list resonated with so many software developers that it’s still commonly in use today. Many job posts still include their “Joel Score” as a signal to developers that they care about the health and quality of their team.
Here at Tighten, we regularly discuss (and publish) our opinions about what makes a good software team, and how to maximize our own team’s health, productivity, and happiness. So we thought it would be fun to celebrate the 20 year anniversary of this iconic post with our own twist on it—heavily opinionated, based on our shared values, and sourced from our experience as web and app developers who regularly work with a variety of different software organizations.
The Tighten Test
Do you work 40 hours a week or less?
Do you set aside time at work for learning?
Do you have the tools you need to get the job done?
Do you keep an up-to-date list of prioritized tasks/tickets?
When new features take longer than expected, do you cut their scope and/or extend the timeline?
Do your codebases have up-to-date written setup and deployment instructions?
Do you write great commit messages and pull requests?
Is all incoming code automatically linted and tested?
Is all incoming code reviewed by someone who didn’t write it (or written while pairing)?
Do your local and staging environments match production as closely as possible?
Are you automatically notified about errors in production?
Do you deploy to production at least once a week?
As with the original test, 12/12 is a perfect score, 11 is tolerable, but 10 or lower and you’ll start noticing problems. Joel also noted that most software organizations are running with a score of 2 or 3.
1. Do you work 40 hours a week or less?
This one should be self-explanatory: the easiest way to ensure people are happy is to give them time to enjoy their life and maintain their health. There are many studies about the negative effects on health caused by overworking, and employees who are healthy tend to be happier and more productive. Some companies like Microsoft have even been experimenting with four-day workweeks in recent years—and seeing boosts in productivity.
At Tighten we don’t have a four-day workweek (yet? 😉), but we’ve been taking 20% time on Fridays since 2016: more on this in the next section. We also don’t work overtime.
2. Do you set aside time at work for learning?
It’s one thing to be a good developer, but to stay a good developer you have to constantly learn new things and also keep your existing skills sharp. While it’s impossible to learn everything, the best software development teams make some space for learning at work.
As mentioned, at Tighten we dedicate a day every week to learning and teaching: on Fridays we contribute to open source, read or watch tutorials, write blog posts, etc., instead of our usual client work. But you don’t need to set aside an entire day—there are other ways to make space for learning, like encouraging pair programming to spread knowledge around, including time for research in your tasks, and arranging internal talks within your team.
3. Do you have the tools you need to get the job done?
If someone on your team needs a license for something, can they get it? If you need specific office equipment—like an ergonomic desk or keyboard—will your company provide it for you?
Some developers manage to produce amazing work on old, slow laptops—or even a paper and pencil—but if your company’s business depends on your software, everyone on your team needs hardware that won’t slow them down, software to make them more productive, an office setup that maximizes their physical well-being, and space to take care of their mental health.
4. Do you keep an up-to-date list of prioritized tasks/tickets?
Joel’s original test included “Do you have a bug database?”, but we wanted to stress the importance of regularly prioritizing tickets at the top of your list. Working on the right thing is more important than doing good work on the wrong thing, so make sure your team is regularly re-ordering tickets so developers are always picking up the highest priority task.
5. When new features take longer than expected, do you cut their scope and/or extend the timeline?
In our experience, setting deadlines based on estimates doesn’t work, since estimates are merely a guess at what might happen in the future; not only is software complex and unpredictable, but requirements and priorities change all the time. Deadlines also tend to be the primary cause of overtime; many teams “crunch” to hit a due date, which can jeopardize team members’ physical & mental health.
Instead of estimating and pretending to know the future, we just do our best work every day and keep in close communication with our clients so everyone always knows the status of the project. If a client has a target to hit, we work with them to cut the scope of the requested feature—fans of agile practices will be familiar with this tactic—to ensure a usable, simpler version of what they need will be done with time to spare. If there’s time left later, you can always go back and add more to a feature.
Cutting scope allows us ship to production early and often, get feedback on features from real users faster, and save a lot of time by not developing and maintaining complex additions when users end up needing something different than expected.
6. Do your codebases have up-to-date written setup and deployment instructions?
How long does it take a new developer to get set up with your codebase? Without written instructions, it might take anywhere from a few days to a few weeks.
Since we work with a variety of clients, we’re constantly the new developers on a project—and while not having written instructions doesn’t necessarily mean your code is bad, we find that well-documented codebases are a good indication of regular maintenance and care for the project. Written instructions also help your team internally: for example, they can make a huge difference if the only person who knows how to deploy leaves the company.
7. Do you write great commit messages and pull requests?
While Git history might not be as important on solo projects, it matters a lot on a team. As frequent newcomers to a project, commit messages are invaluable in helping us understand why changes were made and how they relate to each other, without needing years of context or domain knowledge.
Understanding existing code is often the most time-consuming part of a development task. Once someone on a team wraps their brain around a programming challenge, it would be silly to have other developers spend that time again when they review or change the same code—but that’s exactly what happens when you leave commit messages and PR descriptions blank. The moment you submit a PR, you have more context about the task you’re working on than anyone else, so write it down while you remember! This will save time for everyone else: people who review your PR, new developers in the future who dig through Git history, and even future you when you can’t remember the details.
Great pull requests should also be digestible: ideally containing visual demonstrations, and small enough to be reviewable in 30 minutes or less. Since PR reviewers don’t have as much context as the developer who worked on a task, reviewing a huge PR can be disproportionately time-consuming.
8. Is all incoming code automatically linted and tested?
Disagreements about code style happen on every development team, but that’s no reason to let them get in the way of getting work done. Pick a style (preferably the standard in whatever language you’re using) and use linter and/or fixer tools to enforce it automatically, and never waste time arguing about code style again. You can fix your entire codebase in one go and ignore the commit in Git blame to maintain a useful history. As an added benefit, all future code changes will be easier to review since your diffs won’t be cluttered with meaningless changes to code style.
Running automated tests against all new code is also essential. Existing tests make sure new code hasn’t broken anything, and new tests protect new code from breaking in the future. The amount of code covered by tests matters too: most of it should be covered (though 100% coverage is often more trouble than it’s worth). Running an automated test suite with one test is better than nothing, but ultimately not enough to give you confidence that your app still works.
9. Is all incoming code reviewed by someone who didn’t write it (or written while pairing)?
One way we ensure that our code is of the highest quality possible is by always having a fresh set of eyes look it over before we consider it “done”.
Whenever possible we work in two-person teams, with each developer reviewing the other’s PRs on GitHub before they’re merged. We also have a strong pair programming culture here, where two developers will work together on the same code simultaneously while sharing screens over Zoom or some other tool.
Particularly when building large or complex features, pair programming often results in superior code compared to code that was written solo—not only because it helps weed out errors before they make it into a commit, but also because pairing allows the developers to reason through design decisions together in real-time, in a deeper and more meaningful way than is possible during a conventional code review. Plus, pairing can be a ton of fun, and is a great way to learn from one another!
Either way, whether through pairing or a GitHub-based code review of a PR—when it comes to code quality, four eyes are always better than two.
10. Do your local and staging environments match production as closely as possible?
Developing on different framework, language, database, or operating system versions will almost certainly cause unnecessary friction (“It works on my machine!”). Limiting the differences between environments also limits time wasted on errors caused by mismatched software versions. If you use build scripts and dependency managers (like Composer), you can update dependencies automatically in all environments, and take advantage of new language or software features everywhere.
Using tools like Docker, you can go even further and have your environments match exactly. If your local, staging, and production environments are identical, developers can prepare the application for the exact environment in which it will run. And with continuous integration and deployment (CI/CD), updates to the project and environment can be built, tested, and shipped the same way.
11. Are you automatically notified about errors in production?
Nobody writes bug-free code, and you can’t fix errors you don’t know about. Make sure any errors that occur in production are reported somewhere the whole team can see. Many legacy PHP apps silence errors altogether, which is even worse—silencing an error doesn’t make it go away! There are plenty of bug reporting services like Bugsnag and Sentry that give you a full stack trace, request & session data, and all the context you’ll need to fix most errors, as well as configurable notification channels like Slack.
12. Do you deploy to production at least once a week?
The timeframe is arbitrary; the important thing here is that you’re deploying to production frequently. Deploying shouldn’t be a big, scary event: if you do it often enough, if your deployments happen automatically after tests pass, and if you report errors in production there’s really not much to worry about. Modern continuous integration (CI) pipelines make it easier than ever to deploy automatically. We use tools like GitHub Actions and Laravel Envoyer to deploy to production every time we push code and our tests pass.
If you don’t meet all of these guidelines today, don’t worry! They simply serve as a set of goals our team has agreed to work toward, because they make us happier and more productive developers. We hope they’ll do the same for you.
Some of the links in this post are special! When you make a purchase through our links, we might earn a commission at no additional cost to you.
We LOVE Costco! We love the product selections, we love the prices, we love the food court, we love the fuel discounts, we love car rental prices, and more. If you’ve don’t have a Costco Membership, this is the deal you’ve been waiting for.
Groupon is offering a Costco Membership Deal that you don’t want to miss!
This offer is valid for NEW members, or for prior members whose memberships expired prior to April 1, 2020. This deal is not valid for membership renewals
Costco Membership Deal details
The deal includes a one-year Costco Gold Star membership for $60 (regular price), but includes a cash card and coupons that make it worth trying out the membership. Even if you only shop in-person at Costco and use the $40 gift card, you’ll only pay $20 for the membership.
A One-Year Costco Gold Star Membership with auto-renewal of the Costco membership using a Visa® credit or debit card. It’s easy to cancel your Costco membership before or right after the renewal – they will prorate your refund at any time during your regularly priced membership.
A membership card for the Primary Cardholder and one additional Household Card for anyone living at the same address, over the age of 18
A $40 Costco shop card (gift card is valid towards any purchase, including gas). This is an amazing offer!
$40 off any order of $250+ on Costco.com
Why I love Costco
We have had a Costco membership for over 10 years – even when we were just a 2-person family. Now that we have 2 children, the amount of money we’ve saved on groceries, household goods, clothing, diapers, beverages, vacation car rentals, insurance, new tires, and more is WAY more than we’ve paid for our membership.
Did I mention the clothing? I should be embarrassed by how much clothing I’ve purchased from Costco, but I’m not. The clothing rotates regularly, and they offer clothing and shoe brands such as Adidas, PUMA, Free People, Champion, Columbia, Eddie Bauer, Hunter (including Boots at times!), Tom’s, Buffalo, Lucky Brand, Nautica, and more. They also carry fine jewelry, designer bags, and more. I love that you can order the clothing online with free shipping, and return to the store if I don’t like it.
Costco’s return policy is one of the best in the biz. They offer no-questions-asked returns for most items that they sell at any time (select electronics excluded).
Once you purchase the deal, you’ll have to go online to activate (it’s super easy).
Costco often has GREAT deals on holiday gifts for all ages, so now is the perfect time to join!
Building a real-time chat room with Larasocket, Tailwind, Alpine, Livewire, and Laravel
https://ift.tt/30OkWAT
Laravel has a new Broadcaster: Larasocket. Today, we are going to see how we can use Larasocket with Tailwind, Alpine, and Livewire to build a beautiful, and lightweight real-time chat room. You can view the complete tutorial here.
What is the TALL stack?
Tailwind: Made by Adam Wathan. A powerful, lightweight, CSS library made up of utility classes. Utility classes offer all the power of normal CSS in a class-based interface for developers. Need to add margin-right? Just add the class mr-{amount}
Alpine:Made by Caleb Porzio. A lightweight javascript library for simple client-side logic without needing the bulky Vue or React frameworks.
Livewire: Made by Caleb Porzio. A powerful library to help the abstract client to server communication. Need to make an AJAX request to submit a form? Not anymore. Livewire offers an easy way to call PHP code, right from the clients, as well as re-render to UI based on backend changes.
Laravel: From laravel.com: “Laravel is a web application framework with expressive, elegant syntax. We’ve already laid the foundation — freeing you to create without sweating the small things.”
Getting Started
We can quickly get started using a few helpful commands on the CLI:
laravel new larasocket-tall-demo cd larasocket-tall-demo composer requirelivewire/livewire laravel-frontend-presets/tall php artisan ui tall --auth
For any Laravel application that uses Broadcasting, we need to uncomment this line in config/app.php :
// App\Providers\BroadcastServiceProvider::class,
Broadcasting with Larasocket
Now that our Laravel application is off the ground, let’s bring in Larasocket to use as our broadcaster. It’s free to get started 💪
composer require larasocket/larasocket-driver
npm i laravel-echo larasocket-js
Over in config/broadcasting.php we need to add the Larasocket driver as an option:
We can now update the newly createdcreate_messages_table migration with:
Schema::create('messages', function (Blueprint $table) {
    $table->id();
    $table->text('body');
    $table->foreignId('user_id')->constrained()->cascadeOnDelete();
    $table->timestamps();
});
We are all done making database changes so let’s persist these:
php artisan migrate
Let’s add our column and relationship to Message.php:
class Message extends Model
{
    protected $fillable = [
        'body'
    ];

    public function user()
    {
        return $this->belongsTo(User::class);
    }
}
Over in User.php we can add the messages relationship:
public function messages()
{
    return $this->hasMany(Message::class);
}
Laravel Events provide a great interface to send data in the socket messages. Let’s update our newly created MessageSentEvent to pass along the needed data:
class MessageSentEvent implements ShouldBroadcast
{
    use Dispatchable, InteractsWithSockets, SerializesModels;
/**
     * @var Message
     */
private $message;

/**
     * Create a new event instance.
     *
     * @return void
     */
public function __construct(Message $message)
    {
        $this->message = $message;
    }

/**
     * Get the channels the event should broadcast on.
     *
     * @return \Illuminate\Broadcasting\Channel|array
     */
public function broadcastOn()
    {
        return new PresenceChannel('demo');
    }

/**
     * JSON data to broadcast with this message
     */
public function broadcastWith()
    {
        return $this->message->toArray();
    }
}
Later on, we will dispatch this event when the user submits their message.
Important: don’t forget the implements ShouldBroadcast! This interface tells Laravel to use the Broadcaster to send out socket messages using whichever driver you have configured.
There is just one last task before our backend is ready. We need to secure the demo channel using routes/channels.php:
Remember that ChatRoom Livewire component we made earlier? It is now time to put it to work. The first thing we need to do is create a new route in our routes/web.php file:
/** * @param $message */ public function incomingMessage($message) { // get the hydrated model from incoming json/array. $message = Message::with('user')->find($message['id']);
array_push($this->messages, $message); }
/** * @param $data */ public function here($data) { $this->here = $data; }
/** * @param $data */ public function leaving($data) { $here = collect($this->here);
/** * @param $data */ public function joining($data) { $this->here[] = $data; } }
Laravel Livewire is doing a lot behind the scenes for us.
First, note the protected $listeners array. Livewire uses this array to automatically subscribe to channels (uses Echo, in Javascript) for us. You can read more about that here. We will use the standard here, join, leaving presence channel events to keep track of who is in the chat room.
Currently, there is a Livewire bug that limits the presence channels we can subscribe to. It only allows those 3. Not a problem, we will leverage Alpine to easily subscribe to more channels in the Javascript. Let’s create the UI to go with our ChatRoom. In chat-room.blade.php let’s update it with:
Note that we are using Tailwind to help construct a pleasant UI, easily. Tailwind provides a nice library of CSS classes to easily update margin, padding, borders, display, colors, everything, and anything. Styling our elements in using Tailwind has a few key advantages:
Go inside of Italy’s Beta Utensili factory, where they take pieces of raw steel, heat them, hot roll, and machine hammer them into their rough shapes, before cutting them out, sand blasting, grinding, tumbling, and refining their openings before hardening and plating each piece into a finished combination wrench.