https://laracoding.com/wp-content/uploads/2023/08/storing-form-data-in-a-laravel-database-step-by-step-guide_536.png
When developing web applications with Laravel, a common task is to store form data in a database. In this tutorial, we will guide you through the process of capturing user input from a Laravel form and storing it in a database using Laravel’s powerful ORM, Eloquent.
Step 1: Setting Up the Database
Before diving into form submission, ensure that you have a database connection configured correctly in your Laravel application. Open the .env file and verify the database credentials (e.g., DB_CONNECTION, DB_HOST, DB_PORT, DB_DATABASE, DB_USERNAME, DB_PASSWORD). If needed, make any necessary adjustments to match your database configuration. The.env file should look similar to the one below.
APP_NAME=Laravel
APP_ENV=local
APP_KEY=base64:PZNdti8R6gIx0XGfXZpUA9gX4uiHyboi+DrozytCEwY=
APP_DEBUG=true
APP_URL=http://your-domain.test

LOG_CHANNEL=stack
LOG_DEPRECATIONS_CHANNEL=null
LOG_LEVEL=debug

DB_CONNECTION=mysql
DB_HOST=127.0.0.1
DB_PORT=3306
DB_DATABASE=your-database
DB_USERNAME=root
DB_PASSWORD=mrsid
Step 2: Creating a Migration
We will now create a migration that will contain the definition of the structure of our database table. Run the following command to instruct Laravel to generate it:
php artisan make:migration create_user_comments_table
Laravel has now added a basic migration file to the folder database\migrations, which we can edit to suit our requirements.
Step 3: Editing the Migration
Now open the newly generated migration file and define the table schema within the up method. Here you can specify the columns you need to store your form data. In our example, we’ll make a form with fields like name, email, and message, so our migration file might look like this:
<?php

use Illuminate\Database\Migrations\Migration;
use Illuminate\Database\Schema\Blueprint;
use Illuminate\Support\Facades\Schema;

return new class extends Migration
{
    /**
     * Run the migrations.
     */
    public function up(): void
    {
        Schema::create('user_comments', function (Blueprint $table) {
            $table->id();
            $table->string('name');
            $table->string('email');
            $table->text('message');
            $table->timestamps();
        });
    }

    /**
     * Reverse the migrations.
     */
    public function down(): void
    {
        Schema::dropIfExists('user_comments');
    }
};
Step 4: Running the Migration
To create the table in the database, run the migration using the following command:
This command will execute all pending migrations in order of creation date. In the example shown you can see Laravel first runs its 4 default migrations and then runs our newly added migration which creates the table user_comments:

Step 5: Creating a Model
Next, run the following command to create a model UserComment that represents the table you just created:
php artisan make:model UserComment
Step 6: Creating Form in Blade
Now create a blade file in your /resources/views folder and copy and paste the code below to add the HTML code of the form.
<form action="" method="post">
    @csrf
    <table>
        <tr>
            <td>Name</td>
            <td><input type="text" name="name" value=""></td>
        </tr>
        <tr>
            <td>Email</td>
            <td><input type="text" name="email" value=""></td>
        </tr>
        <tr>
            <td>Message</td>
            <td><textarea name="message"></textarea></td>
        </tr>
        <tr>
            <td></td>
            <td>
                <input type="submit" />
            </td>
        </tr>
    </table>
</form>
Note that we used a named route: “comment.store”, we’ll define this later in our routes/web.php
Step 7: Creating a Controller
Next, run the following artisan command to make a controller named CommentController:
php artisan make:controller CommentController
Step 8: Creating the Routes
Now we will add 2 routes. We will name the first route “comment.index”, this will display our page containing the form. The other route will be named “comment.store”, this will receive the form and store it in the database.
Open your web.php file and add the following code:
Route::get('/comment', [App\Http\Controllers\CommentController::class, 'index'])->name('comment.index');
Route::post('/comment', [App\Http\Controllers\CommentController::class, 'store'])->name('comment.store');
This will indicate that Laravel should:
- expect a GET to URL “
/comment"and needs to call the function “index” in CommentController - expect a POST to URL “
/comment"and needs to call the function “store” in CommentController
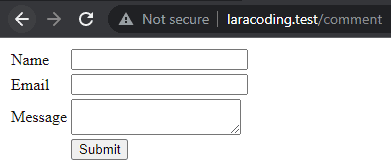
Step 9: Showing the Form
Now edit the CommentController and add a function called index by pasting the code below:
<?php

namespace App\Http\Controllers;

use Illuminate\Http\Request;

class CommentController extends Controller
{
    public function index()
    {
        return view('comment');
    }
}
You should now be able to see the comment form when you open your browser:
Step 10: Processing Form Data
We will now make changes to our CommentController by adding a store() function to handle the (post) form submission defined in our web.php route file. Within this function, we will create a new instance of the UserComment model and assign the input values from the form to the respective model attributes: name, email, and message.
Note that we have also added some validation rules which Laravel will check. This way we can ensure that the entered form fields contain the expected data.
<?php

namespace App\Http\Controllers;

use App\Models\UserComment;
use Illuminate\Http\Request;

class CommentController extends Controller
{
    public function index()
    {
        return view('comment');
    }

    public function store(Request $request)
    {
        $request->validate([
            'name' => 'required|max:32',
            'email' => 'required|email',
            'message' => 'required|string|required|max:255'
        ]);
        $userComment = new UserComment();
        $userComment->name = $request->input('name');
        $userComment->email = $request->input('email');
        $userComment->message = $request->input('message');
        $userComment->save();

        // Additional logic or redirection after successful data storage

        return redirect()->back()->with('success', 'Comment stored successfully!');
    }
}
Step 11: Displaying Feedback to the User
To ensure proper user feedback in cases of incomplete or invalid input, as well as after successfully storing the data, it’s important to provide informative messages.
When redirecting back to the form page, we can use the ->with() function to set a success message. Additionally, if there are any validation errors, Laravel will populate an $errors variable with the corresponding error messages.
To ensure that both the success message and validation errors are displayed when applicable, we need to include the following code snippet just above the comment form in your view file:
@if(session()->has('success'))
<p>
</p>
@endif
@if ($errors->any())
<ul>
@foreach ($errors->all() as $error)
<li></li>
@endforeach
</ul>
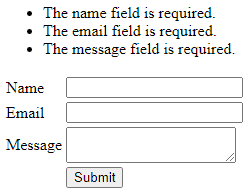
@endifNow, when attempting to save the form with missing or invalid inputs, we will encounter validation errors:
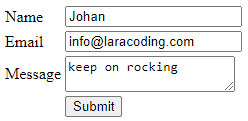
However, if we fill in valid values and resubmit the form, the input will be successfully saved:
After saving the form, the browser will automatically redirect back to the form page and display a success message:

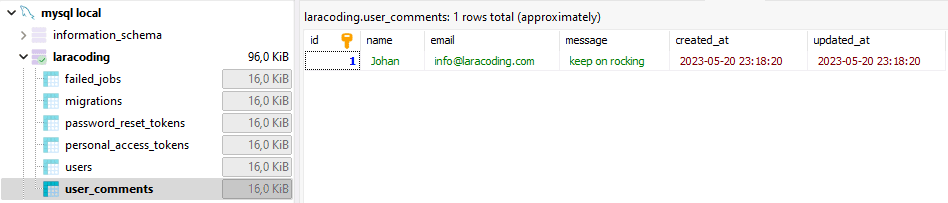
Now, if you view the database you can see the data has been stored correctly. You might use a tool like phpMyAdmin, or my personal favorite the free MySQL tool: HeidiSQL which will show:
Further reading
We can further improve and shorten our Controller code by using the following steps:
- Moving the validation rules into a Form Request Class
- Enable Mass Assign of values on the properties in the Model UserComment (name, email, message)
- Call Eloquent create method and mass assign the values of all validated fields.
public function store(UserCommentStoreRequest $request)
{
    UserComment::create($request->validated());
    return redirect()->back()->with('success', 'Comment stored successfully!');
}
To learn exactly how to apply Mass Assignment and a Form Request to achieve this read our detailed guide: Why Use Laravel Form Request and How? (BIG Code improvement)
Conclusion
In this tutorial, we explored the step-by-step process of storing form data in a Laravel database using Laravel’s ORM, Eloquent. We covered essential steps such as setting up the database connection, creating a migration to define the table structure, running the migration to create the table, creating a model to represent the table, creating a form in Blade, creating a controller to handle form submission, defining routes for the form, processing the form data, and providing user feedback in the form of success messages or validation error messages.
By following these steps, you now have a solid understanding of how to capture user input from a Laravel form and store it in a database efficiently and securely.
Laravel News Links