https://www.laravelia.com/storage/logo.png
Gate and policy are the most important topics in Laravel. Like roles and permissions, we can also handle user access control using the gate and policy in the Laravel application. In Laravel, gates are simply closures that determine if a user is authorized to perform a given action. Policies are classes that organize also authorization logic around a particular model or resource.
In this tutorial, we will look up the gate as well as policy with perfect examples. I will use the latest Laravel 10 application to create this laravel gates and policies example. I will create a roles table and will create different types of roles and finally show you how to use the gate to control user access from that roles table.
First of all, let’s see the example of the Laravel Gates tutorial:
Step 1: Download Laravel
First of all, we need a complete fresh Laravel 10 application. So download it by this command:
composer create-project --prefer-dist laravel/laravel blog
Step 2: Create Migration
Run the following command to create a roles table:
php artisan make:migration add_role_column_to_users_table
Now open this migration file and update with the below code.
<?php

use Illuminate\Database\Migrations\Migration;
use Illuminate\Database\Schema\Blueprint;
use Illuminate\Support\Facades\Schema;

return new class extends Migration
{
    /**
     * Run the migrations.
     */
    public function up(): void
    {
        Schema::create('roles', function (Blueprint $table) {
            $table->id();
            $table->enum('role',  ['admin', 'staff'])->default('staff');
            $table->timestamps();
        });
    }

    /**
     * Reverse the migrations.
     */
    public function down(): void
    {
        Schema::dropIfExists('roles');
    }
};
Step 3: Connect Database
Now connect the database, cause we need migration for this Laravel roles and permissions example:
.env
DB_CONNECTION=mysql
DB_HOST=127.0.0.1
DB_PORT=3306
DB_DATABASE=laravel
DB_USERNAME=root
DB_PASSWORD=password
Now run migrate to add this table.
php artisan migrate
Step 4: Create Gates
Now time to create gates for our application. So update the below file as like below:
app/Providers/AuthServiceProvider.php
<?php

namespace App\Providers;

use Illuminate\Support\Facades\Gate;
use Illuminate\Foundation\Support\Providers\AuthServiceProvider as ServiceProvider;

class AuthServiceProvider extends ServiceProvider
{
    /**
     * The model to policy mappings for the application.
     *
     * @var array<class-string, class-string>
     */
    protected $policies = [
        //
    ];

    /**
     * Register any authentication / authorization services.
     */
    public function boot(): void
    {
        Gate::define('isAdmin', function ($user) {
            return $user->role == 'admin';
        });

        Gate::define('isStaff', function ($user) {
            return $user->role == 'staff';
        });
    }
}
Step 5: Use Gates in Blade
Now our gate declaration is done. Now we will see how to see that gate in the Laravel blade file. See the example:
resources/views/welcome.blade.php
@extends('layouts.app')

@section('content')
<div class="container">
    <div class="row justify-content-center">
        <div class="col-md-8">
            <div class="card">
                <div class="card-header">Dashboard</div>

                <div class="card-body">
                    @can('isAdmin')
                        <div class="btn btn-success btn-lg">
                          You have Admin Access
                        </div>
                    @endcan

                    @can('isStaff')
                        <div class="btn btn-primary btn-lg">
                          You have Staff Access
                        </div>
                    @else
                        <div class="btn btn-info btn-lg">
                          Default access
                        </div>
                    @endcan

                </div>
            </div>
        </div>
    </div>
</div>
@endsection
Now let’s see how to use Laravel Gate in the controller:
App\Http\Controllers\TutorialController.php
<?php

namespace App\Http\Controllers;

use Illuminate\Support\Facades\Gate;

class TutorialController extends Controller
{
    public function __invoke()
    {
        if (Gate::allows('isAdmin')) {
            dd('Admin allowed');
        }

        abort(403);
    }
}
We can also use the gate in our route file like below:
routes/web.php
<?php

use Illuminate\Support\Facades\Route;
use App\Http\Controllers\HomeController;

Route::get('/home', [HomeController::class, 'index'])->middleware('can:isAdmin')->name('home');
Step 6: Create Policy
Now time to talk about Laravel policy. There is an artisan command make:policy to create policy in Laravel. So now create a policy using the below command:
php artisan make:policy PostPolicy

//Yu may specify a --model when executing the command:

php artisan make:policy PostPolicy --model=Post
Step 8: Register policies
In this step, we need to register our policy before using it. Register it in the following file:
app/Providers/AuthServiceProvider.php
<?php

namespace App\Providers;

use App\Models\Post;
use App\Policies\PostPolicy;
use Illuminate\Foundation\Support\Providers\AuthServiceProvider as ServiceProvider;

class AuthServiceProvider extends ServiceProvider
{
    protected $policies = [
        Post::class => PostPolicy::class,
    ];

    public function boot(): void
    {
        $this->registerPolicies();
    }
}
Once the policy has been registered, we may define methods for each action it authorizes in the PostPolicy class like below.
app/Policies/PostPolicy.php
<?php

namespace App\Policies;

use App\Models\Post;
use App\Models\User;
use Illuminate\Auth\Access\Response;

class PostPolicy
{
    /**
     * Determine whether the user can view any models.
     */
    public function viewAny(User $user): bool
    {
        //
    }

    /**
     * Determine whether the user can view the model.
     */
    public function view(User $user, Post $post): bool
    {
        //
    }

    /**
     * Determine whether the user can create models.
     */
    public function create(User $user): bool
    {
        //
    }

    /**
     * Determine whether the user can update the model.
     */
    public function update(User $user, Post $post): bool
    {
        //
    }

    /**
     * Determine whether the user can delete the model.
     */
    public function delete(User $user, Post $post): bool
    {
        //
    }

    /**
     * Determine whether the user can restore the model.
     */
    public function restore(User $user, Post $post): bool
    {
        //
    }

    /**
     * Determine whether the user can permanently delete the model.
     */
    public function forceDelete(User $user, Post $post): bool
    {
        //
    }
}
The above look was the default policy. Now we will update it like this:
<?php

namespace App\Policies;

use App\Models\Post;
use App\Models\User;
use Illuminate\Auth\Access\Response;

class PostPolicy
{
    /**
     * Determine whether the user can view any models.
     */
    public function viewAny(User $user): bool
    {
        //
    }

    /**
     * Determine whether the user can view the model.
     */
    public function view(User $user, Post $post): bool
    {
        //
    }

    /**
     * Determine whether the user can create models.
     */
    public function create(User $user): bool
    {
        //
    }

    /**
     * Determine whether the user can update the model.
     */
    public function update(User $user, Post $post): bool
    {
        return $user->id === $post->user_id;
    }

    /**
     * Determine whether the user can delete the model.
     */
    public function delete(User $user, Post $post): bool
    {
        //
    }

    /**
     * Determine whether the user can restore the model.
     */
    public function restore(User $user, Post $post): bool
    {
        //
    }

    /**
     * Determine whether the user can permanently delete the model.
     */
    public function forceDelete(User $user, Post $post): bool
    {
        //
    }
}
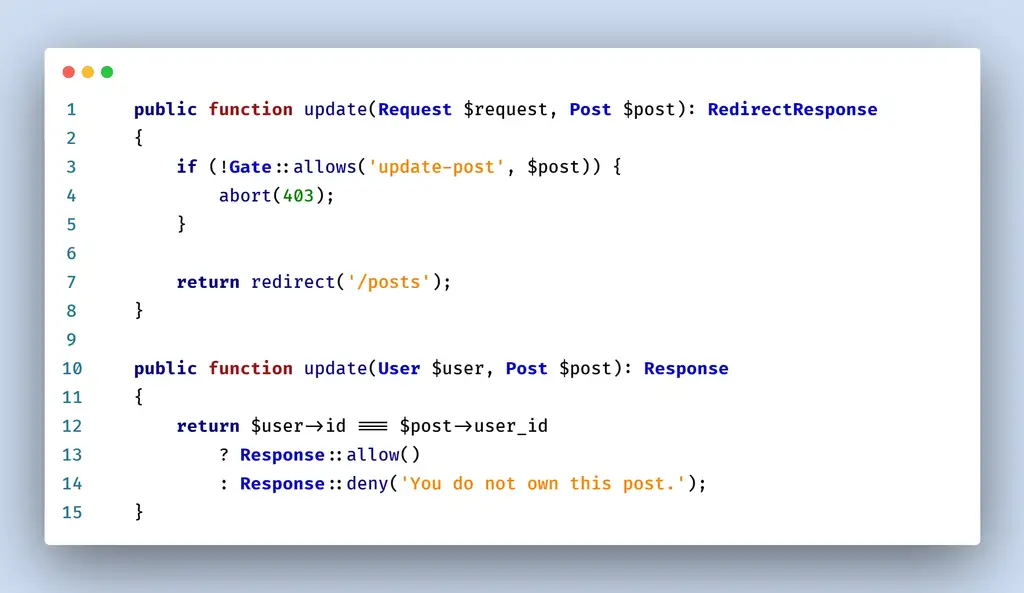
Now let’s see how to use this policy in our controller update method:
App\Http\Controllers\TutorialController.php
<?php

namespace App\Http\Controllers;

use App\Models\Post;
use Illuminate\Support\Facades\Gate;

class TutorialController extends Controller
{
    public function update(Post $post)
    {
        if (auth()->user()->can('update', $post)) {
            //user is authorized to perform this action
        }
        return view('welcome');
    }
}
Or you can authorize user like this:
App\Http\Controllers\TutorialController.php
<?php

namespace App\Http\Controllers;

use App\Models\Post;
use Illuminate\Support\Facades\Gate;

class TutorialController extends Controller
{
    public function update(Post $post)
    {
        $this->authorize('update', $post);
    }
}
We can also use policy in Laravel routes like below:
routes/web.php
<?php

use Illuminate\Support\Facades\Route;
use App\Http\Controllers\TutorialController;

Route::get('post/{post}', TutorialController::class)->middleware('can:update,post');
Now in the final part, we will see how to use laravel policy in blade file:
@can('update', $post)

@elsecan('create', App\Models\Post::class)

@endcan

@cannot('update', $post)

@elsecannot('create', App\Models\Post::class)

@endcannot
Conclusion
You know how to use laravel policy and laravel gates in laravel application. Hope this laravel gate policy tutorial will help you to handle user authorization.
Laravel News Links