https://photos5.appleinsider.com/gallery/59642-121802-000-lede-Logic-Pro-d2-xl.jpg
Logic Pro on an iPad
Today’s iPads are capable enough to be used as full Digital Audio Workstations, but there’s also a range of audio editing apps for every need — and budget. Here are your best choices.
One thing that iPads are unexpectedly poor at is recording podcasts — they can’t readily be used to record a host and remote guest separately. There are workarounds but none that match the audio quality of being able to record directly.
Which is curious, because once a recording has been done, the iPad is nothing short of spectacularly capable at editing. There is simply a slew of audio editing apps available in the App Store — AppleInsider stopped counting at 60 of them.
Although at least one,Audacity, is really only on the iPad as a scaled-up iPhone app for people who like the Mac versions.
Alternatively, though, some of the apps claiming to edit audio are really meant for other media purposes and happen to include audio editing. A couple of those are worth looking at if you only rarely need to edit audio and you do already know these apps well.
That’s really how you decide between the apps. There is no limit now on what you can do with an iPad and the right app, but you always have to start with what your needs are — and what your budget is.
Apps that include audio editing
Even when audio isn’t their primary focus, there are very many apps that have to include at least some features for editing spoken word or music. The best examples of this are iPad video editors, of which there are now many.
DaVinci Resolve is a video editor, but it can also be used for just audio
Apple’s own iMovie is one, and it’s free for all iPad users. Equally, Apple’s other video editing app, Final Cut Pro for iPad 2 includes very many audio features for $49/year (or $4.99/month).
In this same line there is also DaVinci Resolve, which is free but includes optional in-app purchases. If it’s solely audio editing you want it for, you’ll never need its paid extras.
How, while all of these include at least basic and often quite powerful audio editing features, they are never the right choice unless you need their other functions. If you already edit video, for instance, then being able to quickly use tools to also do some audio editing in an app you’re familiar with is tremendous.
If you don’t already know, say, iMovie, then simply getting to its audio editing features will be a chore.
When you don’t know apps like that, and when you need to do more than one or two quick audio pieces, then you need an audio editor. In AppleInsider‘s experience, there are three audio apps that are worth considering.
Best easy and free iPad audio editor — GarageBand
Apple’s GarageBand is designed first for recording voice and musical instruments, and then for adding music loops. But once you’ve done all or any of that, you have to be able to edit the audio.
Consequently, GarageBand comes with a multi-track audio editor. That means you can, say, have two podcast guests recorded separately and then line them up together.
GarageBand. Note the one-size-fits-all "Fade Out" control
GarageBand also lets you split tracks, so you can cut out sections if you need. There are also features such as fading in or out, although overall, GarageBand tends to prefer ease of use over fine control.
So when you need more, or GarageBand’s settings don’t happen to suit what you want to do, it’s time to buy or subscribe to an audio app.
Best one-off purchase iPad audio editor — Ferrite
Ferrite is an example of where a list of features doesn’t convey all of what’s good about it. For instance, it has multi-track editing, but so does GarageBand.
Yet in Ferrite’s case, manipulating those multiple tracks just feels easier. And there are specific features such as the ability to tell it to automatically dip one track as another is playing.
Multiple audio tracks being edited in Ferrite for iPad
Ferrite is also an example of an app whose free version is excellent enough that you upgrade at least in part just to reward the developer. Nonetheless, if you do upgrade to the Pro version for $30, you do get extra features.
Such as the ability to play back at twice normal speed as you edit. Or the ability to tell Ferrite to strip out accidental silences, for instance when you’ve misaligned two vocal tracks and inadvertently left gaps.
The Ferrite Recording Studio requires iPadOS 16.4 or later.
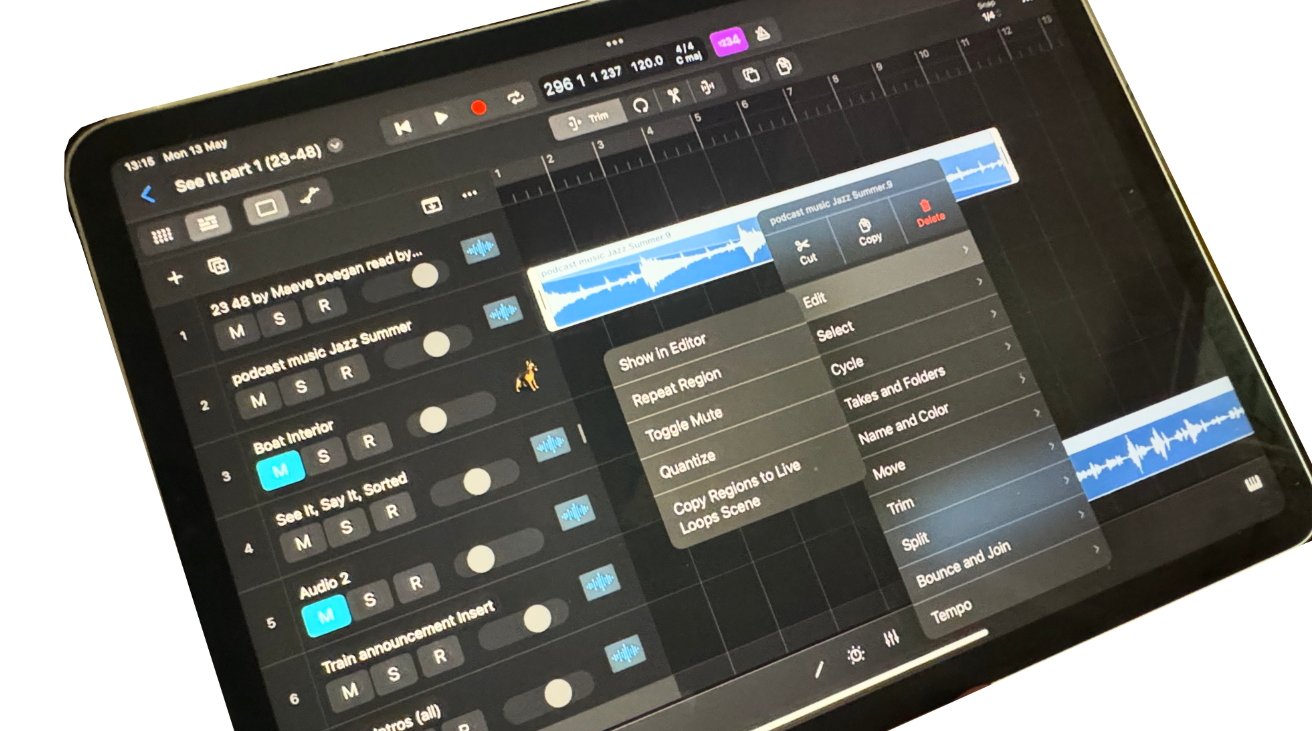
Best subscription iPad audio editor — Logic Pro
As shown off by Apple at its "Let Loose" event as a highlight of the iPad’s capabilities, Logic Pro is surely the single most powerful and comprehensive audio editor available for the iPad. On the Mac, it has competition from Pro Tools and to a lesser extent Adobe Audition, but neither are available on the iPad.
It’s a true Digital Audio Workstation (DAW) and as such is right for musicians, producers, and audio engineers. Logic Pro is really extreme overkill if you’re doing much less than making albums.
Yet even if all you want is to record a podcast with two hosts, having a full-on DAW at your fingertips is superb. It does come with the cost of a fairly steep learning curve, though, simply because it does so much.
It’s also arguably expensive, or at least it is not a casual purchase. Following a month-long free trial, Logic Pro for iPad costs $49/year, or $4.99/month.
Logic Pro for iPad 2 requires iPadOS 17.4. Apple has not yet specified any minimum hardware requirements for the forthcoming new version, but Logic Pro for iPad 1 needed an iPad with an A12 Bionic chip or later.
It also takes up quite a significant amount of storage space. The app itself is 1GB — compared to Ferrite’s 25MB — but then there are optional extras that can swell that to 15GB.
Editing an audio track in Logic Pro for iPad
The AppleInsider podcast used to be edited on Ferrite, but it’s now done on Logic Pro — albeit for the Mac. The Mac edition is a one-off $199 fee and it does not come as part of the iPad version’s subscription.
That’s the same as with the other app that Apple highlighted at its iPad event, Final Cut Pro. But unlike Apple’s video editor, Logic Pro has the tremendous benefit that projects can be moved between iPad, Mac, and back again, as you need.
Choosing the right audio editor for you
The one you want is Logic Pro for iPad — if you’re going to use it enough to warrant the subscription cost. And if you’re going to be using it for either complex enough projects, or just so many of them that it’s worth the time it takes to learn Logic Pro.
Then at the other end of the scale there is GarageBand, which you’ve already got. The fact that it’s designed for musicians means it has a lot of recording and loop features that you might not need, though, and its controls tend to be more basic.
So the sweet spot across all of the audio editor apps that AppleInsider has used, is the Ferrite Recording Studio. This, too, takes some time to learn but not as much as Logic Pro.
There may be situations where it becomes an issue that there isn’t a Mac version of Ferrite. But overall, it just means that the developer is truly focused on making it the best it can be for iPad users.
Whichever app you use, though, it’s got to be said that editing audio on an iPad is a pleasure. It’s much more of a pleasure to edit it than it is to record on, but pinching in and out of a track’s timeline, it feels like you’re touching your music and vocals.
AppleInsider News


 MySQL 8.4 has now been officially released, and this is a quick review of what is in the release notes. This is momentous as it is designated a Long-Term Support (LTS) release. Various 8.0 releases introduced material changes that impacted speed and stability, causing hair-pulling and swearing among those affected. Please note this is a […]Percona Database Performance Blog