Larger Laravel Projects: 12 Things to Take Care Of

https://laraveldaily.com/wp-content/uploads/2021/09/Larger-Laravel-Projects.png

Probably the most difficult step in the dev career is to jump from simple CRUD-like projects in the early years into some senior-level stuff with bigger architecture and a higher level of responsibility for the code quality. So, in this article, I tried to list the questions (and some answers) to think about, when working with large(r) Laravel projects.

This article will be full of external links to my own content and community resources, so feel free to check them out.

Disclaimer: What is a LARGE project?

First, I want to explain what I mean by “large”. Some people measure that in the number of database records, like million rows in users table is large. Yes, but it’s a large database, not the Laravel project itself.

What I mean by a larger project is mostly the number of entities to manage. In simple terms, how many Eloquent Models your project has. If you have many models, it usually means complexity. With that, as secondary measurement numbers, you may count the number of routes or public Controller methods.

Example from an open-source Monica CRM project that has 300+ lines of code in routes/web.php file:

With the scope of work this big, there are usually multiple developers working on the project, which brings the complexity to manage the codebase.

Also, a third non-tech feature of a large project is the price of the error. I would like to emphasize those projects where your inefficient or broken code may cause real money to be lost: like 30 minutes of downtime in an e-shop may lose $10,000 to the business easily. Or, some broken if-statement may lead real dozens of people to NOT place the orders.

So yes, I’ll be talking about those large projects below.

1. Automated Tests

In smaller projects, there’s usually a smaller budget and a stronger push to launch “something” quicker, so automated tests are often ignored as a “bonus feature”.

In larger projects, you just cannot physically manually test all the features before releasing them. You could test your own code, yes, but you have no idea how it may affect the old code written by others. Heck, you may even have no idea how that other code or modules work because you’re focused on your parts of the application.

So, how else would you ensure that the released code doesn’t cause bugs? Quite often a new code is just a refactoring of the old code, so if you change something in the project structure, how would you be able to test that nothing is broken? Don’t fall into the mindset I call “fingers-crossed driven development“.

Also, getting back to the definition of a larger project – remember, the price of the bug is high. So, literally, your broken code may cause financial loss to the business. If that argument still doesn’t convince you to cover the code with tests, probably nothing else will.

Yes, I know that typical argument that “we don’t have time to write tests“. I have a full video about it.

But this is where you need to find that time. It involves some communication: evaluate the deadlines thinking about the time to write tests, also talk to the managers about what would happen if you don’t write tests. They will then understand and allow that extra time. If they don’t, it means they don’t care about quality that much, so then maybe time to find another company?

Now, I’m not necessarily talking about a mythical “100% test coverage”. If you are really pressured on time, pick the functions to test that are crucial for your app to work. As Matt Stauffer famously said, “first, write tests for features, which, if they break, would cause you to lose your job“. So, anything related to payments, user access, stability of the core most used functionality.

2. Architecture and Project Structure

Ahh, yes, a million-dollar question: how to structure a Laravel project? I even published a 5-hour course on that topic, back in 2019, and I still feel I only scratched the surface there.

There are many different models or ideas that you may follow: divide the project into modules, use the DDD approach, pick some from the design patterns, or just follow SOLID principles. It is all a personal preference.

The thing is there’s no silver bullet and a one-size-fits-all approach. No one can claim that, for example, all bigger Laravel projects should follow DDD. Even SOLID principles sometimes are busted as not the best for some cases.

But the problem is clear: as your project structure grows, you need to change something, and re-structure the files/folders/classes into something more manageable. So what are the essential things you should do?

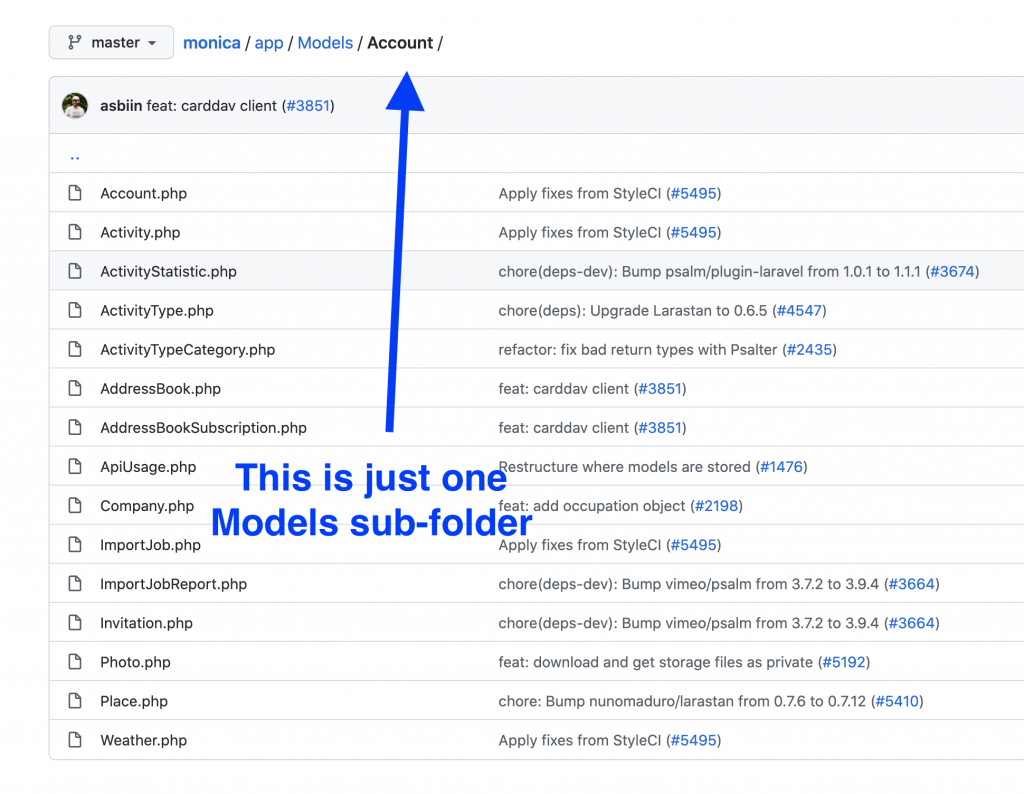
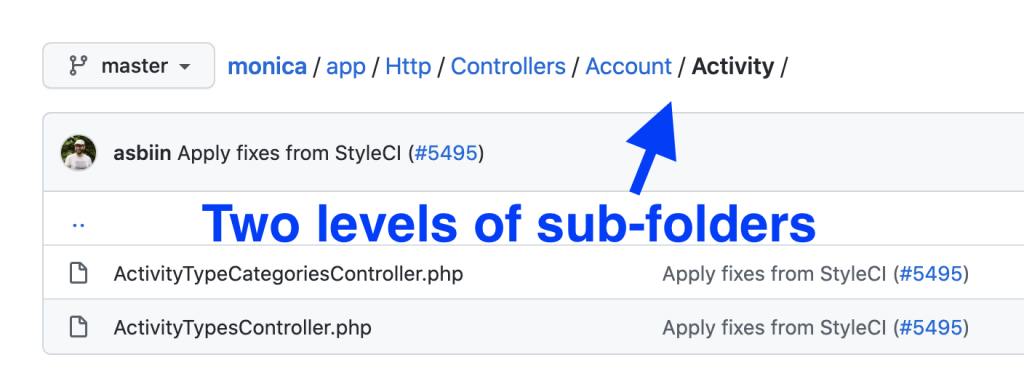
First, move things into sub-folders and namespace everything accordingly. Again, the example from the Monica CRM is pretty good.

Then, make sure that your classes/methods are not too large. There’s no magic number to follow, but if you feel that you need to scroll up&down too often, or spend too much time figuring out what the class/method does, it’s time to refactor and move the parts of the code somewhere else. The most common example of this is too big Controller files.

These are just two pieces of advice, but just those two changes make your code massively more readable, maintainable, and even more testable.

And yes, sometimes it requires a big “risky” refactoring of classes, but hey, you probably have automated tests to check everything, right? Right?

3. “Fake Data” with Factories and Seeds

A topic related to the automated testing we’ve already talked about. If you want to stress-test your application features, you need a large amount of data. And factories+seeds are a perfect combination to achieve that pretty easily.

Just get into the habit of, when creating a new Eloquent model, create a factory and a seed immediately, from the very beginning. Then, whoever will use it in the future to generate some fake data, will thank you very much.

But it’s not only about testing. Also, think about the fresh installation of your application. Large successful projects tend to grow only larger, so you would definitely have to onboard new developers. How much would they struggle with the installation process and getting up to speed, if they don’t have any sample data to work with?

You will also probably need to install your application multiple times on various servers – local, staging, some Docker-based environments, etc. You can customize the seeds to run under the condition of whether it’s a production or local environment.

4. Database structure

Although I mentioned in the beginning that database size is not the definition of a large Laravel project, but database structure is a hugely important thing for long-term performance and maintainability.

Which relationships to use? In Laravel terms, should it be a HasOne? HasMany? BelongsToMany? Polymorphic?

Also, other questions. One larger table or several smaller ones? ENUM field or a relationship? UUID or ID column? Of course, each case is individual, and I have a full course on structuring databases, but here is my main short tip.

Try to ask your “future self” about what potential SQL queries will there be on these DB tables, and try to write those queries first.

In other words, think about the end goal, and reverse engineer the structure from that. It would help you to “feel” the correct structure.

If you have factories and seeds ready (notice the pattern of how the topics in this article help each other?), you would be able to easily simulate the future usage, maybe even measure A vs B options, and decide on which is the correct one. This moment is actually very important: changing the DB structure in the future, with a large amount of live data, is probably one of the most complex/expensive/risky changes to make. So you better make a good decision up front.

That said, you shouldn’t be afraid to refactor the database if there’s a real need for that. Move some data into a separate less-used table, change HasMany into Polymorphic, choose other column types, etc.

Just make sure you don’t lose any customer data.

5. External Packages and Laravel Upgrades

When you choose what Laravel/PHP packages to include in your composer.json, in the very beginning it’s pretty easy: just use the latest versions of everything, and make sure the package is useful.

But later, when the project is alive for a year or two, there’s a need to upgrade the versions. Not only Laravel itself but also the packages, too.

Luckily, Laravel switched to a yearly release schedule from 6-months (and later moved Laravel 9 release to be in sync with Symfony), so developers don’t have that headache every 6 months anymore.

Generally, the framework itself has a pretty stable core, and the upgrades to new versions are relatively easy, should take only a few hours. Also, a service called Laravel Shift is a huge helper for developers who want to save time on this.

But the problem arises from the packages you use.

Pretty typical scenario: you want to upgrade the project to a new Laravel version, but a few packages from your composer file haven’t released their new versions yet to support that Laravel upgrade. So, in my experience, project upgrades are happening at least a few months after the official Laravel release, when the package creators catch up.

And, there are worse scenarios: when the package creator doesn’t have time to release the upgrade (remember, most of them do it for free, in their spare time), or even abandon the package. What to do then?

First, of course, you can help the creator, and submit a Pull Request with the suggested upgrade (don’t forget to include automated tests). But even then, they need to review, test, and approve your PR, so I rarely see that happening in real life. The packages are either actively maintained, or close to abandoned status. So, the only reasonable solution then is to fork the package and use your own version in the future.

But, an even better decision, is to think deeper at the time of choosing what packages to use. Questions to ask are: “Do we REALLY need that package?” and “Does the package creator have a reputation of maintaining their packages?

6. Performance of everything

If the project becomes successful, its database grows with more data, and the server needs to serve more users at a time. So then, the loading speed becomes an important factor.

Typically, in the Laravel community, we’re talking about performance optimization of Eloquent queries. Indeed, that’s the no.1 typical reason of performance issues.

But Eloquent and database are only one side of the story. There are other things you need to optimize for speed:

Queue mechanism: your users should not be waiting for 5 minutes for the invoice email to arrive
Loading front-end assets: you shouldn’t serve 1 MB of CSS/JS if you can minimize it
Running automated tests suite: you can’t wait for an hour to deploy new changes
Web-server and PHP configuration: users shouldn’t be “waiting in line” while other 10,000 users are browsing the website
– etc.

Of course, each of those topics is a separate world to dive deep in, but the first thing you should do is set up a measurement and reporting system, so you would be notified if there’s a slow query somewhere, a spike in visitors at some time or your server is near CPU limit.

7. Deployment Process and Downtime

In a typical smaller project, you can deploy new changes by just SSHing to the server and running a few git and artisan commands manually.

But if you have bigger traffic and a larger team, you need to take care of two things:
Zero-downtime deployment: to avoid any angry visitors that would see the “deploying changes…” screen, and collisions for visitors pre-post deployment. There’s the official Envoyer project for this and a few alternatives.
Automatic deployments: not everyone on your team has (or should have) SSH access to production servers, so deployment should be a button somewhere, or happen automatically, triggered by some git action

Also, remember automated tests? So yeah, you should automate their automation. Sounds meta, I know. What I mean is that tests should be automatically run before any deployment. Or, in fact, they should be run whenever new code is pushed to the staging/develop branch.

You can schedule to perform even more automated actions at that point. In general, automation of this build/deploy process is called Continuous Integration or Continuous Delivery (CI/CD). It reduces some stress when releasing new features.

Recently, the most popular tool to achieve that became Github Actions, here are a few resources about it:

Build, Test, and Deploy Your Laravel Application With GitHub Actions
How to create a CI/CD for a Laravel application using GitHub Actions

But it’s not only about setting up the software tools. The important thing is the human factor: every developer should know the deployment process and their responsibility in it. Everyone should know what branch to work on, how to commit code, and who/how closes the issues. Things like “don’t push directly to the master branch” or “don’t merge until the tests passed” should be followed on the subconscious level.

There are also social norms like “don’t deploy on Fridays”, but that is debatable, see the video below.

8. Hardware Infrastructure for Scaling

If your project reaches the stage of being very popular, it’s not enough to optimize the code performance. You need to scale it in terms of hardware, by putting up more server power as you need it, or even upsizing/downsizing based on some expected spikes in your visitor base, like in the case of Black Friday.

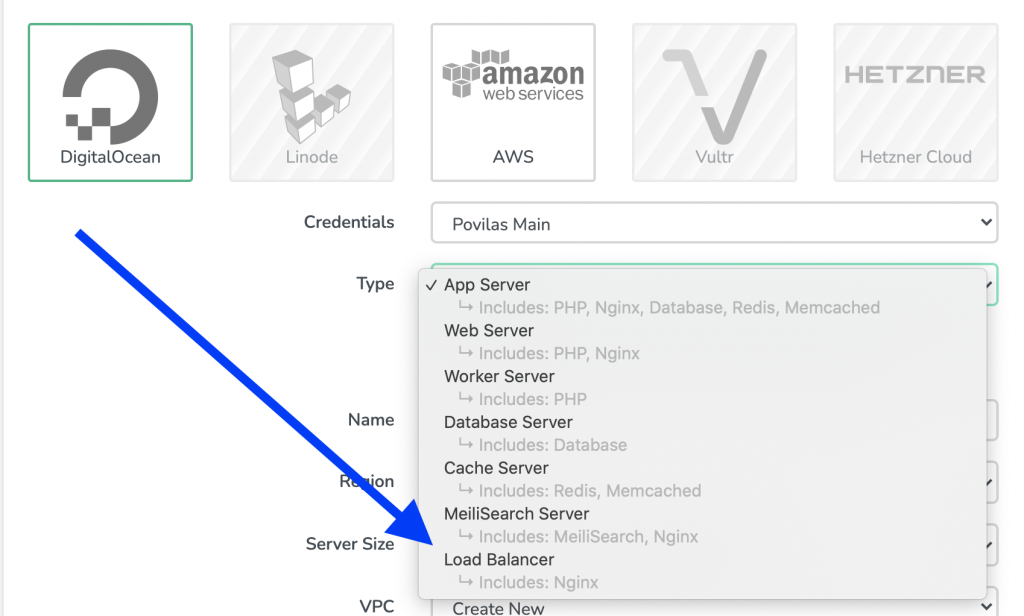
Also, it’s beneficial to have load balancing between multiple servers, it helps even in case one of the servers goes down, for whatever reason. You can use Laravel Forge for this, see the screenshot below.

Also, don’t forget the scaling of external services. There are separate infrastructure hardware solutions to power your File Storage, Queues, Elasticsearch/Algolia, Socket real-time stuff, Databases, etc. It would be a huge article on each of those areas.

There are so many various tools out there that I can’t really recommend one, in particular, everything depends individually on your project needs, your budget, and your familiarity with a certain ecosystem.

The obvious server-power leader of the world is Amazon with their AWS Ecosystem, but often it’s pretty hard to understand its documentation, there are even explanation websites like AWS in Plain English.

Also, there’s a relatively new “player” in town, called serverless. It became a thing in the Laravel world with the release of Laravel Vapor – a serverless deployment platform for Laravel, powered by AWS.

Probably the best resource to get deeper into this whole scaling world is the course Scaling Laravel.

9. Backups and Recovery Strategy

Everyone probably knows that you need to perform regular backups of your database. And, on the surface, it’s pretty easy to do with a simple Spatie Laravel Backup package:

And, of course, you need to automate it, like “set it and forget it”. But, an important question is have you tried the recovery from that DB backup, at least once?

You need to actually test the scenario: what if your current DB server totally dies, or someone drops the whole production database, and all you have is that backup SQL. Try to actually run the import from it, and test if nothing breaks. If there’s a problem with a backup recovery, you better know it before the disaster happens.

Also, it gets more complicated when you have multiple Database servers, replication, and also you want to not slow down your server while the backup is in progress. So you may tweak the process or use some database backup tools directly, even outside the Laravel world.

10. Bug Monitoring Process

Of course, the larger the codebase, the bigger probability of bugs happening. Also, when there are dozens of features, developers can’t test them all themselves, and even automated tests don’t catch all the possible scenarios and cases. Bugs happen to real users of the system, in the wild.

Your goal as a team is to monitor them and be informed when they happen. There are various tools to help with that, I personally use Bugsnag, but there’s also Flare, Sentry, Rollbar – all of them perform pretty much the same thing: notify you about the bugs, with all possible information that helps to trace and fix that bug.

But again, it’s not only about setting up the tool, it’s about the human factor, as well. The team needs to know the process of who reacts to what bug and how exactly: which bugs are urgent, which ones can be postponed, or totally ignored.

Also, the question “Who’s on duty today” is pretty relevant: if the bug tracking software notifies about something, who needs to get that message and via which channel? In our team, we use Slack notifications, and then ideally the situation should be fixed by the developer responsible for that part of the application which is buggy. Of course, in reality, it doesn’t happen all the time, but at least the team needs to know the time-to-react goals.

There’s also another part of the team: non-tech people. Developers need to be in touch with customer support people, and with managers, informing them about the severity and the status of the situation, so the “front-facing” people would talk to the customers accordingly.

11. Security

This question is kinda obvious, so I won’t explain it in too much detail. In addition to generally avoid getting hacked, probably the most important thing is to secure the personal data of your users – both from other users in multi-tenant systems and from the outside world.

I recommend reading this article: How to Protect Your Laravel Web Application Against the OWASP Top 10 Security Risks

Also, I recommend trying to hack yourself. Yes, I’m not kidding – ask some trusted friend/company from the outside to break into your app and do some damage. Heck, even pay for that – there are companies specializing in this area. Of course, you could try to do it yourself, but, as the author of the code, you’re kinda biased, and you probably wouldn’t try something unusual as a typical hacker would.

Finally, I’d like to express my happiness about the fact that we don’t need to explain the need for an SSL certificate anymore: with browser warning changes, and with free tools like Let’s Encrypt, there’s no excuse to not have https:// in your website.

12. Docs for onboarding new devs

The final point in this big article is about people. If you work on the project not from its first day, remember the day when you were introduced to it. Do you remember the feeling of installing everything, reading the docs, playing around with testing data, trying to understand how things work?

Now, imagine the mind of a new developer doing that on the current project, which is not much more complex. So, you need to help those poor guys, as much as you can.

I would suggest to even become that “new developer” for a day. When was the last time you tried to install your application, from the ground up? On a new computer or re-installed OS, for example. So yeah, try that, you may get a few unpleasant “surprises” to fix.

Things like installation instructions in Readme (maybe even with Docker images), comments in the code, making the code “clickable” in the IDE, understandable messages in git commits – all of that should be taken care of. And, remember when we talked about factories and seeds? Yes, that applies here, massively.

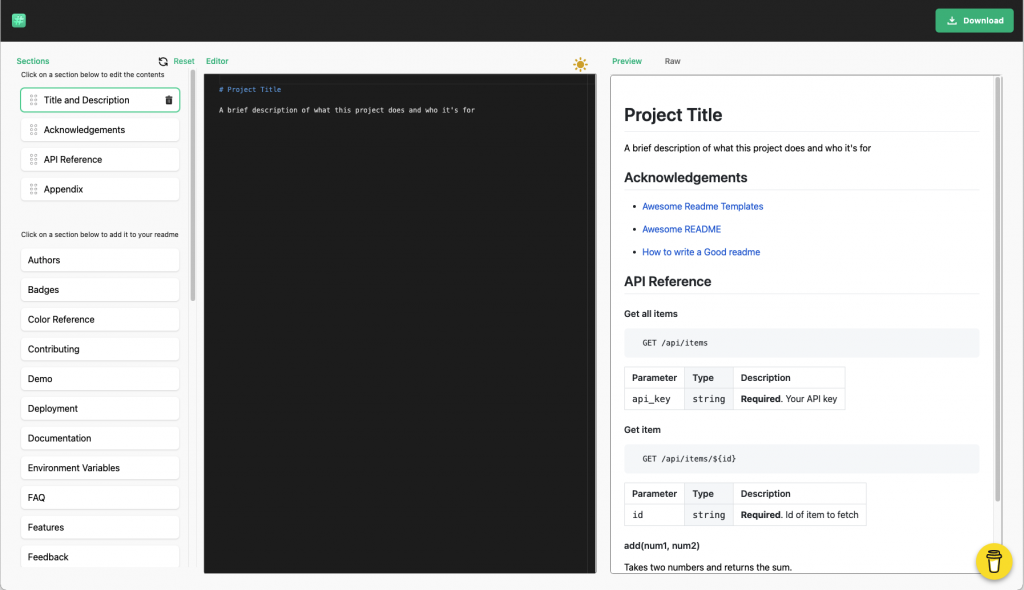
By the way, there are tools to help you, like this Readme generator.

And it’s not only about totally new developers – the same may happen to any existing team member who needs to fix something in the module that they hadn’t seen before. Any help is appreciated.

Your Thoughts?

What do you think about these 12 questions? I tried to provide short comments and external links, but obviously, it’s just an overview. Would you add any more questions to this list? Or, maybe you have a particular question you want me to expand on, in future articles/videos? Shoot in the comments below.

Laravel Daily

Bulk Action using Livewire

https://dev.to/social_previews/article/836547.png

In this Tutorial, we will see how to implement Bulk Action so that User can select and update multiple records using Livewire. This is the part 3 of the Series related to Livewire Table. In Part 2 of the Series we saw how to Hide/Show Columns in a Table using Livewire.

Let us assume we have a Model called as Product and it has a column status. We want to give user the ability to select multiple products and then change the value of status column for all of the selected products.

I would assume that you already have a working Livewire Component which is showing the Records in a Table Form. First of all we are going to add a New Property $selectedProducts to our Livewire Component. This would hold all the Products that user has selected.

public $selectedProducts = [];
Enter fullscreen mode

Exit fullscreen mode

Now in the View, we would like to display a checkbox next to each item. We would create a New column and we will paste the following code inside the loop which displays all the Results.

<input type="checkbox" value="" />
Enter fullscreen mode

Exit fullscreen mode

This would display the checkbox and we have given it the value which is the Primary Key of the Product Table so as to uniquely identify it.

Now we would link this checkbox to the $selectedProducts using the wire:model.

<input type="checkbox" value=""
     wire:model="selectedProducts" />
Enter fullscreen mode

Exit fullscreen mode

Now every time a User selects a Product, $selectedProducts would be updated. So at any time $selectedProducts would have all the Products that User has selected for Bulk Action.

Infact, we are going to use wire:model.defer. The defer directives makes sure that our Component will not be re-rendered when the User checks the checkbox. This will result in a significant performance improvement. If you want to learn more about defer and other techniques to improve Performance using Livewire, you can check this Article.

<input type="checkbox" value=""
     wire:model.defer="selectedProducts" />
Enter fullscreen mode

Exit fullscreen mode

Now we need to create 2 Buttons, Activate and Deactivate. Both these buttons will call a method changeStatus on click. We will pass the value that we want to set for the status column as the parameter. So for Activate we pass 1 and for Deactivate we will pass 0.

<button wire:click="changeStatus(1)">Activate</button>
<button wire:click="changeStatus(0)">Deactivate</button>
Enter fullscreen mode

Exit fullscreen mode

Next we need to define this method within our Component. We can define it as follows. Here $status will hold the value that we want to set for the status column. So for Activate it will be 1 and for Deactivate it will be 0.

public function changeStatus($status)
{
}
Enter fullscreen mode

Exit fullscreen mode

Within this method we will first of all check, if there are any Records that User has selected using $selectedProducts. Then we will update the status column for all those Products. And then we will finally clear the $selectedProducts variable.

if (!empty($this->selectedProducts)) {
    Product::whereIn('id', $this->selectedProducts)->update(['status' => $status]);
    $this->selectedProducts = [];
}
Enter fullscreen mode

Exit fullscreen mode

And that is all we need to do to give User the Ability to update Records in Bulk.

If you have liked this Tutorial, please checkout the Livewire Package tall-crud-generator which automatically generates all the Code related to Bulk Actions.

Laravel News Links

A Horizontal Scalability Mindset for MySQL

https://www.percona.com/blog/wp-content/uploads/2021/09/Horizontal-Scalability-for-MySQL.pngHorizontal Scalability for MySQL

Horizontal Scalability for MySQLAs a Technical Account Manager at Percona, I get to work with many of our largest clients. While the industry verticals vary, one main core challenge generally remains the same – what do I do with all this data? Dealing with massive data sets in MySQL isn’t a new challenge, but the best approach still isn’t trivial. Each application is obviously different, but I wanted to discuss some of the main best practices around dealing with lakes of data.

Keep MySQL Instances Small

First and foremost, the architecture needs to be designed to keep each MySQL instance relatively small. A very common question I get from teams new to working with MySQL is: “So what is the largest instance size MySQL supports?”. My answer goes back to my time in consulting: “It depends”. Can my MySQL instance support a 20TB dataset? Maybe, but it depends on the workload pattern. Should I store 20TB of data in a single MySQL instance? In most cases, absolutely not.

MySQL can definitely store massive amounts of data. But RDBMSs are designed to store, write, and read that data. When the data grows that large, often the read performance starts to suffer. But what if my working dataset still fits in RAM? This is often the critical consideration when it comes to sizing an instance. In this case, active read/write operations may remain fast, but what happens when you need to take a backup or ALTER a table? You are reading (and writing out) 20TB which will always be bounded by I/O.

So what is the magic number for sizing? Many large-scale shops try to keep individual instance sizes under the 2-3TB mark. This results in a few major advantages:

  • Predictable operational times (backups, alters, etc)
  • Allows for optimized and standardized hardware
  • Potential for parallelism in loading data

If I know my instance will never exceed a couple of terabytes, I can fully optimize my systems for that data size. The results are predictable and repeatable operational actions. Now, when a backup is “slow”, it is almost assuredly due to hardware and not being an outlier instance that is double the size. This is a huge win for the operations team in managing the overall infrastructure.  In addition to backups, you have the additional consideration of restore time.  Massive backups will slow restoration and have a negative impact on RTO.

Store Less Data

Now that the negative impact of large, individual instances is known, let’s look at how we keep the sizes down.  While seemingly obvious, the best way to keep data sizes small is to store less data.  There are a few ways to approach this:

  • Optimize data types
    • If data types are bigger than needed, it results in excess disk footprint (i.e. using bigint when int will suffice)
  • Review indexes for bloat
    • Limit composite Primary Keys (PKs)
    • Find and remove redundant indexes (using pt-duplicate-key-checker)
    • Avoid PKs using varchar
  • Purge old data
    • When possible, remove records not being read
    • Tools like pt-archiver can really help in this process

These techniques can help you delay the need for more advanced techniques.  However, in some cases (due to compliance, limited flexibility, etc), the above options aren’t possible.  In other cases, you may already be doing them and are still hitting size limits.

Horizontal Sharding

So what is another way to deal with massive data sets in MySQL? When all other options are exhausted, you need to look at splitting the data horizontally and spreading it across multiple equally sized instances. Unfortunately, this is much easier said than done. While there are some tools and options out there for MySQL (such as Vitess), often the best and most flexible approach is building this sharding logic into your application directly. Sharding can be done statically (key modulus for example) or more dynamically (via a dictionary lookup) or some hybrid approach of the two:

Horizontal Scalability Mindset for MySQL

Sharding Considerations

When you finally have to bite the bullet and split data horizontally, there are definitely some things to keep in mind.  First and foremost, picking the correct sharding key is imperative.  With the wrong key, shards won’t be balanced and you’ll end up with sizes all over the board.  This then becomes the same problem where a shard can grow too large.

Once you have the correct key, you need to understand that different workloads will be impacted by sharding differently.  When the data is split across shards, individual lookups are generally the easiest to implement.  You take the key, map to a shard, and fetch the results.  However, if the workload requires aggregate access (think reports, totals, etc), now you are dealing with combining multiple shards.  This is a primary and major challenge when looking at horizontal sharding.  As is the case in most architectures, the business requirements and workload will dictate the design.

If your team is struggling with an exploding data set, the Professional Services team at Percona can help you design a more flexible and scalable solution. Each case is unique and our team can work with your specific use case and business requirements to guide you in the right direction. The biggest thing to remember: please don’t just keep adding hard disk space to your instances while expecting it to scale. Proper design and horizontal sharding is the critical factor as your data grows!

Percona Distribution for MySQL is the most complete, stable, scalable, and secure, open-source MySQL solution available, delivering enterprise-grade database environments for your most critical business applications… and it’s free to use!

Download Percona Distribution for MySQL Today

Percona Database Performance Blog

Trijicon Supports Mentorship With +One Experience Giveaway

https://www.ammoland.com/wp-content/uploads/2021/09/duck-hunt-iStock-1301911854-500×334.jpg

duck hunt iStock-1301911854
Trijicon’s efforts to supporting hunting are fantastic. IMG iStock-1301911854

U.S.A. -(AmmoLand.com)- NSSF, the firearm industry trade association, is pleased to announce that Trijicon is sponsoring the Trijicon Hunt +ONE Experience Giveaway to focus attention on the importance of mentoring in hunting through NSSF’s +ONE Movement.

The +ONE Movement encourages mentoring of newcomers by experienced hunters and target shooters to pass on the skills and appreciation for these popular outdoor activities. With hunting season approaching, now is a good time to introduce someone new to this great American tradition, and NSSF can help with mentoring and newcomer resources at LetsGoHunting.org.

Trijicon, the Michigan-based optics manufacturer, wants to give someone the hunting experience of a lifetime. The Trijicon Hunt +ONE Experience giveaway includes a fully paid and guided free-range trophy whitetail hunt at Lowrance Ranch in Truscott, Texas with all travel, licenses, lodging, and meals included in the package. The winner of the hunt also receives a Springfield Armory 2020 Waypoint Rifle chambered in 6.5 Creedmoor with a Trijicon Credo HX 2.5-15×42 riflescope to use on the hunt, bringing the total package value to $10,000.

Entries to the sweepstakes are open until October 29, 2021, on the dedicated Sweepstakes page.

“We are grateful for Trijicon’s continued support of the +ONE Movement, which is so important to the future of hunting and recreational shooting,” said Zach Snow, NSSF Director, Member Development. “Trijicon’s efforts help to encourage experienced shooters and hunters to mentor newcomers so they can enjoy these lifelong activities with friends and family.”

“We are excited to further the NSSF +ONE Movement in conjunction with National Hunting & Fishing Day to show our support of the American hunting and conservation model,” said Josh Lyall, Trijicon Director of Marketing. “Trijicon is a company comprised of hunters and target shooters and we are always looking for ways to introduce more people to the world of hunting and shooting sports.”

There are now over 2 million pledges and potential mentees who are part of the +ONE Movement. Individuals and businesses interested in promoting and getting directly involved in the +ONE Movement can visit letsgoshooting.org/plusone and letsgohunting.org/plusone to learn more about the initiative and find ways to get started. Additional +ONE resources can be downloaded and or ordered at nssf.org/plusone.


About The National Shooting Sports Foundation

NSSF is the trade association for the firearm industry. Its mission is to promote, protect and preserve hunting and shooting sports. Formed in 1961, NSSF has a membership of thousands of manufacturers, distributors, firearm retailers, shooting ranges, sportsmen’s organizations, and publishers nationwide. For more information, visit nssf.org

National Shooting Sports Foundation

The post Trijicon Supports Mentorship With +One Experience Giveaway appeared first on AmmoLand.com.

AmmoLand.com

Laravel Tinker PHPStorm Plugin

https://plugins.jetbrains.com/files/14957/137820/icon/pluginIcon.pngA free and open source plugin to run PHP code directly as if through Tinker without leaving your favorite IDE. Includes all PhpStorm features you are already used to like code completion, error correction and color scheme.Laravel News Links

Comic for September 25, 2021

https://assets.amuniversal.com/744dff80f250013976ad005056a9545d

Thank you for voting.

Hmm. Something went wrong. We will take a look as soon as we can.

Dilbert Daily Strip

I Love My Hoe Dag Garden Tool

https://i0.wp.com/toolguyd.com/blog/wp-content/uploads/2021/09/Hoe-Dag.jpg?resize=600%2C569&ssl=1

Hoe Dag

The Hoe Dag, shown in this photo by Lee Valley, has really been my MVP tool this past gardening season.

To be frank, it does not feel very heavy duty, but I put it through its paces, digging up rocks, roots, and heavy clay soil.

The Hoe Dag is said to be superb for digging, planting, tilling, weeding, and even chopping through roots. It’s described as rugged, and it has proven this to be true.

The multi-purposed gardening tool features an 8-1/2″ arc-shaped blade with a 2-1/2″ edge on one end and a 7/8″ edge on the other. It has a 15″ seasoned hardwood handle.

Lee Valley says that the Hoe Dag has been hand-crafted in the USA for over 50 years.

Although I’ve been hard on my Hoe Dag, I don’t forget that it’s handle is made of wood and that it’s attached to the steel head via a socket joint. It can handle a bit of abuse, but I reach for a different tool for heavier prying.

I absolutely definitely recommend the Hoe Dag. Sure, it’s basically a double-sided short-handle hoe, and there are other tools that are almost kind of like it, but they’re not quite the same.

The Hoe Dag is well-made, it’s extremely versatile, it’s comfortable and light to swing, and it’s made in the USA.

Price: $32.50

Buy Now via Lee Valley
See Also via Amazon

Lee Valley currently offers free ground shipping on orders $30 and up.

ToolGuyd

Decorator Pattern vs. Proxy Pattern

https://doeken.org/assets/img/decorator-vs-proxy-pattern.jpg

There are two patterns in PHP that are very similar; The Decorator Pattern and The Proxy Pattern. Because they are so
similar, you can quickly mistake one for the other. Does that matter? Maybe not, but I think it’s good to know the
differences when communicating about them.

Similarities between Decorators and Proxies

Both the Decorator Pattern and the Proxy Pattern revolve around the idea of wrapping an instance of an existing
interface (let’s call that the inner instance) with a class that implements that same interface and delegates their
function calls to the same functions on their inner instance.

These patterns are very useful for adding or changing functionality of an instance without breaking encapsulation. It
can also change or extend functionalities of final functions and classes. And because they usually serve one purpose
they can easily be tested.

Example

interface SubscriberInterface {

public function subscribe(string $email): void;

}


class SubscriberDecorator implements SubscriberInterface {

private SubscriberInterface $inner_subscriber;


public function subscribe(string $email): void {

$this->inner_subscriber->subscribe($email);

}

}

In this example you can see that our SubscriberDecorator implements the SubscriberInterface and it also requires
some instance of the SubscriberInterface. After that it delegates the subcribe() function to the same function on
that instance.

Differences between Decorators and Proxies

When it comes to naming a class a Decorator or a Proxy you have to look at its intent. What is the class actually doing
with the instance it is wrapping?

Required vs. Optional dependency

You might have noticed I didn’t include a __construct() method in the previous example. This was intentional, because
this is where the first difference can be apparent.

A Decorator requires an instance of the interface it is wrapping, while a Proxy does not require such an
instance. A Proxy can receive an instance, but is also allowed to create this instance itself. So you can create
a new Proxy on its own, while a Decorator needs another instance as dependency.

// Decorator

public function __construct(public SubscriberInterface $inner_subscriber){}


// Proxy

public function __construct(?SubscriberInterface $inner_subscriber = null){

$this->inner_subscriber = $inner_subscriber ?? new InnerSubscriber();

}

Additive vs. Restrictive

Decorators are additive; meaning they only add new functionality by wrapping the function call and returning the
original value. It can however do anything before or after that call. You can for example log every value when a
function is called or dispatch an event. Just make sure to return the original value.

Proxies are restrictive; meaning they can change the behavior of a function or even restrict calling a specific function
by throwing an exception.

Tip: Both Decorators and Proxies are allowed to add any extra functions or parameters that are not on the interface. It can therefore be wise to implement some magic __isset(), __get() and __call() methods on the Decorator or Proxy to pass these calls along to their inner instance as well. This way you can still call those methods and parameters even if you add multiple decorators on top.

public function __call($name, $arguments)

{

return $this->inner_subscriber->{$name}(...$arguments);

}


public function __get($name)

{

return $this->inner_subscriber->{$name};

}


public function __isset($name)

{

return isset($this->inner_subscriber->{$name});

}

General purpose vs. Specific purpose

Decorators serve a general purpose. It will add some functionality regardless of the instance it is wrapping. This means
that multiple decorators should be able to be applied on top of one another in any random order and still produce the
same result and added functionality.

Proxies serve a more specific purpose. It will mostly be used to change or append functionality to a specific instance
of the interface. Proxies also aren’t commonly stacked on top of one another as a single proxy is usually enough.

Tips for Decorators and Proxies

Here are a few tips you might consider when working with Decorators and Proxies.

Make a base abstraction

If you create multiple Decorators or Proxies of the same interface it can be beneficial to create an abstract class of
the interface or a trait that satisfies the interface, where every function is already deferred to the function on
the inner instance. If you are a package creator, you might even consider providing this implementation inside the
package. This way a Decorator or Proxy can extend or use this implementation and only (re)declare the functions
it needs.

interface SubscriberInterface

{

public function subscribe(string $email): bool;


public function unsubscribe(string $email): bool;

}


trait SubscriberTrait { ... }

{

private SubscriberInterface $inner_subscriber;


public function subscribe(string $email): bool

{

return $this->inner_subscriber->subscribe($email);

}


public function unsubscribe(string $email): bool

{

return $this->inner_subscriber->unsubscribe($email);

}


public function __call($name, $arguments)

{

return $this->inner_subscriber->{$name}(...$arguments);

}


public function __get($name)

{

return $this->inner_subscriber->{$name};

}


public function __isset($name)

{

return isset($this->inner_subscriber->{$name});

}

}


// You can now extend this class, or implement the interface and trait.

abstract class SubscriberDecorator implements SubscriberInterface

{

use SubscriberTrait;


public function __construct(SubscriberInterface $inner_subscriber)

{

$this->inner_subscriber = $inner_subscriber;

}

}

Single responsibility Decorators

It might be tempting to add multiple features onto a Decorator, but the beauty of them is that they can be added or
removed without changing the underlying code. So try to make tiny Decorators that focus on one thing and apply these on
top of each other. Again, this simpleness makes them easier to test as well.

Examples

You can find a couple of nice examples of Decorators and Proxies in Symfony.

Their developer toolbar shows a lot of information regarding events and cache, for example. They log this information by
decorating the current EventDispatcher with
a TraceableEventDispatcher and
the current cache adapter with
a TraceableAdapter
within the dev environment.

An example of a Proxy can be found in
the DeflateMarshaller of
the symfony/cache package. This Marshaller is restrictive due to its dependency on gzinflate() & gzdeflate() and
it’s changes to the output of the inner instance.

Thanks for reading

I hope you enjoyed reading this article! If so, please leave a 👍 reaction or a 💬 comment and consider subscribing to
my newsletter! I write posts on PHP almost every week. You can also follow me
on twitter for more content and the occasional tip.

Laravel News Links