Discovery UK digs into the How It’s Made archives for this brief look at the process that goes into creating traditional magnets. After melting a cocktail of various metals in an electrical induction furnace, the fiery metal is poured into sand molds, then cooled, separated, and charged with multiple electromagnetic fields.
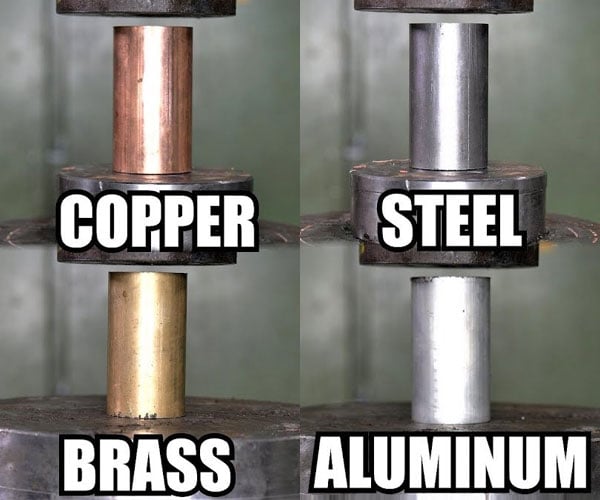
Between steel, aluminum, copper, and brass, which one is strongest? The guys at the Hydraulic Press Channel decided to put each one to the test on their 150-ton press, with some pretty explosive results. We wonder what titanium or tungsten would do under the same forces.
Laravel Multidomain is a package by @gecche that allows a single Laravel Installation to work with multiple HTTP domains:
There are many cases in which different customers use the same application in terms of code but not in terms of database, storage, and configuration.
This package gives a very simple way to get a specific env file, a specific storage path, and a specific database for each such customer.
Once you finish the installation and setup outlined in the readme, you can use package commands to manage domains:
# Adding a domain php artisan domain:add site1.com php artisan domain:add site2.com # Removing a domain php artisan domain:remove site2.com
When you add a domain, the .env configuration file is created for that specific domain:
php artisan domain:add site1.com # Generates the following configuration file .env.site1.com
You can also list domains with the domain:list command:
php artisan domain:list
Be sure to check out the full documentation of the package before deciding to use this package. This package provides an extended kernel and requires some buy-in in the methodology of this approach. Just make sure you evaluate the design of this package (and any package for that matter) for your use-case.
You can learn more about this package, get full installation instructions, and view the source code on GitHub at gecche/laravel-multidomain.
This package was submitted to our Laravel News Links section. Links is a place the community can post packages and tutorials around the Laravel ecosystem. Follow along on Twitter @LaravelLinks
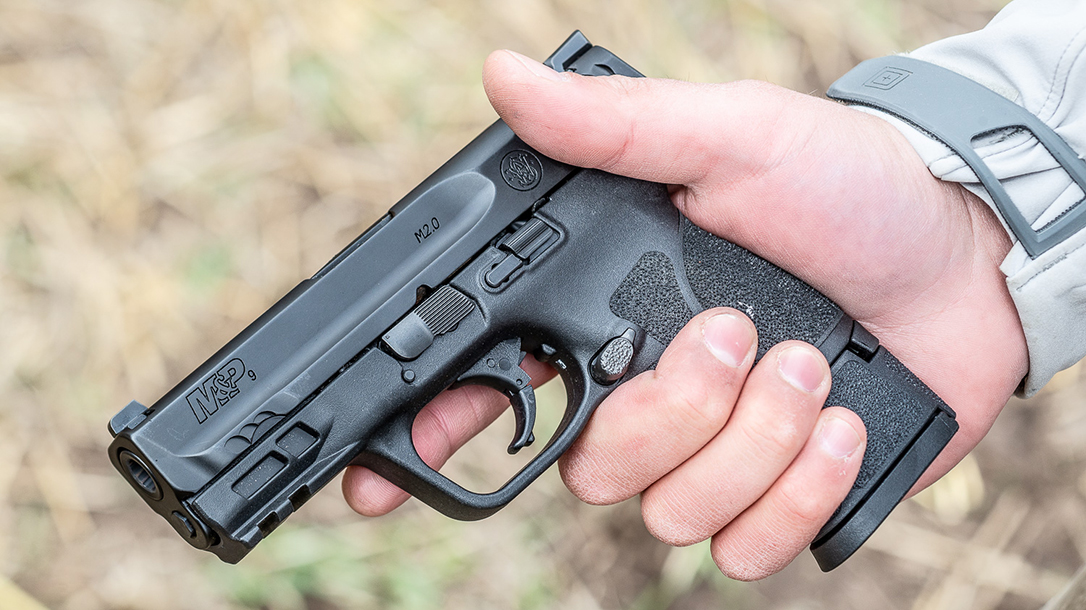
During the recent Athlon Outdoors Rendezvous, our editors got the chance to get some trigger time on the new Smith & Wesson M&P M2.0 Subcompact Pistol. And S&W’s newest carry gun didn’t disappoint.
RELATED STORY
Smith & Wesson M&P M2.0 Subcompact: First Look at the New Carry Gun
Smith & Wesson M&P M2.0 Subcompact
Athlon staff members took on steel targets with the pistol, littered at nearly every conceivable distance out to more than 100 yards. Plate racks, static steel, dueling trees – you name it. Regardless of the target presentation, the M&P M2.0 Subcompact Pistol proved up to the task.
“Now this has all the M2.0 enhancements, including interchangeable palm swell grips, and that M2.0 crisp trigger pull,” said Matt Spafford, Media Manager, Smith & Wesson. “Plus, this gun also comes with magazine extenders for both 17-round and 15-round magazines in 9mm, allowing you to use it with a variety of magazine options.”
The M&P M2.0 features an extended stainless steel chassis. It delivers a high grip-to-bore ration, and low bore axis, which aids tremendously in recoil control. Four interchangeable backstraps ship with the gun, which should enable nearly everyone to find that near perfect, custom-like grip. Finally, the grip comes textured, with metal components wearing a tough Armornite finish. There’s just so much to like about the new M2.0 Subcompact.
File this under least surprising news of the day. The US Secret Service has studied school shooters and found that — shockingly — almost none of them “just snapped.” To the contrary, virtually every one of them exhibited warning signs and, as such, the murders they committed could have been prevented.
The study was conducted by the Secret Service’s National Threat Assessment Center and concluded, in part, that “schools may need to think differently about school discipline.” To which anyone who’s been paying any attention would reply…duh.
The problem comes when the “different approach” to take is something along the lines of what’s being advocated by woooly-headed social justice advocates like Elizabeth Warren who thinks the solution is to remove all armed security personnel from the nation’s schools.
Because leaving America’s schoolchildren completely vulnerable to those who would murder them is the only fair, socially responsible thing to do. Or something.
By Colleen Long, Associated Press
Most students who committed deadly school attacks over the past decade were badly bullied, had a history of disciplinary trouble and their behavior concerned others but was never reported, according to a U.S. Secret Service study released Thursday.
The study by the Secret Service’s National Threat Assessment Center is one of the most comprehensive reviews of school attacks since the Columbine shootings in 1999. The report looked in depth at 41 school attacks from 2008 through 2017.
The information gleaned through the research will help train school officials and law enforcement on how to better identify students who may be planning an attack and how to stop them before they strike.
“These are not sudden, impulsive acts where a student suddenly gets disgruntled,” Lina Alathari, the center’s head, said in an Associated Press interview. “The majority of these incidents are preventable.”
Nearly 40 training sessions for groups of up to 2,000 are scheduled. Alathari and her team trained about 7,500 people during 2018. The training is free.
The Secret Service is best known for its mission to protect the president. The threat assessment center was developed to study how other kinds of attacks could be prevented. Officials use that knowledge and apply it in other situations such as school shootings or mass attacks.
Since the Columbine attack on April 20, 1999, there have been scores of school shootings. Some, like Sandy Hook in 2012, were committed by nonstudents. There were others where no one was injured. Those were not included in the study.
The report covers 41 school attacks from 2008 through 2017 at K-12 schools and were chosen if the attacker was a current or former student who used a weapon to injure or kill at least one person at the school while targeting others.
“We focus on the target so that we can prevent it in the future,” Alathari said.
Nineteen people were killed and 79 were injured; victims included students, staff and law enforcement. The research was launched following the shooting at Marjory Stoneman Douglas High School in Parkland, Florida, in 2018.
The Secret Service put out a best practices guide based on some of the research last July to 40,000 schools nationwide, but the new report is a comprehensive look at the attacks.
The shootings happened fast and were usually over within a minute or less. Law enforcement rarely arrived before an attack was over. Attacks generally started during school hours and occurred in one location, such as a cafeteria, bathroom or classroom.
Most attackers were male; seven were female. Researchers said 63 percent of the attackers were white, 15 percent were black, 5 percent Hispanic, 2 percent were American Indian or Alaska Native, 10 percent were of two or more races and 5 percent were undetermined.
The weapons used were mostly guns, but knives were also used. One attacker used a World War II-era bayonet. Most of the weapons came from the attackers’ homes, the investigators reported.
Alathari said investigators were able to examine detailed information about attackers, including their home lives, suspension records and past behaviors.
There’s no clear profile of a school attacker, but some details stand out: Many were absent from school before the attack, often through a school suspension; they were treated poorly by their peers in person, not just online; they felt mistreated; some sought fame, while others were suicidal.
The key is knowing what to look for, recognizing the patterns and intervening early to try to stop someone from pursuing violence.
“It really is about a constellation of behaviors and factors,” Alathari said.
The attackers ranged in age but were mostly young adults, seventh-graders to seniors. More than three-quarters initiated their attack after an incident with someone at school.
In one case, a 14-year-old shot a classmate at his middle school after he’d been mocked and called homophobic names. The attacker later reported the victim made comments that made him uncomfortable and they were the final straw in his decision to attack. Seven attackers documented their plans and five researched their targets before the attack.
Thirty-two were criminally charged, with 22 charged as adults. Most took plea deals. More than half are incarcerated. A dozen more were treated as juveniles. Seven committed suicide and two were fatally wounded.
Alathari said the report shows that schools may need to think differently about school discipline and intervention.
The report does not weigh on political topics such as whether guns are too accessible or whether teachers should be armed.
She said their goal is to make schools a safer place where no more attacks occur.
AddChat is a new chatting friend of Laravel. It’s a standalone Chat widget that uses the website’s existing users base, and let website users chat with each other.
You get full source-code, hence AddChat lives and runs on your server/hosting including database. And therefore, you get complete privacy over your data. Either you’re a big corporate sector or a small business. AddChat is for everyone.
Here’s a complete video tutorial guide for getting started quickly AddChat Laravel Academy ✌️
Overview
Addchat Lite is a chat widget that you can integrate into an existing or a fresh Laravel website. AddChat works like a standalone widget and fulfills all your business-related needs like –
User-to-user chatting
Live real-time chatting (without page refresh)
Internal notification system (saves Pusher monthly subscription fees)
Customer support ( Pro)
Multi-user groups ( Pro)
and a lot more features coming up in AddChat Pro ⚡️
Why AddChat ?
Some of the key highlights, why you would like to go with AddChat!
Save monthly subscription bills (pay once use forever)
No Confidential Data leak
Complete Privacy
Easy to install & update
Use existing users database
Multi-purpose, use it as Helpdesk, Customer support, User-to-user chatting and much more…
AddChat never modifies your existing database tables or records. And it never breaks down any of your website functionality.
AddChat is fully tested and ready to be used in production websites.
Technical Specification
AddChat is very light, high performance, scalable and secure.
AddChat front-end built with VueJs, which is purely API based web-app.
AddChat back-end (API) built with Laravel
AddChat Laravel version is a Laravel package, hence, can be installed via Composer in an existing or a fresh Laravel website.
User Interface & Design
AddChat is designed in CSS Flexbox and Sass. Let’s see what’s so special about CSS Flexbox and why we used it.
AddChat is a CSS Framework Independent. Means, no matter in which CSS Framework your website is in, it neither affects the website CSS nor gets affected by it.
or any other…
AddChat CSS is completely encapsulated (wrapped in AddChat wrapper with #addchat-bot .c- prefix).
We’ve used the popular NPM package auto-prefixer to make the AddChat UI design same across all types of browsers e.g Chrome, Firefox, Safari, Edge etc
Multi-regional
AddChat is compatible with all languages and timezones. AddChat auto adapts and adjust website’s default timezone and language. Please refer to the Language section for more info about adding a new language in AddChat Laravel
AddChat never breaks any of your website functionality, even if something went wrong with AddChat, there are fallback modes for every worst-case scenario.
Lite Version
This is AddChat Lite version documentation
AddChat Lite is open-source, free to use. Lite version has got limited features & functionality.
Pro Version
AddChat Pro Version comes with Commercial license. Pro version is fully loaded with a lot of useful and exciting features.
For Info, the php artisan addchat:install publishes AddChat assets to your application public/assets directory
addchat.min.js for modern browsers & addchat-legacy.min.js for older browsers. These will be used switched by the browsers automatically on the basis on type="module" & nomodule, you need to nothing.
Setup finishes here, now heads-up straight to Settings docs
YouTuber The S loves to make stuff from cardboard, and often incorporates matchsticks into his designs. In this clip, he compiles four builds which incorporate jet engines powered by numerous lit matches. While they don’t travel that fast, the fiery launches are quite the spectacle.
Opinion: Here are AmmoLand’s top ten (10) ammo retailers that we use to get the best prices when buying ammunition online for our guns.
AmmoLand Editor’s Note, ammunition prices that are shown in online seller’s screen-grabs are only valid at the time of the article publish date. Internet ammo prices always subject to change.
Buying Ammunition Online, Our Top Ten Places to Shop
USA – -(AmmoLand.com)- Lower Prices, bundle deals, discounts, and convenience are just a few words that come to mind as to why buying ammunition online is a good idea.
Often prices at retail are nearly double the online prices, which, for the avid shooter, makes life a touch more difficult. Online sales of ammo typical help you avoid sales tax unless you live in the same state as the company itself, however, in most cases, you can save your self 8-10% on your purchase by purchasing online. If sales tax saving is not enough, online shopping provides much deeper inventory opportunities.
These days, and due to public pressure and anti-gun measures, many major storefront ammunition retailers have eliminated ammo sales from their operations. While this seems like a loss for the public, it strengthens the ability to support real pro-gun industry and 2A supporting companies. Here are our top ten online ammunition retailers in no particular order.
Buying Ammunition Online, Here Are Our Top Ten Places
Brownells.com your place for Bullets, Ammo and Buying Ammunition Online.
Brownells, Ammunition Sales:
Led by the Bureau of Propaganda, Brownell’s own staff who’s unafraid to troll the folks down in Bentonville and stand up to the digital powers in California, Brownells offers a smooth process for selecting, buying and shipping. The Brownells website features make it easy to quickly narrow down what you need by ammo subcategories and even price range. Brownells understands the needs of shooters and even help you narrow in on price per rounds and display in real-time what is on clearance sale. [check AmmoLand’s page tracking the best of Brownell’s ammunition deals]
Choose from Handgun, Rifle, Rimfire, and Shotgun on an easy-to-use scroll down menu and sift through over 3,500 options to find what you need for your weekend at the range or to stock-pile your safe room. Brownells has a fair shipping policy with the free shipping threshold starting at $99 with coupon codes. www.brownells.com
Palmetto State Armory, Cheap Ammo Sales:
Palmetto State Armory Cheap Ammo Sales
Regardless if its a weekend with the crew or you are gearing up to defend your home turf when bulk selection is needed, Palmetto state Armory is one of the best online e-sales platforms. PSA offers not only a variety of rounds you need but the bulk ammo we all desire. Palmetto State stocks over 3,000 online ammunition options and some of the best pricing options on cases of ammunition over 1,000 rounds in popular calibers such as .223/5.56, 9mm, and .45 ACP. Shipping costs are based on distance and weight. Keep a close eye on their daily ammo deals if you plan on buying ammo online [check the AmmoLand’s PSA bargain page] since they will offer free shipping on certain items from time-to-time. https://ift.tt/PPYAaT
Sportsman’s Guide, Ammunition Online:
Sportsman’s Guide: bullets, ammunition, and sales bargains.
The Sportsman’s Guide club membership of $49.99 per year provides ample value for purchasing ammunition online. Not only does Sportsmans Guide give you a variety of options when buying ammo online for handguns, shotguns, and both rimfire and centerfire rifles, Club Members never pay a penny for standard shipping on orders of $49 or more, and they give you 5% off on guns & ammo daily. [AmmoLand tracks Sportsman’s Guide ammo bargains here.] Sportsman’s guide has highly competitive pricing on bulk 1,000 cans of .223 ammunition and all the hunting ammunition you need for your season. www.sportsmansguide.com
Natchez Shooters Supplies, Bulk Low Price Ammo:
Natchez Shooters Supplies, Bulk Low Price Ammo
If you want everyday quality discounts and low prices on bulk ammunition [ammo reloaders check out this bulk buy on 6000 bullets of Hornady .22 cal ], from your pistols to your ARs and even shotshells for your duck guns, look at the offerings from Natchez Shooters Supplies. With reliable 1-2 day shipping from the time of order, Natchez Shooters Supplies brings avid ammunition users their savings by buying through them. In addition to selling ammunition online, Natchez Shooters Supplies offers gear for hunting, fishing, camping, clothing, and optics. [Check AmmoLand’s page tracking the best of Natchez Shooters Supplies deals] Natchez is a quality online shopping destination for you and your family. www.natchezss.com
Gorilla Ammunition, High-Quality Ammunition:
Gorilla Ammunition Premium Quality Ammunition
Unlike others, Gorilla ammunition is its in-house brand manufacturing popular calibers for hunting, target shooting, defense, subsonic, and polymer. According to their website, they host one of the few in-house ballistics laboratories among manufacturers equipped with pressure sensors and Oehler 85 Acoustical velocity & targeting system to build the best ammunition possible. [find Ammoland’s page tracking the news & deals at Gorilla Premium Ammunition here] Free shipping is available when you buy ammunition online over ten boxes. Additionally, Gorilla Ammunition offers firearm parts through their store. Don’t forget to check out their great apparel available as well. www.gorillaammo.com
Rainier Arms:
Rainer Arms Bullets Ammunition Reloading Parts Sale Prices Free Shipping
Rainer Arms is full of options to outfit your gun room from brand name ammo from CCI, Aguila and Hornady ammunition to gun parts and deals on premier shooting sports brands. Rainer Arms, the Washington-based company has its own ammunition brand, Rainier Munitions, and also hosts the Apx Club to give hunters and shooters alike a membership-based pricing & shipping opportunities for $99.99 per year. [see AmmoLand’s deal tracking page for Rainer found here] The Apex club provides access to new product listings, exclusive access to events, and fee ground shipping on ammo orders in the contiguous United States. www.rainierarms.com
Primary Arms, More Ammo Deals:
Primary Arms, More Ammo Deals
Primary Arms hosts over 24 brands of ammunition, including Sig Sauer, Barnes, and Sellier & Bellot all available buy online through their website. Both handgun and rifle rounds are available in both popular centerfire and rimfire calibers, and Primary arms host some of the most reliable brands like Federal, PMC, and Hornady. In addition to ammo Primary arms is also home to full lines of firearm parts for popular caliber guns such as the AK-47, the AR-15, AR-308, and handguns. [check AmmoLand’s page tracking the best deals at Primary including ammunition.]
Sportsman’s Warehouse, Clearance Ammo:
Sportsman’s Warehouse, Clearance Ammo
Sportsman’s Warehouse is a time-honored brand known amongst sportsmen across the country who buy ammunition online. They proudly host 12 popular brands which equate to over 287 individual ammo SKUs of available rifle, shotgun, and pistol ammunition to buy online. Sportsman’s Warehouse might be a waterfowl hunters’ best friend as they position their steel shot ammo competitively. [Ammoland’s deals page for Sportsman’s Warehouse] You’ll want to check this site out if you hunt ducks and geese before your trip to the blind. www.sportsmans.com
Botach, Surplus Ammo:
Botach Ammo Store Retailer Bargain Price Coupon Codes
Everything you need to outfit your tactical shooting needs and to outfit your wardrobe with street clothes from Adidas and Under Armour. If you were disappointed in “Richards Sporting Goods,” look no further than Botach when you need to buy ammunition online. Twenty-four brands and 143 SKUs of ammunition. Botach features not just popular calibers for handgun, centerfire, and rimfire rifles but also provide opportunities to buy defense ammunition online with options such as SDI 12-Gauge 60-Caliber 3 Rubber Ball Round and the SDI 12-Gauge Bean Bag Round. [Check out all the great savings we have recoded at AmmoLand’s Botach deals page.] Don’t forget to pick out a great deal on ammunition storage while you shop as well. www.botach.com
Optics Planet, Brand Name Ammunition Cheap:
Optics Planet, Brand Name Ammunition Cheap
To finish up the top ten places to buy ammunition online, it would be remiss if we left out the expansive options available on Optics Planet. With 476 ammunition products to choose from, you’ll be able to find what you need for every gun you have. Optics Planet gives hunters and shooters alike consistent discounts on ammunition and shows you the percentage savings. [track AmmoLand’s deal page for Optics Planet here.] Optics Planet also allows you to compare attributes of ammunition side-by-side with each other. www.opticsplanet.com
Buying ammunition online gives you options, discount values, and the ability to find great bundle deals to save you money and time. With a bit of planning and persistence, you can take advantage of what is possible through our top ten online ammunition retailers.