Easter just isn’t Easter without some Peeps. Take a 360º video tour of the Just Born candy factory with Food Network to see how these colorful marshmallow treats are born, including a part of the assembly line called the “Sugar Shower.” Did she really use the word “peepsinality” or were we just hearing things?
These Hilarious Star Trek Videos Turn Bloopers Into Canon
https://ift.tt/2wAyweM
Worf and Riker. Image: CBS
Boy, there sure was a lot more high-fiving on the Enterprise than I remember.
Star Trek: The Next Generationwas, for all its goofiness, played relatively straight. It was a serious sort of show, even if absurd things sometimes happened. It did not, as a rule, have a lot of gags. Star Trek INtakes by YouTuber Ryan’s Edits changes that, and in the process renders Star Trek’s vibe absolutely absurd. The idea, so far as I can tell, is a simple one: edit outtakes together with the actual episode footage.
This simple idea has incredible results, as normal Star Trek moments turn absurd, surreal, and incredibly funny. I laughed harder at these videos than I have at just about anything lately. There are a handful in a playlist on the Ryan’s Edits channel. The most recent one, featuring Worf and Riker, is one of the best.
The video is titled “Something’s Wrong With Worf”, but, really, it’s Riker I’m most concerned about here. Where’s he going? Is somebody going to stop him? All the videos have this quality, creating a sort of silly alternate universe, entirely chaotic version of the show. I don’t really think CBS should do an absurd art-house comedy version of Star Trek, but, based on this, I’m pretty confident that if they did I would watch it.
For more, make sure you’re following us on our Instagram @io9dotcom.
Smith & Wesson M&P 22 Compact: 15,000 Rounds Later
https://ift.tt/2yaj5dt
Smith & Wesson M&P 22 Compact: 15,000 Rounds Later
Five years ago I decided to purchase what would be my first true silencer host. I decided to take a friend’s advice and start small with a dedicated rimfire silencer, ultimately choosing the budget-friendly SilencerCo Warlock II. While the Warlock was in NFA jail, I was scouring the internet for a 22 pistol that could reliably run any standard velocity ammo I could find. After a lot of searching, I finally settled on the Smith & Wesson M&P 22 Compact.
The Right Tools
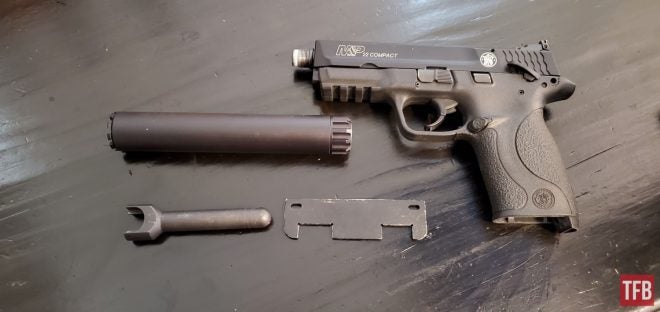
M&P 22 Compact Silencer and Tools
Over the years I’ve found that it’s all about having the right tools to routinely disassemble the M&P 22 Compact. Rather than highlight the pistol’s features I’ve put together a quick how-to guide for servicing the M&P like a pro.
M&P 22 Compact Adapter Wrench
To attach a silencer you’ll need to remove the factory barrel nut and purchase a thread adapter. This particular adapter is a Delta series that I purchased from SilencerCo. More importantly, you’re gonna need a wrench, and I mean like a REAL wrench.
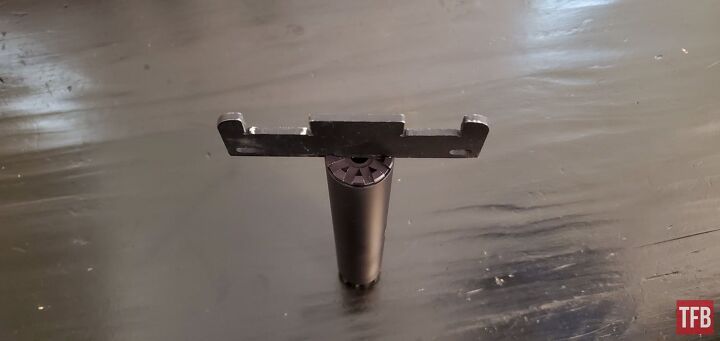
M&P 22 Compact Takedown Adapter Removal
EWK Arms makes a wrench out of bar stock specifically for the factory barrel nut on the M&P 22. If you want to suppress this little pistol, it’s absolutely worth the $30.
M&P 22 Compact Takedown Removing Slide
With the adapter removed, and takedown lever pushed down, you simply slide the slide rearward and up to remove it from the frame.
M&P 22 Compact Disassembled
As you can see this little M&P is pretty filthy, and only gets cleaned roughly every 1,500 rounds. Pretty impressive when you consider that the only stoppages it’s recently had were failures to lock the slide open on an empty mag.
The Silencer
SilencerCo Warlock II Front Cap Removal
Next up is the Warlock II, which is incredibly light and easy to take apart for service. Using the takedown tool supplied, you simply insert it into the grooves on the front cap, and twist counter-clockwise.
SilencerCo Warlock II End Cap Removal
From there you flip the tube over and use the large end of the takedown tool to remove the mount.
SilencerCo Warlock II Takedown
The Warlock II uses a Click Together Assembly (CTA) to connect the baffle stack. The CTA stack does a great job of keeping carbon trapped in the baffles so baffles fall freely out of the tube when disassembled.
Takeaways
Hindsight is always 20/20, and if I could go back in time I would’ve opted to spend the extra money and buy the heavier Stainless Steel SilencerCo Spectre. I’m not discounting how awesome the 3oz Warlock II is, but for a heavy use its aluminum baffles are difficult to clean.
M&P 22 Compact Slide Release Wear
As for the M&P, it just keeps on running. To this day the only real wear I’ve noticed on the gun has been on the slide release. Occasionally it’ll fail to hold the slide back on the last round, but this hasn’t been enough of an annoyance for me to want to fix it. The gun just works and shows no signs of stopping.
The Verdict
Smith & Wesson M&P 22 Compact and SilencerCo Warlock II
I can’t say enough nice things about the M&P 22 Compact. Its short barrel means that standard velocity ammo is rendered subsonic, and the gun is just an all-around blast to shoot. I started keeping track of how many rounds I shot through this gun just so I could remember to clean the silencer. Undoubtedly if I hadn’t, the Warlock would surely be fused together by carbon and lead at this point.
If you’re in the market for a 22 pistol that isn’t picky about ammo, is easy to clean, and performs well suppressed, you absolutely need to look at the M&P 22 compact.
Would I buy it again? Absolutely, and there isn’t another 22 pistol I’d rather own.
Note: At the time of this article, the M&P 22 Compact has 15,220 rounds through it.
We are committed to finding, researching, and recommending the best products. We earn commissions from purchases you make using the retail links in our product reviews.
Airplane Recycling Company Employee Has to Activate Detached Emergency Slide, to the Amusement of Co-Workers
https://ift.tt/3c8zLkp
Whatever group of people engineered self-inflating airplane emergency slides deserve many awards. It’s absurd to see something that big emerge from something that small in such a short amount of time:
As for how and why this guy is tasked with doing this in a driveway: The video is from a Dutch company called Aircraft End-of-Life Solutions, who recorded it in December of a previous year. As the name suggests, AELS dismantles and recycles decommissioned airplanes, and blowing the slide was part of their "End of the year clean up."
In this video, I have shown you how to make Laravel 7 auth scaffolding from scratch. With this video tutorial, you will learn a step by step process for making authentication & registration system for Laravel 7. To read text tutorial & code for this video please visit http://bit.ly/laravel7-auth Laravel 7 authentication Laravel 7 registration system Laravel 7 make:auth Laravel 7 login registration tutorial Social Links ——————- https://www.youtube.com/LaravelArticle https://ift.tt/2y4ytbz https://twitter.com/laravelarticle ⚠️ DISCLAIMER Do not download or copy from this channel. It’s a cybercrime. All video of this channel are copyright to laravelarticle.com
One of the most asked questions I get about Cashier is how you start testing your billing integration of your app. So let’s check out a couple of ways how you’d tackle that.
Stripe API
The best way to test Cashier and your billing integration is to actually hit the Stripe API. Doing so will give you the confidence that your billing integration is actually working as expected. In fact, we added a section to the docs yesterday that details just that.
To get started, add the testing version of your Stripe secret to your phpunit.xml file:
Now, whenever you interact with Cashier while testing, it will send actual API requests to your Stripe testing environment. For convenience, you should pre-fill your Stripe testing account with subscriptions / plans that you may then use during testing.
Hitting the Stripe API will cause your tests to run slowly but usually you wouldn’t be running these tests very often, maybe just right before you do a deploy. Therefore it’s best to separate these tests into a separate directory in your test suite.
In order to test different kinds of scenarios in your test suite you can make use of a vast range of Stripe testing tokens.
If you want to look at an example of doing these kind of tests, have a look at Cashier’s own test suite.
stripe-mock
Stripe is currently developing a library called “stripe-mock” which will allow to mock these expensive HTTP calls when testing. Unfortunately, the library currently is stateless and Cashier relies on persisted state in Stripe a lot. When this library eventually implements persistence, we’ll update Cashier’s own test suite and update these docs so you can make use of it.
Hiding Behind An Interface
A second option is to hide Cashier calls behind an interface. In fact, in one app I took this approach and it worked very well. The apps’ tests ran very fast. Let’s see how we’d tackle this.
We’ll start off by defining an interface for our subscriptions:
<?php namespace App\Billing\Subscriptions; use App\User; use Laravel\Cashier\Subscription; interface SubscriptionRepository { public function subscribe(User $customer, string $plan, string $paymentMethod): Subscription; }
Then implement the actual Stripe calls which we’ll use in our app:
<?php namespace App\Billing\Subscriptions; use App\User; use Laravel\Cashier\Subscription; final class StripeSubscriptionRepository implements SubscriptionRepository { public function subscribe(User $customer, string $plan, string $paymentMethod): Subscription { return $customer->newSubscription('main', $plan)->create($paymentMethod); } }
And the TestSubscriptionRepository which contains our testing implementation:
<?php namespace App\Billing\Subscriptions; use App\User; use Illuminate\Support\Str; use Laravel\Cashier\Subscription; final class TestingSubscriptionRepository implements SubscriptionRepository { public function subscribe(User $customer, string $plan, string $paymentMethod): Subscription { return $customer->subscriptions()->create([ 'name' => 'main', 'stripe_id' => Str::random(), 'stripe_status' => 'active', 'stripe_plan' => $plan, 'quantity' => 1, ]); } }
After this you can register the implementations in the register method of your AppServiceProvider:
$this->app->singleton(SubscriptionRepository::class, function ($app) { if ($app->environment('testing')) { return new TestingSubscriptionRepository; } return new StripeSubscriptionRepository; });
And now your Stripe calls will be replaced during your tests and they’ll run much faster.
There are a couple of downsides to this approach. First of all, you’re trading part of the confidence you get when actually hitting the Stripe API. The other downside is that you’ll have to partially re-implement Cashier’s behavior. And depending on how much functionality you use from Cashier that could potentially be a lot. Of course, you’d only replace the parts which make Stripe calls.
Mocking
The third one is an obvious one when unit testing. You could use a library like Mockery to mock those expensive API calls. Let’s see how that works.
Imagine we have the following job:
<?php namespace App\Jobs; use App\User; final class SubscribeCustomer { private User $customer; private string $plan; private string $paymentMethod; public function __construct(User $customer, string $plan, string $paymentMethod) { $this->customer = $customer; $this->plan = $plan; $this->paymentMethod = $paymentMethod; } public function handle(): void { $this->customer->newSubscription('main', $this->plan) ->create($this->paymentMethod); } }
We could write the following test where we mock the actual Cashier calls:
<?php namespace Tests\Unit\Jobs; use App\User; use App\Jobs\SubscribeCustomer; use Illuminate\Foundation\Testing\RefreshDatabase; use Laravel\Cashier\SubscriptionBuilder; use Mockery; use PHPUnit\Framework\TestCase; class SubscribeCustomerTest extends TestCase { public function tearDown(): void { parent::tearDown(); Mockery::close(); } /** @test */ public function it_can_process_a_new_subscription() { $subscriptionBuilder = Mockery::mock(SubscriptionBuilder::class); $subscriptionBuilder->shouldReceive('create') ->with('foo-method'); $customer = Mockery::mock(User::class); $customer->expects('newSubscription') ->with('main', 'plan-1') ->andReturn($subscriptionBuilder); (new SubscribeCustomer($customer, 'plan-1', 'foo-method'))->handle(); } }
And thus no Stripe API calls are made. Of course this only mocks the calls but doesn’t re-implements the behavior like our interface example. The above technique is ideal for unit tests but not so much for feature tests.
Conclusion
We’ve seen three different techniques when it comes to testing Cashier and while each one holds a benefit and a downside I’d still recommend making actual Stripe HTTP calls if you want to be entirely sure your billing integration works as expected. If stripe-mock ever gets persistency we can solve the speed issue that way. But definitely don’t be afraid to use the other two techniques. Use what works best for your situation.
Where You Can Buy Used Airplane Windows, Lights, Seats, Coffeemakers, Bathrooms and Other Parts
https://ift.tt/3a2Uq7T
In 2005, Derk-Jan van Heerden was an aerospace engineering student at TU Delft. That year he wrote his Master’s thesis on the subject of "What happens to decommissioned airplanes?"
After graduating, van Heerden got a job with KLM’s Engineering and Maintenance division, where he managed the disassembly of a Boeing 747. He didn’t last long; after just five months, van Heerden had learned enough to start his own company, Aircraft End-of-Life Solutions.
While their main business is reselling operational parts to the aircraft industry, "We receive many requests from people who want to buy aircraft parts for decoration," the company writes. As a result, they’ve begun holding periodic sales and auctions open to anyone. You can buy wheels, lights, landing gear, ovens, coffeemakers, business class seats, the bathrooms, you name it.
"We love to see how creative people can be with aircraft components," they write. "Did you ever try to make a photo frame out of an airplane window? Or a bar from an engine inlet? What is the coolest thing you have ever made of aircraft parts? Ours is this coffee table."
To stay abreast of the sales, you can sign up for their Alternative Re-use Mailing List. And if you’d just like to browse what parts they’ve got available to industry, they keep a downloadable stock sheet here [XLS download].
Announcing Percona Live ONLINE – A 24-Hour Virtual Event
https://ift.tt/3c9a8QG
We are excited to announce Percona Live ONLINE, a stand-alone virtual event we’re bringing to the community. It’s totally free of charge, and available for everyone to attend, no matter where you are in the world!
Percona Live ONLINE is not intended to replace our in-person Percona Live conferences in Europe and North America. We’re still on track to bring you Percona Live Europe in Amsterdam, October 19-21, 2020.
However, given the current circumstances, it seemed like a good time to introduce an online version of Percona Live to a wider audience. We’ll be featuring topics and speakers showcasing the latest trends in open source database technology.
The conference will be a true follow-the-sun event running for a full 24 hours kicking off at 10:00 am Eastern time on May 19, 2020, with some exciting keynote speakers. This allows users in EVERY timezone to be able to participate — like a hackathon, but for database content! Look for the full agenda to be released next week.
How Are We Selecting the Speakers?
Normally we’d run a call for papers but as we’d already gone through a selection process for our Austin event, we’re pleased that many of the speakers we have reached out to have said that they would be willing to support this great new online initiative.
With just a single track planned for Percona Live ONLINE, we’re currently working on creating a balanced agenda that will embrace MySQL, MongoDB, MariaDB, PostgreSQL, Kubernetes, cloud… and more!
There will be a limited number of speaking spaces so if you don’t receive an invite the first round, we will look at a second event and hope to get those speakers on the agenda then!
Will We Be Featuring Sponsors for Percona Live ONLINE?
The companies that sponsor the in-person Percona Live events enable us to deliver conferences of high standards in desirable locations. Without them, we simply could not present conferences to the standards our community has come to expect. In return, sponsors get an opportunity to engage with attendees and showcase their products and services. They know that they’ll get a great return on their investment!
Percona Live ONLINE is a new concept and heavily focused on the community aspect. Although we are confident that it will be a huge success, without known outcomes, we have decided not to solicit sponsorship for this event. We will revisit this for future events if we think that we can offer benefits to sponsors and participants alike.
How Can I Access the Conference?
We encourage you to pre-register to ensure you receive the latest information on the agenda, as well as streaming links for the conference. It is totally free to register and participate! Pre-register today!
Been There, Got the T-Shirt?
Many of those who have attended Percona Live conferences collect our unique event T-shirts.
Well, fear not! We will have a limited-edition t-shirt this year as well, but you’ll have to earn it! Make sure to follow the chat during the conference live streams to find out how to get one.
We’ll also be offering some cool prizes during the event. Stay tuned for more news!
Where Can I Interact With Other Online Attendees During the Conference?
We will have dedicated chat rooms and a live chat feed throughout the conference. Please pre-register so that we can send you details on how to access these.
Will I Be Able to Access Recordings If I Miss Some Sessions or Fall Asleep During the Event?!
Recordings of sessions will be made available shortly after the conference ends so you’ll be able to access them later. But honestly… we don’t think anyone is going to be sleeping!
We look forward to seeing you all virtually on May 19! Use #PerconaLive to stay up to date with the latest news and happenings!
Six years ago Laravel Cashier was released just before Laracon with the goal of being an easy to use subscription billing system that ties directly into Stripe. Since then Cashier has continued to get a lot of nice upgrades and this week the Laravel team released a brand new version, Cashier v11, that introduces support for Stripe’s Multiplan Subscriptions and a new Tax Rates feature.
The Multiplan subscriptions allow you to assign multiple billing plans to a single subscription. This is useful if you allow up-sales or secondary features. Then the new Tax Rates feature allows you to apply a tax rate on a model-by-model basis, which could be helpful if your customers span multiple countries or tax zones.
With the release of V11, some of the requirements have also changed and these include:
PHP version v7.2+
Laravel v6.0+
Stripe SDK v7.0+
It also requires some new migrations and you should follow the upgrade guide for complete details.
Developers may have a hard time adapting to the frontend environment. There are several challenges, for example learning how to work with a new library for the construction of interfaces, such as ReactJs, VueJs or simply Javascript. It’s good for developers to have experience in these technologies, though they have a logarithmic learning curve.
It’s for this reason that this time I bring you a guide to a framework for Laravel that is trending at the moment: Livewire.
What’s Livewire?
It comes as an attractive solution for developers since it allows building user interfaces as PHP components without the need to use reactive javascript.
Livewire is defined as a full-stack framework for building dynamic interfaces. With this framework you can build user interfaces through PHP classes, which allows backend developers to work in an environment they are used to work in.
How does it work?
When we visit a page, in the first load of the interface, Livewire is responsible for rendering the component as a simple blade and injecting the HTML result to the requested page.
Then the magic happens, every time actions are triggered due to user interactions with the interface, requests (AJAX) are executed, which returns the rendered HTML with the corresponding changes. Then it is again injected into the page.
Finally, the library automatically detects the changes that need to be done to the DOM, updating only what’s necessary.
The challenge
We will venture into the implementation of a product catalog, which will have a simple shopping cart for checkout. It will also be able of adding and removing products from it. The objective is to understand how it works and the most important characteristics of this package.
Enough with theoretical aspects… let’s get to work!
First of all we will initialize a Laravel project from scratch. To do this, we execute:
The next step is to configure the project. First, you should configure the .env file and then install and configure livewire.
composer require livewire/livewire
After finishing up these first two stages, we will create the product’s entity with its model, migration, factory and data seeder. This is how we obtain fake data to run tests with the project. Then, execute the following command:
php artisan make:model -msf Product
– m | creates migration
– s | creates seeder
– f | creates factory
Now it’s time to update the content of the files created by the command:
<?php use Illuminate\Database\Migrations\Migration; use Illuminate\Database\Schema\Blueprint; use Illuminate\Support\Facades\Schema; class CreateProductsTable extends Migration { /** * Run the migrations. * * @return void */ public function up() { Schema::create('products', function (Blueprint $table) { $table->id(); $table->string('name'); $table->string('description'); $table->float('price'); $table->timestamps(); }); } /** * Reverse the migrations. * * @return void */ public function down() { Schema::dropIfExists('products'); } }
<?php /** @var \Illuminate\Database\Eloquent\Factory $factory */ use App\Product; use Faker\Generator as Faker; $factory->define(Product::class, function (Faker $faker) { return [ 'name' => $faker->word, 'description' => $faker->text(180), 'price' => $faker->numberBetween(50, 100) ]; });
database/factories/ProductFactory.php
<?php use App\Product; use Illuminate\Database\Seeder; class ProductSeeder extends Seeder { /** * Run the database seeds. * * @return void */ public function run() { factory(Product::class, 50)->create(); } }
database/seeds/ProductSeeder.php
<?php use Illuminate\Database\Seeder; class DatabaseSeeder extends Seeder { /** * Seed the application's database. * * @return void */ public function run() { $this->call(ProductSeeder::class); } }
database/seeds/DatabaseSeeder.php
Thanks to these changes we are ready to execute the next command while having data to work with.
php artisan migrate:fresh --seed
If everything was correctly executed, this message should appear at the end of the console: “Database seeding completed successfully.”
In this case, we’ll manage the state of the shopping cart with a Laravel session. We’ll create a facade that manages it using basic operations to obtain, add and remove products. I won’t explain how to configure a facade in Laravel because it’s not part of the guide’s objective. Our facade should look like this:
<?php namespace App\Helpers; use App\Product; class Cart { public function __construct() { if($this->get() === null) $this->set($this->empty()); } public function add(Product $product): void { $cart = $this->get(); array_push($cart['products'], $product); $this->set($cart); } public function remove(int $productId): void { $cart = $this->get(); array_splice($cart['products'], array_search($productId, array_column($cart['products'], 'id')), 1); $this->set($cart); } public function clear(): void { $this->set($this->empty()); } public function empty(): array { return [ 'products' => [], ]; } public function get(): ?array { return request()->session()->get('cart'); } private function set($cart): void { request()->session()->put('cart', $cart); } }
Cart.php
Now that our facade is configured properly we can start developing our catalog. We’ll be using TailwindCSS to structure and style the application. In order to add this dependency we will follow the following steps:
We now need to define our layout. Livewire will automatically search for a layout named app.blade.php and render the components by default where we define the content section:
To ease the access to the different views, we should add a navigation bar and create a new file called resources/views/layouts/header.blade.php with the following content:
Now we’re ready to start creating components with Livewire. We’ll start creating a component for the home interface, in which we want to show a welcome message.
To do this, we will execute the command php artisan make:livewire Home which will automatically add two new files in the project. The first one contains all the logic of the components and the other one contains all the HTML linked to it. It’s worth mentioning that this last one is a blade file, so we can use the same blade directives we’re used to using in Laravel.
The views files are in resources/views/livewire , we must add content to the file home.blade.php within the existing route tag <div>.
! Don’t forget that the blade file must have only one root element.
The next step is to modify the route’s answer so that Livewire can take control of the route and render the component within the section ‘content’ defined in the layout.
Let’s now modify the file web.php, it should be seen this way:
<?php use Illuminate\Support\Facades\Route; Route::livewire('/', 'home')->name('home');
routes/web.php
! Livewire’s library automatically searches for a component named home within the directory app/http/livewire
If we now run our project with php artisan serve and access to http://localhost:8000 this is what we’ll see:
If you can see this view, you’re on the right track! You can now move forward to the construction of our product catalog. We’ll again create a Livewire component with this command:
php artisan make:livewire Products
The ‘Products’ component will have the following content:
<?php namespace App\Http\Livewire; use App\Product; use App\Facades\Cart; use Illuminate\View\View; use Livewire\Component; use Livewire\WithPagination; class Products extends Component { use WithPagination; public $search; protected $updatesQueryString = ['search']; public function mount(): void { $this->search = request()->query('search', $this->search); } public function render(): View { return view('livewire.products', [ 'products' => $this->search === null ? Product::paginate(12) : Product::where('name', 'like', '%' . $this->search . '%')->paginate(12) ]); } public function addToCart(int $productId): void { Cart::add(Product::where('id', $productId)->first()); } }
Here we will see functions with different objectives. The ‘mount’ function will always be executed before the ‘render function’. It’s where we should define the logic that involves the data that will be rendered later.
The ‘render’ function is in charge of rendering the blade file. It’s executed the first time the page is loaded and every time there’s an interaction with the page (whenever a user interacts with the different visual components).
We also have the ‘addToCart’ function, which can be called from the view. For example: On a button click.
As we can see in line 3, the ‘search’ attribute is used as the model in the input. This means that every time a change is made in the input, the component will be updated with the new value of the input. This ends up in the execution of the ‘render’ function once again.
We’ll also use the following layout for the product pagination.
It’s time to define the route ‘/products’ to make our component work. To do this, we modify the file web.php.
<?php use Illuminate\Support\Facades\Route; Route::livewire('/', 'home')->name('home'); Route::livewire('/products', 'products')->name('products');
routes/web.php
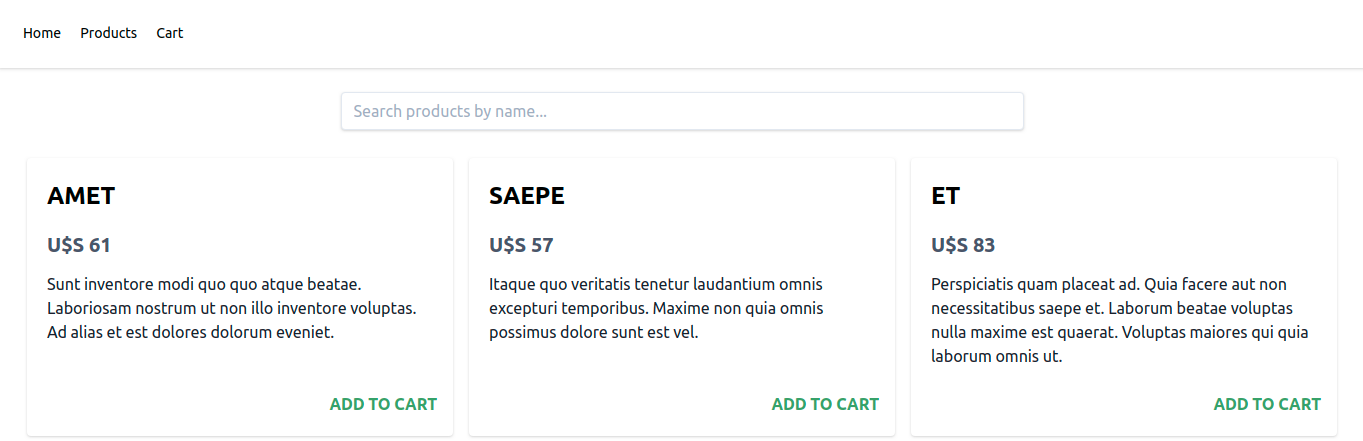
After defining this, if we access to the route /products we’ll obtain the following result:
At this point we can filter the products by their name, as well as add them to the shopping cart.
The next step is to create the shopping cart interface. By doing that we’ll be able to see the products, remove them and finish the checkout process. Now execute the following command:
php artisan make:livewire Cart
Add the following content to the files app/Http/Livewire/Cart.php and resources/views/livewire/cart.blade.php
<?php namespace App\Http\Livewire; use App\Facades\Cart as CartFacade; use Livewire\Component; class Cart extends Component { public $cart; public function mount(): void { $this->cart = CartFacade::get(); } public function render() { return view('livewire.cart'); } public function removeFromCart($productId): void { CartFacade::remove($productId); $this->cart = CartFacade::get(); } public function checkout(): void { CartFacade::clear(); $this->cart = CartFacade::get(); } }
app/Http/Livewire/Cart.php
We’ll obtain the status of the shopping cart in the mount() function. This way we’ll be able to show the existing products in the view.
We should define the function ‘RemoveFromCart’, which will be in charge of removing a product (using its ID) from the shopping cart. It’s important to notice that this job is delegated to the facade.
There’s also a function called ‘checkout’ that makes the checkout and removes all the products from the shopping cart.
This is probably the interface in which we use the blade directives the most. We can verify the existence of products in the shopping cart in the line 4. If they do exist, the elements will be listed. If there are no existing elements, a message will be displayed saying that there are no products in the shopping cart.
Notice that each product is associated with a button. Every time the click event is executed, the function RemoveFromCart – defined in the component – is activated and will remove the element from the shopping cart.
What’s left? Updating the file web.php, which should now be seen this way:
<?php use App\Http\Controllers\HomeController; use App\Http\Controllers\ProductsController; use Illuminate\Support\Facades\Route; Route::livewire('/', 'home')->name('home'); Route::livewire('/products', 'products')->name('products'); Route::livewire('/cart', 'cart')->name('cart');
routes/web.php
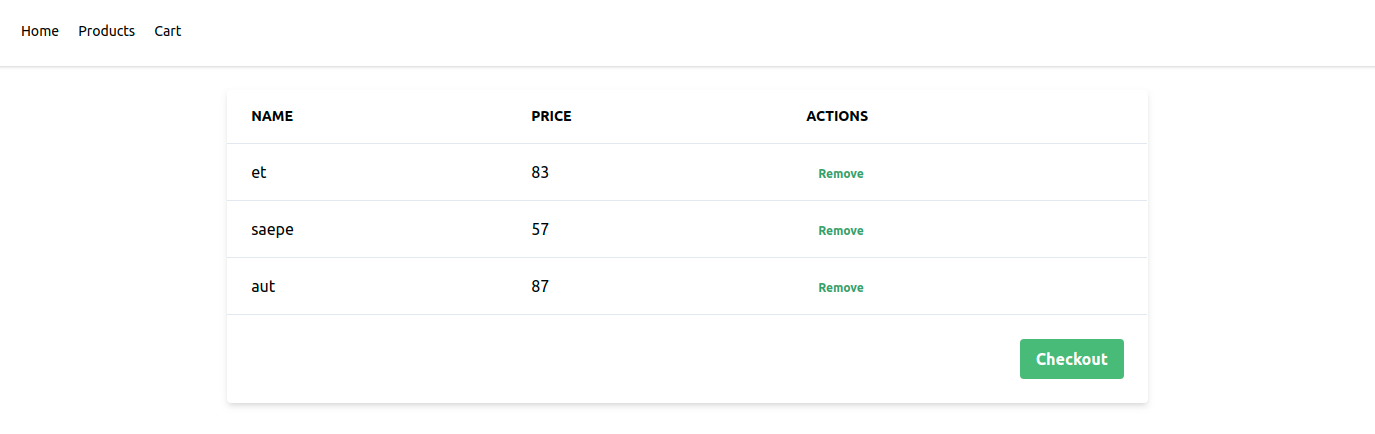
Finally, if we add a product to the shopping cart and access a /cart, we should get to the following view:
Activating the SPA mode
To activate this navigation mode, the first thing we should do is install the turbolinks dependency. This dependency automatically injects the received HTML without reloading the page. To install it, we use: npm install --save turbolinks
After this, we must update the app.js file, which should contain this content:
require('./bootstrap'); var Turbolinks = require("turbolinks") Turbolinks.start()
resources/js/app.js
Finally, we execute npm run watch
If we head back to our project in the navigator, we’ll be able to see how it’s exchanged throughout the different pages, without reloading the site.
Product counter (optional)
We can also add a product counter in the shopping cart. For this we will use events and listeners of the Livewire components. The logic behind this functionality is to issue notifications every time a new product is added to the shopping cart and every time it is removed. We need a component to listen to those events and updates when it does.
To do this, we’ll need to modify our project a little bit, the first thing we will do is create a new header component
php artisan make:livewire Header
We modify the generated files in the following way:
<?php namespace App\Http\Livewire; use Illuminate\View\View; use Livewire\Component; use App\Facades\Cart; class Header extends Component { public $cartTotal = 0; protected $listeners = [ 'productAdded' => 'updateCartTotal', 'productRemoved' => 'updateCartTotal', 'clearCart' => 'updateCartTotal' ]; public function mount(): void { $this->cartTotal = count(Cart::get()['products']); } public function render(): View { return view('livewire.header'); } public function updateCartTotal(): void { $this->cartTotal = count(Cart::get()['products']); } }
We don’t need the file we were including in the header anymore because we’re now using our component, so we can delete the file.
Now we must modify the function that adds and removes products from the shopping cart. We’ll modify app/Http/Livewire/Products.php y app/Http/Livewire/Cart.php respectively.
public function addToCart(int $productId): void { Cart::add(Product::where('id', $productId)->first()); $this->emit('productAdded'); }
app/Http/Livewire/Product.php
public function removeFromCart($productId): void { CartFacade::remove($productId); $this->cart = CartFacade::get(); $this->emit('productRemoved'); } public function checkout(): void { CartFacade::clear(); $this->emit('clearCart'); $this->cart = CartFacade::get(); }
app/Http/Livewire/Cart.php
Conclusions
One of Livewire’s best advantages is the possibility to construct user interfaces with PHP’s simplicity. It would be much complex to build the same thing using javascript and would require more learning and development time.
I guess that another amazing advantage is the possibility of using all the resources Laravel Core provides us in Livewire’s class components. This unifies both environments.
Livewire came here to stay, willing to set an ecosystem in which backend developers feel free to implement solutions with PHP in both, frontend and backend.


 We are excited to announce Percona Live ONLINE, a stand-alone virtual event we’re bringing to the community. It’s totally free of charge, and available for everyone to attend, no matter where you are in the world!