https://blog.finxter.com/wp-content/uploads/2023/03/image-399.png
Python has several web frameworks for creating web applications.
are some of them.
If you want to become a Python web developer, the importance of learning Django and Flask plus other frameworks can never be overemphasized. There is no better way to learn than working on projects using web frameworks.
 Recommended: Flask vs Django: Comparing the Two Most Popular Python Web Frameworks
In this three-part tutorial series, I will walk you through the process of building a weather app using three Python frameworks: Django, Flask, and Streamlit. We will start with Django, and if you have been following my project tutorials on Django, this will be an easy ride for you.
Then, for the very first time, I will be creating Python projects using Flask. We will learn this in part two. In the final part of this series, we will see how to create this same application using Streamlit, and have it hosted on Streamlit Cloud for others to use.
A Weather Application

A weather application enables users to get real-time weather information on cities they select. Using powerful web frameworks like Django makes building such an app a fairly easy job for Django developers. All we need is a public API to get real-time information.
We will use the OpenWeatherMap API. So, if you have not already done so, head over to the website and register to get an API key. The API key enables us to benefit from the services rendered by OpenWeatherMap. Make sure you keep your API key safe. We are going to follow best practices for using the API key.
Getting Started
Follow these five steps to set up Django on your system.
- Create a folder for this project using any name of your choice and
cdinto it.
mkdir django-project && cd django-project
- Create and activate a virtual environment.
python3 -m venv .venv
. .venv/bin/activate
- Install the necessary modules and dependencies.
pip install django requests tzdata
- Create a
requirements.txtfile to store the module versions
pip freeze > requirements.txt
- Then, fire up the local server using the command
python3 manage.py runserverto check if everything was installed successfully.
Creating Django project and app

Run this command in your terminal to create a Django project:
django-admin startproject weather .
Don’t forget the dot to create the project in the current directory. The mange.py file is used the execute some Django commands. So, let’s use it to create Django app.
python3 manage.py startapp app
Feel free to use any name of your choice. I briefly explained the function of those files inside the project and app folders. Check it or the documentation if you want to learn more:
Recommended: How I Created a URL Shortener App with Django
We have to let Django know that a new app is created. We will do this in settings.py file. Open it and scroll down to INSTALLED_APPS, and add the name of the app.
INSTALLED_APPS = [
    'django.contrib.admin',
    'django.contrib.auth',
    'django.contrib.contenttypes',
    'django.contrib.sessions',
    'django.contrib.messages',
    'django.contrib.staticfiles',

    # custom app
    'app',
]
We are not working with models in this project. So, everything is going to be simple. Let’s now implement the search functionality using the API key.
Using the OpenWeatherMap API

In your app_level folder, create a file called secret_key.py. Then, add your API key there like this:
KEY = 'YOUR API KEY'
Create another file inside the folder and call it weather.py. You will import the API key there.
import requests
from datetime import datetime
from .secret_key import KEY

def getWeather(city):
    url = f'https://api.openweathermap.org/data/2.5/weather?q={city}&appid={KEY}&units=metric'
    response = requests.get(url).json()
    current_time = datetime.now()
    formatted_time = current_time.strftime('%A, %B %d %Y, %H:%M:%S %p')
    context = {
        'city': city,
        'description': response['weather'][0]['description'],
        'icon': response['weather'][0]['icon'],
        'temperature': 'Temperature: ' +  str(response['main']['temp']),
        'country_code': response['sys']['country'],
        'wind': 'Wind: ' + str(response['wind']['speed']) + 'km/h',
        'humidity': 'Humidity: ' + str(response['main']['humidity']) + '%',
        'time': formatted_time
    }
    return context
We import the modules we will use, including the API key.
Then we create a function with a city parameter. This function uses the requests module to get weather information of a given city using the API key. We select only the items we need; and wrap them in a dictionary. We are going to import this function to the views.py file.
Can you see how we use the API key without exposing it?
Creating Views

Open the views.py and let us add in some code.
from django.shortcuts import render
from .weather import getWeather

# Create your views here.

def index(request):
     try:
         if request.method == 'POST':
             city = request.POST['city']
             context = getWeather(city)
             return render(request, 'home.html', context)
         else:
             city_weather = {}
             context = {'city_weather': city_weather}
             return render(request, 'home.html', context)
     except:
        return render(request, 'error.html')
It’s a good practice to create a separate file for the weather information and have it imported into views.py file.
This makes your code neat and readable.
The index() function uses the try statement to make sure the code runs without errors. It checks if the request method was POST, if so, it retrieves the city name and passes it to the getWeather() function.
Finally, it renders the result on the home.html web page. But if there was an error. The error.html web page is displayed.
Registering URLs
Let’s create and register the urls.py file. This file registers all URLs created in the app folder.
from django.urls import path
from .views import index, error

urlpatterns = [
    path('', index, name='home'),

]
We also have to register the application URLs. Go to your project-level folder and open the urls.py file.
from django.contrib import admin
from django.urls import path, include

urlpatterns = [
    path('admin/', admin.site.urls),
    path('', include('app.urls')),
]
Creating Templates

Last but not least is templates. Create a templates folder, then go to the settings.py file under the TEMPLATES section.
TEMPLATES = [
    {
        'BACKEND': 'django.template.backends.django.DjangoTemplates',
        'DIRS': [os.path.join(BASE_DIR, 'templates')], # add these
        'APP_DIRS': True,
        'OPTIONS': {
            'context_processors': [
                'django.template.context_processors.debug',
                'django.template.context_processors.request',
                'django.contrib.auth.context_processors.auth',
                'django.contrib.messages.context_processors.messages',
            ],
        },
    },
]
Next, create three files inside the folder with the names, base.html, home.html, and errors.html.
base.html:
<!DOCTYPE html>
<html lang="en">
<head>
    <meta charset="UTF-8">
    <meta http-equiv="X-UA-Compatible" content="IE=edge">
    <meta name="viewport" content="width=device-width, initial-scale=1.0">
    <title>Weather App</title>
    <!-- getting bootstrap5 from CDN -->
    <link href="https://cdn.jsdelivr.net/npm/bootstrap@5.2.0/dist/css/bootstrap.min.css" rel="stylesheet">
</head>
<body>
    {% block content %}

    {% endblock %}
</body>
</html>
All other HTML files will inherit from this base.html file. We are using Bootstrap to style the web pages. Now the home.html.
<!-- extends is for inheriting from the base.html -->
{% extends "base.html" %}
{% block content %}
<div class="row justify-content-center my-5">
    <div class="col-md-5">
        <div class="mt-4 p-5 bg-success text-white rounded mb-3">
            <h1>Django Weather App</h1>
        </div>
        <form action="." method="POST">
          {% csrf_token %}
          <div class="input-group">
            <input type="text" required class="form-control" name="city" placeholder="Search City...">
            <div class="input-group-append">
              <button class="btn btn-success" type="submit">
                Search
              </button>
            </div>
          </div>
        </form>
        <hr>
        <div class="card">
           <div class="card-body">
                <img src="http://openweathermap.org/img/w/.png" alt="">

                <div class="card-text float-end"></div>
                <div class="card-text"><h5>, </h5></div>
                <div class="card-text"><h6></h6></div>
                <div class="card-text"><h6></h6></div>
                <div class="card-text"><h6></h6></div>
                <div class="card-text"><h6></h6></div>
            </div>
        </div>
    </div>
</div>
{% endblock %}
Django syntax makes it easy to dynamically write to web pages. If you check back on weather.py, you will notice the return results wrapped in a dictionary were dynamically written to the web page using the form.
The form with the action=dot signifies the current URL. The csrf_token protects against malicious attacks.
Finally, the error.html file.
<!-- extends is for inheriting from the base.html -->
{% extends "base.html" %}
{% block content %}
<div class="row justify-content-center my-5">
    <div class="col-md-5">
        <h1>Page Not Found</h1>
        <p>Make sure you are connected to the internet or you are entering a valid city name</p>
        <a href="{% url 'home' %}" class="btn btn-secondary">Home</a>
    </div>
</div>
{% endblock %}
The {% url ‘home’ %} is another way to refer to the home.html web page. Remember the ‘home’ in the urls.py file? Let’s now test the project on the local server. Run python3 manage.py runserver to open the local server.
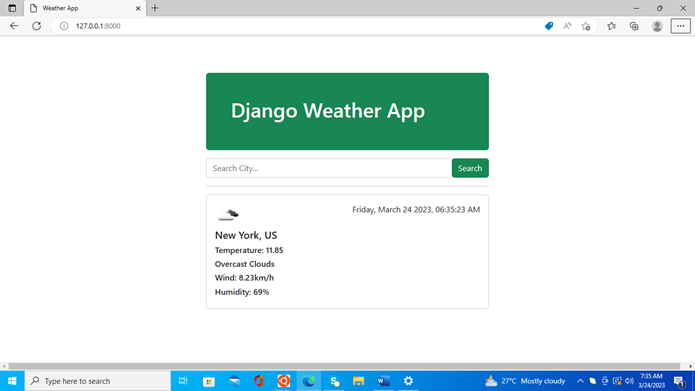
Conclusion

We have successfully come to the end of this tutorial. We have learned how to create a weather app using Django. The full code is available on my GitHub page.
You have undoubtedly learned many things that can help you while working on projects. Watch out for the second part of this series, where I created the same app using the Flask framework.
Be on the Right Side of Change