Withings adds sleep apnea detection to its tracking mat

There are countless products available that help you track your sleep, giving you insights into your sleep patterns and quality. But there’s been nothing to help snoozers identify sleep apnea, a potentially-serious condition that could traditionally only be diagnosed by a sleep clinic. Now, health device maker Withings has released a new update to its sleep tracking mat that could help users recognize the symptoms of this disorder.

Around 22 million Americans suffer from sleep apnea, which is characterized by pauses in breathing, or periods of shallow breathing, during sleep. As well as symptoms of fatigue, sleep apnea can result in headaches and depression, and in serious cases, stroke and heart failure. The update to Withings’ sleep tracking mat ($100) will monitor breathing disturbances during the night, and give users educational content about the signs of sleep apnea via the Health Mate app.

The update also helps set the company’s sleep mat apart from its competitors — Apple’s Beddit Sleep Monitor, for example, costs $150 but doesn’t have this function. But this is just the first step for Withings in this area. The company says it’s working on even more advanced diagnostics for sleep apnea, and aims to have medical-grade certified tracking for the condition in place by the end of the year.

Via: 9to5mac

Source: Withings

via Engadget
Withings adds sleep apnea detection to its tracking mat

‘We don’t even use computers!’: Watch a Microsoft PowerPoint presentation get mocked on ‘SNL’

It’s the first Monday back at work after daylight saving time and hopefully you don’t have to make a PowerPoint presentation today. If you do, it surely can’t be worse than what “Saturday Night Live” stars Kate McKinnon and Aidy Bryant came up with this weekend.

The late-night comedy took a run at Microsoft’s presentation program, in a skit starring actor Idris Alba and cast member Mikey Day as employees for the software giant, helping some office workers brush up on the PowerPoint skills.

“We don’t even use computers, just the phone, so we will see,” said Bryant, playing one of two receptionists charged with making a mock presentation. It only got worse from there.

With each slide, the receptionists fell further and further into despair, saying they had no idea what they were doing with PowerPoint. “This is not my world! … Honestly I’m at the point in my life where I feel that I can’t learn.”

Check out the video above, and take some time to brush up on your own skills today.

via GeekWire
‘We don’t even use computers!’: Watch a Microsoft PowerPoint presentation get mocked on ‘SNL’

7 Ultimate Typing Games If You Want to Type Really Fast

typing-games

Learning to type quickly and accurately is an essential skill. Whether you are learning for the first time, upgrading to touch typing or an alternate keyboard layout, repetition is key to improvement. But repetition with practice can feel like a drag.

Let’s face it—playing games is way more fun. So we went out and picked seven excellent typing games that will challenge you.

Why Should You Play These Typing Games?

There are numerous websites and pieces of software to help improve your keyboard skills. Many of them employ game mechanics, but can’t claim to be computer games. Many typing games are lacking in content and do not give a satisfying experience when compared to mainstream games—but there are exceptions.

This article will focus on fully fledged games that feature typing. Some are speed typing games, others are word games requiring fast keyboard skills, and there are even some arty indie typing experiences.

1. Typefighters

Typefighters multiplayer typing game

Singleplayer: Yes (Play against A.I.)

Multiplayer: LAN and Online

By far the most traditional typing game on this list, Typefighters takes a well-worn idea and does it well. While there are several modes to choose from, the general gameplay stays the same.

Type the words on the screen faster than your AI or real life opponent to gain points. Whoever reaches a certain point cap or who is scoring highest when the time is up wins.

This game is pure typing. You can even navigate the menus by typing, which feels incredibly satisfying for those who know keyboard shortcuts for everything!

Multiple modes can be played against friends online and over LAN. What this game provides in comparison to standard typing instruction software is game feel. Every keystroke has a satisfying sound, and completion of words shakes the text and the screen giving excellent user feedback.

Available on Steam: Typefighters

2. God Of Word

God Of Word - Wordplay Adventure

Singleplayer: Yes

Multiplayer: Online

God Of Word is a wordplay and typing game of epic proportions. You play a young actor, tasked with recreating famous battles of history for the gods of Olympus. Weapons, potions, and upgrades are all essential to progress. But without quick wits and fast fingers you won’t get far!

The core gameplay consists of word scramble puzzles, along with speed typing challenges to defeat groups of enemies. Each boss (a computer controlled enemy) brings a mechanic that needs more impressive wordplay and tactics. The campaign plays out over 5 acts, with two endless modes.

The multiplayer mode allows online play against friends or other strangers and comes with a separate upgrade system to customize your character.

Available on Steam: God Of Word

3. The Textorcist: The Story of Ray Bibbia

The Textorcist: The Story of Ray Bibbia

Singleplayer: Yes

Multiplayer: No

Do you like Bullet Hell games, horror movie themes, and adult humor? The Textorcist: The Story of Ray Bibbia is all of these things, along with being an incredibly challenging typing game. You play the titular role, a self-styled exorcist/detective tasked with investigating a string on strange possession cases.

Each battle consists of dodging vast numbers of enemy attacks while typing the words required to banish each demon. Failing to avoid attacks causes you to drop your prayer book, and you can’t continue the incantation until it is retrieved. The game is challenging from the get-go, and the ramp up to “full on bullet hell while typing Latin” is severe. Be prepared for a challenge.

Fantastic pixel artwork and pumping electronic soundtrack add to the experience. The story is incredibly dark yet comical, and this game is most certainly NSFW! Nevertheless, this is one of the most original typing games ever created, and a must for any quick-fingered gamer.

Available on Steam: The Textorcist: The Story of Ray Bibbia

4. The Typing Of The Dead: Overkill

Typing of the Dead: Overkill

Singleplayer: Yes

Multiplayer: Local Co-op

We couldn’t make a list like this without including The Typing Of The Dead. It was one of the most unusual arcade games ever devised. A near direct adaption of the popular House Of The Dead 2 from Sega, the arcade cabinets shuns guns for computer keyboards.

In-game, the characters also had keyboards (with rucksack mounted computers no less), and gun-play is replaced with typing at speed to stop the invading hordes. A mixture of quick-fire words, and (sometimes bizarre) phrases need constant vigilance to avoid getting eaten.

While the original release is now hard to run, Sega released a modern addition in 2013 in the form of The Typing Of The Dead: Overkill. The newer version retains the original’s gameplay but updates the graphics for modern hardware. There is plenty of content to keep you busy after the primary campaign, with cheap DLC bundles which add to the base game.

Available on Steam: The Typing Of The Dead: Overkill

5. Secret of Qwerty

Secret Of Qwerty

Singleplayer: Yes

Multiplayer: No

Lovers of all things retro will find plenty to like about Secret of Qwerty. This loving indie recreation of old school RPGs (right down to the dodgy translation of dialogue) has a crucial difference. You guessed it—typing replaces standard combat.

Like the much-loved adventure RPGs of old, you must explore a fantasy world, clear dungeons, and survive random encounters. Each battle rewards the player with XP and Gold which can be used to buy more powerful items to help you on your quest to defeat an evil wizard arch enemy. This game is a nod to much adored old games, and at a “Pay What You Like” cost, is worth your time.

Available on Itch.io: Secret of Qwerty

6. Monologue

Monologue - Browser Typing Game

Singleplayer: Yes

Multiplayer: No

Monologue is the only browser game on this list, and what it lacks in game depth it makes up for in charm and humor. You play as the antagonist who has placed their foe in the path of an oncoming train. Rush to finish your victory speech before they escape! You must type your speech correctly, as any mistake knocks you back to the start of the current word, thus wasting precious time.

Fun but straightforward graphics, jaunty old west music, and the mumbles and coughs of the player character complement the hilarious randomly generated speech. Monologue was an entry in the 2015 Train Game Jam and is free to play online.

Available at Itch.io: Monologue

7. Epistory – Typing Chronicles

Epistory - Typing Chronicles

Singleplayer: Yes

Multiplayer: No

There are few typing games which can boast gorgeous 3d graphics, a story, voice acting, and puzzle-based gameplay. In this third-person RPG, you play as a girl riding a three-tailed fox through a series of beautifully Origami-like stylized worlds. All interaction happens by typing words. The game adapts to your typing speed as you clear enemies and environmental elements.

The player gathers XP through exploration, trials with waves of enemies, and memory puzzles which also unlock new areas. You can buy new skills with experience points that grant movement speed increases and aids to combat. A particularly nice touch comes in the form of languages you cannot speak until a skill is learned.

The game adds harder words if your going is too easy. This game also supports alternate keyboard layouts including AZERTY, Dvorak, and Colemak. If you are looking for a full game experience in a typing game, Epistory – Typing Chronicles is one of the strongest contenders around.

Available on Steam: Epistory – Typing Chronicles

A Twist on the Usual Touch Typing Games

Good typing games can seem to be thin on the ground. But there are some great examples out there. Mixing games into your practice will improve your typing skills. And a good routine always reinforces good habits, and a good mechanical keyboard while not essential really improves the typing experience.

Of course, you need to learn those good habits in the first place, and learning the proper touch typing technique is just as important as its practice.

Read the full article: 7 Ultimate Typing Games If You Want to Type Really Fast

via MakeUseOf.com
7 Ultimate Typing Games If You Want to Type Really Fast

The Skeleton

As we do in many series at Laracasts, we’ll begin with laravel new project. Following that, we’ll incrementally pull in all necessary npm dependencies and construct the base skeleton for our "assets" website.
View the source code for this episode on GitHub.
via Laracasts
The Skeleton

5 Tips for a Successful Software Migration to the Latest and Best Tools

Photo by Startup Stock Photos from Pexels

Businesses need to stay on the cutting edge of technology. That’s why it’s essential to use the most advanced tools. Your business is only as good as your data. Moreover, if you’re running outdated, unresponsive data-handling software, you should consider scheduling a software migration to the latest and best tools.

What we mean by that is that you need to move your data over to software that has the capacity, security, and functionality you need. If you don’t, your old software will put you behind your competition and cost you money.

However, getting the best software systems for your business isn’t cheap, and data migration is challenging. But industry experts are clear—the total cost of operating old technology rises sharply over time and outpaces the return on investment. For your business to stay relevant in today’s marketplace, your technology infrastructure needs to offer the right performance, scale, and flexibility for your expanding needs. Think of new software as an investment rather than an expense.

Recently, we helped a company that does porta-potty rentals in Dallas to transition their systems. The process was tough, but we made our deadline, and the results were worth waiting for. Here’s what we learned during the process. We hope our software migration experience helps make yours a success.

Give Yourself Plenty of Time

Software migration is complex, and you still have a business to run. Moreover, transition time varies considerably based on factors like the quality of source data, hardware capability, and the compatibility of data fields between the old system and the new.

It’s nearly inevitable that something will go wrong. However, because that’s not unexpected, you can compensate for it by starting sooner rather than later. Nick-of-time timelines don’t cut it. Be patient and prepare for what is to come.

RELATED ARTICLE: SOME USEFUL TIPS FOR BUYING THE PERFECT HR SOFTWARE FOR YOUR BUSINESS

Build a Migration Dream Team

With data, it’s garbage in, garbage out. So if you’re using your staff instead of hired help, it pays to choose the most qualified individuals to assist with the transition. Databases are always more disorganized than anyone expects them to be. On the other hand, one of the benefits of a software migration is that incorrect or corrupt data can be culled.

The best candidates to work on the project are those who know how to retrieve information from your current system effectively. These people will recognize bad data. What’s more, they can clean it up before they migrate it over to the new system.

Software migration is a big project. That means there are roles for team members from testing to data entry. To lead the charge, choose tech-savvy people who are willing to learn the new software first and teach others the ropes. For leaders, make sure your software provider offers comprehensive support.

Know the Process

Learn, do, teach, lead—it’s an educator’s mantra, and it will help you better navigate your transition. Software migration is a top-down project, and training everyone on the new system is a priority. However, no matter the size of your company, its leaders need to learn the process, practice it, and be able to demonstrate it to others before rolling it out.

Ensuring that a solid training schedule is in place to bring your team up to speed with the new software minimizes costly downtime and errors. However, if you’re ready to take point, you can quickly mobilize an entire team and confidently delegate responsibility to others. This concept is especially critical if you’ve made changes in data-handling procedures to reflect the change in software.

Consider Auto-Migration Options

A significant part of the cost of software migration is the time it takes to do the job. It’s painstaking work. Moreover, if your staff is too busy taking care of your customers or they’re not knowledgeable enough to be useful helpers in the transition process, it’s worth considering auto-migration.

Auto-migration is an automated process that transfers the bulk of data for you. But not all business software providers offer that option. Also, there may be technological barriers, including deep software incompatibilities and poor-quality legacy data. The cost of auto-migration may be higher upfront depending on the complexity of the systems. However, it relieves some of the pressure on staff. What’s more, in some cases, it may be a more economical option.

Hire Help for Your Software Migration

In our recent migration effort, we weren’t able to use company staff because of their responsibilities. But even when auto-migration is an option, you’ll still need extra hands to address hardware interface issues. Additionally, legacy data might not transfer to the new system correctly. In any case, you’ll need to educate staff about the new system.

A software migration can disrupt business-as-usual. But hiring help with the right expertise and credentials smooths the transition.

Data handling technology has evolved markedly in the past decade, but going forward, it will advance by leaps and bounds. Businesses that fail to adapt will be left behind. Information is a strategic asset that needs to be harnessed and used to its fullest potential. Using the latest and best tools makes the job easier and more profitable.

The post 5 Tips for a Successful Software Migration to the Latest and Best Tools appeared first on Business Opportunities.


via Business Opportunities Weblog
5 Tips for a Successful Software Migration to the Latest and Best Tools

Check Out These 5 Brilliantly Simple Woodworking Hacks, That Actually Are Hacks

Everyone loves shop tips and time saving ideas. Not all of these ideas qualify for the overly used word “hacks” , however, I feel like Glen from the youtube channel DIY Creators really nailed it with this one.

I started watching this, totally expecting the typical hyperbole associated with “hacks” and as I watched I was totally surprised. I didn’t think the milk jug on the circular saw would work, but he shows it working over and over, and I’m totally going to do this on mine.  The janky caulk gun is ridiculous but I could see actually using this in a pinch. Fantastic job Glen!

via MAKE Magazine
Check Out These 5 Brilliantly Simple Woodworking Hacks, That Actually Are Hacks

Laravel Eloquent Collection Tutorial With Example | Laravel 5.8 Guide

Laravel Eloquent Collection Tutorial Example

Laravel Eloquent Collection Tutorial With Example is today’s topic. The Eloquent collection object extends the Laravel base collection, so it naturally inherits the dozens of methods used to work with an underlying array of Eloquent models fluently. All multi-result sets returned by Eloquent are instances of an Illuminate\Database\Eloquent\Collection object, including results retrieved via the get method or accessed via a relationship.

Laravel Eloquent Collection Tutorial

We will start this tutorial by installing fresh Laravel. Right now, Laravel 5.8 is the latest version of Laravel. If you are new to Laravel 5.8, then check out my Laravel 5.8 CRUD tutorial for starters. Install Laravel using the following command.

composer create-project --prefer-dist laravel/laravel blog

Okay, now set up the database inside the .env file.

DB_CONNECTION=mysql
DB_HOST=127.0.0.1
DB_PORT=3306
DB_DATABASE=blog
DB_USERNAME=root
DB_PASSWORD=root

Next step is to migrate the tables inside the database using the following command.

php artisan migrate

Seed Database

Laravel includes the simple method of seeding your database with test data using seed classes. All the seed classes are stored in the database/seeds directory. Seed classes may have any name you want but probably it should follow some sensible convention, such as UsersTableSeeder, etc. By default, the DatabaseSeeder class is defined for you. From this class, you can use the call() method to run other seed classes, allowing you to control the seeding order.

Create a UsersTableSeeder.php file using the following command.

php artisan make:seeder UsersTableSeeder

We will use Model factories to generate fake data.

Now, write the following code inside the UsersTableSeeder.php file.

<?php

// UsersTableSeeder.php

use Illuminate\Database\Seeder;
use Illuminate\Support\Str;

class UsersTableSeeder extends Seeder
{
    /**
     * Run the database seeds.
     *
     * @return void
     */
    public function run()
    {
        $faker = Faker\Factory::create();
        for($i=0;$i<50;$i++) {
            \App\User::create([
                'name' => $faker->name,
                'email' => $faker->unique()->safeEmail,
                'email_verified_at' => now(),
                'password' => '$2y$10$TKh8H1.PfQx37YgCzwiKb.KjNyWgaHb9cbcoQgdIVFlYg7B77UdFm', // secret
                'remember_token' => Str::random(10),
            ]);
        }
    }
}

So, it will generate 50 random users records in the database.

Now, we need to modify the DatabaseSeeder.php file.

<?php

// DatabaseSeeder.php

use Illuminate\Database\Seeder;

class DatabaseSeeder extends Seeder
{
    /**
     * Seed the application's database.
     *
     * @return void
     */
    public function run()
    {
        $this->call(UsersTableSeeder::class);
    }
}

Before you seed the file, we need to regenerate the Composer’s autoloader using the dump-autoload command.

composer dump-autoload

Okay, now go to the terminal and run the seed file using the following command.

php artisan db:seed

It will generate fake data in the users table.

Laravel Eloquent Collection Tutorial


So now, we have test data to work with, and we can query the database using Laravel Eloquent Collection.

Query Data using Laravel Eloquent Collection

Now, write the following code inside the routes >> web.php file.

<?php

// web.php

Route::get('/', function () {
    $users = \App\User::all();
    foreach ($users as $user) {
        echo '<pre>';
        echo $user->name;
        echo '</pre>';
    }
});

In the above code, we are displaying only the name of the users in preformatted HTML view.

If you go to the root route, then you will see something like below image. Of course, the data will be different because the faker library randomly generates it. It will be 50 names.


Laravel 5.8 Guide

All collections also serve as the iterators, allowing us to loop over them as if they were simple PHP arrays.

The collections are much more potent than arrays and expose the variety of map / reduce operations that may be chained using the intuitive interface.

Laravel chunk() Collection Method

The chunk() method breaks a collection into multiple, smaller collections of the given size.

Write the following code inside the web.php file.

<?php

// web.php

Route::get('/', function () {
    $users = \App\User::all();
    $chunks = $users->chunk(2);
    $data = $chunks->toArray();
    echo '<pre>';
    print_r($data);
    echo '</pre>';
});

The output of the above code is following.


Laravel chunk() Collection Method

The chunk() method is especially useful in views when working with the grid system such as Bootstrap.

Laravel Custom Collections

If you need to use the custom Collection object with your extension methods, you may override the newCollection method on your model. See the following example of the User.php model.

<?php

// User.php

namespace App;

use Illuminate\Notifications\Notifiable;
use Illuminate\Contracts\Auth\MustVerifyEmail;
use Illuminate\Foundation\Auth\User as Authenticatable;
use App\CustomCollection;

class User extends Authenticatable
{
    use Notifiable;

    /**
     * The attributes that are mass assignable.
     *
     * @var array
     */
    protected $fillable = [
        'name', 'email', 'password',
    ];

    /**
     * The attributes that should be hidden for arrays.
     *
     * @var array
     */
    protected $hidden = [
        'password', 'remember_token',
    ];

    /**
     * The attributes that should be cast to native types.
     *
     * @var array
     */
    protected $casts = [
        'email_verified_at' => 'datetime',
    ];

    /**
     * Create a new Eloquent Collection instance.
     *
     * @param  array  $models
     * @return \Illuminate\Database\Eloquent\Collection
     */
    public function newCollection(array $models = [])
    {
        return new CustomCollection($models);
    }
}

Once you have defined the newCollection method, you will receive an instance of your custom collection anytime Eloquent returns the collection instance of that model. If you would like to use the custom collection for every model in your application, you should override a newCollection method on the base model class that is extended by all of your models. In the above example, we have override inside the User.php model class.

Okay, now create a CustomCollection.php file inside the app folder.

<?php

// CustomCollection.php

namespace App;

use Illuminate\Support\Collection;

class CustomCollection extends Collection 
{
    public function gotAllUsers()
    {
	dd($this->items);
    }
}

Here, $this->items have all the users records. We can access these records inside the CustomCollection class.

Finally, write the following code inside the web.php file.

<?php

// web.php

Route::get('/', function () {
    $users = \App\User::get();
    $users->gotAllUsers();
});

Refresh the root route, and the output is following. It is up to 50 records.


Laravel Custom Collections

Finally, Laravel Eloquent Collection Tutorial With Example is over.

The post Laravel Eloquent Collection Tutorial With Example | Laravel 5.8 Guide appeared first on AppDividend.

via Planet MySQL
Laravel Eloquent Collection Tutorial With Example | Laravel 5.8 Guide

Laravel 5.8 Form Validation Tutorial With Example

Laravel 5.8 Validation Tutorial


Laravel 5.8 Form Validation Tutorial With Example is today’s topic. Laravel  Framework provides many different approaches to validate your application’s form data. By default, Laravel’s base controller class uses the ValidateRequests trait which provides the convenient method to validate incoming HTTP request with a variety of powerful validation rules. We can use the Validation differently in Laravel. We can either use inside the controller’s method or create a FormRequest class to validate the incoming requests. In this tutorial, we will all ways to validate Laravel.

Laravel 5.8 Form Validation Tutorial

Okay, now the first step is to install Laravel 5.8. If you are new to Laravel 5.8, then check out my Laravel 5.8 CRUD tutorial on this blog. So, install the Laravel 5.8 using the following command. Right now, Laravel 5.8 is the latest version. So in the future, you may need to specify the version while installing the Laravel 5.8.

composer create-project --prefer-dist laravel/laravel blog

Okay, now go inside the project folder and open the project in the code editor.

Now, create a MySQL database and also connect that database to Laravel 5.8. Write the database credentials inside the .env file.

DB_CONNECTION=mysql
DB_HOST=127.0.0.1
DB_PORT=3306
DB_DATABASE=blog
DB_USERNAME=root
DB_PASSWORD=root

Create a FormController.php file using the following command.

php artisan make:controller FormController

Create two methods inside the FormController.php file.

<?php

// FormController.php

namespace App\Http\Controllers;

use Illuminate\Http\Request;

class FormController extends Controller
{
    public function create()
    {

    }

    public function store(Request $request)
    {
        
    }
}

Now, write the two routes inside the routes >> web.php file.

// web.php

Route::get('form', 'FormController@create')->name('form.create');
Route::post('form', 'FormController@store')->name('form.store');

Now, create a model and migration file using the following command.

php artisan make:model Form -m

Write the following code inside the [timestamp]_create_forms_table.php file.

// create_forms_table.php

public function up()
{
        Schema::create('forms', function (Blueprint $table) {
            $table->bigIncrements('id');
            $table->string('item_name');
            $table->string('sku_no');
            $table->integer('price');
            $table->timestamps();
        });
}

Now, create a table using the following command.

php artisan migrate

Also, to prevent mass assignment exception, add the $fillable property.

<?php

// Form.php

namespace App;

use Illuminate\Database\Eloquent\Model;

class Form extends Model
{
    protected $fillable = ['item_name', 'sku_no', 'price'];
}

Inside the views folder, create layout.blade.php file and add the following code.

<!DOCTYPE html>
<html lang="en">
<head>
  <meta charset="UTF-8">
  <meta name="viewport" content="width=device-width, initial-scale=1.0">
  <meta http-equiv="X-UA-Compatible" content="ie=edge">
  <title>Laravel 5.8 Form Validation Example Tutorial</title>
  <link href="" rel="stylesheet" type="text/css" />
</head>
<body>
  <div class="container">
    @yield('content')
  </div>
  <script src="" type="text/js"></script>
</body>
</html>

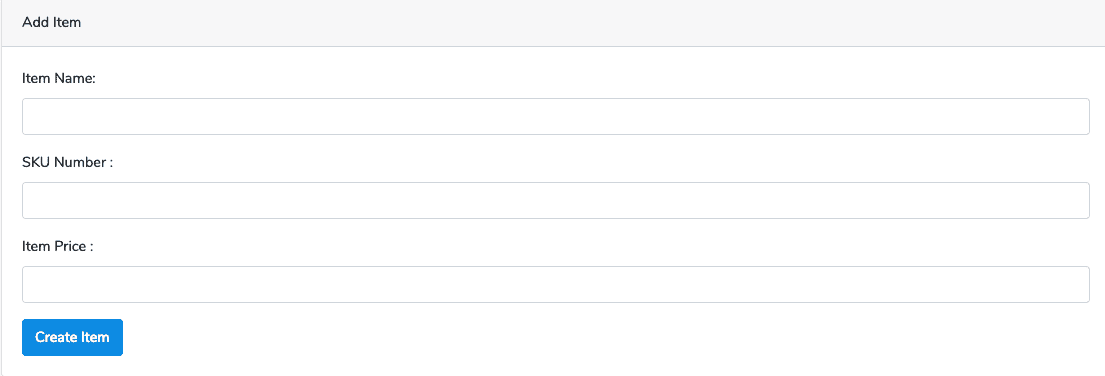
Now, in the same folder, create one file called create.blade.php and add the following code.

<!-- create.blade.php -->

@extends('layout')

@section('content')
<style>
  .uper {
    margin-top: 40px;
  }
</style>
<div class="card uper">
  <div class="card-header">
    Add Item
  </div>
  <div class="card-body">
    @if ($errors->any())
      <div class="alert alert-danger">
        <ul>
            @foreach ($errors->all() as $error)
              <li></li>
            @endforeach
        </ul>
      </div><br />
    @endif
      <form method="post" action="">
          <div class="form-group">
              @csrf
              <label for="name">Item Name:</label>
              <input type="text" class="form-control" name="item_name"/>
          </div>
          <div class="form-group">
              <label for="price">SKU Number :</label>
              <input type="text" class="form-control" name="sku_no"/>
          </div>
          <div class="form-group">
              <label for="quantity">Item Price :</label>
              <input type="text" class="form-control" name="price"/>
          </div>
          <button type="submit" class="btn btn-primary">Create Item</button>
      </form>
  </div>
</div>
@endsection

Now, write the FormController’s create() function.

// FormController.php

public function create()
{
    return view('create');
}

Now, you can access the form on this URL: http://localhost:8000/form.


Laravel 5.8 Form Validation Tutorial With Example

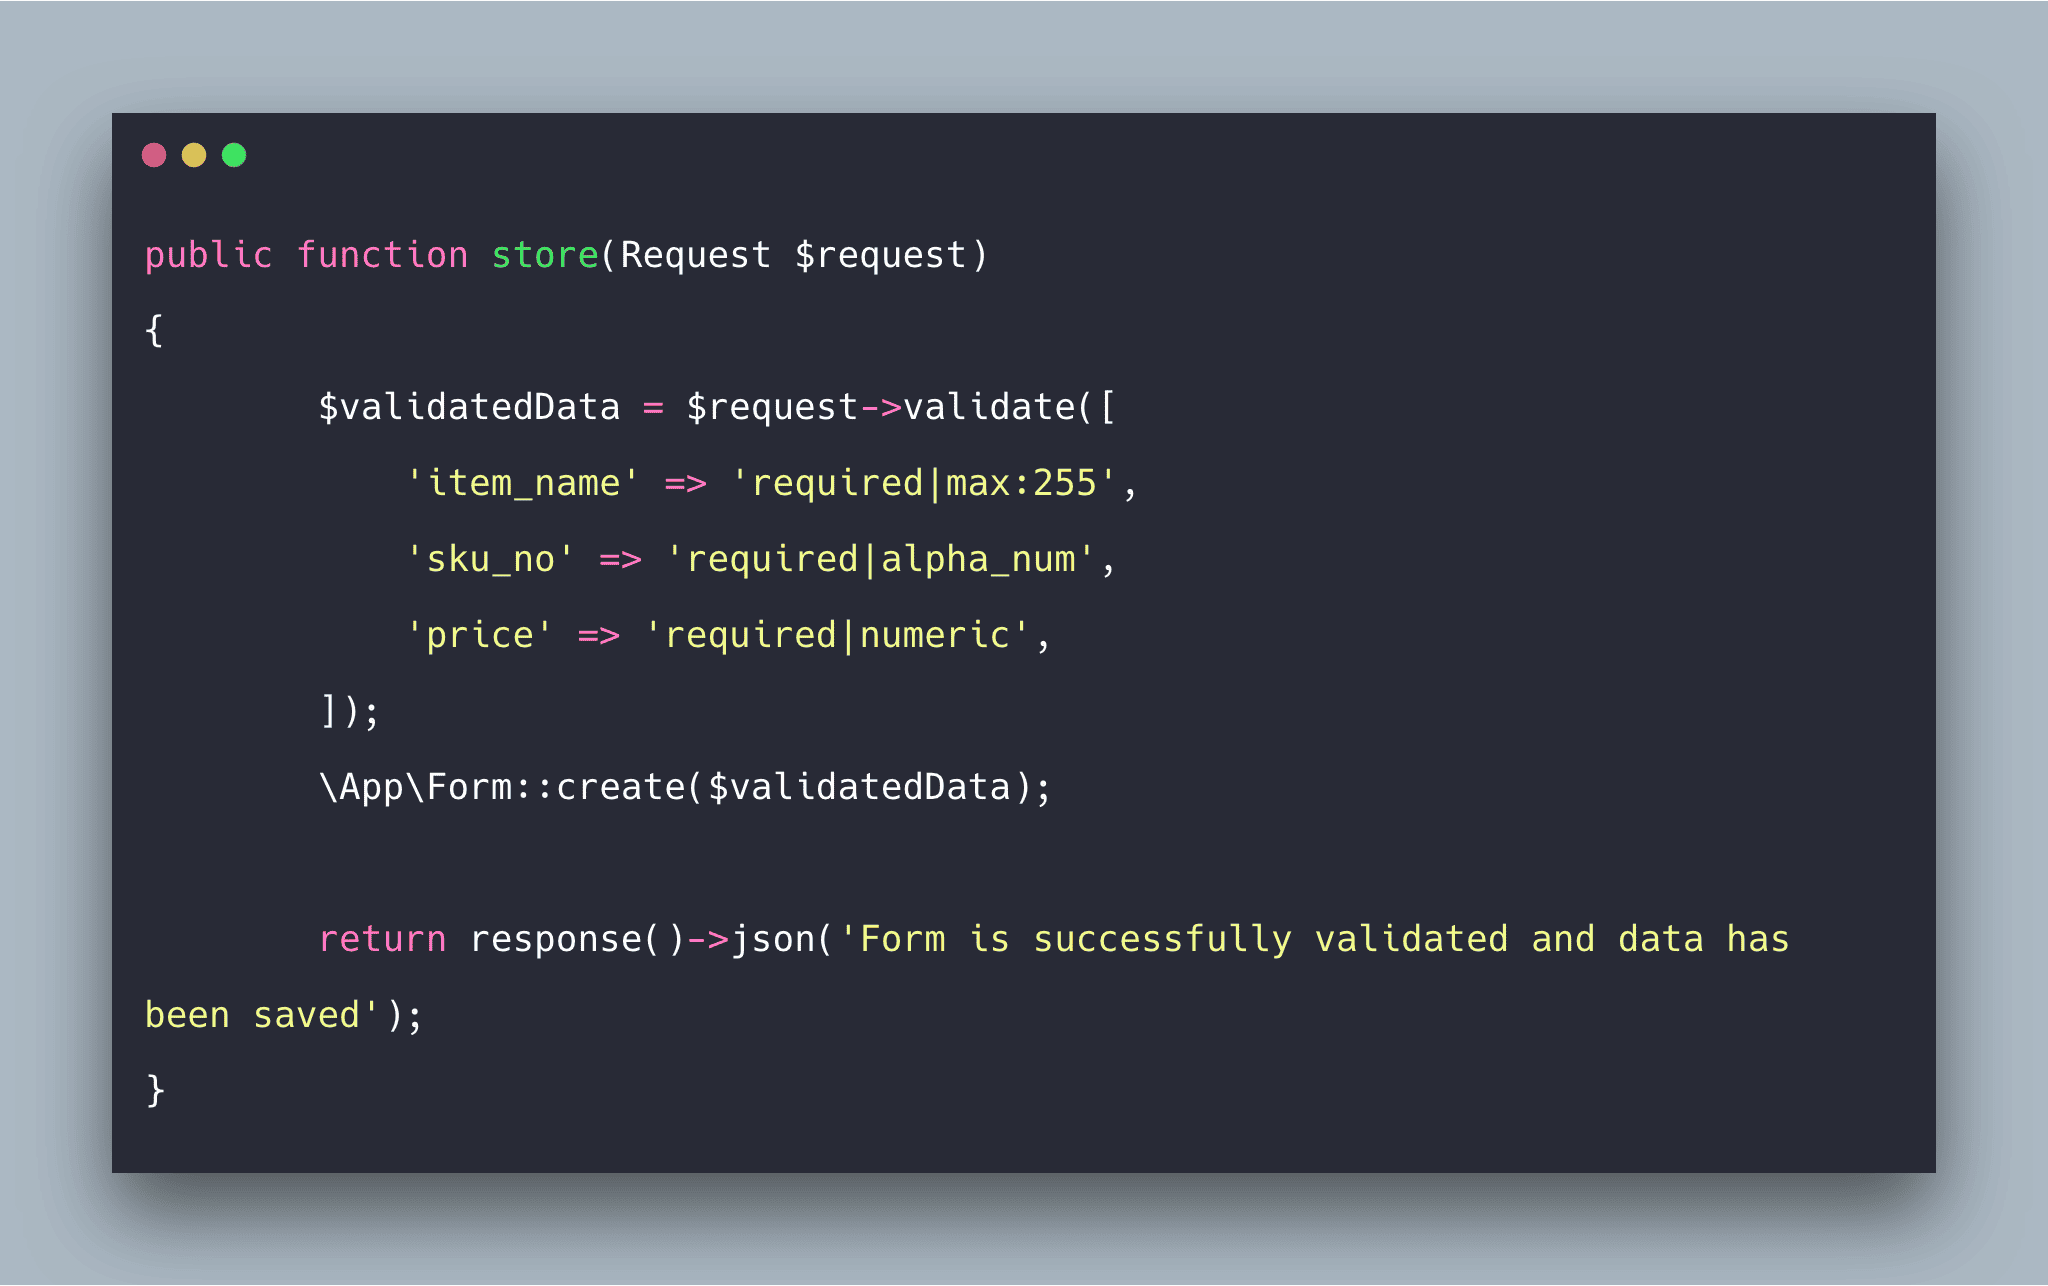
Writing The Validation Logic

Okay, now we can write the validation logic inside FormController’s store() function.

// FormController.php

public function store(Request $request)
{
        $validatedData = $request->validate([
            'item_name' => 'required|max:255',
            'sku_no' => 'required|alpha_num',
            'price' => 'required|numeric',
        ]);
        \App\Form::create($validatedData);

        return response()->json('Form is successfully validated and data has been saved');
}

As you can see, we have passed the desired validation rules into the validate() method. Again, if the validation fails, the proper response will automatically be generated. If the validation passes, our controller will continue executing normally and save the data in the database, and we get the json response.

If we submit the form without filling any values, then we get the error response like the following.


Laravel 5.8 Form Validation Tutorial With Example | Custom Validation

Stopping On First Validation Failure

Sometimes you may have requirement to stop running validation rules on an attribute after the first validation failure. To do so, assign the bail rule to the attribute.

// FormController.php

$validatedData = $request->validate([
      'item_name' => 'bail|required|max:255',
      'sku_no' => 'required|alpha_num',
      'price' => 'required|numeric',
 ]);

In this example, if the max rule on the item_name attribute fails, the max rule won’t checked. Rules will be validated in the order they are assigned.

Displaying Validation Errors

Laravel will automatically redirect the user back to their previous location. Also, all of the validation errors will automatically be flashed to a session.

Notice that we did not have to explicitly bind the error messages to a view in our GET route. It is because Laravel will check for the errors in the session data, and automatically bind them to the view if they are available.

In our example, we have iterated the $errors array variable inside the create.blade.php file. That is why we user can see the errors.

@if ($errors->any())
      <div class="alert alert-danger">
        <ul>
            @foreach ($errors->all() as $error)
              <li></li>
            @endforeach
        </ul>
      </div><br />
@endif

Form Request Validation in Laravel 5.8

In the above example, we have written the validation rules inside the controller function. We can also create a separate file to write the validation rules. For more complex validation scenarios, you may wish to create a “form request.” Form requests are the custom request classes that contain validation logic. To create a form request class, use the make: request Artisan CLI command.

php artisan make:request FieldRequest

It will create a file inside the app >> Http >> Requests folder called FieldRequest.php file.

Let’s add a few validation rules inside the rules method.

// FieldRequest.php

public function rules()
{
    return [
         'item_name' => 'bail|required|max:255',
         'sku_no' => 'required|alpha_num',
         'price' => 'required|numeric',
    ];
}

Also, you need to return true from the authorize() method inside the FieldRequest.php file. If you plan to have an authorization logic in another part of your application, return true from the authorize() method.

// FieldRequest.php

public function authorize()
{
        return true;
}

So, now, you do not need to re-write these rules inside the FormController.php’s store() function.

You need to import the FieldRequest namespace inside the FormController.php file and pass the FormRequest as a dependency injection to the store function.

<?php

// FormController.php

namespace App\Http\Controllers;

use Illuminate\Http\Request;
use App\Http\Requests\FieldRequest;

class FormController extends Controller
{
    public function create()
    {
        return view('create');
    }

    public function store(FieldRequest $request)
    {
        $validatedData = $request->validated();
        \App\Form::create($validatedData);

        return response()->json('Form is successfully validated and data has been saved');
    }
}

If the validation fails, the redirect response will be generated to send a user back to their previous location. The errors will also be flashed to a session, so they are available for display.

Customizing The Error Messages

You may customize the error messages used by the form request by overriding the messages method. This method should return an array of attribute/rule pairs and their corresponding error messages.

// FieldRequest.php 

  /**
   * Get the error messages for the defined validation rules.
   *
   * @return array
   */
    public function messages()
    {
        return [
            'item_name.required' => 'An Item Name is required',
            'sku_no.required'  => 'An SKU NO is required',
            'price.required'  => 'The price is required',
        ];
    }

Save the file and again submit the form without any values and you will see these error messages instead of default error messages.


Customizing The Error Messages in Laravel

Manually Creating Validators

If you do not want to use a validate() method on the request, you may create the validator instance manually using the Validator facade. The make method on the facade generates a new validator instance.

// FormController.php

use Validator;

public function store(Request $request)
{
    $validatedData = Validator::make($request->all(), [
        'item_name' => 'bail|required|max:255',
        'sku_no' => 'required|alpha_num',
        'price' => 'required|numeric',
    ])->validate();

     \App\Form::create($validatedData);

     return response()->json('Form is successfully validated and data has been saved');
}

It will also give us the same output. If you would like to create the validator instance manually but still take advantage of the automatic redirection offered by the requests to validate() method, you may call the validate() method on an existing validator instance.

For more validation, you can check out Laravel 5.8’s official documentation.

Finally, Laravel 5.8 Form Validation Tutorial With Example is over.

The post Laravel 5.8 Form Validation Tutorial With Example appeared first on AppDividend.

via Planet MySQL
Laravel 5.8 Form Validation Tutorial With Example