Comic for January 05, 2020
https://ift.tt/2FnHBrY

fun
via Dilbert Daily Strip http://dilbert.com
January 5, 2020 at 02:04AM
Just another WordPress site
Comic for January 05, 2020
https://ift.tt/2FnHBrY
fun
via Dilbert Daily Strip http://dilbert.com
January 5, 2020 at 02:04AM
Listen to this Awesome Heavy Metal Cover of Toss a Coin to Your Witcher
https://ift.tt/2QohZl8

Netflix’s gift that just keeps on giving has spawned yet another fan creation from the new hit show, The Witcher. In this case, it comes from the incredibly catchy "Toss A Coin To Your Witcher" song that premiered with the second episode of the series and has since taken on a life of its own after being let loose onto the internet.
A dedicated fan has created an alternate version of The Witcher‘s now infamous song, but with a new tweak that seems perfect for the show. Thanks to the infectious nature of the song, this likely won’t be anywhere near the last time someone decides to cover "Toss A Coin To Your Witcher" with their own, unique spin.
RELATED: The Witcher’s Ciri Reveals Interesting Detail About Her Character
A newly released video by Dan Vasc, a Brazilian rock and metal singer on YouTube, stars the vocalist as he sings through a metal version of the song. While neither the lines or the melody of "Toss A Coin To Your Witcher" are changed in the new metal version, the instruments used to play the song, as well as the style of singing, are changed to emulate a gruffer, metal vibe. With how the tune sounds as a metal track, it’s only a matter of time before the new version of the song is added to The Witcher 3: Wild Hunt, like the original was.
Dan Vasc’s previous selection isn’t limited to songs inspired by gaming and film, as he has also done covers of dozens of songs ranging from other rock and metal titles along with a number of other songs with his own personal flair. Naturally, there are still more TV and film inspired references within the singers YouTube channel, such as Lord of the Rings covers, but the range on the choices of music are in no way limited to a single style. Given the content creator’s experience with music and the themes of The Witcher, the choice to make a metal version of the show’s most famous song was clearly an easy one.
With how incredibly popular the song has been since the show released, even getting its own Beat Saber level, there is seemingly no end in sight for fan creations and interpretations based on the tune. Then again, there don’t seem to be any naysayers coming out of the woodwork against getting to hear even more of Jaskier’s legendary tune. At this point, the song seems to have more of an impact on Geralt’s fame in the real world than in the show.
The Witcher is available to stream now, exclusively on Netflix
MORE: The Witcher Fan Art Combines Geralt With the Joker
via Game Rant https://gamerant.com
January 4, 2020 at 05:08AM
Comic for January 04, 2020
https://ift.tt/2sCLjvk
fun
via Dilbert Daily Strip http://dilbert.com
January 4, 2020 at 02:07AM
3 Things Every Gun Owner Should Do in 2020
https://ift.tt/2SOtXGt
SIG SAUER P320 (courtesy Nick Leghorn for TTAG)
Happy new year. Now that the hangover has fully cleared and the calendars have been replaced around the house, it’s probably a good opportunity to do some of those tasks that you’ve been putting off or forgetting about. The little things that might seem slightly annoying, but might just save your life.
Matt Sandy for TTAG
Some of us manage to regularly get in some range time with our home defense guns. But it seems that’s increasingly rarely for me — my range time has been severely limited recently, in case you couldn’t tell from my posting history.
For those who similarly don’t get out to the range as often as they’d like, the new year is a perfect time to pull the guns out and make sure that they are clean and in good working order.
Some things to put on your checklist:
Oh, and of course, give everything a good scrub down and lube when you’re done. Next . . .
This one was inspired by true events.
I have a GunVault MiniVault in my bedroom where I store my SIG SAUER Mk25 P226 as my “bump in the night” gun. The other day I wanted to give the handgun a once-over so I entered the combination, heard the click of the lock, and…nothing. The door didn’t budge.
A couple of further futile attempts later and I had to grab the spare emergency key to finally get it open.
What had happened was, unbeknownst to me, the battery had run down to the point where the electronics would still work, but there wasn’t enough juice left to actually pop the door open. So while it sounded like it was working, the reality was that it wouldn’t open without the key.
That’s annoying for “normal” use, but potentially deadly if I needed to rely on that handgun in an emergency.
For those of us who rely on electronic access control mechanisms, the turn of the calendar is a good time to go ahead and rotate those batteries, whether they need changing or not. It’ll set you back a few dollars, but the peace of mind is more than worth the price.
Image by J. Schwarm courtesy GSL Defense Training / Guns Save Life
The tool is only as good as the person wielding it. Most gun owners hit the range every so often and call it good for their recurring “training,” but having your skills tested and sharpened by a professional is a great reality check and can give you some concrete things to work on in the coming year.
Point in case: I used to be a pretty competent competition shooter. Well, best on staff here at TTAG anyway (an admittedly low bar).
I went to a local match not too long ago after about a year’s hiatus and marveled at how much I was absolutely sucking at every stage. I could feel myself being more far sluggish than I ever remembered, missing shots that once were child’s play.
I was off my game, and I knew it was because I hadn’t been practicing as hard as I once was.
The same goes for self defense shooting. Going to the range and popping a paper target just isn’t enough; you need to be training as often as you can. And no, the new Call of Duty: Modern Warfare doesn’t count.
The best way to knock off the rust is to sign up for a class — any class, really — and get some proper training. Make it your gun-related new year’s resolution to pick a course, book it, and attend sometime, preferably in the early part of the year.
You’ll be thanking yourself if you’re ever in a position where those skills become a matter of life and death.
guns
via The Truth About Guns https://ift.tt/1TozHfp
January 4, 2020 at 11:05AM
Laravel User Notifications: Send Immediately or Daily Digest
https://ift.tt/2MWEEmi
Try new QuickAdminPanel 2019 generator version! Theme choice, Auto-deployment and more:
programming
via Laravel News Links https://ift.tt/2dvygAJ
January 3, 2020 at 08:45AM
Building filters using laravel-query-builder
https://ift.tt/2M9Z7UE
Oh Dear! monitors your entire website, not just the homepage. You’ll get a notification as soon as your website is down, a monthly uptime report, a warning a few days before your SSL certificate expires and much more! Start your free 10 day trial now!
Stay up to date with all things Laravel, PHP, and JavaScript.
Follow me on Twitter. I regularly tweet out programming tips, and what I myself have learned in ongoing projects.
Every two weeks I send out a newsletter containing lots of interesting stuff for the modern PHP developer.
Expect quick tips & tricks, interesting tutorials, opinions and packages. Because I work with Laravel every day there is an emphasis on that framework.
Rest assured that I will only use your email address to send you the newsletter and will not use it for any other purposes.
programming
via Laravel News Links https://ift.tt/2dvygAJ
January 3, 2020 at 08:45AM
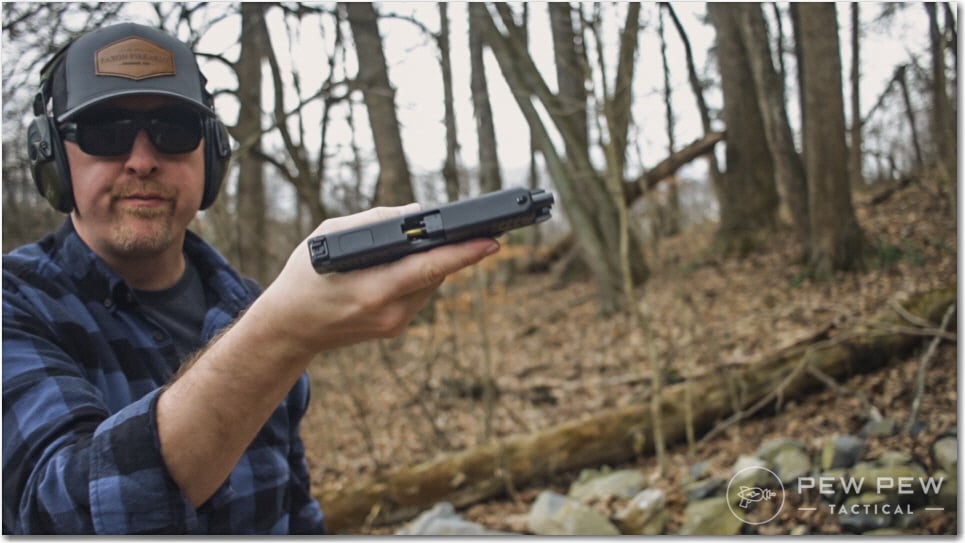
[Review+Video] Glock 44: First Legendary .22LR?
https://ift.tt/39XaokR
The Glock 44 is Glock’s first .22LR since its founding in 1963.
Is it worth the wait?

We’ll cover it’s fun factor, reliability, accuracy, ergonomics, stats, target audience, and more.
We’ve got a full video review from Johnny too!
If that was awesome…please subscribe to our YouTube channel for the newest reviews.
Table of Contents
Loading…
Glock has been busy touting the G44 as “Legendary” and I was super excited to be one of the few media outlets to be invited to its unveiling.
Thoughts of a Glock carbine and maybe something crazy like a polymer lever action were going through my head.
When I found out it was a .22LR pistol…I thought “cool.”
Makes sense.
Glock never had a .22LR and they will sell a metric buttload for training and plinking once it’s on sale January 20.
People on the internet were less than enthusiastic…I think due to some overhyping.

And maybe some stats on the gun…we’ll get to that soon.
If I had to choose one word for the Glock 44…it would be fun.
Softest recoil ever. Affordable ammo. Easy to plink a few hundred rounds at the range.
Plus it’s almost identical in dimensions to the Glock 19.
Who were the happiest folks at the event?
The TRAINERS.
They knew Glock hit a homerun with a G19-sized .22LR handgun.
Now you can start young, new, old shooters on a lighter recoiling gun that’s almost the same as the most popular Glock model.

Full review of the Gen 5 Glock 19 from us.
And how about another huge audience? Plinkers who like saving money.
At release the MSRP is $430 but street price at the January 20, 2020 release date will likely be around $360.
Plus did I mention it takes affordable .22LR?
And because of its weight…some backpackers might like it as well.
Now let’s dive a little deeper…
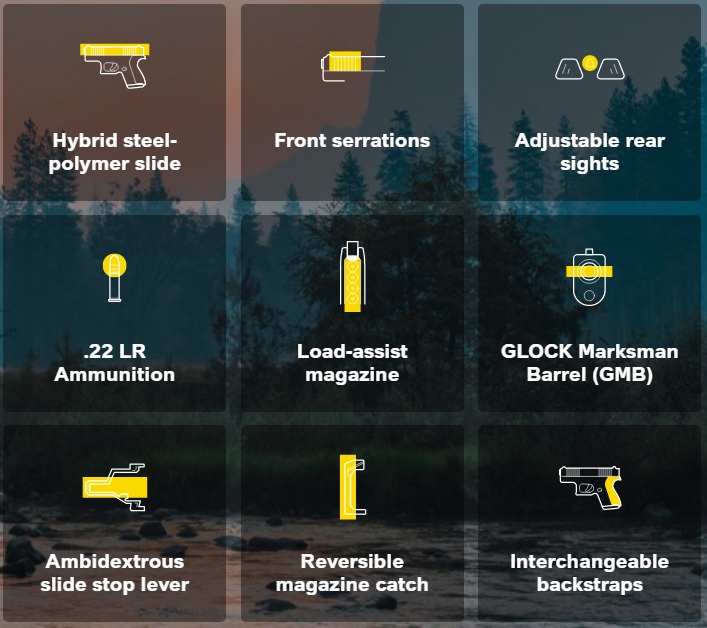
First thing…this thing is light.
About 3/4 pound empty and 1 pound fully loaded. A G19 is almost 2 lb loaded.
The weight reduction is due to a 5-section hybrid polymer steel slide which is needed so that the blowback action of the .22LR has enough oomph to cycle.

But have no fear…the important bits are all metal on metal.
Weight aside…if you handed the G44 to me blindfolded I wouldn’t be able to tell it wasn’t a G19.
And because of that…it fits in all G19 holsters. There’s some ever-so-slight differences so you might need to adjust retention.
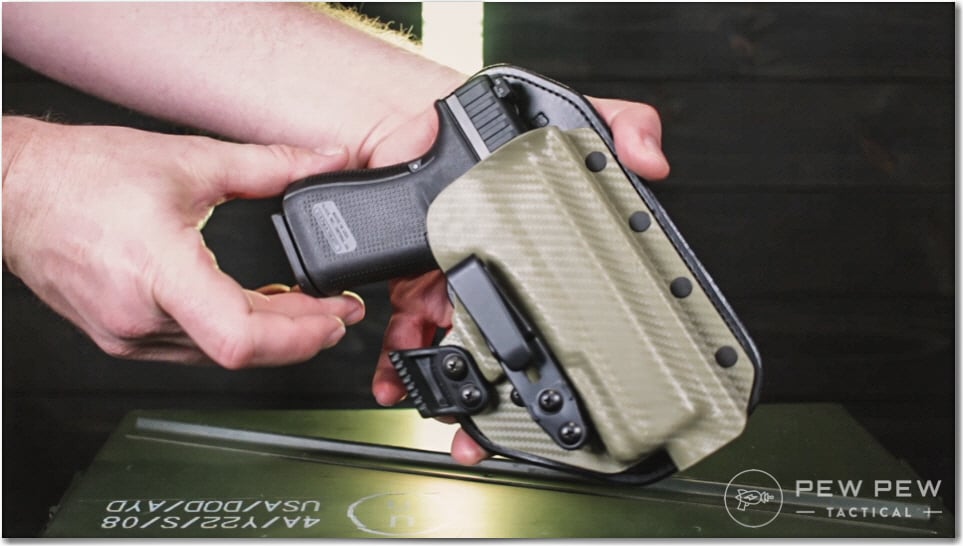
Check out some of our favorite G19 holsters here.
How about other stuff?
Trigger is the same.
You get backstraps to choose the right fit for your handsize.
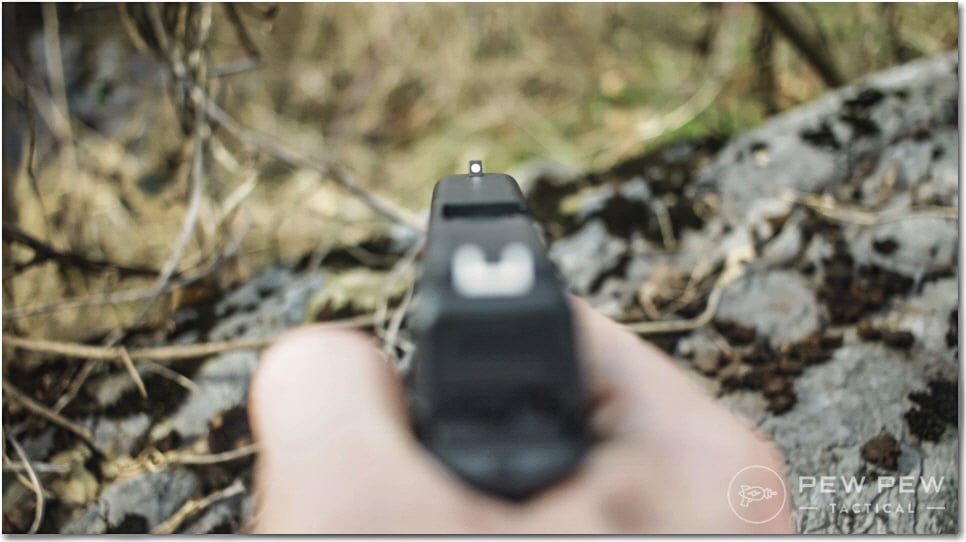
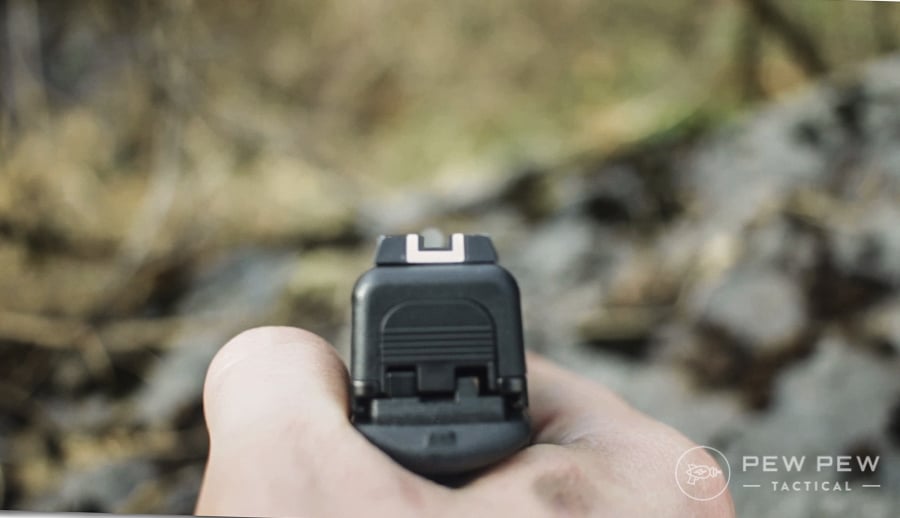
Plus the same sights (for better or for worse) but with adjustable rear ones.
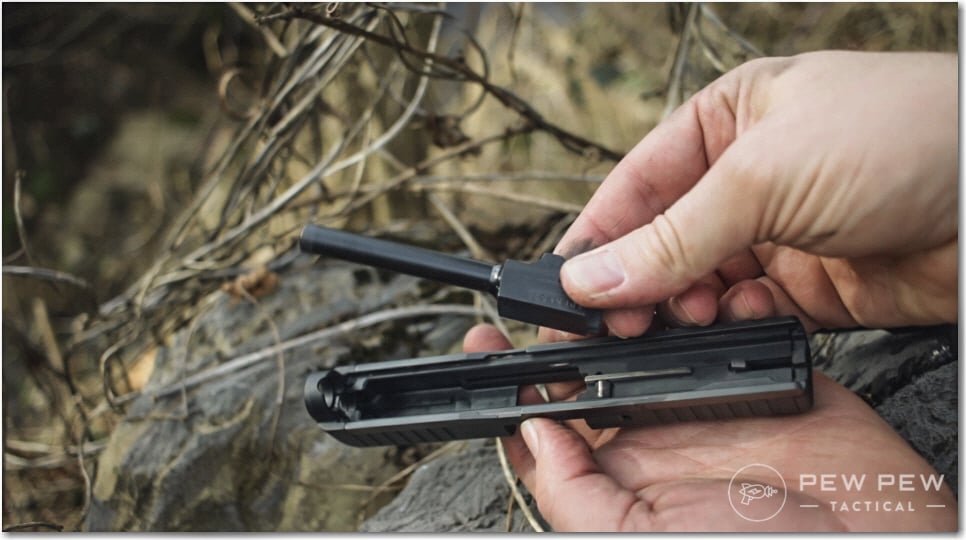
Breakdown is also the same.
If you can break down a normal Glock…you can breakdown the G44.
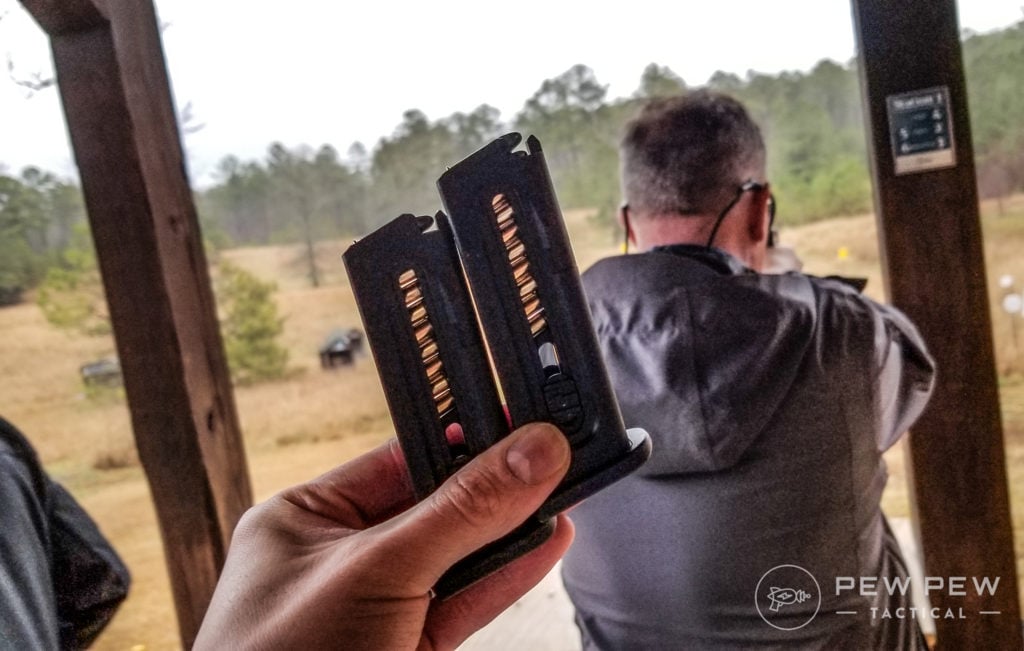
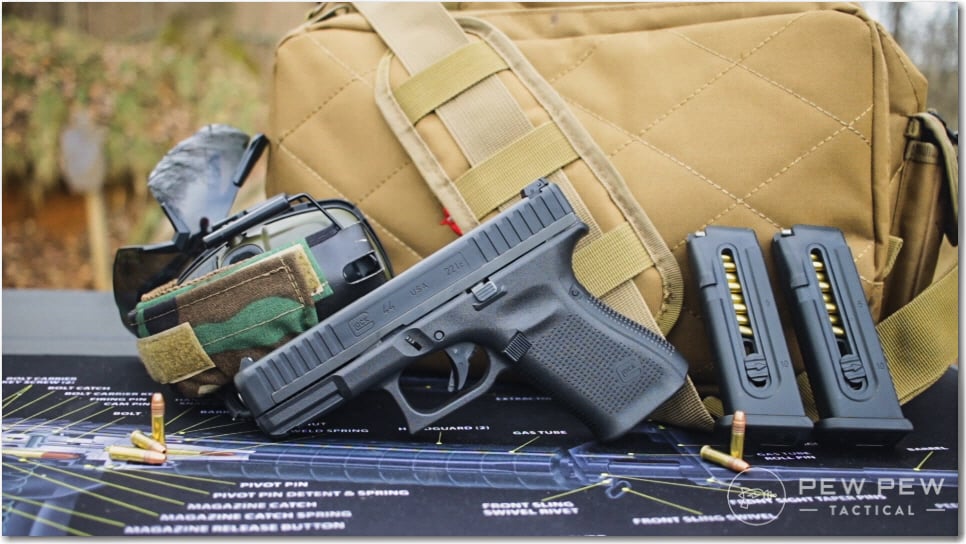
Magazines…this is where people flipped out.

Yup…that’s a 10 round magazine.
Glock chose the 10 round capacity for reliability since it’s nearly impossible to double-stack rimfire rounds.
No one seems to complain about other .22LR pistols being only 10 rounds…but I can understand the frustration of it living in a double-stack body.
It does come with a super-helpful load assist mechanism that will help out new shooters’ thumbs.

Hopefully a Glock 15-rounder comes out…or some other manufacturer steps up to the plate.
Now let’s back to the pew pew!
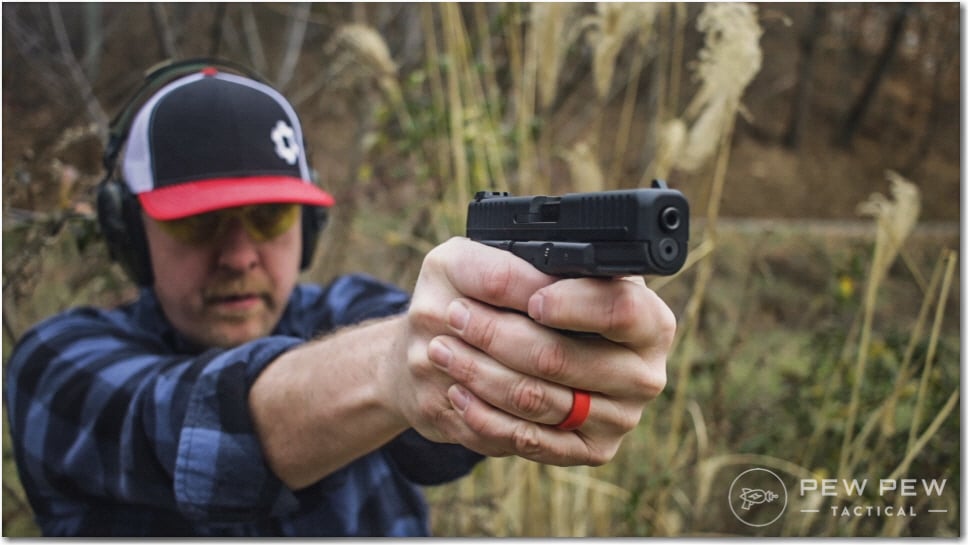
Recoil? What recoil?
My first shot brought amazement.
First because of the lack of recoil. And second because it really highlighted how much I was pushing the front muzzle down to compensate for rise.
Johnny had no problems with 50 yard targets.
And I was able to consistently bring it out to 100+ yards at the Glock event.
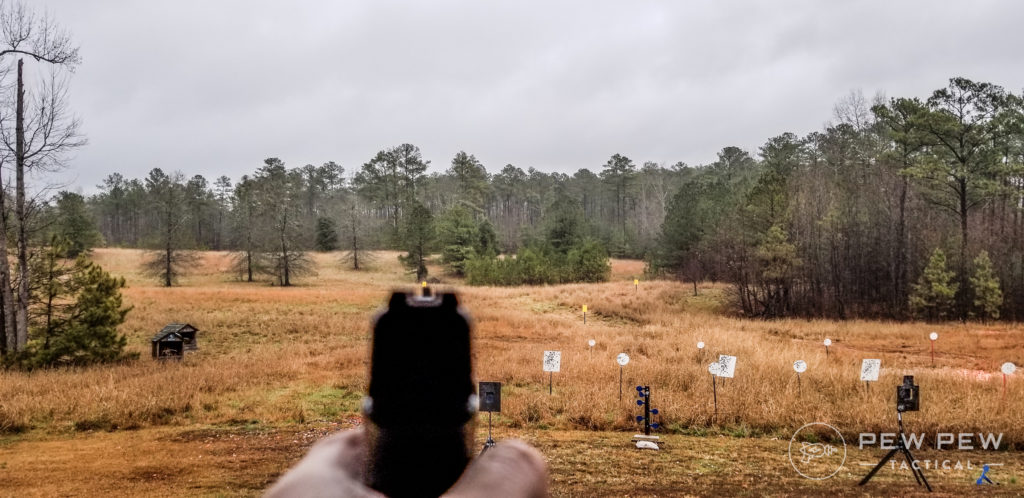
A Glock rep came up and congratulated me on hearing some different *ting* sounds from the far target.

I’m moving reliability into its own category.
At the Glock event…the test pistols have been through almost 10,000 rounds.
However, we started to see some misfeeds and stovepipes at the end.
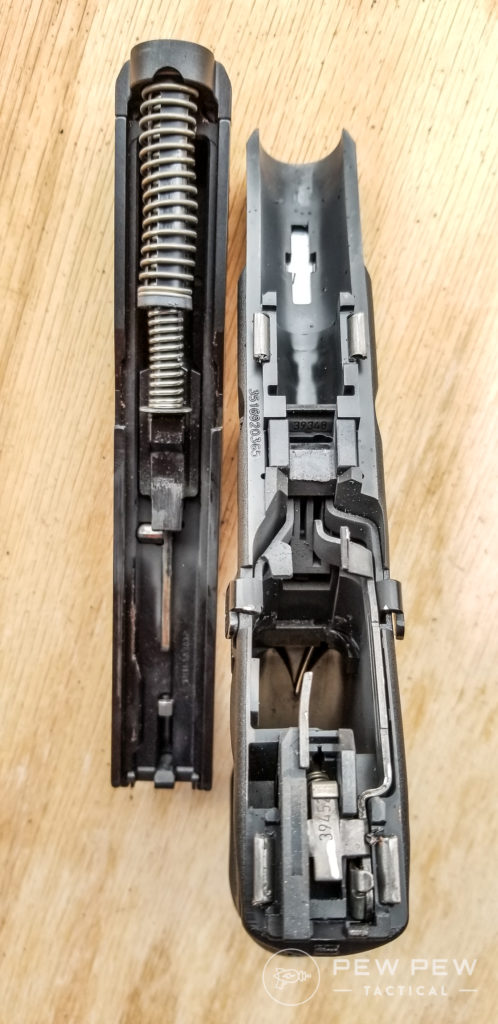
The frame and slide actually don’t seem that dirty for the number of rounds.
But the barrel feed ramp?
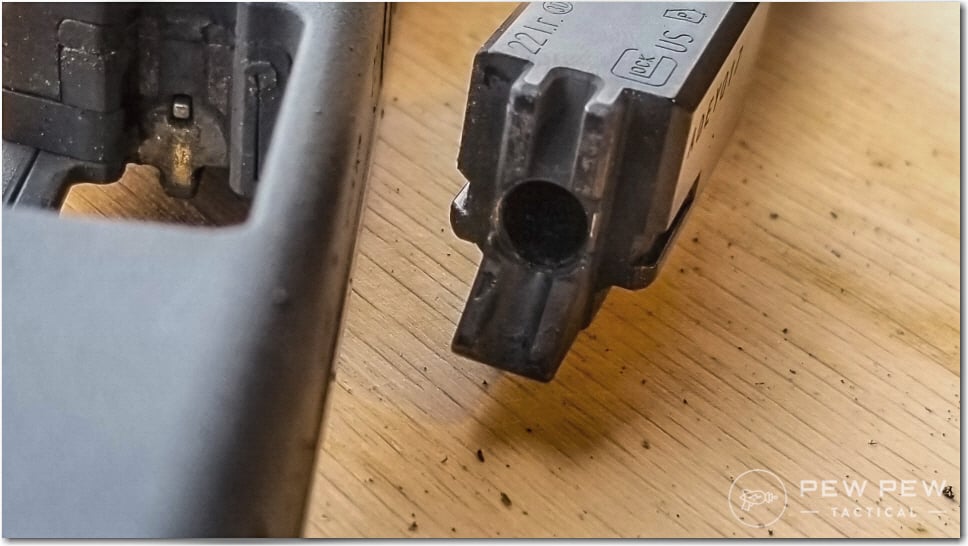
That bad boy had some stuck on carbon crud that started to break off. I think the created divots were the ones creating most of the stoppages for us.
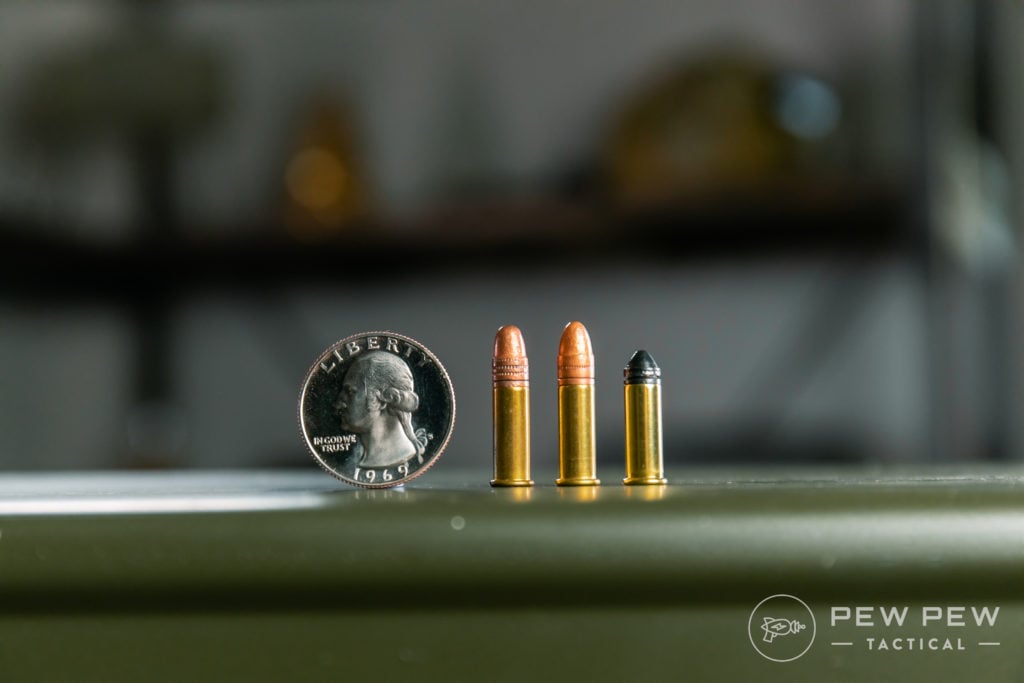
As for ammo… we used exclusively Blazer .22LR.
But once Johnny got his hands on a test gun…
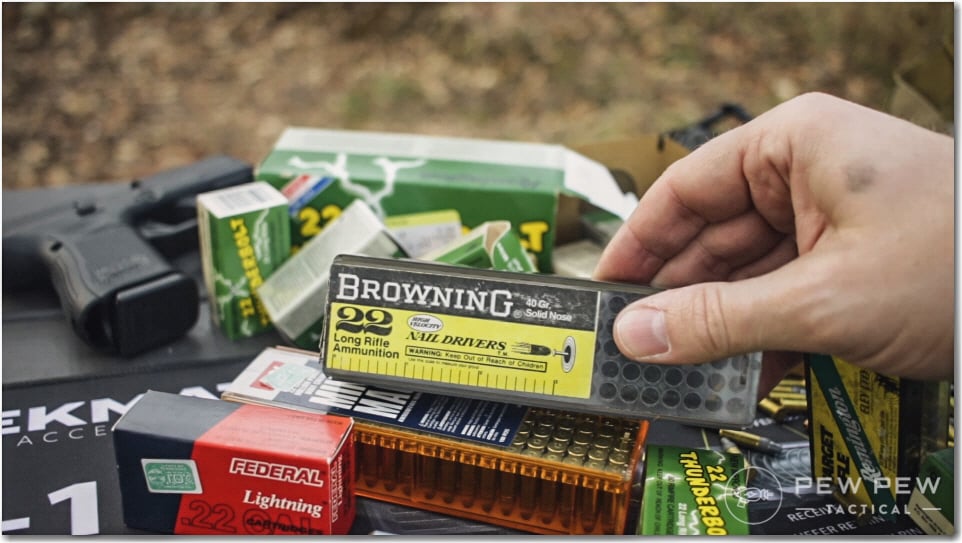
We had him running through some ancient Remington and Browning. And some Walmart Remington Thunderbolt and Winchester X.

The cheaper stuff from Walmart and the older ammo gave our test gun multiple stovepipes, misfeeds, and didn’t lock back the slide.
However, with hotter loaded new CCI Minimag (the good stuff)…the G44 ran flawlessly.
Prices accurate at time of writing
Prices accurate at time of writing
Based on our experiences…we’d recommend going with hotter ammo to make sure your G44 runs.
Check out some of our favorites in Best .22LR Ammo.
Glock said they tested over 120 brands of .22LR but maybe some of our batches were even more finicky than standard rimfire.
Here’s the official blurb…
The Glock 44 is designed to work with a variety of quality 22 l.r. ammunition that is manufactured to SAMMI and/or CIP specifications. GLOCK recognizes that some 22 l.r. ammunition offerings may not produce sufficient energy to fully cycle the slide. GLOCK also recognizes that the quality of 22 l.r. ammunition varies greatly between different types and brands. Therefore, it is recommended that you test fire several fully loaded magazines using your preferred ammunition to ensure optimum performance.
G44 Owner’s Manual
Here’s some of the important bits…
And the specs compared to a G19.

Reliability: 3.75/5
With the cheap or under-powered stuff it’s a 3/5. With Mini-Mag or Blazer it’s a 4.5/5. Let’s split it in the middle.
Ergonomics: 4/5
Glocks have grown on me over the years. Controls are easy to index and the grip angle is solid.
Accuracy: 4.5/5
It’s not a match-grade pistol but it will put rounds where you want them. We’re pretty impressed with it hitting 100+ yards consistently with a non-fixed barrel like other .22LR pistols.
Customization: 4/5
There’s lots of stuff you can change on a Glock…especially when it’s nearly identical to a G19. Get ready for some Gucci G44s to hit Instagram.
Plus there’s also the option of a threaded barrel for around $150. It’s metric so you’ll need an adapter for your normal 1/2×28 threads.
But, it has a different locking block so you can’t alternate stuff with a G19…sorry!
Value: 4.5/5
There’s a lot of value if it’s near the rumored street price of $360. Although I would have liked to see 3 magazines and a threaded barrel standard.
Overall: 4/5
The .22LR Glock 44 does what it is supposed to do. Shots on target, reliable with specific ammo, and comes in at a great value. Plus it’s nearly identical to the Glock 19 which makes it the perfect training and plinking gun.
What do you think of the G44? Is it Legendary? Check out our master list of Best Glocks and also Best .22LR Pistols.
The post [Review+Video] Glock 44: First Legendary .22LR? appeared first on Pew Pew Tactical.
guns
via Pew Pew Tactical https://ift.tt/2m7cc0U
December 31, 2019 at 05:25PM
8 websites every Laravel developer should bookmark
https://ift.tt/2QmZj4Z
A curated list of excellent Laravel related websites for any Laravel developer, from novice to experienced.
programming
via Laravel News Links https://ift.tt/2dvygAJ
December 31, 2019 at 11:51AM
Injecting the flu vaccine into a tumor gets the immune system to attack it
https://ift.tt/2u3zy17

picture alliance/Getty Images
A number of years back, there was a great deal of excitement about using viruses to target cancer. A number of viruses explode the cells that they’ve infected in order to spread to new ones. Engineering those viruses so that they could only grow in cancer cells would seem to provide a way of selectively killing these cells. And some preliminary tests were promising, showing massive tumors nearly disappearing.
But the results were inconsistent, and there were complications. The immune system would respond to the virus, limiting our ability to use it more than once. And some of the tumor killing seemed to be the result of the immune system, rather than the virus.
Now, some researchers have focused on the immune response, inducing it at the site of the tumor. And they do so by a remarkably simple method: injecting the tumor with the flu vaccine. As a bonus, the mice it was tested on were successfully immunized, too.
This is one of those ideas that seems nuts but had so many earlier results pointing toward it working that it was really just a matter of time before someone tried it. To understand it, you have to overcome the idea that the immune system is always diffuse, composed of cells that wander the blood stream. Instead, immune cells organize at the sites of infections (or tumors), where they communicate with each other to both organize an attack and limit that attack so that healthy tissue isn’t also targeted.
From this perspective, the immune system’s inability to eliminate tumor cells isn’t only the product of their similarities to healthy cells. It’s also the product of the signaling networks that help restrain the immune system to prevent it from attacking normal cells. A number of recently developed drugs help release this self-imposed limit, winning their developers Nobel Prizes in the process. These drugs convert a “cold” immune response, dominated by signaling that shuts things down, into a “hot” one that is able to attack a tumor.
But not everyone has a response to these drugs, raising the question of whether there are other ways to activate the immune system at the site of a tumor. One potential option is simply the things that normally rev up the immune system: infectious agents. The immune response to cancer-targeting viruses mentioned above would provide an indication that this does occur. Others have targeted a variety of pathogens to the sites of tumors and found that this increases the immune response to the tumor as well.
To check whether something similar might be happening in humans, the researchers identified over 30,000 people being treated for lung cancer and found those who also received an influenza diagnosis. You might expect that the combination of the flu and cancer would be very difficult for those patients, but instead, they had lower mortality than the patients who didn’t get the flu.
For more detailed tests, the researchers moved to mice, using melanoma cells that can form tumors when transplanted into the lungs of the mice. These model systems often respond to treatments that don’t end up working in humans, so the results have to be treated with appropriate caution. Still, they can be a valuable way of understanding the biology of the immune response here.
The use of melanoma cells is informative, as these cells cannot be infected by the influenza virus. So this system also provides a test of whether the tumor cells themselves have to be infected in order to increase the immune response to them. Apparently they do not. Having an active influenza virus infection reduced the ability of the melanoma cells to establish themselves in the lung. The effect isn’t limited to the location of the infection, though, as tumors in the lung that wasn’t infected were also inhibited. The effects were similar when breast cancer cells were placed into the lung, as well.
All of this is consistent with the immune stimulation provided by a pathogen. The stimulation causes a general activation of the immune system that releases it from limits on its activity that prevent it from attacking tumor cells. But does it require an actual infection? To find out, the researchers used a flu virus that had been inactivated by heat treatment. Normally, heat treating a virus is used to create a control for an effect that needs an active virus. But here, it turned out to be another experiment, as the heat-treated virus was also able to work just as effectively as the live virus.
This isn’t entirely surprising, given that inactive viruses are often used as vaccines and thus clearly can stimulate the immune system. But that, in turn, suggested another experiment: would vaccines actually work? To find out, the researchers obtained this year’s flu vaccine and injected it into the sites of tumors. Not only was tumor growth slowed, but the mice ended up immune to the flu virus.
Oddly, this wasn’t true for every flu vaccine. Some vaccines contain chemicals that enhance the immune system’s memory, promoting the formation of a long-term response to pathogens (called adjuvants). When a vaccine containing one of these chemicals was used, the immune system wasn’t stimulated to limit the tumors’ growth.
This suggests that it’s less a matter of stimulating the immune system and more an issue of triggering it to attack immediately. But this is one of the things that will need to be sorted out with further study. The location of the stimulation will also need to be sorted out, too. Here, stimulation in one lung increases activity in both. But injection into muscles didn’t work at all, and earlier work by some of the same team had indicated a heavy infection outside the lungs enhanced tumor growth by diverting immune cells elsewhere.
But the story does fit in well with the general consensus that the immune system can be a powerful tool against cancer, provided it can be mobilized properly. And, in at least some cases, a flu vaccine just might do the trick.
PNAS, 2019. DOI: 10.1073/pnas.1904022116 (About DOIs).
geeky
via Ars Technica https://arstechnica.com
December 30, 2019 at 07:10PM
The one video game my kids played all year long
https://ift.tt/2ZDfBdt
I was cooking this weekend when my eight-year-old son looked up from the couch, where he was listening to the Stardew Valley game soundtrack on Apple Music.
“Dad,” he announced, “I’m going to read you the name of every song on this album.”
“Cool,” I said as I minced the garlic.
“Stardew Valley Overture,” he began. “Cloud Country. Grandpa’s Theme. Settling In. Spring (It’s a Big World Outside). Spring (The Valley Comes Alive). Spring (Wild Horseradish Jam). Ha ha!”
He liked the phrase “Wild Horseradish Jam” so much that he read it again before going on.
“Pelican Town…”
As a parent, I have acquired the finely honed ability to tune out my beloved offspring, and I put it to use now. This was a good decision, because the Stardew Valley soundtrack has a whopping 70 different tracks. Minutes passed before he finally made it to track 70: “Load Game.”
He then lay still, listening to the “Dance of the Moonlight Jellies,” and I listened to it, too. The music in Stardew Valley can feel buoyant, melancholy, or numinous—sometimes all three at once. Underlying its many moods are feelings of stillness and calm; even “Mines (Danger!)” lacks the frenetic element found in so much video game music.
The “night market.” Stardew Valley features a day/night cycle that is linked to your character’s energy meter.
A recent update added multiplayer co-op capabilities.
A multiplayer farm in action. Look at all the pumpkins!
You can eventually acquire animals. My kids cannot get enough of this feature…
Like its music, Stardew Valley does not agitate or arouse, but neither is it boring, sappy, or simple. It is, nominally, a farming simulator, in which you inherit a patch of land from grandpa and head out to the country to clear trees and grow pole beans. But then you find the nearby town, and the mines, and the locals, and a strange tower, and a branch of the evil JoJoMart corporation, and you pick up a fishing pole and some geodes and a strange key… Indeed, the game turns out to be surprisingly complex, and my kids have become experts at using the Stardew Valley Wiki to figure out how the game works and what you can do within its world.
Because our kids get enough screen time during the week—the two oldest kids use Chromebooks constantly at school and for homework—we limit their time on the PlayStation 4 to weekends. Which has meant that every Saturday morning of 2019 in Casa Anderson has been permeated by the sounds of the Stardew Valley soundtrack as the kids build, explore, unlock, and interact within the game.
geeky
via Ars Technica https://arstechnica.com
December 30, 2019 at 12:06PM
